Welding of metals is the most common method of joining them in various sectors of the economy (construction, mechanical engineering, pipeline laying, etc.). In everyday life (at home, in the country, in the garage) we also encounter the need to use metal welding. To a non-specialist, this work seems incomprehensible, difficult and mysterious. Moreover, it is associated with a certain risk to life.
Let's see if this is true. How to weld metal using electric welding?
In the modern retail network there is a wide variety of welding machines, inverters, and protective equipment when carrying out welding work. They are available to anyone, therefore, by purchasing the appropriate equipment, you can do these yourself welding work fulfill. You just need to understand what metal welding technology is and what the safety requirements are. In addition, you need to get the necessary welding practice.
Types of metal welding
Nowadays, a lot has been developed various technologies how to weld metal. For example, you can use electronic and laser radiation, connect products with a gas flame and cook with ultrasound. But the most widely used energy source is the electric arc.
You should also be concerned about fire safety - remove all flammable materials and liquids from the welding site, prepare a fire extinguishing agent for use (if there is no special means even a bucket of water will do), ensure ventilation of the room where the work will be done, especially from the front and back sides of the welding machine.
Be sure to read the instructions for use of the welding machine and follow all the recommendations given there.
electrical safety
Before you try to master in practice how to weld metal, you need to make sure that the parameters electrical network, from which the welding machine is powered, meet its requirements. Otherwise, other electrical appliances connected to the network may be damaged, not only for you, but also for your neighbors. This is especially true for transformers, which significantly affect the power supply network by the presence of voltage surges during the start of welding and increased current consumption when the electrode sticks at the welding site. In addition, it should be positioned so that it cannot fall, damage itself or cause damage to surrounding people and objects during work. The wires connected to the device must have good insulation and be straightened. The possibility of their damage must be excluded.

Procedure for preparing for work
How to weld metal correctly? The area to be welded must be cleaned to bare metal and dry. It is prohibited to carry out welding work in wet weather, rain or negative temperatures air. Do not allow the electrodes to get wet.
How to properly weld metal using electric welding?
Welding is carried out at constant voltage or at alternating voltage. Transformer welding machines provide welding with alternating voltage.

When welding DC There are two options for connecting the welding machine. When connecting the plus to the ground and the minus to the electrode (this is called direct polarity), the metal heats up more, the melting zone is created deep and narrow. This inclusion is used when welding thick metal and leads to economical consumption of electrodes. When turned on in the opposite direction (reverse polarity), the electrode heats up more strongly and is consumed faster; the melting zone becomes wide and shallow. Therefore, reverse polarity is used only when welding thin sheets of metal.
Distinctive features of inverters
How to properly weld metal convert alternating voltage industrial network into a pulse sequence of a higher frequency and then a constant voltage current is generated. Thanks to the availability electronic circuit, which implements these transformations, the inverter has little influence on the power supply network during operation, has a smoother adjustment of the output voltage, and is characterized by low weight and dimensions. In terms of the quality of the product, the inverter is not inferior to other similar equipment. Therefore, welding inverters have recently become very widespread when prices for such devices have decreased. The advantage of such a device is its relative ease of use when welding.
How to choose an inverter
An important parameter of the inverter is the load period (LP) of the current source. This value, characterizing the efficiency of the inverter, shows the ratio of welding time to time idle move. Household Appliances do not work continuously. They must cool down periodically. So, a duty cycle value of 30% of the inverter means that after every 3 minutes of welding you will have to wait 7 minutes until the source cools down. If you try to continue working without interruption, the unit may burn out. Or the protection will work and it will turn off. Therefore, you should choose an inverter with a duty cycle of at least 60% and a maximum current of at least 140 - 160 A.
Preparing to work with the inverter
To gain experience in how to properly weld metal with an inverter, it is first recommended to work with metal at least 2-3 mm thick and use 3 mm electrodes. It is better to buy new electrodes. Old, stale, borrowed from others are likely to be damp and unsuitable for work.

How to weld metal correctly? If this is your first time, first try to make a seam on the surface of one piece of metal without welding it to another piece.
Let's look at the sequence of work.
Firstly, it is necessary to connect the electrode to its holder, and the ground wire to the workpiece to be welded using a terminal. The other ends of the wires must be connected to the inverter outputs in straight polarity.
Secondly, you need to turn on the device and set its output parameters in accordance with the recommendations, depending on the thickness of the material being welded and the selected electrode size.
The technology of metal welding provides that in order to heat the metal to the temperature required to obtain a high-quality weld, it is necessary to take an electrode corresponding to the thickness of the material. The thicker the latter, the larger the layer of metal it can heat and the higher the current must be set on the inverter to form an electric arc. At the same time, the higher the current, the faster the metal melts and the faster the electrode is consumed. For a thin layer of metal at a high current and a thick electrode, holes often form and the material burns through. If the current is too low, either an electric arc does not occur, or, if it does occur, a poor-quality seam is obtained, the so-called non-burnout.

The third thing to pay attention to is the formation of an electric arc. To do this, you need to strike the end of the electrode at the place to be welded, like a match against a box, without removing the end of the electrode from the metal. When an arc occurs, a red spot forms on the metal. But this is not yet molten metal, but only flux formed when the powder shell of the electrode melts. You must wait, holding the end of the electrode at a distance of 1-4 mm from the surface of the metal, until the metal at the arc site warms up to form a so-called weld pool - a drop of molten metal, characterized by a bright orange and trembling from the flow of current.
Fourthly, it is necessary to move the end of the electrode one or two millimeters towards the seam being made, again holding it at the specified distance from the metal. Again, wait for a drop to form, and so on, moving along the welding seam being performed. When an electrode touches a metal surface, it creates short circuit, the arc disappears, the inverter turns off the current. Therefore, when making a weld, you must try to maintain a constant distance between the end of the electrode and the metal surface, gradually bringing the electrode closer to it as it burns. More precisely, the electrode does not burn, but melts; the metal in the weld pool is formed mainly from the metal core of the electrode. The powder coating of the electrode surface, when melted, forms flux and gases that prevent the flow of oxygen from the surrounding air to the welding site and oxidation of the metal, and also help the process of forming a high-quality weld.
During the welding process, it is recommended to hold the electrode at an angle of approximately 30 degrees from the perpendicular to the part being welded so that a compact weld pool is formed and the welding site is clearly visible to you. The more the electrode is inclined towards the part during the welding process, the more elongated in the opposite direction the spot of the heated metal surface will be and the longer the formation time of the weld pool at the same current strength. The narrowest spot of melting metal is achieved when the electrode is perpendicular to the metal surface. But in this case, it is difficult for the welder to observe the welding process. Therefore, this position is used only when welding in hard-to-reach places.

How to properly weld metal with an inverter?
After practicing making a weld on a simple surface, you can start connecting metal parts. The process is similar, the difference is that the part to be welded must first be fixed in in the right place using a clamp or another method, and when a weld pool appears, move the end of the electrode not directly along the seam, but in a zigzag motion from the center of the seam towards first one, then the other part, gradually moving along the seam, connecting them in this way.
The main thing is that success comes with experience. By purchasing it, instead of using the services of third-party specialists (for quite a lot of money), you can learn how to do welding work yourself. Good luck with your studies and work!
In everyday life, the need to weld objects periodically arises. Very often such a need arises in the private sector. If there is a large number of jobs, you can contact experienced welders, and if small jobs It is better to use an inverter welding machine.
This is the simplest, most affordable and convenient type of welding. It is available for everyone to work with. To do this, you need to know the principles of the welding process.
 Welding with an inverter has become a breakthrough in the field of welding machines, since outdated transformers are quite heavy and difficult to use. The advantage is that with inverter welding, spatter occurs less than when welding from a transformer.
An inverter is a welding machine that allows you to connect sheets of metal using an electric discharge. He has distinctive feature: has light weight and maximum capabilities, thanks to which he has access to work previously carried out by heavy and complex devices. The weight of the device depends on its power (from 3 to 7 kg).
You can transport it using a handle or strap. Cooling is provided by ventilation holes in the case. This device consumes electricity, which flows only for arc work, and she does it herself welding process.
The device is insensitive to voltage changes. If there are constant fluctuations, you should pay attention to the required voltage, which is indicated in the inverter’s passport.
Displayed on the surface of the device control knobs and indicators:
- turns on and off with a toggle switch;
- the voltage and current values are set using knobs on the front panel;
- the panel has indicators informing about power supply and device overheating;
- The outputs (“+” and “-”) are located on the front panel.
Additionally included in the set 2 cables available. One of them ends with a holder for the electrode, and the second has a clip in the form of a clothespin for securing the product. The device is connected via a connector located on the rear panel of the device.
Principle of operation
 Inverter - electronic device, powered by electricity. When old welding machines are turned on, a strong and huge jolt of electricity occurs, which may result in a power outage.
The inverter has storage capacitors, accumulating electricity and providing uninterrupted operation networks. They gently ignite the arc of the inverter.
It is worth paying attention to the fact that electricity consumption depends on the diameter of the electrodes. The larger it is, the greater the consumption. In this regard, in order not to burn household appliances, before working with the inverter, it is necessary to calculate the maximum possible amount of electricity that will be consumed by the device.
It is worth considering that for each electrode diameter there is a minimum current, i.e., if you try to reduce the current, the seam will not work. If the current increases, it will work, but the electrode will quickly burn out.
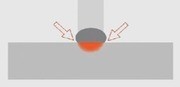
The arc comes from the connection metal section electrode and welded metal. Electrode and metal begin melt under the influence of arc temperature. The molten parts in its place form a bath. The coating of the electrode melts, part of which goes into gaseous state and blocks the bath from oxygen. The other part of the coating (in liquid state) protects the metal from air during welding and during the cooling process.
After welding and cooling of the metal, the liquid part is slag covering the seam with outside. After cooling, the slag is removed by tapping with a hammer.
The electrode melts during the welding process. So that the arc does not go out, you need to maintain its length, i.e. the distance between the metal and the electrode. This can be done by inserting the electrode into the welding site at the same speed and exactly along the seam joint.
With a short arc (about 1 mm), the metal is heated over a small area, and the weld comes out convex. At the point where the seam and metal meet, a defect such as an undercut (a parallel dimple near the seam) may appear. It reduces the strength of the seam.
A long arc is unstable, poorly protected from air, almost does not heat the metal, and the weld is not fully deep. Normal arc size - from 2 to 3 mm. A constant gap of this size will form a normal seam with good penetration.
To work with welding, the following protective elements are required:

Necessary prepare safe place for welding:
- Free space, absence of everything unnecessary.
- Good lighting.
- The work is performed standing wooden flooring, which protects against electric shock.
After this it is necessary tune welding current (depending on the thickness of the metal and parts) and select an electrode (2−5 mm). Usually the strength of this current is indicated on the device body. Electrodes must be selected based on the brand of welding materials. Next, connect the ground terminal to the surface to be welded.
To obtain a reliable and high-quality connection before starting work metal should be prepared. Use a metal brush to remove rust from the edges, which need to be treated with a solvent (gasoline, white spirit). It is important to prevent the presence of grease and paint materials on the edges.
For beginners, it is better to make a seam in the form of a roller on a metal sheet with a large thickness. The sheet must be placed horizontally on the table. There's chalk on it a straight line is drawn for guidance in the work along which the roller will be laid. To start welding, you need to ignite the arc. You can do this in 2 ways:
- chirping;
- tapping.
You can strike and hold the arc in both ways. Next comes the welding process itself, which produces a weld seam. Metal scale on top of the seam needs to be removed by tapping with a small hammer or hard object. The ability to control the length of the arc will provide excellent results.
The beauty of the seam is influenced by:
- electrode inclination angle;
- diagram of transverse and longitudinal movements;
- speed of electrode movement.
How to cook a vertical seam
 Welding such seams (slanted and ceiling) is quite difficult process. This is due to the fact that even molten metal is subject to the law of gravity. He is constantly pulled down, which causes difficulties. Beginning welders will need to spend a lot of time learning how to do this.
There are 3 technologies for vertical seam welding:
- Triangle. Used when connecting parts with a thickness of no more than 2 mm. Welding occurs from bottom to top. The liquid metal is on top of the solidifying one. It flows down, thereby covering the suture roller. The flowing slag does not interfere, since it moves along the solidified bath, which exits at a certain angle. Externally, the weld pool looks like a triangle. In this method, it is important to move the electrode accurately to completely fill the joint.
- Herringbone. This type of welding is suitable for gaps between workpieces equal to 2-3 mm. Along the edge from the depth towards you, you need to use an electrode to melt the metal to the entire thickness of the workpiece and, without stopping, lower the electrode to the gap. After melting occurs, do all this along the other edge. You need to continue from the bottom to the top of the weld. This results in a uniform arrangement of molten metal in the gap space. It is important to prevent the formation of undercut edges and metal leaks.
- Ladder. This method is used when large gap between the workpieces being joined and little dulling of the edges (or its absence at all). Welding is carried out in a zigzag manner from one edge to the other from bottom to top. The electrode stops at the edges for a long time, and the transition is made quickly. The roller will have a small cross-section.
Welding polarity
 Melting of the metal during the welding process is carried out under the influence of the heat of the arc. It forms between the metal and the electrode when they are connected to opposite terminals of the welding device.
There are 2 options for performing welding work: direct and reverse polarity.
- In the first case, the electrode is connected to the minus, and the metal to the plus. There is a reduced introduction of heat into the metal. The melting point is narrow and deep.
- In the second case, the electrode is connected to the positive, and the metal to the negative, resulting in a reduced heat input into the product. The melting point is wide, but not deep.
When choosing welding, it is necessary to take into account that the network element connected to the plus heats up more. Thick metal is welded with direct polarity, and thin metal with reverse polarity.

In addition to the fact that welding can connect parts, it you can cut them. To do this, you need to increase the current and cut off the part or corners. It’s just not possible to do it exactly.
By using this guide, you can gradually improve your skills and use inverter welding without any problems in the future. The main thing in this matter is practice.
You bought a welding machine and want to learn how to weld with an inverter for beginners.
There is no need to be afraid of difficulties! The inverter device is easy to use, any person without experience and knowledge can short time master the welding process.
Equipment, equipment, safety precautions
Safety precautions. Welding production is associated with electrical voltage, or in common parlance - current. The current is invisible, but can kill a person.
We check the welding cables for serviceability and connect them to the inverter equipment. Return cable with a clothespin on metal to the negative connector. Cable with electrode holder to connector +. We insert the electrode into the electrode holder.
When connecting the device to the network, visually evaluate the current-carrying cables for serviceability. After making sure that the cables are in good condition, we plug in the plug into the socket and the toggle switch on the device, having previously set the current regulator to the lowest value. If the cooling fan starts working smoothly, without crackling or noise, then everything is fine.
Metal weight. When connecting heavy structures, take precautions. If multi-ton products collapse, they can lead to death or disability.
Equipment. Welding production involves high temperatures. The welder must have:
- canvas mittens (gaiters);
- robe (special suit);
- mask with a light filter;
- respirator for work in confined spaces;
- boots with rubber soles.
Gaiters are used when welding at heights, when arms are raised up, and mittens in other cases.
Other accessories:
- welding machine;
- hammer;
- brush;
- electrodes.
Electrodes are selected according to the metal (carbon content, additives) and by diameter, depending on the thickness of the metal and technical characteristics inverter
Inverter Welding Basics
For beginners, experienced welders advise attaching the holder cable to the body, pressing it with the elbow of the arm and wrapping it along the forearm (from the elbow to the hand), and taking the holder in your hand. This way the shoulder joint will pull the cable, and the arm and hand will remain free. The method will help you manipulate your hand with ease.

Correct placement of the cable on the forearm. WITH with bare hands It's not worth working.
If you simply take the holder in your hand without wrapping the cable around your forearm, then during the welding process your hand will get tired and wrist movements will cause the cable to dangle. Which will affect the quality of the welded joint.
How to cook using inverter welding correctly? We set the welding current on the machine according to the diameter of the electrode, the type of connection and the welding position. Setup instructions are available on the device and the electrode pack. We take a stable stance, move our elbow away from the body (no pressing), put on a mask and begin the process.
It is better to start welding with an inverter for beginners with metal blanks more than 20 cm.

It is known that a beginner, putting on a mask and lighting an arc, stops breathing, trying to boil the entire length of the workpiece in one breath. With short products, you will develop the habit of cooking in one go. Therefore, practice on long workpieces, learning to breathe properly when welding.
Workpieces (plates) on the work table can be placed in a horizontal plane - vertically towards you or horizontally, it makes no difference.
At the beginning of welding, place the electrode clamped in the holder at an angle of 90 degrees (perpendicular) and move it towards the seam by 30-45 degrees. Light the arc and start moving.

The distance between the surface to be welded and the electrode is 2-3 mm, imagine that you are running a pencil along a sheet of paper.
Please note that when welding, the electrode decreases as it burns - gradually bring the melting rod closer to the surface at a distance of 2-3 mm and maintain an inclination angle of 30-45 degrees.
Video:
How can a beginner learn to weld with a welding inverter?
First we learn to light and hold an arc. Feel the edge when to bring the electrode closer to the surface to be welded during combustion so that the arc does not interrupt.
The electrode is ignited in two ways:
- tapping;
- chirping.

The new electrode ignites easily. A slag film appears on the working rod, preventing ignition. You just need to tap longer to break the film.
Video: What is arc force on a welding inverter and how to use it.
It is better for a beginner to first learn on a thread seam; the electrode is held smoothly, without oscillatory movements.
After mastering thread technology, proceed to welding metal with oscillatory movements. Which are used on thick metal for heating, holding the electrode at a certain point using movements - herringbone, zigzags, spiral or your own method.

Types of oscillatory movements
At the beginning of the connection, we carry out several movements from left to right, forming a weld pool and go along the seam making oscillatory movements. The angle of inclination of the electrode is 30-45 degrees. After passing, we beat off the slag with a hammer and clean it with a brush. Take care of your eyes, wear glasses.
Tip: at the end of the weld, make oscillatory movements to the sides and move the electrode towards the deposited metal. This trick will add beauty to the welded joint (get rid of the crater).
Video: how to cook gusset, butt and overlap.
Seams are divided into:
- single-pass (one pass replenishes the thickness of the metal);
- multi-pass.
A single-pass weld is performed on metals up to 3 mm. Multi-pass seams are applied for large metal thicknesses.
Welders check the quality of the seam with a hammer - they strike next to the seam. If the seam is smooth, without irregularities, then after the impact the slag flies off completely, there is nothing for it to catch on. It is important to choose the right one temperature regime: an overheated seam (hardened) will break, an underheated one - there is a risk of lack of penetration.
The current is selected based on the diameter of the electrode, in theory 30 A per 1 mm of electrode diameter.
Direct and reverse polarity when welding with an inverter
Let's consider polarity when welding with an inverter. With a DC connection, the movement of electrons is constant, which reduces spattering of molten metal. The seam is of high quality and neat.
The device has a choice of polarity. What is polarity is the direction of movement of electrons depending on the connection of cables to equipment connectors.

The polarity is indicated on the pack of electrodes; these instructions will help you correctly connect the wires to the equipment.
Welding thin metal with an inverter
The essence of connecting thin plates comes down to selecting small-diameter electrodes and adjusting the welding current. For example, for metal with a thickness of 0.8 mm, electrodes with a diameter of 1.8 mm are used. The current on the inverter is set to 35 A.
Technology occurs in intermittent movements. Watch the video for a detailed description of joining thin plates.
Video:
How to cut metal with a welding inverter
To properly burn a hole in a pipe, we set the current on the device to 140 A for a 2.5 mm electrode. We light the electrode, placing it in one place to warm up the metal and press it in. We move the electrode to a new place, warm it up and press it in. Gradually, we cut a hole in the pipe.

Pipe cutting
When cutting, it is better to place the plate vertically so that the molten snot flows down. If you cut in a horizontal position, icicles will harden at the bottom of the cut. That's all the tricks!
Beginners are tormented by the question, which polarity of wires is better when cutting with an inverter?
Video:
P.S. Text material and videos will help you master inverter welding for beginners in a short time. Good luck!
Welding equipment today comes in many varieties. But inverter devices have gained the greatest popularity among home DIYers due to their compactness and versatility. A welding inverter is equipment that allows a master to perform various types of welding work. But to carry them out efficiently, it is not enough to have an expensive unit; you also need to learn how to use a welding machine.
To use an inverter efficiently and safely, you first need to properly prepare it for operation. This process is carried out in several stages. The first task is to install and connect the unit. Inverter installation must be carried out according to certain rules:
- the unit must be placed so that it is at a distance of at least 2 m from walls or any objects;
- the device must be grounded;
- the welding location must be chosen so that it is away from flammable objects;
- It is recommended to cook either on a free area or on a metal table.
The inverter can be connected both to a household network (220 V) and to a network with a voltage of 380 V, which is usually used in production. If you plan to use the unit away from electrical networks, then it can be connected to a generator, diesel or gasoline.
Electrical connection
Connecting a welding machine to a household electrical outlet often causes problems. The reason for their occurrence may be old wiring or insufficient diameter of its wires. Typically, wiring is designed for current up to 16 A. And since all switched on devices in the house can exceed this value, for safety reasons they are installed circuit breakers(automatic machines). Therefore, when connecting, you need to know the power of the welding machine so that it does not trigger the machine.
Connecting the inverter to a household network
You should also pay attention to network drawdown. If, when you turn on the inverter, you notice a decrease in voltage in the electrical network, this indicates an insufficient cross-section of the wires. In this case, it is necessary to measure to what values the voltage drops. If it drops to values below the minimum values with which the inverter can operate (indicated in the instructions), then the device cannot be connected to such a network.
Using an extension cord
The network cable connected to the inverter meets all power requirements and does not cause connection problems. But if its length is not enough, then you should select an extension cord with a wire cross-section of at least 2.5 mm 2 and a length of no more than 20 meters. Such parameters of the extension cord will be enough for the inverter to operate with a current of up to 150 A.
It should be remembered that when connecting the device to the network through a carrying case, the remaining part should not be kept wound up, since when the unit is turned on, it will turn into an inductor. As a result, the conductors will overheat and the extension cord will fail.

Connection to generator
In cases where it is not possible to connect the device to the mains, you can connect it to a generator that runs on either gasoline or diesel fuel. Gasoline power plants are the most widespread. But not all of them are suitable for connecting welding machines. In order for the inverter to operate effectively, the generator must have a power of at least 5 kilowatts and produce a stable output voltage. Voltage fluctuations can damage the welder.
It should also be taken into account how electrode diameter you will work. For example, if the electrode has a diameter of 3 mm, then an operating current of about 120 A with an arc voltage of 40 V will be required. If we calculate the power of the welding inverter (120 x 40 = 4800), we get a value of 4.8 kW. Since this will be the power consumed, a power plant capable of producing only 5 kW will operate at the limit of its capabilities, which will significantly reduce its service life. Therefore, the generator must be selected with some power reserve, approximately 20-30% higher than that consumed by the inverter.

Connecting welding cables
There are 2 terminals on the front panel of the inverter, next to which there are markings in the form of “+” and “-” signs. Welding cables are connected to these terminals, one of which has a metal clip (clothespin) at the end, and the second has a holder for the electrode. Both cables can be connected to both terminals, depending on the welding method, which will be discussed later. After connecting the cables to the device, one of them, which has a clothespin, is connected to the welding table or to the workpiece.
In some cases, standard cable lengths may not be sufficient, for example when working at heights. In such situations, the question arises: is it possible to extend the welding cable? Professionals do not advise doing this, especially if it concerns inverter device. This fact can be explained by the fact that each cable has certain resistance characteristics. Therefore, “leaks” of voltage and current along its entire length are inevitable. Therefore, the longer the cable length, the stronger the tension sags.
If you try to compensate for the loss of voltage and current by adding values on the unit panel, then this measure will most likely damage the inverter electronics. It turns out that it is easier to bring the device closer to the welder’s workplace than to spend a considerable amount on repairing the unit after lengthening the cables.

Setting up the device
The quality of welding work depends on whether the welding inverter is set up correctly, especially when it comes to the right choice electrodes. You should also consider:
- weld depth;
- location of the seam in space (vertical or horizontal);
- brand or type of metal being welded;
- metal thickness, etc.
You should know that corresponding electrodes are produced for each type of metal. Electrodes with a diameter of up to 5 mm can be used with inverters. But for each thickness of the equipment it is necessary to select the corresponding welding current strength. To properly set up the welding machine, you can use the table below.

For example, if you have to weld 5 mm thick mild steel with an inverter, then you should select a 3 mm electrode, and set the current on the machine to 100 A. After test welding, the current can be adjusted, that is, reduced or increased.
Safety precautions when working
The established safety rules, one might say, were written in the “blood” of the victims, and therefore it is strictly forbidden to neglect them. The health and life of not only the welding equipment operator, but also the people around him depends on their compliance. So, the safety rules include the following.

If the safety rules have already been studied, then you can begin to familiarize yourself with how to properly work with electric welding.
Polarity selection
It is no secret that the process of metal melting occurs due to high temperature an electric arc that occurs between the material being welded and the electrode. In this case, the cable with the electrode holder and the ground cable (with a clothespin) are connected to different terminals of the device. To connect the cables correctly, you need to understand in what cases they are swapped.
When welding with an inverter or any other welding unit, direct and reverse polarity is used for connecting cables to the machine. Straight polarity It is commonly called a connection when the cable with the electrode is connected to the minus, and the metal being welded is connected to the plus.

This connection method allows the metal to warm up well, which results in a deep and high-quality seam. The direct polarity method is used when cooking thick metal products.
It involves connecting the electrode cable to the positive, and the ground cable to the negative.

With this connection, the metal heats up less, and the seam becomes wider. Reverse polarity is usually used when welding thin metal products to prevent through burning of the part.
Welding current selection
The welding current is selected taking into account the thickness of the metal to be welded and the diameter of the filler. To simplify the calculations, you can use the table that was given above in the section that discussed setting up the unit. Also, when choosing the optimal current strength, you should remember the rule: the higher the current strength, the deeper the seam is, and the faster the electrode can be moved. Therefore we need to achieve ideal ratio the speed of movement of the additive and the current strength so that the seam has the required convexity and depth sufficient for good welding of the edges of the parts.
Methods of working with different metals
Since the welding process is impossible without igniting the arc, you should know that there are 2 methods to do this:
- you need to hit the metal with the electrode several times until the arc ignites.
- You need to strike the metal with an electrode, like a match, several times.
Each master selects the most convenient and suitable way arc ignition. But you need to scratch not just anywhere, but along the line of the weld, so that no marks are left on the workpiece.
The place where metal melts under the influence of an electric arc is called weld pool. To move it along the seam line, use one of the methods shown in the following figure.

For normal bath movement, the electrode is tilted at an angle of 45-50°. By tilting the additive at different angles, you can control the width of the bath. Each master selects optimal angle tilt to obtain a seam of acceptable quality.
Advice! The movement of the bath is facilitated if the device has the “arc force” function, which prevents it from going out.
The electrode can take position angle back or angle forward. To obtain a wide seam, the equipment is tilted at an angle forward, since this method produces less heat. Thin metals are welded using this method. It is customary to weld thick metal at an angle backwards.
To weld non-ferrous metals you will have to connect an argon burner to the welding inverter and use a non-consumable electrode (tungsten). Additive in in this case These are metal rods that are placed on the seam line and melted by an electric arc. During the welding process, the pool is blown with inert gas.

Rules for servicing the inverter device
Maintenance of an inverter-type welding machine includes the following items.
- Visual inspection. It must be carried out every time before and after starting work to detect possible damage to the insulation of welding cables and the power cord. Also, during an external inspection, the absence of damage to the housing and controls is checked (you need to check the current regulator).
- Carrying out internal cleaning of the unit. It is carried out after removing the casing from the device to remove dust and accumulated contaminants from all its components. Cleaning is carried out using a directed flow compressed air on dusty parts.
- Checking and cleaning the device terminals. The places where the power cables are connected should be checked periodically. If oxidation is found on the terminals, it should be removed using fine sandpaper.
You should also avoid contact with the inverter welding machine by drops of water, water vapor and other liquids that can penetrate inside the unit and cause electrical circuits to short out. If any liquid nevertheless penetrates into the device, then the casing should be removed from it and all moisture should be removed. Dry the inverter electronic board especially carefully using a regular hair dryer.
Crazy Stroitel.ru presents to you detailed description welding with an inverter. An inverter is a welding machine that can be used to join metal sheets under the influence of an electric discharge. Welding inverters have become a real leap in the field of welding machines, since the old transformers are quite heavy and difficult to use. The inverter is accessible to anyone; it is enough to know some principles of the welding process using it. The big advantage is that when welding with an inverter, there is less spatter than when welding from a transformer.

A distinctive feature of the inverter is, first of all, its light weight and maximum capabilities, with the help of which it can perform such work that was previously performed by complex and heavy units. The electricity consumed by this small device is directed exclusively to the operation of the arc, with the help of which the direct welding process is carried out.
The equipment is insensitive to voltage drops in the electrical network, which are observed in rural areas. If you experience fluctuations in your private home, when purchasing, pay attention to the recommended voltage in the inverter’s data sheet. Some sources allow electrode welding d =3 mm even at 185 V mains voltage.
The opinion of professional welders is clear: with the help of an inverter it is easier to hold the welding arc and get a beautiful, high-quality seam.
Before starting welding with an inverter or the basics of electric welding
Inverter welding machines are very economical and extremely convenient to use, which is very important especially for those who are interested in inverter welding for beginners. What are the basics of welding with an inverter, the technique of working with it, is important for a beginner? First of all, it is worth noting the operating principle of the inverter. Since the inverter is an electronic welding machine, the main burden of working with it falls on the electrical network. Compared to old welding machines, the activation of which results in a strong and maximum jolt of electricity, as a result of which the electrical network of the entire village is turned off, the inverter has storage capacitors that accumulate electricity and ensure, firstly, uninterrupted operation of the electrical network, and secondly , gently ignite the electric arc of the inverter. In a fairly accessible form, you can learn inverter welding lessons on your own. And if you have a question about how to learn to cook using inverter welding, then we can provide you with several useful tips, which is the first thing you should pay attention to before welding. Very important point is also the fact that the larger the diameter of the electrodes, the more electricity it consumes. Therefore, if you decide to test your inverter in operation, it is worth approximately calculating the maximum amount of electricity consumed by the device so as not to burn household appliances at the neighbors. In addition, for each electrode diameter the minimum current strength is shown, that is, if you try to reduce the current strength, the seam will not work. If you decide to experiment and increase the current, the seam will work, but the electrode will burn out too quickly.
Inverter: external inspection of equipment
The inverter sold by the retail chain looks like a box. Its weight depends on the power of the device: 3 - 7 kg. Carrying equipment is done using a belt or handle. Cooling is carried out through ventilation holes in the case.

The following control handles and indicators are located on the surface of the equipment:
turning the device on and off is carried out using a toggle switch,
the current and voltage values are set using knobs on the front panel,
the panel has indicators that inform about power supply and equipment overheating,
In front of the panel there are outputs marked “+” and “-”.
Additionally, the kit includes two cables. One of them ends with an electrode holder. The second has a clip shaped like a clothespin for securing the product to be welded. The welding equipment is connected through the connector located on the rear panel of the device.
Basics of electric welding
In order to understand what happens during welding, just look at the proposed picture.

The arc is formed from the contact of the metal part of the electrode and the metal being welded. Under the influence of the arc temperature, both the welded metal and the electrode begin to melt. The molten part of the metal being welded and the metal rod of the electrode at the arc site form a bath. The electrode coating melts. Part of it turns into a gaseous state and closes the bath from oxygen.
The electrode coating remaining in a liquid state is located on top of the liquid metal, protecting the metal from atmospheric oxygen during welding and during cooling.
After the welding is completed and the metal has cooled, the liquid part of the coating turns into slag, which covers the seam with outside. After complete cooling, the slag can be easily removed by tapping with a hammer.
The electrode melts during welding. In order for the arc not to go out, it is necessary to maintain a constant distance between the electrode and the metal, the so-called arc length. This is achieved by feeding the electrode into the welding zone at the same speed. At the same time, try to guide the electrode exactly along the joint of the weld.
Additional video on the topic:
Lesson on welding with an inverter for beginners (step-by-step instructions)
1. To start working with welding, you need to have protective elements, namely:
- gloves made of rough fabric (not rubber);
- To protect your eyes, be sure to purchase a welding helmet with an installed protective filter, which is selected taking into account the magnitude of the welding current. It is more convenient to use a chameleon mask for welding. The filter used in it recognizes the arc and is dimmed to match its parameters. Please note that at low temperatures the filter does not have time to work in time; at temperatures below -100C, the chameleon mask does not provide protection;
- a rough jacket and trousers made of natural dense material that does not ignite from sparks during the welding process. Clothing must cover the neck securely and have long, buttoned sleeves that protect the arms;
closed leather shoes with thick soles.

2. But one machine is not enough to start welding. Welding work requires availability individual funds protection and preparatory measures aimed at creating safe conditions. Preparing the site is as follows:
Provide clear space on the table for welding. Remove everything unnecessary where splashes could get in.
Provide high-quality lighting for the work area.
Welding work is performed while standing on a wooden flooring that protects against electric shock.
3. Set up the welding current and select an electrode. We use electrodes for inverter welding from 2 to 5 mm. We set the welding current depending on the thickness of the parts and the material being welded. Usually on the inverter body it is indicated what the strength of this current should be.
4. If you have just purchased electrodes in a retail chain and you are confident in their quality, you can skip this section. The information provided will help prepare for operation electrodes that were stored in unheated conditions. wet room. In order to ensure a high-quality welded joint, they must be dried for 2-3 hours at a temperature of 2000C. For this purpose, you can use an old electric oven.
Electrodes are selected strictly based on the brand of materials being welded. For training, you can use the most common ones: ANO or MR.
5.Connect the ground terminal to the surface to be welded (highlighted in red).

6. In order for the welding connection to be reliable and of high quality, before starting work, the metal to be welded must be prepared:
- Completely remove rust from the edges with a wire brush.
- Treat the edges with a solvent: gasoline, white spirit.
- When preparing, pay attention to the inadmissibility of grease and paint products on the edges.
7. It is better to start training by making seams in the form of a roller on a sheet of metal of large thickness. Make the first seam on metal, which you place on a horizontal table surface. Draw a straight line on the metal with chalk; you will use it to lay the roller and guide you as you work. The welding process begins with ignition of the arc. There are two ways to ignite the welding arc:
- striking metal, as when lighting a match,
- by tapping on a metal surface.
You can try to strike and hold the arc using both methods. It is advisable not to leave traces outside the welding zone when igniting. An arc is formed from the contact of an electrode and metal. The welder moves the electrode to a very short distance corresponding to the length of the arc and begins welding.

8. Let's start welding.
We will get a welding seam. We remove scale (scale of metal on top of the seam) by tapping it with a small hammer (or another hard and weighty object).

9. This is approximately what we should get.

Watch the video:
Arc gap control
What is arc span or arc length? This is the gap that is formed during the welding process between the electrode and the metal. The basics of welding state that the important point is constant control and maintenance of the same size of this gap.
Short arc
With a short arc, about 1 mm, the metal is heated over a small zone and the weld becomes convex. At the junction of the metal and the seam, a defect such as an undercut may appear. This is a small groove near the seam and parallel to it. The undercut reduces the strength characteristics of the seam.
Long arc

With a long arc it is difficult to ensure its stability. The arc is poorly protected from atmospheric air, heats the metal less, and the result is a seam of insufficient depth.
Normal arc

Providing a constant gap of normal size will lead to the formation of a normal seam with good penetration. The normal arc size is 2-3 mm.
Popular mistakes made by beginners when welding:
By learning to control the length of the arc, you can ensure optimal result. The arc forms a weld pool as it passes through the gap, melting the base metal and the electrode. It also ensures the transfer of deposited metal into the bath.
How to correctly form a welding seam and what defects there are
How to learn to weld with a welding machine and avoid defects? When the electrode moves quickly during the welding process, a defective seam is formed. The bath line is located lower than the surface of the base metal. If the arc penetrates intensely and deeply into the base metal, it pushes the bath back and creates a seam. Therefore, during the welding process, it is important to ensure that the seam is level with the metal. Obtaining the required depth of a high-quality seam is ensured by the skill of the welder. In addition to translational movement along the welding edge, it performs transverse movements to ensure penetration and obtain the required seam width. The choice of which movements to perform is a personal matter for the welder. For metal thicknesses up to 4 mm, European standards advise against performing transverse movements.
The bath follows the heat - this must be remembered when changing direction when welding. 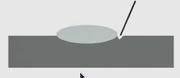 Undercut formation occurs when there is not enough electrode metal to completely fill the pool when moving across. To prevent the formation of such a side groove (undercut), you need to control the outer boundaries, carefully monitor the bathtub and, if necessary, make it thinner.

When the electrode is slightly tilted, all the force is directed back and the seam rises (floats). 
When the electrode is tilted too much during the welding process, the force is applied in the direction of the seam, which prevents normal control of the bath.

If it is necessary to obtain a flat seam or move the bath back, use the electrode tilts at different angles. Work begins at an angle from 45° to 90°, since this angle allows you to observe the bath and weld normally.
During work, the welder feeds the electrode into the welding zone with a certain inclination. A distinction is made between forward and backward angle welding. This technological technique allows you to adjust the seam parameters.
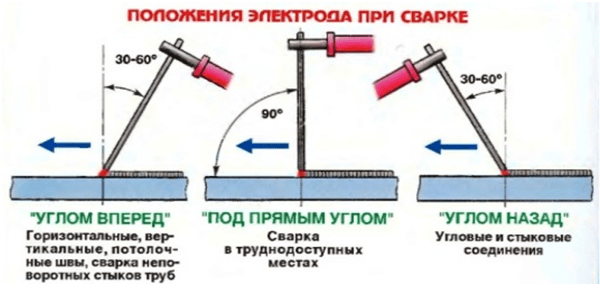
When welding at an angle forward, the seam is smaller in depth but wider, which is convenient for thin metal. Welding of thick metal is performed at a backward angle, which ensures greater heating of the metal in depth. When performing work, it is advisable to maintain the angles indicated in the figure. The large blue arrow shows the direction of welding - the movement of the weld.
Additional video on the topic:
Direct and reverse polarity when welding with an inverter
The process of melting metal during welding occurs under the influence of the heat of the arc, which is formed between the electrode and the metal as a result of connecting the metal and electrode to opposite terminals of the welding machine.
There are two options for carrying out welding work, differing in the order of connection, called welding with direct and reverse polarity. With direct polarity, the electrode is connected to the minus, and the metal to the plus, there is a reduced heat input into the metal. The melting zone is narrow, but at the same time deep.
When the polarity is reversed, the electrode is connected to the positive, and the metal to the negative, resulting in a reduced heat input into the product. The melting zone is quite wide, but not deep. You can observe the effect of cathodic cleaning of the welded surface.
What polarity should you choose when welding? Welding is performed in both direct and reverse polarity. When choosing, take into account the fact that the network element connected to the positive heats up more. The area colored in red in the figure heats up the most during welding.
When welding thin metal, they are afraid of overheating and burning it. A minus is connected to the product and cooked with reverse polarity. Thick metal is welded using straight polarity.
Effect of Electrode Feed Speed
The welding speed and electrode feed must ensure that a sufficient amount of molten metal enters the welding zone. Lack of metal leads to undercutting.
When the electrode moves quickly along the seam, the arc power is not enough to heat the metal, the seam is shallow, lies on top of the metal, without melting the edges being welded. When the electrode moves slowly, overheating of the main and electrode metal, possible burning of the surface and deformation of thin metal.
Effect of current
The current strength is set at the inverter according to the data given in the table. As you can see, the data is speculative.

The current strength and the speed of movement have a complex effect on the weld. High current increases the depth of penetration and allows you to increase the speed of the electrode. With optimal matching of current and speed, the seam is moderately convex and beautiful, providing the required depth of penetration of the edges being welded.
Welding process with an inverter on thin metal sheets
 What else should you pay attention to before carrying out the welding process? On the polarity of electrons. This is the basics of welding. In the DC welding process, there is a negative and positive source charge. Speaking about how to properly connect a welding inverter, first of all, you need to decide which charge to connect where, based on the fact that if the material that needs to be welded has a positive charge, then it will heat up more. If a positive charge is connected to the electrode, then it will heat up and burn more. Reverse polarity is typical when welding with an inverter, since it is intended to weld thin metal sheets, and they are easy to burn through. Therefore, if you are primarily interested in welding thin metal with an inverter, you should pay attention Special attention to establish the reverse polarity of the inverter, as well as to normal current strength. Electrodes for inverter welding of thin metal are connected “plus” to the inverter arc, and “minus” to the metal sheet.
In a private home, welding of thin parts is more important. Because the slightest mistakes can lead to burning through the metal. Before you start working with thin parts, try to master the basic seams on thick metal.
- Perform welding at the minimum recommended amperage.
- Make the seam at an angle forward.
- Be sure to perform welding with reverse polarity.
- A big problem when welding thin metal is deformation of the part. To reduce it, secure the parts during welding.
- When making tacks on long products, more than 0.5 m, start placing the tacks from the middle of the product to the edges.
The most common request on the Internet for those who want to learn how to use an inverter is “inverter welding for beginners video.” We provide a unique video on the pages of our website in which you can see all the principles of operating an inverter for a beginner.
And we will allow ourselves a few more tips on learning the welding process with an inverter:

More videos on the topic:
Study the video on how to work correctly welding inverter and we are sure that the welding process will not be difficult for you. Before watching the video, carefully read the description of welding, which is written in our article.
Video lessons on welding with an inverter:
And finally, how to choose the right welding inverter?
We also recommend:
Comments:
Facebook (X)
VKontakte (0 )
Regular (37 )
- Anatoly
Very good and useful article! I really enjoyed reading it, thank you for such a detailed analysis various nuances in welding. Let's practice!)
- Volodymyr
Pane Meister. I’m just starting to boil it, I put it in the recommended voltage, otherwise the electrode burns out and the polarity of the palate is normal, but you won’t be able to, and you’ll be happy anyway.
- Dmitriy
Welder Kyiv, welding work at affordable prices
If you need help, write here in the comments, we will always help) - Anton
Thanks a lot!!!
- Valery Anatolyevich
Very useful video for beginners, helpful information Overall a useful site! Thank you! Good luck in your work!
- Tatiana
I need a craftsman to weld a metal crown to the frame of the icon. Metal - brass.
- Sonya
Thank you, I really liked the article and the comments too
- Alexander (Foreman)
Dear friends, this month this article was viewed 8272 times, which is a high figure. Please recommend this article to your friends on social networks to bring more more benefit for beginner welders.
- Alexander
please tell me the polarity. + connect to the electrode or to ground. Otherwise they write differently everywhere. The welding stopped welding the metal, sent it for repair after the repair, it worked for a while and again the same problem was reported to the master and he said that the electrode should be connected to - connect a + to ground a in the instructions on the contrary it is written + electrode, - mass.
- Dmitriy
Guys, I want to say the following, I have enough practice in welding metal. Today I cook metal as if I were making a craft from plasticine, I can easily weld a hole with a diameter of 40-100mm in the ceiling with a three-point electrode, without a patch, and so on, in short, it’s fun. I received this skill, and this happened 18 years ago, as soon as I began to see and distinguish the color of the metal during heating with an arc. Therefore, I consider the most important skill during arc burning: 1. to distinguish slag from metal. 2. see the heating temperature of the metal by its color. Learn these things and you will be amazed how easy and simple everything is.