Hello dear readers.
Gone are the days when women with basins ran to the river to wash clothes.
Now almost every home has a washing machine, and not just a washing machine, as there used to be, jumping and running around the room while washing and spinning, but modern automatic machines. And today I want to devote an article to how to install washing machine do-it-yourself automatic machine. If you think this is difficult, then you are wrong. Despite all the complexity of the technology, installing a washing machine with your own hands is a simple procedure. There is no need to invite an installation specialist and pay money. Read the article to the end and your new washing machine will work for you without problems for many, many years.
Today, washing machines are the height of technology. You set the program, load the dirty laundry and just press the start button, the smart technology will do the rest for you. But before it starts working correctly and smoothly, it is necessary to carry out some procedures. These are what we will look at now.
How to install and connect a washing machine: step-by-step instructions
Step 1. The first thing you need to do after the machine arrives at permanent place dislocation is to remove the packaging material and install washing machine to the place where washing will be done.
Remove packaging carefully and store for 7 days. It is during this period of time that you can exchange the purchased product for a new one if there are any defects in the work, the dimensions do not fit, or you are simply not satisfied with the design.
Step 2. On the back side of the machine body, unscrew the shipping bolts and remove the plastic spacers. This is easy to do: relax mounting bolt, lifting up and aligning the plastic spacer with the hole, remove it from the body of the washing machine.
Step 3. In the places of the holes through which the spacers were removed, we insert plastic decorative plugs that come with the machine.

Step 4. Connect the water to the machine.
- To do this, insert a filter towards the hose with a curved end that comes with the machine. The filter is inserted with the convex side towards the outlet of the washing machine.
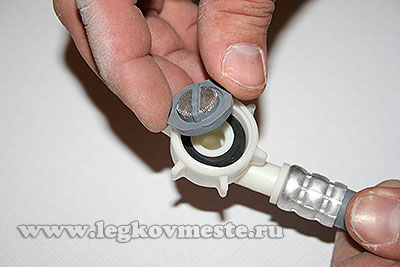
- Tighten the nut connecting the hose to the machine. We tighten by hand, without using keys. Thanks to rubber seals the connection is hermetically sealed.

- We screw the other end of the hose to the cold supply tap. tap water, also without using keys.

note that the washing machine is connected specifically to cold water. Of course, when connecting to hot water you can save some amount Money on the saved electricity used to heat water. But, on the other hand, if you forget once and load items into the machine that are washed on a delicate cycle at a temperature of 40˚C, you can irreversibly ruin the entire batch, resulting in items with a lot of shrinkage.
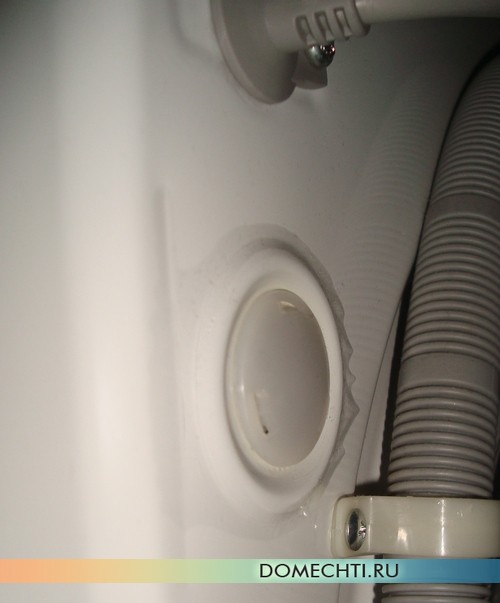
Step 5. We connect the drain hose to the sewer system.

Initially, it is assumed that the water will be drained from the machine in, since it is included with the washing machine. goes by car a special hook into which the hose is threaded and the entire structure is hung on the bathtub.
This is, of course, very inconvenient. Therefore, it is advisable to provide a special drain or into a siphon under (some siphons have a special outlet for drain hose) or provide for draining directly into the sewer system, as in the photo above. This method of connecting to the sewer system is much more convenient. The only condition must be to create a bend in the drain hose to form a water seal and to locate the upper level of the bend above 60 cm above the floor level. This will prevent it from getting into unpleasant odors from the sewer into the car and will not allow water to drain by gravity.
Step 6. We fill the water supply hose and sewer hose of the machine into the recesses provided on the back of the machine. We install it close to the wall and use the twist-out adjustable feet to achieve stability.
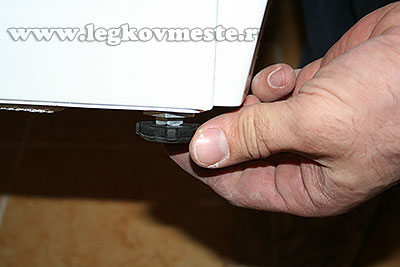
By pressing alternately on all four corners of the machine, we check its stability. If, when pressing on the corner, a swing occurs, screw in or slightly unscrew the leg in the swing corner and select the existing gap. We achieve a completely stable position.
Step 7 We connect the washing machine to the electrical network. To do this, simply insert the plug into
Today we will tell you how to connect an automatic washing machine in an apartment, but first, do not forget to clarify whether the warranty is lost if you do the process yourself? If the guarantee still remains or it is not important to you, then you can continue to study our article.
Installation steps:
Careful inspection of the washing machine
When they bring it to you, you will immediately be asked to sign the receipt. But you shouldn’t do this without checking the machine, you just need to carry out a few simple steps.
- Tell the couriers to unpack the car.
- Check outer covering cars, are there any dents or deep scratches?
- Shake the machine, just shake it from side to side. If you hear any strange knocking noises inside the machine, ask for a replacement, this is a good reason to replace the washing machine.
- Don't forget that you spent money on the purchase, and if something is wrong, you should talk about it immediately. Only sign the receipt if everything is in order.
- Remember that couriers will happily sell you low-quality goods because they don’t care about the quality of the equipment. Do not listen to all their persuasion and urgently check the product, you will use this machine for more than one or two years.

Removing shipping parts
When you unpack the machine, you should begin dismantling the shipping parts. They create a rigid connection between the rotating parts and the washing machine tank. This is done to ensure that there is no serious damage to the washing machine during delivery. It is not difficult to recognize shipping parts; these are bars, bolts and staples. If you turn on the washing machine without dismantling it, you risk breaking the washing machine. Of course, most people use the appliance first and then read the instructions, but here you risk losing your new washing machine, so you will have to study the instructions in advance.
Choosing a location for installation
Before you call a professional to install the machine, you need to designate a location in advance and carefully measure it. This should be done not even before installation, but before purchase. Measurements must be taken both in height and width. Do not forget to take into account the surface of the walls; if there are any bulges or dents, the machine will stand crookedly, or even not fit into the place you need. You need to subtract one centimeter from the measurements so that the machine is slightly smaller than the installation location. In this case, you will 100% not go wrong with the place.
Electrical connection
The most difficult stage of work, here you need to be extremely careful and responsible. The washing machine consumes quite a lot of energy, approximately 2.5 kW. It is not for nothing that the rooms in which the washing machine is located are considered dangerous; they contain very high electrical voltage. But manufacturers have taken this into account and the latest models of washing machines have grounding and double insulation to increase the safety of automatic and semi-automatic machines. 
To connect an automatic washing machine at home, you need to have a special socket with a built-in grounding contact. In Russia, such sockets are jokingly called “Euro-sockets” because of their High Quality. Our vintage sockets carry 6A current, while our new sockets carry 16A current. Domestic sockets are very dangerous; all extension cords, adapters and tees significantly reduce protection and increase the risk of fire. It is advisable to choose a socket that is made of ceramic inside; if the inside is plastic, the socket is unsafe.
Now new sockets are installed in, because that is where the washing machine is most often located. But people forget that in the bathroom high humidity, and this can have serious consequences, unless it is a special outlet that is not afraid of moisture. Many people believe that electric shock is not dangerous due to grounding, but most houses have been grounded, which does not provide high protection.
In order to reduce the risk of electric shock, you need to install the RCD correctly. It is capable of de-energizing an electrical circuit at the moment when you are about to be shocked, which is why RCDs are now considered the best device for protection against electricity. But you shouldn’t take risks and install the RCD yourself; here, as elsewhere, an individual approach is important, so contact a specialist. He will select the appropriate class of RCD and increase your safety.
Often an automatic washing machine is connected by a body to water pipe or even a battery, but this is very dangerous. Electrical voltage appears on the pipe or battery due to poor grounding, and the battery or pipe itself may become deformed over time. But this is not the worst that can happen - if someone connects welding machine and tries to process the battery - the washing machine will end. The electronics will burn out completely, and this may cause a fire. The same reaction can occur if you connect the washing machine to the pipe with a jumper. If you are not a professional electrician, do not use questionable grounding methods, you could lose your life. 
Of course, it is better to do at least some dubious grounding than not to do it at all. Your soul will become calmer and thoughts of electric shock will disappear, but the chance of getting a shock will not decrease. Guaranteed grounding can be obtained in very tall houses, where there is not even gas in the kitchen, and only electric stoves with a power of 10-15 kW are used. In addition, grounding is present in administrative buildings. But how to ensure good protection from electric shock in your apartment? We will write about this below.
Install the outlet as close to the washing machine as possible, because its cord is 1.5 meters long. But if the length is not enough, call a service technician, he will help you install a long cord. As soon as you connect the automatic washing machine to the network, the voltage on the body will be 60-120 Volts, and it is transmitted through a filter that suppresses interference. If there is no grounding on the machine, the current flows into the body, and there is a chance of getting a shock. Therefore, you need to make a separate outlet and connect to switchboard. This way you will reduce the voltage from weakened apartment wiring. The fact is that a washing machine consumes a lot of electricity, about 10A, but standard wiring only carries 6A. The thing is that the old apartments were built on the basis that a central gas supply would be used and hot water. People wanted to save money on building houses, and did not even realize that in the future everyone would start using water heaters and automatic washing machines. In this regard, the majority of the Soviet household appliances were double insulated and fairly low power, and no grounding was required. ![]()
Are there any advantages to connecting a washing machine to hot water?
In many ways, these are unjustified expenses, because the washing machine acquires a more complex structure and unnecessary parts. Besides, everyone knows the more small parts in technology - the more often it breaks. But does it make sense to connect a washing machine to a hot water valve if it is already built into it?
Everyone knows that an automatic washing machine is filled with hot and cold water before you start washing. If the water temperature is standard, then at the end of mixing it will be 40 degrees. This temperature is suitable for all washing programs. But if the water is too cold or hot, the mixing temperature will be different and the delicate wash mode will not be available. The hot water valve makes it possible to heat the water, but in no case cool it. Moreover, the amount of cold and hot water during dialing does not depend on you. Therefore, you should not overpay for a hot water valve; the temperature may still be too high, and the delicate wash mode will only ruin new things.
What is needed to connect to the water supply?
Almost all washing machines are immediately connected to cold water. What is required for this procedure? If your place of residence already has an outlet for a washing machine, everything will be much simpler, but if there is none, you will have to connect it manually. For iron pipes you will need a welding machine, and for plastic pipes you will need a soldering iron. If you don't have a soldering iron or welder, you'll need a crimp outlet. It is produced under different diameters pipes, you will need a pipe outlet of 15 millimeters or slightly larger, depending on the diameter. The outlet can even be installed on plastic and iron pipes, which makes it very practical.
You can buy a bend in hardware stores or at construction markets, you can immediately buy a faucet for the machine. Typically, a faucet is installed in the toilet outlet to allow water to drain. In order not to install a clamp outlet, it is better to buy an adapter coupling and a tee valve in advance, optimal diameter 15 millimeters. 
If an emergency leak occurs, you can use the outlet to shut off the water to the machine, so install it on the pipe so that it can be easily used. During installation, use the rubber gasket and bolts for tension and girth. When you finish pulling, turn off the water flow and drill a small hole in the pipe with a diameter of about 10 millimeters. Next, insert the faucet for the machine to the outlet and install a hose to supply water.
How to connect a washing machine to the sewer?
The sewer line is plastic pipes leading to the sewer. To make the connection, you need to take the following tools and materials: a 50 mm tee, an outlet 50 mm in diameter and 40 cm in length, a coupling, a fastening clamp, a rubber cuff, air valve 50 mm.
In the room, you need to ensure free access of the drain hose to the drain point, and then use a hacksaw to make an entrance for a 12 cm pipe in that place. Insert a coupling and a 50 mm tee into the hole. Install the plastic pipes in such a position that they can be moved freely from side to side to install the coupling and tee.
If you are installing the machine in the kitchen, look at the sewer riser. Do not forget that in the bathroom the riser is 100 millimeters, and in the kitchen it is only 50 millimeters. Don't forget to consider the floor you live on and the age of the house. If you install the washing machine correctly, you can avoid eternal squabbling with your neighbors. 
Test run of the washing machine
At the end of installation, the equipment needs to be checked, but do not put things into the machine, just pour powder to wash the machine of the factory grease and get rid of small debris. The most important thing is to check whether the machine heats the water normally and how quickly it fills the water. Next, check how the machine spins and drains the water; if everything works correctly, the installation is complete. 
To consolidate the information, we suggest you watch the video:
If you have any questions, please ask them in the comments to this article.
IN modern world Almost every second family has an automatic washing machine in their household - this benefit has long been rooted in the subconscious of our people and nothing can knock it out of there. As you can imagine, a simple purchase automatic washing machine of little help in household, because it still needs to be properly installed and connected.
Of course, without knowledge and experience it’s difficult to figure it out, but if you’ve ever encountered such an activity or have “crazy hands,” it’s not a sin to try. And our advice will definitely be useful to you! Now let's see how to do it correctly step by step.
How to prepare a washing machine for installation
And let's start by learning how to unpack it correctly. Yes Yes exactly. A lot of troubles happen just because of ignorance of how to properly reactivate a purchased washing machine. Although in fact, as experience and practice shows, this is a very simple and uncomplicated matter.
Having freed the washing machine from its packaging, the first thing to do is to rid it of the shipping bolts - they are designed to secure the drum during transportation. If the installation of an automatic washing machine is carried out without removing the locking screws, then as a result, you will receive, at a minimum, severe vibration, and at maximum, a complete breakdown of the newly purchased equipment.
We turn the washing machine backwards and look for four holes sealed with plastic plugs - two at the top and two at the bottom. We take out the plugs and unscrew all four screws - seal the remaining holes with the plugs that come with the machine.

That's it preparatory stage the work ends - now the installation and connection of the washing machine can continue without any problems.
Installing a washing machine by level
Let's start in order. We install the washing machine in the intended place, arm ourselves with a small level and achieve its ideal location in the horizontal plane. For such adjustment, there are adjustable supports at the bottom of the washing machine - as a rule, in modern machines they are located only at the front. The rear legs are not adjustable, so the entire leveling operation will have to be completed using the two front legs.
It is very important to fix the adjusted supports in the desired position - for these purposes, each adjustable leg equipped with a lock nut. If the locknuts are not tightened, then after a while the legs will unscrew and, as a result, its level will be lost, as a result of which you are at risk of repeated DIY washing machine installation.
Connecting the washing machine to the water supply
Now there is not much left. At the next stage of work self installation washing machine will require you to connect it to the water supply system and. It would seem that everything is simple, but this only applies to the case if the appropriate connections to and from the drainage system were prepared in advance. In this case, you only have to connect the machine to the water supply using a special hose included in the kit, and insert the corrugated drainage hose into the tee of the sewer system.

Connecting a washing machine yourself


If there are no prepared connection points, you will have to work a little and make them yourself. It all depends on the material from which the water supply in the apartment is made. WITH metal-plastic pipe Everything is simple - cut it, insert a tee and tighten the nuts tightly. Things are a little more complicated with polypropylene pipe– to insert an additional tee you will need a special soldering iron. But about steel pipes and I don’t even want to talk about it, there’s a lot of hassle with them, in general, installing and connecting the washing machine to metal pipes– the matter is quite serious and it is better to entrust it to professionals.
Where to install the washing machine: possible places in the apartment and house
As a rule, in our apartments there are only a couple of places where it is possible to freely install a washing machine: the kitchen and the bathroom. Installing a washing machine in the bathroom can lead to some troubles - the equipment rusts and its service life is reduced several times. You understand that high humidity in this room does not bode well - it can lead to oxidation of contacts in the electrical part of the equipment and premature damage to the housing. In this regard, the installation differs quite favorably - here the troubles described above do not threaten you.
Well, in principle, you can install a washing machine anywhere; there is a place for it in almost any room of an apartment or house - some people, due to lack of space, install the necessary attribute comfortable life in the hallway and even in the bedroom. The most important thing in this story is to find a place for draining and connecting the water supply - fortunately, the hoses used to connect the machine can be extended to any length.