Many happy owners of comfortable homes often forget about extremely unpleasant problems that tend to appear where you don’t expect them. It's about about elementary leaks. Their appearance is most often associated with unpleasant disputes with neighbors, damage to property and, accordingly, serious unplanned expenses. In addition, there is also the threat of defeat electric shock when moisture gets into the electrical network. The only way to solve all these problems is to competently installed sensor water leaks. Or rather, a whole system assembled from these devices.
How does such a system work?
Modern industry produces two types of such sensors. These are wired devices that connect to the controller using a wire, and wireless ones that send a radio signal. Regardless of the type of device, they are equipped with two electrodes. If the sensor is immersed in water, its poles close and the device sends a signal to the controller. That, in turn, redirects it to the valves of the shut-off equipment and immediately blocks the water supply. The entire procedure takes no more than 15 seconds.
The water leakage sensor is triggered when moisture gets on it. The signal is transmitted to the controller, which shuts off the water supply. All operations take no more than 15 seconds
The water will be turned off until the emergency is resolved. After which it is enough to perform a few simple operations and the device is ready for use. A properly connected and properly functioning system fully guarantees reliable protection against sudden leaks of plumbing or heating.
To save money, some craftsmen recommend assembling a water leakage sensor with your own hands. Unfortunately, this is practically impossible. The device itself is quite simple, but making it absolutely safe is difficult. Homemade device threatens electrical injury to everyone living in the house.
What is included in the leak protection system?
There are many variations of home leakage protection systems. The most common are Neptune, Aquaguard and Gidrolock (you can see more details at the end of the article). The principles of their operation are similar. They are designed to work with motorized ball valves with a diameter of 1”, ½” or ¾”. The devices can not only shut off the water, but also supply light or sound signal. They are also easily compatible with systems like " smart House"and can be integrated into them.
Any water leakage protection system includes a leakage sensor, a control device, a controller and ball valve with electric drive
Let's talk in more detail about one of these devices, the Neptune devices. They are available in different variations, but all contain:
- Controller. Designed to process the signal coming from sensors and supply control voltage to electrically driven ball valves. In addition, the device is responsible for powering all sensors, as well as for sound or light warning about the accident. The controller can be mounted in any place convenient for the user, except where water may get on it. Available in various designs.
- Water leakage sensor. When moisture gets in, the device sends a signal to the controller. Connects only to a safe power source, so if you accidentally touch the plates it is safe for others. Installed in places where leaks are most likely: near washing machines, bathtubs, showers, sinks, etc. The manufacturer usually recommends wiping the sensor plates with a damp sponge at least once every 3 months. This operation is carried out for prevention and to check the functionality of the entire system.
- Ball valve with electric drive. The unit is designed to block heating or water supply in case of leakage. The device reliably holds water until the accident is eliminated. The device is installed immediately after the inlet valves in the water cabinet. For its installation, it is best to involve a plumber, since the connection is made only with a PVS 3x0.5 power cable or its equivalent through a junction box.
The number of system elements may vary depending on the specific location of its installation.
Rules for proper installation
Before you begin installing the system, you should draw up detailed diagram placement of all its elements, on which you will need to mark the location of each device. In accordance with it, it is checked once again whether the length of the connecting wires included in the kit is sufficient for installation, if they are provided for by the design of the devices. The installation itself is carried out in the following sequence:
- We mark the installation areas for sensors, taps and controllers.
- We lay the installation wires according to the connection diagram.
- We cut in ball valves.
- We install sensors.
- We mount the controller.
- We connect the system.
Let's take a closer look at the most important stages.
Stage #1 - insertion of the ball valve
As already noted, it is best to entrust the installation of an electric ball valve to a specialist. The device is mounted after manual valves at the pipeline inlet. It is strictly forbidden to install structures instead of taps at the inlet.
It is recommended to install filters on the pipeline in front of the unit to purify the water. This way the devices will last longer. It is also necessary to ensure uninterrupted power supply for them. In operating mode, the device consumes about 3 W, at the moment of opening/closing the valve - about 12 W.
Stage #2 - installing the sensor
The device can be installed in two ways:
- Floor mounting This method is recommended by the manufacturer. It involves inserting the device into tiles or flooring in areas where water is likely to accumulate due to possible leakage. In this case, the contact plates of the sensor are brought out onto the floor surface so that they are raised to a height of about 3-4 mm. This setting eliminates false alarms. The wire to the device is supplied in a special corrugated pipe.
- Installation on the floor surface. In this case, the device is placed directly on the surface of the floor covering with the contact plates down.
Installing a water leak sensor with your own hands is quite simple, especially if the second method is used.
Stage #3 - installation of the controller
Power to the controller must be supplied from the power cabinet. Zero and phase are supplied to the device according to the connection diagram. To install the device, you need to perform the following operations:
- We are preparing a hole in the wall for mounting the controller box.
- We make recesses for the power wires from the installation site to the power cabinet, to each sensor and to the ball valve.
- We install the mounting box on the prepared place in the wall.
- We are preparing the device for installation. Remove its front cover by pressing the latches on the front of the device one by one with a thin slotted screwdriver. Remove the frame and connect all the wires in accordance with the diagram. We install the prepared controller into the mounting box and secure it with at least two screws.
- We assemble the device. Carefully place the frame in place. Place the front cover and press on it until both latches engage.
If the system is assembled correctly, after pressing the power button it begins to work. This is usually indicated by a glowing indicator on the controller. When there is a leak, the indicator color changes from green to red, a buzzer sounds and the tap blocks the water supply.
To eliminate the emergency situation, the manual valves of the pipeline are closed and the power to the controller is turned off. Then the cause of the accident is eliminated. The leakage sensors are wiped dry, the controller's power is turned on and the water supply is opened.
Competently installed system Leak protection reliably protects against all sorts of troubles associated with water leaks
Video reviews of the Neptune and Aquawatch systems
The leakage protection system eliminates many problems and unnecessary costs. The cost of compensation for damage is not comparable to the cost of the device. It is best to entrust the installation of devices to specialists who will carry out the installation competently and quickly.
As practice shows, self-made structures do not always fulfill their functions, and they are also potentially dangerous. You shouldn’t skimp on the safety of your loved ones; it’s best to purchase and install a certified, reliable device.
The advantages of the system are:
- The presence of a protection complex of 3 elements: 3 type C batteries, a 5 V mains adapter, a built-in battery. The battery kicks in when the power goes out or the batteries are low.
- The system is completely autonomous.
- The warranty on it is 4 years.
- Managing and using it does not require special knowledge and skills.
- The system is designed for simultaneous operation with 6 taps.
The valves are installed on cold pipes and immediately after the inlet valves into the apartment. The rest of the equipment - filters, meters - is installed after them.
The wired system costs between $170 and $330. If the wireless option is selected, then it increases to $350 - $415.
Other protection system options
The choice of systems is not limited to the two most popular. If desired, you can find other similar devices.
Eg, "GIDROLOCK" system also reliable enough to protect premises various types. She has standard design. If a leak occurs, the control unit will not only stop it, but also emit a characteristic sound signal.
The control unit can be equipped with the following functions:
- sensor circuit break monitoring;
- Battery charge level monitoring;
- weekly self-cleaning of ball channels.
The cost of the kit can range from $130 to $780.
 System "Stop Flood "RaDuga" does not require laying wires, the sensors operate on a radio signal.
Protection against leakage is due to the operation of a solenoid valve that shuts off the water supply.
In this system, it is possible to increase the number of control sensors and . The response time of the equipment is 7 – 10 s.
The system has other advantages:
- operating on a radio signal, it does not in any way affect the operation of other equipment;
- the operation of the equipment does not depend on the electrical network; it is equipped with batteries;
- There is a self-diagnosis system.
The cost of a complete set for cold and hot water is about 300 dollars.
How the devices that make up the system work
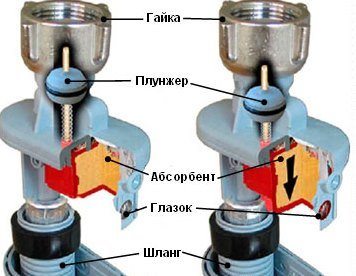
Leak sensor is a (rarely metal) container equipped with two sensitive contacts. On the surface of the contacts there is anti-corrosion coating.
There is no danger in touching the sensor as it is connected to a safe power source.
The sensor works like this: water, being an electrical conductor, closes the contacts, the resistance between them drops sharply, which for the controller is a signal of a leak. If small splashes come into contact, the sensor does not work.
Wireless sensors are completely autonomous and can be installed anywhere. But at the same time, the controller cannot check the functionality of the sensor.
Wired sensors are constantly under, which makes it possible for the controller to continuously monitor their performance.
The sensor can be installed in two ways:
- Embed into the floor in those places where water accumulation is most likely (protrusion above the floor level 3 - 4 mm). In this case, the devices are installed with the contact plates facing up, and the wire is supplied to them using a corrugated tube.
- If insertion is not possible, then the device is placed directly on the floor, with the contact plates facing down. The contacts do not touch the floor, since there are point protrusions on the body of the device. This prevents false alarms when water drops enter.
Once every three months, the sensor plates need to be wiped.
Controller mounted in a place convenient for notifying owners about a leak and allowing for maintenance of the device. If the system is wired, then the control unit should be located near the sensors, but so that water does not get on the housing.
The controller and solenoid valve must be powered through an RCD.
 Actuators can be of two types:
- blocking water;
- signaling a leak (buzzers, sirens, SMS).
It is clear that just sending a signal does not solve the problem, so it is better if the system is equipped with devices that shut off the water. These can be solenoid valves or electrically actuated ball valves.
Solenoid valves They are very sensitive to the purity of water, so they place them between them and the valve. They require a constant supply of electricity, so such systems need to be equipped with additional power sources that turn on when there is no power.
Ball Valves can be removed from the controller at most. Than 100 m. They obey only the command given from the control unit.
The housings of these devices are made of stainless steel or chrome-plated brass. The valve is driven by a brushless electric drive, which consumes energy only during closing and opening of the ball valve. When the signal is triggered, the valve closing speed is calculated so as to prevent the development of water hammer.
Ball valves can be powered either from the central power supply or from additional source nutrition. Some systems have a "maintenance check" function that is designed to keep the valves in working order. In this case, once a week, at the command of the controller, the taps are turned at an angle of 3 to 5 degrees, which helps prevent the ball from becoming overgrown with deposits of salts and dirt.
It is best to have leaks installed by specialists who are familiar with the process and installation features in various rooms, but you can do it yourself. 
If such a decision is made, then the following order of installation of system elements should be followed:
- The automation unit is installed first;
- then install the shut-off valves;
- then they install control sensors and connect them to the control unit;
- connect the electric drive of the locking devices to the controller;
- testing the operation of the system.
Despite the apparent simplicity of installation, you need to remember that this will require upgrading the indoor plumbing system. And to do this, you need certain knowledge and skills, as well as a tool. If you have not done such things before, then it is not worth the risk. Otherwise, you will cause a flood before installing the protective system.
Finding a puddle of water under your washing machine is extremely unpleasant, because you will not only have to repair the machine, but also pay for repairs to the neighbors whom you flooded. However, in case of water leakage, there is special protection and an Aquastop system for the washing machine. It is worth considering the methods of such protection in more detail and understanding the disadvantages of each of them.
Protection options
All washing machines, depending on the presence of a protection system, can be divided into three groups:
- cars without protection;
- cars with partial protection;
- machines that are completely protected from leaks.
Most machines in the low and mid-price category are not equipped with leakage protection. What does this mean? And the fact that water is supplied to the machine from water pipe through a regular flexible hose with special nuts at both ends. The bottom of such machines, as a rule, is missing or closed plastic panel. And if the inlet hose ruptures, then all the water in such a machine will flow out onto the floor. IN multi-storey building This situation leads to flooding of the neighbors below.
Therefore, in this case It is recommended to close the water supply tap after turning off the machine or install an additional protection system yourself in the form of inlet hoses with valves, we will talk about them further. In some washing machines high-class protection is already installed. For example, complete protection against water leakage is available in cars under the following brands:
- Asko;
- Ariston;
- Bosch;
- Siemins;
- Miele;
- Zanussi;
- Electrolux.
Partial protection against leaks
 What is partial protection, let's figure out how it works. Machines with such protection against leaks are equipped with a special tray, for example, like the one in the figure.
A float equipped with an electric switch is installed inside the pan. The tray is made of plastic or metal, the float is made of polystyrene foam. When water flows inside the machine, it falls into the pan, with a certain amount of water the float rises and the switch is activated. At its signal, the machine switches to emergency mode, the washing process stops, the pump operates and pumps out the water.
Important! In such a situation, an error code is displayed on the machine display, different models different designations, for example, in an LG car the code E1 will appear, and in a Samsung car - E9.
If water leaks into the pan, you need to pour water out of it, and then look for the cause of the breakdown and fix it. About everyone possible reasons and eliminating leaks, you can learn from the article about why a washing machine leaks.
Inlet hoses with valves
Washing machines with partial protection are called so because the protection is activated only when water flows into the machine. But if the hose breaks in some place outside, then flooding cannot be avoided. In this case, it is worth considering inlet hoses equipped with protection. They come in three types:
For your information! The Aqua Stop inlet hose is designed for a pressure of 70 bar, which is 7 times more maximum pressure in the pipeline.

Complete protection against leaks - Aqua Stop system
Washing machines with complete protection against water leaks have not only a tray with a built-in float, but also a hose with a solenoid valve, which we described above. In other words, if you connect such a hose to a partially protected car, then it can be called fully protected.
Such protection against leaks is considered the most reliable. Undoubtedly, cars equipped with the Aqua Stop system have an advantage over conventional cars. Having overpaid several thousand rubles for it, you don’t have to look for a high-quality inlet hose and figure out how to connect it correctly. The entire system has already been debugged by the manufacturer.
It should be noted that the “Aqua Stop” protection is triggered in cases of leakage of the washing machine tank, damage to the pipes, increased foaming and foam escaping.
In addition, complete protection against leaks is accompanied by an emergency water pumping system. It is triggered if for some reason the main and safety valves do not operate. The main valve is the machine valve to which the inlet hose with Aqua Stop protection is directly connected. You can read about how the main valve works and how to replace it in the article “Intake Solenoid Valve.”
Thus, the protection of the automatic machine from water leaks can be complete or partial. How to protect your premises from flooding is up to you. However, it is better not to skimp on safety, and at least independently install an “Aqua Stop” hose with a solenoid valve on the washing machine. Believe me, it's worth it!
This article describes the making of a flat.
The main task of this automated system is closing electric valves on apartment water supply pipelines in emergency situations. Emergency situations can occur when flexible (braided) connecting hoses break and valves, tees, and pipelines malfunction. The principle of operation of the system is to detect flooding by sensors, which, using electronic device close the valves on the water supply pipelines.
Protection against leaks and flooding eliminates significant time and Money and problems with neighbors. The costs of purchasing and installing an automated system are not commensurate with the costs of eliminating the consequences of an accident.
Can be purchased and installed ready-made system anti-flooding. Such systems are commercially available. These are “Aquaguard”, “Neptune”, “Gidrolok”. Each system has its own advantages and disadvantages, but the main disadvantage of all of them is their high cost of $200 - $500, depending on the types of sensors (wired and radio sensors) and the types of controllers and actuators.
I decided to assemble the system myself. In the selection of components, preference was given to the reliability and practicality of the components used.
The “SAU-M7.E Level Control Device” was selected as an electronic device that performs monitoring and control functions according to a given algorithm.
“The SAU-M7.E device is intended for creating automation systemstechnological processes related to the control and maintenance of a given level of liquid or granular substances in various types of tanks, containers, containers, etc.”- quote from the instructions.

This device is distinguished by its reliability, large selection and flexibility of parameter settings, and small overall dimensions. And also the maximum permissible load current, switched by the contacts of the built-in relay 8A, which allows you to control actuators without additional starters.
The next step was to select flood sensor housings and draw printed circuit boards for the selected housings. For the sensor housings, four doorbell buttons were purchased from the store.


Manufacturing of flood sensors.
A sketch has been drawn to fit the dimensions of the button. printed circuit board flood sensor.
 We cut out four boards from foil fiberglass according to the given dimensions. Using a drawing board filled with bitumen varnish, we draw conductive paths on the boards according to the sketch. Dry the varnish and place the boards in a ferric chloride solution for etching. When the unvarnished areas of copper dissolve into ferric chloride, wash the boards and wash off the bitumen varnish with solvent.
 We attach a lump of stranded wire to the soldering iron tip and use it to service the printed conductors. The solder should coat the copper conductors with a thin, shiny film.

The boards, at first, were planned to be installed in the button cover, as evidenced by the grooves on the sides of the boards. But then it was decided to install the boards in the lower recess of the button itself.


Appearance of the button without a cover.


We install the board in the prepared place at the bottom of the button and use a drill with a diameter of 0.8-1.0 mm to drill the board together with the button in the corners. IN drilled holes insert staples made of tinned copper wire with a diameter of 0.8 mm.

We stretch the bracket towards the printed circuit board until it stops and form legs with a height of 2.5 - 3.0 mm at the corners from the wire of the bracket. Solder the wire to the printed circuit board.


Disconnect the LED with a resistor from the terminals. We solder terminal lugs to the pieces of wire, connect them under the screws of the button terminal block and solder them to the brackets of the printed circuit board.


The button itself and its contacts have not been changed and are used in the sensor and serve to monitor the integrity of the connecting line (when you press the button of any sensor, an alarm should be triggered and the siren will turn on). The flood sensors are ready, now you need to place the sensors in places of suspected leakage (under the hydrobox cabin, under the washing machine, under the washbasin, under the water supply distribution panel) and draw connecting lines from them to the SAU-M7.E. I used a flat flexible telephone four-core wire 4x0.75 mm 2 for the lines. The wire is inserted into the button box, the conductors are connected in pairs, terminal lugs are soldered to the pairs and secured under the screws of the button.
 All four wires are led under the plinth to the installation site of the SAU-M7.E device and connected in parallel to terminals 1 and 4. A jumper is placed between terminals 4 and 2. This jumper is needed to turn on the second relay of the device, which, when turned on, will turn off pumping station. But this operation is only necessary for those who have a pumping station installed to increase and stabilize the pressure of the water supply network when using shower cabins and hydromassage boxes.

Connecting and setting up the SAU-M7.E level control device.
To connect the device we use the diagram
 When any flood sensor is shorted by spilled water, the output electromagnetic relays “Top” and “Operation” are turned on. The relay contacts turn off the pumping station and connect the electromagnetic valves EK1 and EK2, embedded in the water supply pipelines. I used Italian “SEME” 8715NN0206 electrovalves, normally open. They close when 220 V is applied to the valve winding.
Together with the electric valves, contacts 10 and 11 of the Top relay, a time relay E17M-12 is connected, which is designed to limit the sounding time of the emergency siren to one minute (so that neighbors don’t get nervous when no one is home). Contacts PB 15 and 16 turn off the emergency siren, the emergency warning light remains on until the emergency is eliminated. Any time relay, siren and warning lamps can be used. To power them, you can use a constant voltage of 12V on pins 5 and 6 of the SAU-M7E device.
Before putting the SAU-M7.E device into operation, you must configure it by switching jumpers on switches K1-K4.

The photo shows how the jumpers should be positioned.

We apply supply voltage to the circuit and check its functionality. In the absence of water, the flood sensors are dry, the water supply system operates normally.

If water gets to the flood sensors, the alarm on the front panel of the SAU-M7E looks like in the photo

The electrovalves should shut off the flow of water, it sounds sound alarm, the red emergency warning light is on.
Thus, the system protection against leaks and flooding collected with your own hands and tested. The cost of the system is an order of magnitude less than the industrial cost, but in terms of reliability it is in no way inferior. In this protection system, it is better to use three-channel liquid level control devices SAU-M6 instead of SAU-M7E. This device is simpler and more convenient to use in in this case. It contains three separately regulated channels and three relays. Therefore, it is easier to implement the system operation algorithm on it. But I couldn’t find such a device, so I used the SAU-M7E.
If you decide to assemble a system on the SAU-M6, please contact [email protected]. There is a system diagram and instructions for the SAU-M6. Write reviews, share new ideas.
Have you had the unpleasant experience of a water pipe break? Do you want to protect yourself from possible damage to property and from conflicts with neighbors that arose due to the flood? Then you need reliable protection against leaks.
It is known that in large cities, 9 out of 10 major utility accidents occur in the water supply system. Moreover, every day there are about 30-40 such problems in the water supply system, which is quite a lot even for a city with a million people. In most cases, special water leakage sensors help to save the situation, which are triggered if liquid gets on the floor.
Important: the system does not respond to simple wet cleaning of the room. The system reacts against leaks when a sufficient amount of water touches the surface of the sensors.
In order to understand exactly how this works, you need to have an idea of how the leakage protection system works. A special smart device consists of several elements:
- Electromagnetic (solenoid) valves for installation on a pipe.
- Sensors (alarms) for contact with water (wired/wireless).
- The control panel for the leakage protection system, which is also called a controller. It is a kind of control panel that is capable of not only receiving sensor readings, but also generating light and sound signals.
The principle of operation of the home “defender” is as follows:
- First, you need to install the solenoid valves on the pipe after the coarse filter. In this case, it is desirable that the control part of such valves is located exclusively on top of the pipeline.
Important: some private craftsmen neglect the installation conditions of the system and install valves instead of a valve. This is absolutely impossible to do. Otherwise, there is a risk of leaving the entire riser without water in the event of an accident.
- Water leakage sensor mounted either on floor covering, or drown in the floor using silicone sealant. It is worth noting here that professionally installed control alarms should respond to a certain volume of water on the floor, and not to simply washing the floor.
- So, when a large volume of liquid falls on the floor, the sensors are triggered to close the contact plates and send a signal to the control panel. This, in turn, gives a signal to the solenoid valves to turn off the water in the system. The water is shut off until the apartment owners arrive. And now, in principle, an accident appears before you, but not on such a scale as it could have happened if the water had flowed incessantly.
Example: a washing machine that is turned on works independently without the presence of the owners in the house. In the absence of the apartment owner, it breaks down drain hose, and the water does not go into the drain, but onto the floor. Moreover, the washing assistant continues the cycle. This means that about 90 liters of water will spill onto the floor (this is exactly how much the average machine takes for one wash). So, if the house has a water leak protection system, then the sensors will block the access of water to the machine and it will stop working. As a result, the accident will be eliminated in the bud. The owners will only have to collect the spilled water and restart the machine after repair. But if there is no protection against leakage, the water will flow exactly until the caring hand of a person stops it.
Important: if the house has several floors and each of them has a water supply system, then leakage protection must be installed on each floor.
It's worth remembering that reliable operation Protection against water leakage in the apartment requires preventive maintenance. So, once every 3-4 months it is necessary to clean the sensor contacts from dust, grease and soot so that the control alarms always respond fully to water. Cleaning is carried out using a soft cloth soaked in a light solvent. In addition, you should always monitor the condition of the mesh in the coarse filter housing. It must be constantly cleaned of accumulated sand and rye from the water supply.
Water leakage protection: types

All leakage protection for apartments and offices can be divided into wired and wireless. That is, the system’s sensors can be connected to the controller, or they can contact it remotely. Let's consider both types in detail.
- Wired elements. This type of control signaling devices is considered more reliable, but is not always convenient for installation in hard to reach places. Data transmission from such sensors to the controller occurs via wires. However, this is also a disadvantage - it is not always possible to hide the wiring on the floor in the room. And this spoils the interior. A sensor with wires has a lower price than a wireless element. At the same time, such a monitoring device consumes only 8 V of energy. It is recommended to install wired sensors in close proximity to the control panel.
- Wireless sensors. These elements operate using radio waves. This is how they send signals to the controller. But, despite the wireless design, the elements still require separate power. In addition, wireless sensors are several times more expensive. Installation of such elements can be done at any distance from the control panel and in any, even the most inaccessible place.
Important: all sensors must be installed only in possible places of water leakage in the apartment. As a rule, these are the bathroom, kitchen and the location of household appliances powered by water and installed in utility rooms.
Benefits of a smart system

- The system has an uninterruptible power supply. Thus, the leakage protection is completely energy-independent and can work even if the lights are turned off at home. When the electricity in the apartment is turned on, the device’s battery is constantly in “charging” mode.
- Ball valves provide reliable protection from leakage at any time of the day or night.
- All working components of the system consume from 5 to 12 V, which does not pose a threat to humans. In addition, current is supplied to the system periodically when the signal is turned on.
- Self-cleaning of ball valves from salt and lime build-up occurs due to periodic closing of the elements.
- Saving family budget on the system's electricity consumption. Only 5-12 V and then only at the moment of opening/closing taps.
- All metal elements The devices are made of anti-corrosion alloy, which increases the service life of the devices.
Installation smart protection against leakage must be carried out strictly according to the following scheme:
- Installation of the controller at the selected location;
- Installation of shut-off ball valves (valves);
- Installation of leakage protection sensors (signaling devices) in the designated zones and connecting them to the control unit;
- Connecting electrical wires of ball valves (valves) to the power supply;
- Testing the connected device.
Well-known manufacturers of water leakage protection
The modern market offers a lot smart systems aimed at protecting an apartment or house from water leakage. Let's look at the more popular ones:
Protection "Aquaguard"

The system has many advantages:
- So, the source built into the controller uninterruptible power supply controls not only the operation of the system, but also the battery charge level.
- Leakage protection "Aquastor" is designed to work simultaneously with six taps.
- Installing the system does not require special skills.
- The sensitivity of the sensors is adjustable.
- The device is equipped with a modern Japanese electronics system.
- In addition, the system can be mounted with the possibility of decorating wires in the wall.
Important: in addition, the device is equipped with systems for self-cleaning valves, temporarily disabling control alarms and auto-awakening from sleep mode.
Neptune system

Ideal leakage protection for an apartment. The device can be mounted on either metal pipes, and on pipes made of plastic or polypropylene. The protection can simultaneously service up to 8 ball valves (valves) with 20 sensors connected to the system. In this case, the response time of the system in the event of a water leak is no more than 2 seconds. In addition, the system is mounted using a canopy method, which simplifies its installation.
Protection "Hydrolock"

This system is capable of working in temperature conditions from -20 to +60 degrees Celsius. In this case, the maximum water temperature to which the sensors react is +60 degrees. Defense has two alternative sources power supply - batteries and an accumulator that consumes only 1.5 V when the taps are turned on. Shut-off valves (taps) in the Hydrolock system are equipped with a self-turning function, which allows them to be cleared of limescale.
System "Rainbow"

This system has more modest operating dimensions, but at the same time does an excellent job of receiving signals from sensors. The system’s response speed is up to 10 seconds, which are allotted to filter out false signals when wet cleaning etc. The controller can simultaneously contact 9 sensors located in all water supply areas. At the same time, on open area the maximum location of the control signaling device from the controller can be 100 meters, and provided that the sensors are installed in the apartment panel house- 20 meters. The weight of the entire system with all components is about 500 g.
Important: even if you are confident in your plumbing abilities, still trust the professionals when it comes to electrical work. In this case, you will be provided with a guarantee from the installer company for the operation of the controller and alarms.


