With a minimum amount of material and time spent, you can make a memorable gift or retro-style decoration for your interior with your own hands. The tree will give the photo a special inner glow, and you will also get beautiful matte shades in the transferred frame. This is a step-by-step illustrated master class on creating real works of art with your own hands.
You learn:
- Select color images to transfer to wood;
- Work with gel medium (gel medium transfer - transfer gel, gel for transferring images; freely sold on the RuNet);
- Transfer any image to the surface;
- Competently complete the work of transferring the image to the surface.
1. Select suitable source materials.
The wooden base can be of any shape, but its surface must be perfectly smooth so that the image lies flat and without breaks in every sense. It is also preferable to use light wood, since it is this that gives that “inner glow”. A particularly light base is important for portraits so that the skin tone does not change for the worse.
As for the photograph, it must be printed on a laser printer and from the very beginning in a size equal to the size of the wooden base for transfer. Therefore, after printing, it is good to trim off the excess white paper from the frame to make it easier to work with later. The picture should normally be high-contrast (you can process the image in a graphics editor on your PC if this is not the case). But pictures that are slightly out of focus and with very soft shades of color give an excellent retro effect on wood. See examples of suitable shots below - from bottom to top and from right to left: a contrast shot, but out of focus; the photo is out of focus and has soft tones; contrast shot in perfect focus. Wood will enhance color rendering in any case.

Any transfer medium gel can be used, but the best image is produced by a gel with a matte effect (marked “matt” on the package) and the most dense/thick consistency (marked “heavy” on the package).
Also to you will come in handy:
- unnecessary plastic roller,
- (or) a wide wooden stick (purchased at a pharmacy),
- a pair of medium-sized flat brushes for applying the composition (glue brushes),
- soft sponge or dish sponge (new),
- water in a small bowl or low glass,
- paper towels/napkins/handkerchiefs/toilet paper or thin ones kitchen towels,
- a small amount of oil (any liquid from the kitchen).
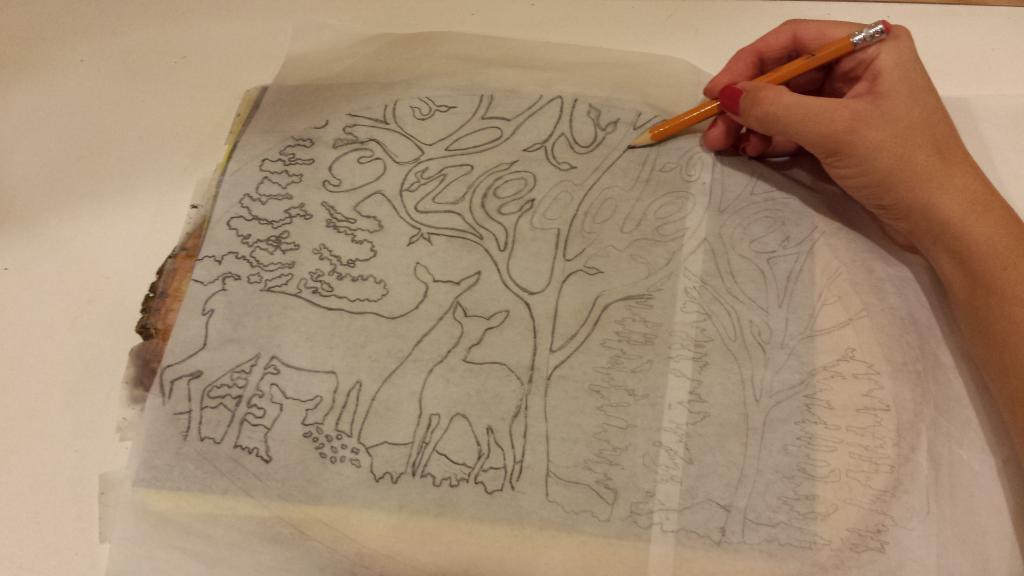
2. Right before you begin, wipe your wood base several times with a clean, dry towel to remove any crumbs or dust.
3. Apply a good layer of transfer gel to the surface of the wood: definitely not thin (a lot of wood shouldn’t be visible through the gel), but not very thick (the gel layer shouldn’t look like impenetrable icing on a cake either). Just squeeze the gel out of the tube or transfer it with a spoon from the container onto the tree, and then distribute it more or less even layer with a brush (or a wooden stick, or a plastic card - whichever is more convenient for you). Don't forget to make sure that the layer on the edges of the wooden base is no thinner than in the middle.

4. While the gel is still wet, place the print side down on the gel. The photo can be cropped to a size slightly smaller (or much smaller) than the wooden base, then you will end up with a thin or wide wooden frame around the image. Using your fingers carefully (so as not to move the photograph even a millimeter, hold it with one hand and gently smooth it in all directions with the other), smooth out the superimposed photograph, slightly pressing it to the surface and removing air between the photograph and the gel on the wood. It is important not to press so hard that the gel begins to squeeze out on the sides!

5. Smooth it with your fingers, take a plastic card (it’s more convenient to use than a stick, since the first edge gives more uniform pressure) and, again holding the photo with one hand, continue to smooth the white surface of the photo with the second edge of the card.

6. After this, set your workpiece aside until the gel dries COMPLETELY overnight. Resist the temptation to hold up the photo and see what happens: you will probably ruin the work. If you work in the summer, you can also put the workpiece in the sun for a couple of hours (but not on the radiator!!) and then check the degree of drying, and this may(!) be enough.
7. After the gel has COMPLETELY dried, take a sponge, dampen its edge a little in water (do not saturate it with water, just wet it) and start applying water directly to the back white surface of the photo on the tree. Do this carefully in several passes (wetting the sponge several times), first blotting the image with a sponge, and then, when there is already a lot of water on the paper, continuing to move in gentle circular movements. That is why - so that the material does not immediately begin to wear off with water pellets - it is necessary to print the photograph initially on special paper for photographs, and not on regular office paper. Make sure you are working with the soft part of the sponge and not the hard scrubbing layer. During this process, when squeezing the sponge into the glass, a whitish liquid will flow, and this is normal. The paper should be completely wet from the center to the edges without gaps.

8. Next, still continuing to wet the sponge from time to time, begin to roll away the wet paper from the image. Make sure to not only work in one central area, but equally around the edges so that the paper doesn't rub off in one area because you may start to remove your transferred image. Don’t be especially afraid of this, rub with light pressure, and the paper will come off quickly, the main thing is not to rub one place with force, as if you were scrubbing a stain; in particular, do not rub those places where the paper is no longer there.


The paper should come off completely this way. If some areas do not want to be rubbed off, use your own moistened fingers, as they are smoother and you can feel the pressure and progress better with them.

Run the sponge over the picture without pressing to remove all the pellets down to the smallest ones, and then without pressing with wet fingers over the same surface to make sure by the texture that there is no more paper left, not even a thin layer.
Wipe the image with a clean, thin towel to remove paper “dust” and any remaining moisture.
At the end of this stage, wet your fingers again and walk again several times, but almost without any pressure, over the image, since the paper hairs probably still remain: while the paper is wet, it is not visible, but when it dries, it will become very noticeable if it remains in the image.
9. Dry the picture on the wood again with a thin towel. Set aside the tree with the image until it is completely dry from moisture.
10. As you can see in the picture below, even if you rubbed very carefully, after drying, some of the paper fibers will still “show up” in the image. You can use water again and then dry the picture again. But here's another one, more efficient technique completion of work.
With one finger, literally take a couple of drops of oil and carefully apply it to the picture in a circular motion. And as you work, you will see how these fibers simply disappear. Once you have achieved the desired result, take a thin towel (paper or fabric) and start wiping the oil from the picture with the tip.


11. If during operation a small amount of gel goes beyond the edges of the image onto wooden base, just carefully remove the frozen lumps of gel with your fingers.
12. By by and large, the work is done. But now you can decorate the frame, for example, using a special ornamental adhesive tape with a pattern - washi-tape (freely sold on the RuNet). Here the frame is presented in the form of an abstraction, repeating and shading the colors of the image. It is also convenient for sealing the side edges of a wooden base. You can also use acrylic paint instead of ribbons. It is also worth painting the back side of the tree with one color.


In the variety of materials used for finishing, wood occupies a special place. This material is notable for its unique texture, environmental friendliness and natural origin. The wood itself, especially when varnished or otherwise decorated, is quite beautiful. However, at the same time, it often becomes the basis for placing certain images. Moreover, the latter can be transferred independently. And there are several ways to do this.
Unlike paper and canvas, painting on wood is something new and interesting in our design. Therefore, such paintings will attract attention, and those people who want to create an interior that can surprise can consider this particular option.
In addition, you can decorate the wood that is used directly in the decoration, making the interior that is familiar to many look completely new. In addition, this way you can decorate a variety of wooden crafts, starting from boxes and ending with furniture.
Finally, transferring an image onto a wooden surface can be a hobby for children and adults, and for some, a way to earn money. After all, things self made are actively being acquired today.
What needs to be done with the drawing and wood before transferring
- Transferring an image onto a wood surface, like any other, is in some cases impossible without the mirroring effect. In the case of an image, this is not so important, but it is better to initially make letters and numbers mirrored, so that after transfer they will take on correct view;
- Any drawing is best transferred to high resolution. During the work process, blurriness may appear, and if the image resolution was initially low, this can greatly deteriorate the quality of the final result;
- The quality of the transfer directly depends on how clean and smooth the surface is. Any contamination is unacceptable, as are unevenness. In the latter case, you can use sandpaper;
- The color of the wood can also play a role in transfer. It is best to use options that are as light as possible.
Transfer with sublimation paper
A special type of paper that, when heated, can adhere to a surface, such as wood. Anything can be printed on such paper, and the process of transferring an image with its help is as simple as possible.
Ironing paper
It is often used when it is necessary to transfer images to wood for subsequent tracing with a special soldering iron and thus creating a picture. Some people draw by hand, while others prefer this method. However, the method is also suitable for creating final products, and due to its cheapness and simplicity, it is very accessible and popular.
To transfer, you need to print the desired image on a sheet of paper. The sheet itself is laid on a perfectly cleaned and smooth wood surface. This wets the paper small quantity acetone, which will make the process of transferring pigment from it to wood when heated better.
Important! When working with acetone, all precautions should be taken. Remember that the material has a strong odor and evaporates rapidly. It is best to work in a ventilated area, and you should protect your respiratory system with a respirator or at least a mask. It is also important to have a fire extinguisher on hand to prevent static electricity.
By stretching the paper soaked in acetone until required sizes, we begin to iron it with a hot iron, and after a while the image will be transferred.

Transfer using decoupage film
Decoupage is becoming a very popular hobby, so many people know how to handle film from it. After printing the desired image on it, also prepare white acrylic paint.
It is necessary to perfectly clean the wood and also give it a smooth surface. Next, we apply pre-slightly diluted paint in two layers. Moreover, the application directions must be perpendicular to each other.
The paint must be allowed to dry. After this has happened, dampened decoupage paper (about 30 seconds soaking in water room temperature) are placed on the surface, removing the base and rubbing with a sponge to ensure a tight fit. After waiting for it to dry, you can treat the surface with varnish.
Transfer using PVA or gel medium
Regardless of the material chosen, the process is approximately the same. However, in the case of gel, the application occurs directly on the board, well, the glue is applied to the photograph. The photo itself can be a simple printout on plain paper. If this is important to the image, it is necessary to have a mirrored version of the photo, as later the picture will take on the correct appearance. The following is the procedure:
- The wood must be thoroughly cleaned and perfectly sanded to create a smooth surface. You can use 120 grit sandpaper;
- Processing photos with glue or wood gel. In the case of the latter, it is necessary to do everything as carefully as possible, without missing the slightest fragment;
- The sheet must be glued to a lubricated surface, and then passed over it with a roller for a better fit, absence of folds and air bubbles. This stage is extremely important, since it determines how well the drawing will be translated;
- Leave the product overnight, then, as soon as the gel is completely dry, wet the sheet and remove it with a dishwashing sponge. The image is translated quite reliably, and it is not so easy to erase it. However, it is still better not to try too hard. However, in the case of PVA glue, it will be more difficult to erase the paper layer;
- After all the paper has been removed, make sure that there are no traces of it left on the surface, as they may interfere with the next step - varnishing. You can use waterproof or clear acrylic varnish.

Elements in the interior made of wood make it more elegant and attractive. This decor can be made with your own hands. The most simple option will become a wooden board with a pattern applied to the surface in accordance with a certain technique. To make a product correctly and beautifully, you need to know exactly how to transfer a design to wood in several ways.
How to decorate a tree with drawings
There are several techniques in which a design can be projected onto a wooden surface. In every situation, it’s worth knowing exactly how to transfer a drawing to wood:
- Burning using a special device. The drawing is clear and embossed. The contours are noticeably limited; you can create a shadow or shadow transition effect.
- Decoupage is the most popular and simple technique creating a drawing. As a result, the image can be colored or black and white, the drawing can be of any complexity.
- Wood carving requires a sketch that is projected onto the surface using several methods: using carbon paper, redrawing, relief copying using sharp tools.
You can partially combine several techniques in one work. This is possible provided that the person has artistic talent, which will help to abstractly imagine the result of the work.
Preparing the wooden surface
Before transferring a design to wood at home, it is worth preparing the surface correctly. Both the work process and the result depend on the quality of the wooden base. The service life is also directly determined by the quality of wood preparation.

Preparation wooden surface:
- Choose correct tree. It is best to work with pressed sheets of plywood, chipboard and other analogues, but natural material is also quite suitable.
- Decide on the parameters and shape of the wooden base. Immediately get rid of excess parts and sand the edges.
- The surface itself should be smooth and even. For this you should use grinding machine, A hard to reach places process with sandpaper or file.
- Only then is a sketch of the image itself prepared for transfer.
Thus, preparation consists of three simple steps that even a child can do.
woodworking
In order for the burning procedure to be carried out quickly and efficiently, it is necessary that the pattern on the surface of the wood be as accurate and high-quality as possible. Several methods are used to transfer an image to a surface. The most popular option remains transfer using a carbon copy.

How to transfer a design to wood for burning using carbon paper:
- You need to take a sheet of carbon paper. It is advisable to use paper that has been used more than once.
- Place the carbon paper with the ink side facing the wooden surface. Place a sheet with a pattern on top and secure the structure with tape or tape.
- Use a graphite pencil to trace the lines of the image. You need to work carefully, limiting the interaction of your hands with the paper as much as possible.
- After completing the tracing of the lines, remove the layers of paper. The drawing for burning is ready.
This method is very reliable, but requires special care in execution. During the translation process, carbon marks may remain, which are almost impossible to clean from the surface of the wood.
Drawing without carbon copy
In order to learn how to transfer a drawing to wood without a carbon copy, you can use several methods. Each one has a different set of tools and materials, but is simple in terms of implementation.

Image transfer methods:
- Graphite print. Take a simple pencil with a soft core and trace the contours of the drawing on paper. Turn the image onto the wooden base and quickly press without moving. In order for the graphite to be printed well, you can run it over the paper with a hard roller or a plastic strip.
- Thermal transfer. First you need to select an image taken on the right device. Using thermal action, a photocopy or printout made on a powder printer will be printed. Place the back side on the wooden base and heat the paper with an iron.
- Reprint using white spirit. The picture must be printed on a laser printer or copier. Attach the sheet with the pattern to the wood and wipe with white spirit. It is worth applying a little product to the cotton pad so that the paper does not become soggy.
There are other options, but the principle of implementation is much more complicated and requires more time and money.
Preparing wood for carving
To form an image on a board or plywood, you need to know just a few basic rules. If the work is done incorrectly, the carving process can become significantly more complicated.
How to transfer a design to wood for carving in order to comply with all the rules:
- Apply a grid onto the surface of transparent paper. The size of the cage will depend on the required size of the pattern.
- If you need to create an ornament, then apply part of the image onto tracing paper and fold the sheet in half. Trace the image onto the other half of the tracing paper with a pencil.
- Symmetrical design can be achieved by using carbon paper.
The method of transferring an ornament or image can be used from the options presented above. The main thing is to lay the sheet with the applied ornament so that the direction of the pattern coincides with the location of the fibers.
Decoupage technique - a simple option for transferring an image
Often not only production is required interesting jewelry for the interior with a picture on wood, and more practical application technology. Knowing how to transfer a drawing to wood, you can restore old furniture, do wooden element designer.
To realize such ideas, the decoupage technique is used. The principle of such work is simple and does not require special skills or availability unusual materials or tools.

How to transfer a design to wood using PVA glue using the simplest algorithm:
- The prepared surface must be coated with PVA glue. The layer should not be too thick. Strokes should be made smooth and uniform.
- Place the design on the surface of the wood and carefully straighten the paper sheet. It is necessary to expel the air and position the edges of the cellulose base.
- From above, coat the image again thin layer PVA. Wait until everything dries and duplicate the layer again.
Further processing is chosen in accordance with the preferences of the “creator”.
Additional finishing
After you have transferred the design to the wood and completed secondary surface treatment, it is worth considering your options further processing surfaces.
There are several options:
- Cover with varnish.
- Paint it.
- Prime.
- Leave the product untreated.
- Laminate.
Additional decoration includes making a stand, frame, or pendant for the finished product. Here you can show your imagination and skills.
In this tutorial I will show you 5 in various ways prints on wood. These are great methods that will allow you to make custom designs such as signs, plaques, gifts, or simply brand your creations.
Step 1: Gathering materials
Materials:
- pine board
- Liquitex gel medium
Step 2: Setup
I tested 4 methods for transferring a design from paper to wood and one method using a technique. On each board I used the same image, which had my logo with a large block of text, a picture and regular sized text, so for each type of application it would be clear how well the wood reacted with different options application.
All pictures were printed on my laser printer (not inkjet). I also mirrored the image so that it would appear correctly on the tree.
Step 3: Method 1 - Acetone


The first method is to use acetone to transfer the toner to the wood. All you need is acetone, a paper towel, nitrile gloves to protect your hands, or you can use an old plastic card. When working with acetone, be careful and read the safety instructions.
I placed the mirrored image on the plywood and wrapped it to secure it in place. Then I dipped a napkin in acetone and placed it on the picture, pressing it firmly on top.
After several repetitions, the toner transferred to the wood and the paper came away from the wood.
Pros: very fast, decent image quality, clean process
Cons: Image quality is average, acetone is a strong chemical
Step 4: Method 2 - Ironing


The next method is to use a regular iron. All you need to do is iron the paper. As in the last step, I wrapped the paper around the piece of wood and then ironed it, being careful not to move the sheet against the wood. I tried to press hard on the iron, and the iron itself was set to high temperature, but it seems to me that the temperature was not high enough.
The picture came out so-so, and I think it was because the iron didn't heat the paper up enough. I've heard that using wax paper can improve the situation, and some craftsmen also transfer images using a soldering iron with a special tip for branding.
Pros: the cheapest method, done quite quickly
Cons: poor image quality, possibility of burning yourself, charring wood or paper
Step 5: Method 3 - Polyurethane Varnish


The third method is based on the use of polyurethane on water based. I used Polycrylic (this is just the name of the manufacturing company, so you can buy any equivalent). You need varnish, an acid brush, a stiff toothbrush and water.
I applied the polycrylic with a small brush, trying to create a thin film so it was wet but didn't puddle. I then pressed the paper directly onto the wet polycrylic and pressed the paper from the center to the edges, removing any air trapped under the paper, and then moved the wood to the side where it dried for about an hour.
After the piece was dry, I wet it with water and then peeled off as much paper as I could remove with my hands. Next, I took a toothbrush and gently rustled it across the surface until all the remaining paper was cleaned off.
The quality turned out to be excellent! Everything except a small defect on the letter “F” looked very good. I was truly surprised by this wood printing method.
Pros: Excellent image quality, safe water-based coating
Cons: paper removal is a rather messy method, takes an hour to dry
Step 6: Method 4 - Liquitex Gel Solvent


The fourth method was a gel solvent. I used Liquitex gloss, a foam brush, an old plastic card, a toothbrush and water.
The process is similar to the one in which varnish was used, the only difference is that we have a gel in our hands, not a liquid. It is better to work with gel with foam, because the brush leaves a lot of tubercles and stripes.
I pressed the picture into the gel and removed the air trapped under the paper, first with my fingers and then with a plastic card. I then left the piece to dry for 90 minutes and then scraped off the paper with a toothbrush.
This option also looked great, but there were a few pieces of paper left on the wood that couldn't be scraped off with a brush.
Pros: Excellent image quality, safe water-based gel
Cons: polycrylic is more difficult to remove, the surface becomes rough, takes a long time to dry
Step 7: Method 5 - CNC Laser


So, now let's try the technological method. I had access to a Full Spectrum Laser Hobby 20x12 and used it to print the same image. Setting up the device is very simple.
Image quality was good as expected. The only problem area was the photograph, which was difficult for the laser to copy. But the text and logo, completely black in the photo, look great.
Pros: excellent detail of text and logo, set it up and the machine will do everything for you
Cons: Expensive to buy, hard to find rentals, doesn't handle photos very well
Step 8: Apply the finishing coat and final opinion


I decided to apply finished works varnish coating to see how to change appearance products and this procedure slightly changed my opinion about each of the methods I tested.
The acetone darkened a lot after varnishing and I liked the final look much better, which is why I'm ranking this result higher than the gel sample.
The option with the iron... remained of poor quality.
The polycrylic darkened even more and looked even better. This is a definite favorite in my ranking.
The gel also darkened, but the surface of the wood was not leveled, and pieces of paper that I could not remove were noticeably sticking out. To achieve a result similar to polycrylic, I had to spend a lot more time.
The CNC laser version did not darken much, but became a little more like scorched wood, the detailing was still excellent.


