Drawing a sketch
How to make a plane from foam plastic?
To answer this question, you must first look at the analogues of flying machines. Main feature designers - observation. Therefore, before you start making an airplane, you need to find out what it consists of. If parents help small child(up to 7 years) in modeling, then you can get by with primitive shapes such as the fuselage, wings and tail. If a child is over 7 years old, then he can study well, and most importantly, understand the design of a flying machine. Any aircraft consists of:
- fuselage;
- cockpit canopy;
- power plant;
- wing;
- chassis;
- stabilizer;
- elevator;
- keel;
- rudder.
The next step is drawing drawings. They are presented in large numbers on the Internet, one example can be seen below. 
What tools are needed?

Video on the topic
Preparatory work
We make an airplane

Working out the details
To finally close the question of how to make an airplane out of foam plastic, we need to discuss the details. As with any layout, details play an important role. And it doesn’t even matter how far the plane departs from reality. Even a fictional model needs elaboration. The first step is to draw the pilots' windows and passenger windows. If you made a three-dimensional model, you can cut out windows to increase realism.
Foam plane - SU-37
Next we move on to drawing the doors. The main thing is to make them proportional to the model. A harmonious size can be derived by focusing on the width finished windows. Next you need to think about the chassis. Many may say that “my plane is taking off, and therefore he removed them.” But even if this is so, the model still needs a hole where the landing gear is hidden during flight. Not a single plane will take off without turbines. Even in a flat model you need to mark them. This can be done by gluing small circles of polystyrene foam together. Well, the most enjoyable part of creating a foam model is painting the airplane. Here you can show your imagination, or you can follow the clear canons of real flight structures. No one will judge a child if he wants to make his airplane “flowered” or “polka dotted.” Well, realistic models do not require a large abundance of colors. It is better to leave the plane white, drawing a couple of colored lines on the fuselage.
Home comfort
Hobby
Home comfort
Loving parents never refuse to make a toy with their own offspring. Even if there is enough money for regular trips to the toy store, the same plane from plastic bottle with your own hands...
Home comfort
Food and drink
Hobby
Hobby
Hobby
Hobby
Hobby
Foam throwing models
The first airplane model.
If you want to start doing something big and serious, but have no modeling skills, then try making throwing airplanes. They are very easy to make and are a gateway to creativity. Based on such models, skills in manufacturing, launching, and the most simple settings models, there is a desire to come up with something yourself...

I called this scheme “Buran” due to its slight resemblance to the Soviet spacecraft.
Before starting work, you need to prepare a sharp knife, preferably a stationery knife with replaceable thin blades, a foam ceiling panel about 4 mm thick without patterns or embossing, so that it is even and smooth. Glue well with PVA, "Dragon", "Titan" or other adhesives for ceilings foam panels. Do not use glue containing organic solvents!!! These are all nitro adhesives, Moment, Supercement, etc. They immediately dissolve the foam.
The fuselage is made from 4 x 6 mm pine slats.
foam planes blueprints
Weight 4 x 15 x 70mm. The load is made so wide that the center of gravity (hereinafter referred to as the CG) of the model is below the wing, and the model does not turn over with its keel in flight.
Cut the wing and upper part of the fuselage of the model according to the template from the ceiling panels. The template can be made from cardboard according to the drawings.


The drawing shows a size of 4 mm in the “Wing Gluing Place”, this is for a 4 mm panel, if your panel has a different thickness, then this cutout should correspond to the thickness of your panel, this is so that when gluing the upper part of the fuselage and the wing there is no “step”, then the lower part (wooden) will fit well and stick well.
We cut everything out, checked the quality and can glue the parts together.
First we glue the rack and weight, then the top of the fuselage and the wing, then the rack and weight to the wing from below so that the noses are aligned and there are no protrusions of foam and wood between them.
It is advisable to glue it like this: lubricate the weight with glue approximately 1 mm thick, press it to the rail, (see drawing) disconnect it and let it dry for 3-5 minutes, then connect it again and compress it, keep it compressed for about a minute. Ready. Lubricate the upper part of the fuselage with glue in the “Wing Gluing Place”, carefully press it along midline wings, disconnect, let dry, then reattach and hold for a little while, about a minute, pressing. In about 10 minutes
In this way, glue the lower part of the fuselage to the wing with the upper part of the fuselage glued.
An hour later, after complete drying, you can paint and begin adjustments.
You can color with felt-tip pens and colored tape, or acrylic water-soluble paints. Nitrovarnishes (nail polish) cannot be used!!! The foam will dissolve immediately!
You can test the paint on scraps of foam.
Alignment check.
Centering can be ensured by trimming the weight or “tail”. To determine what to trim, you need to make a mark on the side of the rail with a pencil - the C.T. point. should be 130 mm from the nose. Place a matchbox on the table, a hexagonal pencil on it and place the plane perpendicularly on the pencil so that the CG mark is on the top edge. If the nose outweighs it, we cut the weight; if the back part outweighs it, we cut the tail. We achieve balance.

Other adjustments during flights.
When thrown horizontally, the model should fly smoothly with a slight decline; if all the planes are level, and the model dives (lowers the nose), trim the load a little more, it is too heavy, and if it pitches up (raises the nose, loses speed, then lowers the nose), then trim the rear rail (can be shortened, can be made thinner).
With normal alignment, the plane flies well. On the street it is convenient to launch from a catapult (rubber loop, buy at a fishing store) at an angle of 30-40 degrees to the horizon. Do not launch towards trees or obstacles, otherwise there will be creases on the wing.


In general, the model is tenacious due to the low weight and elasticity of the foam. By slightly deflecting the elevons, figure flight can be achieved. They need to be deflected with a little “pinching”, then the foam bends well without breaking.
If the right elevon is tilted up and the left elevon is tilted down, the plane will fly turning to the right. If the right one is down and the left one is up, then there will be a left turn. If both are up, then the model will pitch up (raise the nose), and if both are down, then dive. They are called elevons because they deflect like elevators and like ailerons to provide roll and pitch control. They are mainly used on airplanes - flying wing designs. Like our model.
This is a variant of the Buran with two keels. You can trim the main fuselage template by removing the keel part. And glue two fins, the same size as on the main fuselage template.

************ *********** ***********
Here is another very good and “flying” model with two keels

The technology of manufacturing, adjustment and launch is exactly the same as that of Buran, only the drawings (click and download) are different:


After acquiring minimal skills, try experimenting. This is interesting! Good luck!!!
Anything that is unclear can be discussed in letters or on the forum http://forum.rcpilot.ru/
These Buran drawings can be downloaded and printed, then templates can be made.
Return to main page Schematic
How to make a plane from foam plastic: modeling with children
Often children, engaged in creative modeling, ask their parents how to make a plane out of foam plastic. In order not to get confused in such a situation and not to lose authority in the eyes of your child, you need to read this article and remember the simple sequence of actions.
Drawing a sketch
How to make a plane from foam plastic? To answer this question, you must first look at the analogues of flying machines. The main feature of designers is observation. Therefore, before you start making an airplane, you need to find out what it consists of. If parents help a small child (under 7 years old) in modeling, then you can get by with primitive shapes such as the fuselage, wings and tail. If a child is over 7 years old, then he can study well, and most importantly, understand the design of a flying machine. Any aircraft consists of:
- fuselage;
- cockpit canopy;
- power plant;
- outer and inner flaps;
- wing;
- chassis;
- stabilizer;
- elevator;
- keel;
- rudder.
It is not necessary to show all these details in the future model, but even a novice designer needs to know them.
The next step is drawing drawings.
They are presented in large numbers on the Internet, one example can be seen below. But, of course, you can show your imagination and draw your own unique plane.
What tools are needed?
Lumpy foam or foam ceiling tiles. The tile is more convenient in the sense that it is easier to cut, and its width will be the same throughout the entire part. The undoubted advantage of piece foam is the fact that you don’t need to buy it. Almost every person has it in their home and is great for children's crafts.
Stationery knife or scissors. If a child independently looks for the answer to the question of how to make a plane out of foam plastic, then it is better to give him scissors. If the creative process will be controlled by parents, then it is better to use a stationery knife.
Glue. You can take regular PVA, it is suitable for gluing foam. But if you want to assemble a model airplane quickly, then it is better to use Moment glue or its equivalent.
Paper or cardboard for patterns.
Additional details. Their number and name will depend on the type of aircraft you want to assemble. This may include paper clips, skewers and rubber bands - this is necessary for a model airplane with a rubber band motor. You may also need a radio-controlled motor (for example, from an old radio-controlled car). If you are wondering how to make an airplane out of foam and wood, then you will need sheets of plywood, which will later become wooden parts.
Video on the topic
Preparatory work
How to make a foam plane that flies or carries only decorative function? For both options, you need to do some preparatory work. It involves redrawing drawings onto thick cardboard. This step is necessary to ensure that all patterns are preserved until the end of the work and even longer. If any part of the plane breaks, it will be easy to make it again if you have a pattern. The next step is making foam parts. You need to transfer the paper patterns onto the material and cut them out.
We make an airplane
How to make a plane out of foam plastic with your own hands? After making all the parts you need to assemble them into in the right order. First of all, the wings are attached to the fuselage. They need to be glued clearly in the middle, otherwise the model will not have the correct balance. The next step is gluing the “tail”. The rudder, elevator and fin all need to be exactly in place, again for the model to have excellent balance.
Working out the details
To finally close the question of how to make an airplane out of foam plastic, we need to discuss the details. As with any layout, details play an important role. And it doesn’t even matter how far the plane departs from reality. Even a fictional model needs elaboration. The first step is to draw the pilots' windows and passenger windows. If you made a three-dimensional model, you can cut out windows to increase realism. Next we move on to drawing the doors. The main thing is to make them proportional to the model. A harmonious size can be derived based on the width of the finished windows. Next you need to think about the chassis. Many may say that “my plane is taking off, and therefore he removed them.” But even if this is so, the model still needs a hole where the landing gear is hidden during flight. Not a single plane will take off without turbines. Even in a flat model you need to mark them. This can be done by gluing small circles of polystyrene foam together. Well, the most enjoyable part of creating a foam model is painting the airplane. Here you can show your imagination, or you can follow the clear canons of real flight structures. No one will judge a child if he wants to make his airplane “flowered” or “polka dotted.” Well, realistic models do not require a large abundance of colors. It is better to leave the plane white, drawing a couple of colored lines on the fuselage.
Home comfort
How to make glowing water at home? Experimenting with children
Not long ago, glowing water became a very popular pastime. You can also get it at home. But this procedure leaves behind quite a large amount of dirty dishes. Therefore, please note that…
Hobby
How to make paper weapons with your children
Every year the popularity of gifts made from paper is growing. And now the holiday is approaching - Defender of the Fatherland Day. And it’s time for mothers and their children to make figurines of a pistol, machine gun, shuriken, tan...
Home comfort
How to make an airplane from a plastic bottle with your own hands
Loving parents never refuse to make a toy with their own offspring.
Foam throwing gliders - Part 1 (Paper Art 12) made of paper
Even if the money is enough for regular trips to the toy store, the same plane made from a plastic bottle with your own hands...
Home comfort
How to make a gun from Lego? Let's figure it out together
Do you want to please your child? We are, of course, talking about boys. Because it is for them that we offer to buy a Lego Pisto constructor that is both fascinating and makes you think and show your imagination...
Food and drink
How to make cream from butter and condensed milk with cocoa powder
Before making cream from butter and condensed milk, you should definitely prepare a sweet and fluffy sponge cake. After all, it is precisely these cakes that are the basis of the most delicious and beautiful cakes. In addition, to prepare dessert…
Hobby
DIY aircraft modeling: how to make an airplane out of wood
Every boy in childhood dreamed of being at the controls of an airplane. The sky, clouds, and travel have always attracted adventurers and brave men. But to feel closer to aviation, you don’t have to buy a plane ticket...
Hobby
How to make letters from foam plastic with your own hands
Decorative words, letters and even entire phrases are an incredibly popular decor for interiors and photo shoots. This decoration can be made for some special holiday or to take original photographs...
Hobby
How to make crafts from foam plastic with your own hands
The interior is one of the most complex images, the creation of which takes a lot of effort, time and money. Some people prefer to use the services of specialists, while others consider themselves specialists and do it themselves. IN …
Hobby
Let's make a tank out of matchboxes with the kids!
Parents have long noticed the fact that children play better with homemade toys. You can play with them both at home and in the sandbox outside and not be afraid that your child will lose or give these toys away. So, let's consider...
Hobby
How to make ice cream from plasticine? Creating with children
Before you start sculpting from expensive materials, you should practice on plasticine. If you want to engage in creativity with your child, then it is better to buy plasticine for children's creativity. Firstly, it is inexpensive, and...
Proposed simple designs gliders were developed in the experimental design circle of the SUT of Kostroma. All of them are made mainly of foam plastic, but differ from each other in dimensions, proportions, weight, wing manufacturing technology, and flight characteristics. Models are recommended for making by young modellers at home, in club classes and technology lessons.
A small, lightweight glider with a wingspan of 200 mm and a weight of 4 g (Fig. 1) belongs to the category of the simplest entertainment models and can be made in a few hours. It is launched in the gym by hand or in calm weather on sports ground using a catapult. The model with a wingspan of 230 mm and a mass of 7 g (Fig. 2) is somewhat heavier and stronger, and its flight duration is longer (about 15 seconds). The glider is designed to be launched by hand and using a catapult (even in light winds) on a football or other field.
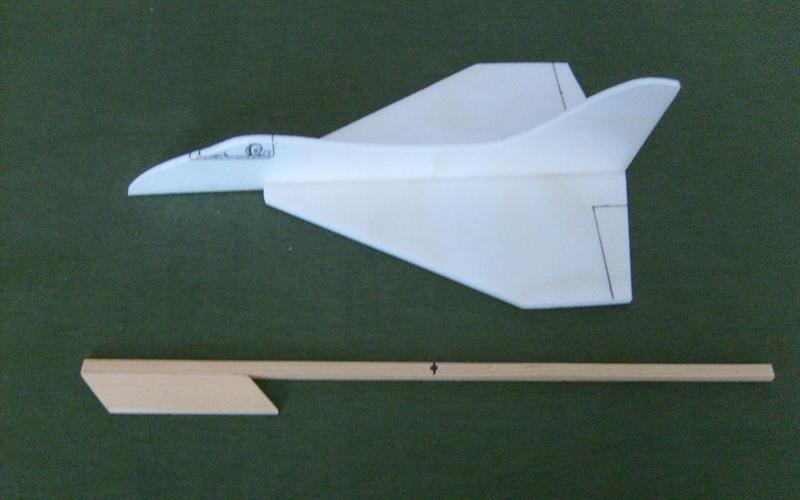
A more complex model (Fig. 3) with a wingspan of 400 mm and a mass of 26 g is a throwing glider. Both beginners and experienced modelers are passionate about building throwing gliders. Competitions are held for this class of models. The main task is to achieve maximum flight duration. Gaining height is ensured only by hand throwing. When designing such a glider, one has to solve a whole range of problems. It is necessary to achieve the optimal ratio of the mass of the model, the shape and area of the load-bearing surfaces so that the glider can be thrown onto maximum height. After takeoff, the model should clearly enter the stable long-term gliding mode. For this purpose, in the proposed design the fuselage nose is made quite short, and the tail boom is made long, but light and strong. With such an aerodynamic design, the almost weightless and compact tail unit is located outside the zone of turbulence from the wing and works efficiently. Even in the absence of upward flows, students in grades 5 and 6, with a correctly executed throw, managed to achieve a microfloat flight duration of up to 30 seconds. To run such a model, a field of at least 200x200 meters in size is required, preferably outside the city.
Preparatory work consists of making life-size drawings of parts, making templates for the wing, stabilizer, fin and fuselage nose, and selecting materials. You will need foam plastic ceiling tiles 3.5 mm thick with dimensions 500×500 mm (sold in hardware stores and finishing materials), dense types of foam plastic, wood (spruce, pine, linden), PVA glue and paints.
1 - centering weight (lead); 2 - nose of the fuselage; 3 - fuselage (pine); 4 - wing; 5 - stabilizer; 6 - keel; material of parts 2, 4, 5, 6 - foam plastic

1 - centering weight (lead); 2 - nose of the fuselage; 3 - fuselage (pine); 4 - keel; 5 - wing; 6 - spar (match); 7 - stabilizer

1 - centering weight (lead); 2 - nose of the fuselage; 3 - fuselage (pine); 4 - keel; 5 - wing; 6 - reinforcement for the finger (plywood s1.5); 7 - spar (pine); 8 - stabilizer
It is recommended to start creating models with the manufacture of the wing, fin and stabilizer. After marking the contour according to the templates, these parts can be cut out with a scalpel. Then you should start profiling them. In order to simplify the design, the wing has a flat-convex profile along its entire span. It is better to remove a significant part of the material from the line of maximum thickness with a sharp knife. The surface finishing is carried out using sandpaper of various grains, glued to plywood plates measuring approximately 50x200 mm, with constant monitoring using templates. To give the wing of the model (Fig. 1.2) a small transverse V-shape, before gluing it into the slot of the fuselage along the axis of symmetry, an incision must be made on the upper surface. In the second of the proposed designs, the central part of the wing is reinforced with a short matchstick spar. In the model of a throwing glider (Fig. 3), a slot should be made on the lower surface of the wing and a spar should be glued into it. Further from the wing, where the spar ends, you need to saw off the “ears” and re-glue them at the required angle. Pre-joint surfaces are beveled with sandpaper so that the gaps are minimal.
As is known from the practice of launching throwing gliders, a good throw is obtained when the fuselage is grasped with the thumb and middle finger, and the last bend of the index finger rests on the rear edge of the root part of the right console. Therefore, it is advisable to reinforce its lower surface with a 1.5 mm plywood or cardboard pad for the index finger. The leading edge of the wing can be covered with thin colored paper on liquid PVA. The keel and stabilizer of the models have a “flat board” profile with rounded edges. The notch should highlight the “rudder” and “elevator”.
The nose of the fuselage of the models is made of dense foam, and the fuselage rail is made of light wood. A slot was made in the bow exactly along the wing profile and a cavity was drilled for a lead weight. The exact location of the groove on the lower surface of the fuselage for engaging the rubber cord of the catapult is selected experimentally.
The parts are connected using PVA glue. The wing is carefully inserted into the fuselage slot and fixed with glue. The area where the wing and fuselage meet should be reinforced with strips of drawing paper. Next, the keel and stabilizer are glued.
The finishing of the models includes painting the fuselage slats and paper-covered sections of the wing with nitro enamel.
Debugging of airframes begins with the elimination of distortions, and then proceeds to balancing. The center of gravity of models launched using a catapult (Fig. 1,2) should be at a distance equal to approximately 33% of the wing width, measured from the junction of its leading edge with the fuselage. The throwing glider has a centering of approximately 45°. Adjustment is carried out by increasing the mass of the centering weight or reducing it by drilling it.
During test runs of models, due to minimal deflection of the elevators and rudder, a smooth transition is achieved after gaining altitude to hovering in a left turn. Recommendations for launching and debugging simplest and throwing gliders were previously given in the magazine.
A. TIKHONOV, Kostroma
A small, lightweight glider with a wingspan of 200 mm and a weight of 4 g (Fig. 1) belongs to the category of the simplest entertainment models and can be made in a few hours. It is launched in a gym by hand or in calm weather on a sports ground using a catapult. The model with a wingspan of 230 mm and a mass of 7 g (Fig. 2) is somewhat heavier and stronger, and its flight duration is longer (about 15 seconds).
The glider is designed to be launched by hand and using a catapult (even in light winds) on a football or other field. A more complex model (Fig. 3) with a wingspan of 400 mm and a mass of 26 g is a throwing glider. Both beginners and experienced modelers are passionate about building throwing gliders. Competitions are held for this class of models. The main task is to achieve maximum flight duration. Gaining height is ensured only by hand throwing.
When designing such a glider, one has to solve a whole range of problems. It is necessary to achieve the optimal ratio of the mass of the model, the shape and area of the load-bearing surfaces so that the glider can be thrown to the maximum height. After takeoff, the model should clearly enter the stable long-term gliding mode. For this purpose, in the proposed design the fuselage nose is made quite short, and the tail boom is made long, but light and strong. With such an aerodynamic design, the almost weightless and compact tail unit is located outside the zone of turbulence from the wing and works efficiently.
Even in the absence of upward flows, students in grades 5 and 6, with a correctly executed throw, managed to achieve a microfloat flight duration of up to 30 seconds. To run such a model, a field of at least 200x200 meters in size is required, preferably outside the city. The preparatory work consists of making life-size drawings of parts, making templates for the wing, stabilizer, fin and nose of the fuselage, and selecting materials. You will need foam ceiling tiles 3.5 mm thick with dimensions 500x500 mm (sold in building and finishing materials stores), dense types of foam, wood (spruce, pine, linden), PVA glue and paints.
It is recommended to start creating models with the manufacture of the wing, fin and stabilizer. After marking the contour according to the templates, these parts can be cut out with a scalpel. Then you should start profiling them. In order to simplify the design, the wing has a flat-convex profile along its entire span. It is better to remove a significant part of the material from the line of maximum thickness with a sharp knife.
The finishing of the surface is carried out using sandpaper of various grains, glued to plywood plates measuring approximately 50x200 mm, with constant monitoring using templates. To give the wing of the model (Fig. 1.2) a small transverse V-shape, before gluing it into the slot of the fuselage along the axis of symmetry, an incision must be made on the upper surface. In the second of the proposed designs, the central part of the wing is reinforced with a short matchstick spar.
In the model of a throwing glider (Fig. 3), a slot should be made on the lower surface of the wing and a spar should be glued into it. Further from the wing, where the spar ends, you need to saw off the “ears” and re-glue them at the required angle. Pre-joint surfaces are beveled with sandpaper so that the gaps are minimal. As is known from the practice of launching throwing gliders, a good throw is obtained when the fuselage is grasped with the thumb and middle finger, and the last bend of the index finger rests on the rear edge of the root part of the right console.
Therefore, it is advisable to reinforce its lower surface with a 1.5 mm plywood or cardboard pad for the index finger. The leading edge of the wing can be pasted over with thin colored paper on liquid PVA. The keel and stabilizer of the models have a “flat board” profile with rounded edges. The notch should highlight the “rudder” and “elevator”. The nose of the fuselage of the models is made of dense foam, and the fuselage rail is made of light wood.
A slot was made in the bow exactly along the wing profile and a cavity was drilled for a lead weight. The exact location of the groove on the lower surface of the fuselage for engaging the rubber cord of the catapult is selected experimentally. The parts are connected using PVA glue. The wing is carefully inserted into the fuselage slot and fixed with glue. The area where the wing and fuselage meet should be reinforced with strips of drawing paper.
Next, the keel and stabilizer are glued. The finishing of the models includes painting the fuselage slats and paper-covered sections of the wing with nitro enamel. Debugging of airframes begins with the elimination of distortions, and then proceeds to balancing. The center of gravity of models launched using a catapult (Fig. 1,2) should be at a distance equal to approximately 33% of the wing width, measured from the junction of its leading edge with the fuselage. The throwing glider has a centering of approximately 45°.
Adjustment is carried out by increasing the mass of the centering weight or reducing it by drilling it. During test runs of models, due to minimal deflection of the elevators and rudder, a smooth transition is achieved after gaining altitude to hovering in a left turn. Recommendations for launching and debugging simplest and throwing gliders were previously given in the magazine.
Rice. 1. The simplest entertaining model of a light glider: 1 - centering weight (lead); 2 - nose of the fuselage; 3 - fuselage (pine); 4 - wing; 5 - stabilizer; 6 - keel; material of parts 2, 4, 5, 6 - foam plastic

Rice. 2. Model of a glider for hand launch and using a catapult: 1 - centering weight (lead); 2 - nose of the fuselage; 3 - fuselage (pine); 4 - keel; 5 - wing; 6 - spar (match); 7 - stabilizer Fig. 3. Model of a throwing glider: 1 - centering weight (lead); 2 - nose of the fuselage; 3 - fuselage (pine); 4 - keel; 5 - wing; 6 - reinforcement for the finger (plywood s1.5); 7 - spar (pine); 8 - stabilizer
Recently, small models of gliders made from EPP have begun to appear in toy stores, in other words, from ceiling tiles. Of course, such a toy flies beautifully, can withstand many flights and can be used anywhere, but the prices are steep - $9 apiece. But you can also make a homemade model by spending no more than 30 rubles on an airplane! So, let's start sculpting our toy.
Materials:
*ceiling tiles without relief pattern
*PVA glue
*pine slats 4x4 mm
*buttons
*clothes pegs
*pins or needles
*pens, markers, etc.
*stationery knife
*fine skin on a block
*plasticine

First you need to print and cut out the templates for the airplane.

It is advisable to glue the printout to cardboard. Then attach them to the tile, secure with buttons and draw the wing, stabilizer and keel.


Afterwards, we remove the templates and cut out the workpiece with a stationery knife (or a medical scalpel) with an allowance of 1-2 mm.

Be careful not to touch the workpiece lines.

Now you need to process the workpieces. We mark the boundary lines, take a block with sandpaper and give a profile to the wing and stabilizers using back and forth movements.


You need to process it confidently, smoothly, without jerking, otherwise you can ruin the part. Of course, you can give a profile with a heated iron, but this method does not always work.


If you have given details the required form, then you can start gluing. Never grab the Moment glue! Solvents will turn the plane into mush, so you need to use PVA glue. A rail 18-25 cm long is smeared with glue on one side and the other, and left for 5 minutes so that the glue is absorbed into the wood. The middle of the stabilizer and wing is marked and the bottom is coated with glue along the middle line. Next, we secure everything with clothespins, the keel is attached with pins to the wing also along the midline.
An airplane made from ceiling tiles will become a great gift for boys who are interested in aviation. And it will be even more enjoyable for your child if you make a glider with him. We will tell you in our article how to make a glider from ceiling tiles?
Preparing materials
Creating an airplane from ceiling tiles will become impossible without:
- ceiling tiles with no pictures on them;
- polystyrene foam up to 2 cm thick;
- PVA glue;
- stationery knife;
- drawings of the future aircraft;
- markers and pens;
- pins;
- plasticine;
- sandpaper on a block.
Some craftsmen use hot melt glue instead of PVA.
Drawing drawings

The first step in creating airplanes from ceiling tiles is to print out the templates:
- You need to print out the drawings of the future glider onto a blank sheet of paper.
- The finished printout is applied to the tile and secured with pins.
- Next, the details of the aircraft are drawn on the tile - the model aircraft body, wings, keel and air intakes.
It is advisable to stick printed drawings onto cardboard.

It is not necessary to print out the aircraft model drawings. You can paint the details directly onto the sheet of ceiling tiles.
Processing the template
After you have drawn the airplane model parts on the ceiling tiles, use stationery knife try to cut the blanks as carefully as possible.
It is best to cut out airplane parts with a gap of 1-2 mm from the workpiece lines.
For this:
- mark the boundary lines;
- Using sandpaper on a block, give a profile to all the parts of the future aircraft, performing back and forth movements.
You need to process smoothly and confidently. Otherwise, you risk damaging the parts of the future vessel. Instead of sandpaper, some use a heated iron. But it’s not always possible to create a profile this way.
Gluing stage
It is recommended to glue glider parts from ceiling tiles with PVA glue.

It is not recommended to use instant superglue for gluing, as the parts will turn into mush.
The first step is to glue the air intakes together. Each air intake consists of 3 separate parts. When the glue on the air intakes has dried, glue these parts to the body of the future aircraft.
Making the fuselage

Your glider model will be more “advanced” if you glue the fuselage to it. The fuselage is divided into front and rear sections. Each part in turn is divided into upper and lower. Drawings of the fuselage parts that are attached to the tail must be made in 2 copies.

Draw the fuselage details and then cut them out. Be sure to also sand these parts using sandpaper. After this, you can start gluing them. If you want, you can paint the fuselage camouflage or another color.


