Periodically replacing the faucet in the kitchen is a very common phenomenon that almost every resident of our vast country has to deal with. As a rule, the need for this procedure arises due to intensive use in conditions of high rigidity. tap water. The service life of cranes is also affected by the very mediocre quality of devices in the budget price segment.
In any case, if the faucet in the kitchen fails, our compatriots have two options: contact a qualified plumber or replace it yourself. This publication will describe in detail how to change the faucet in the kitchen with your own hands without the involvement of expensive specialists.
Types of Kitchen Faucets
 Before starting to replace the faucet in the kitchen, the owner must decide on the choice of the device to be installed, because models can differ significantly in:
- design;
- operating principle;
- installation method;
- manufacturing material.
When choosing the “appearance” of the device, the owner must be guided by his own preferences. It will be very nice if the appearance of the mixer is in harmony with the interior of the entire kitchen space.
The first thing you should pay attention to when choosing a device is the installation method. According to this parameter, all kitchen faucets are divided into two types: wall-mounted and table-top. The first ones are most often used to embody brave design ideas luxury interiors. The installation of a tabletop kitchen faucet is carried out directly on the sink panel, which is very convenient when operating and maintaining the device.
There are two types of faucet attachments to the sink:

Types of faucets
Today, modern industry offers three types of mixers:
- Valve. The design of this type of faucet involves the presence of two faucet boxes with valves that control the temperature and pressure of the flow. Advantages: accessibility, wide the lineup. The disadvantage is the very short service life basic elements designs.
- Single lever. The temperature and water pressure are controlled by changing the position of one lever. Advantages: modern design, ease of operation, variability of choice.
- Contactless. These are the most modern, functional and expensive devices. To turn on the faucet, you just need to bring your hand to the spout. The main disadvantage of contactless models is their very high cost.
A few words about the material from which they are made modern faucets. Stainless steel, silumin, brass, bronze and ceramics can be used in their manufacture.
Silumin models show the shortest service life.
When choosing a kitchen faucet, you should pay attention to the design of the spout, which can be high, low or retractable. Low, convenient in the bathroom, but not in the kitchen. It is difficult to place a large saucepan or kettle under such a “spout” of the faucet. Tall, convenient for everyday use, but in case of strong pressure, be prepared for splashes scattered throughout the kitchen space.  Today, the most popular models are faucets with a pull-out spout.
When choosing a faucet for the kitchen, you should pay attention to models whose water jet will precisely hit as close to the center of the sink as possible.
Selecting mixer hoses
 Before removing the faucet in the kitchen, it is necessary to dismantle the hoses supplying hot and cold water to the device. The problem is that during operation on them inner surface is formed limescale, which significantly reduces their flow area, which affects the reduction in water pressure in the mixer.
 The supply hose fitting is made of soft non-ferrous metal. Dismantling these elements from the tap is often accompanied by a change in the thread geometry, which subsequently leads to a decrease in the tightness of the connection. That is why experts recommend that when installing a new device, complete replacement mixer hoses, given that they are supplied as standard on most models. However, their length most often does not exceed 30 cm, which may not be enough to connect the mixer to, and the quality of these components, as a rule, leaves much to be desired.
When purchasing new hoses, you should pay attention to the following parameters:
- hose length;
- diameter and type threaded connection with a water supply system;
- fitting length.
The dimensions of the hose must correspond to the distance between the mixer and the connection point with the water supply system.
You should purchase hoses with different fitting lengths for more convenient assembly of the device. 
There are options with two types of threaded parts: “male” and “female”. 
The standard nut diameter is ½ inch. To connect to the water supply system, “female” type hoses are most often used.
Experts recommend purchasing corrugated flexible hoses made from of stainless steel. They are more reliable, durable and higher cost compared to rubber hoses with metal braid.
In some cases, hoses are not used at all to connect the mixer to the water supply system. Instead, stationary metal-plastic pipes are installed.  To connect them to the mixer, specialized fittings are used.
Replacing a kitchen faucet yourself: stages of work

All work on replacing a kitchen faucet can be divided into two stages:
- dismantling the old device;
- installation of a new mixer and connecting it to the water supply system.
The first thing you need to do after purchasing a new device and components is to prepare the tool for work. You may need wrenches and wrenches. Which wrench is needed for the mixer depends on the model and the diameter of the nuts on the hoses. Most often these are open-end wrenches for 10x12, 22x24. For some models, a 10x12 and 12x13 deep stock socket wrench may be useful.
When using a faucet with a stud fastening, you may need open-end wrench on 11. If the faucet is supposed to be attached to the sink with a clamping nut, then the best option will use an adjustable wrench.
In addition, you may need pliers, a wire brush, flax tow and (or) fluoroplastic tape (fum tape), sealant, rags, and a bucket for draining water from the device. If the plumbing connections are made of metal, it may be necessary to remove rust from the thread grooves. This operation It is better to use a metal brush.
Removing the old mixer

How to remove a faucet from a sink? Before proceeding with the actual dismantling of the old mixer, you need to perform preparatory work:
- Turn off the water to the tap.
- Unscrew the siphon.
- Unscrew the union nuts of the hoses from the water supply system side.
- Remove the screws securing the sink to the kitchen cabinet countertop.
Now, the sink with the mixer needs to be turned over for easier access to the mixer mounting system. Next, we’ll look at how to unscrew a faucet from a sink that is secured with a clamping nut.
It's actually simple:

The universal lubricant WD-40 will greatly simplify the process of unscrewing stuck nuts.
Installing a new faucet

- Insert the valve body into mounting hole provided in the sink.
- We put a gasket on the thread, which comes complete with the new mixer.
- We tighten the structure with a clamping nut.
- We screw the supply hoses into the holes of the mixer. This must be done extremely carefully, tightening with a wrench no more than 2 turns of thread.
All that remains is to install the sink on the countertop and secure it with screws at the fastening points, then connect the hoses to the water supply system, being careful not to overtighten the connection to avoid deformation of the gasket.
To ensure tightness, experts recommend applying sealant to the back of the perimeter of the sink.
Before supplying water to the mixer, adjust the position of the device on the sink, and then tighten the clamping nut. Final stage– installing the siphon in its original place and checking the tightness of all connections.
Changing the mixer yourself - video
If you need to replace a faucet in the bathroom or kitchen, but have no experience in performing such work, do not despair. This does not mean at all that the task is impossible and you will have to call a plumber. It is enough to carefully study the manual and scrupulously follow all the instructions. Do you agree?
We will tell you in detail how to install a faucet on a sink. Here you will find out what technological features When installing the device, it is necessary to observe what types of sinks are being installed on. The article also lists common mistakes that you should not make. home handyman.
Almost every adult man is able to install a faucet at home. It’s just that you don’t always have similar experience behind you, and sometimes it’s awkward to ask more experienced colleagues.
On help will come detailed process installation, which will eliminate many questions and give you confidence in your own abilities - installing the mixer is quite easy to handle.
How to prepare for installation?
Before you begin the actual installation, you will need to go through preparatory stage. First you need to carefully inspect the sink if it is already installed in the bathroom. If it's a kitchen sink, you still have to study it. First of all, you are interested in the number of holes provided by the manufacturer for the future mixer.
Often the manufacturer completes the original sink bowls with a faucet with all the parts necessary for installation. But this is only possible in expensive models, where all the plumbing elements are designed in the same style.
When purchasing a faucet, it is important to check that all parts are included. After all, installation will require nuts, sealing gaskets, flexible or rigid liners. The availability of all components should be paid attention to before purchasing the product.
If the faucet was purchased via the Internet, then, after unpacking the purchase, you should consider everything, study the available parts, instructions and assemble the faucet in the sequence indicated in it
When the mixer of the desired model and size has been purchased, the instructions have been studied, all that remains is to install it. To do this, you will need tools that it is advisable to prepare before starting work.
These are wrenches and adjustable wrenches, sealing tape, masking tape, small key, screwdriver, pliers, flashlight, plumbing mixer kit with all components, a piece of soft cloth.
You may need to buy 2 additional hoses if the length of the tubes that come with the mixer is not sufficient. And you will also need a hacksaw for metal if you are going to install a model with a mechanical adjustment.

It is important that everything you need is at hand and nothing distracts you during installation.
If the bathroom has already been in use, then most likely you will first have to remove the old faucet. It is important to do everything extremely carefully so as not to damage the sink if you do not plan to replace it. It is better to line the bottom of the container with a piece of soft cloth to avoid accidental chips and scratches.
Then you need to turn off the water supply taps to the mixer. If there are none, then you will have to turn off the water in the entire apartment/house. Then you need to check this by opening the mixer - if nothing drips, then you can proceed with dismantling.
If you plan to completely change a set of plumbing fixtures, then, naturally, it will be done first. Then you will need to turn off the water supply and lay down soft cloth on the front of the container to protect it from accidental damage.
Description of installation technology
If the preparatory work is carried out correctly, then installing the mixer on ceramic sink It won’t take much time – on average it will take about 30 minutes. This is provided that the instructions included in the kit have been read and the mixer itself has been assembled.

Some faucets are sold disassembled - before you begin installing such a model, you will have to assemble it
The easiest way to install a faucet on a ceramic sink is if it is not yet secured to its place of work. When this is not possible, installation may be a little difficult and you will need a flashlight. In places that are difficult to reach, you will need to illuminate them with a flashlight - an assistant will be needed here.

It is important, before purchasing, to measure the expected length from the tap to the water pipes and estimate the length of the supply hoses that come with the mixer
In order to attach the faucet to the sink, you need:
- Screw on with a 10 or 11 wrench flexible liner to the mixer. You can use a flexible corrugated stainless steel tube.
- Place a rubber or silicone gasket on the base of the faucet.
- Using a key or your hands, screw in 2 studs one at a time. If the model comes with a bushing, then you won’t have to install any studs.
- Insert flexible hoses into the hole in the sink.
- Place the horseshoe-shaped mounting piece on the bottom.
- Place a metal washer of the same shape on top of the gasket.
- Attach a union nut to each of the two studs, tightening the adjustable or wrench for reliability.
When tightening the nuts, it is important not to overdo it - the connection may burst and will leak water. If you tighten the nuts loosely, the fastening will dangle and the faucet on the sink will continue to dance from side to side.
Image gallery
- a plumbing fixture, the structure and principle of operation of which are well known to everyone. But quite often buyers ask the question: “A faucet with a nut and a faucet with a stud: what is the difference?” If you also want to know the answer to this question, we recommend reading this article.
Faucet with a nut or a stud: which one to choose?
Faucets are attached to washbasins and kitchen sinks using nuts or studs. Both fastening elements do not affect the appearance of plumbing fixtures, functional differences there is also no difference between them. Both nuts and studs are mounted under the fender of the sink, countertop, etc.
Despite the lack of visible differences, we will still consider each type of mixer separately.
Faucet with nut - its body has a thread and a nut. You should choose a mixer so that its body and nut itself are made of brass, since such products are more reliable than, for example, silumin ones.
It is better to choose for a metal sink. It is necessary to check that the area under the hole is level and flat. If this condition is met, the nut will lock securely and correctly.
A mixer without nuts (on a stud) is usually mounted on a countertop or other surface 3–3.5 cm thick. The mixer can be equipped with one or two studs. Note that models with two studs are more reliable.

Thus, when choosing a mixer, you need to take into account the features of your kitchen, but there is no fundamental difference between models of appliances with nuts and studs.
What materials are used in the manufacture of faucets with a nut?
The most affordable faucets with a nut are silumin (an alloy of aluminum and silicon). They have no other advantages. If you want to purchase a reliable, durable plumbing fixture, then do not choose this product.
Chrome-plated steel faucets with a nut are much more reliable and durable. If speak about metal models, then you should pay attention to those made of bronze or brass. Such alloys do not corrode and do not change the composition of water. Faucets with a nut, made of bronze or brass, are durable and long-lasting.
For the production of faucets with a nut, they are also used polymer materials. Such models are strong, durable, inexpensive, but significantly inferior to their metal counterparts.

Nowadays, ceramic faucets with a nut are quite common, which is explained by their unusual appearance - they serve as a real decoration for bathrooms. According to the manufacturers, they are wear-resistant and reliable. However, practice proves the opposite - cases of damage are not uncommon ceramic products from impacts (cracks and other defects appear on them).
Thus, we can conclude that metal faucets with a nut are more practical.
Faucet outer covering
The coating is necessary to give an aesthetic appearance faucet with a nut, and also makes its maintenance easier. The most common coating options are chrome or stainless steel. Such faucets look impressive, they are difficult to scratch, but stains from dried water are clearly visible on them. Brushed metal faucets are less likely to show streaks and will fit well into any bathroom.

You can choose a colored enamel faucet with a nut. It's easy to choose the most good color products for your kitchen, but do not forget that there is a possibility of damage to the enamel upon impact.

If you want to make your interior memorable and unusual, then pay attention to bronze covered with a noble patina.

Quite common now kitchen sinks from artificial granite or marble. You can always match them with similar faucets with a nut suitable color. The products are coated with a special enamel, which is practically indistinguishable from natural stone.

If you want to make a truly chic kitchen, you can choose a gold-plated faucet with a nut. Be prepared for the fact that such plumbing fixtures are usually made to order. You can also choose much cheaper analogues with a gold finish, but they look too provocative, so they are purchased very rarely.

The union nut for the faucet clamps the faucet with reverse side attached surface.
Mixer union nuts can be steel, copper, or brass. They have a fine thread pitch, which reduces the likelihood of unwinding. The marking contains information about the main size - the diameter of the nut (sometimes they write the wrench size).
Mixer nut diameter (mm): 35, 40.
Nut thickness (mm): 18, 22, 26.
Wrench size (mm): 17, 19, 24.
What additional functions can be implemented in a mixer with a nut?
Most large manufacturers Plumbers add interesting features to manufactured faucets.

Let's give specific example: there are mixers with a nut that have a filtration and purification system drinking water. There are two channels and two outlet nozzles in their spout, and an additional lever on the body. Such a faucet supplies water for doing household chores, and after switching the lever, clean, drinkable water comes out.
To use water more economically, fittings and nozzles are installed on the spout. They can be supplied complete with a tap. They can also be purchased additionally.
Now all owners are trying to be careful about water consumption. Therefore, it makes sense to install simple and inexpensive devices that will reduce water consumption to 1.35 liters per minute. This amount of water is quite enough to do all household chores.
You can also purchase an unusual mixer with a nut - with an illuminated water stream. This is also done thanks to a flow aerator, with LEDs installed on it, a temperature sensor and a power source (usually a built-in turbine that generates the necessary voltage).

Jet cold water will have Blue colour, warm – green, hot – red. Such lighting not only looks original, but also protects users from accidental burns.
If the water from the tap flows very hot (more than +50 °C), the red LED will switch to pulse mode and thereby warn of danger.
Remember the following tips:
Do not buy a faucet with a nut from your hands or from dubious stores. You will almost certainly buy a cheap knockoff that won't last long.
Before purchasing, go online and study the manufacturer’s reputation and reviews of its products. If you haven’t found this company on the Internet, then forget about it.
It often happens that unscrupulous manufacturers swap some letters in the names of well-known companies, for example, “Hanza” instead of “Hansa”, “Grehe” instead of “Grohe”, and “Domixa” instead of the Danish “Damixa”.
Do not forget that companies that care about their reputation always provide a guarantee for the product they offer, for which purpose the mixer with nut must have a corresponding mark in the passport.
How to replace a faucet with a nut yourself
Before installing a faucet with a nut in the kitchen, you first need to remove the old one. Then they install a new one and connect it. It is also necessary to have keys of a suitable size on hand (usually 10, 11, 22 and 24) and some auxiliary materials. To dismantle the union nuts of the mixer, you will need two adjustable wrenches.
There is a good chance that new hoses will be required. As a rule, kitchen faucets with a nut come with hoses, but they are only 30 cm long. Therefore, before starting work, make sure that this length will be enough for you.
It is important to consider the distance from the mixer with a nut to the cold and hot water pipes. The hoses should sag a little, since when the tap is turned on/off, the pressure changes sharply, causing the hoses to twitch. If the tension is too high, the connection will soon leak. Thus, if the distance from the pipes to the mixer inlet is no more than 25 cm, then the existing hose is enough; if the distance is longer, buy a new one.
It is necessary to choose only high-quality flexible hoses made of stainless braided or corrugated stainless pipe, because they are the ones that will last a long time.
Before you go for a hose, you need to determine the size of the “needle” (the tip that is screwed into the mixer with a nut), the diameter of the pipe and the type of its end (male-female) - in order to choose the right fittings.
When connecting hoses or supply pipes, you should adhere to the following diagram: left - hot water, on the right – cold.
There are times when difficulties arise when dismantling an old mixer: the nut may become stuck. If you encounter such a problem, then use universal lubricant in WD-40 cans. This liquid seeps well even into the most microscopic cracks. Apply the lubricant to the stuck joint and wait 10–15 minutes.
If no methods help to unscrew the nut, then use a grinder to cut the body along with it. However, this can only be done if the mixer is to be disposed of.
If the faucet is fixed on the countertop, then you need to act “from the inside” - unscrew the nut while in the closet and illuminate it with a flashlight.
Installation begins with attaching the mixer to the sink with nuts. The mixer always comes with a rubber sealing ring, which must be placed in the groove located at the end of the body.

The cylindrical part with thread is inserted into the hole in the sink. The rubber ring should not move.

The kit should include a wide rubber gasket, which also needs to be installed at the bottom.

Now screw on the brass fixing nut with a “skirt”. The “skirt” is an extension in the form of a washer, thanks to it the tightest clamping of the installed rubber gasket is created.

The nut is tightened with an adjustable wrench so as to ensure that the mixer does not move on the sink. It is important that the spout is positioned so that the sectors of rotation to the left and right from the central position are equal, and the switch lever or valves are level with respect to the sink. If the mixer is installed at an angle, then the spout position is selected diagonally.

In order to level the mixer, loosen the nut, perform the necessary manipulations and fix it again. Now install the hoses, first the one with the short fitting, and tighten them with a 10mm wrench.
If the sink has been removed, it must be reconnected to the sewer by replacing the siphon and inserting a corrugated hose with a sealing collar into the outlet sewer pipe. Now you can turn on the water supply and check the operation of the mixer with the nut.
Please note that you first need to spill water without the aerator tip in order to avoid clogging it with small particles accumulated in the pipes, faucet, and hoses. It is enough to drain a few liters of water, and then you can put the aerator in place.
It is also important to check the tightness of all connections during the first descent. If leaks are suspected, the connections must be tightened immediately.

There is no need to wrap the threaded part of the fitting with FUM tape or solder it, since it has one or two O-rings that ensure the required tightness of the connection. The fitting is screwed in until it stops, but you should not overtighten it, as you can damage the rubber ring. All you need is hand effort and one turn of the key.

Now you can install the hose with an extended fitting. If water is supplied through metal-plastic pipe, then the fittings are screwed in in a certain sequence: first the one that has a bend, and then the straight one. When the hoses (fittings) are screwed in, the sink must be secured in place.
The specialists of our company “SantechStandard” will always help you choose the right mixer with a nut. Our company is a supplier engineering plumbing in Russia since 2004.
By cooperating with our company, you gain the following advantages:
quality products at reasonable prices;
constant availability of products in stock in any quantities;
conveniently located warehouse complexes in St. Petersburg, Moscow, Novosibirsk and Samara;
free shipping in St. Petersburg, Moscow, Novosibirsk, Samara, including transport companies;
delivery of goods to the regions through any transport companies;
individual approach and flexible work with each client;
discounts and various promotions for regular customers;
certified and insured products;
registered in Russia trade marks, That is additional protection from low-quality fakes.
The specialists of our company “SantechStandard” are ready to help both individuals and companies choose plumbing equipment. You just need to contact us by phone:
The faucet is integral to the kitchen sink and the work involved in installing the sink includes installing the faucet on the sink. Read about options for installing a faucet in a kitchen sink in this article.
Two options for installing the mixer
There are two fundamentally different options installation of a sink mixer. These options for the selected sink differ, or more precisely, whether there is a hole in the sink for installing a mixer.
In the next two photos we see two different types of kitchen sinks. The first sink has a factory hole standard diameter for installing a mixer. The second sink does not have such a hole. This means that you can make a hole for the faucet yourself or install the faucet on the countertop next to the sink.

The option of drilling a hole yourself is possible, but has a number of disadvantages. First of all, in the place of the factory hole for the faucet, manufacturers of metal sinks strengthen the sink. Thanks to this, the mixer stands firmly on the sink and does not “play” with the metal. If you drill a hole yourself, the mixer may vibrate after installation. In addition, drilling the sink yourself will damage its anti-corrosion coating at the drilling site.
Therefore, if there is no hole in the sink, then the mixer is placed on the countertop. In the photo we see options for installing a mixer next to the sink.
Stages of installing a faucet on a sink
The mixer is installed on the sink before it is installed on the countertop. It is more convenient and technologically better.
Connecting the mixer to the water supply is carried out after installing the sink with the installed mixer on the countertop or kitchen cabinet. It is better to assemble the mixer on a comfortable surface.
To assemble, prepare yourself, a mixer with an installation kit and a flexible hose. The installation kit is included with the mixer and includes:
- Gaskets;
- Fastening washer;
- Studs (stud) fastenings with nuts.
This is the most common option for attaching the faucet to the sink, which can be called standard.
The flexible hose is screwed to the faucet before installing the faucet. There is no need to wind the flax under the thread.
To tighten the liner at its end there is a hexagon for an open-end wrench No. 10. The tightening must be done with a slight increase in order to avoid cracking the gaskets on the hose.
After attaching the hose, screw the fastening sleeves into the mixer body (if they are included separately and not assembled at the factory).
After assembling the mixer, it is installed in the sink hole. Don’t forget to install the gasket between the sink and the mixer, which comes with the mixer. The gasket can be pressed into the mixer body.
On the back side of the sink, we put a special gasket and a washer of the same profile on the mounting bushings. Next, screw the faucet to the sink with nuts, tightening the nuts until they stop.
 Installation of the faucet on the sink is completed
 To ensure that the fastening does not weaken over time, we fix the first nuts with second nuts, which are not included in the mixer kit and must be purchased in advance.
The result of the installation should be a strong fastening of the mixer, it should not wobble, the liner should be on the mixer.
When choosing a kitchen faucet, you need to follow not only aesthetic considerations, but also its practicality. Moreover, not only in terms of ease of use, but also ease of installation, as well as opportunities for current repairs. Therefore, before going to the store, it makes sense to study the features of the models. various designs and the nuances of their connection.
When choosing optimal model the following points are taken into account: 
- dimensions and depth of the sink;
- availability of free space at the sink between the bowl and the wall;
- dimensions and location mounting hole for the faucet.
The most widely used types of kitchen faucets are:
- axle crane;
- single lever;
- electronic.
Kinds
- Traditional axle-box cranes are simple in design and reliable. The main working element in them is the crane axle box, which can be easily replaced or repaired if necessary. Accordingly, the problem of how to change the entire faucet in the kitchen does not arise. Crane axle boxes come in two types: ceramic and worm. Firstly, locking and adjusting the flow of water is done by rotating ceramic plates with a hole relative to each other. Secondly, by raising and lowering the rod rotating along the thread.
- Single lever kitchen faucet is more convenient to use, since it has one single control body. Main element it contains a cartridge, very similar in design to an axle-box faucet, but it controls two flows of water at once. The housings of single-lever models can be either stationary or rotating relative to the installation axis. There are also ball ones, in which the water is blocked by a rotating ball with holes.
- Electronic options allow you to provide water at a constant temperature. Some models can turn on water using a contactless sensor. However, structurally they are very complex devices, which inevitably increases their cost. Power supply can be supplied from the mains or from batteries.
The height of the spout is selected taking into account the characteristics of the sink bowl. For shallow models, models with a low spout, which reduces splashing, are better suited.
In a kitchen, installation is most often done either directly on the sink bowl or on the countertop.
Preparation of materials and tools
Before changing the faucet, you need to prepare a complete set of tools and consumables.
 The following tools will be needed:
- adjustable or open-end wrench by 10-12 mm;
- tubular wrench for screwing hard-to-reach nuts;
- pliers; screwdriver;
- rag;
- basin or suitable sized bucket,
- flashlight.
Materials you will need:
- installation kit supplied with the device (stud, O-rings, nut and fastening half-washers);
- fum sealing tape or flax with special impregnation (English sealant Tangit is especially suitable);
- silicone sealant;
- flexible liner.
The length of the hoses is selected so that the hose does not break at an acute angle, but is not stretched.
Before replacing the faucet in the kitchen, it is advisable to purchase new supply hoses (often included with the new faucet).
Bellows or reinforced hoses can be used as connections.
- Bellows liners They are made of stainless steel, are highly reliable and costly.
- Reinforced hoses more common due to their low price and sufficient reliability.
You can indirectly determine which kitchen faucet is better by the quality of the connections.
Reliable products have the following characteristics:
- braid made of stainless steel or aluminum;
- ethylene propylene rubber (EPDM) hose.
- tips and fittings made of stainless steel or brass.
Removing the old tap and hoses
To replace the crane with a new one, you must first dismantle the old equipment.
This requires a number of operations. 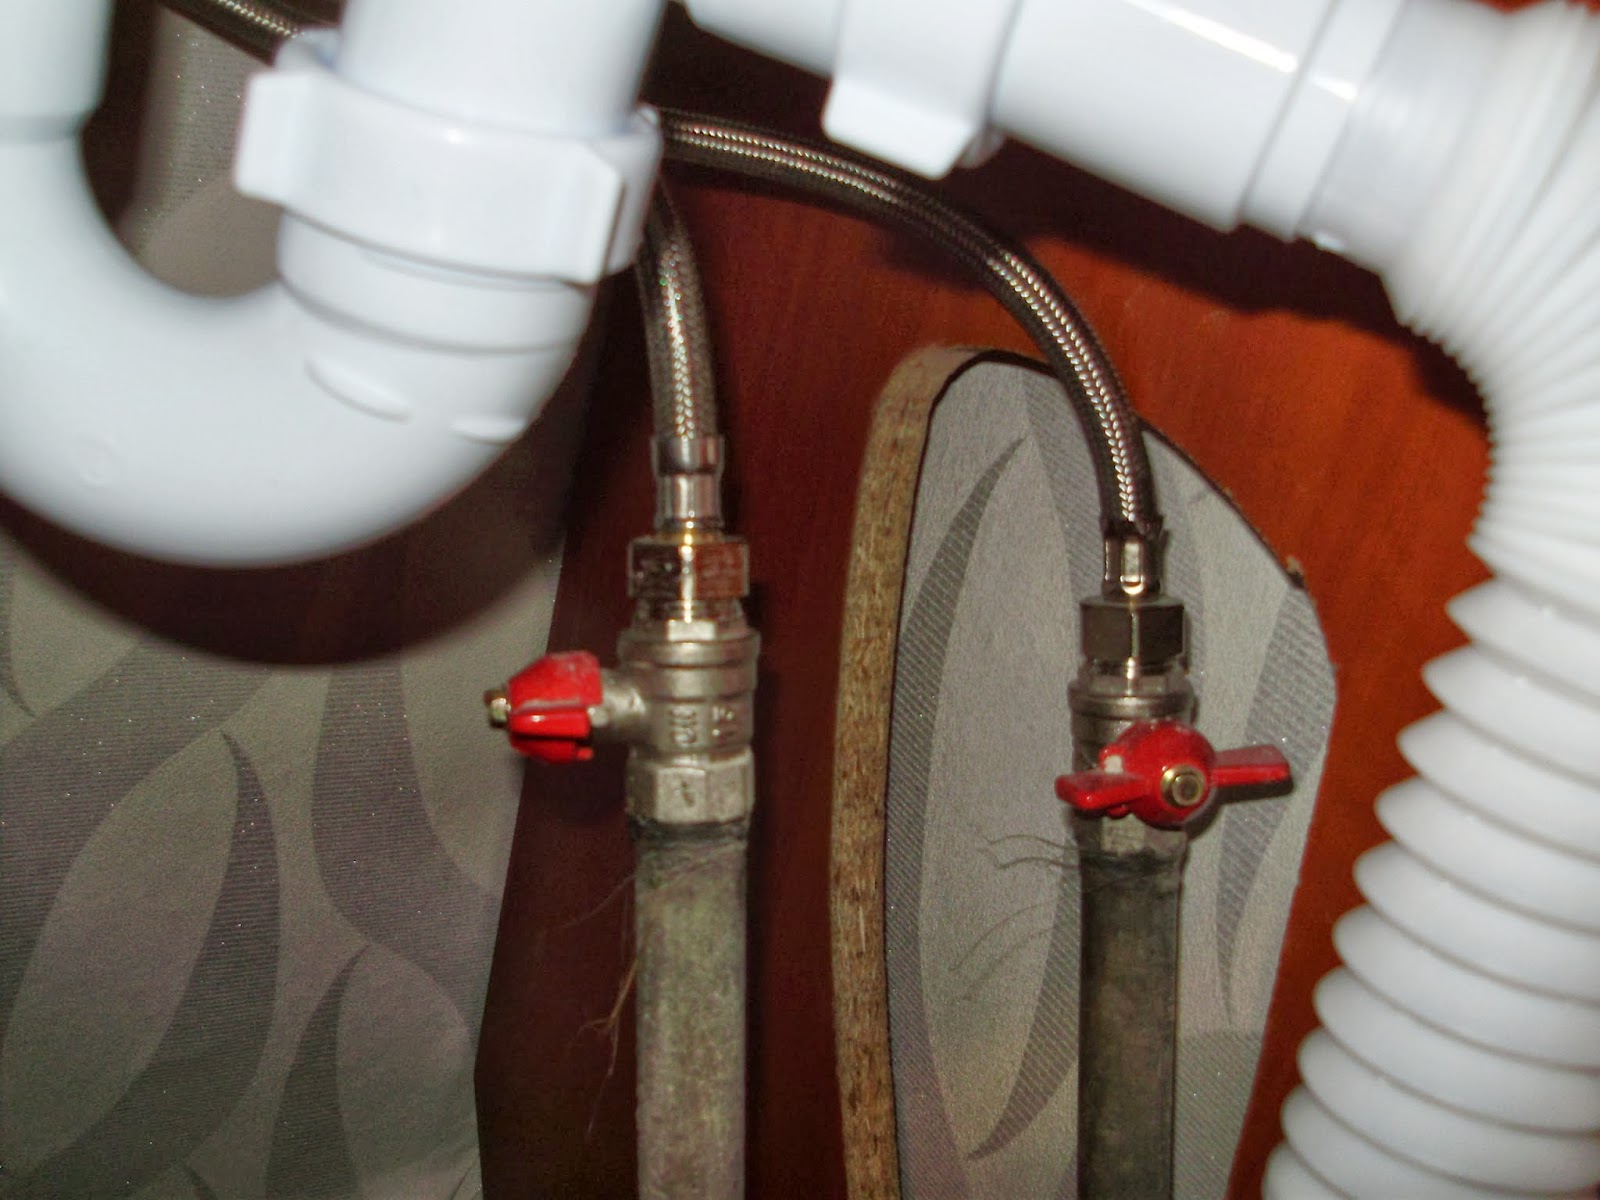
- The water is blocked on the outlet to the sink.
- The taps are opening so that the remaining water in the pipes can flow freely into the sink.
- If the sink is a surface-mounted type, then it is detached from the cabinet.
- The liner is disconnected from water pipe . At this stage, it is advisable to use a basin to drain the remaining water.
- The siphon is unscrewed.
- The sink is raised and installed on the cabinet in such a way as to provide free access to the place where the device is attached.
- Flexible connections are disconnected.
- If there is a watering can, then it is also disconnected.
- The fastener is unscrewed.
Then you should hold the spout with one hand, and with the other unscrew the threaded mounting pin and remove the old tap.
Kitchen faucet installation
Assembly

First of all, you should assemble the device itself. those. screw on the spout, aerator, install handles, etc. The sequence of operations may be different for different models and from different manufacturers. You can find out more details and features in the instructions supplied with each device. When choosing a faucet for the kitchen, it is advisable to make sure that this document is clear.
When assembling the faucet, you should not put in significant effort. As a rule, all components can be screwed on freely by hand. If you need to use keys, they must be used with the utmost caution. Otherwise, there is a risk of damage to the chrome plating of the device.
The fabric pads will become great solution, how to install a faucet in the kitchen without damaging it.
The length of the fittings can be either the same for both connections or different. The second option is used by many manufacturers to facilitate installation work. The order of further actions will depend on where the faucet is attached: directly to the sink or to the countertop.
Installation on the sink
There are two ways to attach a two-valve faucet to a sink:
- on a stiletto heel
- on the nut.
With stud fastening
 In the first case, a threaded rod should be screwed into the valve body before installation. It has threads along its entire length, but before screwing in, you need to make sure that the spline notch will remain on the outer part and will not go into the valve body. This is necessary to simplify repair or dismantling in the future.
In some models for overhead sinks there may be two such pins. Next, an annular gasket is placed on the base of the tap.
It is necessary to ensure that it lies in the place intended for it.
In some cases, the gasket may have complex shape and during installation it must be oriented accordingly.
The next step is to insert flexible hoses into the hole in the sink and install the kitchen faucet in place. When performing this operation, it will be convenient if you rotate the sink so that you can work with both hands both on top of the bowl and on the bottom.
Then put on rubber compressor, sealing the installation site on the underside of the bowl. The shape of this seal coincides with the shape of the pressure plate.
Now you can put the pressure plate on and screw the nut onto the threaded rod. When the faucet is secured, begin fixing the sink to the cabinet.
With nut fastening
 Installation on the nut is done in a slightly different way. Cranes of this design have a wide cylindrical part at the base with a thread onto which a fastening nut is screwed. Connecting the liner to such a base is much easier than in the case of a stud-mounted fastener. Therefore, the supply hoses will be connected after installing the faucet on the sink. It will not be superfluous to take this point into account when deciding which mixer to choose.
Installation consists of several operations:
- Gasket Installation into the groove under the base of the device;
- The threaded part is inserted into the mounting hole of the sink. When performing this action, it is necessary to control the position of the elastic pad;
- From the bottom of the sink, another rubber gasket from the supply kit is put on. It differs in shape from the top gasket. If the top one looks like a thin rubber ring round section, then the lower one is flat and wide. At the same time, the design of a kitchen faucet may be different, and the shapes of the gaskets may also differ;
- The fastening nut is screwed on. In this case, you need to control the position of the mixer base. The front part of it should be facing the front edge of the sink. If the design of the tap is such that it is difficult to visually determine its position, then the alignment is checked by turning the spout. It should deviate at the same angle in both directions. If the tap is located in the corner of the sink, then it should be oriented diagonally to the sink;
- The supply hoses are screwed on. First of all, a hose with a short fitting is installed, then with a long one (disassembling a kitchen faucet - in reverse order). Additional sealing of the connections is not required, since their fittings already have rubber O-rings. You should not forget about their existence when connecting the eyeliner. The tightening forces should not be excessive so as not to damage the rubber seals.
The final stage is installing the sink on the cabinet.
Tabletop installation
 This installation option is in many ways similar to the nut mount. The difference is that in this case the sink usually does not have wide sides with space for installing a tap. Therefore, the mortise mixer will have to be placed on the countertop, in close proximity to the sink.
The mounting location must be chosen in such a way that it is convenient to reach the crane controls. In this case, it is necessary to check that in the working position the spout is above the sink.
Having decided on the fastening point, proceed to drilling a hole in the tabletop. To do this, use a drill and a wood pen. Pen diameter - 38 mm. The remaining steps will be as follows:
- supply hoses are threaded into the threaded cylindrical fastener;
- the liner is attached to the base of the mixer;
- the cylindrical fastener is screwed in there;
- put on the upper rubber gasket;
- the entire structure is inserted into a hole in the tabletop. It is not possible to thread the liner nuts into the hole at the same time, so they are threaded sequentially one at a time;
- From below, a rubber gasket, washer and nut are put on the fastener.
Then the position of the mixer is checked and the entire structure is tightened with a wrench.
The built-in mixer is installed in almost the same way.
Installation of coarse filters
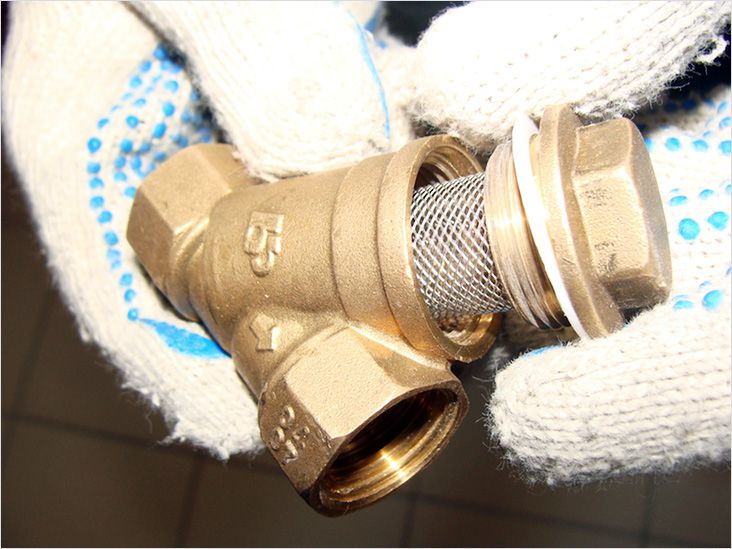 Tap water often brings with it a lot of debris:
- sand,
- pieces of rust, etc.
To rid the aerator and mixer cartridge from contamination, it is necessary to use coarse filters.
It is best to install the filter at a branch from the riser, where it will be easy to maintain. In this case, it is necessary to control the position of the oblique pipe with the filter mesh. It should always be angled downwards, making the mesh easier to clean.
In addition, the arrow on the filter housing must coincide with the direction of water movement.
Connecting hoses
The choice of a kitchen faucet also depends on the availability of high-quality hoses in the kit. At one end they have a fitting for connecting to the mixer, at the other - union nut for connection to the water supply. The fitting is fitted with one or two O-rings and rubber. They are quite enough to ensure tightness when connecting to a new mixer.

After completing the installation of the mixer, you need to make sure that it is working and that all connections are tight. To do this, open the tap on the riser and the mixer in the kitchen. After the air escapes, the mixer is closed and the appearance of leaks is monitored for half an hour.
Most often, leaks occur due to improper assembly of the faucet and poor sealing at the connection points.
- In the first case it is necessary to disassemble the faucet and reassemble it, ensuring that the gaskets and cartridge are positioned correctly. In the instructions you can find information on how to disassemble the mixer.
- In the second case- use fum tape or flax for a tighter connection of the fitting or union nut.
A little more problems may bring a pull-out kitchen faucet in which the hose to the watering can may be damaged. It is better to replace such a part entirely.
Is it necessary to install ball valves in front of the mixer?
The ball valve has only two operating positions:
- open,
- closed.
Installing such a tap allows you to cut off the tap from the water supply for repair or replacement. However, in practice this does not always make sense.
As plumbing experts recommend, first you need to study the water distribution diagram throughout the apartment. If immediately after diverting from the riser there is already ball valve, then there is no need to duplicate it. If desired, you can install a valve or reducer that will help limit the water pressure in the tap.
How much does it cost to replace a kitchen faucet?
The total cost of replacement will consist of the costs of the crane itself, Consumables and for work on its installation. At the end of 2018:
- The minimum price of a kitchen faucet is 400 rubles. The maximum is from several thousand.
- Which mixer is better is up to the owner to decide, but more expensive models will always be more reliable. A coarse filter costs from 120 rubles.
- In most cases, you won’t have to spend money on eyeliner, since it is usually included in the kit. If it is not there or is not long enough, then you will have to pay 150 rubles for the hoses.
- Calling a plumber will cost from 400 rubles. At self-installation the work will be free.
To prevent the problem of “how to choose a kitchen faucet” from bothering you too often, you just need to promptly replace worn-out gaskets, cartridges and aerators. In addition, it is periodically necessary to clean the coarse filter and monitor the condition of the mesh inside it.


