Interior doors separate the space of 2 adjacent living spaces: bedroom and living room, children's room and common room, kitchen and corridor. Depending on the requirements set for the opening, they may differ in material, geometric dimensions, transparency, opening method and external design.
Standard sizes of interior doors.
The material of the canvas determines its strength, durability, possible design and external impression. From geometric dimensions Ease of passage depends. Let's consider what parameters interior openings will be most comfortable and what width and height of the canvas is recommended by the standard.
Standard requirements
The dimensions of the passages between rooms are smaller than the entrance to a house or apartment. In accordance with the requirements of the standard, the entrance door should not be less than 80 cm, while it is more convenient to use an entrance with a leaf of at least 85 cm.
Door frame thickness.
They are not installed for indoor passages...
0 0
Installing double-leaf interior doors is a feasible task for a knowledgeable craftsman. Not to say that this is the same as installing a single-leaf door, but this task cannot be called difficult either. The principle of assembling the box is the same, the equipment is the same. I beveled the door frame at 45 degrees and assembled it. Installation in doorway. Inserting hinges into frames and door blocks, installing doors, aligning gaps, installing door hardware. But still, we repeat once again, it is better for an experienced technician to perform such an installation. Installation of a double-leaf interior door - affordable repair, an important stage in the repair.
Characteristics
Types of double doors and their advantages
Double doors are an excellent design for a non-standard doorway, a way to ensure the security of the entire home and a façade decoration item.
At this point in time, leading manufacturers create a huge assortment double doors, performing many functions and...
0 0
Don't whine! He left and thank God! - Anya straightened her brains out.
“I can live without him”! - that’s it, “I can’t” - who will feed and clothe? - She pointed to Katyushka. This guy? Well, for a month or two I would have quit. There are girls all around, jumping out of their panties.
I got there, but you can’t carry the cup. Get up!
Lyudka slowly trudged to the washbasin to wash the dishes. While making the beds, every now and then she glanced out the window, as if there were playground, a familiar figure in a black jacket might appear.
Anya shook her head; her friend “passed out” again, drowning in memories.
...Lyudka almost runs along the corridor, holding her turban on her head with her hand. The other hand is occupied with a bag of wet laundry. Opening the door to the group, he bumps into Raizman.
- Damn! - the towel falls to the floor.
Sashka has a mocking squint of his eyes and an impudent smile: “It seems to me, or under the robe
there is nothing?"
“Have you smoked some weed, kid?!” Lyudka hisses.
- I prefer sex! - a smug smile demonstrates even...
0 0
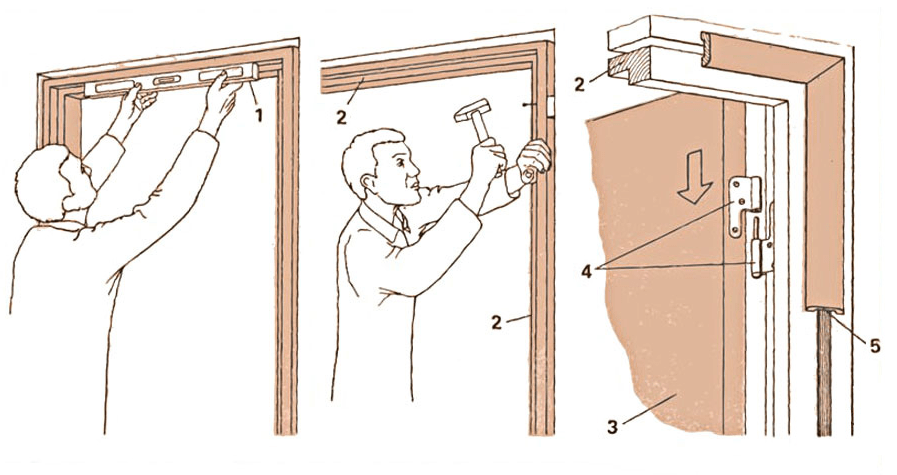
Here are instructions for self-installation wooden doors.
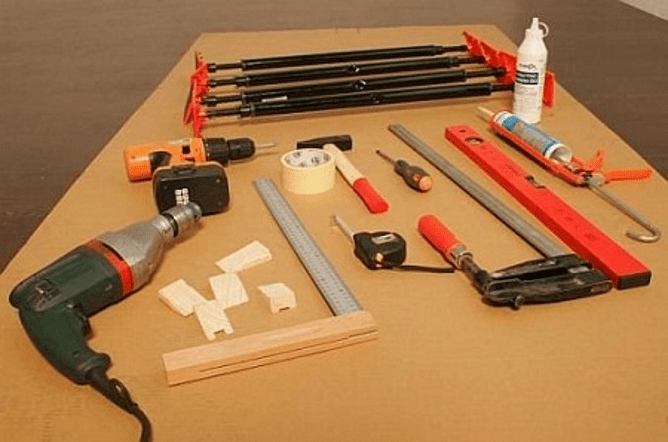
Required Tools and materials:
Door leaf, hinges, lock, door frame.
Wooden blocks for spacers.
Wooden wedges.
Nails, hammer, nail puller or pliers.
Self-tapping screws, screwdriver, drill, feather drills, wood bits.
Process:
This article presents the easiest way to install a door; the likelihood of errors with this installation option is minimized.
Cut the door frame bars to size door leaf, taking into account that the horizontal bars should overlap the ends of the vertical bars, it is also necessary to take into account the gaps between the door leaf and the beam itself, in order for the door leaf to freely enter the door frame, they should be about 3-4 mm. It is also necessary to cut a quarter from the horizontal beams in those places where they will overlap the vertical beams at the end as shown in the photo.
...
0 0
Hello. If there is a beginning of apartment renovation, then there will be an end. Once upon a time they started making screed, plaster, and putty. All tiling work has been completed. All finished floors have been laid. And the time has come to assemble and install the doors. Read all about doors here.
And we have to assemble and install ordinary, wooden, untreated doors. Recently I was lucky enough to work with such doors. I was lucky, in the full sense of the word. I love the smell of real wood, not plasticized veneer. And in case of an error with the gaps between the door leaf and its frame, there is always the opportunity to plan the door without compromising its appearance. But, of course, we don’t want to make mistakes, and therefore we will assemble and install the door based on theoretical and practical rules assembly and installation of doors.
It should be borne in mind that the wider the door, the larger the gaps must be made between the door leaf around the entire perimeter and its frame. Standard sizes available...
0 0
09.05.2012 10:00
MDF door frame
Recently I had to install doors in one apartment. Boxes with built-in hinges were assembled. Wedged into openings on wooden wedges, the pretend gap was adjusted with slats. Then I filled everything with polyurethane foam. After two days, the gaps began to increase and the tongues on the locks no longer reached the bar. Explain why this happened, is it possible that the foam draws the MDF into itself? It turns out that the box is stretched and not compressed by the foam. It seemed to me that I had enough experience, but a problem has arisen and I want to find an intelligible answer.
Read others useful materials on the topic MDF door frame:
Answers
It seems to me that you bought bad frames for the door. They were probably lying somewhere in a warehouse in a cold place, or maybe they got wet in the damp. In general, after installation they dried out a little and the shell began to wobble. I had...
0 0
Entrance doors - the beginning of security of premises
It is from the door that any house, apartment, or indeed any room begins. How secure your door is will determine how difficult it will be for intruders and strangers to get into where you live or work. What connects the doors to the alarm. After all, our site is dedicated specifically to alarm systems, and doors are a means of passive safety. But if we look at this topic more deeply, it turns out that doors are the first and integral part of the security alarm system.
What kind of entrance doors should there be? Let's look at a few basic principles.
1. Doors must be double. Having opened the first ones, the criminal faces a new obstacle, and the alarm has already gone off. If the apartment or house is connected to the security console, the duty squad has left and while the intruder is fiddling with the second doors, he will have time to get to the object. And a loud sounding siren can attract outside attention, which...
0 0
What can you say about entrance doors? No matter how strange it sounds - they meet us, and they also see us off...
This is what gives us peace of mind. Behind them, in our apartment, we feel protected: from external adversities, from street chaos. When we leave or move away, this is our main hope that our home will remain inaccessible.
And everything that we have will lie in the same place where we put it. And how we sometimes neglect our protection. And God forbid something happens, we begin to blame ourselves - how so, why?? Let's not let this happen!
The main thing is reliability
You cannot skimp on entrance doors. They are set not for a year or two, but for decades. The main thing is reliability. Thickness metal sheet should not be less than 1.5 mm (in Chinese doors thickness is 0.6 mm and they can be easily ripped open with a can opener). Fishing corner - at least 45 mm, mandatory profile pipe for rigidity (so that the door with the boat does not open). And insulation: after many years of work, I...
0 0
Home Repair Guide
How are wooden doors installed?
Door installation is a separate topic in construction and renovation. After all, when entering any apartment or house, the first thing that catches your eye is the door. And in fact, it doesn’t matter so much whether they are expensive or cheap. Of course, an expensive door looks much richer due to the quality of the door leaf and cashing, but illiterate installation can ruin a door of any price category. The opposite is also true - a flawlessly fitted cheap door will always please the eye with clearly defined gaps along the surface. We will talk about wooden doors.
The first thing to start with is correct measurement. This is necessary in order to determine the size of the door. When measuring, you need to take into account the wall opening, the thickness of the canopy and the width of the door leaf so that later, the assembled canopy will fit into the doorway without unnecessary gaps, but not too tightly (there should be room for polyurethane foam). Of course, when these measurements are taken...
0 0
10
How to install an interior door frame
Modern doors- both high-tech and simple design. Compared to older products, the number of parts has been significantly reduced, and the installation of the interior door frame has been simplified. Today, the entire structure can be qualitatively assembled with your own hands. The main thing is to be patient and work carefully so that the assembly of the interior door frame is correct. Otherwise, you will have to buy a lot of new material, which is not always possible.
Preparation
Box type
Installation Tools
To work with the structure door block You will need a fairly simple set of tools. The instructions will be drawn up taking into account a number of assumptions:
The old shell has been removed; the opening is cleared of foreign debris; all pre-finishing work has been completed; the work is done by hand by a person who does not have special skills in working with carpentry tools.
0 0
11
Definitely just cooked steel door, really loud, cold and unattractive.
First, it needs to be made as silent as possible. To do this, be sure to glue the seal to the edges and places where it abuts the box, and inner part cover with self-adhesive isolon.
Secondly, it needs to be insulated. To do this, we push the space of the box (box) with mineral wool, we put it inside the door, and you can press it with plywood or USB, just tighten it with self-tapping screws and frame it in figured corners.
Third - Decoration, here you have enough imagination, you can paste over the door and door with self-adhesive film, you can cover it with decorative slats, you can apply a coating similar to the coating on the walls of the room and do everything in one tone, there are people who wallpaper doors, and outside painting a brick wall is not an acquired taste.
This is such a minimalist decor, but it looks something...
0 0
12
Currently, the idea is extremely relevant visual expansion living space, which is why many people refuse to install interior doors. It is worth noting that sooner or later, for one reason or another, interior doors appear in these houses, decorating the interior and making the living space truly comfortable. The presence of doors allows you, if desired or necessary, to retire, isolate yourself from extraneous noise, and concentrate. In addition, an interior door is an independent aesthetic and functional element of the interior.
There are frequent cases of replacing interior doors that do not “fit” into the new style decision living space. However, it is worth noting that the variety of doors is the most various forms and size often creates a problem for the consumer, who is forced to change not only the door leaf, but also the door frame.
When deciding how to make a door frame, you need to take into account what is available...
0 0
13
So - extra. Or in other words - an additional plank. This name causes confusion among people whose profession and interests are far from installing doors and decorating premises. And this is normal, since it is impossible to know everything in the world, and every business has its own subtleties and competent specialists who know these subtleties. Therefore, let’s ask one of these specialists what “extra” is. Sergey, what is this?
Sergey: The additional plank is a plank a little more than two meters long. Thickness from 6 to 30mm (except in special cases) and width from a few centimeters to 25cm (again - except in special cases).
Installation door trims necessary in cases where the wall thickness is greater than the width of the door frame.
In old buildings, we are accustomed to the fact that the width of the box was initially made equal to the thickness of the wall (or not very equal), and then the defects and irregularities were covered with platbands and painted. Therefore, there were often platbands...
0 0
14
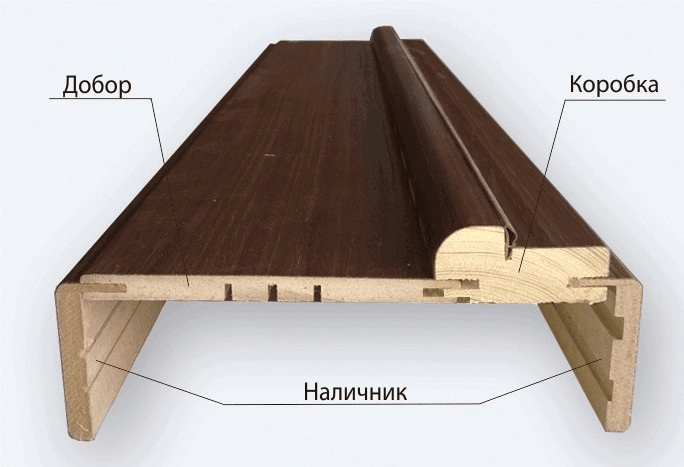
Why do you need moldings - door frame, platband, additions? Why do you need moldings - door frame, platband, additions
When buying a door, you need to think about the so-called molding. This includes door frames, platbands, extensions, and flashings.
Door frame
A U-shaped structure of a pair of vertical posts connected by a crossbar on which the door leaf is hung is called a door frame. It may have longitudinal slots for installation telescopic platbands.
Door frame
The frames are made from the same materials as the doors themselves, for example: solid wood, laminated wood, MDF. Door frames made of MDF and laminated wood are less susceptible to changes from temperature and humidity than those made of solid wood.
Platbands
The door frame, even tightly inserted into the opening, does not look entirely aesthetically pleasing where it borders the wall. In order to hide these places, platbands are used. They can...
0 0
15
Assembly and installation of the door frame in the opening
The door frame is the basis of any door structure. The width of the door frame may vary, but the standard size is 70 mm. The door frame, the dimensions of which should not exceed the thickness of the wall, is mounted vertically in the opening and the door is hung on it. The box consists of three elements - the lintel, the hinge beam and the shutter beam. Assembling the door frame is not difficult (despite the fact that new door A door frame assembly diagram is always attached), it is carried out on a flat surface, preferably on the floor. First of all, the upper ends are cut at an angle of 45 degrees. vertical bars, and then from internal corner cut, the length of the beams is measured. The beams and the lintel are fastened with self-tapping screws. The door frame seal must be installed correctly. In this case it will serve reliable protection from noise, dust, insulates the room and muffles the impact of doors on the door frame.
Usually the door frame is made of MDF....
0 0
16
Door installation
One of the indicators of the correct installation of the door is that when opening the door leaf remains motionless in any position, that is, no matter in what position we leave the door leaf, spontaneous opening or closing of the door does not occur. This can only be achieved with strict vertical installation doors. Door hinges must be lubricated and positioned vertically. If the door is installed vertically, and the hinges are deviated from the vertical, the door leaf will “pull” the hinges and it will open or close. When cutting into attachments, pay attention to this. Most often, the hinges “pull” the door when the cutting depth into the frame or door leaf is not the same. If such a defect is detected, then you need to either “sink” all the hinges to the same depth, or place wood chips under the “recessed” hinge.
The second indicator is correct installed door is the same thickness of the slot in the door vestibule. The door leaf must fit clearly into...
0 0
17
Door frame assembly
Based on the nature of opening, doors are divided into swing, sliding, folding and lifting. Swing doors are the most common due to their simplicity. constructive solution and ease of use.
For the standard height of the door frame (2070 mm), the height of the opening left in the walls should be 2100 mm. The width of the opening is taken to be no less than: for entrance doors - 900, interior and kitchen doors - 800, bathrooms - 700 mm, for interior doors swing doors with two panels - 1300, less often 1500 and 1900 mm. The door frames themselves are made lower and narrower than the opening by about 30 mm. So, for example, the door frame for the bathroom is made in size...
0 0
18
Replacing entrance or interior doors is a great opportunity to repeatedly improve the design of a room, making it truly comfortable and cozy. But often, new doors are not suitable for installation on existing frames, so it becomes necessary to replace the doors with a complete replacement of the frame.
Installing hinges
The method for correctly assembling and installing a door frame without a threshold will be as follows.
Currently, almost everyone door designs mid-price category are sold complete with a disassembled door frame. And assembling such a system on your own will not be difficult.
Due to the fact that the timber for making the box is fully prepared for use (covered with veneer, decorative film), you need to handle it very carefully so as not to spoil the attractive appearance during installation.
So, when the door leaves have already been purchased, you can start making the door frame....
0 0
19
When buying doors in a store, we obviously do not purchase a door block fully prepared for installation, but an enlarged similarity children's construction set for “skillful hands”. It is quite understandable why hinges are not hung and locks are not cut in, because it is not known which way the door will open. Manufacturers do not assemble boxes because they do not know exactly the dimensions and features of the opening being installed. Therefore, owners have to hire craftsmen or build this themselves important part door block. And for this you need to clearly know how you can and should make cuts on timber, how to assemble a door frame for the long-term service of an interior or entrance structure.
The complexity of a number of operations for assembling the base frame for hanging a door lies in the specifics of the production of cuts and in the connection of components. The work, which seems simple to the inexperienced layman, is complicated by the presence of a pretend recess on the profiled jambs and crossbars of the future...
0 0
The ability to handle carpentry and measuring tools is already a reason to try to solve such a problem. not an easy task How to install interior doors with your own hands. The work is simple, but tricky in its own way. It will take scrupulousness and even tediousness in marking and adjusting, otherwise it will be installed correctly interior door It won't work with a box.
Features of installing interior doors
At first glance, nothing complicated, but this is only a superficial impression. It's about about not just installing the frame and door leaf into the interior opening, but doing it beautifully, without distortions, scratches or sagging hinges. If this is your first experience, then it is best to make a detailed step by step instructions DIY installation of interior doors. This is not shameful for beginners. Even experienced craftsmen often make notes with their own hands - what not to forget and what to pay attention to when installing a door frame on a specific interior partition.
During the installation process, you will need to solve two of the most difficult problems yourself:
- Correctly assemble and install the frame of interior doors, align and secure it so that the frame does not sag under the weight of the door leaf;
- With your own hands, mark and cut out the mounting grooves on the vertical post of the frame and on the end of the interior door leaf.
U experienced craftsman It takes 2-3 hours to install an interior door; a beginner will need at least a day to completely install the frame and hang the door leaf.
Advice! It is not necessary to stupidly follow the instructions for installing interior doors, which recommend sequentially installing lock fittings, attaching hinges, and only at the very end solving problems with hanging interior doors. The main thing is to install the frame and door leaf with your own hands with a fresh mind, and you can put off the trim, locks and handles with trim for the next day.
There will be a lot of measuring and sawing. All cuts are made by hand hand hacksaw, therefore, in addition to fresh forces, you will need to stock up on quality tools.
Tools for installing interior doors
A day or two before the start of work, you will need to assemble a working arsenal for working with lumber. You can collect it from friends or rent it. Why two days before installation? Because well before starting work, you will need to check with your own hands the serviceability and functionality of each tool:
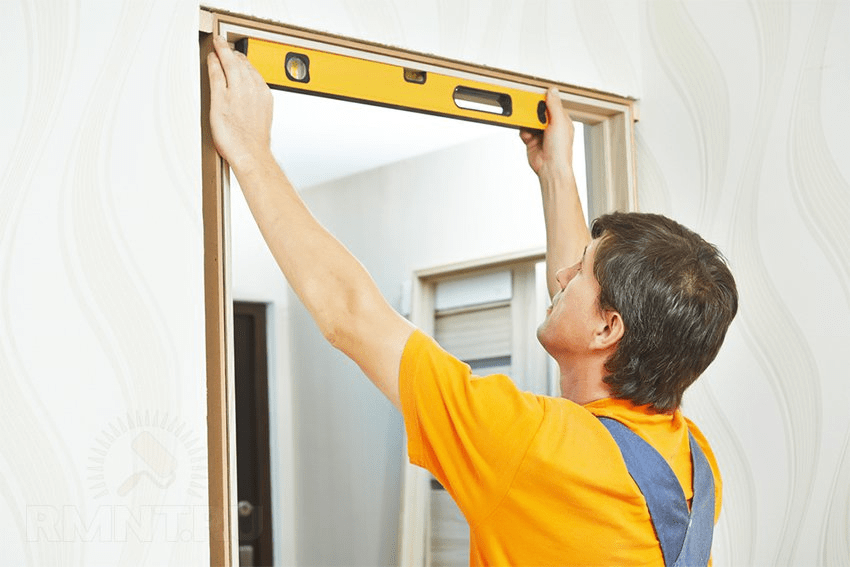
- Construction levels - small, 70-100 cm, and large, 150 - 200 cm, with a working bubble indicator. Usually they don’t pay attention to the condition of the camera and beacon, considering them to be in good working order, but at rental stores you can sometimes find bent and even broken copies, these are the most important tool in the installation of interior doors;
- Marking tool - carpenter's corner with a ruler, tape measure and meter metal ruler. We check for the presence of angle marks at 90° and 45°;
- A screwdriver or electric drill with a bit attachment for cross-head screws. We check with our own hands how the cartridge holds, and the serviceability of the wiring - batteries;
- Cutting tool, you can cut the timber of interior doors with a jigsaw, but it is best to stock up on a pair of hacksaws - carpentry and metal. The first is used for cutting box parts, the second is used for fine cutting of platbands.
In addition to the tool, you will need a hammer, a clamp, a carpenter's chisel, foam in a can, tape and gloves. There is little dust and waste generated when installing interior doors, but you will still have to periodically remove it with your own hands so as not to spread it throughout the apartment.
In addition, it would be correct to have a hammer drill with a bayonet blade in stock, because when installing an interior door frame, problems may occur with the doorway in the wall. Ideally, the gap between the frame posts and the ends of the opening should remain 10-20 mm, for normal alignment and foaming of the cracks. In reality, the opening may be uneven, and you will need to knock down part of the concrete or stone with your own hands, a hammer drill or a hammer and chisel.
How to assemble an interior door frame
The best option would be to purchase a ready-made door kit, which usually includes:

In this case, the entire process of installing the interior frame box comes down to transferring the second parts of the hinges onto the frame parts with your own hands, assembling the hinges with self-tapping screws and installing them in the opening.

The entire job will take less than two hours. One of the options for installing interior doors with your own hands in the video

The only drawback of the above scheme is that not all manufacturers modern models interior doors manufacture their products in kits designed for do-it-yourself installation. Most often, the customer buys a door leaf, and the trim and frame parts are purchased with the expectation of installing an interior door with a frame on their own.

How to install an interior door with your own hands
First of all, you need to lay out the door leaf on a level area. Next, the selected pair of beams is laid to the left and right ends of the sash. Using a tape measure, we measure the width and expected height of the future supporting frame. Then, using a building level and a tape measure, check the dimensions of the interior passage.
Important! This is done in order to determine whether the platbands will cover the edges of the hole in the wall, and what thickness of additional elements should be used.

If you “miss” the height or width of the frame, you will have to redo the trim yourself or, even worse, you will need to raise the interior door in height.
Assembling a door frame frame of any size
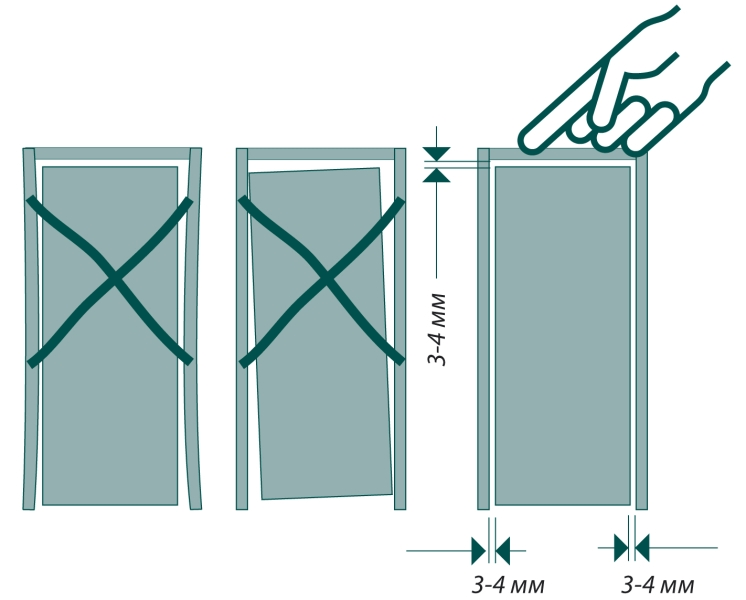
In order to install the interior door without distortions, it is important to choose the correct distance between the left and right posts so that the door leaf fits into the frame with a small gap, no more than 2 mm on each side. In this case, the door will open freely without jamming in the hatch.

The easiest way to assemble the frame with your own hands is using a clamp, a saw and two blanks. Vertical posts, as in the case of preparation, are placed at the ends, leveled and secured with clamps.

On the side of the upper and lower edges of the canvas, an allowance equal to the thickness of the timber is left on the workpieces. At the same time, on the left allowance, a cut line is applied with your own hands at an angle of 45° for further joining with the horizontal crossbars of the frame. Without disassembling the structure, markings are applied to cut out the grooves for the canopies, lock and handle.
If the interior door is too wide or complex shape, then usually at this stage they check the conformity of the configuration of the frame with the door to the shape of the interior opening. To do this on wooden plank drive a pair of nails at a distance from each other equal to the outer width of the frame. The plank must be secured above the opening, and a couple of plumb lines are hung on the nails. If the gap between the frame and the wall is 10-15 mm, then the calculation is correct.
Installing hinges on an interior door
After all checks have been completed, it is necessary to cut out mounting grooves for the awnings in the canvas using a chisel or carpenter's knife and hammer. The easiest way is to mill a niche using hand router, but, as practice shows, the work can be done with your own hands and without expensive power tools.

If this operation causes difficulty, then for interior doors you can use overhead hinges or models for drilling. For installation you only need to drill holes for screwing in the fasteners.
We fix the frame in the doorway
- We mark the level of the upper horizontal cross member of the frame with a marker on the steppe, this will help to complete correct installation horizontally and vertically;
- Using wedges and a building level, we level the frame vertically and horizontally with our own hands. We fix the position of the frame in the opening with wooden plugs and wedges.
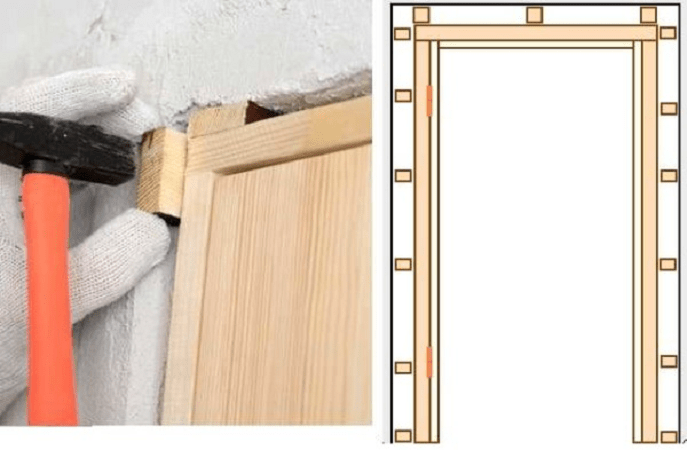
Advice! If the frame and door leaf are light in weight, then the frame can be fixed with mounting perforated petals to the wall of the interior partition.

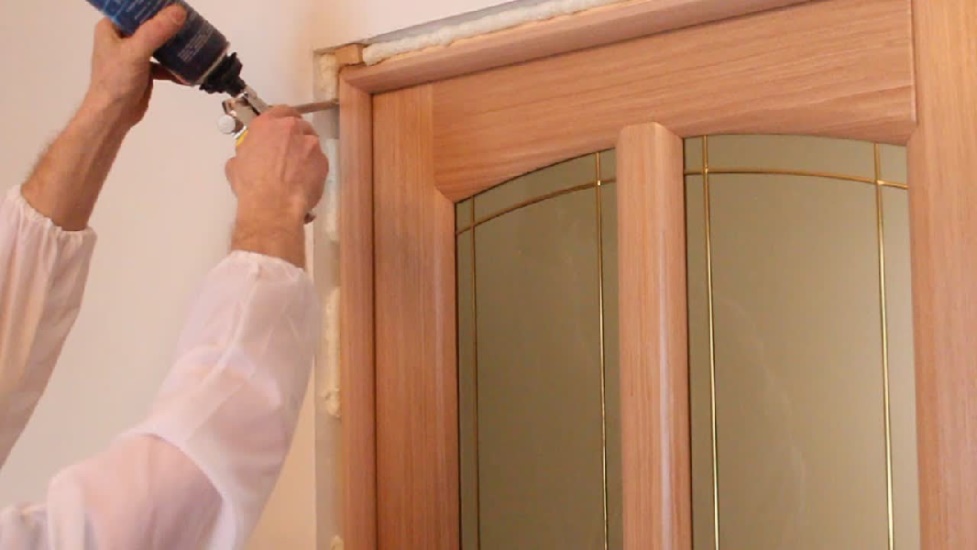
Next, you need to blow out the space between the frame and the wall with polyurethane foam; while installation is being carried out on the polyurethane foam, you need to check it again and, if necessary, finally level it vertically using a long building level. We apply a small building level to the upper mark and, if necessary, we knock the frame to the desired height.
Installation of door leaf
After the loot is firmly fixed with hardened foam, it is necessary to install the mating parts of the canopies. To do this, initially the door leaf is raised with wedges so that there is a gap of 1-2 mm between the threshold and the lower edge.

All that remains is to install the sash on the awnings, and you can move on to decorative finishing interior doors.
Installing trim on interior doors
Covering the frame with platbands is not particularly difficult. First of all, install the vertical trim strips. The height of the plank is measured according to the mark made earlier, after which the platband is applied to the frame and the cut line is marked at an angle of 45 degrees.
Advice! It is best to make an undercut with your own hands using a thin hacksaw blade on metal. First stick tape onto the cutting line. The plank is nailed with wallpaper nails or placed on glue.
The second vertical casing is installed in a similar way. After the installation of the vertical parts has been completed, you can mark the cut line on the horizontal strip and install it on the door frame in the same way.
What are the sizes of extensions for interior doors?
Additional strips are used as additional element to increase the width or thickness of the door frame. Most often, installing extensions on interior doors is required in a situation where the wall is much thicker than the canvas, and there is a gap between them that needs to be closed.
The width of additional slats ranges from 10 mm to 200 mm, for interior designs the most popular size is 10-20 mm, and often, due to the non-standard profile of the slot, the extensions have to be ordered or cut out with your own hands from the trim strips.

How to install extensions on an interior door
If after installing the box the unpleasant fact is discovered that vertical plane frame is recessed into the space of the interior opening relative to the wall surface, then the only way to correct the position is to use additional strips.

You must first determine the size of the extension; to do this, place a building level on the wall and use a ruler to measure the distance to the front edge of the box. Thin strips are nailed with wallpaper nails, wide extensions are glued to the frame.
Professional advice on how to install interior doors
Among the features of installing home doors, the following problem areas can be noted.
Before installing the trim, you need to make sure that the frame or additional strip is located in the same plane with the surface interior wall. Otherwise, even if you do it perfectly with your own hands, a gap will definitely appear between the platbands.
The second problem that we have to face is the sagging of doors when incorrect installation. To correct the position, you need to remove the door leaf, place washers, or trim the edge and install the door in place.
Conclusion
Installing interior doors with your own hands will require a little practice in installing awnings and extensions, but in general the work is not difficult, and with the right skill you can hang the door in a few hours. The craftsmen claim that with each installation, the quality of their DIY work doubles.
You can make a door frame yourself For correct production You will need to take measurements of the doorway and interior door and only then begin processing the wood. Self-made doors will allow you to save a considerable amount of money.
What is a door frame for?
The door frame is part of the structure in doorway, which ensures correct installation of the door. By appearance it resembles a frame. Without door frames it is impossible to install interior doors.
Attached to the door frame metal hinges, on which the door will be mounted, as well as a mortise plate for a lock or latch. The condition of the entire structure with a wooden door depends on how well the frame is made and how well it is installed.
Door frame ensures proper door installation
When measuring the frame, you need to take into account the weight of the door leaf, which will bear the load on the door frame.
The door frame consists of three parts - two side and one transverse. If necessary, you can make a threshold. Although now floor coverings install neat metal thresholds, which can be purchased together with laminate or linoleum.
To make a door frame yourself, you should start by taking the necessary measurements and selecting the material.
Door jamb: measurements and choice of material
Let's start with the fact that you need to choose the right timber (lut) in the store. It should match the width of the wall into which the box is inserted. There are loots various types, with a variety of coatings and all suitable sizes.
The materials from which the loot is made also vary:
- solid wood;
- metal.
If you buy it in the same place as the door, you will be offered an identical loot, which will be no different from the door. Door manufacturers often launch production wooden blanks for door frames. For front door It is better to choose a frame made of solid oak - more reliable and durable than MDF.
Before you start making the door frame, you need to take measurements
If suddenly the width of your wall is not standard and none of the proposed options are suitable, take a beam slightly narrower than the wall, and the remaining width can be compensated for by a good-quality board.
When the materials are ready and the tools are available, we move on to making the box.
Making a box begins with taking measurements. If desired, you can draw a drawing. Measurements are taken after the old frame has been dismantled and the opening has been repaired - the unevenness in the wall has been puttied. First you need to take measurements of the height of the future structure and the width of the doorway. It is not advisable to exceed the size of the loot, as this will make it more difficult to file off the extra pieces.
How to make a door frame yourself
To make a box of standard sizes, you will need three purchased timbers. Two of them will go to the racks, one will be cut into the upper crossbar and threshold.
The threshold may not be installed, in this case the required length will be cut from the whole beam, and the rest will go to waste.
The height of the racks is not difficult to determine; they can be the height of the entire opening in the wall. However, no less than the height of the door with upper and lower gaps (2-3mm), as well as double the thickness of the door at its thinnest point. If the frame does not have a threshold, then the thickness is only of the top crossbar in the thinnest place (where it is embedded under the door). But then the gap from below should be increased to at least 20 mm.
The process of making a door frame with your own hands
The length of the top crossbar should include the width of the door with two small distances (2-3 mm each). Similarly with the threshold (if you decide to install it).
In order to connect all the parts of the box together, it is necessary to make several cuts on the upper (lower) crossbar. You need to remove a small piece from the thick part of the loot. To do this, it is better to place all the parts on the floor and combine them into the future box.
When docking, it will become clear what exactly is preventing a tight connection. When sawing off excess pieces of loot, it is important not to damage the coating of the box.
Do-it-yourself door frame: assembly of the structure
Once all the parts are adjusted, you can proceed to assembling the box. It is also easier to assemble it on the floor.
Loot assembly:
- Before connecting with screws or nails, you should drill holes for future screws or nails. This is necessary to prevent the tree from bursting.
- After connecting all the parts, it is better to test yourself by placing the box in the door.
- Check all the gaps, and in this position it is convenient to make markings for future hinges.
- Perhaps it will be more convenient to embed the hinges and lock before installing the box, and after installation, simply assemble everything, like a construction set.
When all the door frame parts are ready, you can begin assembly.
There is another option for connecting the box parts by cutting them at an angle of 45 degrees. This option is also not bad, but additional accuracy is required.
Sections can be made using a miter box or special tools.
The finished parts of the MDF door frame can be covered with PVC film or veneered. If the loot is made from natural wood, it can be opened with varnish or painted with any paint.
Wooden door frame: installation of a finished structure
Once the box is assembled, you can begin installation. You need to have a hammer, self-tapping screws, a hammer drill, polyurethane foam and wooden wedges.
Progress:
- We insert the box into the opening. If the box has small gaps with the opening, then you are very lucky.
- If the loot has a special removable bar behind which you can hide the bolts, then this is a second success.
- In this case, we level the box, put wedges between the wall and the box so that it does not wobble, and use a hammer drill to drill a hole through the hole into the wall.
- There should be at least 3 connections on the posts, and 1-2 on the lower and upper crossbars.
- After this, fill the gaps between the box and the wall with foam. After drying, cut off the foam at the base with the wall and install the door and trim.
There are cases that after assembling the box, it does not fit tightly in the opening - there are gaps of 2-3 cm or more.
The door frame installation process can be carried out after it has been assembled
In this case, the installation is a little more complicated:
- You need to get wooden wedges 2 mm thick.
- Before inserting the frame, you must insert the door into it. It is not necessary to secure it with all the screws in the hinges, but it should still stand in its place.
- We place the box together with the door in the opening. Secure with wide pegs to level.
- Make sure that the box is not only level, but also does not fly out or sink over the edges of the wall.
- We close the door from the outside and secure it with wedges around the perimeter. Special attention We pay attention to the middle of the racks and the top crossbar.
- After installing all the wedges, we fill in the gaps between the core and the wall with polyurethane foam.
Blow out the foam carefully so that when it dries, it does not expand the container so that the doors then cannot open and close freely.
Before blowing, for better adhesion of the foam, get rid of dust using water or a primer.
After the foam has completely dried (about a day), we cut off the foam, remove the wedges from the door, and check the work. Finishing touch– we attach locks and platbands.
How to make a door frame with your own hands (video)
If, when purchasing a new interior door, restoration of the old door is impossible, you can do it yourself. At the same time, it is very important to follow simple rules so that the finished box looks no worse than the factory version.
Similar materials


To replace or install an interior door, it is not necessary to seek the help of a specialist, since even with basic construction skills and the ability to use tools, you can do this work yourself.
Installing an interior door
First you need to dismantle old door. This is done using a hacksaw and a pry bar. Saw one of the side beams with a hacksaw, then split it with a pry bar.


If you have standard door openings, then you can easily buy a ready-made door of the required size. However, it happens that in old private houses the openings may not be standard. Of course, you can buy a door to order, the size you need, but it will cost an order of magnitude more, and if you want to change the door again in the future, you will have to order again right size. It’s easier to adjust the doorway to what you need standard size 70 or 80 cm. If the opening is wider, it can be shortened brickwork.

When purchasing a door, you can immediately purchase fittings (lock and awnings). The door will be supplied with a door and platbands. The installation of a door begins with the installation of a door or door frame. Lutka elements are usually bigger size, so you will need to cut off the excess. Along the edges of the long elements of the box, you need to break off the strip so that the upper part of the box fits into the groove of the lower part.


Next, measure the width of the door and add 4-6 mm to it so that there is clearance between the frame and the door.

Then cut the desired length of the top of the loot. When measuring, use a tape measure and a square with a pencil to cut exactly 90 degrees. You can cut it with a handsaw or a jigsaw with a thin file.
After this, connect the piece, securing it with self-tapping screws. Before tightening the screw, drill a hole to avoid chips and cracks, especially if the door is wooden.


Once you have assembled the door frame, cut off the excess from the bottom pieces along the length of the door.
Next, you can begin installing the awnings. Here it is important to decide which way the door will open and attach the awnings accordingly. First screw the awnings to door frame, retreating from the edges approximately 25 - 30 cm.

Then place the door in this frame, installing special distributors between the frame and the door. They usually come complete with the door. Thanks to them, the gap between the door and the hatch will be uniform on all sides.


After this, you can screw the awnings to the door. Before tightening the screws to secure the canopies, be sure to drill a hole exactly in the middle of the canopy holes.
Once the door is assembled, unscrew the door hinges to install the door into the doorway. The door frame is installed on polyurethane foam. However, before you start blowing out the foam, secure the loot with wooden wedges. You can additionally secure the box with a profile by screwing one screw into the box and the other into the wall.


When the door frame is exactly level, both horizontally and vertically, you can install the door by screwing the awnings to the door.
Next you need to install the lock. As a rule, the lock should come with instructions for installing it. If you do not need the door to be locked with a key, then you can use a regular lock with a handle, thanks to which the door will open by pressing the handle down. To do this, drill a hole with a feather drill, the diameter of which should correspond to the width of the mechanism that is inserted inside.

Here you immediately need to decide what level of handle height will be so that you are comfortable. Then insert the lock inside. After this, measure the distance to the rotating mechanism on the lock, and transfer this measurement to the door. Now you can drill a hole into which the handle will be inserted. In the door frame, using a feather drill, you need to drill holes into which the lock will fit.


