Kitchen table do it yourself - this is one of the most common creations home handyman. Of course, you can buy a ready-made table, choosing from a wide range of such products.
However homemade design, will not only get rid of extra costs, but will also help to optimally manage a small kitchen area.
With your own hands you can make a very simple table, or an original one, modern design. It all depends on the desire and availability of certain skills.
 In principle, kitchen furnishings include both kitchen and dinner table. Kitchen The table is intended for final preparation and serving of dishes before serving, as well as for light snacks for 1-2 people.
Dining the table is used only for eating, and unites all family members and guests.
Taking into account the small dimensions of standard apartments, most people do not see the differences in such pieces of furniture as, and use only one option for all cases. This attitude is facilitated by the absence of fundamental differences in their design. They differ only in size and some specific design related to the placement of users. All this allows you to make a kitchen table with your own hands.
Important! A kitchen table must satisfy the following basic requirements: sufficient capacity, compactness, optimal location in the kitchen, strength, aesthetics, ease of use, ease of manufacture and operation.
Appearance and dimensions
 Among the main parameters of the kitchen table that determine appearance and functional abilities, its shape and size stand out.
The choice of dimensions depends on the size of the room and the composition of the family.
The height should ensure comfortable placement of a person and is usually chosen around 75-85 cm.

Important! The dimensions of the tabletop are selected at the rate of 60 cm per person.
According to the configuration of the table top, tables are divided into the following types:
Material
 Before you make a wooden dining table with your own hands, you should decide on the materials. Their choice is determined by availability, price, strength characteristics, ease of processing, and room design style.
In manufacturing, either one type of material or a combination of them can be used.
The most popular materials are:

Elements
A simple kitchen table has only a few components:
- Tabletop. It is she who performs the main functions and provides appearance. This most important element must have a flat, smooth, horizontal surface.
- Base. The table top is attached to the base, which allows the table to be placed on the floor. It must be stable and durable. The most common option is 4 legs. The design of 2 wide sidewalls is quite popular.
- Strengthening elements. To ensure that the legs do not diverge different sides, and the entire structure moved freely and withstood loads, are used cross bars between legs, reinforcing frames, etc.
The kitchen table can also have a more complex, universal design: 
- cabinets, drawers, shelves. The possibility of using the space under the tabletop is especially important in small kitchens. For this there are many standard projects kitchen tables that have a base in the form of a cabinet equipped with a door or drawers. Quite often, such drawers are made directly under the tabletop;
- transformers. In order to increase the number of seats around the table, there are several ways to design it. The most commonly used is the sliding and folding version. In the first case, the tabletop, consisting of 2 halves, is moved apart if necessary, and an additional panel is installed in the middle part. In the second case, the table in its normal state has a small width, designed for 2-4 people. At the right moment, an additional plane rises on hinges, which significantly increases capacity.
Tools
When making a kitchen table with your own hands, it is important to prepare in advance the right tool taking into account the material used:
- universal tool – grinder, milling cutter, Sander, electric drill;
- for carpentry work - a plane, electric jigsaw, screwdriver, hacksaw, hammer, mallet, chisel, file;
- for working with plastic – a construction hair dryer;
- to cut plastic and metal you will need a hacksaw;
- measuring instrument - metal ruler, square, tape measure, caliper, level.
How to make a wooden dining room with your own hands?
 The manufacturing technology of any table is based on the following stages - manufacturing individual elements, assembly, final processing of the finished product.
It can be illustrated using the example of a simple kitchen table, economical design. In this case, you can use chipboard.
How to make the frame and tabletop yourself?
Before you make a dining table with your own hands, you need to make the following elements:
- Tabletop. It will require a sheet of chipboard measuring (56-60) x (95-100) cm with a thickness of 14-16 mm. It is best to use a stove with smooth surface, otherwise the surface is carefully sanded with emery cloth or using a grinding machine. The corners of the sheet are rounded with a jigsaw. You can use a plastic jar lid for marking. The rounds are processed with a file and emery cloth along the entire perimeter, giving them a rounded shape.
- Frame to strengthen the tabletop. It is made from wooden blocks measuring 25x45 mm (2 bars each 70-72 and 30-32 cm long). Gusset the frame is provided in “half a beam”, i.e. half of the beam is cut at the ends to a length of 25 mm. The bars are joined with their wider side vertically. The joints are coated with carpentry or PVA glue and reinforced with screws.
- Side racks. The base of the table is 2 sheets of chipboard measuring (45-48)x75 cm. An oval cutout is made in the lower part to form the legs. The height of the cutout is 10 cm. You can use a saucepan lid for marking.
Assembly
Assembling a simple kitchen table is carried out in the following order: 
- Marking the center of the tabletop to simplify subsequent work.
- A frame is installed at the bottom of the tabletop strictly in the center (based on the markings). Fastening is provided with 3.5x50 mm self-tapping screws in 4-6 places.
- The center of the narrow side of the frame is marked and, focusing on it, the sidewalls are fixed. Fastening is done using furniture corners and 3.5x15 mm self-tapping screws.
- Installing a spacer element between the sidewalls. It is made from wooden beam 4x4 cm long is 20 mm greater than the distance between the sidewalls. The spacer is fixed at a height of 25-35 cm with 4x65 mm self-tapping screws.
Final processing
A few tips that will extend the life of the table.
Important! All joints should be coated with glue or a special putty for wood.
Important! The screw heads are recessed by 2-3 mm, coated with glue and covered with putty on top or covered with furniture caps.
The dining table is important element kitchen interior. The design and dimensions of the kitchen table should allow the entire family to be seated at it, but at the same time not interfere with free movement. Available for sale big choice kitchen tables of various shapes, from domestic and foreign manufacturers. But if you have some carpentry skills, then it might make sense to make a table with your own hands, with your own design that will fit perfectly into the general interior kitchens.
In our article we will tell you: how to make kitchen tables different models what tools and materials to use for this. Also at the end of the article, you can see unusual models of kitchen tables.
Tools
Despite the variety of table models and production methods, the set of tools used for making tools, with minor exceptions, remains the same:
- Electric jigsaw.
- Hacksaw.
- Drill.
- Screwdriver.
- Set of drills.
- Screwdriver Set.
- Electric planer.
- Electric planer.
- Sander.
- A set of hexagons (in cases of using confirmations).
- Iron or heat gun (for edging the ends with tape).
- Yardstick.
- Pencil.
- Ruler.

Depending on the complexity of the table design, additional tools are included in the set.
Materials for manufacturing
The following materials can be used to make a kitchen table:
- Chipboard – Chipboard.
- LDSP – Laminated chipboard.
- Glued board.
- Regular edged board.
- Wooden beam.
Often in the production of kitchen tables, a combination of two or more of the above materials is used. 
Accessories
Kitchen table fittings include the following fastening and decorative elements:
- Furniture corners.
- Confirmations.
- Eccentric bolts.
- Hinges for folding tables.
- Rollers for sliding tables.
- Corner leg mounts.
- Legs-overlays for tables made of chipboard.
- Plastic profile for table top.
- Trimming adhesive tape.
- Decorative plugs.

Certain table models may include additional fittings not included in the list.
Table options and methods for making them
Simple kitchen table made of chipboard
Marking
On the purchased laminated chipboard sheets, mark the parts of the table:
- First of all, mark the tabletop, since it is the largest element of the table. The tabletop is made in the shape of a rectangle with rounded corners.
- In the second step, draw two side posts that will serve as the legs of the table. The stands are usually made in the shape of a chess rook, with a round cutout at the bottom. But you can show your imagination and make racks of a different shape, the main thing is to comply with two conditions: the racks must be stable and not crawl out from under the tabletop.
- Finally, mark the upper and lower crossbars that connect the racks to each other and increase the stability of the table and the strength of the table top. Please note that the lower crossbar is made 1.5-2 times wider than the upper one. The shape of the bottom crossbar can be either flat or wavy.
When making markings, take into account the fact that the table posts should be located 15-20 centimeters from the edge of the tabletop. 
Cutting out table pieces
- Place a sheet of chipboard on the table.
- Using a jigsaw, cut out the tabletop. When cutting, do not forget to place an unnecessary piece of plywood under the cut line, this will help avoid chipping on the back side cut.
- Cut out the rest of the table. Avoid sagging of the sheet, this can lead to the clamping of the jigsaw saw, as well as to the breakage of the cut part.
- Finish the edges of the cut parts sandpaper or a vibrating sander.

Trimming the edges of parts with tape and profile
- Place the plastic profile on the edge of the tabletop.
- Having reached the corner bend, warm up the profile construction hairdryer and rotate the profile.
- For a more secure installation plastic profile on the countertop, you can additionally use universal glue.
At the second stage, you will need to trim the racks and crossbars of the table with a special tape:
- Clean the ends of the parts from dust and grease.
- Pressing the tape with a hot iron, glue it to the end of the part.
- Cut off the excess with a knife, matching the width of the tape with the width of the end. Smooth out any unevenness with sandpaper, being careful not to scratch the tape or the part.
- Apply tape to the ends of the remaining parts.

Please note that gluing the trim tape is only required in visible places on the table parts.
Table assembly
- Using confirmations, connect the floor racks with the upper and lower crossbars. The location of the top crossbar should allow it to support the tabletop and prevent it from sagging. The lower crossbar is attached above the round cutouts of the racks, 20-25 centimeters from the floor.
- Having made the base of the table, install the tabletop on it, securing it to the furniture corners with inside.
- Install plastic pad feet on the bottom of the table posts.
- Close the heads of the confirmations with decorative plugs.
A simple kitchen table made of chipboard is ready! 
You can also watch how to make a table from chipboard in the video:
Kitchen table "book"
The “book” table consists of the following parts:
- The base is made of posts and crossbars.
- Narrow main table top.
- Pairs of movable legs-stands.
- Two opening side tables.
- Piano and regular hinges.
- Fastening elements.
A table of this design can be made from laminated chipboard, or from glued and edged timber. Also, to make the base they use metal parts.
Let's look at the process of making a table from laminated veneer lumber.

Manufacturing of tabletops and stands
In order to make a tabletop from bars glued together, you need to have at least two racks with clamps on which you will form the tabletops. Stands and tabletops for a table made of laminated veneer lumber are made in the following way:
- Take several bars with a cross-section of 50x30 millimeters and place them on racks with clamps. Place the bars in such a way that the annual rings on adjacent bars face in different directions, this will avoid bending of the part during subsequent use.
- Form a shield from the bars, slightly larger in size than the future tabletop.
- Coat the ends of the bars with PVA glue.
- Clamp the shield with clamps. Avoid squeezing too hard, otherwise the shield will bend.
- Leave the glued bars for a day for the glue to dry completely.
- After 24 hours, remove the shield from the clamps and treat the surface planer or using an electric planer.
- Cut the shield to the required size and finish the edges with a plane or hand router.
- Thus, you need to make two table posts, two crossbars, one narrow and two wide side tabletops.
 Bars clamped with clamps
 Making retractable legs
Retractable legs for the “book” table are made in the shape of frames, where the lower crossbar is located 15-20 centimeters from the floor. To make a frame, you will need four bars with a cross section of 50x25 millimeters. The connection of the bars can be made using long screws, tenons and glue or confirmats.
Assembling the book table
- Assemble the table base by connecting the posts and crossbars.
- Attach a narrow tabletop to the base.
- Attach retractable legs to the table posts using hinges.
- Attach the side ones to the narrow tabletop, attaching them to the piano canopies.
- Install the pad feet on the racks.
- Check the operation of all moving parts of the table by unfolding it completely.
 Table-book
 Varnishing the table
To highlight the beauty of the wood, cover the finished table with a clear varnish, if desired, pre-treating its surface with stain. To achieve a polished effect, you will need to apply several layers of varnish. 
How to make a “book” table, watch the video:
Extendable kitchen table
The sliding table has the function of increasing the surface of the tabletop due to installation additional elements. This type of table is popular in small apartments, where the area of the home does not allow the installation of a regular big table.
An extendable table is made from the following parts:
- Two main countertops.
- Additional collapsible table top.
- Bases with tray.
- Four legs.
- Corner mounts for legs.
- Rollers for table tops.
- Hooks for fixing tabletops.
- Spikes of clamps.
It is best to make an extendable table from a combination of chipboard and bars.
 Accessories for extendable table
 Manufacturing of countertops
- From a sheet of laminated chipboard, cut out two tabletops of the same size, which will form the main surface of the table.
- Cut out an additional table top. The width of the additional tabletop should not exceed a third of the total area of the table, otherwise the table will not be stable in the extended position.
- Apply edge tape to the edges of the tabletops.

Making the base of an extendable table
The base for the sliding table is made of four narrow crossbars connected to each other by corner fastenings for the legs and a tray. To lighten the overall weight of the table, instead of laminated chipboard, you can use plywood 5 millimeters thick for the pallet. Also, instead of a pallet, manufacturers often use metal or wooden crossbars, which strengthen the structure and serve as storage for the middle tabletop.
Making table legs
The legs for the sliding table are made from four bars with a cross-section of approximately 50x50 millimeters, slightly beveled towards the bottom. A hole is made at the top of each leg for a mounting screw. The hole should be located on the inside. Don't forget to sand the legs with a plane and sandpaper.
Assembling an extendable table
- Install the sliding tabletops onto the base, attaching them to the roller mounts.
- Extend the tabletops and install a removable tabletop. To properly fix the additional tabletop on the base, install spikes on it, which will connect all parts of the table together.
- To prevent the tabletops from coming apart when the table is assembled, install locks in the form of hooks on them.
- Attach the legs to the base.
- Varnish or paint the tray and legs.

Instructions for assembling the sliding table are also in the video:
Folding wall table
If you have a very small kitchen and there is no way to install a regular kitchen table, then making a folding wall table can be a solution to the problem. Its advantage is that when folded it takes up only 15-20 centimeters of kitchen space, and when disassembled it can easily accommodate two or three people for lunch.
The folding table consists of three parts:
- Countertops.
- T-shaped wall mount.
- Triangular folding stand
You can make a table from plywood, bars, hinges and screws.
 Wall Table Parts
 Making a wall table
- Use a plywood jigsaw to cut out the tabletop.
- From bars with a cross-section of 100x20 millimeters, make a wall mount in the shape of the letter T. The upper mount bar should correspond to the width of the tabletop, and the lower one to the height of the triangular stand.
- Make a triangular stand that hinges to support the tabletop in the open position.
- Install the mount to the wall using dowel screws.
- Attach the table top to the top mounting bar. Use hinges or piano canopies to connect.
- Install the triangular stand.
- Check the operation of all parts of the table by disassembling and reassembling it several times.
- Cover the table with varnish or paint.
If you have a tabletop, but you don’t want to make parts for a folding table by hand, then purchase folding brackets from the store. Bracket models are specially designed for wall mounting and are very inexpensive, ranging from 170 to 700 rubles.
 Wall bracket for the table
 You can see another version of the kitchen table in the video:
Design and shapes of kitchen tables
To help you choose a kitchen table, we present you with photographs of the original models:

- Rustic laminated wood kitchen table.

- A “tansformer” table on one leg of complex design.

- Extendable table with a pattern on the tabletops.

- Table made of laminated boards with rounded tops, in high-tech style.

- Round table with original legs.

- Massive kitchen table made of timber.

- Original table made of laminated veneer lumber.

- A beautiful board table with a very simple design.

- with internal electric lighting.
Now that you know everything about making tables, it won’t be difficult for you to make your own table for the kitchen!
Even if furniture production is far from your area of expertise, make country table with your own hands to gather with family and friends on warm summer evenings is a completely feasible task.
Its main advantage, as opposed to a purchased one, is its undoubted savings. It is not necessary to make a table from scratch: simply by assembling purchased parts, you will save 30-50% of the cost. If you manage to use materials left over from construction or renovation, the costs will be limited to the purchase of fittings.
To choose a design, you need to decide where the product will be used.
By using cheap, substandard boards for your country or kitchen table, you will get benefits that are not available to mass production. Sounds dubious? But it’s true: the knots that cause boards to be rejected have the most interesting decorative properties. If you manage to highlight them successfully, you will become the author of a completely unique design product that would be a shame to leave in the garden in the rain.

Making a country table with your own hands to gather with family and friends on warm summer evenings is quite a feasible task.
To choose a design, you need to decide where the product will be used: on a grassy lawn under a tree, to complement a gazebo, to stand in a workshop or in a house.
The simplest country table can be assembled in a few hours with a minimum of materials, but it will not last long. To get a product that will be truly pleasant to use, you need to carefully prepare the boards and perform all technical operations at each stage with high quality.

Its main advantage, as opposed to a purchased one, is its undoubted savings.
If you find a large stump in the forest, it can be easy to make garden table. All you need to do is remove the bark from the stump, make an even cut along the top, sand it, treat it with an antiseptic and varnish it. It is enough to nail or screw the finished stump to the “leg” furniture board- and it’s done.
Tabletops made from boards fastened at the bottom with transverse slats look good. If you prefer a glued tabletop, you can make it yourself, but it will require a lot of effort.

If you manage to highlight them successfully, you will become the author of a completely unique design product that would be a shame to leave in the garden in the rain.
It is difficult for a novice master to fasten the legs securely, so try to choose a design, correctly assessing your skills and taking into account the cost of labor and time. The easiest way to make cross-shaped and L-shaped legs. To attach straight legs, you need to carefully connect the parts.
One of the most cozy options for garden - collapsible table with benches, which can be installed in a gazebo or on the veranda. It’s not difficult to do, the main thing is to choose quality materials and properly prepare them for work.

The simplest country table can be assembled in a few hours with a minimum of materials, but it will not last long.
How to choose a tree?
For garden or kitchen table will do wood of many species, both soft (pine, spruce, cedar, fir) and hard (oak, birch, ash, walnut, maple, apple, pear, acacia, etc.) The exception is too soft wood species (poplar, alder, aspen, willow).
One of the main parameters of the suitability of wood for making furniture is resistance to rotting: the species listed above meet this requirement.
If you do not plan to do furniture work on a regular basis or are just starting to practice, give preference to the most common types of wood - pine and birch.

Tabletops made from boards fastened at the bottom with transverse slats look good.
Wood can be used for the tabletop, frame and legs different breeds. At the assembly stage you will need dowels: they are usually made of acacia or boxwood. Birch wood has an inexpressive pattern and can be significantly warped due to spilled liquid - it is better not to use it as a tabletop material, but due to the hardness of this species, it can be used to make legs.
It is better to make the tabletop from oak or pine. If you know how to brush wood, the surface of your kitchen table can become a real work of art. Wood can be brushed soft species: wood is burned gas burner, and soft fibers are removed with a wire brush. It is better to carry out work in the yard due to the large amount of dust. If you managed to burn the wood evenly, you will be pleased with the result. Brush can be tinted with stains, stains, artistic paint diluted with water acrylic paint. Of course, brushing the wood is not necessary: it is only a finishing option.

If you prefer a glued tabletop, you can make it yourself, but it will require a lot of effort.
Selection of paints and adhesives
Before installation begins, the boards must be protected from rotting. The tree must be impregnated with water-polymer emulsion (WPE): treatment is carried out twice with an interval of 3-5 days. This is enough for the product to last a long time.
Some models will require glue. Along with special carpentry adhesives (BF-2, etc.), you can use construction PVA: it is applied to both surfaces to be glued, dried until tack-free, then the parts are connected and kept under pressure for up to three days.

It is difficult for a novice master to fasten the legs securely, so try to choose a design, correctly assessing your skills and taking into account the cost of labor and time.
Choice paint and varnish materials determined by where the product is planned to be used: in the yard or indoors. For garden table which is inevitably exposed to precipitation, alkyd, alkyd-urethane, nitrocellulose varnishes and oil paints are suitable. For the kitchen table, as for any furniture that is constantly located indoors, it is better to use acrylic paints and varnishes: they are more environmentally friendly and do not have a strong odor. Varnishes marked with the “blue angel” sign are recommended for children's furniture and toys.
If you decide to cover the wood with stain, paint or simply tinted varnish, this must be done before assembly. Material compatibility must be taken into account. The varnish is tinted with a paint of a suitable composition: if the varnish is alkyd, the paint should be oil-based; if you use acrylic varnish, it can only be tinted with acrylic paint. At first a small amount of The varnish is thoroughly mixed in a separate container with paint, and then the resulting mixture is added to a larger volume of varnish.

One of the most comfortable options for the garden is a collapsible table with benches, which can be installed in a gazebo or on the veranda.
What tools are needed
To work you will need:
- hacksaw,
- a circular saw or jigsaw;
- drill;
- screwdriver;
- hammer (if you decide to use nails).

Many species of wood are suitable for a garden or kitchen table.
This list includes only the most necessary tools, but to make the work more comfortable and the finished product to look aesthetically pleasing, it is advisable to buy or rent a rotary miter box, an eccentric sander and milling machine.
The rotating miter box makes it possible to make cuts exactly according to the right angle. An eccentric sander will allow you to prepare parts simply, quickly and efficiently: you will sand the boards in an hour, instead of doing it all day by hand with sandpaper. For high-quality processing A belt sander is useful for the ends, and a milling machine allows you to select wood for the required grooves and process the edges.

If you do not plan to do furniture work permanently or are just starting to practice.
Homemade table from pallets
A spectacular table in a rustic style can be constructed from pallets ( wooden pallets). If you are the happy owner of such a container, especially a double-deck pallet, just disassemble it: there is no problem purchasing boards!
Do you think that buying new boards is always better? You probably haven’t worked with wood before: you can’t use raw wood (the product will become deformed after a few months), and dry boards are much more expensive. To dry green wood planks, they are stacked in a well-ventilated area: this necessary process will set your project back by 4-6 months! The already mentioned rejected boards, also dry, can be a good option for the kitchen table.

It is possible to use different types of wood for the table top, frame and legs.
Let's return to the pallets: they are disassembled. Now you have at your disposal strong boards with different patterns and colors, it is possible that they are from trees of different species. These features should not be considered as disadvantages: they will give the product a zest: you just need to create from them interesting composition, alternating boards of a similar shade.
The sides of the pallet will make an excellent frame, and the remaining strips will be used to assemble the tabletop.

It is better to carry out work in the yard due to the large amount of dust.
To make the legs, you will need a beam at least 5 cm thick. All parts must be prepared: sand strictly along the grain with sandpaper, first coarse (No120-150), then finer grain (No400-600), carefully removing dust.
Some boards can be painted with acrylic or oil paint. Fans of the loft style can use stencils in the form of numbers or simple graphic symbols. We stain boards with a beautiful natural pattern or simply varnish them. After staining or first layer acrylic varnish soft fibers rise; They need to be sanded with medium-grit sandpaper and a new coat of varnish applied.

A spectacular table in a rustic style can be constructed from pallets (wooden pallets).
If a non-aqueous varnish is used, it is enough to apply 2-3 layers, and if acrylic, the number of layers can reach up to ten.
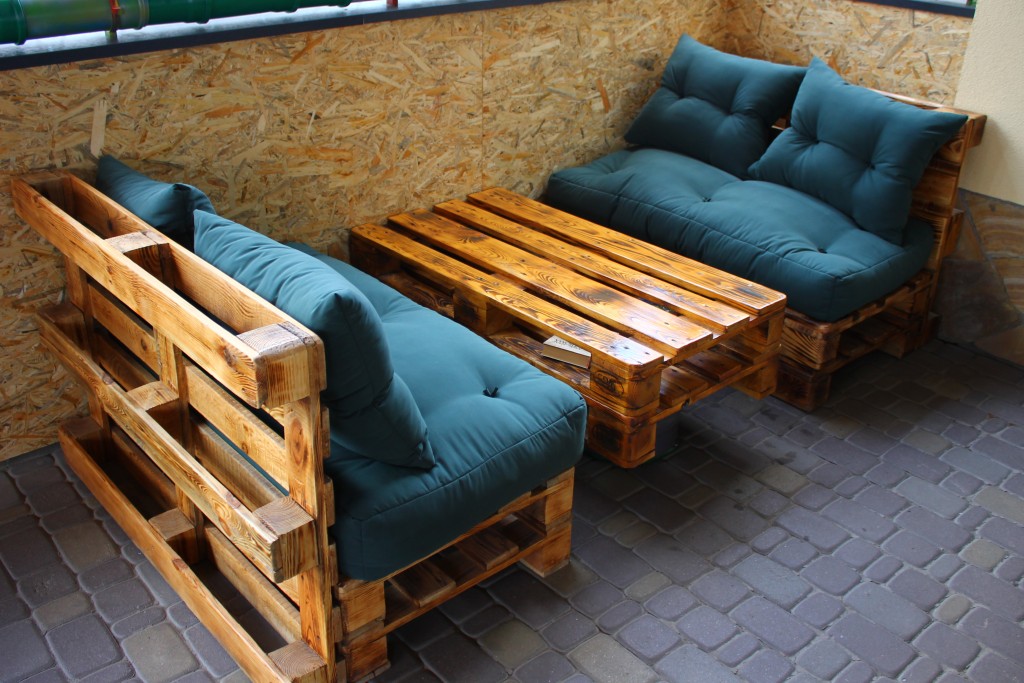
Rejected boards, also dry, can be a good option for a kitchen table.
We fasten the tabletop boards with strips, which we place at the joints of the boards. Using a drill, screwdriver and self-tapping screws, we fasten the boards to the planks (we use two self-tapping screws at the joints, solid boards- one). The use of a drill is necessary so that when screwing in the screws the wood does not crack. We assemble the frame from the prepared pallet sides. Using a drill of a diameter suitable for self-tapping screws, we drill holes at the joints. We coat the joints with glue and fix them with self-tapping screws. We install the legs: simply screw the boards to the frame, screwing in the screws diagonally. To strengthen the structure, we make jumpers at the bottom in a similar way.

To make the legs, you will need a beam at least 5 cm thick.
Wooden table with glued top
For a glued tabletop, you need to select boards of the same width. If the table is intended for a workshop and its appearance does not have of great importance, you can use old floorboards: there are already grooves there. To make the grooves yourself, you will need a milling machine.
A flat surface is required to assemble the tabletop. We simply coat the sides with glue, join the boards together without gaps and tighten the resulting structure with clamps. Depending on the glue used, the tabletop should dry from 1 to 3 days. If everything is done correctly, you will get a tabletop with a completely flat surface without cracks. All that remains is to work on the ends - first trim them with a jigsaw and then sand them. If you do not have a belt sander, this must be done manually - with sandpaper, first coarse, then medium-grit.

After varnishing the parts, you can proceed to installation, which consists of several stages.
If you don’t want to bother with glue and clamps, you can use a ready-made furniture panel made from hardware store. Then the tabletop remains to be covered with transparent or tinted varnish.
For good result you need to apply 5-7 (for acrylic varnish up to 10) layers. After every third layer work surface The countertops should be sanded with fine-grained sandpaper, carefully removing dust with a damp cloth. At the varnishing stage, it is important not to rush: each layer of varnish must dry thoroughly.
All that remains is to make the legs of the garden or kitchen table: let’s focus on the option with L-shaped legs. You will need boards with a thickness of at least 22-25 mm.

For a glued tabletop, you need to select boards of the same width.
L-shaped legs consist of two parts connected at an angle of 90. It is necessary to make a sample on the boards to be joined, coat the joint with wood glue, and then install self-tapping screws.
When the glue has dried, we coat the legs with varnish and, after drying, simply fasten them to the tabletop with self-tapping screws.

There are several options for connecting the legs to the tabletop.
Table with straight legs
To make straight legs, just saw thick timber into pieces of equal length. There are several options for connecting such legs to the tabletop.
To ensure that straight legs are installed securely, you can use a dowel connection at home. You can make them yourself from acacia wood or buy ready-made ones. To assemble dowel joints you need quick-drying wood glue (BF-2).

To make straight legs, just cut a thick beam into pieces of equal length.
Table with X-shaped legs
Sequence of work.
- On the inside of the tabletop we attach two strips on each side with self-tapping screws.
- To make the table look good, the edges of the planks must first be cut at an angle of 52.
- We attach paired planks so that the legs fit, making overlaps of 2-3 mm on each side.
- Place the boards on a flat surface, crossing them at the desired angle. We measure the distance between the ends of the boards: it should correspond to the width of the table.
- We outline the intersection with chalk: here you need to select half the thickness of the boards so that after assembly they lie in the same plane.
- We coat the recesses with glue and place the parts under the press for 1-3 days. For greater reliability, the connection can be strengthened with self-tapping screws.
- We varnish the legs.
- All that remains is to attach them to the tabletop, placing them in the grooves formed by the slats - and the table for your garden with your own hands is ready.

X-shaped legs are made from beams or boards with a thickness of at least 50 mm.
Table with benches
The optimal solution for a gazebo is a dining table with benches attached to it. It is better to make this design collapsible so that it can be stored indoors for the winter.
The table will require thick boards (from 32 mm), which need to be cut into pieces according to the drawing. IN this option Two benches are attached to the table. When all the parts are cut, they need to be sanded, paying particular attention to Special attention ends. We varnish each board separately.

The optimal solution for a gazebo is a dining table with benches attached to it.
To connect the parts of the structure, we will prepare studs (length 160 mm), nuts and washers - 24 pcs. For other connections we use screws or nails of suitable length. Using a drill, you need to prepare all the holes for fastenings.
According to the drawing, we assemble the tabletop and the upper parts of the benches. We cut off the transverse slats along the edges, the angle should be 45. This is convenient to do with the help of a rotary miter box.
We make and fasten all the legs with self-tapping screws. We fasten the parts cut at an angle.

We varnish each board separately.
We tighten the product with studs and bolts. The holes for the studs must be pre-drilled with a drill. When installing the stud, you need to put washers on both sides and tighten the nuts using a wrench.

We tighten the product with studs and bolts.
We fasten the seat boards with gaps of 5 mm. When the seats are connected to the sawed-off supports, we attach them to the assembled base with 160 cm boards: you will need 4 boards.
Install the remaining studs and enjoy the result.

Using a drill, you need to prepare all the holes for fastenings.
VIDEO: Do-it-yourself wooden table for a gazebo
50 photo ideas: how to make this table with your own hands


The role of the kitchen table in everyday life is difficult to overestimate. It is considered the main attribute in the kitchen, and not without reason - after all, it is at the table that the whole family most often gathers, celebrating various events happening in life.
When talking about kitchen tables, the one that most often comes to mind is the dining table. However, kitchen tables are used not only for dining and differ in their functions. Thus, the bar table perfectly divides the space into zones. It can be used as a dining room for a small number of people, usually 2-3 people. It is especially relevant when you need to save space. The table under the sink serves as the basis for embedding the sink.


When thinking about purchasing a kitchen table, you can consider making it yourself. This option, firstly, will save some money. Secondly, surprise your guests original form products, unusual design or by way of decoration. Third, master carpentry skills. And, of course, enjoy the work done and the final result.


Having convinced yourself of the need to make a kitchen table yourself, you need to determine for yourself a number of important parameters. Namely, decide what shape it will be, choose a design option, calculate the dimensions of the product and the size of individual parts, and decide on the material for their manufacture.
You will learn how to make a table with your own hands in the video:
Kinds
Tables differ in design options: classic, folding, transformable, corner, folding or hanging, retractable. If desired and necessary, the table can be equipped with a cabinet or with drawers. The choice of design option depends primarily on the size of the kitchen and the semantic load.


For small kitchens, most likely ideal solution There will be a folding version or a folding, bar, corner one. Corner tables can also be folding or folding.


Transforming tables solve the problem when you need a 2 in 1 solution, which significantly expands the possibilities of its use. So, with a slight movement of the hand, graceful coffee table can easily turn into a full-fledged dining table.

A retractable table saves space and is usually built into kitchen units.
With the help of a bar table, you can divide the room into zones of both small and large areas.


Materials
The materials from which a table can be made are amazing in their diversity and require a clear idea of themselves.
For this purpose, arrays of various wood species, such as oak, coniferous trees. If a beginner is going to engage in production, then pine is perfect, since it is much easier to process. Solid wood furniture is considered “capricious” and requires special treatment. It may fade when exposed to direct sun rays, absorb odors, it is poorly affected by changes in humidity and temperature. Positive points This material is environmentally friendly and durable. Solid wood furniture looks very elegant and expensive.

- Chipboard- a material that is quite common and very often used for making furniture. It is made from dry wood chips and resin using the pressing method. Among the disadvantages are environmental unsafety. Plus - relatively inexpensive cost.
- MDF is considered more environmentally friendly material compared to chipboard, but is also more expensive. It is obtained by mixing wood chips with carbide resins modified with melamine and pressing them. The downside is that it is easily flammable, and even quickly heated objects, not to mention an open fire, pose a potential risk of ignition.
- An alternative to chipboard and MDF can be furniture board. It has a relatively inexpensive cost. It is a strong and environmentally friendly material. It consists of glued bars, tightened with a press.


- Metal can also be used to make a table. Most often used for these purposes stainless steel. The cost of such material is quite high, and a cold surface will require the use of tablecloths or napkins. However, the sparkling appearance of such an attribute will definitely attract everyone's attention.

Dimensions and shape
The most common form is rectangular. A rectangular table is convenient because it can accommodate a fairly large number of people, while requiring less usable space than a round one. It can easily be pushed against the wall. But due to the sharp corners, both rectangular and square options are considered the most dangerous.


Round- claims to usable area 1.5-2 times larger than the area needed for a rectangular table designed for the same number of people. It is believed that a round table creates a feeling of coziness in a room more than other shapes.

photos
Oval tables, as well as rectangular ones rounded corners combine the advantages of rectangular and oval shapes. Oval tables are considered the most elegant and aristocratic.

Dimensions can vary from large to compact. If necessary, design compact table can be provided in such a way that it can be increased. For example, a folding table when folded takes up small space, when unfolded, it can accommodate a fairly large number of people.


An important point is the calculation of dimensions. If it concerns standard kitchen, ranging from 6 to 8 square meters, drawings and diagrams will demonstrate standard solution height 750 mm, length and width from 800*500 mm to 1200*600 mm, respectively.
For correct calculation, the number of persons must be multiplied by 60 (perimeter per person). But as for the width, the optimal width here is from 800 to 1200 mm. Because narrow tables are difficult to set, and wide ones are not very comfortable to sit at. For round table you need to measure the circumference using the formula - diameter * 3.14 (pi).

photos
Step-by-step instruction
- If you intend to make this kitchen attribute yourself, you must make a drawing.
- To make a table from solid wood, you will need the following tools: a plane, a grinder or a grinder, an electric jigsaw, a circular saw, a drill (with a 6-8 mm drill), a screwdriver, sandpaper, self-tapping screws (30-35 mm), wood glue, dowels, clamps, pencil, tape measure, gloves and safety glasses.
- It is necessary to buy supports (legs) for the table, which can be different - from ordinary rectangular to curly.
- For a tabletop 80 cm wide you will need four boards 120 cm long. They must be dry.
- To ensure a smooth finish, the countertop must be sanded well. The joints must be processed in such a way as to achieve complete contact with each other.
- To avoid deformation of the tabletop from excess moisture, the boards should be laid in a pattern facing each other. To connect the boards you will need dowels.
- At the ends of the boards that will be connected, make holes with an 8 cm drill. The distance of the holes from each other should be 10-15 cm. Then these places must be sanded and the end, holes and dowels greased with glue. Drive the dowels into the holes and thus connect the tabletop. Excess glue must be removed.
- Using screws and glue, it is necessary to connect the transverse and longitudinal boards with the legs. We make two holes in the top of the longitudinal boards; they will be useful for attaching the tabletop. Wait 12 hours. Install the countertop.
Cover the finished product with varnish, paint or stain. When using stain, you need to take into account some nuances - choose the right thinner (if you do not have enough experience, you need to use a slow thinner), the surface to be treated must be sanded evenly, it is important to adjust the gun correctly (the torch must be oval in shape and the applied layer must overlap the already applied layer by half).

Traditionally for making wooden furniture dowels are used. This connection is invisible and low cost.
For tables made of wood, it is appropriate to use wooden dowels, since they dry out at the same time in this case. For Chipboard is better use plastic ones, since chipboard practically does not shrink.
But it can be difficult for inexperienced craftsmen to achieve the most accurate calculation when planning holes for dowels. Therefore, an alternative to them are Euroscrews or Confirmats. Of course, this makes the product somewhat more expensive, but makes it easier to manufacture.


Kitchen table from laminated chipboard With metal legs can be a fairly budget-friendly solution.
- Nowadays you can easily buy a chipboard sheet of the required size, or cut it yourself. The most common top covering made of plastic makes the tabletop quite resistant to abrasion.
- For work you will need: an edge for processing the end, couplers, connecting and end strips, designed to protect the joints and ends of the tabletop from moisture, dirt, and grease. In addition, they make the look more aesthetically pleasing. To make such a table, you also need to purchase legs.
- Mark the desired radius of curvature on the chipboard sheet. Next, cut the tabletop to the specified shape using a jigsaw. To prevent chipping plastic surface It is better to work with a saw with reversible teeth. Using a router, make a groove and fill the edging.
- Be sure to apply sealant to both the edge and the top edge of the tabletop. Remove excess sealant. There is a special solvent designed to clean surfaces from such materials. Using self-tapping screws, install the holders and put the legs on them.
It should be noted that such a table can be made quite easily and quickly.

The following method allows you not only to collect modern model wooden table without huge costs, but also to remake an old countertop.
- To do this, you will need unnecessary boards of the same size, wood glue and three clamps.
- The boards must be laid out on the work surface so that the middle of the board being laid is at the junction of the two previous ones.
- Using wood glue and clamps, you need to fasten the boards together. Then smooth the edges and sand the surface. Sand the edges and cuts.
- If the table is made entirely, then to make the legs you will need two boards and a corner that will connect them together, as well as wood glue.
- First we glue them together with glue, then strengthen them with a corner.
- We attach a rim along the perimeter, on the inside, where the legs are connected to the tabletop.
- You need to fasten the tabletop, legs and rim using a corner.
- Cover the surface with varnish.
- To make or restore a table, you can also use wooden pallets.
- To do this, we make the base of the tabletop and attach the supports. For strength, you can add wooden spacers to the legs.
- It is better to install wheels, as the tabletop will be quite mobile.
- Adjust a piece of plywood to the desired size and attach a rim around the perimeter.
- We lay a piece of plywood on the base.

To decorate the tabletop you can use chopped ceramic tiles or a mirror. We glue them to the tabletop and fill the voids with grout for the seams. On finishing stage Everything can be painted or varnished. This method can also be used to restore damaged or old countertops.

photos
There are many more ways interesting options decorating tabletops. One of which is dyeing through tulle. The result of this decoration is a beautiful lace pattern.


