How to cover radiators so that they fit perfectly into general design rooms and did not spoil their design? But with this calculation, of course, to avoid significant losses in the efficiency of radiators? This question arises quite often when completing renovations of an apartment or house. If cast iron radiators of an old model are installed in the heating system, but there is no desire to change them, since they function perfectly, then they can be disguised decorative screens or bars.
These devices, we repeat, must be made in such a way that they do not interfere with the flow of heat into the room. Therefore, if you plan to make them yourself, you need to carefully consider the design. In addition, such products can be ordered from a furniture workshop, taking measurements from the place where they are installed, or they can be immediately purchased ready-made in specialized stores.
It should be noted that you can choose a model of protective and decorative screen that will not only disguise the unsightly appearance of cast iron products, but even increase circulation warm air from the radiators towards the room.
To choose the right screen model, you need to understand the operating principle heating radiators and some patterns of transfer of thermal energy into the room.
Operating principles of heating radiators
The heating radiator, heated by the coolant passing through it, releases heat into the room in two ways. The first is natural convection of heated air. The second is thermal infrared radiation that comes from the surfaces of the heating device.

Yes, everyone knows cast iron radiators MS-140 heats a room with convection currents at low coolant temperatures, that is, when it is still not very cold outside. When the system is brought to a maximum heating temperature of 70 degrees and above, then heat enters the room to a greater extent due to direct thermal radiation from battery surfaces.
Efficiently working decorative screen
In order to select or make a screen that will minimally reduce infrared radiation and will not slow down (and sometimes even improve or activate) the circulation of heated air, it is necessary to take into account some nuances:

- Although the design shown in the first illustration looks aesthetically pleasing and is generally functional, it will not allow heated air to flow freely into the room. The wooden grille almost completely blocks access to the heat emanating from the radiators. The upper part of the radiator is also closed, and if it does not have special aerodynamic guides, then the convection of warm air will be extremely difficult.
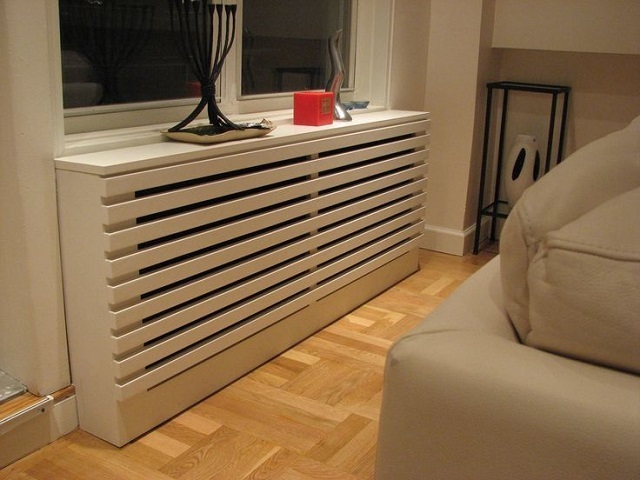
- This version of the design covering the radiator is more acceptable, since there are sufficiently large gaps between the trim strips - this will allow direct thermal radiation to freely enter the room. However, it is unfortunate in that the top and bottom of the grille are closed, which will impede circulation air masses. Wide window sill, perhaps convenient for use as a shelf, but it excludes the creation of a warm air curtain, which should block cold air flows from the window.

- This grille-screen model can be called a very good option, since the facade panel has many gaps through which the heat emanating from the surfaces of the radiator sections can pass (it would not be advisable to have a more sparse weave). The horizontal upper part of the structure is a frame that will not become an obstacle to circulating air flows. There are no barriers at all to the entry of cooled air from below. In addition, the bottom façade panel can be raised when cleaning.

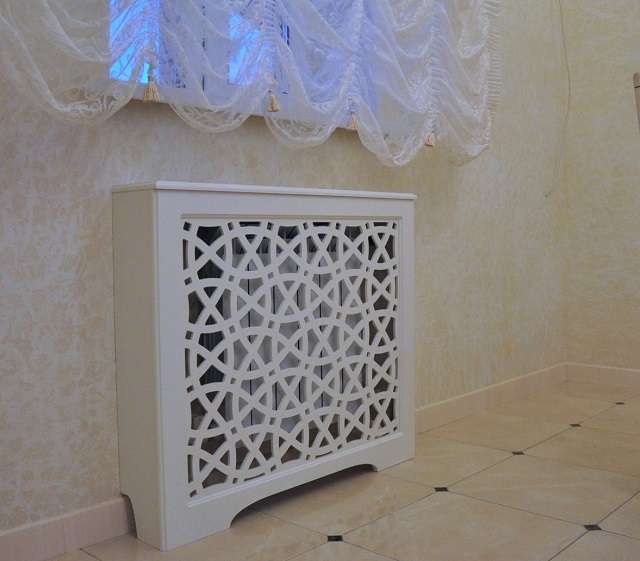
- Another model of a decorative screen that is suitable for masking any battery. The product is made in the form of an openwork mesh, so it looks light, almost weightless, but at the same time, the panel reliably hides the radiator located behind it. Thanks to the mesh structure of the façade and top panels, the heated air will not encounter obstacles to both direct heat input and the circulation process.
An effective device that can be used to complement the screen design is an aerodynamic visor. This element, installed under the window sill at an angle, will direct the rising hot air towards the room, preventing it from accumulating under the plane of the window sill. Such a visor should run along the entire length of the radiator.
But that's not all. It is recommended to supplement the design with another device - a heat injector. These are two more guide plates curved towards the room along the entire length of the radiator, installed on top along the boundaries of the space between the battery and the decorative screen. This does not interfere with the operation of normal convection flow when the coolant temperatures in the heating system are low. But when the heat is high, it collects all the heat that accumulates between the radiator and the screen, and redirects it into the room with a powerful air flow, creating a kind of thermal curtain. The efficiency of the heat exchange device increases significantly, and thereby largely compensates for the losses arising due to existing obstacles to direct thermal radiation.
The diagram below shows a screen, complemented by an aerodynamic visor, mounted on a radiator, as well as the heated air flows emanating from it:

- A - heat-reflecting screen made of foil heat-insulating material, mounted on the wall.
- B - aerodynamic curved canopy, installed under the window sill from its edge to the wall at an angle.
- B - two heat injector blades, fixed in the upper part inside the decorative screen, creating a tapering nozzle in the space between the radiator and the outer casing (screen).
- G - elements of the lattice front part of the decorative screen.
Thermal direct radiation is shown in the diagram with red dotted lines (item 3), ending with arrows. It is clearly visible that those of them that were initially directed towards the wall are reflected from the foil screen and redirected towards the room. They also heat up and decorative panel, which, in turn, also becomes a source of thermal radiation.
Blue arrows show the direction of cooled air (item 1) entering the radiator from below, which then heats up and rises upward, again heading into the room (brown arrows, item 2), which is facilitated by the aerodynamic visor and heat injector.
Types of decorative screens by material and design
Decorative screens for heating radiators are divided according to two criteria - these are design features and material of manufacture. Before moving on to their consideration, it is necessary to note two more important factors that you need to pay attention to when choosing these products:
- In winter, when radiators heat up to high temperatures, strong convection currents are created. That is, cold currents tend to the radiators along the floor, pushed by warm air, carrying dust with them. Dust particles will inevitably settle not only on the radiators themselves, but also on the surface of the screen or grille. Therefore, it is necessary to choose a product from a material that is easy to wet clean.
- Apart from decorative? The screens also have a protective function, since it covers the radiator fins, reducing the risk of traumatic situations. This is especially important to take into account when choosing the material for making panels if small children live in the house, and cast iron radiators with their characteristic angular shapes are installed in the system.
Design features of decorative screens
Decorative masking panels are divided according to the method of attaching them to radiators. Today there are box-type screens and wall-mounted products.
- Box screens are made in the form of a lattice enclosed in a frame. This type of product is used when it is necessary to hide the unsightly appearance of the radiator, and sometimes even the heating circuit pipes. The boxes are lined up along the entire window sill or cover only the radiator.

Quite often the masking box is turned into a continuation of the window sill or even into desk or a cabinet. However, as mentioned above, such designs significantly reduce the flow of heat into the room.

- Hinged lattice screens can be equipped with an upper horizontal panel with a decorative lattice installed in it, or consist only of a facade part.

The first ones are used to disguise batteries installed in a niche or areas not covered by a window sill. These screen options are hung directly on the radiator sections.
Mounted screen models are installed on radiators installed in any way, that is, both in a niche or under a window sill, and on devices protruding from the wall.
- Flat screens mounted on the wall are most often installed on radiators that are not covered by a window sill, but can be used to cover radiators installed in a niche.

If this option is planned to be used to disguise batteries recessed into the wall, then it is necessary to leave gaps in the upper and lower parts of the niche for the free circulation of heated air masses.
By the way, many people prefer solid facade screens for the reason that they best hide the “unflattering” appearance of the batteries. One can argue with this - a neat grille, especially one that has a certain “pattern”, even with a fairly large vacuum, attracts the eye, and the sections shining through it become almost invisible. But at the same time, the efficiency of direct thermal radiation is incomparably higher.
Types of screens by material of manufacture
Both screens and grilles are made from different materials. To decide on the choice of products according to this criterion, you need to consider them characteristics. It is especially important to consider temperature regime, in which the heating system operates in winter, as well as the resistance of the material to thermal loads and its environmental friendliness.
- Metal grating screens - this is a perforated sheet of metal without a frame or fixed in a metal frame, and having a protective and decorative enamel coating. Such screens are made using stamping technology. They may simply have geometrically correctly located holes (slots), or the perforation may even create one or another simple pattern.

Such grilles do not completely cover the radiators, allowing air flows to circulate freely throughout the room. The screens look quite neat and aesthetically pleasing. In addition, the product meets environmental standards, and the manufacturing material is resistant to high temperatures that may arise during operation, warms up well and itself becomes a source of thermal radiation.
The enamel coating is applied to the surfaces of metal gratings using the powder coating method. Therefore, the metal is not exposed to corrosion, and the “fresh” color is preserved for a long time without fading.
Metal versions of screens are produced both in a hinged version and in the form of boxes.
In addition, this type of screen will well protect the child from serious injuries if he accidentally falls near a cast iron battery.
The screens are easy to install at the site of operation and are durable. According to the design, the product can be selected to suit any interior style. If desired, or if the color scheme of the interior changes, the metal grille can be easily repainted in the desired shade.
Metal screen grilles have a relatively affordable price, despite their excellent characteristics.
It should be noted that panels can be manufactured to individual orders according to specific dimensions provided by the customer, as well as taking into account the specific configuration and location of radiators.
Prices for decorative metal screen
decorative metal screen for radiators
- Screen-grids made of polyvinyl chloride (PVC) . This version of the panels is made entirely of plastic or in a combined version, in combination with natural or artificial rattan. In such PVC panels, a frame is made in which a rattan mesh is fixed. Plastic can have a coating that imitates various materials - it can be various types of wood, stone, metallic or fabric weaving.
PVC has lower thermal conductivity than metal, which is why it is combined with natural rattan, which conducts heat well.

Polyvinyl chloride is resistant to fairly high temperatures and can be easily cleaned from dust using a vacuum cleaner or wet cleaning. The material does not emit toxic fumes and will provide good protection against injury for a small child.
The screens have a fairly aesthetic appearance and can be matched to any interior design.
The cost of PVC products is more affordable than metal panels, but in terms of service life they are significantly inferior to the latter.
- Wooden screens for radiators . Wood has always been an ideal material for residential interiors, as it can bring an atmosphere of comfort and coziness to them. Treated and sanded wood, coated with a tinting compound, will be a harmonious addition to interiors made in different styles, since the grille can have any relief patterns.

After tinting, wooden screens are covered with several layers of varnish produced in water based, or are painted with special heat-resistant paints. The coating not only gives the products a noble appearance, but also protects the wood from a combination of moisture and elevated temperatures, that is, it preserves it from deformation.

If wooden screens are intended to be installed on radiators operating on the convection principle, then the top of the radiator must remain open. To do this, the panel installed horizontally on top should, like the front one, be lattice-based, since small slotted holes for a full-fledged process may not be enough to fully transfer heat from the radiator.

Wood is often combined with a mesh woven from thin rattan (rattan palm stems). This option transfers heat from radiators into the room much more efficiently than just a wooden grille. In such models, a rigid frame is made of wood, on which rattan weaving is stretched. This combination of materials gives the product a particularly aesthetic appearance. Rattan and wood, as well as the compositions used for their decorative processing, are environmentally friendly materials that do not emit toxic fumes.
Sometimes MDF is used instead of wood to make frames, which is almost impossible to distinguish from natural material at first glance. However, you need to know that in the production of MDF, adhesives are used that may contain formaldehyde. When heated, fumes of this substance, which is toxic, will enter the premises. That's why similar option It is not recommended to purchase for installation in residential premises, and even more so in bedrooms or children's rooms.
It is recommended to periodically clean wooden screens and screens combined with rattan using a vacuum cleaner.
A (conditional) disadvantage of wooden products can be considered their high cost, especially in cases where they are made to an exclusive order. In many ways, the price of such gratings will depend on the type of wood used and the complexity of the planned project.
- Glass decorative screens . Many are afraid to install products made from this material as panels decorating radiators. But such fears are in vain, since the screens are made from special high-strength tempered glass with a thickness of 6–8 mm. And breaking it even intentionally is quite easy.

Glass screens for radiators are made in the form of flat panels with drilled holes for fastenings. They are fixed only on the wall or on the wall and floor using racks, which themselves are also an element of the screen’s decor.

Glass screens completely cover the front part of the radiators, but the top and bottom of the heating device remain open, which allows convection air flows to circulate freely. Therefore, this type of panel will be an ideal option for radiators operating on the principle of convection heating. But if they are used to cover conventional radiators, such panels will very significantly suppress direct thermal radiation.

Products made from glass have many advantages, which include the following:
- affordable cost - they have a lower price than wooden versions of screens and grilles;
— it is quite possible to install the panel yourself, since all the necessary fasteners for installation are included in the kit;
- decorativeness and variety of design of products - they can be matte, plain in various colors, with thematic and floral designs and photo collages;
- opportunity to do individual order by applying a specific design or photograph to a special film using thermal printing, which is then fixed to the panel;
— safety in operation and care of products;
— environmentally friendly materials;
- heat resistance.
But for safety reasons, it is hardly worth installing such glass screens in a nursery, where children can play very active active games. The glass is unlikely to break, but the end sides of such a screen still pose an increased risk of serious injury.
You may be interested in information about what characteristics have
* * * * * * *
So, a lot when choosing screens depends on the type of radiators, the style of the interior, as well as the financial capabilities of the homeowner.
However, no matter which option is chosen, decorative screens will perfectly disguise the unsightly appearance of cast-iron batteries of old models, protect them from dust and dirt, as well as grease deposits if the battery is installed in a kitchen area. In addition, the panels will reduce the risk of injury to children who may accidentally hit themselves or get burned when the batteries become very hot.
The information given above will be a good help when purchasing decorative screens or grilles, since it highlighted all the main aspects that you need to pay attention to when choosing a product from a particular material.
Video: screen options for radiators from the Premier Profile company
APPENDIX: Calculation of radiators for a room, taking into account the features of their connection and location
We must assume that since a site visitor is reading this article, he will be interested in calculating the required power of the heating radiator (number of sections - for collapsible models). Moreover, the final value also depends on the presence and type of decorative screen.
You may be interested in information about how it is produced
The required power of a heat exchange device installed in a room depends not only on the area of the room, but also on a number of other criteria. All this is taken into account in the calculator presented to the reader.
Below are some explanations on how to carry out the calculation.
Beauty at the expense of warmth
At major renovation premises, you can, of course, hide the battery in the wall using a niche made of plasterboard, chipboard or plastic. Heat ventilation and removal from the battery, in this case, is carried out through a grille, which must be installed in such a niche. As a rule, such niches are decorated with a grating made of chipboard or wood. It is possible to select both the grille itself and its frame in the required color scheme. These grates are sold in a wide range, they are durable and transmit heat well.
Reading bench above the radiator
In addition, the issue of converting heating radiators can be solved by covering them with special decorative screens. Such devices can be installed directly in front of the heating radiators or in a hinged form.

Hinged screen made of thin wooden slats

A simple wooden lattice painted to match the wall trim

A hanging metal screen slightly reduces heat transfer, is inexpensive and easy to install
These solutions cannot always be called optimal, since a very large part of the heat generated by the battery is wasted in this case. The effect is close to what would be achieved by hiding the battery behind the curtains.

Metal screen with openwork design

Any screen design must provide access to the radiator
At the same time, closing heating radiators serves the function of protecting small children from burns. Screens, boxes and niches are beautiful and can be matched to any interior. This type decor is used, as a rule, in living rooms and is an ideal stylistic solution for them. Covering radiators in children's rooms with boxes and screens is optimal solution both for safety purposes and for decorative purposes. A panel made of wood or chipboard can be decorated with bright patterns and used as a play element.

Screen idea for high battery

An old wooden bench used as a battery box in the hallway of a village house
Requirements for decorative elements
 There should be a gap of at least 8 cm at the bottom for cold air circulation
Before hiding the battery, you need to take into account that there should be no obstacles to the circulation of heated air from above, below and on the sides. Therefore, boxes and shield screens are usually equipped with gratings.
The distance from the floor to the edge of the decorative element is important. It should be at least 8 cm. Through this gap, cold air rises up along the radiator section, heating up along the way. If the gap is blocked, heat transfer will be disrupted.
It is worth considering the formation of dust on screens and boxes during the convection process. For this reason, you need to select a product from a material that is easy to wet clean.
The decorative ceiling must be resistant to long-term exposure to high temperatures.
How to hide a pipe
 Open way masking pipes
Sometimes it is necessary to hide not only the radiator itself, but also the pipe sections connected to it. Different methods are used for this:
- Open method. The fastest. The pipes are painted to match the color of the walls, making them almost invisible. The idea of decorating with available materials, for example, painting a heating element to match the color of wood and attaching twigs to it, can also be interesting and original.
- Hidden broach. The pipes are hidden in grooves in the wall and covered with cladding. The downside is that in the event of a breakthrough, the casing will have to be opened, so this method is absolutely not suitable for old wiring.
- Packing in floor screed. This method of laying a highway is suitable if the concrete layer has not yet been poured. It also requires labor-intensive opening in the event of an accident, so a plan for laying communication lines should be kept in case of repair of the heating system.
- Covered with a wide plinth. This is possible if the heating pipes run along the floor. If a similar arrangement of the heating circuit is in the bathroom or kitchen, you can make a structure similar to a stair step and decorate it with tiles.
A good option is to use false walls. Behind decorative partition you can hide anything, including heating elements. But the false wall must be quickly dismantled to ensure easy access in the event of an accident. The easiest way is to create a frame bulkhead from timber or metal profiles and cover it with plasterboard, plastic or plywood. It is useful to place hatches with flaps at the places where pipes are connected to the heating device and where couplings and tees are located. It is good if the area of the room allows you to install the decorative covering not close to the radiator, so that it does not heat up too much and does not emit potentially dangerous substances.
Knowing how to decorate pipes or heating radiators in an apartment or private house, you can easily solve the problem of masking a utility junction. Decorative ceilings will improve the appearance without reducing the efficiency of heating the premises. Also, a beautiful screen will allow you to get rid of long, dust-collecting curtains in favor of modern roller or Roman curtains.
Using special screens
 The screen for the battery must match the design of the room and allow heat to pass through well
To cover heating radiators in a house or apartment, you can use decorative screens. Choose the one that suits you based on two parameters - design and material of manufacture.
Design features
Masking shields are classified according to the method of fastening to the batteries. According to this principle, screen boxes and hanging products are distinguished.
The decorative box consists of a frame with a large-mesh lattice on the front side. Such products are used when it is necessary to hide the unaesthetic appearance of the battery, and sometimes even the heating circuit pipes. The boxes are installed along the window sill or cover only the radiator. They can be equipped with opening doors, which makes cleaning and temperature control of the coolant easier.
There are two types of hanging grid screens:
- models in the form of a horizontal panel located on top, with a decorative grille built into it;
- options consisting only of the facade part, which are called shields.
The first option is used to hide radiators located in niches or not covered by a window sill on top, and is installed directly on the radiator.
Flat screens mounted to the wall are often placed on radiators under the window, not covered by the window sill. They are also used to hide batteries installed in niches.
Material of manufacture
 Plastic screen
To choose a decorative element according to this indicator, you need to take into account the characteristic features of the material.
To mask batteries, screens made of the following materials are used:
- metal;
- wood;
- glass;
- plastic.
To cover unsightly heating radiators, apartment owners most often prefer simple white metal boxes. Such options cannot be called sophisticated, but they are inexpensive and give off heat well. If strength and appearance are important, and cost does not matter, it is better to opt for a stainless steel product, which is different for a long time operation and aesthetic design. Typically, such decors are used to hide cast iron radiators.
MDF is the most practical and inexpensive material that has all the advantages of wood and at the same time is not afraid of moisture and temperature changes. Screens made of such material are less susceptible to deformation and bending. There are openwork options made from MDF on sale.
Glass panels for heating devices stand out for their maximum design variability. They are made entirely from glass or with the addition of other decorative materials. The location of the corners must be such that it is impossible to get hurt or caught on clothing. Usually, drawings and patterns are applied to the surface of the product. To prevent glass from breaking or scratches, it is covered with a laminate. In addition to laminated glass, triplex or acrylic is often used.
Plastic screens are the cheapest, but at the same time dangerous option. The shield is subject to deformation from the heat of a hot radiator and releases harmful components into the air. It is not advisable to use such screens where people stay for a long time.
Battery screen
Screens come in a variety of shapes and are made from several basic materials. The most popular are metal, wood and glass. Screens made from each of these materials have their own characteristics, advantages and disadvantages. If we talk about metal screens, their use has a very good effect on heat transfer from the battery.


In the photo above you can see an example of the placement of such a mesh-type hanging screen
It is very important when closing a heating battery to always understand that this reduces the efficiency of its operation, and accordingly increases energy costs during the heating season. And metal structures made from such meshes are the least likely to prevent the spread of warm air throughout the room, and therefore are recommended for installation if heating costs become a significant figure in the family budget

If a grid on the wall instead of a radiator doesn't seem like a good idea, then you can look for screens made of solid metal sheets with designs made into them. These images are cut into the surfaces of the screen and make it permeable to warm air flows. Variations of drawings can be very different and choosing a picture that suits your interior will not be difficult.


Second after metal in terms of heat transfer efficiency is the glass screen for the radiator. It is installed on special mounts, which are closed with metal tubes.


The most important advantage of this option for hiding the battery is that absolutely any pictures can be depicted on the glass. Manufacturers actively take advantage of this feature of the material and place the most incredible images on glass screens.


Here we are not just talking about covering up an unsightly element in the interior of a room. Such a screen will be a great addition to the design of a room in almost any style and can even create a separate unique accent in one place or another of the room.
The next way to decorate batteries is to install a wooden box in the place where they are placed. Such a box can be of completely different shapes and colors, and its functional purpose can even hide the very fact of the presence of a battery on the wall.


After viewing these examples, it becomes clear how successful the idea of disguising a heating radiator as a piece of furniture can be. Below are several more options for boxes made in the natural color of wood, which look great in the interior and, in addition to the task of closing the radiator, perform a certain function.


One more in a good way Sharing a wooden screen with a window sill can help remove batteries from sight. With proper space planning, this combination can be used to place several house plants, or by arranging an additional resting place on the windowsill.


And finally, ideas for decorating a heating radiator without closing it. It is not necessary to completely hide the battery; you can include it in the interior elements if you correctly use the shape of the radiator in the process of decorating it.


When choosing a design for closing the battery, try to ensure that there is always access to air from below, and that the top cover is equipped with ventilation holes. The air in the room moves along the radiator from bottom to top and this process ensures effective heat exchange in the room. Cooled air approaches the battery from below and, during the heating process, rises upward along its body. Therefore, when installing a decorative box or screen, always remember that in addition to the aesthetic component, its shape must take into account the peculiarities of heat exchange processes in the room.
The best solutions for the kitchen
The design of kitchens, not as strict as is customary for living rooms, gives free rein to imagination. In addition to the above-described ways to hide heating radiators, in the rooms where culinary masterpieces are created, designer delights are also created to decorate heating radiators. The radiator and the pipe connecting it to the heat source can be painted in the same color as the walls, decorated using the decoupage technique, or these two methods can be combined.

A battery painted to match the walls will be less conspicuous

An even greater effect can be achieved if you paint the battery to match the wallpaper

The battery can be displayed as part of an artistic composition
Many ideas are available on the Internet. Taking them as a basis, you can create a masterpiece yourself and without much labor or time, decorating external elements heating systems with an elegant or cheerful design. Battery decoupage involves transferring a design from a carrier onto the metal surface of a radiator. When decorated using the decoupage technique, batteries can be decorated using ready-made designs made on thin paper (both rice paper and ordinary decorative napkins are suitable). There are a lot of design options: flowers, wood decoration, geometric designs.


Khokhloma painting on a heating radiator
If you have artistic abilities, you can do without ready-made solutions and paint images directly onto the surface. For such work you will need heat-resistant paints and varnish. The latter is necessary for those who decide to decoupage the battery themselves. For decoupage you will also need glue; regular PVA will do.
Common methods of disguise
The presence of any problem always leads to its solution, and masking heating radiators in apartments is no exception. Designers and builders have developed several solutions to this problem. Let's look at the most popular of them:
One of the most common ways to solve the problem of closing a heating radiator is to install a metal screen. Usually these screens serial production, but are produced for certain types of radiators. Their advantage is high heat transfer, durability, absence of the slightest deformation under temperature influences, as well as low price. But the minus probably outweighs all the advantages of this type of disguise, since this screen can hardly be called beautiful.
 Metal screen for radiator
You can solve the issue of the aesthetic component after purchasing such a screen: decorating or painting a metal screen yourself is quite feasible for creative people.
Another method to disguise a battery indoors is to install a wooden screen. A custom wood craftsman can make such a model, masking a radiator in the house. The ideal option would be to make a screen that is similar in style and shape to the furniture in the room.
 Wooden screen for a radiator in the interior
Most often, lattice screens or mesh screens are made from wood, which cover the battery from view but allow heat to pass through well. Such screens are not cheap, especially if they are made to order, but they look very impressive and are also extra space for sitting or placing certain items: toys, decorative items, vases, etc. The disadvantage of wooden screens is that they can become deformed when exposed to high temperatures. You can create a screen model from wood yourself by first measuring the area of the radiator and its thickness.
 Screen-grid for heating radiator
The next option to close the battery is plastic screen. It is relatively cheap, but it is sometimes noted that when exposed to high temperatures, some types of plastic can release toxic substances, so it is better not to risk it and choose another way to hide the radiator.
 Decorative plastic screen
Another common method for covering a radiator is custom-made furniture or built-in furniture. This could be a chest of drawers that hides the heating system, a long bench or a console table that hides the radiator. The only thing, when you are planning such furniture with a craftsman, you need to ensure that heat can penetrate into the room. To do this, you can make carved cabinet doors or carved vertical surfaces.
 The heating radiator is built into the furniture
As an option, you can consider making a decorative fireplace in place of the radiator, which will not only be decorative, but also a real warm, cozy place - a kind of hearth in the room.
Simple ways to protect your summer veranda from snow and rain
Usually the meaning of veranda is additional area home or cottage, which often plays the role of a balcony or open area.
Quite often this is something like a greenhouse or winter garden. Often the veranda is an additional extension of the cottage.
Today there are few standard projects provide for the construction of a veranda simultaneously with the construction of a particular house. For this reason, many people build verandas on their own.
Most often, such a structure is already a closed roof or canopy, since enjoy fresh air and the landscape is much more comfortable when the hot rays of the sun are not shining from above and the rain is not dripping.
Sometimes it all starts with creating such a site or simply trying to expand the living space. Open verandas look extremely tempting summer period, allow you to have a good rest and enjoy the freshness of nature.
However, with the onset of colder evenings, its use becomes extremely difficult and inconvenient.
That is why many resort to solutions such as closing verandas from unfavorable factors and even insulation, which provides this building with the actual status of part of the house.
Today, there are a large number of ways that allow you to close the veranda from a wide variety of adverse natural phenomena.
In addition, it is better to think about the possibility of insulating the veranda at the initial construction stage. Subsequent reworking of the basic design into an insulated one may require additional costs and be much more labor-intensive than the initial design.
How to Hide a Battery Disguise Ideas
A popular solution for masking batteries
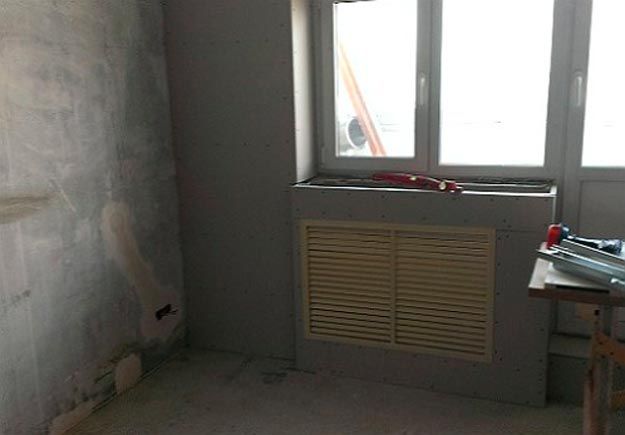
The most common way to hide a battery is to cover the wall with plasterboard. This method has its advantages (quick, easy and inexpensive) and disadvantages (reducing the area of the room)
It is also necessary to pay attention to the fact that, without practical knowledge and experience in working with drywall, masking batteries can become a real pain. It should be remembered that it is not recommended to completely cover heating appliances with plasterboard.
To ensure proper air circulation, slits are made in the material, which are subsequently closed with special decorative screens. The use of such screens also helps to maintain radiators.
Another advantage of drywall is the ability to hide not only radiators, but also the pipes leading to it. Along with this, it is more expedient to cover the entire wall with material when renovating the entire room.

How to hide a battery - easy and simple!
An easier and less expensive way is to cover the batteries with a hanging screen. Today there are a huge number of different models:
- hinged screen with cover;
- screen boxes;
- metal screens;
- wooden screens;
- MDF screens;
- glass screens.
Hanging screens will help hide radiators when renovations in the room have long been completed. Installation of such models does not require special knowledge and effort; they are installed by hanging them on the battery. The hanging screen does not interfere with air circulation and heat exchange and performs decorative function and greatly facilitates the process of maintaining the heating device. Such screens are produced with two options for pipe connections - one-sided and two-sided.

Box screens are most often used to mask batteries installed in hallways and along blank walls. Such models not only perform a decorative function, but also serve as an excellent piece of furniture. They can be used as small shelves on which you can put your favorite trinkets, and if you have a cat in your house, believe me, the surface of such a box will become its favorite resting place during cold weather. The boxes also differ in size, so if you have fairly low radiators, use small-sized products that can easily be turned into cozy and comfortable benches. Their finishing can also be done in various techniques, this includes openwork carvings, decorative overlays, and the ability to apply any image to the front of the box, the main thing is that such a screen does not disturb your interior, but becomes a real addition to it.

Metal, wood and MDF screens for batteries can also be made in the form of a box or have a flat shape, which is ideal for masking batteries built into niches or hidden with drywall. The screens offered today have original design- these are carvings, drawings and forged decorations, thanks to which you will not only hide radiators, but also preserve the interior of the room.

How to hide a battery - an original approach
Don't want to install screens and deal with drywall? Show your creative qualities - visually dissolve the battery in the interior. Paint the radiator in the color of the walls or, conversely, make the radiator the main highlight of your room. Today you can use the services of a printing company that will print the image you choose on self-adhesive paper - later you can easily place it on the radiator and make your interior unique. You can paint the batteries yourself - some draw with colored pencils, some give the batteries the color of their favorite animal, and some prefer to imprint their favorite flowers and patterns on it.

Crafters can experiment with different textures and shapes, giving the batteries original look. Today you can easily find master classes on decorating heating devices with various covers in the shape of animals; you can also use the remaining yarn and wrap it around the radiator (it is not at all necessary that the yarn be of only one shade).
If you know how to work with beads and beads, prepare a frame according to the size of your battery and create an original bead curtain or curtain of woven beads, which you attach to the frame.
Everything is in your hands and depends entirely on your capabilities!
How to close batteries correctly technical rules and tips
Before closing the radiator, you need to take into account several technical nuances:
- Keep in mind that the heat transfer of a closed radiator is reduced in any case, no matter what masking method you choose. The main thing is that the change is not significant. Ideally, the decrease in air temperature in the room should be about 1-1.5 degrees.
- Before closing the battery, put it in order: blow it out, wash it (this is done at the end of the heating season) and paint it.
- Keep in mind that the denser the grille weave, the better it masks the radiator, but the worse it conducts heat. Therefore, when choosing a screen for a battery, try to look for a middle ground or rely on heat saving.
- To minimize heat loss, the screen can be placed on legs and a groove can be cut in the center.

When closing the battery, it is very important not to block convective air flows, otherwise it will blow in the room and the windows will begin to fog up, which will ultimately lead to the appearance of mold on the walls. Ideally, the window sill visor should protrude no more than 30 mm above the radiator; the top and bottom of the radiator should be as open as possible.
There must be a distance of at least 35-50 mm between the battery and the screen
There should be a gap of about 60-70 mm from the radiator to the floor and to the window sill.
To resolve emergency situations, it is necessary to provide free access to the radiator. For example, the box grille can be removable, folding (see photo), opening on hinges or sliding out on profiles.
Decorating a battery in the bathroom
Not every bathroom has separate radiators, except for the one that serves as a heated towel rail. Modern products are quite aesthetic. The need for decoration arises if the battery has not been replaced for a long time, as a result of which it has lost its appearance. The easiest way to give a heating device a presentable appearance is to paint it. The paint color is selected according to the color of the room. Of course, the product to be painted is thoroughly cleaned. However, decoupage in the bathroom is just as appropriate.

An example of successful use of a battery as a bright accent
In addition, it is possible to cover the battery in the bathroom with a mesh, which can act as a storage system.

Protective screen with storage shelves

The battery can be hidden in a stylish cabinet

Or leave it in plain sight, covering it with a shelf on top
To summarize, it should be noted that decorating a radiator is a creative process. When choosing a method for transforming heating radiators, the main thing is not to overdo it with decorative elements, maintaining the overall style of the room
It is also important to take into account that the main functional purpose of the radiator should not be affected - heating the room in the cold season
They decorate both old cast iron batteries and modern products made of aluminum and bimetal. The latter are especially amenable to drawing, since the external design consists of flat plates on which it is convenient to apply a design.
When choosing paint, you should remember that special paints are produced for heating radiators that can withstand high temperatures.
Heating radiators cannot always serve as interior decoration. Therefore, they have to be hidden, decorated with all possible ways. Let's try to figure out how to do this beautifully and correctly.


Features and Requirements
Decorating heating radiators is not as simple a task as it might seem at first glance. It is necessary not only to hide the unsightly radiator, but also to maintain a comfortable temperature in the room. Obviously, closed batteries provide much less heat, and access to them becomes difficult.
In order to properly close the radiators and not reduce heat transfer (or at least reduce it slightly), you need to understand how radiators heat the room and on what principle they work. And choose the decor so that it represents minimal interference when the batteries perform their functions.


Removable or attached screens that do not have solid fastenings are well suited for this. This is necessary so that the radiator can be accessed at any time. Such a need may arise unexpectedly, and if the battery is mounted into a wall, a plasterboard box, or covered with a screen “tightly” attached to the wall, the structure will have to be broken. It will not be possible to dismantle it without damage.


Another important criterion when choosing decor is how much it will affect heat transfer. Heating of the room occurs due to the release of infrared radiation (it heats objects) and convection (it directly heats the air).
Solid screens, devoid of gaps at the bottom and top, will become a serious obstacle for both the first and the second. The best option would be perforated, carved or lamella screens that do not cover the battery either from above or from below. Or closing slightly.
In order for the air to warm up evenly, it must be able to freely enter from the bottom of the battery, pass through it and exit from the top already warm. A tightly “sealed” radiator does not give it this opportunity, which is why the temperature drops. As for IR radiation, it simply cannot pass through a solid, impenetrable screen, which provides almost one hundred percent thermal insulation of the battery.


Recently, you can see that batteries are often covered with glass screens with photo printing. Of course, such a solution has high decorative properties However, the temperature in a room equipped with such decor drops significantly.
The optimal solution for any interior would be a wooden perforated or carved screen. The main thing is that it has as little continuous surface as possible and as many holes as possible to allow air to circulate freely. In addition to the fact that wood fits harmoniously into almost any interior style, it is also necessary to highlight its environmental friendliness. When heated, it will not release any harmful substances. On the contrary, when exposed to heat, wood releases essential oils that have a positive effect on human health (of course, we are talking about natural wood).


Economical ways
To hide old heating batteries, it is not at all necessary to use expensive materials and designs. There are many budget-friendly ways to close unsightly radiators while maintaining high heat transfer rates and easy access to the system.
These methods include:
- Coloring. Even old, Soviet models of batteries can be turned into a stylish element of the interior by painting them to match the walls or, conversely, in a contrasting color. The costs are minimal, and the benefits are obvious: quick access to the radiator is maintained, convection is not hampered in any way, and the room remains at a comfortable temperature. Such radiators will fit into any interior, from modern loft to classic, the main thing is to choose the right color.
- Textile. The simplest thing is to cover the radiators with curtains that go down to the floor. The main thing is to ensure that there is no possibility of the fabric catching fire from too hot batteries. Or - if the option with curtains is not entirely acceptable - you can pull it over wooden frame fabric that harmonizes in color with all other textiles in the room, and cover the radiators with this screen. Air easily passes through the fabric; it does not present any obstacle to this, which means that heat transfer will not decrease.
- The use of materials such as plastic, MDF panels, and drywall will also be inexpensive. However, they also have a significant drawback - a decrease in heat in the room. And from the point of view of environmental friendliness, these materials leave much to be desired. The same plastic, for example, is better used in the bathroom to turn off the tap, in the kitchen, that is, in rooms with high humidity, where the same wood, the same metal will quickly become unusable due to external factors. Boxes made of MDF panels or plasterboard have good thermal insulation properties, which in this case is completely unnecessary. And it will be difficult to get close to the system.


Of course, low cost - significant advantage material, and for many it is decisive. However, we should not forget that its main function is to provide not only the aesthetic appeal of the heating system, but also warmth in the apartment. Therefore, you should not focus solely on price.
Wooden structures have a good combination of accessibility, aesthetics, environmental friendliness and the ability to transmit heat. A simple grille made of narrow slats, which are sold in any hardware store, can effectively hide radiators and will not interfere with them. normal operation. In addition, such a solution will look natural in any interior. It is not for nothing that wood has been used since ancient times to decorate houses. Its unique natural aesthetics, the warmth and comfort that it brings to the home are still appreciated and in demand.
If, as a background for carved wood panel choose a metal sheet– copper or aluminum – this solution will bring double benefits. The wood will take on a decorative function, and thanks to the metal, the temperature in the room will not only not decrease due to the closed radiator, but may even increase.


Popular solutions
Currently, there are many ways to hide old cast iron radiators under the window. Screens from a wide variety of materials, niches, painting, mounting into the wall - options for every taste. But if decorating heating radiators in a living room, bedroom or nursery is quite simple - just choose a solution that will harmonize with the overall style of the interior - then in rooms with characteristic conditions (for example, in the kitchen, bathroom) this is more difficult to do.
For these rooms it is necessary to select a material that can withstand high humidity., and temperature changes, and possible exposure to steam, chemical substances. And with all this it will be non-toxic. The best option would be to paint the radiators to match the walls or in a contrasting color. This method of decorating pipes is the most common in bathrooms.


As for the other rooms of the house, everything depends solely on the imagination and budget of the owners. But the basic requirements for radiator screens must be met in any case. After all, their main task is to hide unsightly heating elements without compromising heat transfer. Therefore, any screen must provide free air circulation and IR radiation. At least create minor obstacles to this.
The now popular glass screens, of course, are highly decorative, look great in the interior, but they significantly reduce heat transfer, which means they help lower the temperature in the room. This decor can be used if heating is carried out in some other way, for example, using heated floors.


Quite often you can find such a solution - radiators are mounted inside the wall, and a small window (or two) is left for the passage of heat, closed with bars. Not only does the temperature in the room drop significantly in this case, but also access to the system becomes almost impossible - to do this you will have to break the wall in the literal sense of the word.
The same applies to boxes made of plasterboard, plywood, MDF, chipboard and other similar materials. Reduced heat transfer, difficult access to the system versus decorativeness. Everyone makes a choice for themselves.


Screens made of metal – copper or aluminum – are now gaining popularity. Such models not only will not lower, but may even increase the temperature in the room. Heated by the radiator, such screens themselves act as a battery and additionally heat the room.
If the room is covered with wallpaper, the heating elements can be decorated using leftovers. By cutting them into strips and gluing them onto radiators (with heat-resistant glue, of course), you can minimum costs get a wonderful decorative element that will harmoniously fit into the interior.


In a children's room, you can generally give free rein to your imagination, or you can involve the inhabitants of the room in the process. Children will happily take on the task of decorating their own home and will tell you how they would like to decorate the radiators. Favorite cartoons, fairy tales, your own imagination, in which the room is not a room at all, but a ship, a tank or a racing car. All this can be used when decorating radiators.


To decorate old heating radiators, it is not necessary to spend a large amount of money, effort and time. You can simply paint them. Freshly painted batteries will look good in a modern interior, such as a loft, or in a classic or soft pastel room. The main thing is to choose the right color.
The same loft - industrial style, and its color scheme is appropriate. The most commonly used is black or White color. One of them can be used to color batteries. Elements painted in a contrasting color - black on white or white on a black background - will look especially impressive.


This is unlikely to be suitable for more prosaic, calm interiors - after all, it still emphasizes the heating system, highlights it, and does not hide it. In an industrial loft this is what you need. But, for example, in a classic interior this would be inappropriate. Here it is better to paint the batteries to match the walls so that they blend into the background.


Heating radiators can be decorated with paintings. Such elements will look good in a nursery and will emphasize the dynamic, active, unusual atmosphere inherent in this room.


In the bathroom, you can put the pipes in a plastic box. It would be irrational to use wood or metal in this room - the materials will quickly become unusable, and the design will have to be changed. And plastic can easily withstand the high humidity of this room. However, plastic is not suitable for the kitchen; here it is better to give preference to traditional materials.
The decor of a heating system implies not only the camouflage of its elements, but also the possibility of easy and quick access to any of its components. This is one of the most important selection criteria that must be followed when choosing the design of radiators.

Another important factor is heat transfer. But here you can resort to a little trick. A foil foam insulator hung on the wall behind the radiator will reduce heat loss by twenty times.
But it must be attached to the wall, and not just put the battery. In this case, a distance of at least two to three centimeters should remain between it and the piece of insulator.
It is not advisable to cover the elements of the heating system with boxes, hide them in niches or mount them in walls. If another option is not possible, it is necessary to provide the box with a door to ensure the fastest and easiest access to the system at any time.


Modern industry produces heating radiators that are significantly different from Soviet models, which everyone is so eager to hide or change. These are not only strictly geometric white radiators. These can be models of almost any shape and size. Such batteries do not have to be hidden or covered; on the contrary, it is customary to put them on public display, hang them in the center of the wall and show them to guests as a bright, unusual accent.
Modern radiators are a spectacular decorative element that is attractive in itself. Even simple white models have their own aesthetics. They don't have to be hidden at all. They will perfectly cope with the role of discreet but stylish decorative elements that also serve practical function- heat the room.


Examples in the interior
Decorating or hiding radiators in a room beautifully so that they are not a “fly in the ointment” and do not spoil the entire appearance of the room is not such a difficult task. Modern materials allow us to solve this issue with minimal costs.
Vertical, horizontal, sectional, copper, cast iron – modern market offers a wide variety of radiators to suit every taste.


A battery with a bright, cheerful color, such as yellow, will look good in a children's room - it has a positive effect on nervous system and the emotional state of a person.
New models, unusual for the eyes - vertical radiators. They are located vertically on the wall and can occupy the entire height from floor to ceiling. This element looks quite stylish and does an excellent job of maintaining a comfortable temperature in the room.


How to beautifully close the battery in a room with your own hands? In this article I will share with you tips on how to do it correctly and beautifully. What are the options and which is the most suitable? We will consider all the materials for casing the battery and the tools required for this. I will tell you about the stages of work, what needs to be done. After reading this material, you can easily close your radiator, which will make the room even more beautiful and modern. The article also contains useful videos materials.
Very often, when completing a renovation, people are faced with a situation where appearance The rooms are ruined by the battery. However, many are afraid that closing it will lead to loss of heat in the house and therefore leave everything as it is.
However, there are technologies and materials that will help not only avoid heat loss, but also give the room completeness and beauty.
Selecting material for battery casing
Today, there are a wide variety of options and materials to Beautiful sew up the battery.
According to the features of the closing structure, experts identify the following: decorative finishing groups:
- hinged screens with a lid. You can beautifully close cast iron batteries;
- hanging screens without a cover. With their help it is also possible finishing cast iron batteries;
- flat screens. They can be used to cover modern radiators. In such a situation, the radiator is located deep in the niche;
- side box With its help, you can completely hide not only the heating device itself, but also the place where it is mounted.
Radiators can be finished with the following materials:
- metal;
- plastic;
- glass;
- tree;
- drywall.
Since an increasing number of people prefer to use drywall for repairs, it is also used quite often for covering batteries. Moreover, you can sew up the battery with plasterboard yourself.

Drywall in terms of finishing heating devices has gained such popularity due to its advantages:
- environmental friendliness of the material. Finishing interior space this material is completely safe;
- plasterboard sheets have excellent physical and mechanical properties, so they can be used both in the room and in the bathroom or kitchen;
- low price;
- ease of installation. You can easily make a screen with your own hands;
- the opportunity to realize any fantasies for interior decoration.
When working with drywall, the following options for closing radiators are possible:
- box The fastest and easiest way. The finishing of the battery in this case exceeds its dimensions on each side by 12-29 cm;
- building a plasterboard wall in front of a heating device. A more expensive and time-consuming method.
The choice of design designed to beautifully close the battery should be made based on your own capabilities and desires.
Tools and materials required for work
To make a plasterboard box yourself, you need to have the following tools with you:
- building level;
- drill with screwdriver attachment;
- screws and dowels;
- metal knife;
- perforator;
- pliers;
- tape measure and pencil;
- ruler-corner.

In addition, to beautifully close the radiator you will need the following materials:
- plasterboard sheets. Can be used both ceiling and wall;
- metal profiles having a U-shaped section;
- putty.
Once the material and design option have been selected, the work itself should begin. First of all, you need to do the final preparation of the battery, which consists of painting it. Since after the finishing is completed, this procedure will be impossible to carry out.
When the paint has dried, you can begin marking. Let's consider this procedure using the example of a plasterboard box. To do this you need:
- measure all parameters of the device. Measurement accuracy is up to a centimeter. The exception is for projects that require precision down to millimeters;
- since the box has small size, then its depth and width are determined by the dimensions of the radiator. Remember that you need to make a minimum distance of 10 cm from the edges of the device;
- taking into account the position of the box, you need to draw a horizontal line;

Note! All markings should be made using a level. Otherwise, creating an even and correct structure will be very problematic.
- if the box will stand on the floor in a room or kitchen, then you need to draw three lines: two on the sides (depth) and one that will connect them (the front edge of the structure);
- A square should be placed on the bottom edge of the device and vertical lines should be drawn along the wall at right angles. They should be brought up using a level;
- Above the battery, these lines must be connected with a horizontal segment.
If everything was done correctly, then at the end of the marking you will get a rectangle or square (depending on the length of the radiator). If the box will be on the floor, for example in the kitchen, then the markings on it should reflect its base.

When making a decision beautifully close radiator with a plasterboard wall to hide the pipe, markings are made in the following way:
- The markings are drawn from the floor to the ceiling. Vertical lines are marked on the wall. The distance between them is half a meter or a whole meter. Don't forget to use a level;
- The vertical line is extended to the floor using a corner. The distance between them depends on the planned distance from the battery;
- similar markings are made on the wall. Lines are drawn strictly opposite to the floor lines and parallel to them;
- then we draw two lines above and below the radiator. In this case, you need to retreat 10 cm;
- Lines for the profile are also drawn on the right and left sides of the heating device.
Stages of installation work
Finishing the battery with plasterboard (or any other finishing material) with your own hands is possible only after completing the preparatory work. When the markings are ready, you can begin mounting the profile frame. To do this you need:
- first you should attach the profiles, which should be located on the walls;
- Marks are made in the wall with a screwdriver and drilled out using a hammer drill. required holes along the entire length of the profile. Dowels are inserted into them;
- The profiles are pressed to the holes and screwed with screws. Fasteners must be installed every 15-25 cm;
- Then, by analogy, you should attach the guides that are adjacent to the wall;
- after this you need to install the profiles into the depth of the structure. To do this, they should be cut into suitable lengths and attached to long guides that run vertically;
- We connect the profiles at the top and bottom with long segments.

After creating the frame, you can begin attaching the material. Finishing with plasterboard sheets involves the following actions:
- we apply the sheets to the profiles and make marks in the places of the cuts;
- cut the sheets into the required pieces;
- We attach them to the frame with screws. The interval between them should be 10-15 cm;
- To create smooth and neat corners, you should use an aluminum corner and putty.
Upon completion of the installation work, the plasterboard box is ready for final finishing. It can be painted, wallpapered or tiled.
Installation of a plasterboard wall frame involves the use of longer profiles that will run vertically. In all other respects, installation work is carried out in a similar way.
You can sew up any heating device using drywall yourself. To do this, you just need to correctly mark and install. Thanks to this, your battery will be hidden from view, while it will continue to heat the room as before.
source: https://gipsportal.ru/montazh-i-svojstva/chem-zakryt-batareyu-v-komnate.html
Closing the gypsum board battery quickly and securely
Sewing a battery with plasterboard is actually as easy as shelling pears; a simple process will take 4 hours at most. By giving preference to gypsum boards, you get their main advantage. Drywall - incredible comfortable material, it is easy to install and bends easily. Therefore, make a box the desired shape for the radiator will not be a big deal. Below is a simple method describing how to cover a battery with plasterboard.

You can cope with this task yourself, the main thing is to have the necessary tools and materials at hand, then the installation process will not take much time.
Preparatory work
So, in order to cover a radiator with plasterboard, you need to correctly mount the frame from the profile. To do this you will need the following Consumables:
- metal profiles UD and CD (the differences between these profiles are that one of them is used as a guide, and the other as a stand);
- dowels;
- self-tapping screws;
- screwdriver;
- putty knife;
- putty;
- metal scissors;
- decorative lattice;
- level;
- roulette;
- pencil;
- directly the gypsum board itself.
You can use a wall sheet of plasterboard or use the ceiling sheet left after renovation, it all depends on the size of the structure itself, as well as on your personal preference.

Stages of work performed
Structure of a plasterboard sheet:
- First, make markings on the floor, so you will determine the location of the UD profile. You will need to step back 40 mm from the wall, because the thickness of the plasterboard is 12.5 mm, and the width of the profile is 27 mm.
- According to the markings, it is necessary to sew a guide profile along the entire perimeter of the opening, this way we will get a finished frame for the future design. Professionals advise fastening with self-tapping screws and dowels, maintaining an interval of 15 cm.
- CD profiles are vertically inserted into the frame on both sides of the radiator, which must first be cut with metal scissors in accordance with the required height from the floor to the window sill. Make sure that the profiles are located strictly at the specified level. Fastening to the frame is best done with self-tapping screws of the “seed” type.
- If the distance from the installed CD type profiles exceeds the distance to the wall by more than 60 cm, then you will need to install additional vertical guides.
- Next, you will need to install guide profiles horizontally above and below the batteries. This way you will have a finished frame around the entire perimeter of the radiator, which can be safely sheathed with plasterboard.
- After the frame is completely covered with gypsum board sheathing, feel free to proceed to the final stage of installation work - puttying and painting the surface.
- Install a decorative grille that masks the radiator.

Helpful tips when working with drywall:
- When purchasing gypsum boards in a store, it is best to choose waterproof drywall. Remember that you have to finish the area in the apartment that is most at risk of flooding.
- If after the repair you have a sufficient number of wooden slats left, they can become a worthy replacement for a metal profile during installation of the frame.
- Do not under any circumstances allow the window sill board to protrude from under plasterboard construction, otherwise this may lead to disruption of air convection, that is, to the blowing of warm air and to the unpleasant appearance of condensation on the windows. Moreover, if the window sill board overlaps the battery by more than 50%, this leads to an increase in the likelihood of condensation on the windows.
- The material for decorating heating radiators can be not only a decorative grille. Here everything depends on the personal preferences of the owners themselves. For example, in addition to the well-known wooden fences, metal structures made of chrome and of stainless steel. These designs are perfect for a high-tech interior.
- If you want the drywall seams not to be noticeable, then chamfer along the entire edge of the gypsum board being installed. Their size will depend on the way you putty the seams. If you use reinforcing tape, then the chamfer is removed at an angle of 45 degrees. If you plan to putty without using serpyanka, then the chamfer angle is 20-25 degrees. A special edge plane will help you easily remove the chamfer.
- Before you start puttingty, use a primer; it will allow you to get better adhesion between the gypsum board and the putty mixture. Do not forget also about the places where the screws were screwed in and the corners.
And when choosing paint for finishing the finished structure, it is also best to purchase heat-resistant one. Since the heating season is long, paints may lose their brightness or, even worse, crack.
source: //www.vashgipsokarton.ru/konstrukcii/zashit-batareyu.html
Many, during repairs, strive to beautifully cover the battery with plasterboard. This is primarily due to the unaesthetic appearance of the batteries. It is very difficult to come up with and implement a successful design solution that could make the part of the room in which this element is located attractive. That is why owners are increasingly deciding to cover the radiator with plasterboard. This solution obscures the radiator from view and does not harm the heating system in any way.
In order to cover the battery with plasterboard, you will have to build a special plasterboard box. Anyone can make a plasterboard box for a battery on their own. This solution will not only cover unsightly heating pipes, but will also decorate the room if you choose the right design.
What will be required during the work process?
In order to create a box for a plasterboard battery, you will need the following:
- Screwdriver;
- Hammer drill (as well as a six-centimeter drill);
- Scissors cutting metal;
- Roulette;
- Level;
- Pencil;
- Stapler;
- Knife (stationery and preferably with replaceable blades).

How to sew up a battery with plasterboard without materials? That's right, no way! You will need the following:
- Twelve-millimeter plasterboard sheets;
- Metal profiles;
- Serpyanka;
- Perforated corner;
- Self-tapping screws for metal;
- Self-tapping screws for drywall;
- Dowels.
And also, you probably want to decorate the structure after hanging the battery on the drywall. For decoration, of course, additional materials will be required.
Let's get started
The first condition for installing a plasterboard box is that the window sill should be three centimeters or more away from the battery. If the distance is too small, the window sill will have to be repositioned to achieve the desired distance. If this becomes necessary, cut the window sill to the required size, insert it under the window frame and fill it with foam from the base to the window sill. Place a weight on top for three hours. After this, you can begin installing the box.

Wall marking
Before proceeding with installation, it is necessary to carry out preliminary markings. It is worth remembering that a plasterboard box is a small structure and should not occupy half the room. Its parameters depend only on how large your battery is installed. The minimum distance from the edge of the battery to the edge of the box should not exceed ten centimeters. This is the shortest distance that allows you to install a removable screen on the front of the box.
What is markup for? Many people do without it, however, the markings will allow you to more accurately install the frame. Drawing markup is divided into three main stages:
- Draw a horizontal line starting from the position of the future structure. If the bottom of the box does not reach the floor, retreat the required distance and use a level to draw this line. If the bottom of the box is in contact with the floor, then you will need to draw three lines. Two of them will be located on the sides and indicate the depth. The third connects the first two and points to the edge of the structure.
- Using a square, draw vertical lines on the wall. Place the tool on the bottom edge and draw lines along the wall at right angles. To bring the lines to required size, you will have to use a level.
- Draw a horizontal line that will connect the vertical lines. You need to run this section directly above the battery along the wall.
After finishing the marking, you will see that you have formed a square or rectangle, depending on what shape your battery. If the structure touches the floor, then you need to draw the base of the box.

Installation
After the necessary preparatory work, you need to start creating a frame from metal profiles. You need to install profiles on the wall, floor and window sill. To secure the profile, press it against the wall with your hand and use a hammer drill to drill a hole in the profile and in the wall at the same time. You need to install a dowel in the resulting hole and secure the structure with a screwdriver.
You also need to install a profile under the window sill, but now you will have to use metal screws. The length of each screw should not exceed the thickness of the window sill. When you have installed the profile to the base and under the window sill, install the jumpers.
As a rule, by covering the battery with plasterboard, a screen is installed - a kind of decorative grille. Decide where the future screen will be placed and frame it with a size slightly smaller than the lattice parameters.
After finishing work with the frame, you can proceed directly to plasterboard covering. Drywall is a material that is very easy to process. And in such work, this parameter is simply necessary. An ordinary stationery knife is enough to cut a plasterboard sheet and cut out a shape of the desired size. This is done quite easily, but after cutting there is a lot of dust left. Therefore, you should not cut plasterboard sheets next to expensive furniture.
Drywall pieces can only be screwed to the structure with a screwdriver and nothing else. Theoretically, you can do without a screwdriver if you put a Phillips bit on the drill. However, this is terribly inconvenient, so if you do not have a screwdriver, it is recommended that you purchase one before starting to work with drywall. Even after the renovation is completed, it is unlikely to be found master, which will not need a good unit, so you don’t have to spare money on tools.
After you finish the box itself, you need to start installing the perforated corners. Secure them at the corners of the structure. There are two ways to make the mount. You can simply attach the corners with a stapler, or you can directly glue them using gypsum plaster. Which method suits you best, decide for yourself.
You will find that there are many seams left on the structure, which will significantly interfere with further design processing of the box. Apply sickle tape to each seam and then use gypsum plaster again to seal the seams.
After this, you can begin to design the box. But before you begin this step, you need to do some preparation. The entire plasterboard box must be puttied, treated with sandpaper and a deep penetration primer.
Decor
Plasterboard sheets form a surface that is very easy to finish with any material. They are smooth, which allows you to glue wallpaper or paint the box without any problems. Simple painting is the most popular way to finish plasterboard boxes.

Often two or more colors are used for painting. The choice of paint completely depends on the interior and design of the rest of the room. It is extremely important that the box does not stand out from the overall style.
Various patterns applied on top of already painted drywall look very interesting. It all depends only on your imagination. If you wish, you can even disguise the battery as a cabinet.
Even if you have not found any original design solutions that could beautifully fit the plasterboard box into the interior of the room, you can always simply hide the structure by connecting it to the window sill. The box will simply look like part of a solid wall, not standing out at all.
A radiator as an element of a heating system does not always meet the aesthetic expectations of the owners of a house or apartment. Many people want to decorate such structures, smoothing out their impact on the interior as a whole. However, before closing the battery, you need to carefully weigh the pros and cons, because an incorrectly installed design can significantly reduce heat transfer.
Decoration
The battery does not need to be closed. There are a few alternative ways hide radiators if they do not fit into the interior.
Painting
During repairs, it is enough to remove the old coating and repaint the surface. To do this, use special paint that is resistant to elevated temperatures. The color must be selected to match the interior of the room. True, this option is best used with modern aluminum batteries. Painted cast iron items will stand out a lot.
It is not necessary to make radiators monochromatic; they can be decorated with various designs. This is especially important to do in a children’s room or kitchen. If artistic skills are completely absent, you can use special stencils.
Curtain

You can cover the radiator using a cotton curtain. True, this option is only suitable for products installed in a niche. You can attach the curtain to the window sill using Velcro; the fabric should be matched to the wallpaper. As an alternative, blinds can be used.
Decoupage

Using ordinary napkins and PVA glue, you can also decorate a heating device. This is easy to do with your own hands; special skills and expensive materials are not required. It is enough to choose napkins to match, cut out the necessary elements and paste them over the radiator. You can apply a special heat-resistant varnish on top.
Screens
If decorating heating appliances for some reason does not suit you, you can hide them under special grilles or perforated screens. Such devices are made from the most various materials, have a variety of shapes and designs.

When choosing a screen, it is worth remembering that the better the perforation, the more heat from the radiator will enter the room. Blind side and top bars seriously reduce battery efficiency.
Glass

Screens made of thick glass will successfully hide the heating device. You can purchase options with photo printing or entire glass paintings; such products look beautiful and very stylish. Glass screens only cover outside batteries. They are secured using screw holders with elastic protective pads.
Mounted

You can hide radiators using hanging grilles. Most often, such products are used for those located in a niche under the window sill. Anyone can also handle the installation - you just need to hang the structure on the heating device.
Wooden

Best suited for rooms with classic design. In addition, wood products can be used as a stand. However, there is also a drawback to such a screen. It lies in the short shelf life of the products. Alas, wood, regardless of quality, sooner or later becomes deformed under the influence high temperature and it will simply dry out.
What can you do yourself?
Now there are many opportunities to design screens for heating devices with your own hands. The easiest way is to cover the heating radiator with plasterboard. This universal option is suitable for any room, from the living room to the kitchen.
Required materials and tools
- pencil and tape measure;
- hammer drill and screwdriver;
- metal scissors and stationery knife;
- level, stapler, sandpaper;
- self-tapping screws;
- drywall, UD and CD profiles;
- lattice.
Frame
In order to cover the radiator with plasterboard, you need to make a frame. To do this, UD guide profiles are secured with self-tapping screws to the underside of the window sill, walls and floor. The front edge of the resulting frame is deepened by 13 mm so that after covering with plasterboard, the surface of the screen coincides with the wall.

Then the CD profiles are screwed vertically, and the distance between them should be slightly more sizes grates.
Sheathing
Using a knife, cut blanks of the required size from a plasterboard sheet. Then the drywall is screwed to the frame with self-tapping screws. The screw heads should not be deeply recessed, otherwise the sheet may tear and the structure will not be securely fastened. On last stage secure the decorative lattice.

Plasterboard structures fit perfectly into the interior, but significantly reduce the efficiency of the radiator. Small space for the flow of warm air impedes convection. Therefore, when choosing a screen or decorative design, you need to find a balance between aesthetics and minimal reduction in heat transfer from the radiator.


