For the citizens, the problems of drainage and disposal of household waste are solved by municipal services, but adherents of free-living country life have to think through such pressing issues on their own. If the owner of an estate intended for the residence of a large family most often has to order the installation of a bulk septic tank or local station cleaning, then a summer resident with his own hands can easily build a cesspool from inexpensive or waste materials. It will cope with the important sanitary function perfectly, and will not require the allocation of too much money for arrangement.
The simplest and most cost-effective options
The historical predecessor of this sewer facility was a simple hole dug in the ground, the walls of which were coated with clay and reinforced with boards. Then they began to bury old barrels, tanks, and other used containers into the ground. Nowadays, such “reservoirs” for collecting and partially filtering wastewater are installed only if the daily amount does not exceed 1 cubic meter. m.
A simple cesspool for a toilet can satisfy the needs of summer residents who stay on the site a couple of days a week in summer season. However, its device is not approved, and sometimes completely prohibited by sanitary and epidemiological services, often accompanied by the imposition of administrative penalties.
Elementary cesspool: from the simplest container lined with boards for a toilet to a tank made of concrete rings
Attention. The depth mark of the bottom should be at least 1 meter higher than the maximum (spring-autumn) groundwater level.
If the owner suburban area I really don’t want to spend money on the structure, and he has a number of worn tires, this material can be put to good use. You just need to lay the tires in the dug pit, fastening them together with bolts. If the pit is located outside the house or toilet, a hole must be cut in the side of the tire placed on top to connect the sewer pipeline. After digging around the homemade treatment plant filled with soil and placed on top concrete slab with a hole for a ventilation pipe and a hatch for pumping out.

The owner of a N-number of worn-out tires can use them to build an excellent reservoir for collecting waste
Common types of structures
According to characteristic design differences, cesspools are divided into absorption structures and sealed containers. The functions of collecting, accumulating and treating wastewater are also performed by septic tanks. They are more technically complex installations with forced stimulation of the movement of wastewater inside and with biological and chemical treatment methods.

Violation of sanitary and epidemiological standards for location is unacceptable cesspool
Containers without bottom - absorbent
Direct descendants of the “people's” cesspool. Their characteristic– absence of a bottom, due to which the liquid component of the wastewater, having undergone purification by coarse filtration through a layer of a mixture of sand, gravel, broken brick and other “ingredients”, passes into the ground. The absorption option is considered the most economical; moreover, the construction of a pit of this type can easily be carried out by a contractor who has absolutely no experience in the field of construction. Another saving: due to the partial infiltration of purified water into the ground, there is much less need to call sewer trucks.

Structural diagram of a cesspool without a bottom - wastewater is filtered through crushed stone
An absorbent type of pit is chosen if there is no need to drain a large amount of wastewater, if country house no jacuzzi, dishwashers or washing machines. The land will not be able to process and accept a large volume. In addition, the cleaning carried out cannot be classified as a 100% effective procedure, which means that wastewater from the absorption pit will still pollute the environment.
Sealed waste water tanks
Their name contains a direct hint indicating the main design feature. Essentially, these are closed containers made of waterproof concrete, brickwork, plastic, gas silicate blocks that require constant emptying after filling. Sealed structures will ensure the complete absence of odors typical of wastewater, but will force the owners to regularly call a sewer truck to remove accumulations.
Important. A cinder block is not suitable for building a cesspool; it will collapse too quickly from contact with water.
The easiest way is to buy and bury a factory-made plastic container in the ground to collect wastewater, connect a sewer pipeline to it and periodically call the vacuum cleaners to empty it.
The simplest scheme for constructing a wastewater tank would be to install a store-bought plastic container. It does not need to be sealed, however, it is advisable to fill the bottom of the pit with a kind of cement screed and strengthen the walls with reinforcement. In principle, if the owners are not embarrassed by the unpresentable appearance, then there is no need to bury it in the ground. Another very compelling argument in favor: a plastic structure can be installed regardless of the close level of groundwater. There will be no harm to the environment anyway.

The tank should not be completely filled with sewage; there should be at least one meter between the manhole cover and the liquid level; if the level exceeds the limit, the container should be emptied
The simplest homemade septic tanks
These are more complex structures that not only deep cleaning, but also processing wastewater into fertilizer valuable for gardeners. Most often, they are a system of two or three chambers, in the first of which only collection and rough mechanical purification occurs, and in subsequent chambers specific bacteria enter the battle, finally processing the polluting inclusions of wastewater.
A cesspool with an overflow purifies water so well that it can be successfully used for economic and technical purposes, for example, for watering or for cleaning the area. But in order to make a septic tank with an overflow, considerable effort will be required.

The operating principle of a three-chamber septic tank is based on multi-stage wastewater treatment: in the first tank, the collected wastewater is subjected to coarse filtration, in the following chambers finer purification is performed
If you don’t mind the effort, but there is no surplus of financial resources, you can again resort to worn-out car tires. In the sense of “bald”, but not worn-out tires. Moreover, the owner will save not only due to waste building material. To install a septic tank made from tires, you do not need a powerful concrete foundation, just a compacted cushion of crushed stone with sand with a thickness of 30-40 cm and a ten-centimeter screed.
- To increase the volume of the created reservoir, the sidewalls of the tires must be cut off.
- A concrete pipe is installed vertically in a well made of tires; its diameter should be approximately two times smaller than the same size of tires. The upper cut of the concrete pipe is located 10 cm below the well made of rubber.
- The bottom of the pipe is filled with concrete to create a monolithic concrete cylinder.
At the top you will need to make holes for infiltration and for installing pipes that provide overflow.

Design of a cesspool with overflow: the pipe entering the chamber must be located higher than the overflow pipe
- The sewer pipe must be inserted into a concrete container located inside the tires.
Input locations sewer pipes in vertically installed concrete pipes needs to be sealed.
Let's consider the stages of installation of several design options.
Absorbing
Owners of small country estates who decide to make a basic sewer system with their own hands most often choose this option. Attracts simplest design and the opportunity not to resort to the services of vacuum cleaners too often. The walls can be made of bricks or gas silicate blocks, but it is easier and faster to build them by placing concrete rings on top of each other.

It is much faster to build walls from gas silicate blocks than to lay them out of brick, and it is even faster to make a pit from concrete rings, but to install them you will need a crane

Sealed
The construction principle is similar, only there is no need to form holes for the infiltration of treated wastewater and the bottom must be completely concreted. It is advisable to reinforce the lower concrete platform by laying a concrete mesh on the bottom before pouring. To prevent the reinforcement from “drowning” in the concrete, it must be slightly raised above the surface and secured on pegs.
An important aspect: it is recommended to seal the walls. Cheap option for internal insulation - bitumen; the outside of a home-made sewerage facility can simply be coated with clay. If the walls of the pit were built of brick, they can be plastered.

The standard design of a sealed cesspool with a concrete bottom; the walls can be built from concrete rings, lined with bricks or gas silicate blocks, make a monolithic container, pour concrete into the formwork
Brickwork will take significantly more time than installing concrete rings. At the bottom, by analogy, they arrange concrete screed, and you can lay bricks either in a circle or by “drawing” a square or rectangle in the perimeter. The poured concrete platform must “mature” before starting masonry, standing for 7-8 days.
Important. During the masonry period, it is necessary to form holes for the supply of sewer pipes. The connection point is located below the freezing level recorded by local weather services.
The sewer pipeline to the waste collection point should be slightly inclined to ensure spontaneous movement of the contaminated mass.

The pipe introducing wastewater into the pit must be located below the freezing level, the pipeline must be laid at an angle to ensure spontaneous movement of wastewater
Installation of ready-made complexes
It’s impossible to think of anything simpler and more convenient than their use; the arrangement of a cesspool from precisely sized components is carried out extremely quickly. The only drawback: volume parameters specified by the manufacturer. But they produce a factory product mainly with the average consumer in mind. That is, finding the necessary kit is not difficult at all.

There are many ways and methods to make a cesspool. From the variety of options, it remains to choose the optimal type of design that meets your needs. Which costs are more important, what is best to save on, is up to the owner and contractor to choose, and knowledge of the design differences will help make the right decision.
Evgeniy Sedov
When hands grow out the right place, life is more fun :)
Content
Most suburban areas, especially country houses, do not have access to a centralized sewer system, and land owners solve the sanitary and environmental problem of wastewater on their own. Therefore, it will depend only on the awareness of the owners how a self-built drainage pit in a private house will cope with the removal of waste and sewage. Let us consider in more detail all the options for solving the problem in small populated areas, where the issue of wastewater is acute.
What is a drain pit
Do-it-yourself cesspools in a private house are primitive, but at the same time one of the most effective ways disposal of sewage and wastewater in residential or industrial suburban buildings. The structure is a system of structures and devices:
- pit;
- reservoir, container for storing or receiving wastewater;
- drainage system from sewer pipes;
- filtration system (if necessary);
- special fastening devices;
- seals and sealants.
Drain pit in a private house with your own hands - this means saving money and wide possibilities for choosing the type of structure, but before you start complex work, you need to study all the advantages and disadvantages of each design and choose the optimal scheme in your particular case. It is important to remember that an improperly designed sewage disposal system can lead not only to toxic leaks, property damage and aesthetic discomfort, but also jeopardize the health and life of residents.
How to make a drain hole
Sewage pit in a private house with your own hands it is convenient because most of its types do not involve the use of sewerage machines. Such designs of drainage structures are considered the most the best option, they do not require constant and regular maintenance. It will be necessary to involve complex equipment only once every few years, which will save the cost of maintaining the cesspool. For residents of areas remote from the city, these options for drainage structures made from different types material:
- from automobile rubber tires;
- wood: board, plywood, fiberboard, chipboard;
- plastics, metal-plastic, plastic, MDF;
- concrete rings and slabs;
- bricks
Types of sewage pits in a private house by period of operation:
- not sealed type for summer use;
- non-sealed type for all-season use.
Almost all proposed types of materials are interchangeable and for the most part have a low cost (especially since it is not at all necessary to use new materials; used ones are also perfect). Therefore, every homeowner will be able to choose the option that suits them and make a drainage hole in a private house with their own hands. The main thing is to correctly take into account the location of the structure and the amount of wastewater per person per day. Daily norm without further filtration approximately 30-50 liters per person.

Location
In accordance with State sanitary standards, a sewage pit in a private house must be located at a remote distance from the walls of residential buildings and structures, children's playgrounds. Location of the cesspool personal plot and the distance from it to the neighbors’ residential building or cottage is determined by the decision of the owner of the site in compliance with the rules of good neighborliness.
Controversial issues regarding the arrangement of an autonomous sewer system are considered in order to resolve land disputes in accordance with the law. The main condition on the site in conditions of autonomous (non-centralized) water supply is the distance from individual wells and water supply sources. The distance on the site from one object to another should be at least 20 m, and ideally 50 m.
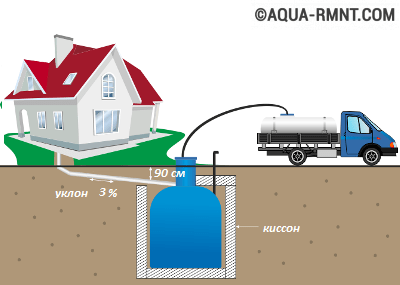
Otherwise, the sewage will contaminate the drinking water on the site and become a source of disease. In this case, it is important to take into account the direction of the slope of the site: the location of the drain tank should be below the level of the drain site. It is advisable that the inclination increases by three centimeters each linear meter drain pipe, then the sewage will drain by gravity.
Device
Naturally, most owners, in addition to solving the safety problem, will take a responsible approach to the issue of ensuring that all the structures necessary for the construction of the facility are in harmony with all the buildings on your site. To choose a location for a drain, you need to take into account many factors:
- terrain;
- nature of the soil;
- depth of groundwater;
- Availability drinking water.
If a drainage pit for a private house will be used by residents only in the summer, then its depth can be made from 1 to 1.5 meters in size (depending on the number of drains). When the structure is used and in winter period time or year-round, it must be taken into account that the depth must be calculated taking into account freezing and soaking of the soil. The drain must be located at a depth of no less than 0.5 m. Such a system must have ventilation ( vertical pipe from a hole with a protrusion outward of 20-30 cm) and drainage.
If autonomous local sewerage settles down on a summer cottage, it is very convenient to choose a cesspool with a filter bottom - a cleaning well. But in this case, it must be taken into account that the total amount of wastewater and sewage should not exceed 1 cubic meter per day. This device is well suited when the soil is sandy or sandy loam and the groundwater level is at a depth of less than 2.5 meters.
Construction consists of the following stages:
- When digging upper layers Soil and soil are scattered around the site. One and a half cubic meters of soil are left for the installation of a heat-insulating layer, which will subsequently be located above the ceiling.
- At the same time, the walls in the pit are being built and the outlet pipes are being laid. The walls of the structure are made of bricks or concrete rings, and the pipes are placed at an angle to prevent stagnation of harmful liquid.
- At a certain depth (depending on the volume of the tank), the end of the outlet pipe is inserted into the structure.
- After the installation of pipes, rings, floors, and covers has been completed, it is necessary to install hatches.
- When building brickwork at the level of the walls, make a trench 30 cm wide, then the concrete slab will lie on top of the walls of the well exactly on the ground. The slab must be backfilled to the surface level, and the hatch remains open.
When constructing a sealed cesspool, the following factors must be kept in mind:
- Among the structures there are both sealed concrete wells and factory-made plastic containers.
- The tightness of wells is worse than that of plastic tanks. A good option- This is a Euro-cube, it is light and inexpensive. Holds 1000 liters and has a plastic or wooden pallet.
- The ventilation pipe must have a diameter of at least 10 centimeters and be located 70 centimeters above the surface.
- For laying pipes, it is very important to choose a place that does not come across bushes, trees, roots and does not impede access for necessary repairs.
The principle of using this type of structure is that sewage does not enter the ground. They are collected in a special container through specially laid pipes, and pumped out of it using special equipment. How often you will have to call a sewage truck and pump out sewage will depend on the number of residents and the time of year of operation.
Dimensions
The dimensions of the drainage pit in a private house should be calculated so that it can accommodate two volumes of the tank in which water is heated for a bath, shower, and other household needs. This ratio of the size of the barrel and the pit will allow the owners to use it for a long period of time for reliable daily use in the summer. People who decide to build a cesspool on their own need to correctly calculate the capacity of the structure in advance. The calculation is made using the formula V=Nday*Xperson*Vday/person, in which:
- V-calculated volume of the cesspool, m3;
- Ndn - number of days of work for accumulation (before pumping is necessary);
- Xperson - number of permanent residents;
- Vday/person is the daily water consumption of one resident in liters.
Approximate calculation for a house or cottage where a family of five lives. Let’s say the cesspool is cleaned once a month, and water consumption is 150 l/person. With these indicators, the volume of the future drainage pit is calculated: V=30*5*150=22.5 m2. The value of daily water consumption depends largely on the needs and habits of household members. Observations show that urban residents use more water than residents rural areas.
DIY drainage hole
For the construction of non-hermetic devices for summer use, boards, metal or plastic barrels, old car tires, plywood. Drainage pits, designed for year-round use, are constructed from stronger and more durable materials: concrete rings, brick, metal sheets. Do-it-yourself drainage pit in a private house is a completely accessible and feasible process, the main thing in which is to adhere to the basic requirement - reliable sealing and waterproofing (water lock) of the container for draining sewage.
Made from concrete
Drain pits made of concrete rings are considered one of the most reliable and durable structures that are designed for year-round use. They hold up great low temperatures in winter and soil viscosity during the rainy season. Compared to other options, concrete structures are somewhat more expensive, but after construction, provided that it is carried out competently, such structures autonomous sewerage do not require regular maintenance, repairs or modifications.
The procedure and stages of construction of the structure:
- Dig a pit of the required size and level the bottom to install the lower ring.
- The rings are installed sequentially, hermetically sealing them together with cement mortar.
- The number of rings depends on the required volume of the pit.
- The upper part of the ring should protrude 20-30 cm above the ground level.
Advantages:
- reliable material;
- speed of construction;
- big choice ring size;
- convenience in purchasing related materials.
Flaws:
- attraction of special equipment and trained employees to manage it;
- It is advisable to have a photo of a similar building or create drawings.

Made of brick
One of the most expensive, but reliable and effective options do-it-yourself drainage hole - made of brick. If you want to save money, you can use substandard or used bricks. The procedure for constructing the structure, as in the case of a pit made of concrete rings - the brick is laid on cement mortar in a circle along the walls of the pit. Pros of using bricks:
- durable and durable material;
- minimal builder skills required;
- without the use of special construction equipment.
- A rectangular or square pit will not withstand heavy loads, if high humidity may collapse.
- In order to build a round hole, you need the help of a specialist.
- When building an airtight pit with your own hands, you will need a lot of cement and sand.
Made of plastic
The use of plastic is the most popular and inexpensive option manufacturing a drain structure. Her main feature- this is tightness, preventing waste from entering into groundwater. The installation procedure is simple. You need to choose a place and dig a hole with a volume 40% larger than the plastic container. Make a sand cushion 20-30 cm high. Pour a 20 cm wide base from concrete and attach a barrel (storage) to it so that it does not float when high level groundwater.
The container can be secured with chains, ropes, or covered on the sides with sand, gravel, or crushed stone. Cut a corresponding hole in the top of the container and connect the pipes; seal the joint well, for example with silicone. Insulate with a layer of thermal insulation to prevent freezing of drains during sub-zero temperature. The top of the pit can be covered with plywood, boards, metal sheet, but be sure to install a hatch with a diameter of at least 70 cm for further maintenance. Design advantages:
- light weight;
- many varieties;
- ease of arrangement;
- for a long time operation.
- plastic can be deformed under loads;
- exposure to temperature changes.
To avoid such troubles when building a cesspool with your own hands, it is important to provide thermal insulation. It is better to choose a container with a metal frame, and line the barrel with bricks. If all construction rules are followed, such a DIY pit will last more than 30-40 years, but subject to regular preventive maintenance: additional insulation for the winter, regular pumping of sewage.
Made of wood
A do-it-yourself drainage pit made of wood is a temporary solution to the problem of wastewater. After choosing a location and digging a recess of the required size, four boards are knocked together according to the dimensions of the walls of the pit. The panels are installed in a prepared pit, and at the joints they are fastened to each other using timber.
Spacers are installed between the boards to strengthen the structure; fastening of the two sides is ensured by resting on adjacent boards. From above, the structure is covered with plywood, metal, a shield of boards and covered with water-repellent material (polyethylene), covered with soil as thick as a spade bayonet.
Positive aspects of a wooden drain bottom:
- accessibility and ease of material processing;
- to assemble the structure is not required special effort and skills;
- The box is easy to install and dismantle.
Flaws:
- short service life;
- small tank volume.
From tires
This is the easiest method to build a hole with your own hands. In the selected location, a recess is dug slightly larger than the diameter of the tires. The prepared tires are installed one on top of the other, but before that the inner sidewalls on both sides of the tire are cut off. This is done to prevent waste from accumulating on the sides of the tire. This is easy to do: make a hole on the side of a suitable diameter for the possible passage of a hacksaw and saw off unnecessary parts. It will take 40-50 minutes to prepare one tire.
16.06.2016 0 CommentsThe cesspool for a private home has evolved somewhat over the past decades. In addition to the simplest design (a hole in the ground) and a concrete well-type structure, septic tanks have been actively used in private use for the last 10 years. The latter direction has a number of branches: pumpable sealed septic tanks and systems with wastewater treatment for further discharge. Below is more information about each type of sewerage structure.
In contact with
Classmates
Calculation
For cesspools with a filter bottom it is used simple formula calculating their volume - 0.15 m 3 per person per day living in a given house. For longer use from cleaning to cleaning, if you are planning a sealed design, you can increase the volume by 50...70% for each person.
Do not get too carried away with increasing the volume, as this will entail additional construction costs, and the benefit from rarely calling the car will be offset by the costs of cleaning the tank: over time, sludge accumulates in the containers/pits, which also needs to be removed. In a cesspool with a filter bottom, this process also occurs: over time, the soil loses its ability to filter wastewater - it becomes clogged with fats and waste fractions that are not subject to decomposition.
For sealed systems, it is recommended to take the wastewater rate from 0.2 m 3 / person per day for calculation. This is the required minimum. The second calculation option is based on the maximum amount of wastewater based on the consumption rate of plumbing fixtures for 2...4 weeks. This option is more reliable.
The consumption rates are as follows:
- 1 tap – up to 0.1 m 3 per day;
- Shower (taking into account the number of residents) – 0.08 m3 per day per person.
- Bathroom - up to 0.25 m3 per week for each resident.
- Toilet - from 0.04 m 3 per day per person.
- Washing (dishwasher) machine - 0.01...0.02 m 3 each time it is turned on.
- Other plumbing fixtures are subject to availability.
- Reserve – at least 30%.
Example calculation for a family of 4 people
For a day, a family of four needs
- Household needs - 0.1 m 3
- For shower - 0.32 m3
- For taking a bath once a week: 0.25/7*4=0.14
- Sanitary needs - 0.16 m3
- Washing once every 2 days: 0.02/2=0.01
- Total minimum required for daily use: 0.82 m3
- Taking into account the daily supply, 1.1 m 3 of capacity is required.
Next, you consider how much volume you can afford, taking into account the cost of forced cleaning and the required space for construction. For a pit with a filter bottom, 6 m3 will be enough. For a sealed design with weekly cleaning, you will need a capacity of at least 6 m 3, taking into account weekly cleaning.
Simple and proven option
A simple cesspool in the yard is a mandatory attribute of any private home that does not have the opportunity to connect to a central sewer system. The construction of cesspools can be as simple as possible: if there is dense soil and compliance with construction standards, they dig a well and cover it.
Location options
- at least 5 meters from the house or more;
- no further than 1...4 m from the fence;
- no closer than 30 m to the nearest body of water;
- from a source of drinking water - no closer than 50 m.
It is advisable to fence the area, but leave access for the vacuum cleaner service vehicle.

The location of the cesspool relative to other objects on the site
This DIY cesspool design is ineffective. Construction is fraught with a number of difficulties: it is necessary to dig down to solid layers of soil, and then additionally remove from 2 to 4 m 3 of rock. The last disadvantage of the design is the low volume of wastewater that it is able to serve - up to 0.5...1 m 3 per day. There is one advantage: it’s cheap and you can do it yourself.
Work procedure for a do-it-yourself cesspool without pumping:

Conclusion: the simplest cesspool, without strengthening the walls, is suitable for use with a small volume of wastewater. This option is acceptable for a summer residence, but not for permanent residence.
Brick/concrete sewer well
 Prefabricated sewer wells they dig in the same order as a simple cesspool. Their difference is the main walls made of brick or ready-made concrete rings. Brick is practically not used in such structures today.
These designs come in two types: sealed and with a filter bottom (do-it-yourself cesspool without pumping). In the first case, the well is concreted and sealed. Ventilation is required. In designs with a filter bottom, the bottom is left open and the soil underneath acts as a filter for wastewater.
 The order of work is similar to the first section, only the operations of laying concrete rings (brick laying) are added. You can build a do-it-yourself cesspool using bricks yourself; you will have to hire equipment to lay concrete rings.
A cesspool made of concrete rings is strictly limited in size. There are three main sizes of these products for private yards: 70, 100, 150 cm. In industrial construction, rings up to 2 m in diameter are also used.
 Instead of a do-it-yourself cesspool for a private house, you can build a more modern structure - a septic tank. With a sealed septic tank for 1 chamber, you are not so limited in choosing the location of the structure - this is its advantage. But construction will be a little more expensive than for option 1, but much cheaper than a cesspool made of concrete rings.
The second option is a multi-chamber septic tank with several levels of water purification. In essence, this is a minimal water treatment plant, the product of which can be returned to the soil, used for irrigation or discharged into a reservoir. The conditions for using such a design are that you must constantly monitor the condition of the discharges and control the quality of the purified water. For this purpose, a number of technological measures (filtration systems) and special drugs(chemical and/or biological treatment).
This option for a do-it-yourself cesspool is more expensive, but eliminates the constant use of forced cleaning services.
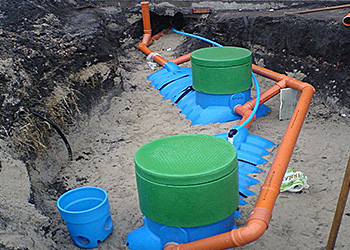
Procedure for installing a septic tank
- Preparing the pit (according to the dimensions of the tank, taking into account the cushion).
- Backfilling of crushed stone cushion - from 0.5 m.
- Laying sand (up to 0.1 m)
- Tank installation. WITH outside compensation structures must be installed in the tank. They can be done in different ways: scald the tanks with reinforcement, line the pit with bricks, etc. The main task here is to prevent the soil from the outside from pressing on the walls of the tank, otherwise it may burst and depressurize.
- After installing the septic tank, the free volumes around the tank are filled with sand, and a soil backfill is laid on top (again, on a protective structure, so as not to push the tank from above).
Note. For round tanks there is no need to make a protective unloading casing. For “cubes” - a must.
 In conclusion, the basic rules for laying pipes (as a reminder):
- Calculate the slope angle for all communications: for each meter of sewerage, the slope must be at least 2% (difference in level 2 cm). With a pipe length of 5 meters, the difference should be at least 10 cm. For longer sections of pipelines, it is advisable to set a larger inclination angle of 3...4 cm per meter.
- Consider the freezing depth. Sewerage – “ warm system": reactions are constantly taking place in it with the release of heat. But it must be insulated (in case long downtime), and buried to a depth of at least 1 m for temperate latitudes.
- The pipes are laid on a sand cushion; after laying, they must be covered with bricks. Plastic will not bend under soil pressure, but under constant pressure it very often cracks. An example of such an impact would be a vehicle constantly driving over a pipe. For protection, it is enough to lay out a protective tunnel with walls made of brick, old concrete curbs, stone and cover the pipe with the same materials. The pipe in the tunnel can be covered with sand. Another option is to fill the structure with concrete and then backfill the trenches. But it's not convenient. If pipe repair/cleaning is required. Or in the case of adding a new branch to it from a guest house built 3...5 years later.
In contact with
For collecting household waste in private homes or on garden plots a drainage pit is required. Its construction is not difficult, so you can do it yourself, without the involvement of specialists. To create a drainage pit with your own hands, you will need some knowledge, we talked about it in this article.
Sanitary restrictions
To avoid penalties and litigation with neighbors, when choosing a location for a drainage pit, the following sanitary and technical requirements should be taken into account:The storage pit for domestic wastewater is located only on the territory of a private household; you do not have the right to place it outside; distance from the fence – from 1 m;
In order to avoid wastewater getting into drinking water if the seal of the pit is broken, it is necessary to place it at a distance (at a distance of 10 m) from the water supply branch; a distance of at least 20 m from the drinking water well (on loams up to 30 m, on sandstones – 50 m);
The close location of such a pit when it is drowned or washed away can lead to the destruction of the foundation, so the distance from residential buildings(including neighbors) – 10-12 m;
The depth of the hole depends on the occurrence of groundwater, maximum depth- 3m.
When choosing a location for a treatment plant, you should also take into account the possibility of access to special equipment for pumping.
To avoid appearing in the house unpleasant odor You should not place it near windows - you should retreat at least 5 m.
Distance to cesspool
Violation of sanitary standards is fraught with more than just fines. In the event that a sewage spill causes damage natural environment or the health of others, a criminal case may be opened against you (Article 250 of the Criminal Code).
Important! The construction of cesspools without a bottom is allowed only if the volume of domestic waste per day does not exceed one cubic meter. In all other cases, the waste collection container must be sealed.
Types of drainage pits
A variety of materials can be used to construct a storage tank for domestic wastewater:Concrete (including concrete rings);
Plastic;
Rubber tires.

Brick drainage pit
Due to their low airtightness, wood and rubber tires are used only for the construction of small drainage structures. Most often, cesspools are constructed of concrete or brick.
Calculation of storage capacity
The size of such a container depends on the number of residents, the number of installed plumbing fixtures, the presence of a shower or bathtub, bathhouse, dishwasher, washing machine, pumping frequency and other nuances. The generally accepted rate of wastewater per person without further filtration is 30-50 liters (0.03-0.05 cubic meters) per day.Thus, provided that the drainage pit is pumped out once a month for a family of 3 people, you will need at least:
0.03 x 3 x 60 (number of days in 1 month) = 4.5 m3
Advice. In case of unforeseen situations (for example, snow drifts and the impossibility of timely pumping), it is better to size the storage tank with a reserve. Since the volume of one GAZ sewer truck is on average 3.8-4 cubic meters. m, in order not to overpay for driving the car, it is wiser to make the holes a multiple of this value.
Concrete drainage pit. Construction stages
1. Initially, the hole is prepared manually or using an excavator. Usually its width is no more than a meter. The length of the cesspool is calculated depending on the volume of wastewater. For ease of pumping, it is better to make the bottom of the pit with a slight slope.2. To prevent the walls from crumbling, they are leveled.
3. Pipes are connected to the pit. In order to wastewater entered the pit by gravity, they must be located at a certain slope. For pipes d160 mm it is 10 mm per meter of passage; the slope of 100 mm pipes is 20 mm.
4. It is advisable that drain pipes were located below the freezing level. Otherwise, they will have to be carefully insulated.

Pipe supply
6. It is better to make a hydraulic lock between the walls of the pit and the ground. To do this, wet clay is poured between the formwork and the soil and thoroughly compacted. This must be done as the formwork is being erected.

Clay castle
7. It is advisable to waterproof the walls of a concrete pit using ordinary polyethylene film.
8. Standard formwork is prepared for the side parts of the structure. Since concrete walls have a significant mass, the formwork is secured as firmly as possible using self-tapping screws.
9. The structure must be reinforced. All metal rods are connected with wire.

Cesspool reinforcement
10. The thickness of the concrete cesspool walls is 25 cm.
11. To avoid the appearance of cold seams (places of “weakness” in concrete), walls are poured only in one step.
12. The solution is mixed in a ratio of 1:2:3 (cement, sand, crushed stone). It should be quite liquid. If you throw a small pebble into it, if there is enough liquid, it should be completely immersed in the solution.
13. During the pouring process, the solution should be periodically compacted with a shovel or vibrating compactor (bayonet). Otherwise, voids will form in it, which will negatively affect the strength of the structure.

Compacting concrete makes it stronger and prevents voids
14. In hot weather, to avoid cracking, it is better to cover the drying concrete surface with bags.
15. After the concrete has completely hardened (this happens on average within a week), the pit is carefully waterproofed with bitumen. To do this, the walls are first cleared of irregularities. The bitumen is crushed into pieces, heated to a boil, then removed from the heat and gradually added to it in a thin stream. a small amount of kerosene, gasoline or diesel fuel (10 liters of bitumen will require a liter). This is done so that the bitumen is more liquid. If you don't dilute it, it will harden almost immediately after you remove it from the heat.

Heating bitumen on a fire
16. You should not overheat the bitumen or heat the mixture together with gasoline, kerosene or diesel fuel, otherwise it will flare up. If the heated bitumen does catch fire, to extinguish the flame, you should immediately cover the container with plywood or a suitable lid.
17. For waterproofing, you can purchase already ready solution roofing bitumen mastic, but it will cost more.
18. The resulting mixture is applied to the walls with a brush. After the first layer has dried, another one is applied.
19. Can be used as a cover reinforced concrete slab with hatch for pumping and cleaning.

Drain pit hatch
Advice. In the drainage pit, as a result of waste rotting, methane is formed - a rather explosive gas. It is vented using a ventilation pipe located in the pit lid. The diameter of such a pipe is 100 mm with a height of 600 mm.

Ventilation pipe arrangement
Video: Drain pit: stages of construction
Unfortunately, not everywhere there is a centralized sewerage system and people are forced to install outdoor toilets on their property.
In the warm season, going outside is not difficult, but in the cold season, you don’t want to go out into the cold again.
And that’s why many people think about equipment in the drainage pit area. Let's consider the topic of a drainage pit in a private house in this article.
To ensure the installation of a drainage pit, it is better to hire professional workers, but you can equip it yourself.
Volume calculation
The equipment for the drainage pit is considered cheap and in a simple way in order to provide private homes.
To calculate the required volume of the drainage pit, you need to multiply the number of people who will live in the house by 1.2 m3. Let's give an example: if there are five people in your family, then the volume of the drainage pit will be at least two and a half meters cubed.
Types and purpose
Drain pits come in different types:
- Fecal. A pit, the name of which speaks for itself, that is, this pit is designed to drain water from a toilet or toilet, which is located on the site.
- Sewage. It is intended for, that is, drainage from baths, showers, and washbasins.
- Combined. The pit is designed to drain both fecal matter and household water.
In rural areas, it is better to equip two pits: a fecal pit and a waste pit.
How to equip a drainage pit in a private house
Determining the dimensions
Depth
First, find out the groundwater level in your area. You can check the level yourself, or you can check it using a well if you have one nearby.
If groundwater is at a depth of 6-8 meters, then a pit for draining waste must be made at a level of 2-2.5 meters.
Length Width
In the event that groundwater is close to the surface, plastic container cannot be placed underground. In this case, make a sealed concrete well and a plastic container is placed in it, but this method will cost more.
In order for a plastic pit to work well for a long time, the hole under it must be dug so that there is a distance of 30 cm from the walls to the container.
The container is installed strictly horizontally. It is important that the tank has ventilation tube, otherwise there will be a danger of the tank exploding, since organic waste releases methane gas when decomposed.
The drainage pit has its positive and negative qualities, but its presence deduces country life and life in a private house to another level. For this reason, people are increasingly making cesspools of various designs on their plots.
We wish you good luck in your endeavors!