Good day.
In order to be able to organize a wireless network at home Wi-Fi network and give Internet access to all mobile devices (laptops, tablets, phones, etc.) - you need a router (even many novice users are already aware of this). True, not everyone dares to connect it and configure it themselves...
In fact, most people can do this (I don’t take into account exceptional cases when an Internet provider creates such a “wild” with its own parameters for accessing the Internet...). In this article I will try to answer all the most FAQ that I heard (and hear) when connecting and setting up Wi-Fi router A. So let's get started...
1) What router do I need, how to choose it?
Perhaps this is the first question that users who want to organize a wireless Wi-Fi network at home ask themselves. I would start this question with a simple and important point: what services does your Internet provider provide (IP telephony or Internet television), what Internet speed do you expect (5-10-50 Mbit/s?), and at what protocol you are connected to the Internet (for example, now popular: PPTP, PPPoE, L2PT).
Those. The functions of the router will begin to appear by themselves... In general, this topic is quite extensive, therefore, I recommend that you read one of my articles:

searching and choosing a router for your home -
2) How to connect the router to the computer?
As a rule, the router itself comes with a power supply and a network cable for connecting to a PC (see Fig. 1).
By the way, please note that back wall The router has several sockets for connecting a network cable: one WAN port and 4 LAN ( the number of ports depends on the router model. In the most common home routers, the configuration is as in Fig. 2).
Rice. 2. Typical rear view of the router (TP Link).
The Internet cable from the provider (which was most likely previously connected to the PC’s network card) must be connected to the blue port of the router (WAN).
Using the cable that comes with the router, you need to connect the computer’s network card (where the provider’s Internet cable was previously connected) to one of the router’s LAN ports (see Fig. 2 - yellow ports). By the way, you can connect several more computers this way.
At an important moment! If you don’t have a computer, you can connect the LAN port of the router to a laptop (netbook) with a network cable. The fact is that the initial setup of the router is better (and in some cases, it is impossible to do otherwise) via a wired connection. After you specify all the basic parameters (set up a wireless Wi-Fi connection), you can disconnect the network cable from the laptop and continue working via Wi-Fi.
As a rule, there are no issues with connecting cables and power supplies. Let's assume that your device is connected, and the LEDs on it started blinking :).
3) How to enter the router settings?
This is probably the key question of the article. In most cases, this is done quite simply, but sometimes... Let's consider the whole process in order.
By default, each router model has its own address for entering the settings (as well as login and password). In most cases it is the same: http://192.168.1.1/, however, there are exceptions. Here are a few models:
- Asus - http://192.168.1.1 (Login: admin, Password: admin (or empty field));
- ZyXEL Keenetic - http://192.168.1.1 (Login: admin, Password: 1234);
- D-LINK - http://192.168.0.1 (Login: admin, Password: admin);
- TRENDnet - http://192.168.10.1 (Login: admin, Password: admin).
At an important moment! It is impossible to say with 100% accuracy what address, password and login your device will have (even despite the brands I listed above). But this information must be indicated in the documentation for your router (most likely, on the first or last page of the user manual).
Rice. 3. Enter your login and password to access the router settings.
For those who were unable to enter the router settings, there is a good article with reasons (why this could happen). I recommend using the tips, link to the article below.

How to log in to 192.168.1.1? Why it doesn’t log in, the main reasons are:
How to enter the Wi-Fi router settings (step by step) -
4) How to set up an Internet connection in a Wi-Fi router
Before describing these or those settings, a small footnote should be made here:
- First - even routers from one model range may have different firmware (different versions). The settings menu depends on the firmware, i.e. what you will see when you go to the settings address (192.168.1.1). The settings language also depends on the firmware. In my example below, I will show the settings of a popular router model - TP-Link TL-WR740N (settings for English language, but understanding them is not so difficult. Of course, it’s even easier to set up in Russian).
- The router settings will depend on the network organization of your Internet provider. To configure the router, you need connection information (login, password, IP addresses, connection type, etc.), usually everything you need is contained in the Internet connection agreement.
- For the above reasons - it is impossible to give universal instructions, which is suitable for all occasions...
At different Internet providers different type connections, for example, Megaline, ID-Net, TTK, MTS, etc. use a PPPoE connection (I would call it the most popular). In addition, it provides higher speed.
When connecting PPPoE to access the Internet, you need to know the password and login. Sometimes (as for example, MTS) uses PPPoE+Static Local: access to the Internet will be provided, after entering the password and login for access, the local network is configured separately - you will need: IP address, mask, gateway.
Necessary settings (for example PPPoE, see Fig. 4):
- You need to open the “Network / WAN” section;
- WAN Connection Type - indicate the type of connection in in this case PPPoE;
- PPPoE Connection: Username - specify the login for accessing the Internet (specified in your agreement with the Internet provider);
- PPPoE Connection: Password - password (similar);
- Secondary Connection - here we either do not indicate anything (Disabled), or, for example, as in MTS - we indicate Static IP (depending on the organization of your network). Typically, this settings item affects access to local network your Internet provider. If you don’t need it, you don’t have to worry too much;
- Connect on Demand - establish an Internet connection as needed, for example, if the user accesses an Internet browser and requests a page on the Internet. By the way, please note that there is a column below Max idle Time - this is the time after which the router (if it is idle) will disconnect from the Internet.
- Connect Automatically - connect to the Internet automatically. In my opinion, the optimal parameter is what you need to choose...
- Connect Manually - connect to the Internet manually (inconvenient...). Although for some users, for example, if they have limited traffic, it is quite possible that this type will be the most optimal, allowing them to control the traffic limit and not go into the red.

Rice. 4. Setting up a PPPoE connection (MTS, TTK, etc.)
It is also worth paying attention to the Advanced tab - in it you can set DNS (they are sometimes necessary).

Rice. 5. Advanced tab in the TP Link router
Another important point - many Internet providers bind your MAC address to the network card and do not allow you to access the Internet if the MAC address has changed ( approx. Each network card has its own unique MAC address).
Modern routers can easily emulate the desired MAC address. To do this you need to open the tab Network/MAC Clone and press the button Clone MAC Address.
Alternatively, you can tell your new MAC address to your Internet provider and they will unblock it.
Note. The MAC address is something like this: 94-0C-6D-4B-99-2F (see Fig. 6).

Rice. 6. MAC address
By the way, for example in “ Billine» connection type is not PPPoE, A L2TP. The setup itself is done in a similar way, but with some caveats:
- Wan Connection Type - the connection type must be selected L2TP;
- Username, Password - enter the data provided to you by your Internet provider;
- Server IP-address - tp.internet.beeline.ru;
- save the settings (the router should reboot).

Rice. 7. Setting up L2TP for Billine...
Note: Actually, after entering the settings and rebooting the router (if you did everything correctly and entered exactly the data that is needed), the Internet should appear in your laptop (computer) that you connected via a network cable! If this is the case, all that remains is to set up a wireless Wi-Fi network. In the next step, we will do this...
5) How to set up a wireless Wi-Fi network in a router
Setting up a wireless Wi-Fi network, in most cases, comes down to specifying the network name and password to access it. As an example, I’ll show the same router (though I’ll take Russian firmware to show both Russian and English options).
First you need to open the Wireless section (wireless network), see fig. 8. Next, set the following settings:
- Network name - the name that you will see when searching for and connecting to a Wi-Fi network (enter any);
- Region - you can specify “Russia”. By the way, many routers don’t even have such a parameter;
- Channel Width, Channel- you can leave Auto and not change anything;
- Save your settings.
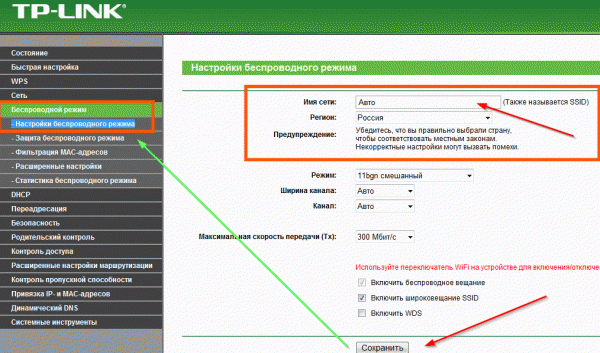
Rice. 8. Setting up a Wi-Fi wireless network in the TP Link router.
Next, you need to open the “ Wireless Security". Many people underestimate this point, but if you do not protect the network with a password, then all your neighbors will be able to use it, thereby reducing your network speed.
- Version: you don’t have to change it and leave it automatic;
- Encryption: also automatic;
- PSK password is the password to access your Wi-Fi network. I recommend that you indicate something that is difficult to find by regular search, or by random guessing (no 12345678!).

Rice. 9. Setting the encryption type (security).
After saving the settings and rebooting the router, your wireless Wi-Fi network should start working. Now you can set up a connection on your laptop, phone and other devices.
6) How to connect a laptop to a wireless Wi-Fi network
As a rule, if the router is configured correctly, there should be no problems with setting up and accessing the network in Windows. And such a connection is made in a couple of minutes, no more...
First, click on the Wi-Fi icon in the tray next to the clock. In the window with a list of found Wi-Fi networks, select yours and enter the password to connect (see Fig. 10).
Rice. 10. Selecting a Wi-Fi network to connect your laptop.
If you entered the network password correctly, the laptop will establish a connection and you can start using the Internet. Actually, this completes the setup. For those who did not succeed, below are some links to typical problems.

The laptop does not connect to Wi-Fi (does not find wireless networks, there are no connections available) -

Problems with Wi-Fi in Windows 10: network without Internet access -
According to my observations, few of those who were able to independently connect wifi router, if there wired Internet, knew how to do it RIGHT. That is, use it to set up a wireless network and integrate it into it different devices. As a result, they subsequently encounter difficulties that could have been solved at the local network design stage.
How to connect a wifi router?
Before you start step by step description regarding connecting a Wi-Fi router, I want to draw your attention to one point.
To create a full-fledged local wireless network, you need to buy a device such as a ROUTER, or also called a ROUTER.
The fact is that there are a lot of devices similar in appearance and functionality for various purposes. For example, out of ignorance it is easy to confuse it with a wired router without WiFi, which also distributes the Internet signal to devices. But only with the help of cables - it does not have an antenna.
Another device similar in design appearance- access point. In general, her tasks are slightly different from ours. A characteristic difference between a router and an access point is the presence of several sockets for network cables. While at the point there is usually only one.
The point of connecting a router is that it is now it, and not your PC, that will connect to the Internet via cable. That's all for this required parameters, required to connect to the provider, which were once used in your desktop computer, will now be registered in the router settings. And all other devices will already receive Internet via wifi from it and according to the rules that will be specified in it.
For clarity, look at the diagram:

In order to connect a router at home and set up a Wi-Fi network, I used a dozen models from completely different manufacturers. I can say with confidence that in terms of the actual configuration of the WiFi router and connection to the provider, the difference between them lies only in the details of the graphic design of the admin panel. Therefore, having mastered the principle once on one model, you can apply them to others. Today, as an example, I will illustrate with screenshots from two routers - TrendNet TEW-632BRP and ASUS WL-520GC.

How to connect a router to the Internet via DHCP?
The first setting we will look at is setting up a DHCP server.
If previously there was only one computer and it alone received an IP address from the provider, then we can connect many computers and gadgets to the router. This means that it is the router, instead of the computer, that will “communicate” with the provider’s equipment. And within the framework of our home network between these devices, it will itself assign an internal IP address to each computer, laptop, phone, TV and everything else.
Procedure:
- After connecting to the power supply, first of all you need to configure the router to communicate with the computer. To do this, insert the Internet cable into the WAN slot on the device. And we connect the other cable, with two plugs, which most likely came with the device, at one end to the computer’s network card. Where there used to be an internet cable. Others - in any of the LAN1, LAN2, LAN3 or LAN4 slots of the router.

I also want to note that it is better to connect the router to the network through a source uninterruptible power supply. I had an unpleasant experience when good device from Netgear faltered due to a power surge in the network. It simply began broadcasting wifi not at 100, but at 2 meters. Of course, I had to buy a new one.

- Next, take the installation disk that came with the router. And we start installing the drivers and software.
- After this, we need to configure the computer to work with the router. Now our network card is configured to connect directly to the Internet through the provider. This means that perhaps the control panel contains some data that is important for us to save and use later when working with the router. To do this, go to the settings of the TCP/IP v.4 protocol as shown in the diagram:
For Windows XP: “Start > Control Panel > Switch to Classic View > Network Connections.”
In Windows 7: “Start > Control Panel > Network and Internet > Network and Sharing Center > Manage network connections > Change adapter settings.”
In the screenshot, I go to the “Wireless Connection” settings, but you don’t have it yet, and since we connected the computer to the router with a cable, you need to select the “Local Area Connection” item:

If you have something indicated here, then write down this data on a piece of paper. This is especially true for those who have lost their contract for the provision of services and do not know the data for connecting to the World Wide Web. For a certain type of connection, which will be discussed below, this may be useful. After this, here, in the network connection settings on your computer, you need to set the IP, gateway and DNS to automatic. We will already enter these parameters in the wireless router itself.
- After that, go to the address “http://192.168.1.1”. Typically, configurations with the router occur here, if they did not have to be done at the software installation stage. But look in the instructions for the device to see which way to go to the router’s control panel. Since the default preset IP on different models may vary. Also one more thing popular place placement brief instructions— sticker on the bottom of the device. Look there too. If there are no instructions in the instructions, or it is lost, then go to the Control Panel, as I already described above. Only after right-clicking on “Local Area Connection” in the window that appears, click the “Details” button. In the window that opens, look for IPv4 Default Gateway - this is the IP address of the router.

- Now, finally, go to the address indicated there through the browser (http://IP ADDRESS OF YOUR ROUTER). And we find the DHCP Server item in the menu (in Trendnet it is combined with WAN) and set the range of values for possible IP addresses of devices within your local network. For me it was like this: Start IP - 192.168.10.101, End IP 192.168.10.200. And of course, opposite the DHCP Server item there should be an Enabled parameter. Domain Name or Host Name is the name of the future home wifi network. Let me make a reservation right away that the screenshots below were taken from my devices, which are already working or have been working for several years. Their interface is in English, so it would be difficult for a domestic beginner to figure out what’s what without help - I hope these pictures will help you. Most modern firmware and software are already in Russified form, so it will be even easier to understand.
This is what it looked like on Trendnet (highlighted in red):

And here it is in ASUS:

Setting up a computer connection to the router via LAN
Now we will set the parameters for our wifi network at home - IP and router mask. For Trendnet this is the same item (see Figure 1, highlighted in green), for Asus - the WAN & LAN section - at the very bottom of the settings page. In the first case I set IP 192.168.10.1, in the second - 192.168.1.1. This is the address within the local network at which we can access the admin panel through a browser. And through which computers will access the Internet. Mask - default, 255.255.255.0
Connecting a WiFi router to the Internet via the WAN port
These were all the flowers, now the most interesting part is setting up the external connection of the router to the Internet.
There are several types depending on the provider settings. This happens in the WAN menu.

There are several other options for connecting to the provider’s equipment, but I didn’t come across them. Therefore, I will not talk about them for now.
How to encrypt your WiFi connection
If you did everything correctly and saved all the settings, then all devices that support wifi should now see the new network with the name you specified. However, the question of how to connect wifi at home is not yet closed. home network wifi turned out to be open, that is, anyone can use your Internet access for free. In order to ruin everyone and make the wifi network at home accessible only to its owner, you need to protect the wireless network.
There are several methods, I have used two in my practice: WPE (or Shared Key) and WPA. The latter is more reliable, so I'll consider it. Go to security settings. In Trendnet this is the “Security” menu item, in Asus it is “Wireless > Interface”.
Select WPE or WPA Personal (PSK, TKIP) from the menu and set a password for authorization - from 7 to 64 characters. And we save. I show you how it was for me:


Well, now to access the Internet through your router, you need to enter a password. Remained finishing touch— so that there are no problems with connecting various devices to the router and with the operation of programs, we will manually set the DNS server. Setting this parameter is located in the same place where you entered the parameters for connecting to the Internet. Activate the function manual assignment DNS servers and add the IP from Google there:
- DNS-Primary (or DNS Server 1):8.8.8.8
- DNS-Secondary (or DNS Server 2): 8.8.4.4
You can also specify one of the Yandex servers (for example 77.88.8.8).

As you can see, connecting wifi through a router and making a wifi network at home is quite easy. I hope everything works out for you too!
Now for the traditional video for dessert on connecting a router, which will tell you even more clearly about the typical settings for working with the network.
If the power of the router is not enough for stable Wi-Fi coverage of an apartment, home or office, there is a need for additional devices. There are three ways to strengthen the weak signal of the main router: install an additional antenna, a repeater, or another router. Each method has its own advantages and disadvantages; let’s take a closer look at the third option.
How to set up a router
To configure the router, connect a computer or other device with a web browser installed to it:
- You can connect your computer with a cable by connecting the PC’s network card to a free LAN port of the router;
- You can connect to the router via a wireless Wi-Fi network using a laptop, tablet or smartphone.
By default, the wireless network is assigned a name (SSID) identical to the name of the router model, and access to the distributed Wi-Fi network is not protected by a password.
After establishing a connection with the router, open a web browser on your computer or connected wireless device and type the router’s IP address in the address bar. For example, for a TP-LINK router the address will be as follows: http://192.168.0.1
Entering the router's IP address in the browser's address bar will open access to the control panelThe illustrations are taken from the settings of the TP-LINK TL-WR 1045 router; the control panel of other manufacturers looks different, but general principles, abbreviations and terms will be the same.
The correct IP address, login and password required to log into the control panel are indicated on the plate attached to the bottom of the router.
 The IP address, login and password of the control panel are indicated on the nameplate on the bottom of the router
 The login and password indicated on the sign apply only to the control panel, but not to the wireless network distributed by the router. After entering your login and password, you will see main screen, which displays information about the device status and provides access to menu items for setting modes.
Do not change the factory settings of the router unless necessary. After making changes to the router settings, reboot the device.
Video: setting up a Wi-Fi router
Two ways to connect routers
Routers are connected to one local network either by cable or wirelessly. It is recommended to use devices from the same manufacturer.
Cable connection
A twisted pair cable (UTP cable) is laid between the main and additional routers. In the main router, the cable is connected to the LAN socket, and in the additional router - to the WAN socket (this socket is highlighted in color and is sometimes called Internet). With this connection, the additional router will be a network device for the main one, and the main router will act as a provider for the additional one, distributing the Internet and providing a dynamic IP address.
Before installing an additional router, consider how the cable will be laid and carefully measure the length of the future cable channel. When purchasing a cable, buy one meter longer than the measured cable channel, and ask the seller to immediately crimp the ends of the cable into the connectors. If the cable channel runs outside the premises and is exposed to natural influences, then purchase a cable with a reinforced sheath.
Advantages of the method:
- reliability and stability of the cable connection;
- easy setup of both routers;
- The installation location of the additional router is not limited by the wireless coverage area of the main router.
Disadvantages of the method:
- the need to purchase and lay cables;
- When moving the router, the cable will have to be moved to a new location.
Configuring routers when connected by cable
If the main router is already configured to work with the provider and there are no complaints about the work, then there is no need to change anything in the settings.
Make sure that the DHCP function in the main router is enabled to automatically distribute IP addresses on the local network. The start and end IP addresses do not need to be changed.
Setting up an additional router
It is recommended to immediately reset any changes made to the router settings to those preset by the manufacturer. To do this, turn on the router, find the Reset button on the rear panel, press and hold it pressed for 5-7 seconds. To protect against accidental reset of settings, the button is hidden inside the case and can be pressed through the hole using a needle or straightened paper clip.
 An example of the location of the reset button on the back panel of the router: the button is hidden inside, only the hole for pressing is visible
 In the additional router, two settings are checked and set:

 Making changes to the additional router’s own IP address allows you to avoid conflicts of identical addresses on the same network
After changing the router's IP address, to re-access the control panel, enter the new address in the browser's address bar.
There is a cable connection option in which the cable is connected to the LAN port of an additional router. This option requires complex setup and does not provide any advantages over a WAN port connection.
Wi-Fi connection
Advantages of the method:
- does not require physical connection routers with cable;
- allows you to easily move an additional router if necessary.
Disadvantages of the method:
- relative complexity of setup;
- slowdown in wireless network speed.
 The main router receives Internet from the provider and distributes it via the wireless network LAN1; the additional router receives the Internet wirelessly from the main router and distributes it via the LAN2 wireless network
Configuring routers when connecting via Wi-Fi
When two routers are connected on a local network via a wireless channel, a “bridge” connection is used, in English Wireless Distribution System (WDS), designed specifically to expand Wi-Fi coverage area.
Understanding Bridged Connectivity (WDS)
When installing this type of connection, the main router operates in standard mode, and the additional one acts as a Wi-Fi amplifier, receiving and distributing the signal further.
To connect routers in bridge mode, you need to establish a permanent (fixed) communication channel between them and specify the physical addresses of the connected devices in the settings. To set up a “bridge”, both routers are turned on, the main router is configured in advance for the provider, receives and distributes the Internet, and the settings of the additional router are pre-set to the factory settings by pressing the Reset button.
Configuring the main router for WDS mode
We change the automatic broadcast channel selection mode to a fixed channel mode (for example, to the 11th channel).
Setting a fixed channel number prevents the router from automatically scanning the airwaves and selecting the least loaded channel. Therefore, if other wireless networks are operating nearby, you may have to manually experimentally select the least loaded channel or use a special program to search for a free channel. The channel number must be changed simultaneously on both routers - the main and additional ones.
Setting up an additional router for WDS mode

On home page In the router control panel, the “WDS Status” line should display “working.” This means that the additional router has connected to the main router and is distributing the Internet.
Video: how to make a Wi-Fi network between routers (WDS)
Creating a complex network requires knowledge and experience. If you are confident in your abilities, use our instructions. If you doubt your abilities, it is better to ask for help.
When you connect to a new Internet provider, you are unlikely to rush to immediately connect the single end of the Ethernet cable to your computer. It will be much more convenient (and not much more expensive) to use a router. With it, you can simultaneously connect many devices to the Internet - from desktop computers and laptops to smartphones, tablets, TVs, even cameras and doorbells.

Router: pros and cons
What are the advantages of a router over other connection methods (for example, Ethernet modems?)
- Multiple devices are connected simultaneously (computers, smartphones, tablets, TVs, cameras, etc.)
- Multiple communication methods (Ethernet, Wi-Fi)
- Fine network configuration, in particular security
- Routers have additional functions(for example, working with a built-in or USB-connected drive)
We will look at the most common option today: how to install a Wi-Fi router without additional hardware functions (server, etc.) and configure it to work with wired and wireless equipment.
The best place
Where is it better to install a router in an apartment or in a house? The answer to this question depends on several factors:
- Provider cable. If the experts didn’t leave such a long tail, you simply won’t be able to install the router somewhere in the kitchen.
- Workplaces. Of course it would be nice to have optimal reception throughout the house or apartment, but if this is not possible, then you will have to install the router closer to the place where you usually work, be it an office, a balcony or even a toilet.
Try to think about the location of the router so that there are as few concrete barriers as possible between it and your workplace. For a wired connection, this can be solved by simply laying the cable.
In some cases (for example, if you have big house) you will need Wi-Fi repeaters. These are small and inexpensive Wi-Fi amplifiers that hard to reach places may turn out to be life-saving. However, for a relatively small living space (2-4 rooms) correct installation A router in an apartment solves all problems without the help of repeaters.
Connecting the incoming cable
Before installing the router yourself, make sure that the incoming Ethernet cable is correctly crimped, that is, it has an RJ45 type plug installed. For ADSL type communications using a telephone line, an additional splitter adapter is required that splits the signal into the Internet and telephone communications. In any case, the splitter will have the same Ethernet socket (RJ45), to which you need to connect the corresponding cable. It is easy to distinguish RJ45 from a telephone plug/connector: RJ45 is larger. 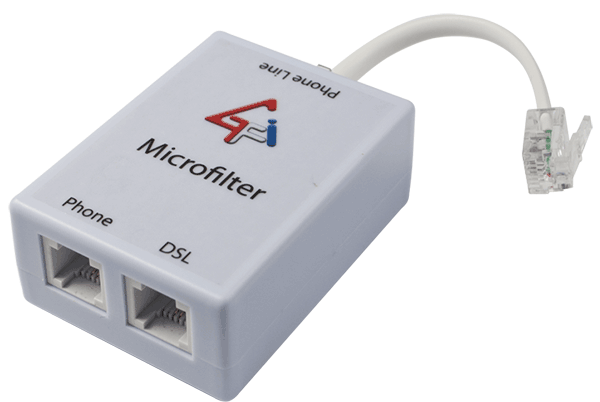
Find a port on the router signed as WAN (Wide Area Network - external network). It is to this that you need to connect the provider's cable, although the router probably has other similar ports. Usually the WAN port is also highlighted in color.
Now you can connect your computer, TV, and other devices that require a wired connection to the remaining output ports.
Software Internet setup
Although you have already connected the router and computer using a cable, you will not immediately have access to the Internet. First, find the instructions that you received from your provider: you will need the data from it before setting up a Wi-Fi router (TP Link or any other manufacturer).
Then you need to log into the router interface from your computer. To do this, in the address bar of your browser, instead of the usual address, you must type the IP address of the router. As a rule, this is 192.168.1.1 (if this is not the case with a particular router, you can check this on the sticker on its bottom or in the instructions). 

A page will open in your browser where you need to enter your username and password to log in. As a rule, manufacturers do not hesitate and set the default login to “admin” and the same password. Enter your login information, click “Login”, and you will be taken to the router control panel.
First of all, you need the “DHCP Server” tab. 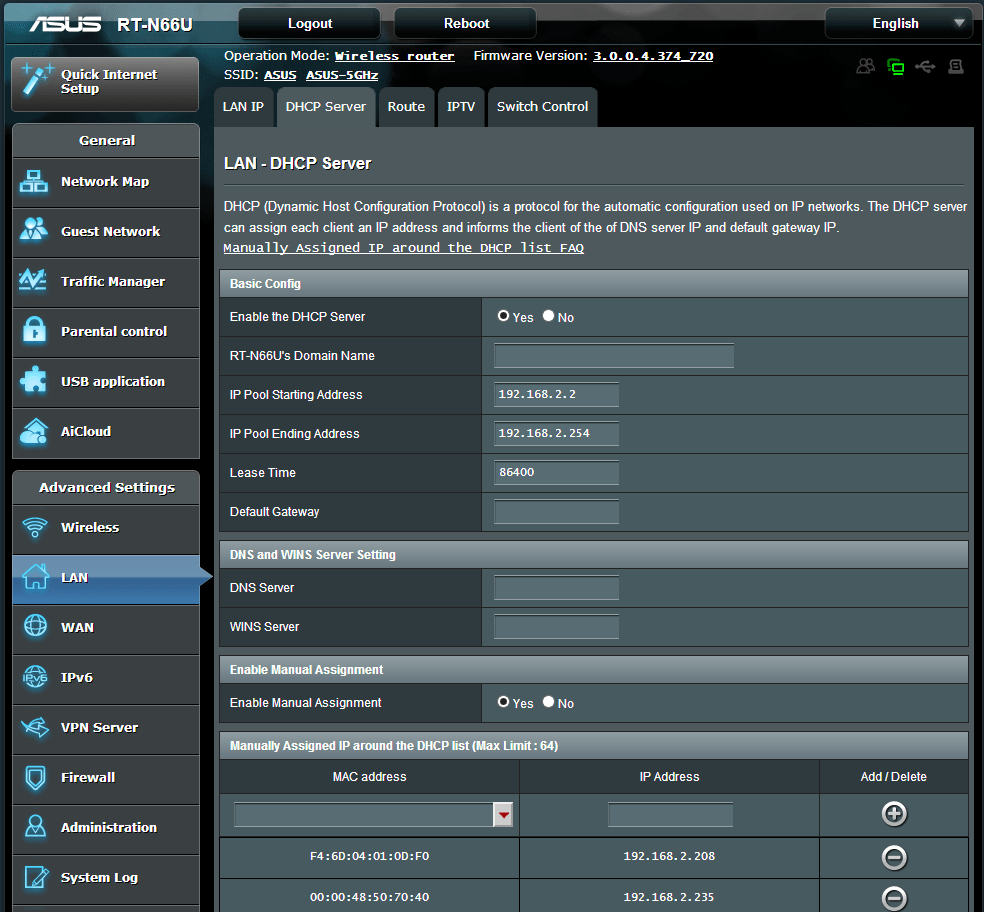
Enter this section and find the Enable button there. After that, click "Save" or "OK". If there is no such button in the section, it means that the settings are saved automatically when you exit.
Check with your provider's instructions to determine what type of connection you are using - dynamic or static IP address. Dynamic in our case is simpler. All you need is to select this connection type in the settings and save them. Sometimes you may need to enter a Hostname.
Providers rarely offer a static IP address. As a rule, it is needed when you need remote access to your workplace or store some publicly accessible materials on it. But it happens that providers simply offer only this type of connection. In the case of a static IP address, you will have to manually enter a whole set of data: your actual IP, default gateway, subnet mask and DNS server. All this data should be in the instructions from the provider or in an appendix to the contract.
There is another type of connection: PPPoE. If for some reason your provider chose it, then you will also have to enter your username and password (twice).
In the web interfaces of routers from different manufacturers, sections may be organized differently, but there is a search system through which you can find keywords, or a list of sections where you can find the necessary tabs.
An important point: even if your computer is a laptop with a Wi-Fi module, for the initial setup you will still have to connect it to the router using a cable. The fact is that wireless communication is inactive by default in routers. And the next step will be to turn it on.
Setting up Wi-Fi on the router
As a rule, in the router’s web interface (we hope you haven’t logged out of it yet?) there is a tab called “Wireless.” Here you no longer need any data from the provider: how to install a router For Wi-Fi devices- at your discretion.
Enter in the “SSID” line the name under which your network will be recognized by devices. The main thing is that you can then recognize it from dozens of others, which today abound in every home in a major city. So come up with some catchy name.
Then create a password. Of course, it doesn't have to be "12345" or your first and last name. However, it should be simple enough that (if necessary) you can easily tell it to your guests, and they will understand it unmistakably.
Some routers support the “guest access” function (an additional SSID is used for this). Through the guest network, the user can access the Internet, but the administrative panel of the router remains inaccessible to him. If your router has such a function, then it is better to name the SSID with full access something unclear and come up with the most complex password for it, but for guest access it is easier to choose a name and password.
Select your network standard. The “later” letter of the alphabet it is designated, the higher its speed: for example, “b/g/n” will provide faster Internet than just “b/g”. It would seem that nothing could be simpler: select the most advanced mode, and that’s it! However, can you guarantee that all your devices support it? Not to mention your guests' gadgets. Therefore, it is better to leave the move to ensure compatibility with older standards.
Select a security standard. The most popular option today is WPA-PSK/WPA2-PSK mixed. This type of encryption reliably protects data and does not slow down work with it.
If your router is equipped with a built-in hard drive or a USB port for connecting it, then, of course, you would like to provide access to it from several devices. For example, you work on documents in your office, from a desktop computer, but later you want to go to the balcony with a laptop and work on more comfort, on fresh air. Or you want to open downloaded movies directly on your TV. Then you will need to find a list of trusted devices and add there all the devices (laptop, TV) to which you give access to memory.
You can limit the number of simultaneous connections to your router. If you do not want to do this, leave the number 0 in the “Connection limit” line - this means no limits.
When choosing a place for the router in the apartment, do not forget: sometimes you will need to reboot it manually, so you should not hide it very high. Although if you have children or playful animals, then it's probably better to play it safe.


