Pleated blinds look gentle and airy, in addition, they perfectly cover the room from the rays of the scorching sun. Vertical blinds made from strips of fabric will help create a fashionable and unusual interior. Make original curtain you can do it in just a couple of hours, step-by-step photo instructions They will help you make your own blinds from wallpaper, fabric and even thread.
If after renovation there is a roll of wallpaper left in the house, try using this wallpaper to make it yourself paper blinds. Such blinds are functional, beautiful, affordable, but require delicate care.
Paper blinds
Paper blinds are easy to make and do not require large financial costs. For homemade version curtains you will need:
- wallpaper;
- one or two cords (slightly longer than the height of the window);
- awl;
- ruler 50 cm;
- pencil;
- scissors.
The width of the wallpaper can be 55 cm or 1 m, depending on the size of the window. For a wide window, you can make a pair of 55 cm products.
Most budget method close the window from sunlight– pleated blinds
- First, measure the height of the window and add 30 cm to this value. Measure the desired length on the wallpaper and cut it.
- From the inside out, draw the wallpaper into equal transverse stripes (2-3 cm wide). Make bends along the lines to create an “accordion”.
- Now use an awl to make two holes along the left and right edges of the workpiece or one in the center. Thread a string through the holes to adjust the height of the blinds. The lower end of the cord can be decorated with a tassel or large bead; tie a knot at the end of the upper cord.
- Attach the upper part of the paper sheet to the window using double-sided tape.
- To get rounded blinds, glue Velcro at the bottom of the product along the edges (on the right and left sides), and then connect both halves. Homemade blinds from wallpaper are ready.
Advice. Medium-density paper wallpaper is ideal for such blinds. With vinyl wallpaper you will have to put in more effort, as they are more difficult to bend.

You can even adjust the height using clothespins
For paper blinds, a sheet of thick paper a quarter longer is suitable. window opening
Detailed video lesson from a handmade master
We sew fabric blinds
Fabric blinds will require more effort and time to manufacture than paper blinds. But they will be more durable and practical. To prevent the curtain from shrinking in size after the first wash, the fabric should be washed before cutting.
Please note! There are several ways to attach blinds. The first option is that the product is mounted in window opening right next to the window. This option is convenient if you have a large window sill. If you sew a curtain on each window sash, you can ventilate the room even when the blinds are lowered. The second method of fastening is outside the window opening, in this case the curtain is sewn wider than the opening by 5-10 cm on each side.

Installation options for horizontal blinds
Pin fabric version can be Velcroed on wooden beam or loops on the finished cornice. The weighting strip is needed so that the product holds its shape well and the fabric is evenly distributed over the entire width of the window.

Fabric blinds can be used independently or together with curtains. They are washable and fit fairly well to the window.
Install fabric blinds Can be used on any window - plastic or wooden. Choose a dense or translucent material depending on the degree of shading you want to achieve. A special curtain fabric or linen is ideal - they are durable and easy to use.
Horizontal fabric blinds
To make such curtains you will need curtain fabric or ribbons - satin or synthetic. Perfect option– dense fabric that holds its shape well, does not fade, does not turn yellow in the sun, with antibacterial and dirt-repellent impregnation.

Original solution, but not easy to implement
Important! Each lamella should be no wider than 10 cm, otherwise the finished product will look too rough. The width of each plank should be the same. When calculating the required amount of fabric, keep in mind that each lamella will need double width and seam allowances of 2 cm.
Step by step order actions
- We cut out the slats.
- Fold each one right side inward and sew on three sides.
- Turn it inside out and iron it.
- We process the unstitched edge (top) with braid and fasten it on both sides, retreating a couple of centimeters to the eyelets.
- We lay the finished strips of fabric tightly one against the other on a long braid.
- Each strip on top must be basted to the braid and stitched.
- We attach the finished product to the cornice.
- We tie threads to the bottom loops of each row and thread them through the rest.
- We bring both threads in one direction and pass them through the ring that was previously driven into the cornice.
- We tie the threads and fasten them to the side of the window opening.
Advice! To make the blinds look neater, attach weights to the bottom bar.
- determine the length of the finished product;
- we calculate required amount and the width of the lamellas;
- we buy a guide made of plastic or aluminum with rotating and moving sliders;
- prepare thin wooden panels;
- We buy durable cord, rings and threaded hooks.
Important! When calculating the width of the lamellas, take into account the size of the window opening - the smaller it is, the narrower the strips of fabric should be.
Making blinds
- We cut out the lamellas, not forgetting that the pattern should be twice as wide as the lamellas plus allowances).
- Fold the fabric with the right side inward and stitch on three sides.
- Turn the lamella right side out and iron.
- We process the fourth side.
- Use glue to secure the top and bottom of each strip.
- We attach a small threaded hook in the center of the upper edge of the panel.
- In the middle of each top panel we make a hole for the cord rotary mechanism.
- We hang the slats on the guides.
- We screw the threaded hooks on both sides at the level of the holes for the cord.
- We pull the cord through all the holes and hooks.
- We fix the cord in the holes with thin chains or matches, having previously lubricated them with glue.
- We tie the ends of the cord in the form of a loop hanging down about 20-30cm.
- At the bottom we fasten the slats together with a cord.
- So that the blinds can be moved, we attach a thin rod on hinges.

Sewing curtains using old blinds
Materials: worn out horizontal blinds, textile the right size, liquid nails, sewing machine, scissors.

Remove all connection elements, bottom stops and slats from old blinds. The central threads must be left
- Cut out the rectangle for the curtains along the base, not forgetting the seam allowances. Make markings on the wrong side, glue the crossbars onto new fabric.
- Fold the edges of the fabric twice, iron them and sew them on the sewing machine.
- Pass the warp threads through the holes in the crossbars.
- Attach the fabric to the base, e.g. liquid nails.
- Thread the thread through the holes and secure with a knot. Hide the hanging ends of the threads on the wrong side.
Glue a piece of fabric to the top crossbar.
Exclusive blinds for a unique interior
- Rope slats are hung on the cornice vertical blinds. They are not connected by the bottom chain.

- Non-standard solution– blinds made of newspaper tubes. Newspaper sheets are rolled into thin tubes using a knitting needle and a screwdriver, painted in desired color, cover acrylic varnish and dried. At the final stage, the tubes are connected into one sheet with twine and hung from the cornice.

A curtain made of newspaper tubes resembles bamboo blinds
- Roller blinds can be held open using a belt with a button.

Homemade Roman blinds
The operating principle of Roman blinds and sails is very similar: a piece of fabric is raised and lowered using a rope and special device. However, a Roman blind can be sewn without a special curtain rod and accessories. It can be safely used for a room of any style and direction, the main thing is to choose the right fabric.


Combine Roman shades with tulle curtains or draped curtains. Using a cord, the fabric is gathered into horizontal folds; it can be fixed at any level.

Roman blinds can be combined with curtains of the same color
Rimka without a special cornice
To make a “rim” you will need:
- thick fabric;
- wooden block for a cornice (2.5 cm thick, 5 cm wide and a length equal to the width of the curtain);
- Velcro;
- finishing braid;
- slats;
- small nails;
- plastic rings of small diameter (1-2 cm);
- weighting material with a diameter of 5 mm or a wooden block;
- three cords (the length of each is calculated as 2 curtain lengths plus 1 curtain width);
- cord fasteners (hooks).
Advice. Instead of plastic rings, you can use metal nuts of the same diameter. A wire with a diameter of 3-5 mm is suitable as a weighting agent.

Work order:
- Measure the window. The width of the product should be 6 cm greater than the width of the window (allowances of 3 cm on each side). The length of the canvas is equal to the height of the window plus 12 cm of allowance (2 cm seam along the top edge and a double hem of the fabric 5 cm wide along the bottom edge).
- Attach the wooden cornice strip with screws to the window opening. Using a staple gun or small nails, attach one piece of Velcro tape to the strip. The second part of the Velcro tape needs to be sewn to the top of the panel.

To secure the curtain rod, you will need screws with rounded tips.
- Divide the window height by the desired number of folds to get the distance between folds.

Table for determining the number of folds
- Place the fabric on the table or floor with the wrong side facing up. Use chalk to mark the fold lines for the folds, the fold lines for the fabric for the weighting, and the places where the rings will be sewn.
Advice. If the window is wide and it is not possible to sew a curtain from one panel, sew two pieces of fabric.
- Apply finishing canvas along the fold lines, and then stitch it so that slats can be laid inside.
- Pass the cord through the rings from bottom to top, bring it out through the rings on the top cornice and through the side hook.
- Pull the cords together to create a beautiful drape.

The finishing border is sewn from the wrong side at the place of future folds

Each ring is fixed with several stitches and secured with a knot.

Next to the place where the weight will be inserted, you also need to sew a row of rings
Advice. To avoid wasting time sewing on rings, you can buy ready-made ribbon with rings.
Roman blind with mechanism
Using a chain-tape mechanism, the fabric is assembled into horizontal folds. If you purchase such a device, you can sew the curtain yourself. This option may be suitable if it is difficult to choose the right color and texture from the entire range of blinds.


To make a Roman blind, you need a special mechanism, which can be ordered at custom sizes window

Cornice and control mechanism
Rim made from scrap materials
Manufacturing of roller blinds
Roller blinds are very similar to Roman blinds. But they are assembled by winding them around a rod or using a rope mechanism.

Mechanism for lowering and raising roller blinds
You will need: two canvases same size, ribbons for garters (the length of each is two curtain lengths plus 25 cm), 2 nylon cords (the length of the first is three lengths of the fabric, the length of the second is three curtain lengths plus its width), as well as two slats, screws, a wooden cornice, furniture stapler.
- Sew two pieces of fabric together to make a bag. Then they turn it inside out and smooth out the seams.
- The weighting material is placed in the open cut and stitched.
- The upper part of the canvas is processed and nailed to a wooden cornice with a stapler.
- Garter ribbons, which will hold the curtain in the folded position, are attached to the cornice with a stapler.

The fabric completely covers the cornice

How to finish the edges of curtains
You can trim the edge of a thin fabric item using adhesive tape. Hem to the desired length, iron the fold, place adhesive tape between the layers of fabric, and iron. For heavy fabric, use adhesive tape folded 2-3 times. This method is fast, but not as reliable as the edging method.

Finishing the edge with adhesive tape
Edging method
Use ready-made braid with finished edges. Instead of braid, you can cut a strip of fabric, bend it in half, and fold the edges inward and press it. The edge of the curtain is placed between two parts of the edging tape, basted and stitched.

Roman blind with wide border
Hemming method
The edges of the panels can simply be hemmed on a sewing machine. The seam on the front side will not be visible if the edges of the product are hemmed with a hidden seam.

With absence sewing machine edges can be finished by hand
Choose wallpaper for blinds, taking into account color design rooms. If making blinds with your own hands from fabric is an impossible task, and the paper version is not suitable for you, order curtains from trusted manufacturers.
Russia, Moscow region, Moscow +79041000555
DIY wallpaper blinds: various ways and step-by-step master classes
Takes ~6 minutes to read

Save
Blinds in our climate are widespread in offices, shops, own apartments. They are easy to buy, but there is an opportunity to save your money and make them yourself from wallpaper. Everything necessary for this is available in every home. After all, after repairs there are always unclaimed rolls left. These curtains are needed for apartment windows, balconies, and cottages. If the remaining material is not enough for all the windows, then you can buy more in stores for repairs.
Advice! Ask the seller for discounted rolls remaining after the sale. The quality is excellent and the price is much lower.

Save
They are easy for anyone to make on their own. Everything you need for this is in any home.
First of all, you need to decide what kind of wallpaper to make the product from. They should be strong, but not too thick. You need to pay attention to their pattern so that it harmonizes in color with the curtains and room furniture. Interesting option, when they are made from the same wallpaper with which the room is covered.
First way
To work you need:
- roll paper wallpaper length not less than 1500 mm;
- scissors;
- meter ruler and pencil;
- cord 1.5-2 mm thick;
- awl;
- double sided tape;
- retainer;
- decorative tape.

Save
We measure the window. Blinds can consist of one wide strip or two narrow ones. The width of the strip should be equal to the width of the window, the length should be equal to the height of the window plus 25%.
It is more convenient to work on large area. We cut a strip of wallpaper to the required size, lay it out on the table, and place weights at the ends so that the roll does not curl up.
The strip needs to be folded into an accordion 3-15 cm long. To make the accordion neat, you need to draw the wallpaper along a ruler. First, place dots at the selected width on both sides of the piece. Then connect them using a ruler. In childhood, many people made toys by folding paper like an accordion, so the process is clear to everyone.
We make the first folds using the edge of a ruler. Apply a ruler to the line and bend it. Using the side of the scissors or a blunt knife, we draw along the fold line so that it is clear and fixed.

Save
When the entire accordion is ready, retreating 15 cm from both ends, use an awl to make holes through which the cord will be threaded for lowering and raising the curtains. If you are planning a wide strip for the entire window, then make more holes in the middle so that the blinds do not sag. If the curtain is narrow, then we make holes in the middle of the strip, but there is no need for holes on the sides.
The next step is to thread the cord into the holes using a large needle or hook. Its ends need to be melted, the lower edge secured in a clamp, you can buy it or cut it from an old jacket. It is needed to ensure that the curtains remain at the desired length.
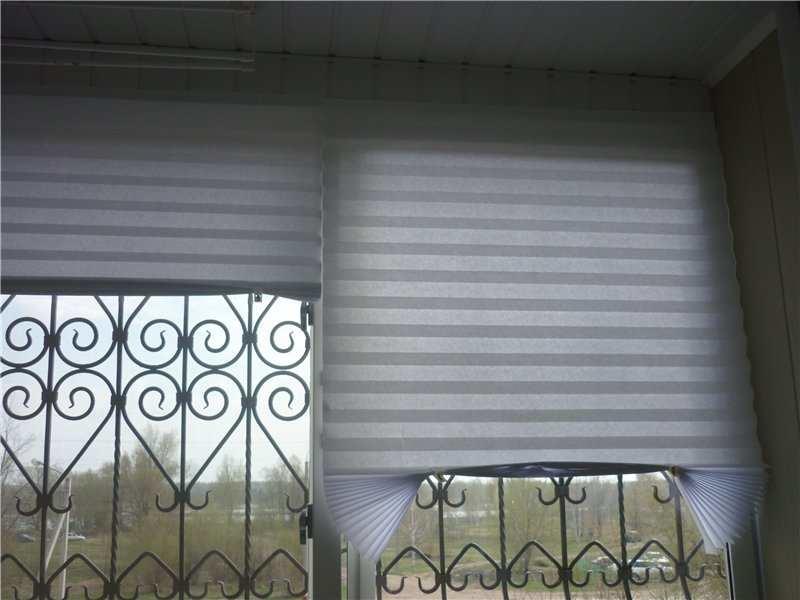
At this point you can finish making them by decorating them. satin ribbon, tying a bow from it. The bottom of the curtain will be straight and horizontal.
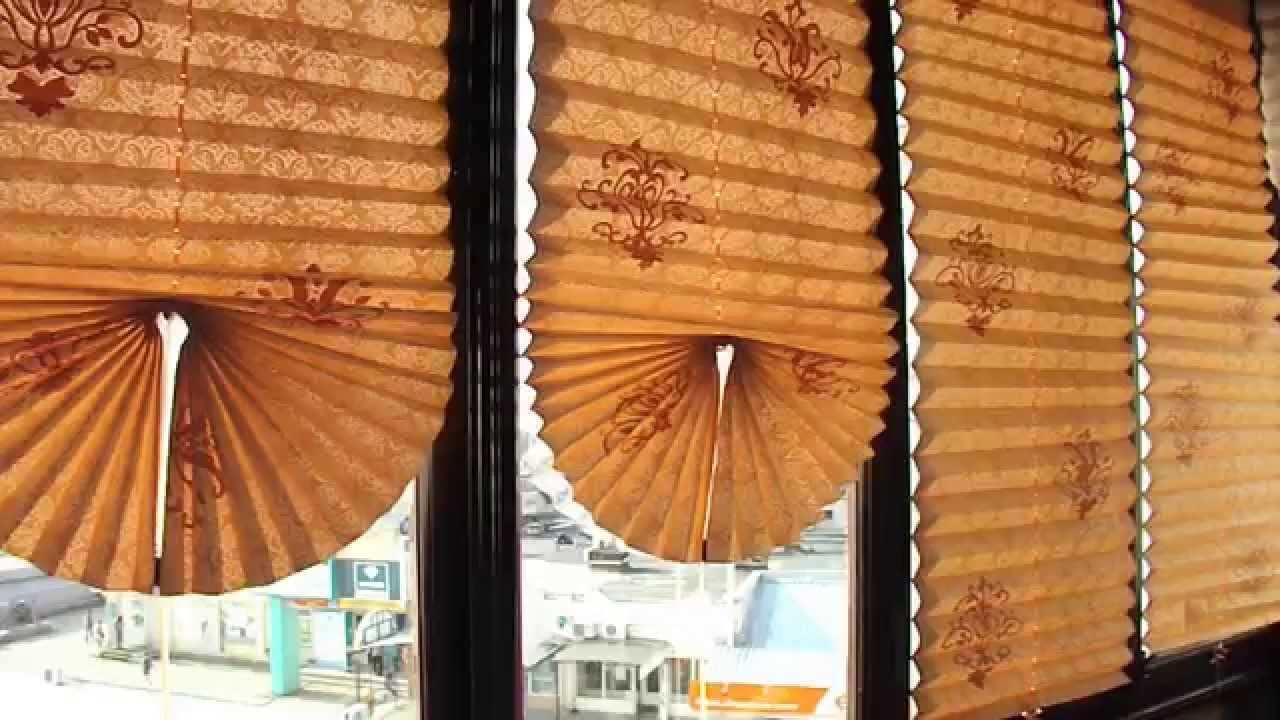
You can finish the blinds with a peacock tail. If a rope is threaded in the middle, then the opposite ends are connected together and glued, you get a beautiful fan.

Save
There are windows complex shape– at the top there is a window in the form of an arch. Then they can be made in the form of a fan, like at the end of a curtain, and close the window completely. If the arch consists of two semi-arches separated wooden partition, then we make two half-fans and close each half-arch.
If there is no need to close the entire window, but you need to shade part of the room, then we make a fan of the required size and close part of the window. We attach wallpaper blinds to the window with double-sided tape, it can withstand up to 3 kg. You can do something else homemade mount– then we glue a strip of thick cardboard to the last accordion, use nails or other fastening material.
Second way

Save
There is another, more the hard way making curtains from wallpaper. They protect better from the sun because they are double:
- The wallpaper must be cut into strips using a 100 mm tire.
- The strips are twisted and glued into tubes; their number should be sufficient to cover the entire window.
- After drying, the tubes are compressed into a flat lamella with clear ribs, and the gluing area is placed at the top in the middle.
- The tubes are coated in the middle with glue and glued on top of each other in a high stack. To avoid glue smearing and leakage, dry glue is used.
- After complete drying, holes are made at a distance of 15 cm. Ropes are passed through them, the lower ends of which are clamped with a clamp. Thanks to these cords, the blinds can be lowered and raised.
- They are attached to two plastic rings and hung on nails driven into the window frame. Or simply glue it with double-sided tape.
Roller blinds: step-by-step DIY instructions
Roller blinds or roller blinds. How to make them yourself? This method is the easiest. There is no need to fold the wallpaper into an accordion, no need to pierce holes and pull the cord through them.
You need to measure a piece of wallpaper twice the length of the window plus another quarter:
- The cut piece is folded in half for strength, glued at the ends with glue or double-sided tape.
- At the edges, pockets are folded back and stapled. Weights - wooden strips - are threaded through them.
- A tape measuring two lengths of the curtains is attached to the top pocket. Spreads over both sides.
- The blinds are glued to the window with tape. They are made the same way, you can only take a different number of tapes holding the roll. You can take one wide ribbon, strengthen it in the middle, unfold the curtain to the desired length and tie a beautiful bow. Or tie two ribbons on the sides of the roll in a bow at the same height from the window sill. Roller blinds ready.
Master class on making blinds from newspapers
The manufacturing process of this type is the most complex and most time-consuming.

Save
You will need:
- newspapers;
- beautiful cord;
- two plastic rings;
- rope;
- Crochet hook;
- paints, brushes for painting newspaper tubes.
For blinds on standard window you need to wind up to 200 newspaper tubes 400 mm long. Long tubes can be trimmed as you work.
Master class: a newspaper is wound onto a thin metal rod, usually a knitting needle is used. A piece of newspaper is wrapped around it and the edge is glued. All tubes should dry well. Then they are painted acrylic paint. It is recommended to add 3 to 1 PVA glue.
After painting and drying, the most crucial moment comes. A large number of small round tubes need to be connected into a durable fabric.
The first connection method: fasten the tubes by intertwining them with rope, making one or two knots at a time. It is advisable to lubricate each node with glue for greater strength. You need to start from the top side of the curtain. The rope should be almost double longer curtains. We tie the upper end to a plastic ring. Now you need to intertwine both ends of the cord from the inside and outside.

Save
The second option is used by those who know how to crochet at least a simple chain. This method is more reliable; the tubes are held tightly by a chain of cord and do not become untied or stretched.
At the bottom, the cord is tied into a knot; we coat it with glue for strength. Lay out the canvas on a flat surface and align the tubes, cutting off any that are too long.
IN window frame drive in nails or special hooks. It is easy to hang the canvas on them using plastic rings. In any case, the curtains are easy to remove on a cloudy or rainy day.
In order not to completely remove the blinds, you can take a beautiful satin ribbon, fasten it on top and lower the curtains on both sides. Down on required height tie the ribbons into a knot and tie a beautiful bow. These homemade curtains are a variant of roller blinds.
Blinds repair
Old faded plastic, paper or wooden blinds can be restored with wallpaper. You need to choose wallpaper that will best suit the interior of the apartment, enliven and decorate it.
You will need:
- wallpaper;
- old blinds;
- PVA glue;
- scissors;
- ruler;
- pencil.
On old curtains we measure the width, length and number of slats. We draw the same stripes on a roll of wallpaper. We mark the locations of the holes in the old blinds so that we can make cuts later. We cut out the strips and glue them onto the old slats. At the holes we cut into three parts. We try to glue one by one without disturbing the wallpaper pattern.
We try them on the windows and admire the updated curtains.
How to make curtains-blinds from wallpaper with your own hands, other options
If there are small pieces of white wallpaper left, we recommend making curtains with your own hands using the weaving technique. This technique originated in Ukraine, and is now used everywhere. Patterns are cut out of paper. The result is paper lace that looks good on the window day and night.
To make such a paper curtain, you will need knives, scissors, a wooden mat, and patterns. On the Internet you can always find tips on this option for making blinds with your own hands from wallpaper step by step and photos of patterns for cutting. With skill, diligence, patience and accuracy, real works of art are obtained.

Save
Another option is Roman blinds. They are usually made from fabric, but wallpaper can also be used. They require more material and more time to manufacture.
Blinds are a practical item in home decoration. They protect people and environments from the sun's harmful rays. In addition, these are not only useful, but also beautiful things in the interior.
Paper blinds have many advantages. You can easily make them yourself using simple wallpaper And auxiliary tools. The scope of application of this type of blinds is large. They can be used to decorate windows in the country house, veranda, balcony, loggia and living rooms. On windows, paper blinds look beautiful and original, while excellently coping with the main function - sun protection. This is an excellent option if it is impossible to purchase ready-made blinds, and for those who prefer manual work.
Blinds owe their appearance to the Indians of the West Indies. The first type of blinds is colonial. It is characterized by the presence of shutters with inclined wooden planks. They reliably protect from the sun and have the special advantage of being low cost. In temperate climates, Venetian blinds began to be made in the 18th century. Their design is characterized by the fact that the inner long sides are fixed in the frame with hinges, and the outer ones with a cord, thus making it possible to adjust the tilt of the lamps depending on the weather and time of year.

Types of blinds differ in design depending on the climate zone and the material from which they are made.
Types of blinds as they appear:
- Horizontal;
- Vertical.
The complex mechanism of blinds with separate lamps often breaks down. Even the most expensive curtains are not immune from them. Therefore, the advantage of homemade blinds is the simplicity and reliability of the mechanism.
Vertical blinds in the interior of an apartment (video)
The most popular types of blinds
Each type of blinds differs in design, materials and different ways adjustments. Knowing the advantages and disadvantages of each, you can choose the most convenient and suitable type.

The most popular types:
- Vertical blinds– curtains in which strips of material called slats are arranged vertically and can be rotated to suit the right angle. These blinds are adjustable using a cord.
- Horizontal blinds– characterized by a system called “ladder”. The slats are arranged horizontally. The slats are adjusted using a special drum.
- Roller blinds- This is a cloth made of fabric that is rolled into a roll using a special mechanism.
- Pleated blinds- This is a canvas made of fabric folded in the form of an accordion. They are adjusted using special cords and threads, at the ends of which clamps are attached.

When choosing a certain type of blinds, you should pay attention to the shape of the windows, the material from which the curtains are made, and ease of adjustment.
How to make blinds from wallpaper with your own hands
Making your own blinds from wallpaper will be easy and interesting even for people far from needlework. The work will not take much time, and the costs of such curtains will be minimal.

Required materials and tools:
- Wallpaper (you can use leftovers);
- Scissors;
- Awl or hole punch;
- Ruler;
- Meter;
- Pencil;
- Satin ribbon or cord (it is important to match them to the wallpaper);
- Scotch tape (regular and double-sided);
- Retainer;
- Glue.
Materials for blinds can be found in every home, so there will be no difficulties in preparing them.

When choosing wallpaper, it is important to pay attention to the following criteria: the material should be dense, transmit light, not too dark and not too colorful.
When the material and tools are available, you can begin making blinds.
Master class on making blinds from wallpaper
There are many master classes on this topic. They all contain almost the same step-by-step instructions with variations depending on the type of blinds being made.

Step-by-step actions:
- Measure the width and length of the glass.
- 25 percent should be added to the length value, while the width should remain unchanged. The length of the ribbon or cord must be taken with an allowance, taking into account tying bows and knots.
- Cut a rectangle of the required size from a piece of wallpaper. If the wallpaper has a pattern, it is important not to disturb it.
- Fold a rectangle of wallpaper like an accordion. The folds should be approximately 3 to 5 cm. When changing the length, the appearance of the curtains may deteriorate. The correct execution can be checked at the end of the work - the end of one side of the canvas should look like the letter “L”. This end will become the bottom of the blind.
- Measure the middle of the canvas, make holes using an awl or hole punch. The back of the hole should be secured with tape. Repeat the action.
- You need to thread a ribbon or cord into the resulting gap. Straighten the blinds to determine the length of the tape. The upper end of the tape should be secured with a knot.
- Make a mount to the window. Attach double-sided tape to the entire side of the upper end of the canvas. This way you can also secure the cord additionally.
- On the bottom strip at the bottom left, glue less than half a piece of double-sided tape. It will help in decorating curtains.
- Decorate the bottom with a “peacock tail”. Glue together the five lower folds of the fabric. Secure with double-sided tape. Bring the cord to the back side, trim off the excess.
- Place a lock on the cord. The retainer must consist of one opening. The fastener should be pulled up; if you need to raise the curtains, close the window, lower the fastener down along the cord. The bottom of the cord can be decorated with a large bead or other decorative element.
This is one option for wallpaper blinds. There are many options. For example, you can make curtains on two cords parallel to each other. The order of work will be similar, with the difference that a double lock will be needed.
How to make blinds from wallpaper with your own hands (video)
Making blinds from wallpaper yourself is an excellent option if you need to quickly curtain the windows to protect the room from sunlight. In every home there is always a leftover piece of wallpaper that will be an excellent source material for future blinds. To make curtains you will need about two hours of time and a basic set of standard tools. Blinds made by yourself will look beautiful on the windows, protect from light and delight the eye with handmade work.
Examples of wallpaper blinds (photo)


Wallpaper blinds are often used for windows in the country house, loggia, veranda, balcony, and for rooms that are located on the sunny side. They can also be hung on windows during renovations or if you simply don’t have enough money. They are quite original, and the costs for them are minimal. To make paper blinds you don’t need to spend a lot of time, just a few hours will be enough.
To make blinds from wallpaper with your own hands, you need materials.
Namely:
- Remains of wallpaper;
- Scissors;
- Roulette;
- Ruler;
- Retainer;
- Regular and double-sided tape;
- Hole puncher or awl;
- Rope;
- An end cap, which can be a bead.

How to make blinds from paper wallpaper step-by-step instruction. First you need to measure the window using a tape measure. Add 30-40 cm to the length of the window. When you have completely decided on the dimensions, using a knife and ruler, cut a piece of wallpaper to the required length. If the window is wider than the wallpaper, you can glue the two panels together using double-sided tape.
The prepared material needs to be folded in the form of an accordion with a strip width of 3-5 cm. Try the workpiece on the window and, if necessary, cut off the excess. Using an awl, punch a hole in the center of the accordion.
Thread a strong rope through the hole, secure everything with tape and cut off the unnecessary end of the rope. Double-sided tape is used to secure the blinds. It is glued to the top strip of the accordion, and the bottom is only half-glued. The lower part must be glued together with a fan. Attach a clamp with an end cap to the end of the thread, and the already completed blinds are glued to the window. Ready-made wallpaper curtains can be decorated with rhinestones, butterflies or patterns. If used carefully, these curtains will last quite a long time.
DIY wallpaper blinds: a master class for the lazy
If there is a need to install temporary blinds, appearance which it does not have of great importance, and above all they are needed for sun protection, you can use simple master class for their production. To make blinds from this material, you need not more than an hour. You can transport them, remove them, and install them again.

To make blinds in a simple way, necessary:
- Take a cut piece of wallpaper and fold it in the form of an accordion pleat. If the accordion is opened, it should cover the entire window.
- To make the bottom heavier, you need to glue thick cardboard to the bottom.
- Glue the top to the sash with double-sided tape and secure the blinds with any tight clothespin of the required size.
There are many more ways to make such blinds, in which different design, operating mechanism or decorative addition.
Wallpaper blinds have many advantages:
- Do not allow sunlight to penetrate into the room;
- I decorate the windows in an original way;
- You can draw any picture you like;
- Do not interfere with flowers that stand on the windowsill;
- Economical to manufacture.

You need to be very careful when combining wallpaper blinds with curtains. Not every fabric looks attractive against their background. It is better to purchase good wallpaper that can be painted and make it match the curtains as closely as possible.
Inexpensive and beautiful: wallpaper blinds
Today, do-it-yourself blinds made from various wallpapers have become often used in the home. This is not only an original and affordable element of the interior, but also protection from the annoying sun and curious others.
Despite the fact that many people believe that such products can only be used for summer cottages, they fit perfectly into the design of any apartment.
Because the this material quite specific, it is not recommended to use it in the kitchen and other household premises.

Despite the fact that paper blinds have a number of advantages, they also have minor disadvantages:
- Short service life;
- Rapid wear;
- Compared to analogues, they look cheap.
Many people choose wallpaper blinds for several reasons. Even if you made blinds from expensive wallpaper, they will cost much less than store-bought counterparts. It takes very little time to create such blinds. If you want, you can change them as many times as you like, the main thing is to have a lot of leftover wallpaper. Nice wallpaper processed using various impregnations, so they repel dirt and dust, which extends their service life.
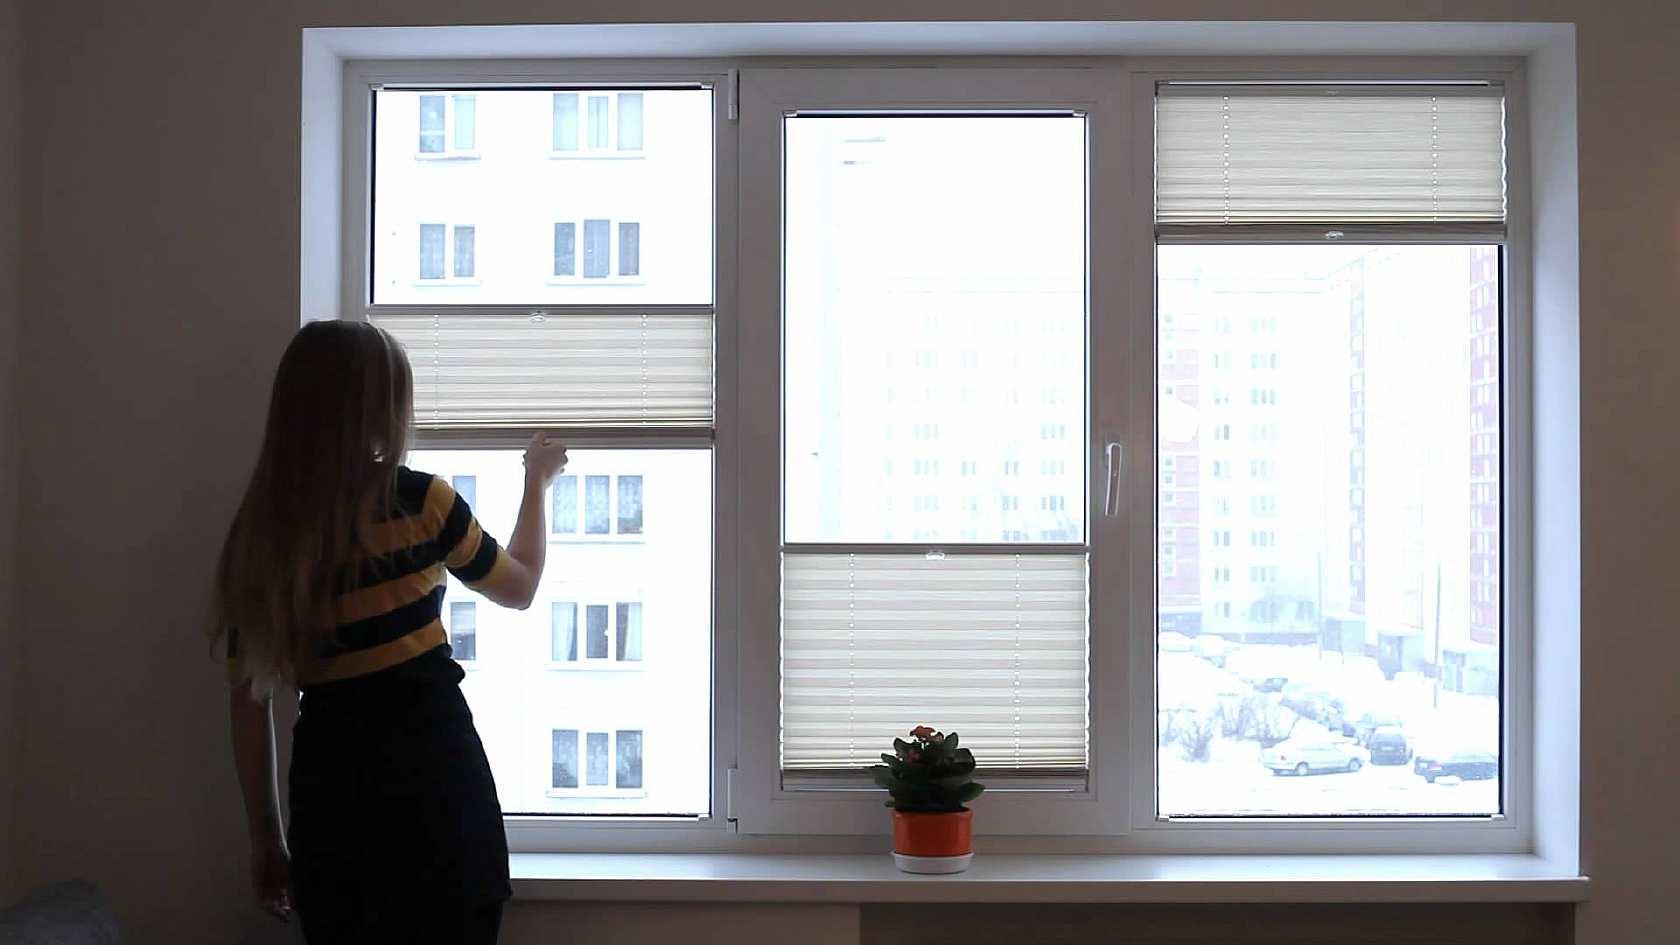
The light filters are attached to the window sashes, which frees up the window sill and does not interfere with the curtains. The method of installing blinds allows them to be removed and reattached as often as necessary, without damaging the window sashes.
How to make roller blinds from wallpaper
Some people are faced with the problem of choosing blinds for windows. It is not always possible to purchase blinds of the required size in stores. Therefore, they began to make them with their own hands at home.

To make roller blinds yourself, you will need:
- Drill;
- Hacksaw for metal;
- Remains of wallpaper;
- Metal tube, diameter – 1.8 cm;
- For a plumb line, a wooden or plastic strip;
- Mount for blinds 1.4-2 m, which can be bought in the store;
- Superglue, for gluing fabric to metal and screws.
Step by step process
- Measure the width and length of the window sash.
- From metal pipe cut off the width of a piece of the desired size.
- Cut the wallpaper to the required length and width, adding 2 cm for the hem at the bottom and the same amount at the top for gluing. The wallpaper should not be very thick.
- In order for the blinds to hang evenly, you need to make a plumb line. To do this, the edge of the canvas must be bent and stitched, leaving a one and a half centimeter pocket along the entire length of the blinds. For a plumb line, you can use a plastic tube or a wooden plank.
- Next you need to insert the fastener into a blank made of a metal pipe.
- Apply glue to the wallpaper and glue it to this pipe.
- After this, proceed to the installation robots. Place marks on the window frame according to the size of the blinds. Attach another part of the mount roller blinds using a drill.
- The last step is to insert the roll itself into the grooves.

Wallpaper blinds are good because they are made by hand, they are made from unnecessary wallpaper remnants, and protect the room from the bright sun. This product is an excellent addition to the design of the apartment. Wallpaper blinds, which are made of paper or non-woven fabric, are multifunctional. They are also a worthy alternative to already boring conventional curtains.
DIY wallpaper blinds (video)
These blinds are suitable for almost any room, especially for the sunny side of the house. For the manufacture of blinds from the most regular wallpaper with your own hands, there is no need to spend a lot of money and time. They can also be made from plain paper such as whatman paper. Therefore, such blinds are very popular.
Wallpaper blinds in the interior (photo)


I'll start with what we have small apartment, the windows of which are directed towards sunny side. If there is no sun in the morning, then being at home is quite comfortable. But after lunch, especially in hot weather, it becomes simply unbearably hot. The air heats up from the window glass and it becomes impossible to breathe. I found a way out of this situation and decided to make my own blinds with my own hands from ordinary vinyl wallpaper, which remained after the renovation. Wallpaper blinds perfectly protect the apartment from the scorching sun, and if you close them in time, then being at home in the evening will be quite comfortable. In this case, there will be no complete darkening, because in fact it is paper. So, first we measure the width of the window and if the wallpaper roll is too wide, then we cut it along the edge. The length of the cut itself will be slightly greater than the height of the glass part of the window (about one and a half times more). Next you need to make a kind of “accordion” (see photo). There is no need to make the accordion small, but it would also be bad to make it very wide. Most best option The width of the fold is approximately 4 centimeters.


While folding the accordion, make sure that it does not move to the side. You need to focus on the edges and make each fold carefully.

Now we take double-sided tape and glue it to the top of our blinds.


Now we take two pieces of rope and thread it through the holes (see photo).

We attach clamps to the lower ends of the rope. These clips can be purchased at any sewing department. They will act as clamps so that our blinds can be raised and lowered.


Our blinds are almost ready. All that remains is to fix them on the window. To do this, we open the second surface of the tape and carefully glue the blinds to the frame.

That's all! The blinds are ready. This is enough economical way which will not take much time to get rid of the scorching sun.


