As winter approaches and the weather gets colder, you notice a draft moving through your apartment. Placing your hand near the window on a windy night, you find a source of painful coolness. Stop putting up with this and sleep under three blankets! There are many ways to insulate windows. They range from simple to complex, from practically free to quite expensive, from “old-fashioned” methods to modern technologies. In this longread we tried to collect the most effective methods.
Before taking drastic action, let's consider possible reasons draft coming from the windows. It would seem that wooden windows, due to their material, preserve more heat, and plastic ones - a relatively new achievement of science and technology - are simply designed for heat and sound insulation. Then why can they allow a draft into our house?
- Unfortunately, poor-quality window installation is quite common. Sometimes installation company workers who call themselves professionals have a very superficial understanding of the installation of window units.
- The second reason may be partly related to the first - an attempt to save money on installing plastic windows. Companies often reduce the price by saving on insulation, foam, and the installation itself. Subsequently Not quality windows are much more expensive due to the need to additionally insulate them.
- Even if cold air doesn't leak through the gaps, the windows themselves may be to blame, like the old "single-pane" windows that provide only a thin glass barrier between the house and the outdoors, but not cozy warmth.
- Window distortion and loose fit window frame to the wall also threatens heat loss. Sometimes this happens due to the deformation of the building, which happens especially often in old wooden houses.
It's wise to start by diagnosing the situation. Determine the most critical places from which the wind blows. Where does the cold come from: from the windowsill or window sashes? Maybe the problem is a worn-out seal or poor-quality slopes?
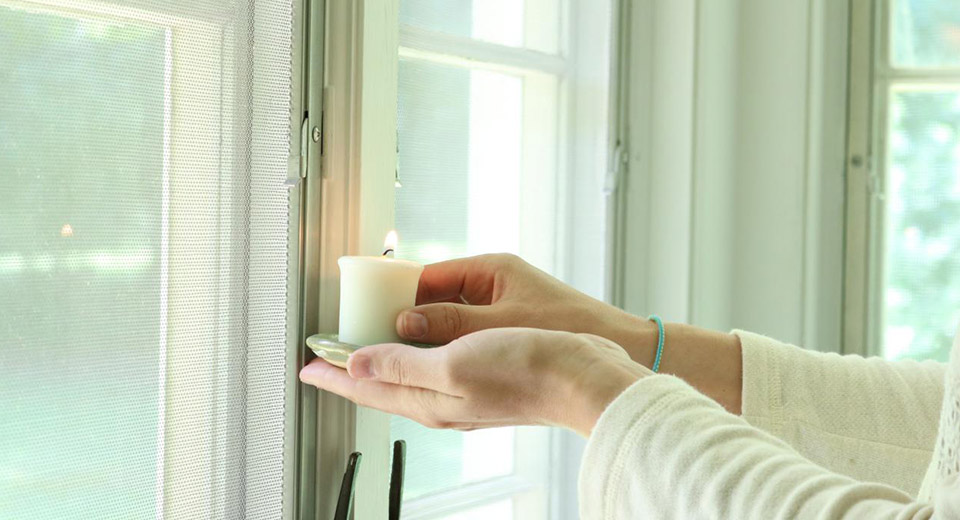
To determine the exact location from which cold air is blowing, you can simply run your hand over the surface of the window unit. If you cannot identify the problem in this way, light a candle or lighter and move it around the frame - the fire is more sensitive to drafts.
Look at the windows when it rains. Moisture accumulated in a certain place will indicate gaps and cracks. When moisture accumulates in the corner of a window or along one of its edges, the problem is likely in the joints. Moisture that accumulates in the middle of the window panel may indicate some type of crack in the glass.
Perhaps the wind is blowing due to a poor-quality seal. Try placing a piece of paper in an open window and closing the window completely. If the paper pulls out easily as soon as you pull the corner of the sheet, it means that the seal is not pressed well against the frame.
Before you choose an insulation method from among those available, it is worth thinking about the goals of the insulation. It's clear that temperature control is a major concern, but what compromises are you willing to make? Will you be able to give up a beautiful view, limit the flow of light, or block access to a window in favor of cheapness?
You also need to consider cost. Some materials cost almost nothing: say, sealant can be bought for a couple of hundred rubles. More reliable and durable solutions will cost more and may require specialist help, but in the long term they may be a worthy investment.
Should I ask for help or insulate the windows myself?
To insulate your windows, you basically have only two options: do all the work yourself or turn to a professional. With your own hands, you can simply insulate a window sill, frame contour, window opening indoors, or replace the seal. If any defect appears during the warranty period, the installer company will have to eliminate all problems. In addition, it is worth resorting to the help of installers if external insulation work is required, and the window is located at a significant height - replacing it or renovation work may be associated with an increased risk, and experts know exactly how to properly insulate plastic windows from the outside.
It is worth remembering that it is better to insulate windows before the onset of winter - then the working conditions will be more comfortable. In addition, sealants and some others Construction Materials can only be used in a certain temperature range, otherwise they lose their properties.
How to insulate plastic windows with your own hands

If you need to insulate a window opening, then polyurethane foam will do. As it expands, it fills the voids in the opening and prevents air movement. However, foam is a short-lived material that is susceptible to low temperatures and is suitable for small gaps. Mineral wool, which has thermal and sound insulation, is also a popular insulation material. It is resistant to high temperatures and easy to install.
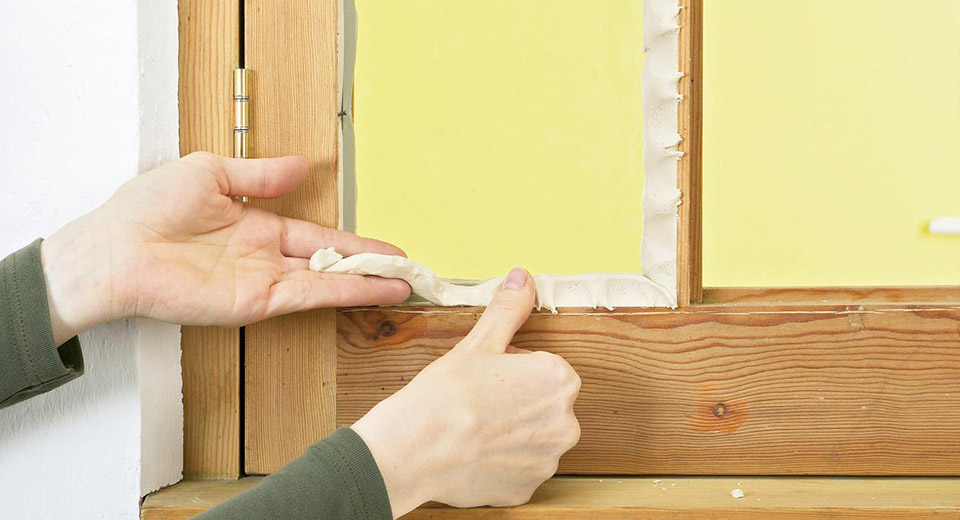
Silicone sealant will also help to insulate window frames. When working with it, it is best to use an inexpensive tool - a lever syringe. The sealant also blocks moisture, making the windows resistant to mold and mildew. It is also worth choosing a transparent sealant - this way it will not be noticeable if it accidentally gets on the glass.
Before you apply caulk or expansion foam, it's worth checking exactly how much it expands - to determine this, apply a small drop to the corner of the window.
Another “cheap and cheerful” method is to plug the cracks in the windows with technical wool and then seal them masking tape. Previously, instead of tape, they used fabric or paper strips with a paste made of laundry soap. But when using this option, its fragility is obvious, and it will not completely get rid of blowing.
A good and inexpensive insulation for plastic windows is foam rubber: the financial costs will be minimal. Remove the film from the adhesive surface of the insulation and press the foam rubber insulation for windows into the required places. With the onset of warming it is very easy to remove. However, if moisture gets in, the insulation may lose its seal.
How to insulate the slopes of plastic windows
To insulate the slopes of plastic windows, you can use the most different materials– sandwich panels, plasterboard, polystyrene foam or polystyrene foam. However, polystyrene foam is the most fragile of the listed materials and tends to accumulate moisture. If it is necessary to insulate a window from the outside, dry mixtures for finishing slopes will help.
First, you need to carefully treat the cracks - eliminate possible contamination and remove old mounting foam. If you have chosen drywall to insulate the slopes, then the sequence of actions is as follows:
- cut blanks from plasterboard required sizes and treat with a moisture-resistant primer, wait until the workpieces dry;
- insert plasterboard sheets in the slot;
- fill the small gaps left between the drywall and the wall, polyurethane foam;
- after the foam has hardened, we finish redecorating primer and paint.
External insulation work is carried out at temperatures up to +5 ° C, otherwise building materials may lose some of their properties.

You can use a special heat-saving film to insulate windows. It transmits light into the room and at the same time does not “release” infrared radiation. This film not only protects the warmth of our home, but also helps get rid of the “ crying windows", that is, from . Also, windows on which heat-saving film is glued are characterized by greater strength. Before starting work, it is important to wash the glass, treat it with a degreasing agent and wipe it dry. Next, you need to stick the film so that its “metal” side faces the street. The film is glued not only to the glass itself, but also with an overlap to the frame. Some manufacturers make films on a self-adhesive basis, but some types of film require adhesive tape. To prevent bubbles and wrinkles on the film, use a household hair dryer.
A simple and inexpensive life hack that will help cope with drafts is to attach bubble film to the window. Choose film with larger bubbles as it tends to handle cold air better. Trim the bubble wrap so that it extends slightly over the window frame. Spray the window with water from a spray bottle, then “glue” a sheet of cut wrapping film onto the wet glass. You can strengthen it double-sided tape. The “bumpy” side should face the glass. The film should adhere easily and remain in place for several months. If desired, you can apply a double layer of film for better thermal insulation. The only negative is that this method blocks the view from the window, but light will nevertheless enter the room.
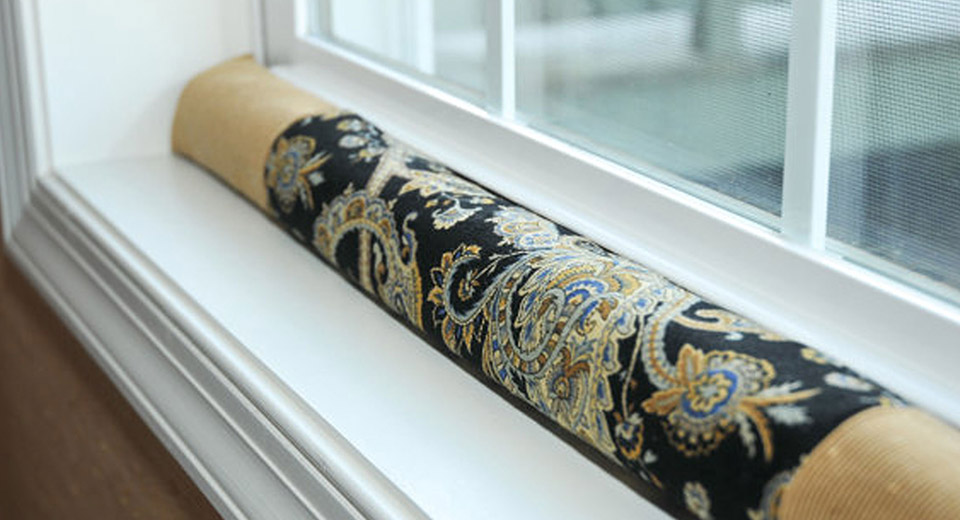
Sew a plain fabric to fit the width of the window. Fill it with some loose, dense substance such as sand, rice or polyester, then place it along the bottom of the window. Heavy materials (denim, corduroy) in in this case will retain cold air more effectively than lightweight materials (cotton, knitwear, etc.).
Replace the seal
If the problem is a worn seal, you can replace it yourself by selecting a suitable one hardware store. It is also better to choose a black sealant: black is the natural color of rubber, and impurities of other colors can spoil the quality of the product. After the old seal is removed, you need to clean the grooves from dust and dirt, treat the corners of the frame with glue and trim off the excess with scissors. The resulting joint also needs to be treated with glue.
People have been using wooden windows for a very long time, so the question “How to insulate old wooden windows?” there are many answers.
- A very old method that our grandparents used is gluing wooden windows newspapers. They were soaked in water and plugged into cracks. The space between the glass and the frame was sealed with paper strips. Of course, “paper will endure anything,” and you can survive the winter with it, but removing newspaper particles in the spring will be very problematic. In addition to the banal inconvenience, there is also a risk of damaging the window covering.
- If old windows need to be insulated quickly, and the aesthetic side of the issue is not very important to you, ordinary paper is also suitable. To make paper putty, you can shred old newspapers, soak them in water, add clay or crushed chalk and seal the cracks with the resulting composition. To secure the window putty, simply use tape. However, this method is short-lived and will most likely last only one season.
- Foam rubber - regular or tubular - can be used as insulation for wooden windows. It will be effective if the wooden doors have already dried out and do not fit tightly to the frame. Previously, foam rubber was nailed down with small nails, but now you can use regular masking tape. This material can serve faithfully for a couple of years, then it will begin to deform and will need to be replaced.
- When insulating wooden windows, you can also use sealant. It is necessary to remove the wooden beads holding the glass using a screwdriver, apply sealant and install the beads back - preferably new ones, since old ones often break during dismantling.
- Wood tends to crack. Therefore, the frame is often covered with a network of small cracks through which heat can escape. To seal them, you will need to clean the glass units from the decorative coating, fill the cracks with melted paraffin, homemade putty, sealant or special putty, and then re-coat the frame with paint or varnish.
We installed or moved into a house with existing plastic windows. We believe that we will no longer have to return to the issue of reliable thermal insulation of window openings in our homes. Alas, this is not true.
The question of how to insulate a plastic window may become relevant again. Perhaps after installing window designs will pass There is not even enough time when it will have to be solved.
Of course, companies that produce and install windows provide their own warranty period. We have the right, before its completion, to make claims to them and demand the promised thermal insulation properties of the window. But the warranty period also ends someday.
It also happens that residents of regions with winter temperatures below minus 30 want to improve the thermal insulation properties of installed plastic windows. This option is possible. And there are appropriate materials for this.

Selection of PVC windows, control over their installation
We resolve the issue of reliability and quality of the thermal insulation properties of window openings independently at the stage of making a decision on installing plastic windows.
If we ourselves do not have experience or skills in installing PVC windows, then we need to responsibly approach our options:
- Which company should you trust to install plastic window structures?
- Windows and fittings, which manufacturer we will install.
- Type of profile, how many air chambers we will choose in it (three chambers is optimal, but more is possible).
- What type of double-glazed window will we order (for better thermal insulation, we choose energy-saving). We choose its width, the number of chambers, the seal, what the chambers between the glasses will be filled with, and what coating will be applied to them.

How to make this choice correctly? Contact specialists, familiarize yourself with the design of plastic windows, the products of different manufacturers, the offers of window structure installers, and the documentation for PVC windows.
It is useful to familiarize yourself with GOST standards for PVC windows and their installation:
- GOST 26602.1-1999 Heat transfer.
- GOST 26602.2-1999 Air and water permeability.
- GOST 26602.3-1999 Sound insulation.
- GOST 26602.4-1999 Light transmission.
- GOST 26602.5-2001 Wind load resistance.
- GOST 30673-1999 PVC profiles.
- GOST 30674-1999 Blocks made of PVC profiles.
- GOST 30971-2002 Assembly seams.
- GOST 52749-2007-8922 PSUL.
Decide on the above questions. The next stage is to carefully monitor the installation process of plastic windows. Whatever quality windows we choose, 90 percent of the warmth and comfort in your home depends on their professional installation.
The right technology and detailed instructions proper installation of PVC windows is established by regulatory documents.
It wouldn’t hurt to familiarize yourself with them before monitoring the actions of window installers: these are:
- main “installation” GOST 30971 – 2002 “Installation seams of junctions of window blocks to wall openings. General technical conditions".
- SNiP 23 – 02 – 2003. “ Thermal protection buildings."
Important! We must insist that the contract with the company that installs PVC windows for us includes a requirement for their installation in accordance with the above GOST.
Before installation we check:
- How to prepare a window opening for the installation of a plastic window. Using a liquid level we check the vertical slope and horizontal level.
- What size gaps are left between the wall and the double-glazed window frame? The gaps should be no larger than the length of the matchbox (no more than 5 cm), but not less than 15 mm. A gap of less than 15 mm will be problematic to fill evenly and reliably with foam insulation.

During installation we control:
- To ensure that the installation seams between the window and the wall are done with high quality, and along their entire perimeter, according to the principle “the inside is tighter than the outside,” in three layers of sealing:
- from the street - climate protection;
- inside - insulation;
- on the housing side - vapor barrier protection.
- How window installers fill these gaps tightly and completely with polyurethane foam.
- Special attention Make sure that the gaps are filled with high-quality polyurethane foam. These are polyurethane foams, foams specially designed for installing windows.
- Check how slopes and window sills are insulated correctly and reliably.
Helpful advice! Spare no expense in installing external slopes. They will help the polyurethane foam retain its properties as insulation longer.
Insulation of window structures and glazed loggias
But, even if the technology for installing PVC windows is correctly followed, there is a need to insulate them for the winter period. Or perhaps you moved into a new building where the windows PVC structures installed en masse, with poor quality fitting.
Inspection and control of window readiness for winter
Before deciding how to insulate plastic windows with your own hands before the onset of cold weather, do we first inspect them?
First you need to identify the very presence of air leakage through the plastic window design. Identify in which node, in which place of the structure there is such a leak. You can determine this by the behavior of the lighter’s flame when you move it around the perimeter of the window or simply by using your hand.
Note! Before winter, do not forget to set the summer-winter adjustment mechanism to the maximum protection position.
Replacement of glazing beads and seals.
If an air passage is detected near the double-glazed window due to a problematic glazing bead (lining), with which the double-glazed window itself is secured, then we change it:
- using a narrow spatula, pry and pull out the old glazing bead;
- Using a rubber mallet, lightly tap to install the new bead.

Visual representation of replacing the lining
If necessary, we replace the seal itself, which has lost its elasticity, between the double-glazed window and the frame:
- Remove the glazing beads (start with the side trims).
- Remove the glass unit by first removing the linings.
- Remove the old seal strip.
- Cut a new sealing tape equal to the length of the old one (preferably with a margin of 3 - 5 cm).
- Carefully, without compression or tension, lay a solid strip of the new seal, cut off the excess piece with scissors.
- Reinstall the glass unit, linings, beadings.

If you find air leaks at the frame, then there is a problem with the clamping elements. In this case, possible reasons:
- the sash is pressed weakly (using a hex wrench, which is used for assembling furniture, or a screwdriver with an appropriate attachment, pliers on the open sash in the hole on the side of the handle and hinges, press the sash more tightly to the base);
- The seals around the perimeter of the frame and sash are poorly fitted:
- Remove the old seal;
- Clear the place where it is placed from possible debris;
- Place a single strip of new seal into the groove of the sash and frame (the length of the extension must exactly match the length of the groove);
- We glue the new installed seal.
Note! Try to buy new seals from the manufacturers or installers of your windows. When cleaning the profile surfaces where you will lay the profile, use PVC cleaners.
Do not forget to take care of the installed seals, wipe with a sponge with warm soapy water, lubricate with glycerin or silicone oil.
When preparing your home for winter, the question arises: how to additionally insulate metal-plastic windows? How to improve the thermal insulation properties of the double-glazed window yourself? And most importantly, how to insulate plastic windows?
These issues can be easily resolved. We insulate PVC windows using heat-saving PVI -. During production, its surface is covered with a special metal coating.
This coating reflects infrared rays and effectively prevents heat loss from living rooms. Insulation of loggias (balconies) that are glazed window systems PVC can also be effectively solved with the help of such film “glass insulation”.

Film is an option on the way to warmth
A good choice, protection and insulation for plastic windows is heat-saving ceramic IR window film (for example, KorQu models of the PREMIUM IR 6070 and IR 6560 series).
And, in combination with heated floors in rooms and on loggias, such film insulation for plastic windows will create an even greater effect in winter, because such films will reflect the heat of heated floors towards its source, i.e. back to the rooms and glassed-in loggia.
This method of insulating PVC windows in living rooms and loggias are inexpensive. And the price, when heat losses are reduced by up to 60 percent, is no longer so important.
Installing such a film on double-glazed plastic windows is a simple process. It is simply glued onto the glass itself and smoothed out. For convenience, you can use a plastic wallpaper spatula.
How can you insulate plastic windows using heat-saving film:
- We prepare the windows (clean, wipe with a wet sponge).
- Prepare the film (after removing the protective layer, wet it).
- We wet the glass.
- We glue and level the film, using a plastic spatula, on the double-glazed window.
- We cut off the excess part of the film with a cutter.

Replacing the assembly seam, installing insulated slopes and window sills
Over time, you have to look for an answer to the question of how to insulate plastic windows from the outside. It’s bad if you didn’t install the external slopes in time, which should protect the heat-insulating layer of polyurethane foam from natural phenomena, and didn’t insulate them.
Then the foam, like insulation, will serve its life faster, will begin to lag behind the wall, and the resulting drafts will transfer the “dew” point to the internal slopes.
If it is necessary to repair the foam thermal insulation layer and its climate protection, we perform the following actions:
- We remove old foam from the gap between the window and the wall (you can use a chisel).
- Spray the gap with water (so that the polyurethane foam will adhere better afterwards).
- We fill this gap with new foam.
- To protect the foam, seal the cracks with sealant (for example, Belinka acrylic sealant, Dymonic NT polyurethane sealant).
- We install external insulated slopes. Foamed polystyrene foam (foam plastic, 2 cm or more in size) can be used as insulation. mineral wool, EPS (extruded polystyrene foam). Some people also use ready-made insulated PVC slope, having bought it in stores like “Maxidom”. It is plastic, dimensions 2200x300x10 (mm), filled with extruded polystyrene.
- We are inspecting the window sill. If necessary, we insulate the window sill.

How to insulate the window sill of PVC windows?
The window sill can be insulated with polystyrene foam (expanded polystyrene foam).
- Cut out the foam to the desired size.
- We grab it with polyurethane foam.
- We lay the window sill on top of the foam.
Important! Do not attach the window sill with self-tapping screws to a plastic window. Use pads to secure it.
Conclusion

In the video presented in this article you will find additional information on this topic.
About 50% of the lost heat leaves the apartment through windows in winter, and you can insulate yourself quickly, simply and inexpensively, so it makes complete sense to understand this issue in more detail. The primary task in this case is to insulate the windows yourself, but a separate section is also devoted to issues of general insulation of the room.
It’s not very wise to start construction and repair work in the winter, so we’ll look at how to insulate an apartment, in most cases, without even moving the furniture. Nevertheless, the described procedures most often allow you to survive a winter with frosts of -20 in a destroyed Khrushchev block in sweatpants and a T-shirt, without spending too much on heating.
Heat transfer mechanisms and methods of controlling them
Back in school, we learned in physics that there are three mechanisms of heat transfer: direct heat transfer (thermal conduction), convection and thermal (infrared) radiation. In a cold apartment, all three occur:
- Thermal conduction - through walls, windows and doors, the floor on the ground floor and the ceiling on the top.
- Infrared radiation - most of all through window glass; in block Khrushchev buildings with radiators in wall niches, up to 15% of heat loss comes from radiation through the walls.
- Convection - through cracks, cracks, porous materials.
According to the mechanisms of heat loss, the methods of insulating the room for the winter also differ.
Thermal conductivity
It is difficult to deal with heat transfer: in most cases, construction work is required, and external work. When insulating from the inside, it is possible that the dew point will move inside the room, and this not only negates all efforts for comfort, but is also dangerous to health.
Read more about insulating apartment walls and under what conditions and how this can be done from the inside.
Fortunately, most materials used in construction conduct heat poorly, and direct heat removal through building structures, even in old block houses, does not exceed 25% of general meaning. Therefore, measures on walls and ceilings can be used as additional ones, or without them at all.
If such events are planned, then after insulating the windows you should tackle the floor and corners:
- Heat transfer from the floor will need to be transferred from convection mode to radiation mode (see below section on additional insulation). At the same time, the thin layer of air near the walls will cool down a little, but overall the room will become warmer.
- The thermal resistance of the corner is one and a half to two times less than that of flat wall the same thickness. Therefore, in order not to round the corners, they should, if possible, be isolated from the general heat exchange in the room - see the same section below.
Radiation
It is the most difficult thing to prevent heat rays from escaping: they are very “sneaky”, and where they leak is not visible. However, there are simple and cheap ways to significantly reduce heat transfer by radiation; they are described below.

Infrared diagram of heat removal from a private house. In a city apartment there are the same weak points: in most cases, first of all, these are windows.
Convection
The cracks in building structures to stop convection, naturally, they are sealed with any suitable materials. Window and door slopes(their thermal resistance is initially small, and convection occurs here even without gaps) should be additionally insulated with materials that conduct heat poorly. As for the cracks in the frames, there is interesting way turn convection from an enemy into a friend, it is described below in the corresponding section.
Window insulation
Slopes
Insulating windows for the winter begins with the slopes. First of all, we treat them along the contour around the window frame with a deep penetration concrete primer; Before doing this, it is advisable to remove the paint with sandpaper. This will increase the thermal resistance of concrete or brick.
For wooden houses, slopes are treated in the same way with natural drying oil. Use polymer putties on water based, in all other cases simply wonderful, are not suitable for this purpose: they reduce the thermal resistance of wood.

Plastic slopes
Next, we install overhead PVC slopes, see the figure on the right. It will not cost much, but the thermal resistance of the “cold bridge” of the slope near the frame will increase tenfold. We fill the cavity inside the plastic slope with polyurethane foam, polystyrene foam, and best of all, with cheap jute or linen tow. An old washed (dirt is a good conductor of heat) potato sack, cut into strips or unraveled into threads, works perfectly.
In this case, mineral wool cannot be used categorically. Firstly, it is harmful to health when used in this way. Secondly, moisture will quickly be sucked out of the air, it will fall and, instead of heating, it will begin to cool.
Glass
If you are taking photographs, do this experiment: remove dirty glass through an infrared filter, and then wash it clean, and take a photograph again in the same way. For non-photographers, let’s immediately describe the result: the dirty one looks only a little cloudy, and the clean one looks silvery.
Glass itself reflects IFK well, but the dirt on the glass, which is almost transparent to it, works like the clearing of photo optics: the transparency of the entire optical system for thermal radiation increases. A quirk of infrared rays.
Conclusion: In the winter, the glass needs to be washed until it squeaks when wiped with paper - the thinnest invisible film of dirt will do its job on the sly, and sealed against dust.
Sealing methods will be described in the next section, because... refer to the insulation of wooden frames. Double-glazed windows in PVC windows are already quite airtight.
Next, we cover the inner glass from the inside, on the side of the room, with transparent self-adhesive. Even the crappiest self-adhesive from a Shanghai offshore shed reflects IFC better than glass, and it will definitely last a year in the room.
Don't worry about trying to smooth out bubbles on cheap self-adhesive tape. It is enough to pierce them with a thin needle and leave them alone: they will soon fall off and stick.
Windowsill

It seems that such a small thing as an incorrectly installed or damaged window sill can cause additional heat loss.
A cold bridge often forms under the windowsill. If there is a gaping crack, foam it. Further repairs can be postponed until spring: it won’t be visible. It is advisable to attach a piece obliquely under the windowsill plastic board, filling the cavity with the same material as in the overhead slopes. In addition to insulation, this will improve air circulation from the radiator; you just need to make sure that there is a gap of at least 6-7 cm. A rag roller, secured to the underside of the window sill and the wall with tape, also gives a very good result. Not in a modern way, but it’s still not visible. And it will last until spring with repairs.
Wooden windows
Insulating old wooden windows requires first of all sealing the glass and frames. The sealing locations and materials used are shown in the figure for “Swedish” windows with split frames. For regular windows, a dust seal is not needed, but a contour seal will be required for the second frame. In all three cases, sealing can be simplified and cheaper.

Sealing wooden windows
Sealant
It is not necessary to use expensive branded compounds for this. Liquid silicone grease or silicone for renovation is ideal plastic bumpers and spoilers, sold in car dealerships and car markets, and the cheapest “China” ones.
Horizontal joints are dripped from a pipette (you will have to throw it away later, but it’s cheap) at the rate of 1 cm - 1 drop, and after an hour they are dripped again. Vertical joints are dug starting from the top corner: a few drops are dropped one at a time until they flow into the joint, then the next section is dug, and so on to the bottom. Fresh excess sealant is removed with a cloth moistened with vinegar; frozen - cut off with a safety razor blade.
Anti-dust gasket
For one season, foam rubber is suitable, for several years - a rubber medical bandage or any thin rubber tape in a roll. You just need to make sure that there are no gaps at the joints: through them the window will attract dust more strongly than without a gasket.
Sealant
But here you can use a trick. There is such a phenomenon - the throttle effect. Simply, air, squeezing through a narrow hole, heats up due to internal friction - the viscosity of air, although negligible, is finite.
Using the throttle effect for insulation is not a discovery. Adhesive-backed foam rubber strips specifically for this purpose have been on sale for a long time. Microporous insulation works like this: when the pressure difference is small, air cannot leak through the foam, and the seal acts as a seal.
When there is a side wind, almost no air is sucked out of the room: turbulence in the window niches reduces the pressure difference. But the frontal, very cold wind pushes the air inside and it heats up due to the throttling effect, and the stronger the wind, the more intense it is. In general, the temperature in the room does not fall, but sometimes it gets warmer due to wind energy.
What's the trick then? The point is that when purchasing, you need to check the suitability of the foam rubber: apply it to your lips and blow. A slight resistance to exhalation should be felt: if the pores in the material are too wide or closed, there will be no throttling effect.
Foam sealant is short-lived: it needs to be removed and thrown away in the spring, and freshly sealed in the fall. But it's cheap.
Gaps in frames
Gaps and cracks in the frames themselves are covered liquid nails or liquid wood. The latter is much cheaper, but will last a season in an external frame and 3-5 years in an internal one.
Video: insulating wooden windows using simple means
Plastic windows
The insulation of plastic windows comes down to washing the glass and, possibly, gluing the inner glass with film, to their inspection, adjustment and replacement of worn seals. The PVC window adjustment diagram is shown in the figure. Operations should be performed with a special key (sometimes supplied with the window) in the numbering sequence in the image.

You can learn more about the technique of adjusting plastic windows.
The sequence of the audit is as follows:

- we check whether the double-glazed window is loose;
- if it plays just a little bit, no more than 0.5 mm, dig around the edge with silicone sealant. “Ersatz” will no longer work here; you need to use special acid-free compounds;
- if it is very loose, take it out and change the gaskets with spacers;
- adjust the window until it fits snugly;
- if the adjustment limits are exhausted (see note 2), change the sealing gasket.
Notes:
- You can once and for all fix the glass unit in the frame with aquarium silicone glue, viscous and durable. Fresh excess is removed with a cloth with vinegar, frozen excess is cut off with a blade. But after this it is impossible to replace the double-glazed window; you will have to break it and most likely the frame will break.
- When adjusting, pay attention to the position of the adjusting pins (Fig. top right). If they easily turn to the maximum pressure position, the sealing gasket needs to be changed.
- If there are visible signs of wear (shrinkage, wrinkles, cracks), the seal must be replaced in any case. It is unacceptable to push it into the groove using improvised means; you need to use a special tool (see figure below).
Video: preparing plastic windows for winter
Additional insulation
Balcony door

Replacing the seal
The exit to the balcony is insulated in the same way as a window. Often this is not enough, so in the winter it is advisable to cover the exit to the balcony with thick fabric or film from top to bottom. Best result provides a film on a slatted or profile frame that completely covers the opening from the side of the room.
Particular attention should be paid to the threshold. Here great benefit will give a fluffy or thick wicker rug: a cold stream will spread to the sides and become imperceptible; In addition, the throttle effect will also work, only superficially.
Entrance to the apartment
The entrance opening is insulated in the same way as the window openings, with one difference: instead of foam rubber seals, good old felt ones are best suited for the door. Foam rubber is generally unsuitable for doors. The quarter is insulated in the same way as a window slope.
Ventilation
The ventilation holes cannot be closed, but the blowing from them is noticeable at times. A radical way to fix proper ventilation in winter - flapper valves in the vents. Without blowing from outside, the firecracker damper will open slightly enough to provide ventilation: in winter, due to greater difference temperatures, air circulation between housing and the street is stronger. When blowing from outside, the damper will slam shut, but enough air will leak through the gap so that the apartment does not become stuffy.
Floor
The easiest way to insulate the floor before spring is to cover it with carpet or just carpets. Convection will move towards the walls and weaken. The carpet, if you do not make any “noise” and if necessary, move the furniture rather than move it, it is laid without fastening, floating.
About full-scale floor insulation.
Corners and openings
Each opening consists of several corners, so corners and openings are insulated in a similar way. Without repair, curtains in combination with a lambrequin are quite effective. Without a lambrequin there will be little use: the air behind the fabric will come out quite freely from above. The fabric should be chosen not so heavy as dense. The film works well: without particularly spoiling the look of the room, it can be pulled in the corners to the walls and attached behind the furniture with tape.
Radiators
It is advisable to place heat-insulating organic fiber mats (not mineral wool!) aluminized on both sides behind the radiators. Such a screen will attenuate the infrared radiation from the battery to the wall by more than 40 times. In a Khrushchev building with radiators in niches, thermal shielding is equivalent to covering the walls with plywood.
General conclusion
Knowing the mechanisms of heat transfer from the apartment to the outside and the design features of the building, you can quickly and inexpensively insulate yourself to complete comfort even in an old block house. First of all, windows should be insulated, starting from the slopes.
(No ratings yet)
Discussion:
Dmitry said:
I would not advise anyone to make large ones in an apartment or house. panoramic windows. Beautiful in summer, cold in winter. After all, glass is not a wall and there are not many ways to insulate it. Despite the fact that all the corners and doors in the apartment are insulated, and the space near the windows is insulated, nevertheless, cold blows from the glass. My wife washes them until they shine for the winter, we glue them with special paper, but we are still inclined to believe that such windows were made in vain.
Anastasia said:
With the onset of cold weather we always struggle with the windows; it blows very strongly. In addition, there is a constant draft. Previously, windows were sealed with moistened newspapers. Now we just cut the foam rubber and close the cracks in the windows, and seal the top with masking tape. It doesn't blow, we like it
Arkady said:
Windows are a very weak point. Freezing is one problem. It's even worse if there is a draft. Even a very small draft can make the room temperature uncomfortable. It's easy to spot. You can explore with your hands the space around the windows and window sill. Any cracks found can be sealed with silicone.
Maria P. said:
Last winter was terrible - it blew all the holes. We walked around the house wrapped in 2-3 layers of clothing. We have now decided not to allow this to happen. I’ll show my husband the article and let him organize a warm, cozy winter for us.
thanks for detailed instructions, no need to look for other sources of information.
Klikoly said:
I want to tell you about my experience in insulating windows. Everyone knows the time of year when the heating hasn’t been turned on yet, and it’s already winter-like cold outside. The temperature in apartments at this time drops to 17-19 degrees (and this is in the best case). In order to somehow escape the cold, most housewives rush to lay insulation and seal the window frames. I also belonged to this majority for a long time. I have not yet tested the effectiveness of this action. I specifically measured the temperature before pasting, and then after. The difference turned out to be only 1 degree. Since then, I began to belong to that happy minority that does not fuss about window insulation. Although, for the sake of fairness, I must say that I did not carry out the ENTIRE range of measures to insulate the apartment described in the article. Maybe in vain. Perhaps this would have given a more significant result.
A draft represents the flow of air created in a room, coming from the street through open doors, windows, cracks in them. In summer a draft brings real help, in the autumn-winter season - leads to heat loss, as a result, despite heating, we freeze, and bills charged for heat delivery rise.
A common cause of drafts is leaky, improperly adjusted windows. Due to cracks in window frames, 20-30% of heat is lost. How to insulate plastic windows for the winter with your own hands and prevent drafts? This will be discussed in this article.
The beginning of the heating season is the last call when you need to make sure that the window frames are sufficiently sealed, prepared for winter, and cold air does not penetrate into the room. How to do it?
 Simple ways check for cracks:
- run your hand along the edges of the glass, door jambs, the flow of cold air is immediately felt by the palm;
- bring a lit candle and follow the flame.
You should pay attention to the condition of fittings and hinges. If you feel a cool breeze on your palm, you need to carry out minor repair work.
How to properly insulate old windows for the winter?
After 10-15 years, PVC windows become insufficiently energy efficient. If the frames and profiles are in good condition, they need to be thermostatically controlled. With the cold weather approaching, many are wondering how to insulate plastic Euro-windows with their own hands.
To save on heating costs, it is often recommended to replace old frames. This is not always necessary. There are methods that can make improving the thermal insulation of window openings cost-effective. What is better to use?
Isolation stages
Upgrading window units usually includes replacing the glazing unit, replacing gaskets, repairing or replacing fixtures, and repairing plaster. You can do some or just one of these steps. The optimal effect is achieved through next works:
How to adjust plastic windows?
Adjusting the Eurowindow, installing it in correct mode effectively eliminates the problem of uncontrolled breakthroughs of air masses inside and helps reduce heating costs.
What you will need:
- screwdriver;
- original keys for window adjustment (can be replaced with a regular hex key of suitable size).

Checking the position of the sash relative to the window frame
The setup begins with checking the position of the sash, stages of work:
- Outline the window in the corner with a pencil.
- Open the sash to check the distance between the closed sash and the frame. It should overlap correctly.
- The sash adjustment screws are located on the upper and lower hinges of the window. Screws allow you to adjust it vertically and horizontally (from right to left). After tightening the screw using a hex key, install the sash so that it overlaps the frame by a few millimeters.
The degree of fit of the sash to the frame
Check the degree of fit of the sash as follows:
- Insert a piece of paper between the sash and the frame.
- Close the window.
- Try to remove the paper - if the paper comes out easily, you need to increase the seal.
To improve the fit, the eccentric screws on the window fittings must be replaced or adjusted. They usually have small “dots” on them - markers that show the direction of the screws. By unscrewing the locking screws relative to the gasket, you can change the degree of fit:
- increase (the point faces the “exit”)
- reduce (the point must be indoors).
The adjustment will allow the sash to fit more tightly to the frame, increasing the tightness of the Eurowindow structure. Once adjusted, closing the window can become a more labor-intensive process. If you don’t want to make the adjustment yourself, you can use the services of professionals.

Checking the condition of the gaskets
 The condition of the gaskets affects the breathability of window frames; it is important to take care of them by lubricating them with appropriate products:
- silicone grease,
- technical Vaseline.
The lubricant will preserve the properties of the Eurowindow for a long time. However, if the gaskets are deformed, cracked, or “extend” beyond the frame, they must be replaced with new ones. The gasket is cut into suitable pieces and carefully glued. Can be used:
- self-adhesive gaskets,
- rubber seals.
It is important to replace the gaskets before frost sets in!
Before sealing window frames, you should thoroughly clean the frames with a special product for caring for window frames.
Checking the fittings
Fittings are a key element of the window frame, although at first glance they are not very noticeable. Before winter, it is worth checking the technical condition of the fittings:
- if they “sit” too loosely, they should be tightened;
- Lubricant may be required (Vaseline works great).
Gaps between frame and glass, trim and wall
Heat also escapes through such gaps; it is necessary to eliminate all gaps. There are several options to solve the problem.

Thermoresistant paper
A popular option is shrink film for insulation. PVC windows. The film is attached using double-sided adhesive tape directly to the window frames. Films form an additional layer on the glass, increasing the thermal insulation coefficient. Self-adhesive thermal insulation films with low-emissivity coatings are popular, give an excellent effect, and do not require additional processing.

Films allow you to create an additional layer of air, increasing the thermal insulation of the glass unit:

Thermal film - inexpensive, efficient material. The film is installed inside and outside. The film mounted inside is more stable and is not exposed to gusts of wind or adverse atmospheric factors.
After tension warm air from a regular hairdryer, the film becomes transparent and does not distort the image. During the heating season, when insulation of double-glazed windows is not required, the film can be removed.
Window insulation - video
When compacting, you must be careful not to overdo it. It is important to provide micro-ventilation, in which a small amount of fresh air enters the premises. Microventilation is important for:
- operation gas system,
- reducing humidity levels,
- fresh air improves our mood.
“Closing it in a jar” too tightly is a bad idea.
Old windows sometimes cause trouble by letting drafts inside. There are several options for how to seal windows for the winter at home. The choice of insulation option for window openings depends on their condition and budget.
Sometimes owners of windows made of metal-plastic profiles are faced with a situation that in winter... window hole Cold air enters the room (drafts, “pulls”). To decide how to insulate plastic windows, you need to find places and identify the reasons for the violation of thermal insulation.
How to determine where it's blowing from
Possible places for cold air to enter are:
- Attaching the window block to wall panel along the entire perimeter (ceiling part, slopes, window sill);
- Seal between the sashes and the window frame;
- Fittings (worn or loose hinges, handle);
- Plastic bead securing the double-glazed window to the profile.
The main reasons for the formation of cracks in these places are:
- Violation of the rules for installing plastic windows;
- Warping of the window frame due to natural shrinkage of a new building or wooden house;
- Usage low-quality materials by the manufacturer when producing PVC profiles and by installers when installing windows in order to save money;
- Drying and cracking of the rubber seal;
- Wear of window fittings, leading to weakening of the clamping force;
- Failure to comply with the rules for operating windows (regular wet cleaning and treating the rubber seal with glycerin, cleaning and lubricating the clamping mechanism and hinges).
To determine the location of the blowing, it is enough to run the back of your hand along the listed elements. In a place where thermal insulation is damaged, a flow of cold air rushes into the room. For greater effectiveness, the palm can be wet.
It is important! There may be several such places, so it is necessary to examine window unit fully.
If in doubt, you can use a lit match, lighter, or candle. They are carried out at a safe distance from the profile (2–3 cm) along the entire perimeter of the window. Deflection of the flame to the side indicates the presence of a draft from the gap.
You can determine where the air is blowing using a burning match.
The tightness of the seal can be checked using a sheet of writing paper. It is placed between the open sash and the frame. The sash is closed by turning the handle all the way. If the paper can be pulled out, it means that the seal does not fit tightly and there is a gap.
Detected places of cold penetration and cracks are marked on the drawing or with a pencil on the window profile. During insulation work, these areas should be given special attention.
- The warranty period has not expired;
- External insulation is required on high floors;
- The cause of the gap is a manufacturing defect;
- Replacement of worn elements of the clamping mechanism is required;
- The work must be completed efficiently and in a short time.
In other cases, it is more economical and expedient to do the insulation of plastic windows yourself.
How to insulate plastic windows for the winter
The material is selected depending on the area that needs to be insulated.
| Insulation | Mode of application |
| Polyurethane foam | The voids between are filled window opening and frame (installation seam) around the entire perimeter |
| Mineral wool (for interior work) | Window sill insulation and internal slopes with a mounting seam width of 30 mm or more |
| Foam plastic, polystyrene foam | Insulation of external and internal slopes with a mounting seam width of less than 30 mm |
| Dry building mixtures(plaster, putty for exterior work) | Insulation of slopes, protection of insulation from exposure external environment outside |
| Silicone sealant | Sealing gaps between plastic window elements |
| Construction tape | Glued on top of the sealant or instead of it |
| Energy saving film | Sticks on inner surface glass unit |
| Replacing dry or damaged seals on the sash and frame |
To protect insulation from mechanical damage and as decorative coatings for slopes indoors, they are mainly used. plastic panels and drywall. The latter requires additional puttying and painting.
Step-by-step instructions for do-it-yourself insulation
All work on insulating plastic windows can be done independently. It's enough to prepare everything necessary tools, materials, carefully familiarize yourself with the technology and sequence of work.
The adjustable elements of the pressing mechanism are protruding eccentrics of cylindrical or oval shape, located at the end of the sash in increments of no more than 70 cm. Additionally, one at a time is placed on the ventilation mechanism (if equipped) and on the hinge side. The cylinders have a notch to facilitate adjustment and set all eccentrics to the same position.
Depending on the brand of fittings, to adjust the cylindrical pin you will need a 4 mm hexagon, an asterisk or a flat-head screwdriver. The oval eccentric is adjusted using a screwdriver.
 Clamping mechanism adjustment diagram
To press the sash more tightly to the frame, use a wrench to turn the trunnions alternately clockwise. The pressure of the upper and lower hinges is adjusted with the screws located on them.
After adjustment, the marks on all eccentrics should be at the same level, the handle should be closed all the way.
When the house shrinks or the sash sags, the rubber seals may adhere unevenly to the surface of the frame. In this case, it is necessary to adjust the position of the sash relative to the frame. To do this, there are screws in both hinges “left-right” and additionally in the bottom one - “up-down”.
Video: how to adjust the window yourself so that it doesn’t blow from it
Replacing the seal
The sealant is purchased from the same company or an analogue with an identical profile.
For ease of work, the sash is removed. For this:
- The window is closed with a lock and the decorative trim of the top hinge is removed;
- After removing the retaining ring, remove the pin;
- The window is opened, the sash is released from the upper hinge by moving it towards you, and removed from the lower hinge by an upward movement (for large dimensions and weight, the sash is dismantled by two people);
- Remove the handle by turning plastic cover at the base and unscrewing 2 screws with a screwdriver;
- The sash is laid on a horizontal surface.
Using a knife, the rubber band is removed from the groove. The groove is cleaned of dirt and debris and degreased so that the new seal stays in it securely and for a long time.
The end of the new seal is cut evenly with a knife and pressed into the groove with a bend towards the sash. In this way, a rubber profile is placed around the entire perimeter.
 Rubber compressor on windows can be replaced if necessary
The end of the seal is cut 0.2–0.5 cm longer than required and, squeezing, pressed into the profile.
It is important! Both ends of the seal can be glued together.
When installed correctly, the ends of the seal are located tightly to each other without gaps. If one edge sticks out, it is removed, cut off a little and inserted into place.
Video: replacing the seal on a plastic window
The seal on the frame is also changed.
Sash with installed handle reinstall in the reverse order of removal:
- Insert into the bottom loop;
- Using a “pull” movement, the parts of the upper loop are connected;
- A pin is inserted into the upper loop and a retaining ring is installed;
- Put on a decorative overlay.
The sash is locked and the seal is checked for cracks. If necessary, the pressing density is adjusted using trunnions and screws on the hinges.
It is important! Before and after the winter season, the seal is cleaned, wiped dry and coated with silicone grease.
Slopes
Often, adjusting the sash pressure is not enough; cold air blows from the windows. In this case, it is necessary to insulate the window slopes. It is recommended to do this both outside and inside. Then the windows will be reliably protected, and the room will maintain a comfortable temperature.
It is important! Since the insulation of slopes is carried out in several stages, it is recommended to carry out the work in summer in dry weather. In winter, for external insulation it is necessary to use materials designed for work at low temperatures.
For the simplest insulation of slopes you will need:
- Polyurethane foam;
- Insulation;
- Silicone sealant or liquid plastic;
- Drywall;
- Hammer;
- Hammer;
- Spatula, trowel;
- Construction tape;
- Adhesive for foam plastic (highly elastic);
- Perforated corner;
- Polymer reinforcing mesh;
- Primer;
- Plaster and putty for interior and facade work.
Polyurethane foam is selected for winter or summer, depending on the time of work.
The insulation can be polystyrene foam or polystyrene foam. Polystyrene foam can absorb moisture and retain it for a long time. Expanded polystyrene is more expensive than its counterpart, but surpasses it in all respects.
The thickness of the insulation is selected so that it completely covers the installation seam and extends 1–2 cm onto the frame.
 To insulate slopes from the inside, you can use different materials
If the width of the installation seam is large, first apply a layer of plaster of the required size.
Insulation from the inside
Initially, the thickness of the insulation and drywall is calculated so that the new slope fits onto the frame, but does not interfere with the opening of the sashes.
The work is carried out in the following sequence:
- The existing old decorative coating is knocked down to the slab or brick with a hammer drill, and cleaned of dust and debris with a brush.
- Detected voids in the mounting layer are filled with polyurethane foam. Excess frozen foam is cut off with a knife. The foam should have low secondary expansion.
- The walls around the entire perimeter are generously primed. Modern primer has antiseptic properties, protecting the surface from the formation of mold and mildew.
- If the surface of the slopes has protrusions and depressions, it is leveled with a layer of plaster. After drying, cover again with a layer of primer for better adhesion to the glue.
- Cut foam blanks according to the dimensions of the slope with a margin of 3–5 mm in width. Both sides are treated with coarse sandpaper, making the surfaces rough.
- The insulation is glued from bottom to top. The glue is applied with a spatula or trowel in a continuous, uniform layer to the slope area and the workpiece. It is better to apply the composition to the foam with a notched trowel. The insulation is pressed against the slope and fixed. The insulation can be glued to the slopes with polyurethane foam. To do this, it is applied in zigzags over the entire surface of the slope and the foam is lightly fixed.
- After the glue has hardened, the prepared drywall blanks are secured on top of the foam with dowel nails of such length that they enter the wall 4–5 cm.
- The joints between the slope and the window frame are coated with silicone or liquid plastic.
- Excess foam and drywall protruding beyond the plane of the wall are cut off with a knife.
- A perforated corner is fixed to the angle between the slope and the wall with putty. After hardening, the excess is removed with fine sandpaper.
- The slope and section of the wall are puttied and, if desired, painted with water-based paint.
It is important! At each stage of work, verticals and horizontals are controlled by the building level.
Video: do-it-yourself slopes made of polystyrene foam
Outside
Polyurethane foam on the outside is especially vulnerable, so it requires careful inspection, removal of the worn-out foam, application of new foam, and filling of voids. Particular attention should be paid to the area under low tide.
- Excess frozen foam is removed, the slope is cleared of old plaster, paint, dust, cover with a layer of primer.
- Level up facade plaster. Mixtures for interior work crack due to temperature changes, so they are not used outside. Treat with primer again.
- The prepared insulation is glued to the slope and additionally secured with “fungi” - plastic dowels with wide caps. Trim off excess foam with a knife.
- A layer of glue is applied on top of the insulation. Immediately lay the reinforcing mesh so that it extends onto the wall, and press it into the glue with a spatula.
- A perforated corner (preferably metal) is attached to the junction of the slope and the wall using glue.
- A layer of plaster is applied on top.
- Install the tide.
It is important! Over time, a gap will form between the plaster and the frame, so it is recommended to use a spatula to make a groove 5 mm deep in this place and fill it with silicone.
Video: insulating slopes from the outside
Due to poor quality or economical work on the installation of the window sill, there can be quite a lot of draft from under it.
To insulate this area, it is not necessary to dismantle the window sill:
- Remove the layer of plaster underneath and carefully inspect the opened space. Often you can find debris and polyurethane foam applied only in some places.
- The debris is carefully removed, and the voids are thoroughly moistened with a brush.
- Next, the entire space under the window sill from the frame to the edge of the wall along the entire length is gradually filled with polyurethane foam.
- After hardening, the foam is cut off. The area under the window sill is sealed with a layer of plaster and putty.
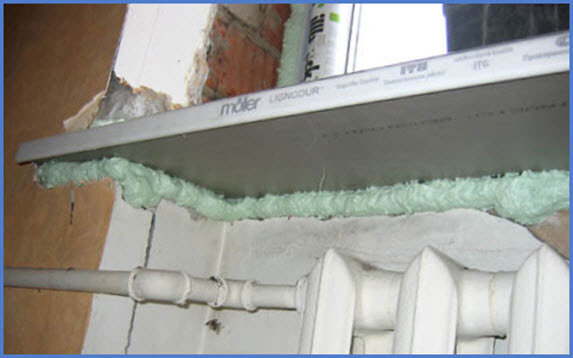 Window sill insulation with polyurethane foam
It is important! It is necessary to control the position of the window sill using a building level. To prevent the foam from moving when it expands, weights (books, containers with water) are placed on top along the entire length.
Glass insulation
First of all, before the onset of cold weather, windows must be washed. Clean glass prevents infrared radiation from penetrating outside, therefore, heat loss is reduced.
One of the latest developments for insulating double-glazed windows is energy-saving shrink film. It has a double effect:
- Reduces heat loss in the form of infrared radiation;
- Forms an additional air layer (the “third glass” effect).
The technology for attaching the film is simple and does not require special skills. To do this you will need a stationery or construction knife, double-sided tape and a hair dryer:
- The window is thoroughly washed so that when you hold it with your finger, a characteristic creak is heard.
- Scotch tape is attached to the frame around the entire perimeter. It is desirable that there are no gaps at the joints.
- The film is laid out and cut to fit the frame with a small margin.
- Remove the protective layer from the tape.
- The film is glued to tape, stretching along the entire perimeter of the frame. Small “wrinkles” will not cause problems. It is important that the film is securely fastened across the entire width of the tape, without “bubbles”. Particular attention is paid to the corners.
- A stream of hot air from a hair dryer is directed onto the film, especially thoroughly heating the folds. Thanks to its shrink properties, the film quickly stretches and “wrinkles” disappear.
 Thermal insulation film is glued to the window without much difficulty
The appearance of the window deteriorates a little, but the heat-saving qualities are significantly increased.
Video: installing heat-saving film on a window
For self-insulation plastic windows, sometimes it is enough to have the right tool on hand. It is important to correctly determine the cause, know the technology and follow the sequence of work performed.


