We continue the series of publications that we started, sharing my experience in laying tiles. Today we are laying tiles on the floor. We lay it on the floor in the shower with a drain built into the floor. We will lay the tiles diagonally.
In the last article I showed, and we started laying from the second row. The next step is to lay the tiles on the floor. I’ll tell you why in this order later in this article. After laying the tiles on the floor, we will report on the first row, which I will also discuss below.
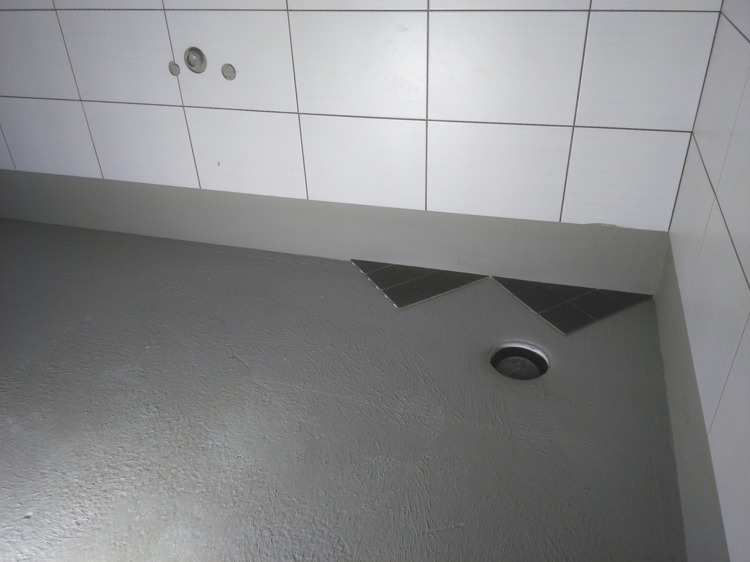
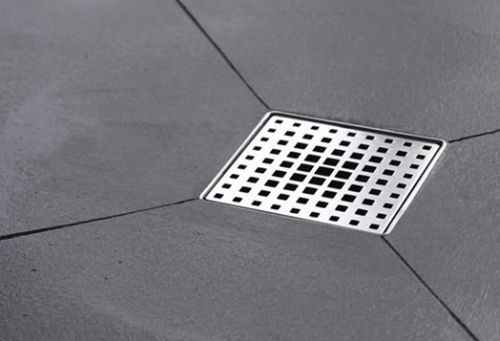
Laying tiles in a shower with a drain
Since we have a built-in drain in the floor of the shower room, we made a slope towards the center of the drain. Due to the 2 cm slope, it is optimal to lay small tiles. The customer chose tiles measuring 95 mm by 95 mm and laid in sections three tiles wide and 4 tiles long. The tiles are glued together special glue with a gap of 3 mm already maintained.
Before laying, it is always important to figure out which wall to start laying from. Since in our case there will be a shower corner, it is visually beautiful to start laying from this place.
Cutting off sharp knife three tiles from the section in such a way that three by three tiles remain glued together. Use a tile cutter to cut them diagonally. Let's try it dry.
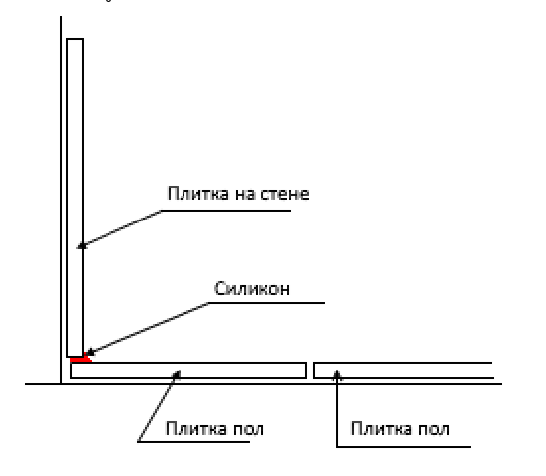
Please note that you must retreat 5 mm from the wall.
Choosing a comb before laying tiles
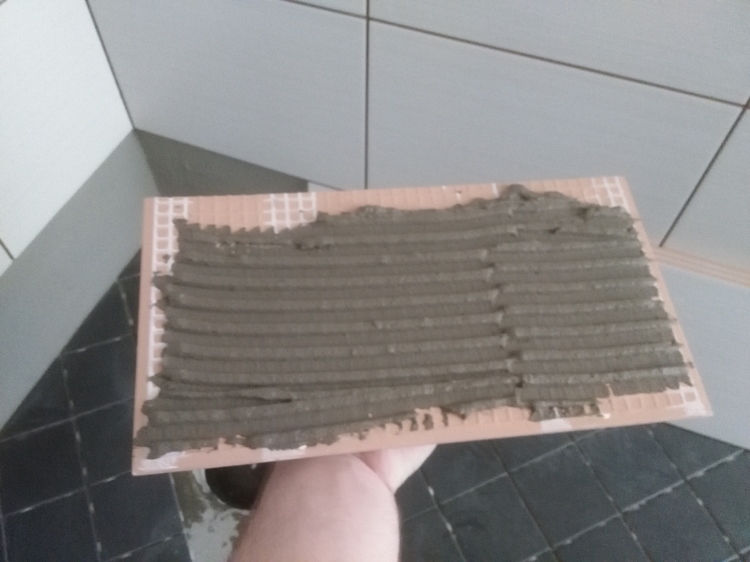
A few words on how to choose the right comb spatula (comb). The depth of the comb groove is selected based on the size of the tile being laid. For small tiles, the depth of the comb groove should be less.
If the tile is 10 by 10 cm, then it is optimal to choose a comb with a groove depth of 6 to 8 mm. If the tile dimensions are, say, 600 by 600 mm, it is better to choose a comb with a groove depth of 12 mm or more. This is due to the fact that if a small tile is laid on a comb with a large groove, it will begin to float and the mortar will come out through the seams.
Please note that than smaller tiles, the smoother the surface should be. For example, the surface for mosaics must be perfectly prepared. And to lay such tiles you need special glue and a comb A 2. If we get the job of laying mosaics, I will definitely write a separate article.
In our case, I lay the tiles on a comb with a groove depth of 8 mm.
Apply glue starting from the ladder along the wall approximately 60 cm. Apply the glue evenly, avoiding sagging.

We lay our first blanks cut diagonally.
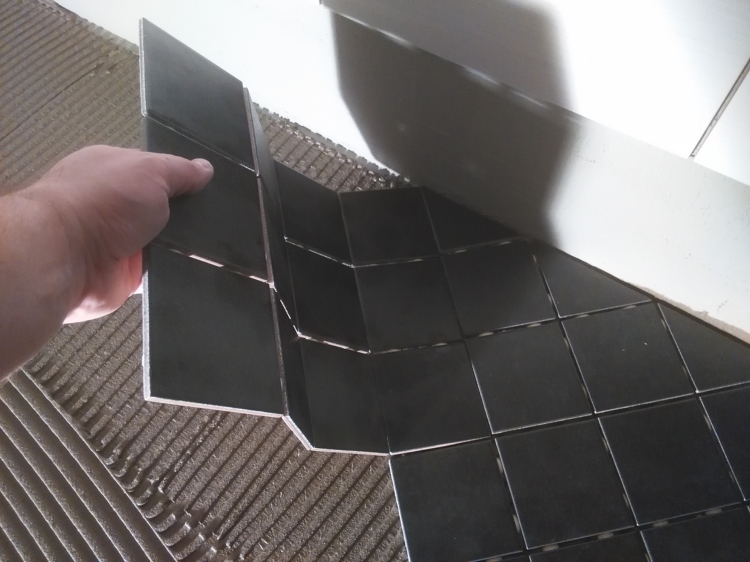 We lay entire sections docking diagonally to our blanks. The photo above shows how this is most conveniently done.
First we just throw on a few rows. We monitor the seams between the sections. Please note that the sections must take a running start. I have a run of one tile.
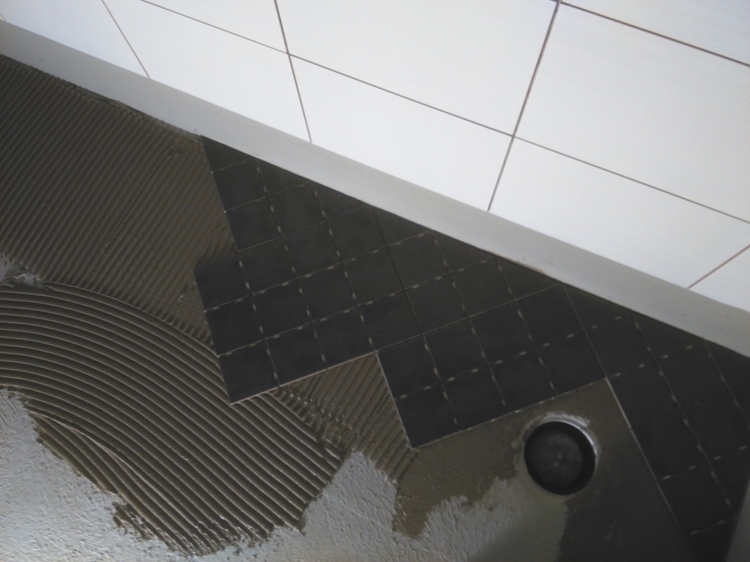
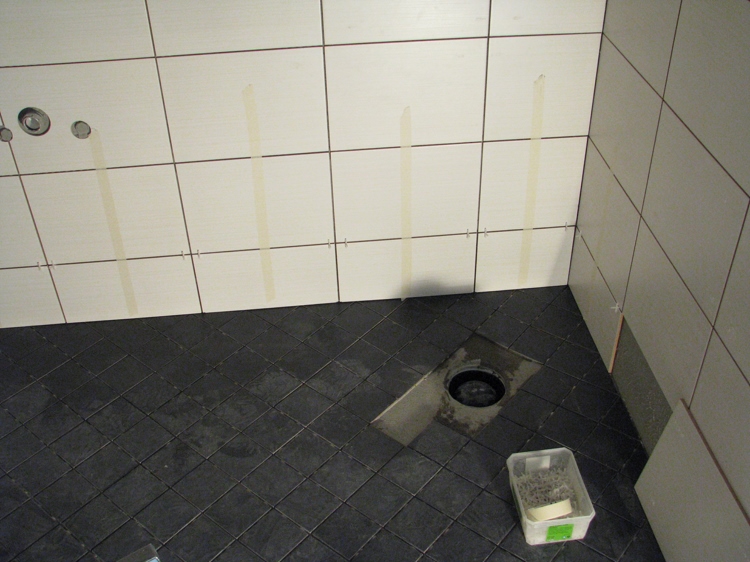
Around the ladder we leave several tiles unfinished. We remove excess glue around the drain.

After we have laid the walls to the end, we make a tricky move. We take the grout sponge on the base and lightly press the tile in a circular motion and set it down.

Some tips. Do not allow the glue to dry out. If you see that the solution has become covered with a dry crust, it is better to remove it, mix it in a bucket and apply again. It is not necessary to lay out all the outer pieces at once. Remove excess glue and reapply the next day.
Why do I do it in this particular order? first the walls from the second row and then the floor. This is done so that the floor tiles extend 5 mm inside the wall. This is important for correct application of silicone later. Schematically it looks like the picture below.
Laying the first row of tiles
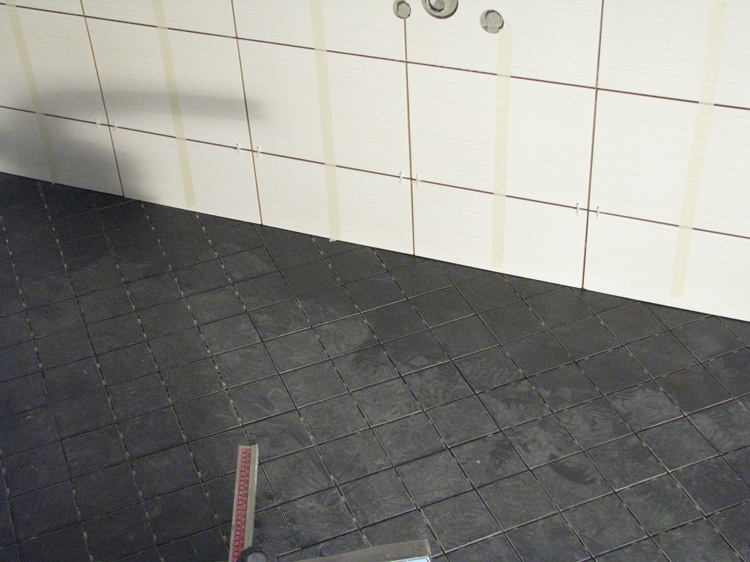
After the tiles have been laid on the floor and you can walk on them, usually the next morning we begin laying the first row of tiles on the walls.
We measure the height of the tile minus 6 mm. 3 mm gap under the cross and 3 mm gap between the floor. At this stage, it is more convenient to apply the solution not to the wall but directly to the tiles.
Apply the solution to the tiles.
Glue it to the wall.

 Using painting tape, we pull the tiles of the first row to the second, placing crosses to hold the seams.
In the next publication I will describe the steps for grouting joints and applying silicone in the corners.
Thanks everyone for your attention! As usual, I thank everyone who follows my publications, reposts on social networks, the buttons are at the top of the article and likes.
If you decide to arrange your shower without a tray, then in this case Special attention rooms need to be allocated.
Waterproofing is the protection of a structure or its elements from the penetration of water into other rooms. It ensures the safety and durability of the structure, saves from structural destruction, rotting of materials, mold, mildew and other microorganisms.
Self-waterproofing a shower requires a responsible approach to choosing the type of protection and materials for this work.
"Wet" zones
To begin with, determine those places in the room where moisture gets most often - the so-called wet zones. This includes:
- the floor on which all the water pours in the shower without a tray;
- seams between the floor and the wall;
- bottom of the wall;
- wall areas in the shower area are most susceptible to water ingress;
- risers and pipes collecting condensate flowing onto the floor;
- places where pipes are inserted into the base.
These areas are areas of high concern and must be isolated with special care.
The first most important step in waterproofing a shower cabin without a tray is the installation of a drain for water drainage. The drain design is installed on concrete base in a certain place, the drainage pipe is connected to the sewer and filled with a layer of concrete.
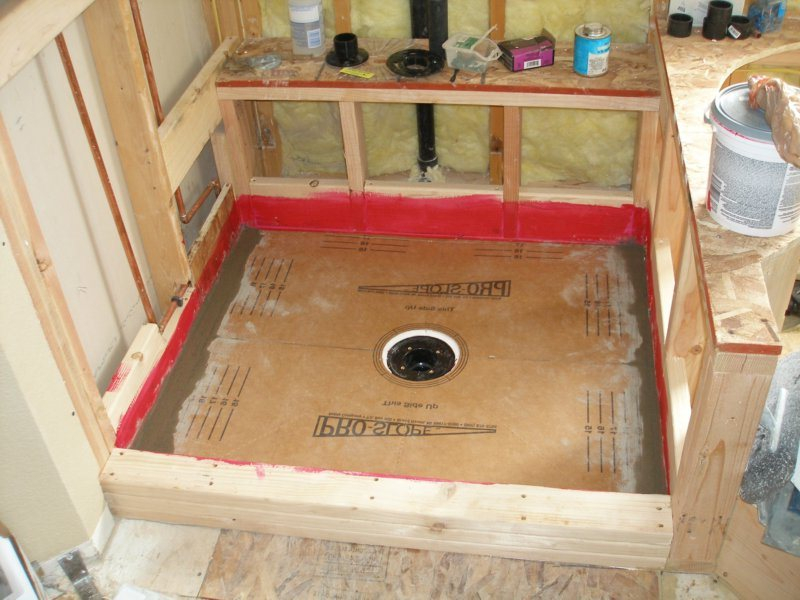
The surface of the drain body is located slightly below the level of the finished floor, which is necessary for proper drainage of water. To seal the seams between the drain and the floor, an elastic profile is used, and the sealing sheet is coated with waterproof glue.
If the drain is installed in the middle of the shower, then a uniform slope of no more than 3% is made to it on four sides of the room. When installing a ladder in the corner of a room, the slope is maintained at 2%.

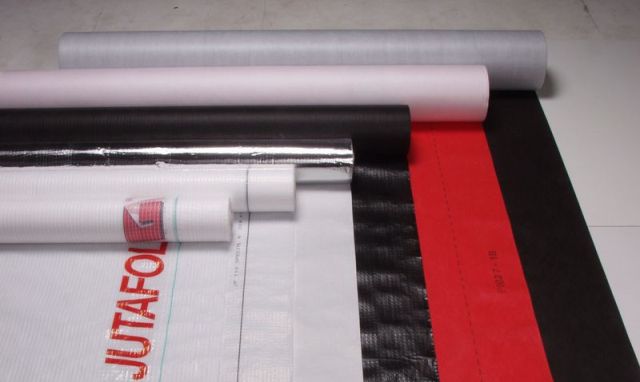
There are several ways to protect premises from leaks various materials. All of them are effective, but the choice is yours.
Pasted insulation
In a shower without a tray, it is performed using rolled welded or self-adhesive materials. This could be “Tekhnoelast”, “Stekloizol”, “TechnoNIKOL” and others.
Preparing the base
Foundation preparation plays an important role. If there are cracks, depressions or bumps in the floor, the surface is leveled using a cement screed.
After the solution has hardened, a special mastic containing bitumen is applied to it, on which strips of material are laid out.
It is important to roll out the rolls in advance, cut them to the desired length and let them rest for a tighter adhesion to the surface.
Laying the material
The strips are laid with an overlap of 10–15 cm and overlapping the walls by 15–20 cm. To ensure a smooth transition of the material, the abutments are rounded with cement mortar. If a weld-on insulator is used in a shower without a tray, then all joints between strips, connections in corners, near the threshold, and around pipes are thoroughly soldered with a gas burner.
When laying self-adhesive rolls, the edges of the strips are pressed tightly against each other, having previously coated the overlaps with special glue. The next layer is laid across the first and the whole process is repeated again.
Each layer is checked for the quality of gluing and the presence of bubbles, which are carefully cut and, generously spread with glue or mastic, pressed tightly to the base and soldered. Each owner determines the number of layers independently, but it is recommended to put at least two.
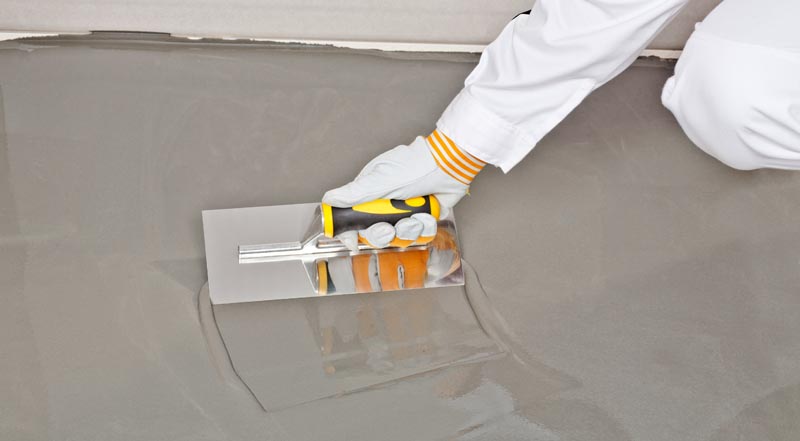
To protect and level the multilayer coating, place cement screed 3–5 cm, and there are already tiles on it.
Coating or painting insulation
As coating waterproofing In the shower room, bitumen-rubber or bitumen-polymer mastics (“liquid rubber”) are used, for example, “Elastopaz”, “Elastomix”, “Tekhnoprok” and others. These materials are easy to apply with your own hands, and the work does not require special preparation.
Preparatory stage
The installation of insulation begins with careful preparation of the base. If it requires leveling, then use a cement screed.
After the solution has set, the surface is cleaned and dusted, a primer is applied, it can be “Ceresit”, “Polastra” and others. After the soil has dried, work with mastic begins.
Application of the composition
“Liquid rubber” is applied with a brush, the layer is made from 2 to 4 mm, the junctions of the floor and walls, as well as the surface around the pipes and drains, are especially carefully coated. Not only the base is painted, but also the walls to a depth of 15–20 cm.

After complete polymerization of the composition, a continuous waterproof layer is formed, on which a cement screed is laid to protect it from external damage. After the solution has dried, you can begin finishing the premises.
Plaster insulation based on polymers
Effective and high-quality waterproofing of a shower can be carried out using polymer-cement compositions such as “Coverkol”, “Osmolastik”, “Osmoflex” and others. They all have high adhesion and good elasticity.
These mixtures, together with cement and quartz sand, contain polymer additives, which, penetrating deep into the base, crystallize, densely filling all cracks, pores, and recesses, thereby providing increased protection against leaks in a shower without a tray.
Work technology
The technology for constructing such insulation is similar to applying painting compounds. The components of the dry mixture are diluted with water according to the instructions, mixed thoroughly until smooth (you can use a construction mixer - a drill with special attachments).
After preparation and cleaning, the surface is moistened and the solution is applied to the base with a hard brush, paying special attention to the “wet” areas. If necessary, the exit points of the risers are reinforced with a polypropylene mesh.
After the first layer has dried, it is moistened again and the second is applied with a spatula, trying to level the surface. Usually this is enough to completely waterproof the shower, but if desired, a third layer can be applied.
No additional screed is required here; after the base has completely dried, you can begin laying the tiles.
In a shower room without a tray, it is done using dry mixtures that use: special cement, quartz sand and active chemical additives - Penetron and its derivatives.
Operating principle
The isolation principle is based on deep penetration components of the mixture into the structure of concrete, giving it hydrophobic properties. The insulating layer is formed not on the surface, but in the very thickness of the concrete. In other words, the concrete itself becomes the waterproofing material.
The reaction of penetration, compaction and filling of concrete pores continues continuously in the presence of water, but this type of insulation only works on concrete surfaces.
Applying the mixture
According to the technology of the device, this is the simplest way to protect against leaks, so it is easy to do it yourself. The mixture is diluted with water and mixed until smooth, then applied with a brush to the cleaned base, carefully treating the junctions and areas around the pipes.
Waterproofing walls
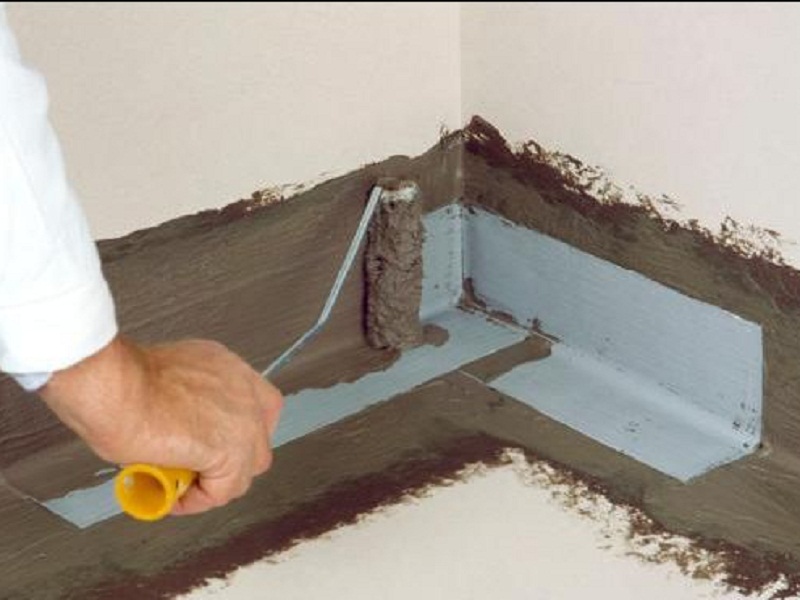
It is produced using base protection technology: the wall is cleaned of stains, old paint and other contaminants.
Cracks, potholes and other defects are sealed with an insulating compound, then the surface of the walls is coated with any polymer mastic. Usually one coat is enough, but in “wet” areas you can apply another coat if desired.
What else do you need to know about waterproofing?
When installing a shower without a tray, the level of the clean floor in the room should be 10 cm below the floors of the entire apartment. If this cannot be arranged, then a side of the same height is made around the perimeter of the room.
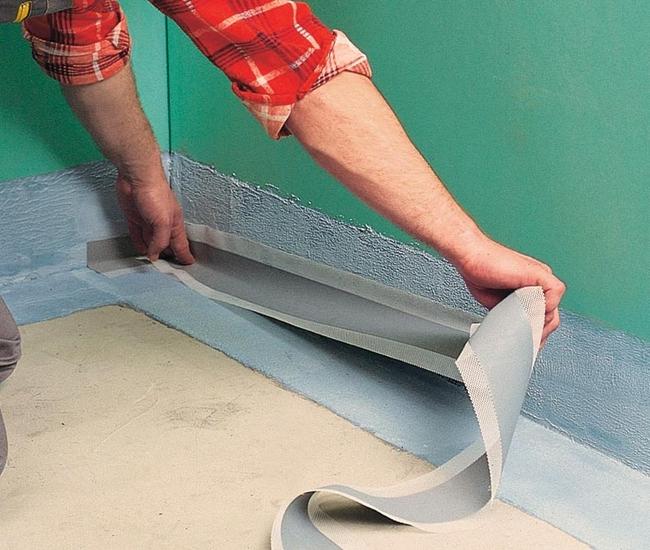
To insulate seams in corners and junctions, use a waterproof sealant or a special elastic waterproof tape, glued to both surfaces.
The shower room must have good ventilation, which will provide minimal humidity in the room. It is not necessary to use only one type of waterproofing; in some cases it is more cost-effective to combine two types.
The installation of a floor in the shower with a drain is an excellent invention of mankind, which contributes to the convenient adoption of water procedures. This article talks about how to install a shower on the floor in the correct and safe way.
For stylish design In the bathroom, you can drain the shower water into the floor. This type of drain installation, which has been around since before showers even existed, is once again quite popular. Thanks to modern technologies, materials and plumbing, the shower becomes more convenient and hygienic. The advantage of this design is the ability to install a shower cabin of any size and shape.
At the same time, the bathroom space becomes visually larger. Such a floor in the shower contributes to the appearance of an additional emergency drain, which can protect the apartment from flooding. Moreover, it greatly simplifies the process of cleaning the bathroom.
Shower floors with curbs typically do not offer these benefits. Sides are made when it is not possible to install a drain at the level of the bathroom floor. In these cases, it is necessary to raise the floor level to ensure water drainage, and erect sides.
General rules for constructing shower floors
When installing a shower floor, first of all, you need to prepare the base and seal it with mastic. Preparation of the base should begin with the removal floor tiles and ties to open access to the drain outlet. After this, clean the surface from dirt.
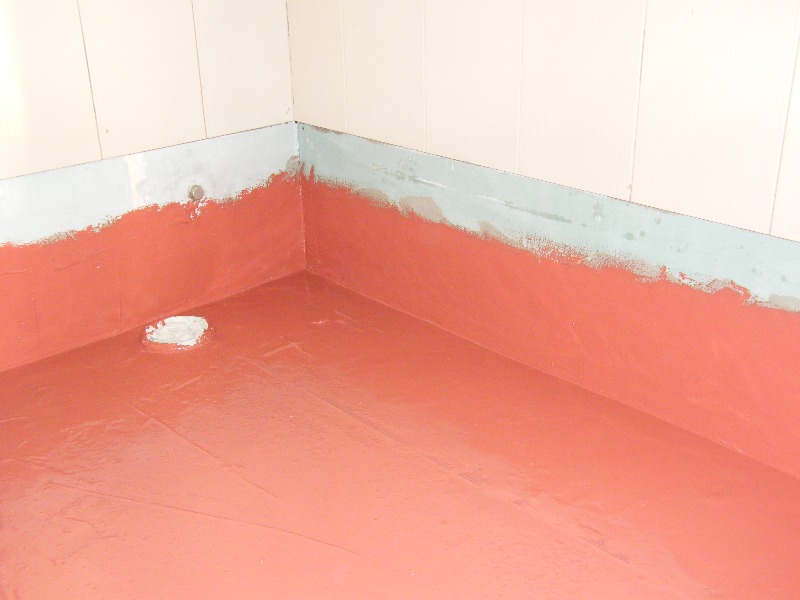
It is important that surface differences do not exceed 2 mm. Now you can apply a layer of mastic. It is applied not only to the floor, but also to the walls (20-25 cm from the floor).
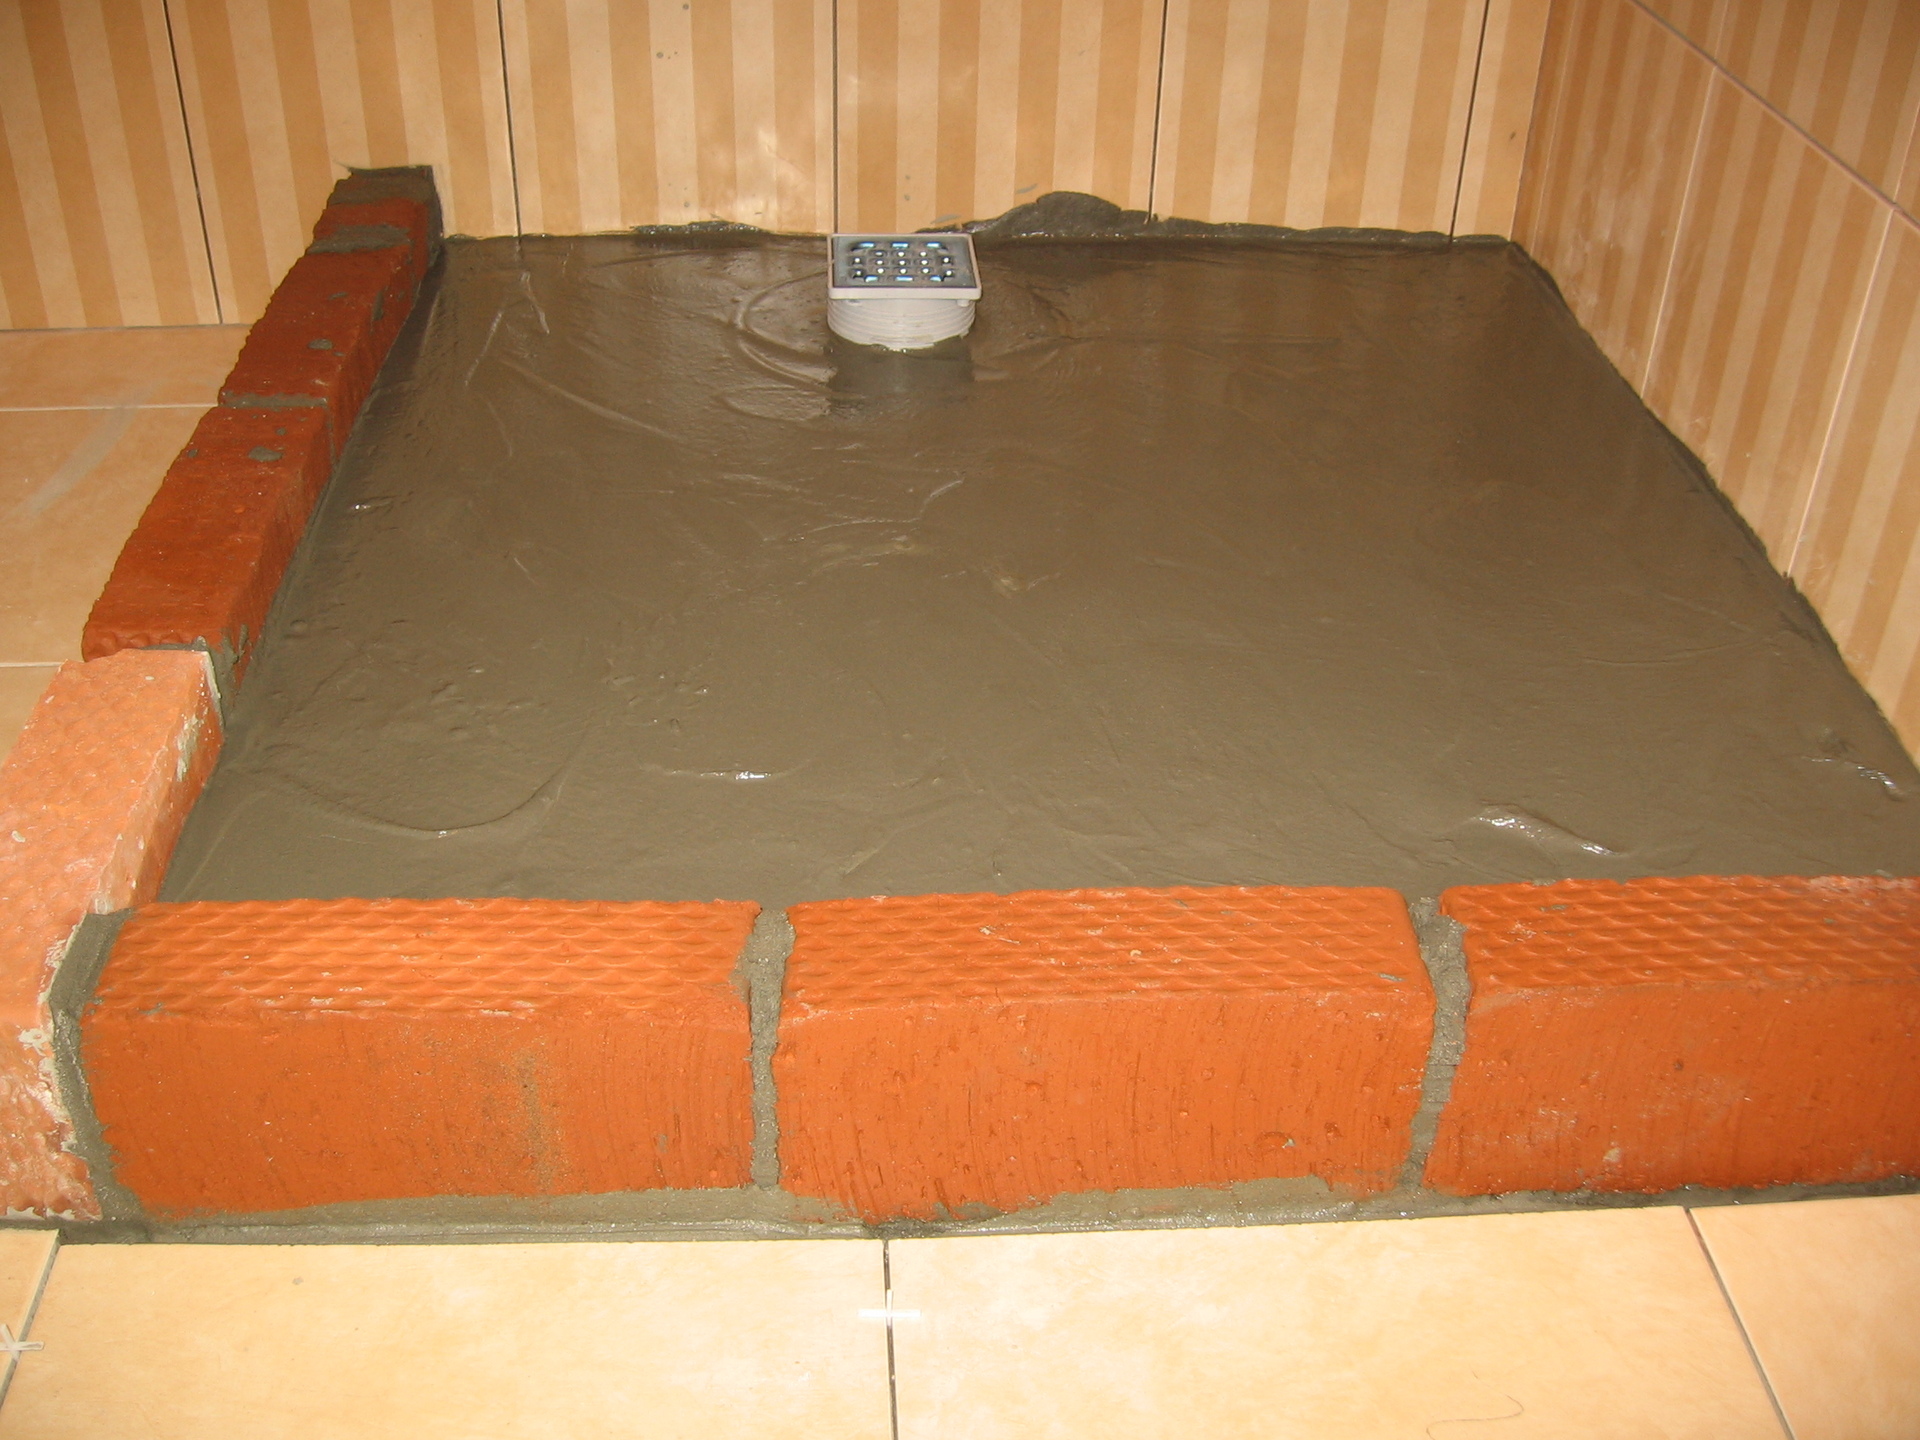
Then the drain and drain are installed. To prevent water from accumulating on the floor, forming a puddle, the water must be directed into the drains. Ladders are containers that receive water runoff and direct it into the sewer system.
After installing the drains, it is necessary to lay waterproofing using roll material. It is recommended to apply waterproofing protection to the shower floor in several layers, since water can penetrate into the floor, which will lead to increased humidity.
The next step is to screed and slope the shower floor. Mark the height of the screed on the walls, taking into account a slope of 3-4%. Then fill the space along the marks made with a cement-sand mixture, leveling the surface with a spatula. After the mixture has hardened it is necessary to apply last layer waterproofing.
Apply waterproofing mastic to the surface of the screeds and walls, and it is recommended to glue the joints of the walls and floors using self-adhesive waterproofing tape. Place a grate over the drain.
Sloping the shower floor to drain water
When everything is ready, you can start tiling. When installing a floor with a slope, first of all the walls are covered with tiles, and then the floor.
When thinking about installing shower floors, some people decide to install heated floors. Of course, it should be handled with the utmost care. The reason for this is the increased risk of electric shock in a room where the humidity level is very high. But, observing all the necessary technologies, installing a heated floor in the shower will not be difficult.
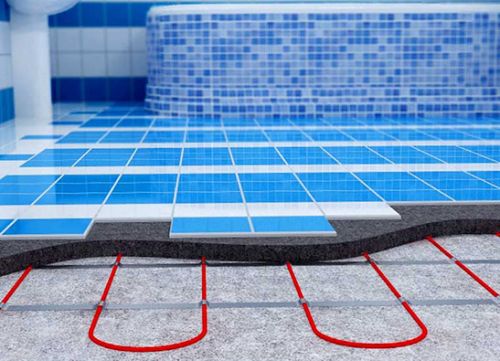
For heated floors, a separate electrical line is most often allocated. Do not forget about the protective shutdown device, thanks to which the system will automatically turn off in the event of various failures. This will protect all family members from electric shock.
In order to install an electric floor in the shower, it is necessary to purchase a double-insulated heating cable, since it is suitable for use in rooms with high humidity. Strictly monitor the serviceability of the insulation and the degree of protection of the thermostat and sensors.
The technology for installing heated floors is quite simple. A fiberglass mesh is laid on the heat-reflecting material, where the cable must be attached. Then a layer of tile adhesive and tile or other covering are applied on top. It is recommended to install a temperature sensor in the bathroom, thanks to which the system will automatically turn on and off.
Previously, a shower stall was most often a a simple box, as people were afraid that architectural excesses could lead to leaks and cause expensive repairs. But modern materials, especially paste-like compositions that form a waterproof membrane after hardening, allow you to forget about these fears. Now you can confidently make your own bench or other addition to make your shower more comfortable.
In this article we will show you how to create three useful elements: a bench, a shelf and a niche. This guide includes key framing and flashing steps, as well as specific techniques for installing tiles and mosaics. This project is not intended for beginners in the field of working with tiles. To take on complex projects like this, you must have some practical experience. But if you have at least basic renovation skills and have successfully installed tile floors, sink walls, or simple shower rooms, the best practices shown here will allow you to move on to such renovations.
Designing, framing and tiling a shower like this one will take approximately four days. Just covering it with tiles will take two days. If you choose standard tiles, then tiles and others Consumables will cost about 25,000 rubles. If you want to decorate your shower with trendy glass tiles like the ones in this guide, you'll have to budget for more. Glass mosaics can be very expensive, so you may want to consider using them only to highlight features. It makes sense to rent or buy a tile cutter if you use 100 x 100mm tiles like we do. But if you choose natural stone or tiles bigger size, and your design project requires frequent cutting of tiles or, moreover, making shaped cuts, rent a special tile saw for the day. You can even cut a glass mosaic, but it is worth considering that you will break approximately every tenth element - however, this will not have any effect of great importance, if you calculate the location well, you will only have to cut a few tiles.
Consider your location carefully
Before you begin, make sure you have enough space in your shower to accommodate a bench. It is necessary to leave at least 0.4 sq. m of shower area so you can move freely. Initially, our bathroom had a 150 cm long bathtub, which we replaced with a one hundred and twenty centimeter shower base. This freed up space for a bench and shelf at the end of the shower.
The secret to a truly high-quality tile installation is to develop a shower plan that takes into account the dimensions of the exact tiles you are going to glue. By using a tile sample to determine the exact size and position of benches, niches, and even wall thickness, you can cover the maximum area with solid pieces and minimize the need for cutting.
A reliable way is to make a full-scale template of each wall on tarred paper (Image A and Photo 1). When designing your walls, be sure to consider the thickness of the drywall and any plywood you'll need for a bench seat, for example. Then make marks on the existing projections that determine the position of the niche. Next, lay the tiles on the template to determine the height, width and depth of shower elements such as the bench, alcove and shelf.
Try to ensure that the entire tile covers all elements as completely as possible. Please note that our niche is surrounded by whole tile. The size of the sample determined the final location and dimensions of the niche (it is much easier to deal with the cut tiles covering the back wall of the niche than those that lie along its edges). Please note that a well-chosen height of the bench also allows you to get by with solid tiles - no cutting is required.
Calculate the thickness of the walls and ledges in order to lay out everything in solid elements. Build a 60 x 120 mm false wall using 1.3 cm thick plywood strips so that the glass mosaic covers the edges without any cutting. We thought about the frame and the thickness of the sheathing to achieve the same goal with the edge of the shelf. If possible, plan the tile layout for the entire space so that you have rows of tiles of the same width on both ends of each wall. Study image A to make sense of it all. Of course, you won't be able to avoid cutting completely. The goal is to make working with tiles as easy as possible. The more effort you put into your design layout, the easier it will be to install the tiles. In the end you will be rewarded high quality tile works.
Construction of a shower frame
If you have space left between the base of the shower and the wall, as shown in the photo, frame a solid wall between them, going from floor to ceiling (Photo 2). If there is nothing under the ceiling to attach the wall to, simply screw it to the drywall and then apply a little mounting adhesive around ceiling slab. Then start designing the niche frame. Use a template to calculate the height of the top and bottom, then insert the bars there. Do side walls, taking into account the size of the tiles that will be located inside and around the opening. If the niche is located at external wall, glue a sheet of foam plastic 25 mm thick with outside sheathing using special foam glue.
Make the frame of the bench with a seat slope of 6 mm so that puddles do not form on it. Cover the bench with a sheet of 18 mm thick plywood, screwing it with 2-2.5 cm long screws. At the end, insert a 10 x 30 cm piece of wood to secure the shelf and the missing pieces in the inner corners.
Shower walls typically use cement-bonded backing sheets, but we used plasterboard sheets. It's a little more expensive than cement bonded particle board, but much easier to work with. You mark it, fix it and cut it just like regular drywall.
Whatever material is used, secure it using screws 6–25 mm long to cement particle boards, placing them every 100 mm along the seams and every 150 mm in other places. If you have a factory shower base installed, leave the bottom edge of the backing sheet just above the edge of the backing sheet. The tile will overhang the edge, allowing water to drain into the base.
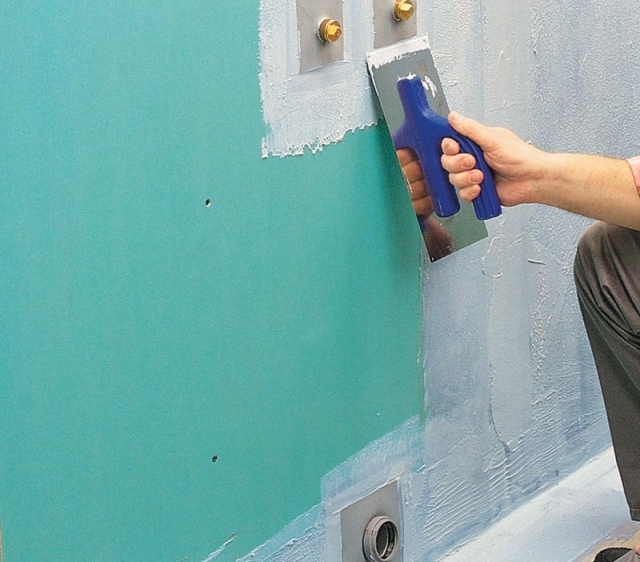
Then place fiberglass tape (designed for use with mortar) on all seams and corners. An adhesive composition is applied to one of its sides, but most brands do not stick very well and do not last long. If problems arise, use a stapler to secure the tape in place. Take about a liter cement mortar and bring to the consistency of “condensed milk”, then apply to all seams using a 15-centimeter spatula. Try to avoid creating large overhangs that will prevent the tile from laying flat.
Application of a waterproofing layer
Any area that will be exposed to large amounts of water should be covered with two coats of waterproofing underlayer applied by brush (available in a number of shopping centers and in all tile stores). Use disposable brushes and let the first coat dry thoroughly before applying the second. The composition we used dries from pink to red. After this, you can apply a second layer (photos 4 and 5). Pay maximum attention to areas that receive the lion's share of shower water, especially corners, horizontal surfaces of benches and recessed niches. For additional protection Also coat all screw heads in areas that will be flooded with the compound. Just as with the solution, try not to allow large build-ups to form.
Laying tiles in a niche
Photo 8: Moisten and lay tiles on the wall
Apply the solution to a horizontal line and in the area of one of the corners of the niche. Install these tiles and then continue laying pieces on the wall, leaving a clear row directly behind the shelf.
Photo 9: Mark the bottom tiles
First, place the tiles on the bottom shelf of the niche, sloping slightly toward the shower. Mark the bottom side tiles to get desired angle, and then finish styling on the sides and top.
Use the template as a guide to accurately place rows of tiles. First draw lines for the rows of tiles that will go around the niche. Then lay down the tile (without mortar) to accurately measure the distance from the bottom of the niche to the beginning of the first row. Draw the lines and attach 25 x 50 mm slats to the wall with screws (photo 7). They will provide reliable support for the rows of tiles below and keep them from sliding down the wall until the adhesive sets (you can remove the strip later and lay the bottom row, trimming the tiles to height if necessary).
Mix about a liter of solution at a time (follow package directions). Apply thin layer mortar onto the back wall of the niche using a 6mm notched trowel (Photo 5). Then press the mosaic sections into the mortar. Lightly tap the tiles using a trowel so that each tile lies flush with its neighbors (photo 11). Carefully inspect the surface for any grout that has come out between the tiles and wipe it off damp cloth; Once hardened, it will be difficult to scrape off.
Start laying the tiles on the wall according to the layout lines. After installing each tile, lightly tap it with your fist to help it adhere. Before gluing the tiles to the wall, dip them in water for better adhesion to the mortar (photo 8). Constantly check that the tiles are level. While the solution is still fresh, you can align the rows by simply pressing a level on several tiles at once (photo 12). Finish laying the tiles on the wall, trimming the top row if necessary. Leave the row empty in the place where the shelf will be located (photo 8).
Tile the bottom of the niche, then the sides and top. At the bottom of the niche, make a slight slope of the tile towards the shower to drain water, adding a little more mortar to back wall. Tape the bottom side tile at the level of the second row and trace the corner using another solid tile (Photo 9).
Tiling a bench
Photo 10: Start from the front
First, lay the tiles on the front of the bench. Cut the mosaic into strips if you need to make slight adjustments to the spacing to keep cutting of the material to a minimum.
Starting at one end, lay the tiles on the face of the bench. If there is still a void at the other end, cut the mosaic into strips and slightly widen the spaces between the rows (photo 10). A small difference in the width of the spaces will not be too noticeable. Lay the tile on the seat to determine the final width of the grout line between the tile pieces on the seat and on the face. Then lay the mosaic, starting from the front, and line up the tile gaps of the top and front. Make sure that the tiles on the edge of the seat are perfectly level with the facing tiles - there should be no dips or protrusions. Place tiles over the remaining area above the bench, stopping at the shelf area (photo 13).
Tile the front edge first, screwing the strip to the bottom of the shelf for support (Photo 14). After about an hour, remove the lath, then finish tiling the bottom, top, and wall behind the shelf. Finally, remove the 25 x 50mm slats and lay out the bottom row of tiles.
Tools needed for repair
Have everything ready before you start necessary tools- this will save you from wasting time.
- Hammer.
- Miter saw.
- Cordless drill.
- A circular saw.
- Caulk gun.
- Screwdriver with four bits.
- Bucket.
- Level.
- Square.
- Tile smoother.
- Stapler.
- Notched trowel.
- Rags.
- Protective glasses.
- Brush.
- Universal knife.
- Master OK.
- Putty knife.
You will also need tools such as a tile cutter, a tile saw, rubber gloves and several large sponges.
Materials needed for this project
Don’t wait until the last minute to make purchases; it’s better to prepare all the materials in advance. Here is their list:
- Tarred paper.
- Plywood 18 mm thick.
- Rigid insulation 25 mm thick.
- Adhesive foam for polystyrene foam.
- Backing sheets.
- Screws 25 mm long.
- Screws 75 mm long.
- Screws 25 mm long for cement bonded particle boards.
- Tile mortar.
- Fiberglass tape.
- Waterproofing membrane.
- Tile.
- Gypsum grout.
- Glass shelves.
- Silicone sealant.
- Seam sealant.
Get the latest news weekly


