Very often the question arises about arranging shelves in the presence of plasterboard walls or partitions. This material is quite susceptible to destruction, and therefore unnecessary impacts on it are undesirable, especially if we're talking about about big ones external loads. When securing heavy objects to drywall, many factors must be taken into account, since neglecting knowledge about this material can lead to its destruction. Even when drilling holes, the wall can be severely damaged, cracks may appear along its entire length, and even worse, it may not be able to withstand the load at all.
First of all, such a factor is the maximum ability of the panel to withstand the load. It is personal for each element; you can find out about this when purchasing or look at the packaging.
The second factor is, of course, the method of fastening. Considering the capabilities of the plasterboard sheet, the characteristics of the load it can withstand are described for the entire area of the structure. Accordingly, if the fastening is carried out with one screw, the structure is unlikely to withstand. Therefore, when fastening heavy objects, it is worth using several profiles.
What is this article about?
Attaching a light shelf
Let's begin to consider the impact of loads on plasterboard materials from fastening lightweight shelves that do not have a big impact on the structure of the drywall.
To attach such shelves, it is enough to use screws. How does the mounting itself take place? plasterboard wall. We will analyze it step by step, and then we will understand the principles of such fastening, its pros and cons. This fastening is also suitable for attaching hooks to drywall, for example, for towels in the bathroom, the main thing is not to hang heavy jackets on them.
Fastening
First of all, you should select the screws. In particular, it is advisable to carry out fastenings using dowels, thus the structure will be much better and more durable. The store will help you choose the right screws or dowels, telling you about all their properties, what load they can withstand, etc. Why will this method be much better and more durable? During installation into the wall, the dowel opens up, placing emphasis on the walls of the hole, which prevents it from being easily removed from the structure.
- We make holes in the structure for installing dowels;
- We install dowels into the wall;
- Using screws, we mount hooks or brackets for the future shelf;
- We hang the shelf on the prepared place.
The mounting method is quite simple.
Find a profile in the wall and install dowels in it. Thus, you can be confident in the quality of the structure and its durability.

Advantages and disadvantages
Now it would be worth noting the pros and cons of such fastening. Let's start unconventionally, with the bad:
- First, of course, this method will not withstand heavy loads (except for fastening to the structure profile);
- It is not advisable to use it when large areas shelves, even with low weight conditions.
And now a little about the good stuff:
- Its installation will require quite a bit of time;
- Thanks to the use of dowels, it is quite durable as long as the shelf is used properly.
Video on the topic
Arrangement of a heavy shelf
How to hang a shelf on a plasterboard wall with a large impact on the surface, namely with a large weight of the shelf. Accordingly, the method for a light shelf will not work here, since under the influence of a large mass the plasterboard will simply crumble and crack, which can lead to complete destruction of the wall structure, as well as to the fall of the shelf. And from this it follows that there is a special way to hang shelves on drywall, and let’s look at it.
To secure such shelves, a special design will be required; firstly, it will be necessary to mount the structure strictly in the profile of the plasterboard sheet, and secondly, the use of special fasteners.
Instructions
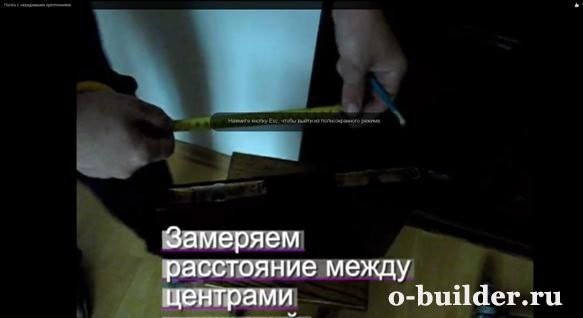
- We drill a hole, completely drilling through the sheet of drywall and the profile to which it is attached (use a magnet to find the location of the profile);
- We install dowels into the prepared holes;
- We secure the fastening system with screws. Please note that it is necessary to tighten the screws to a certain extent so that in the future the wall can withstand the load from the shelf, and also does not deform from the fastening itself.
Please note that the mount is mounted strictly on a horizontal profile.
Pros and cons of this method
Just like with the previous fastening, we will consider the pros and cons. First of all, let's talk about the advantages:
- The main advantage is the ability to withstand heavy loads;
- Fastenings are individually selected for structures different sizes, right up to fastening heavy shelves along the entire perimeter of the wall.
Not a single design is without its drawbacks; there are few of them here, but they still exist.
- Large expenditures of time and effort during the installation process;
- If used improperly or if the structure is abused, it can lead to complete destruction of the wall.
Fastening with anchor bolts - Reliable!
One of the most popular fastening methods is the anchor bolt method. This method is known to almost everyone who works with drywall, but it is used extremely rarely. This design is a fastening directly into the wall through plasterboard sheathing with anchor bolts.
This fastening method is used only if the distance between the wall and the plasterboard is small!
Step-by-step instruction
- A through hole is drilled in the drywall in the place where the drywall rests on the profile;
- Afterwards, a hole is drilled in the wall through the already prepared holes;
- The anchor is mounted into the wall, through plasterboard sheet and clamps down.
- We use an anchor to attach the shelf, or we attach a special fastening to it, for example, a bracket.
This mount is the highest quality and strongest.

Features and Disadvantages
Among the features of this method are:
- Durability;
- Ability to withstand heavy loads;
- It practically relieves the plasterboard sheet of stress.
But there are also some disadvantages, and not a single design can do without them:
- Installation can only be carried out when the structure is built on a metal frame;
- Labor-intensive during arrangement, due to the need to provide holes in the drywall, and then in the building panel;
- The cost is quite high, compared to previous methods;
- Under global loads, or an incorrectly selected anchor, it can destroy not only the plasterboard fence, but also the building panel.
How to choose the right mount
Naturally, many controversial issues arise here. But first you need to decide on the weight and size of the shelf, its design and method of operation. And only after that make a conclusion about which method is right for you.
- If you are going to arrange a small shelf, for example, a shelf for a light painting or photo frame, you can secure the shelf with dowels directly to the gypsum board;
- If the goal is a shelf whose depth is more than 10 cm, but at the same time it is intended for books at most, the method of fastening to profiles is suitable;
- If heavy or expensive fragile objects will be placed on the shelf, it is better to play it safe and attach it to the wall.
But if there is no uncertainty about how the shelf will be used, undoubtedly, the choice should be the most reliable anchor method.
One of the ways to decorate a room is to use shelves. But they are not only an object for decoration. Much more often they are functional. Shelves are hung on the wall, placed on the floor, some are hung from the ceiling or beams. But the best thing is that they are easy to make yourself, with your own hands.
Types of shelves in the house
Depending on the installation location, shelves can be wall-mounted, floor-mounted or hanging. If the floor shelf has a large height - from a meter and above, it is often called a rack. A few words about hanging ones: usually these are decorative structures that hang on a pipe or a specially driven bracket. This option is popular in rooms where heating pipes run under the ceiling: they just beg to have something hung on them. Shelves are hung on the pipe in the kitchen and bathroom: it’s convenient there.
They are made of wood, fiberboard, and have glass shelves. The same materials are used as stands, but they are also made from metal, plastic and other absolutely incredible things - for example, pipes or bottles.
IN living rooms It doesn’t really matter what material the shelf is made of. It is important that its design is in the same style as the interior. Even functionality is not always important: some play a purely decorative role. If they have anything on them, it’s only one or two items. Their role is to give the interior of the home a special style and flavor.
A laconic style of apartment design and the same laconic shelves in a contrasting color. In this interior they - main element The free space above the sofa is organically filled with shelves to match the walls
If we talk about shelves in technical rooms - the kitchen and bathroom, in particular, then in addition to aesthetic considerations, practicality requirements are almost universally added. Even decorative shelves The kitchen must be cleaned well. For bathroom shelves, the requirements are generally high: from time to time there are very high humidity and materials are required that can carry it without any harm. There aren't many of them. It's plastic and stainless steel. They also make bathroom shelves from MDF, but they can be used normally if they are in good condition.
Shelves on the wall
In any room there are places on the wall where you just need to hang something. After all, the majority modern furniture occupies only the lower part - sofas, tables, couches. The upper part remains empty and dissonance arises: the lower part of the room is overloaded and the upper part is half empty or completely empty. These voids on the walls are organically filled with shelves.

The whole system, and the most “dead” space is used - the corner
Structurally, most shelves consist of the actual shelves and lintels. But these components are combined into so many options that it is impossible to count. Simple design This is good: you can make any shelves with your own hands. Moreover, these products may be the first self-made things. It's really simple.
How and what to attach it to
It’s not for nothing that we start with fasteners. The design of a wall shelf largely depends on the type of mounting. Or maybe it’s the other way around. It depends on what to dance from...
Traditional hinges

There is a traditional way - on loops. It is suitable for wood and fiberboard, any other material that is thick enough to attach. Screwed onto the sides with self-tapping screws. Then the distance between the centers of the loop holes is measured and marked on the wall (make sure it is horizontal). At the marked points, holes are drilled for the dowel, the dowel is inserted and a dowel-nail with a small head is screwed into it, which fits into a loop or bracket (a pin slightly bent upward). Then a shelf is hung on them.
Not all materials can be drilled. For example, glass shelves. You definitely can't screw anything into them. Fastenings for glass shelves are special: they consist of two parts, between which glass is inserted. Often elastic pads are installed between the holders. The bottom mount usually has a small clamping screw to secure it in place.
Fasteners for glass shelves
The most popular mount for glass shelves is called “pelican” - for its unique shape. He looks good himself, there is different colors. The thickness of glass that it can hold is from 8 to 34 mm. You can insert not only glass into it, but also any other material of such thickness. It just looks stylish with glass.
It’s easy to make glass shelves on the wall with it: you buy a mount, order it from a glass workshop the right size and shape pieces of glass with processed edges (or cut them yourself if you know how). All that remains is the assembly itself:
- Attach the pelicans to the wall. Two dowels each. Collapsible body - decorative overlay comes off and there are two holes in the mounting plate. One is higher in the body, the second is lower. We secured it and put the decorative trim in place.
- Glass was installed.
- Tightened the screw. All.

There are other forms of similar fasteners. The photo below shows a few of them.

Decorative brackets
Another type of fastening is brackets. They are reliable, some are decorative, so much so that they themselves are decorations.

Concealed installation - shelves without support
And the most amazing device for hidden installation. It makes it possible to hide the fasteners. A seat for the pin and the holder body is cut out at the end, and the shelf is simply put on it.

As you can see, even simple board or a piece of glass on such mounts is already quite good. But there is still a sea of all sorts of ideas.
Bookshelves
There are strength requirements for bookshelves: they can hold significant weight. Therefore, the fastening, materials and design must be reliable. Traditionally, bookshelves are made of wood, laminated or veneered fiberboard. And then fiberboard with a long span (more than 90 cm) sag over the years.
When planning shelves for books on the walls according to your own dimensions, keep in mind that the distance between the supports should not be more than 90 cm. Then even when fully loaded it will not bend. There are two types and varieties of shelves: wall-mounted and floor-mounted. Both of them can be angular.
In the simplest case, it is a board secured in one of the following ways. Some options, especially when presented correctly, look very good.

And with imagination, several planks turn into very interesting thing, which can even be the main element of decor. Ideas for self-made collected in the photo gallery.
And this is a serious way to expand the space due to the angles between two windows. Nonlinearity - they are always interesting, and on such a shelf you can put books of different heights
Floor bookshelves can be loaded more seriously. Here the forms are different: there are racks to which shelves are attached. The highlight can be a broken or unusual line of shelves, as well as interesting racks.
It's more likely bookcase or even a closet, but the essence does not change - original color and interesting small shelves in the central part and the structure looks interesting  A very interesting idea - non-linear shelves and lintels made of thick glass
On the manufacture of fountains (both small indoor ones and more substantial ones for country houses, gardens or garden plot) read.
Hanging
Not very numerous, but an original type. The most important thing is that it can be done easily: a few planks, four ropes or two belts and you can get to work.
This is a complex system of blocks...and the shelves can be located at any level. Two planks, four ropes and half an hour of time are all that is needed to make this shelf How to make hanging shelf— graphic step-by-step instructions
To the nursery
While the child is very small, I want functional shelves, but with children's drawings. But where can you get these? Do it yourself. Any shelf of the configuration you like can be covered with non-woven wallpaper or thick wrapping paper (glued with PVA). After drying, coat with varnish twice. water based. Such shelves can be washed, but what’s most interesting is that the shelf can change with the child. You tear it off old decor, glue a new one. The idea is simple, it works perfectly.

For children, the shelves are not very different in design. If we talk about floor or shelving, then they must be strong, taking into account the fact that older children will definitely want to climb on them. Therefore, often even those shelves that stand on the floor are additionally attached to the wall: so that they do not collapse and crush young climbers. Based on these considerations, they are not made tall: even if they fall, it’s not scary.
The shelves in the children's room also differ in color - they are brighter, can be made in the form of letters, and boxes for toys can be installed in them: this makes it easier to keep them in order. In general, functionality and security must be combined.
 System with drawers - cleaning will be quick Combination of open and closed shelves - convenient for preschoolers
Shelves and shelves for the kitchen
Say what you like, but in the kitchen the main thing is functionality. There is not much free space even on the walls: cabinets take up large territory. Therefore, one of the tasks is to make the most of free space. There are interesting ideas for small or even very small gaps between the wall and the refrigerator or other household appliances. Strictly in size, you can make a pokka on wheels, which can be pulled out and completely hidden there. It is wide and narrow (see photo).

It’s easy to make such a retractable shelf-rack on wheels for different jars. Everything you need is at hand and out of the way
Is there some more interesting ideas about saving space. If the sink or station is located near the window, you can take the sides. There is an interesting hanging option- a grid on chains to which all utensils are attached. But such a shelf is possible if the desktop is not against the wall. Another option for saving space is if the kitchen-dining room is zoned with a counter, you can also make a shelf above it, which will be partially hanging. One part of it rests on the wall, the second on the counter or “hangs” on the ceiling.

Covering the entire wall above your desk with cabinets is not the best solution. They look heavy. The problem can be solved by glass doors, but not everyone likes it. The solution is to do it between the cabinets open shelves. They will add more lightness to the interior and work zone will not put so much pressure on the rest of the space.
Glass and open shelves will “lighten” the interior The style is different - the idea is the same Closed and open shelves in one system - convenient and non-standard
Decorative and original
Often, shelves on the wall play a purely decorative role. They are designed to attract attention and this goal is achieved by an unusual shape, contrasting with the walls and color. You can’t bet much on it: one or two things, but how interesting they are.
Another option for “square” shelves. Two identical sets arranged differently If traditional square shelves decorate the edges with curly frames, the style turns out to be completely different
Another one interesting topic- glass shelves. Just one glass is not very interesting. Its combination with wood and steel is more attractive. The effects are sometimes unexpected. Glass is assembled on guides: the material is fragile and heavy, and it needs to be held. Steel can do this.

In fact, these systems are intended for creating store interiors, but also in apartments modern style or look stylish.

Also suitable for vintage style
What are shelves made of? Even from pipes. Metal and plastic. Do you have any samples left from the renovation? Put it to work and get a designer item, interestingly, assembled from trash.
This is an interesting variation of a bookshelf made of pipes
Today anyone, even the most modern and fashion designer does not apply the opportunity to use practical and stylish shelves when decorating the interior. They will not only become an integral part of the future decor, but will also serve as an excellent book stand (mount for bookshelves), for photos and decorative items.
There are two types of shelf mounting available:
- standard method (using hinged brackets, corners, etc.);
- fastening shelves to the wall without visible fasteners.
We will look at the first method in more detail, since with the standard design it is difficult to achieve a combination of the future interior with the target design.

- Preparation for fastening
- Detailed mounting instructions with photos
Let's consider the process of preparing the fastening
- The first thing you need to do is assess how secure wall, where our shelf will be mounted directly. If it is a brick wall, then it should be at least 25 cm thick, and if you have a concrete wall, then from 10 cm, which will allow you to place not only decorative elements on the shelves.

1 – fastener;
2 – holes for installation;
3 – metal rod;
4 – hinged bracket;
5 – shelf.
2. After this, we move on to determining the thickness of the future shelf.
To do this, you must know exactly what will be placed on the shelf so that there is no deflection or deformation. You can check this by simply taking a board of approximate thickness and placing a weight on it.

- If the interior concept requires thicker boards, then in this case everything should be used according to the recommendations of your designer or the chosen style.
- You will need to take into account the mounting features, since the thickness of the shelf cannot be less than 3 cm. If books are placed, it is better to use a thickness of 4.5 to 6 cm.
- The future shelf will need to be thoroughly dried and soaked before processing.
How to install shelves to a wall without visible fasteners
Step 1. Measure the distance between the holes.

Step 3. After this, we apply our fastening element to the resulting axis and mark holes for it, which should be located on a horizontal line.

Step 5. After this, we clean all the holes from any remaining shavings and dust and drive wooden pegs or plugs under the dowels.

Step 6. After this, take dowels or screws and screw the fastening element to the plugs or pegs.

Step 7. After this, we proceed to installing the shelf itself on the fasteners. If the shelf does not fit very tightly, you can tap it with your palm or a rubber hammer to securely fix it. It should be noted that you need to knock alternately on the left and right, this way you will prevent the shelf from skewing and it will sit evenly on the fastening element.
You can attach various shelves to the wall yourself. At the first stage of work, it is necessary to select the most suitable fastenings for shelves of a certain type, which is the main problem. Next, the tool is prepared and the work is done. What methods are used for fixation and how to install the shelf yourself, read on.
Types of fastenings
To attach the shelf to the wall, you can use:
- exposed (visible) fasteners;
- hidden fasteners that are invisible to the average person.
Exposed Fasteners
Open fasteners include:
- brackets of various configurations and sizes. It is recommended to use such a shelf fixing element only if it fully matches the design of the room;

- metal corners. Devices are the simplest, most common and reliable elements. Can be installed in rooms with any finish;

- loops. They are also a common option. Easy to install and reliable;

- holders. Used advantageously as fastenings for glass shelves. Can be different shapes, colors and different sizes.

Hidden fasteners
Fixation with hidden fastening is carried out using:
- hidden. A special structure is installed inside the shelf, which rests on a bolt screwed into the wall. From the front side, neither the hinge's retaining hole nor the bolt are visible;

- metal rods that are attached to the wall and “recessed” inside the shelf.

Installation of fasteners
Installation of fastening the shelf to the wall with your own hands is carried out according to the following algorithm:
- choice of fastenings;
- preparation of instruments;
- fixing the shelf to the wall.
Selection of fasteners
When choosing fasteners, consider the following parameters:
- the material from which the wall is made. You can hang shelves on brick and concrete walls in any way. For plasterboard walls, it is recommended to select stronger fasteners;
If the wall is covered with plasterboard or other finishing material, then the shelf must be attached exclusively to wooden blocks, other devices holding the sheathing in place, or to the main wall.
- the material from which the shelf is made. Massive fasteners are not suitable for glass shelves, as they make the structure too heavy. For metal shelves, external fasteners are best, and for wooden shelves– internal fasteners;
- thickness and others dimensions. For massive shelves, it is recommended to select similar types of fastenings: large brackets, hidden metal rods, and so on. For light, thin shelves intended for storing souvenirs, cosmetics, and so on, it is advisable to use small corners.
Additionally, it is worth considering the number of fasteners. If brackets, corners or hinges are used, their number cannot be less than 2 pieces, located on each side of the shelf. If the shelf length is more than 1 - 1.5 m, it is recommended to increase the number of fasteners.
Preparing tools
To complete the installation work, you will need to prepare the following list of tools:
- ruler, tape measure and marker for marking;
- building level for leveling in a horizontal position;
- drill. If installation is being carried out on a brick or concrete wall, then it is recommended to use a hammer drill instead of a drill;
- screwdriver or screwdriver, hammer;
- dowels, screws and other fasteners.
Shelf fastening
The instructions for attaching the shelf are as follows:
- At the first stage, it is necessary to determine the place where the shelf will be hung and mark the location of the fastening elements. When applying markings, it is important to take into account the horizontal level of the piece of furniture, since otherwise it will be impossible to put anything on the shelf;

- hole preparation. Before attaching the elements fixing the shelf, it is recommended to pre-drill the holes, even when attaching to a wooden wall;
Preparing the holes will allow you to eliminate even the slightest deviation from the given level and hang the shelf as straight as possible.

- installation of dowels. If the shelf is hung on a brick or concrete wall, then before fixing with self-tapping screws, it is necessary to install plastic dowels, which allow for a stronger adhesion of the fastening element to the wall. Dowels can simply be hammered into the holes;

- fixing the selected mount to the wall using self-tapping screws of a suitable length;

- fastening the shelf to the bracket. If fixation is carried out using hidden metal rods, then before fastening it is necessary to drill holes in the shelf of appropriate size and length;

- checking the correctness of the work. At this stage, it is necessary to check the reliability of the shelf fastening, applying the maximum permissible force to the piece of furniture (for example, you can lean your elbows or hang slightly on the shelf) and the horizontal installation using a building level.

How to install a shelf with hidden fastenings, watch the video.
To secure the shelf, you can use other completely different objects, for example, thick leather belts. Unusual species fastenings will add individuality to the interior of the room.
A shelf in the interior of a room performs 2 functions - aesthetic and practical. This - comfortable stands for books, various useful items and souvenirs, plus a means to create a unique, original interior in the room. The topic of today's article: fastenings for shelves on the wall - their main types. At the same time, we will try to figure out when traditional types of fastenings are appropriate, and when you can resort to something unusual. When purchasing this piece of furniture, the kit often includes fittings and materials for fixing. If you built the shelf yourself, you will have to think about the issue of fastening.
The simplest mount
Immediately before your eyes there is a comic picture by the Danish artist H. Bidstrup, where a home craftsman is trying to nail something to the wall with a nail. But it's not that simple. Questions arise: where exactly to pin this item, what fastening to choose, will it withstand the weight of the structure and the things placed on it?
The easiest installation option is using corners. So, given: an ordinary wooden horizontal shelf without any decoration.
For installation you will need:
- 2-3 metal corners, depending on the length of the product.
- Construction level (laser).
- Construction tape, pencil - for marking.
- Dowels and screws. The latter, if the product is wooden, can be replaced with ordinary nails.
- Drill with a set of drills.

The procedure is as follows:
- Select a location for installation. It would be desirable for this to be free place, and not surrounded by photographs and paintings. First attach the shelf to the wall and see how harmoniously it fits into the interior. If you are satisfied with everything, you can proceed directly to installation of the product.
- Examine the bottom board and select places for fastenings. Drill small holes for the screws and secure the metal fasteners.
- Make markings on the wall. Place the shelf against the wall, and have an assistant make marks with a pencil, preferably under each of the holes.
- Drill holes in the wall according to the marks. If the wall is concrete, then you need to use dowels.
- Place the shelf so that the holes in the wall and on the fasteners match. Carefully tighten the screws.
Now all that remains is to admire the result and arrange books or decorative items.
Hidden fasteners
The use of practical brackets and metal corners It is appropriate when the fastenings fit into the interior of the room. If these details do not fit in with the interior, you have to resort to tricks using different types secret fastenings.
There are 3 types of hidden fastenings of shelves to the wall:
- Wooden bars.
- Hidden loops.
- Metal rods.
What to give preference to?
- Option with hidden hinges- the most popular. First, the loops are attached to back side products. Now all that remains is to hang the structure on the pre-screwed screws.
Important! The only difficulty here is to take all the measurements correctly. Extra holes will certainly spoil the whole plan.
- A reliable and durable method of hanging is to use metal pins embedded in concrete or brick. These can be metal pins of the required length or pieces of reinforcement.
Important! The more massive the product, the more metal pins will be needed.
- The third way to hang a shelf on the wall without visible fastenings is to use it as a base. wooden block with a cross-section in the form of a square or rectangle. The surfaces are connected using dowels - wooden pins coated with glue.
Non-standard shelf mounts
The described types of installation are used for the simplest structures, be it a “glazed box” or a horizontal board. However, designers create unusual designs with complex shape: in the form of animals, plants, geometric shapes or tel. Here you can use the same traditional ways fastening shelves to the wall or non-standard solutions:
- Using a familiar object - a board 1.7-2.0 cm thick, you can make an unusual design: attach shelves in the form of spirals, plant motifs, geometric shapes to it. The shape of stands for accessories can be very different.
- Family tree. Vertical board depicts a trunk, and shelves-branches are attached to it on both sides. You can place photographic portraits of several generations on them.
- Board with straps. A well-polished wooden board with strap fastenings is used as a shelf. It doesn't have to be genuine leather. Faux leather or tape made of wide, durable textiles look good.
Important! Of course, such a shelf is not for heavy books. But how decorative item It looks decent in an interior with small souvenirs. The belts are secured to screws with plastic dowels.
- Glass. This is a real find for small spaces. The transparent design creates the impression of a spacious, uncluttered space. Shelves made of durable glass are secured using special metal brackets with soft gaskets from the inside.
- “From what was” is the solution for the originals. Shelves can be made from leftover building materials (for example, pieces of plastic pipes large diameter). You don’t need to attach such a shelf at all: tie it together with a bundle of pipes and install it in the hallway as a shoe stand.