Actually, my wife and I did not intend to acquire a well in 2009. First they wanted to build a house and only then deal with water. So everything turned out to be a matter of chance. During a January visit to the dacha, we heard a characteristic noise. It turned out that drilling work was underway on the neighbors' property. This was a surprise for us - we did not even imagine that this could be done in the cold. However, it turned out that winter - best time for drilling a well. There are several reasons for this.
Firstly, the drillers are not overloaded and therefore provide winter discounts, and secondly, the ground freezes at this time, which means the damage to the beds from the operation of the equipment is minimal.
After some collection of information, we decided to use the services of the same company that worked for our neighbors. These specialists, although they were from Moscow, drilled a lot in our area and had a good knowledge of the characteristics of local soils.
Typically, drillers drill a shallow well (about 20 m) in one day. In our case, due to frost and some peculiarities of the soil, the work lasted for two days. Only by Sunday evening the craftsmen left, leaving us with a rusty “stump” and the head of the structure for further development of the well.
Spring chores. The first task as the ground thawed was to remove the clay taken from the well. The fact is that the drillers did not warn us about the advisability of laying it on the ground sheet material before starting work. We were not able to remove the soil during the campaign, since it was thrown between the rear wheels of the car. So we removed the remaining clay already in May.
We also failed to properly pump the well in the cold: we solved this problem in the spring. From the explanations of the drillers, I already knew that the well can only be operated with a centrifugal pump, but at the time of commissioning it is acceptable (and even desirable) to use a vibration pump for a short time.
The fact is that vibration pump is not so afraid of sand-contaminated water and is able to effectively prepare a well for the operation of a more “gentle” centrifugal pump. After several hours of pumping, the thick milk at the outlet turned into a slightly cloudy liquid. It was possible to move on.
The main methods of constructing a well.
Most companies, as a rule, offer to install a caisson. Another option is borehole adapter. In both cases, a pumping station is equipped in which either a submersible or surface pump is used (depending on the supply depth).
The proposed kit is not cheap. And if you don’t live in the country all the time, this whole household can become a burden. Since the building freezes in winter, water must be drained from the pipes (to prevent them from bursting). But for some reason, cold weather always comes suddenly here, and then we have to empty the system of water in an emergency.
While thinking through these issues, I, of course, became acquainted with the experience of neighbors who successfully solved the problems of water supply in their areas. Since the companies whose services my friends used were different, the initial conditions did not coincide. In two cases, a plastic pipe with a diameter of 4 inches was used as a casing. It is impossible to install the adapter in this version. The other two have a diameter plastic pipe- 3 inches, but it ends at the top with a steel pipe with a cross-section of 100 mm. With this arrangement, you can use an adapter. One of our neighbors installed it. Such a well looks impeccable, or rather, it doesn’t look at all - the low “fungus” is lost in the grass.
Planning to disassemble in the future an old house and build a new one, I decided to make the arrangement of the well as simple as possible and independent of the buildings. Of course, some components had to be obtained. The first item was already in stock - the head of the structure was sold to me by drillers in the winter. First of all, it was necessary to purchase a centrifugal submersible pump. I didn’t want to shell out a lot, so I didn’t choose the currently popular ones. GRUNDFOS pumps, but decided to take a closer look at devices from SUBLINE, which are much cheaper. From the line of 4-inch pumps from this company, I purchased the youngest (F3/11). In terms of power (370 W), performance and height of the water column, it was quite suitable for us.
When purchasing the pump, I made a mistake - I did not take into account the information that the pump had a short electrical cable. This turned out to be an unpleasant surprise. I had to buy an additional cable and splice it. I didn't know how to do it right. Therefore, I had to look for information, including on the Internet, but ultimately I took the advice of a neighbor who had successfully solved similar problems at one time.
To ensure the tightness of the connections, I used heat-shrinkable tubes - first for each twist (double, with overlap), and then for the entire cable (with filling epoxy resin inside). I used a powerful lighter to heat it up. The neighbor was heating it with an industrial hairdryer - his epoxy blocked the junction of the wires. The resin did not flow on one side of me. Therefore, I decided to add aquarium sealant there for insurance, and in addition, I made a bead of sealant on the outside, wrapped it with electrical tape, pressed it with my fingers, and when it set a little, I removed the electrical tape.
Another purchase is a cable. After examining its different types, I settled on a 04 mm cable in a plastic sheath. To attach the cable I purchased fasteners. I bought both the cable and the cable with a reserve length, so as not to end up in a stupid position during installation if I calculated something incorrectly.
For supply, it was necessary to choose a hose. Shortly before, at one of the construction exhibitions, I learned about domestic PVC-reinforced hoses that are certified for drinking water - I also purchased such a hose and clamps for attaching it.
Since the diameter of the pump outlet pipe is 11/4″ and the diameter of the hose is 3/4″, I had to go around the markets with a piece of hose in my pocket and pick up adapters with which I successfully connected the pump to the supply line. I bought plastic ties to connect the cable, cable and hose.
Upon detailed inspection of all the parts that needed to be connected, it was discovered that plastic hose does not fit on the steel pipe of the head that the drillers left for me. So here, too, we had to come up with a transition - cut a thread on the pipe with a pipe die. I screwed adapters with fittings for the hose onto it.
For some time I did not know where it would be better to place the starting-protective device (ROD), through which the pump was supposed to be turned on. There was an idea to place the ROM opposite the well on external wall at home in a closet. However, I decided to ask what the neighbors thought about this. It turned out that they use “houses” above the well (not counting the option with a well adapter). At the same time, one neighbor placed the ROM in the neighboring building along with the hydraulic accumulator and the rest of the fittings. Another neighbor installed the device directly in the “house” along with wiring for several taps. True, it turned out a little cramped for him.
Taking into account the experience of my predecessors, I sat down to design my own “house” for the well. According to my considerations, in addition to the ROM, an extension cord for connecting to the electrical network and a water splitter with taps should have been placed inside the protective structure. To make it easier to dismantle the roof, the roof of the “house” had to be made removable.
In order not to be mistaken in the size of the structure, I drew the “stump” of the well to scale, added a splitter to it, took into account the top cover that opens upward, and determined the location for the ROM. I did this, of course, taking into account the necessary space for manipulation.
The result was a structure with plan dimensions of 50x60 cm and a height of 60 cm in the lowest part and 75 cm in the highest. The structure was assembled from scraps of clapboard and bars. For the door I used a sheet of steel 1 mm thick, left to me by the drillers. The entire box was covered with old roofing iron.
I attached the “house” to steel corners driven into the ground. I did it like this. The finished structure without a roof was installed on Right place, placing concrete tiles underneath. After that, I applied steel angles to the inner corner bars, and then, using a piece of pipe as an extension, I used a sledgehammer to drive these anchors into the ground. I attached the corners buried in the ground (through holes pre-drilled in them) with screws to the bars of the “house” frame.
The roof was made from a piece of flat slate 10 mm thick, attaching it to the frame of the “house” with long galvanized M8 bolts with washers and gaskets for tightness. At the top edge of the roof from below, I cut a drip groove with a grinder. The top of the roof was covered with PF-115 paint in three layers (I have long wanted to see how this paint would adhere to slate).
System assembly.
On a dry day I spread it on concrete path bedding and placed the pump at one end, and the head and ROM at the other. I measured the required length of the hose and secured the ends with clamps to the adapter fittings at the pump and at the head. Then I attached a cable to the pump, unwound the cable and secured them with clamps every 50 cm.
At the upper end, the hose along the length measured according to the recommended immersion depth was attached with a clamp to the head pipe. The cable was mounted with a loop for fastening to the hook of the head. Then I put the loop on this hook, secured it with wire so it wouldn’t come off, and brought the cable out to the ROM through a special groove. I did not cut the cable and cable exactly in place, but rolled up the excess into little coils just in case.
It is very difficult to drag a long “snake” with a small number of hands. It was necessary to gather relatives and neighbors to bring everything to the well without clinging to the ground, and carefully lower it into the casing. I regret that I didn’t do exactly that - I didn’t want to bother anyone. My wife and I, no matter how hard we tried, still got the hose dirty. Therefore, when pumping the well, I first directed the pumped water back into the well to flush the hose and cable.
Finally, I put the head on the pipe and attached it with a “secret” bolt. I hung the cable and cable reserves inside the house on hooks. I attached the ROM with self-tapping screws to the wall of the “house” so that I had easy access to the start button.
It took almost the entire summer to pump the well to the state of “clean water always.” I never installed a water distributor with taps in all directions, and then I even began to doubt the need for this unit. For now, we simply fill all containers using a hose: washbasins, buckets, barrels. Or we connect a hose to sprayers for watering trees or lawns. Stationary system I will install pipes only when I have thoroughly thought through the structure of the system. It can only be born through evolution based on ease of use.
In the fall, my wife and I removed a pump with hoses from the well for winter storage. It turned out that when manipulating this “economy,” you can get by with relatively little effort if you lay down a large piece of film and fold the hose into rings. Upon inspection, it turned out that the pump adapter nut (despite what was stated by the seller protective covering) is covered with rust. I already began to suspect something like this, since during long breaks between pumping out water I observed brown, rusty water coming out. So you will have to search the markets for a new nut.
Some thoughts on the further arrangement of water supply.
A country house, as a rule, is a place of seasonal residence. Most often we go there during the warm season. Sometimes we visit country farms in winter (for the holidays or just to take a steam bath). In this mode of operation, the entire water supply system must be completely drained before departure. This is very troublesome, so most summer residents do not use the system in winter.
But still, in my opinion, it is possible to use the system in the cold season. To do this, you need to make sure that the water in the pipes does not freeze.
Continuously maintaining a positive temperature in the house and in the supply pipes is too expensive. To do this, the pipe must be buried deep in the ground and introduced into the house through a warm basement.
Another option is not to fill the pipe system in the house, but to equip something like a street water pump. The main thing here is to make sure that the water does not remain above the freezing level. If the pump does not have a check valve, then the water will flow through the pipe itself and will not freeze. If the check valve is noticeably leaking, then the water will also not have time to freeze while it drops to the freezing depth. If the valve is good, then the water flow must be organized. Popular wisdom states that a 03-5 mm hole in the hose, located below the freezing depth, allows water to drain out and does not have time to freeze. However, such a hole reduces system performance.
A friend of mine has been operating a well for more than 10 years, in which water is drained through a calibrated hole made (to maintain geometry) in the metal part of the pump. According to his calculations (which have been confirmed by practice), at a water temperature of about 5°C and an outside air temperature of 20°C, water manages to escape through a 00.8 mm hole, sometimes freezing a little on the walls. Moreover, the next time water is supplied, this ice melts. For severe frosts, the metal outlet pipe should be insulated.
After building a new house, I would like to come to the dacha for a few days in winter. Of course, in this case, a full water supply would not be at all superfluous. After reading the relevant literature and familiarizing myself with the experience of my neighbors, I decided to abandon such a relatively complex unit as pumping station with pipes running at different heights. In my opinion, pressure (sufficient for showering and washing) can also be obtained by installing water tanks in the attic.
Such a storage device is also good because in the absence of electricity the system will work. Of course, the tank must be insulated, and in case of cold weather, it must be equipped with an electric heating element. Water will have to be supplied there through a pipe that rises smoothly in a straight line. Then, in the absence of pressure, the water will flow back freely without stopping. It is advisable to think through the layout of pipes in the premises so that water is drained from the system by opening one or two taps (that is, naturally without any purging).
Based on materials from Dom magazine
Nothing complicates the life of a summer resident more than the lack of a large amount of water. In the warm season, during the dacha rush, its shortage is especially felt: it is necessary for the shower and swimming pool, for watering the garden and garden, just to cook dinner or do laundry. A familiar well, or even better, a deep well in the yard of a house can save the situation. But, unfortunately, hiring a crew and renting equipment will cost a pretty penny. However, it turns out that a self-made well in a dacha is a very real thing. We suggest you figure out how to do everything correctly on your own.
Wells come in different types depending on design features, installation depths and characteristics of the extracted water, but for drilling on suburban area Only two types are suitable:
- sandy (or “on sand”);
- artesian (or “limestone”).
This material about making a needle well with your own hands may also be useful:
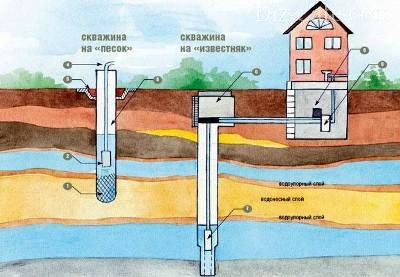
Both types of wells are suitable for a dacha, artesian and sand, but only the sand option can be made independently, without the use of equipment
The name of the species speaks for itself: the indicated rocks are present in the aquifer - either sand or limestone. In addition, both types differ in depth. Drilling of sand wells is carried out to a depth of up to 50 m, and artesian wells - up to 200 m. It becomes clear that wells “for limestone” cannot be drilled independently, therefore for dachas best option– sandy look.

Wells “for sand” and “limestone” differ not only in the depth of drilling of the shaft, but also in its diameter, as well as the size of the casing pipes
First you need to determine the parameters of groundwater occurrence. Before contacting specialists, you can ask your neighbors how deep their wells are. If the parameters do not exceed 25 meters, there is a chance.

The location of the well is chosen not far from the house, and sometimes the shaft is laid directly in a utility room or an extension connected to the cottage
Mechanisms for self-construction of wells
Usually, special drilling equipment is used to construct a well, so a completely logical question arises: how to drill a well in a country house without using it? It turns out that there is a simple manual mechanism consisting of a drilling rig and a column suspended from it. Let's take a closer look at the individual pieces of equipment.
The base is a tower resembling a tripod. The materials for the supports are either metal pipes, or logs connected at the top by a kingpin. The drill column lifting block is also located there. The two legs of the tower are connected by a winch (gate).
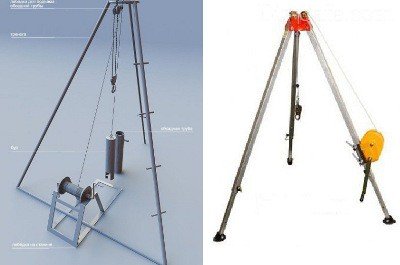
The design of drilling equipment may vary. In some cases, if the impermeable layer lies close to the surface of the earth, a hand drill is sufficient
The drilling column is the main functional element. It consists of several three-meter rods connected by couplings. Sometimes a length of one and a half meters is enough. It is the column that is immersed in the ground, and its length is adjusted using rods. Replacement of special equipment are water pipes equipped with steel couplings.

Drilling heads must be selected depending on the nature of the soil. Here are the most commonly used: 1 - “spoon”, 2 - “coil”, 3 - “chisel”, 4 - “bailer”
The impact or soil-cutting element is the drill head. It is screwed onto the column using a threaded adapter. As the head is lowered into the soil, soil fills the drill cavities. For different types of rocks, different attachments are used: a “spoon” is suitable for soft soil, a “coil” for dense soil, and a “chisel” for hard rocks. Use a bailer to lift the loosened soil up.
To prevent the walls of the well from crumbling, casing pipes are used - as a rule, these are ordinary plastic plumbing products, lightweight and easy to install. The bottom of the pipe is a kind of shoe, with a smooth or jagged edge at the bottom.
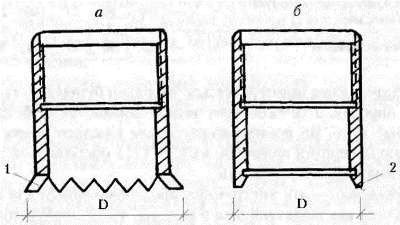
There are two main types of casing shoes: a – toothed (mill), b – smooth. Cutting area: 1 – teeth, 2 – smooth edge
Thus, the construction of a well takes place using special equipment, some of which can be purchased at the store, some of which you can make yourself.
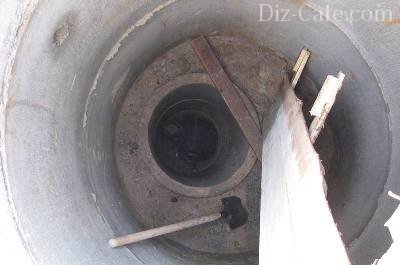
Preparatory stage - construction of a pit
The top layer of soil is prone to crumbling, so the well is protected special construction- a pit, in other words, a hole one and a half by one and a half meters, the depth of which is no more than 2 meters. Boards are used to strengthen the walls, and they also line the floor. The strength of the floor depends on the thickness of the boards, so products no thinner than 5 cm are used. The pit is covered with a second flooring on top.
The holes for sand wells are small in size and are located at shallow depths, while the holes for artesian wells go several meters into the ground
Then prepare the holes in the following order:
- erecting a drilling rig;
- remove the top flooring;
- find the center point on the lower flooring;
- make a hole whose diameter coincides with the shoe and couplings;
- cut out a second hole - in the upper flooring.
The vertical precision created by the two guide holes guarantees high-quality drilling.
Drilling process: sequence of actions
If you prepare the necessary equipment and follow the sequence of steps, there will be no questions about how to properly make a well. The finished drilling rig is equipped with a head and a mechanism in the form of a winch. The bar is passed down through both holes, if necessary, it is extended and the collar is secured. Usually two people rotate the gate, and a third person is needed to correct the position of the bar.

If the well is shallow, then only a drill column is used, directing it down strictly vertically. A tripod with a lift is necessary for deep wells
A mark is placed on the column, retreating 60-70 cm from the top flooring. Having lowered the column to the designated distance, it is removed back, removing the rock raised along with the drill. The cleaned column is immersed in the same way several times. Greater depth requires extension of the bar. To do this, another pipe is connected using a coupling.
Depending on the stability of the soil, the drilling method is chosen - with or without casing pipes. With stable, dense soil, you can drill the entire well without using casing pipes. Crumbling rocks indicate that after 2-3 meters a pipe equipped with a shoe should be installed. The diameter of the pipe is wider than the diameter of the couplings, so the pipe enters the shaft with difficulty. Sometimes, to place it there, they use a screw or a sledgehammer.

Products for laying water pipelines are used as casing pipes - metal or polypropylene pipes required diameter for outdoor work
If rocks are crumbling, collapse should be avoided. For this purpose, the drill is not lowered too low - below the end of the casing by a certain distance. Usually it is equal to half the length of the drill. Thus, the process consists of alternating drilling and installation of casing pipes, which are built up as they go deeper.
Preparing the structure for operation
The end of drilling is the moment when the drill reaches the waterproof layer. The well is thoroughly cleaned with a bailer attachment, and a filter is installed at the bottom, which will serve as a barrier to retain mechanical impurities. Can act as a filtration grid metal grid with a fine mesh or perforated pipe with a small gap.

The well filter consists of the following parts: 1 – perforated pipe, 2 – holes required diameter, 3 – wire winding, 4 – metal mesh
Having equipped the inside of the well, its above-ground part is equipped and decorated. To do this, remove the boards of both floorings, dismantle the lining of the pit walls and backfill. To pump water out of a well, install. The upper part of the structure is decorated with decor. A variety of design ideas, from a simple canopy for the head to a gazebo or a fake well. One option is to install a crane.
Here are two examples of how you can equip a well in your country house:

beautiful and original design wells - small decorative well made of wood, very reminiscent of the real thing. Decor design may vary

To camouflage mines, wells, boreholes, decor is made from artificial stone. Appearance it resembles a natural element - a stone or a large stump
Ways to eliminate well blockages
Groundwater, just like any other, has impurities, so over time the well will become clogged. The time for cleaning is indicated by an inconsistent flow of supplied water.
Cleaning methods are varied, using special mechanisms and substances:
- Water compressor. Sand and silt deposits are easily removed with a jet of water under pressure.
- Air compressor. Effective for removing soft particles such as sludge. Using a vacuum plug, blow through the entire length of the pipe.
- Explosion. Artificially creating a short circuit, as a result of which a bottle of gunpowder dropped to the bottom of a well explodes. The blast wave breaks the blockage.
- Acid. Use with caution as it may damage the filter or pipes. The acid is introduced into the pipe, left for two days, then the water is pumped until it is completely clean.
By installing a water well in your dacha, you can provide your home, garden and garden with the necessary amount of water, and at low material costs.
A well in a country house is an extremely useful structure, problem solving water supply Its drilling can be entrusted to professionals, especially if the water is planned to be used not only for household needs. However, you can install the well yourself. This will require: knowledge, a set of materials and tools, including special drills.
Video about manual well drilling
Selecting a site and necessary tools for drilling
Drilling wells in a country house requires performing a certain series of actions. The first step is to carry out geological exploration and select a suitable location. It is optimal if the first aquifer is located at a depth of 7 - 10 meters. It is advisable to carry out independent drilling if its depth does not exceed 20 meters.

Any summer cottage is unthinkable without water
The main signs by which you can determine the proximity of the location groundwater:
- the presence of a large number of moisture-loving plants in the area allocated for the well;
- natural signs (evening fog, heavy dew, thawed patches on snow cover during the winter months);
- insects (clusters of mosquitoes, midges) and animals. Experts say cats love to lie in places with potential proximity to groundwater.
The construction of a well in a dacha can be entrusted to professionals, but very often craftsmen resort to manual drilling, which is performed using a special tool. To do this, the soil is hollowed out by rotating the drill. Such a tool is made from high-quality steel and hardened using high temperatures.

Manual process self-drilling performed using special tools made from high-quality steel
There are several types of drilling tools:
- A drill spoon, which is used for light clayey, sandy soils.
- A drill spoon with a coil at the end.
- Coil - this drill is necessary when there is a certain amount of gravel in clay and loamy soil.
- Chisels are used in percussion drilling.
- A bailer is necessary to extract rock drilled by impact, work in loose soils.

Various types of drills are used for different types soils: light clay and sandy, complex, containing gravel
The process of drilling a well with your own hands
To drill a well in a country house, you need to install a pile driver - a tripod assembled from thick logs, and also attach it to the ground wide board with a hole for the casing pipe, which is needed to eliminate the possibility of collapse of loose soil during the drilling process. The diameter of this element should allow the drilling tool to move freely. As the casing goes deeper into the ground, it is lowered; for this purpose, it is loaded with ballast and periodically lengthened using threaded connections.
The drill, secured with a rope thrown over the top of the tripod, is directed strictly vertically into the casing and lowered down. Every 0.5 - 0.7 m, the tool must be taken out and cleared of rock. For dense and rocky soils, it is better to use chisels and percussion work.
After the drill reaches soils saturated with water, you should make a note on the pipe, remove the tool and install a filter in its place. The joint is sealed with tow and impregnated with red lead. The next step is to settle the pipe into the ground. You should stop when the water level rises 30–40 cm above the filter. The process is completed by installing a pump, which can be manual or electric. To be on the safe side in case of a power outage, it’s good to have a standard piston version.

Do-it-yourself well drilling rig
Selecting drilling depth and drinking water compliance standards
When deciding how to make a well in a country house, you need to decide on the depth to which the work should be carried out. For technical needs, irrigation is sufficient to reach the first aquifer, since high demands are not placed on water quality. The presence of nitrates, nitrites, organics and other impurities is acceptable. This composition can partly be considered an advantage, since it introduces certain fertilizers into the soil. In this case, drinking water is delivered separately.
If a self-installed well in a dacha is used not only for technical needs, then it will most likely have to be drilled deeper. You can determine the quality of water by submitting a sample for expert assessment to the sanitary and epidemiological service. To be recognized as suitable for use, it must meet certain standards:
- transparency of at least 30 cm;
- the presence of nitrates no more than 10 mg/l;
- the presence of E. coli in an amount of less than 10 units per 1 liter of water;
- the assessment of taste and smell should not exceed 3 points.

When installing a well to extract drinking water, it is important to avoid mistakes that are possible at any stage of drilling. If this task is entrusted to specialists, then they carry out everything necessary work on geological surveys, selection of a suitable location, direct drilling.
Equipping a water supply system in a dacha from a well is not that difficult. It includes several basic elements: a water intake system, a pipeline through the yard and, if necessary, a water supply system inside the house.
Filters and types of water pipes for wells
An important step is to install filters strictly at the level of the aquifer. Their purpose is to prevent the collapse of the well walls and the passage of water into the pipe. There are a number of requirements for this element:
- presence of mechanical strength;
- securing the fence required quantity water;
- presence of maximum filtration area;
- passing a minimum amount of sand and small fractions of rock.
To increase service life and improve filtration, sprinkle with gravel. The filter design includes: a filter part, a pipe and a settling tank. There are several varieties of it:
- a filter consisting of a wire winding;
- mesh filter;
- gravel filter.

A well at the dacha is made with your own hands using various types of pipes. For technical purposes, you can install cheap thin-walled metal, socketed PVC or threaded uPVC pipes. Products made from polyvinyl chloride may begin to partially release chlorine compounds over time. Higher quality water pipes are made from polyethylene, which does not corrode or wear out beneath the surface of the earth. Some technological reasons prevent their use, then steel analogues with an enamel coating are used.
Various well cleaning methods
The question of how to clean a well in a country house arises as a result of irregular, seasonal use of it for several years. The reason, as a rule, lies in silting of the filter or caking of sand in the pipe during the winter months. This problem is much easier to solve by specialists.
There are several popular well revitalization methods:
- flushing by supplying water through a pipe lowered into the well under high pressure. Through the interpipe space, dirt is carried upward and splashes out. The disadvantages of the method are: uncontrolled release of contaminated water and a limited supply of clean liquid;

Flushing - dirt rises up through the interpipe space and splashes out
- Blowing is carried out in the same way as washing, with one difference - instead of water, air is supplied. Both methods can damage the well filter due to the use high pressure;
- pumping out using a pump capable of handling contaminated water. This method is quite neat and simple. The pumped-out cargo water can be drained into containers, while maintaining cleanliness near the well;
- pouring a solution of food acids can revive even a well that has not been working for a long time. To do this, the infused composition is left in the pipe for a certain time and then pumped out. If necessary, repeat the procedure.
In addition to the above, there are a number of cleaning methods, the effectiveness of which is quite high, but there is also the possibility of damage to the pipe or filter. This is, for example, a small explosion in a well. It is worth noting that regular and frequent use can protect against silting problems.
Installing a well in a dacha solves many problems related to the use of water for irrigation, showering and other household needs. It is convenient to entrust all the work to professionals, but this approach can cost a pretty penny. If the aquifer is shallow, it is worth drilling a well yourself, using simple devices and special tools.
We are all accustomed to uninterrupted water supply and constant amenities typical of apartments in big cities. But when it comes to a dacha, and sometimes to private houses, problems arise with uninterrupted water supply. This is where the question arises about the feasibility of creating a water well. And we'll talk about this today.
Well types
First of all, before you start drilling wells in your dacha, you need to understand what the main types of such devices are for supplying clean drinking water. After all, the task is quite serious and it cannot be accomplished without proper preparation.
There are three most popular types of wells:
- sandy;
- artesian;
- Abyssinian well of the simplest type.
Sand well
Even based on the name of the well, it becomes clear that water is extracted with its help from a layer called sand-aquifer. The depth of the water production layer in this case is up to fifty meters. When choosing a sand well, you should know about some points:
- it is quite economical;
- the amount of water will be enough for a small summer cottage;
- the well is quite durable, but the water quality level requires periodic checking.
The sand well should be located away from various sources of pollution, which today may be located far from the city. If all conditions are strictly observed, such a device will serve you from 10 to 15 years.
Artesian well
If you live in an area where there is a limestone formation, you can very well use it to extract water. But this requires a check, which can be of two types:
- You can find out about the presence of a layer from your neighbors.
- You can order test drilling from specialists.
It’s not difficult to guess that asking your neighbors will be completely free and won’t take much of your time. If they answer ambiguously or do not give an answer at all, you will have to order services from professionals.
Unfortunately, it will be difficult to drill such a well with your own hands, but we will still tell you about it.
The depth at which the limestone layer is laid often fluctuates between 30 and 200 meters, which clearly proves why you can’t drill such a well yourself.
Let us say right away that such drilling will not be particularly cheap, but it has its own obvious advantages that explain the relevance of this type of well. It is very durable, because it will also last for your children and, perhaps, for your grandchildren.
An artesian well requires a metal caisson tank, as well as a pump and accumulator installed in it.
By the way, here’s a little trick for you: cooperate with your neighbors in your summer cottage, and this way you can drill one such well for several families. It won't be so expensive, and there will probably be enough water for everyone.
Such a well can be called the simplest. After all, it is easiest to drill it with your own hands. Often such a device is called as follows:
- driving well;
- well needle.
If on your summer cottage the aquifer lies at a depth of only 3-12 meters, you can safely use this option. Just don’t forget about checking the area for the presence of landfills, cesspools and sedimentation tanks in the area, because this way you won’t be able to extract crystal clear water. drinking water.
The well can be drilled in the yard, as well as in the basement of your country house. The second option, by the way, is incredibly convenient, because it will allow you to use water from a well in winter.
To drill this well you need the following:
- grandma and grandma;
- clamp;
- plug filter;
- tap;
- pipes.
If you want the availability of clean water not to be tied to an uninterrupted supply of electricity, you can make not only an outlet pump, but also a manual dispenser.
Choosing a drilling method
Before you start drilling, you need to decide exactly which method you will use. After all, you will also need to make special device– drilling rig. Fortunately, you can do it yourself. You need to choose a drilling method from the following:
- rotary;
- screw;
- shock-rope.
To make a drilling tool you will need the following items:
- drill;
- Bulgarian;
- welding machine;
- other tools that any self-respecting summer resident has.
You can be sure that the drilling tool will be useful to you in the future, so making one is a completely rational step.
Rotary installation
If you decide to make a well in your country house using rotary installation, you need to know that this is one of the most complex options to carry out such operations. But, along with its complexity, this option can also be safely called the most reliable. Considering that this equipment is quite serious, you can only make a special frame for it with your own hands. Purchase other elements from reliable suppliers so that there are no problems during the drilling process.
You will need to purchase:
- Blade drill.
- Motor pump.
- Geared motor.
- Drill rod.
- Swivel.
Do not spare effort on such a drilling machine, because it will be very multifunctional and will allow you to carry out not only impact and rotary drilling, but also drilling with circulation. And this is an excellent opportunity to supply a special solution directly to the well. The solution will erode the soil deep underground, making it easier to bring it to the surface. You don’t need to be a great specialist to understand that in this way the speed of all work increases several times.
Having decided to drill a well at your dacha using an auger, you will need to make a special drill from a pipe (steel). Make sure that the diameter of the pipe used is not less than 100 millimeters. Weld auger turns with a diameter of 20 centimeters to a steel pipe, at its bottom end, and install inclined-type steel knives along the edges of the auger.
You need to complete the work by installing a comfortable handle at the top of the device, which should be removable. The handle can be made from the same steel pipe.
If during the drilling process you do not have enough length of the main pipe of the structure, you can always increase it using a special coupling or threaded connection.
Having secured the resulting device to a tripod tower, you can begin drilling. When drilling is completed, remove from the pit steel pipe It is recommended to use a winch with an electric motor provided, so as not to damage the device and get it out without problems.
With this type of drilling, the working tool is a bailer, as well as a heavy cartridge, which are attached to a cable. The cable is fixed to the frame in a vertical position. During the drilling process, the cartridge hits the ground, breaking it, and with the help of a bailer it is removed to the surface of the earth. For device percussion-rope drilling you will need a cartridge whose mass will not be less than 80 kilograms.
Obviously, it is difficult to manually control such weight, so you will need a rotary motor to lower and raise the load attached to the rope.
In order for the penetrating power of the cartridge to be higher, its lower part should be thoroughly sharpened. In addition, many craftsmen attach particularly sharp triangular-shaped elements to the cartridges, as this allows them to increase the efficiency of work.
You need to start drilling by creating a hole on the land, which is done using a simple drill garden type. When the hole is ready, you can use the chuck and bailer.
DIY sand well in the country
When getting down to work, you need to start by drawing up plans and diagrams. First of all, think about where the well will be located in your yard. Take into account all the buildings on the site to understand how convenient the location you have chosen is. Don’t forget about what you planned to build at your dacha in the future. Remember that a well is built once, and moving it to another location will not be easy.
Features of choosing a pump for a well
To choose the best pump option for your well in the country, you will need to pay attention to some options. This:
- Indicators of the depth of your existing or future well.
- Well debit.
- Distance from house to well.
- Indicators of casing diameter.
All of the listed characteristics together provide an answer to the question of the optimal power for the selected pump. Self-priming pump will suit you if the depth of the well at your summer cottage does not exceed nine meters. If we talk about other cases, then you will need submersible pump for wells.
Work order
Having settled all the location issues and created work plans, it is necessary to begin their implementation:
- Carefully mark for future work. Make sure your accuracy is as high as possible.
- Prepare a hole for the drilling tool to enter.
- Install the drilling equipment to the required position.
- Start drilling.
- Assemble a filter column from a pipe, a sump, and a filter, and lower it into the pit.
- Look closely and find the space between the soil and the outside walls of the casing. It must be covered with crushed stone or sand, your choice. If you choose crushed stone, be extremely careful not to damage the outside of the casing.
- Rinse the filter by pumping water into the pipe. This way you can seal the top part.
- Using screw pump, as well as a bailer, pump out water from the well.
- Make sure that the water from the well is clean.
- Carefully and slowly lower the submersible pump into the well. This procedure is performed using a safety cable.
- Connect the water pipe or hose to the pump.
- In order for the water supply to be adjustable, install a special valve on the pipe.
- The casing, which protrudes above the surface, should not allow water to pass through in undesirable places. For this purpose, perform waterproofing.
- Equip the wellhead with a caisson, and then carefully secure it to the head using a welding machine.
- If you planned to supply pipes to the house, at this stage it is time to lay them in trenches.
- Cover the caisson with soil, and also make a concrete blind area.
This is how, in less than 20 steps, a well can be made in the country. Of course, everything is not so simple, but by doing the work as accurately as possible, you will succeed.
Drilling a shallow well with your own hands
You can also drill a well manual method, but for this, naturally, special equipment will be useful. We list it below:
- drilling rig;
- winch;
- casing;
- rods.
By the way, it is not necessary to take a drilling rig, but only if the well is not deep. For shallow holes, you can remove the drill string by hand.
As for drill rods, they are made from ordinary pipes and are connected using threads or keys. The lower rod should not be forgotten, because it must be equipped with a special drill.
To make cutting attachments you will need sheet steel 3 millimeters wide. And one more very important point concerns sharpening the edges of attachments. They need to be sharpened in such a way that they end up going into the soil underground in a clockwise direction.
Now you should install a derrick on the site where you will be drilling. Make sure that the height of the derrick exceeds the dimensions of the drilling rod so that lifting and retrieving the rod occurs completely unimpeded.
To create a well, you will probably need an assistant. You can start rotating yourself, but after some time, when the drill goes underground, the efforts of one person will not be enough to continue drilling work.
If you and your assistant run into problems or simply get stuck, try pouring water into the soil, as it will soften it somewhat.
While drilling, pull the drill out approximately every half meter to remove excess soil from the well.
When the drill reaches ground level, an additional frame is attached to it. Continue drilling until you notice on the ground that you have finally reached the aquifer. After this, you need to clear the hole of the earth and sink the drill even deeper, trying to reach a layer called waterproof. Having reached this layer, an abundant flow of water will begin into the well.
Pump out the dirty water using a pump and soon you will find clean water. If suddenly you notice that the water is not getting cleaner, you need to deepen the drill a few more meters.
Well care and operation
The fact that you equipped the well yourself does not mean that it will serve you for a long time, because it needs to be operated correctly and also requires careful maintenance.
If you notice that water has stopped flowing with its usual pressure, or it has begun to come out in small jerks, mixed with air, this may only mean the need to clean the well. This issue cannot be put off until later, because the problem will not disappear on its own and will grow like a snowball.
To clean the well you will need a water or air compressor. This way you can quickly and reliably get rid of sand and silt.
If the condition of your well is more neglected, we recommend that you use a short circuit, and maybe even acid. But it is better to trust these techniques exclusively to professionals who earn their living from this type of work.
Common problems and errors
Often people who decide to drill a well with their own hands make mistakes and encounter problems for which they do not know the solution. Therefore, we would like to pay attention to this issue.
It often happens that people choose the wrong type of drilling for certain rocks. Here's how to make your choice:
- For sandy surfaces, it is recommended to use a spoon drill. But one drill will not be enough here, so use flushing with water or drilling mud;
- in the case of quicksand, it is recommended to use a bailer;
- If there is clay on your site, you cannot do without a coil. But if you don’t have one, you can always opt for a bailer or a spoon drill;
- hard sand, which is typical for many areas, can be easily taken with a chisel;
- in turn, hard rocks cannot be drilled with one bit, so they are drilled with a bit only at the first stage. And already on the second stage, soil excavation is carried out;
- Loloto and bailer are used together for layers of pebbles or gravel.
Many beginners stop drilling at the stage when the drill reaches the aquifer, as they discover wet soil at the exit from the funnel. This is fundamentally wrong, because it just means that the water is already very close. Drilling work must be continued until the moment when you notice difficulty in drilling due to reaching the waterproof layer.
It is also not uncommon for a situation in which your well, which you seemingly drilled not so long ago, has stopped functioning. Most likely in in this case that the work was carried out incorrectly. When drilling, beginners often make some popular mistakes from this list, try to avoid them:
- You could lower the pump extremely low, which inevitably led to siltation of the well with sand. If you cannot avoid this problem, simply remove the pump and then remove all the sand. Install the pump correctly and you will be happy.
- A situation in which the casing is not completely seated in the hole can also lead to delivery poor quality water. If you remove the soil using a bailer and then settle the pipe, the problem will be resolved.
- Overdoing it can also lead to unfavorable results. It is not uncommon for newcomers to the field of well drilling to simply walk right through a layer of water. Raise the structure to the desired level of the aquifer and water will appear.
- Under-screwing, as we have already said, is also a popular problem, and the solution here is quite obvious.
We hope that you will remember such mistakes and take them into account when creating your own well at your dacha, which will provide you with clean and high-quality water for many years to come.
Well in the country - Video
Even in the case of simple crafts and work in the country, we often need video instructions and explanations that can dot the i’s, let alone create wells in the country. Therefore, we suggest that you finally watch a video clip on how to properly organize a well on the territory of your summer cottage.
In order to organize on a suburban area, drilling work is carried out and the subsequent installation of a well in the country.
Before drilling a well at the dacha, repairs and a subsequent set of works are carried out. at the dacha it ensures an almost uninterrupted supply of water to the recipient from the well at the required level of pressure.
It doesn’t take very long to create a well in the country with your own hands, and before starting work you should prepare all the necessary equipment and tools in advance.
1 How to make a well in the country?
Before you make a well in your country house, you should carefully familiarize yourself with the methods that allow you to choose the most suitable location for it.
A well at a summer cottage exists to supply water to the recipient. In order to equip a well, you need to carefully approach the issue of choosing all its components.
The water supply station is the heart of the entire water supply system. For efficient water supply, a pumping station (review AL-KO) or a pump is used.
The choice of such equipment is made based on several factors. These include the desired level of water flow, the load level for which the station will be ready, the installation of a unit such as a caisson, and more.
In addition, the artesian well must be equipped taking into account the level of water in the ground. In this case, the installation is carried out taking into account the types of mechanisms.
So, for example, an artesian well that provides water flow from a depth of 7-9 meters is equipped with a self-priming well.


In order to avoid frequent repairs, such a water extraction station is equipped with additional protective equipment. This could be a device such as a caisson.
If the station will extract drinking water from a depth exceeding 9 meters, then care must be taken to install special well pumps.
Repair of such devices will be carried out much less frequently if, after installation, a protective structure - a caisson - is installed on top. Subsequently, to ensure water supply to the house, a place for a well should be arranged.
The water extraction station is lowered to a depth level that is slightly below the static water horizon.
In order to subsequently have access to all communications and make repairs, a caisson should be installed on top of the pump. The installation of a unit providing water supply continues if all the equipment is new and there is no need to repair it. During the installation process, the following elements are lowered into the resulting well:
- Cable providing power supply to the electric pump;
- A plastic pipe through which water will be supplied;
- Lasting steel rope for pumping unit;
- Caisson.
If the system has automatic controls, then start buttons and other control equipment can be placed indoors.
Before repairing or installing a well, you should think about installation. Without it, the unit will be repaired much more often.
Repairs often need to be made when the system is damaged by water hammer. Repairs can be done much less often and with less frequency if you first take care of installing a pressure tank.

The hydraulic accumulator will always contain a certain volume of water, and when it decreases, the pump will immediately turn on and replenish its reserve.
The caisson will provide reliable protection such equipment. A caisson is an insulated container that protects all equipment from the negative effects of the environment.
The caisson is manufactured using various materials. In addition, the caisson is characterized by excellent thermal insulation properties, which is aimed at maintaining a constant temperature inside it. The caisson can be made of metal or reinforced concrete.
2 Types of wells
The choice of one or another type of well for its further installation at a summer cottage directly depends on factors such as:
- Depth of the aquifer;
- Volumes of drilling work carried out;
- Drilling technologies.
2.1 How to choose the right place for a well in your country house?
For selection right place There are several ways to create a well in your country house. You can prepare 1-2 liters of desiccant in advance, which should be poured into an unglazed pot.
A pot of silica gel granules is then buried in the area where the well is expected to be developed. The burial depth should not exceed one and a half meters.
After a day, the pot is dug out and weighed. Where the difference in weight will be greatest, the well should be developed.
Another method is based on simple observation. To do this, in the evening after the summer heat has subsided, or in the early morning, the surrounding area is inspected.
If a sufficient amount of water is concentrated in the soil, then this place will be especially noticeable due to the fog accumulated there. If the fog does not swirl, but rises in a column to the top, then in this place the underground water content is especially high.
Almost all waterproof layers copy the terrain. Therefore, in the pits and depressions between the hills there may very likely be accumulations of groundwater.
In flat areas, water can lie at a fairly large depth. If there are bodies of water near the place where it is planned to create a well, the depth of the aquifer can be determined using the barometric method.

For this purpose, you can use the most common aneroid barometer. On the shore of the reservoir closest to the proposed well-digging site, air pressure measurements must be taken.
Then take measurements at the place where it is planned to equip the future well. If the pressure drop is more than 0.5 mm Hg, the aquifer will be located at a depth of 6-7 meters.
However, the most reliable method is the method exploratory drilling. To do this, using the standard garden borer The soil is drilled to a depth of 6-10 meters. When it hits an aquifer, the presence of water in the hole will become noticeable almost immediately.
2.2 Stages of drilling a well
Since the upper layers of soil are subject to falling asleep, the well is protected by a special structure called a pit. It is a pit with a depth of two meters.
In order to strengthen the walls, the inside is covered with boards. After the pit has been constructed, the derrick is prepared for drilling. The upper flooring of the boards is dismantled, and a search for a central point is made in the lower flooring.
A hole is made there, the diameter of which must match the diameter of the coupling. The drilling rig, already assembled and ready for work, is equipped with a rotating head and a lifting and lowering mechanism, which is presented in the form of a winch.
The drill head is carefully lowered down in a strictly vertical position. After that, it rises up, but with pieces of rock and soil. The head is being cleaned.
The operation is then repeated again until the desired depth is reached. The role is played by products intended for laying a pipeline.


It can be either metal or. In order to avoid soil collapse, the drill should not be lowered below the immersion level of the casing.
The process must be combined - drilling alternates with the installation of casing pipes and their gradual extension as they descend.
It is worth noting that if the soil is dense and stable, the entire well can be drilled without using casing pipes. If the rock crumbles, then after 1.5-2 meters you should start connecting the casing pipe.


