Modern world dictates its own rules. Gadgets are replacing previously familiar things that were part of our everyday life. If previously photographs were stored in photo albums, now most often hard drives, flash drives, online storage. You can view thousands of images at once, but the very charm of the process is lost. Let's compare it to reading books online and in real binding, with paper pages. The book and photo album you hold in your hands have their own magic and unique energy. Photo frames can also be considered an endangered class, but with a big adjustment: if they are ordinary products from a store. Creative handmade frames are out of fashion. They are always relevant, effectively decorate the interior, and become an original addition to a gift. Let's look at ways to make unusual frames that add a special atmosphere to your home.
How to make a photo frame from cardboard
The advantage of this method is that you can use any colors. Cardboard sets are sold in 8, 10, 16, 20 or more shades. Or it’s best to create your own color scheme by covering the surface with paint that matches perfectly with the interior items in your room.
Now more about the process itself:
- We outline the desired size of the future frame, draw a rectangle on cardboard and cut it out. Try not to go over the edges. All irregularities will be visible on bright cardboard.
- Then draw a second rectangle inside with a pencil - slightly smaller size photographs (10x15 or 9x13). We make a neat slit under the photo. Be careful not to damage or wrinkle the cardboard.

- Now about the decor. If the cardboard is plain, with a regular smooth texture, the frame can be supplemented bright elements. These can be stickers that are sold in stationery stores (flowers, figures, letters), stars on a sticky basis, textile roses, voluminous paper compositions, bows, etc. Fantasize boldly. If you have time, you can cover the cardboard with millet, buckwheat, small pasta and spray paint it on top.
Important point: choose good glue, which will ensure reliable fixation of decorative elements.
- We make a back wall that will hold the photo. It is better to take thick paper or the same cardboard. Cut out a centimeter-sized rectangle big photo. Glue the edges to the base so that the top side remains free - you get a pocket. Waiting for it to dry.
- We insert the photo into the frame and admire our hand-made creation.

DIY photo frames from magazine pages
Read magazines become a useless pile, a dust collector that is a pity to throw out, but also useful application can not found. Colorful glossy pages are an excellent basis for decorating an original photo frame. The process itself is also fascinating, which often develops into a hobby. The products are bright, interesting, unique - analogues will be difficult to find. Now step by step.

- Take a sheet of thick paper or cardboard. The ideal size is 20x25 cm. Draw a rectangle in the middle under the photo with a simple pencil; it should be slightly smaller than 10x15. We cut out the window with scissors, without going beyond the specified edges.
- We take up the magazine and tear off or cut off the pages one by one. Each one needs to be twisted into a tight tube. To prevent the sheets from unwinding, we glue the outer edges.
- The tubes can be decorated with multi-colored stationery threads, which you need to buy in advance at the store. It is better to choose contrasting colors; the more shades there are, the brighter the composition will be. We wind the threads onto tubes of magazine pages, leaving small gaps. We fix the edges with loops and carefully trim the ends.

- We frame the cutout under the photo. We glue the tubes around the window one by one, one after another, combining colors at our discretion. We recommend using PVA glue - it holds paper materials best. You can set the tubes in any direction: in straight lines diagonally, vertically, horizontally.
- We make a pocket for the photo. WITH inside frame, glue a rectangle that will cover the window and become a pocket.
- In the central upper part of the frame, we attach a loop under the hook with glue - for placement on the wall, or we make a leg out of thick cardboard (desktop version).
- Insert a photo. Happy debut, you did it!
How to make a beautiful frame for a gift
The ideal gift is one given with soul. Of course, store gifts often require a lot of time to choose, but they do not have the energy of hand-made. Complement the main gift with a photo frame made by yourself, and the hero of the occasion will be pleasantly surprised and touched.

The process is quite simple:
- We cut out the base for the photo from cardboard - use the size as the photo. If the inside is 10x15, the sides of the frame should not be less than 5 centimeters.
- Using scissors, we make a window-slit under the photo.
We select a piece of fabric. Color, print - to your taste. The most advantageous options that look bright and impressive: contrasting peas, multi-colored stripe, patterns on a white background. It is better to select the design according to age and situation. For children - cartoon motifs, for women - floral prints, for men - discreet style.

- We place the fabric on the cardboard and measure out a rectangle with a margin at the edges - for bending. We cut out squares on the sides so that the bends are neat and aesthetic. Don't forget to make a window in the middle.
- Glue the fabric to the cardboard. We try to ensure that the material does not wrinkle, is fixed evenly, and does not slide along the edges.
- At the back we make a pocket according to the principle described above - from thick cardboard glued to the base on three sides.
- We select the color of the ribbon. You can buy it ready-made with a bow. We glue the tape to the fabric from below horizontally or to the side vertically. The frame is ready and waiting for its special moment.

How to make a flower frame
Flowers can become more than just the basis for a bouquet. Floral compositions Of the varieties that become beautiful dried flowers without water, they are an excellent decor for a photo frame.

We'll tell you in detail how to make a masterpiece out of an ordinary frame:
- Hydrangeas, small bush roses in half-open buds, and medium-sized gerberas are ideal for dry compositions. You need to cut the stems so that there are enough of them to fix and the extra ones do not extend beyond the edges of the frame.
- We cover the edges of the photo frame with tape, fabric or lace.
- Now the most important stage is fixing the flowers. You need to act carefully so that the inflorescences do not break. We start gluing from the corner of the frame, slightly diagonally. We try to hide all the voids.

We make a back pocket for a photo and a mount (for a wall - a loop, for a shelf - a support leg). A beautiful frame of flowers is ready.
DIY photo frames made from threads
What to do with threads if you don't know how to sew? Make an original photo frame that will effectively decorate your home. The colors of the threads can be chosen in harmony with the shades of the interior. It will look stylish and conceptual. About the process step by step:
- Selecting threads . A frame in one color will look boring. Try to combine two or three shades; you can use a bright multi-gamut. Red and blue, yellow and green, orange and purple, brown and canary, white and blue look interesting. Be true to your taste and interior colors.

- Let's make the frame itself. To do this you will need a sheet of thick cardboard and scissors. We determine the size, outline interior window and cut out with scissors.
- Apply glue to the surface and begin winding with threads. Measure the length and cut it from the spool - this will make it convenient to combine different colors. The threads should fit tightly to the cardboard and be saturated with glue. After the frame is completely wrapped, place it on the table and press it on top with a press: a stack of books, a jar of water. 15 minutes and you can continue.
- Making a pocket. It will have to be glued to the thread base. Leave the top edge free - you will insert the photo into the frame through it.
- Thread frames look more impressive on a table or shelf. The mounting method is appropriate - support made of kraton.
How to make a photo frame yourself from buttons
There are buttons in every home. You can easily create a colorful set for a photo frame. In addition to buttons, you will need three more items: super glue, thick cardboard and scissors.

- Let's prepare the base. To ensure that the frame does not bend from the weight of the buttons, choose the thickest cardboard. We immediately make both the outer frame and the pocket for the photo.
- We fix the buttons. You can do it arbitrarily, you can compose a drawing, maintain a balance in shades and shape. It is better to start from the top corner and go clockwise.
- Let the frame sit for a while until it dries completely. Try not to put anything on top, the buttons may move, the composition will creep and you will have to start all over again. 10 minutes and the photo frame is ready for use.

Whatever method you choose, the frame will turn out original and unique. Feel free to fantasize, try new materials and decorative elements. Try yourself in hand-made. The process is creative and exciting, often developing into a hobby. How nice it is to then admire frames made with your own hands and soul!
Many needlewomen are interested in: how to make a photo frame from scrap materials? It's very necessary thing, but store frames made of plastic look exactly the same. Therefore, it will be very interesting and useful to learn how to make these things with your own hands, our today’s MK for beginners will help you with this.


DIY photo frames made from eggshells
These stylish items can be made from any old and unnecessary items. You just need to use your imagination and don’t be afraid to create.
The base for a photo frame is usually made of cardboard. In addition, you can use blanks sold in the store for this purpose.
How to decorate a cardboard base? Here you can only be limited by your imagination. We invite you to pay attention to the master class of an original product decorated with eggshells.

1) Cut out a cardboard base for a frame 4 cm wide. The inner perimeter of the frame should correspond to the size of the photo.


2) Make a stand for the photo frame. Cut out such a figure from cardboard.

3) From the rectangular uncut side, measure a two-centimeter strip and bend it.
4) Cut out a rectangle for back wall framework. Let's glue the parts together.

5) Glue the leg. To do this, spread a bent two-centimeter strip with glue and glue it to the middle of the back wall of the frame.


6) We begin registration. Let's cover the frame with blue acrylic paint.


7) Boil 5 eggs, peel the shells from them in large blocks. Paint it in different shades of blue paint.

8) When the paint is dry, grind the shells.

9) Now cover the frame with eggshells in a random order, but tightly together.


10) What a successful decor it turned out to be.

Instead of eggshells, you can use broken seashells or another type of decoration.
Simple paper frame
You can very simply make a photo frame out of paper, but it must be beautiful and embossed, for example from wallpaper.

You will need:
- wallpaper;
- cardboard;
- glue;
- ruler;
- a simple pencil;
- scissors;
- breadboard knife;
- stapler

Sequencing:
1) Draw two rectangles on the back of the wallpaper. The inner perimeter should be equal to the size of the photo. The width between the inner and outer perimeter should be 3 cm.

2) Draw diagonal lines in the central rectangle and mark 1.5 cm from them.


3) Draw another inner rectangle through these points.

4) Cut the inner rectangle along diagonal lines using a breadboard knife.

5) Bend the corners inward.


6) Fold down the side of the outer rectangle.

7) Fold the outer three-centimeter strip in half.

8) There are small squares in each corner. We cut one fold.


9) Fold the frame into a box.


10) We cut it with a stapler.

11) Cut out a rectangle from cardboard and glue it to the frame. This is the back wall.


Making such a frame is easy and will be very interesting for children.
Comfort and coziness
Personally made household items are a kind of amulet, a symbol of comfort and prosperity. Because things into which a person has invested his labor and love have very strong positive energy.
Handmade gifts are especially valued all over the world. They will definitely bring peace and warmth to the homes of your friends, loved ones and relatives. Your boyfriend will certainly be delighted with your photo together in an original frame. And children will be simply delighted to receive a color photo in a bright frame as a gift.
Let's look at very simple and quick ways making frames.
DIY photo frames from toilet paper rolls
Make a three-dimensional base and cover it with details at your discretion.


Cut the rolls into rings with a diameter of 1.5 - 2 cm, bend them into a petal. Glue the petals together good glue, paint in suitable color and the frame is ready!


Cut all the same rolls, connect them together, cover them with sequins or rhinestones and the royal frame is ready!


Making frames using the appliqué method
Here you can literally use all the materials that you can get your hands on: beads, coins, shells, coffee beans, etc. It is better to glue the parts with a hot glue gun.
I would like to offer you, in my opinion, an interesting and entertaining topic:
“Do-it-yourself photo frames” - bright decor for the best photos.
DIY photo frames are great way add individuality to the framing of your favorite photos. Thanks to the author's decor, each photograph becomes not only a memory of special moments, but also harmoniously complements existing interior. Bright frames for children's photographs and romantic decor of love story photo card frames create a special atmosphere of home comfort.
Photo frame “Heart”
You can make a heart-shaped photo frame by following the diagram below. You can make this frame in any color.
We will need:
Pencil, scissors, ruler
Paper of 2 matching designs
Watercolor paper (or other, but thick enough)
Plastic for the window (optional)
Sewing machine
Cord (or tape)
White acrylic paint (optional)
Lace, ribbons, flowers, buttons, acrylic drops, half beads, hole punches
On the background paper, draw a heart with a pencil and cut it out. We apply it to the front paper and trace it a centimeter larger. Cut it out.
Take a sheet of thicker paper (watercolor, for example), trace a small heart on it and cut it 0.5 cm smaller than the intended outline. With a pencil we outline a window for the future photo and cut it out.
We heartily squeeze a large heart in our hands and glue it in several places along the contour to the heart with a window. We sew along the contour of the figure and the window on sewing machine, stepping back slightly from the edge. We cut out a window from the “jamkan” paper, trim off the excess around the edges, try it on to the background heart and admire the beauty!
If you have thin plastic, for example, packaging for something, cut out a rectangle from it, slightly larger than your window, and carefully glue it from the inside of the window along the contour. We glue the cord on which the frame will be held; its ends should be located slightly further from the center than the sides of the window. We glue both hearts together, leaving the distance between the ends of the lace intact; here we will insert a photo. Next we decorate at your discretion.
Our heart photo frame is ready!


Spring motive
This frame has a spring theme. She looks gentle and romantic.
You will need:
Simple frame
Artificial flowers
Glue gun (can be replaced with PVA glue).
Divide the flowers into inflorescences.
These petals need to be glued to the frame using glue gun or PVA glue.
To make it more convenient, try starting to glue the petals from the corner of the frame. Next, gradually fill the frame with petals.
It is worth noting that the petals need to be glued tightly to each other, so your flower bouquet on the frame will appear more magnificent.
Use braid, lace or beautiful paper to cover the edge of the frame.


"Forged" photo frame
Typically, forged frames are not only expensive, but also cannot always be actively used due to their considerable weight. However, it is difficult to argue with the fact that such metal frames are very beautiful. If you are a fan of the art of forging, you can make a “forged” photo frame with your own hands without using metal.
We will need:
Wooden photo frame
Wooden decor
Spray paints (black and bronze)
Paste over wooden frame wooden decor.
Paint the entire frame along with the decorative elements with black paint.
Now the frame has acquired a metallic shine and looks like it was forged.


Photo frames from magazines
We will need:
Old photo frame
- magazines with glossy pages
- knitting needle or wooden stick
- colorless varnish
- scissors
- stationery knife
- glue
Cut a magazine page into two halves lengthwise. Starting from the corner, wind the paper onto a stick or knitting needle, creating a tight tube. Secure the paper with glue and remove the knitting needle. Create required quantity blanks
Think about how you will place the tubes on the workpiece. They can be cut to size in advance or use a utility knife while attaching the pieces to the base. After all the tubes are glued, let the frame dry, then apply two or three layers of clear varnish.


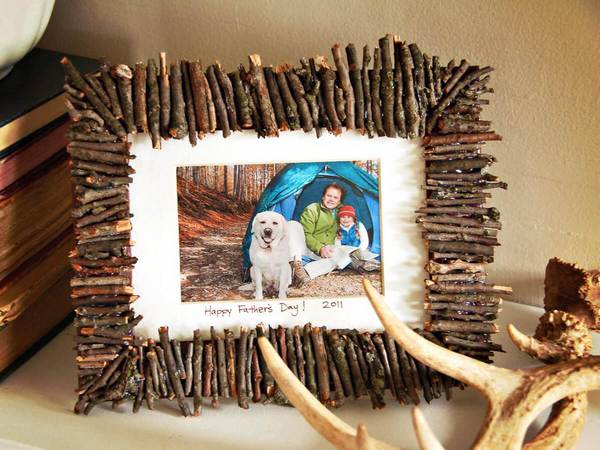
Marine motifs
In the summer, you can bring beautiful shells from the sea and use them to decorate a frame, which can be made from thick cardboard, paper box with thick walls or made of plastic.
Think for yourself how to lay out the ornament on the frame. Maybe it’s worth covering the entire frame around the perimeter? Or, conversely, you can decorate only the bottom with a pattern of shells. left side, then you will get an original asymmetrical pattern.
Before gluing the shells to the frame, try making a preliminary sketch on a piece of paper - what kind of pattern will you get? Or draw some rough sketches and think about which one is best.
You can choose a contrasting background for the frame, on which light shells would look good. You can paint a few shells to give the whole frame a more elegant look.
Glue the shells with universal glue and coat with varnish.


Photo frame ideas with your own hands


In times of digital technology, the value of paper image media has dropped significantly. But in vain, photography is primarily a memory from the past. People are used to holding dear to the heart things next to you. But storing photos in digital media is not always convenient, and the presence of an attractive frame with a favorite image on the table automatically attracts the eye and, accordingly, brings back pleasant memories. You can make a photo frame with your own hands from available materials, using natural materials for decoration.
You can make a photo frame with your own hands using available materials
Knowing how to make photo frames yourself at home is quite useful - sometimes you need a frame of non-standard sizes to hang on the wall, for example, a poster from your beloved computer game, or large size photos, and large frame It can be quite expensive to buy, and it’s not always possible to find a color and texture that matches the photo. A homemade frame will come to the rescue if you decide to hang a hand-embroidered picture, or a certificate of honor, or a page of assembled handwritten text on the wall - at weddings and anniversaries, guests often write such congratulations and wishes as a souvenir to the newlyweds or anniversaries. Photo from kindergarten, or from the school line on September 1, wedding or just good photo from a walk - are there many reasons to hang one of your happy moments on the wall or put it on the table? Let's take a step-by-step look at how to make a suitable frame for them.
You will need:
- 2 sheets of thick paper measuring 30 by 35 cm;
- Old glossy magazine;
- PVA glue, a piece of cardboard;
- Multi-colored threads, colorless nail polish;
- Stationery knife.

This photo frame will be quite affordable.
How to do:
- Stepping back from the edges of the sheet, measure 5 cm. Draw lines along the marked points. Cut the resulting rectangle from the middle of the paper sheet. The result is the base of a photo frame.
- Roll one magazine page tightly into a tube and secure the edges with glue.
- Wrap thread around the curled page, securing the ends of the threads at the bottom.
- Make several of these tubes.
- Glue each piece to the base starting from internal corners products. To give the effect of a volumetric bend, bend the tube at the corners.
- Glue three sides of the second sheet of paper to the inside of the frame. The fourth side is necessary for placing photographs into the product.
- We form the frame leg from a piece of cardboard.
After drying, the craft can be carefully and easily coated with varnish.
Cool DIY photo frame in 5 minutes (video)
How to make a beautiful photo frame from cardboard
Necessary:
- Colored cardboard, colored paper;
- Stationery knife;
- Colored pencils, stickers.

A cardboard photo frame can be very simple
How to do:
- Cut out a rectangle of the given parameter with a stationery knife.
- Mark the dimensions of the photograph on the wrong side of the figure, deviate 1 cm from the markings, and place measurement points for the window. Cut out the inner rectangle.
- We cut out the inner side of the product from less dense paper.
- Glue both sides of the frame, leaving one side for inserting a photo.
- Draw the desired pattern with pencils and decorate with stickers. The edges of the photo frame can be decorated with golden chocolate wrapper.
We make the frame's stand from cardboard. Cut a thin rectangle, fold it in half, and glue it to the craft with the base.
Original design for a photo frame: master class
A very delicate and beautiful frame is obtained when decorated with artificial flowers, wallpaper, pieces of lace or braid.
Necessary:
- Wooden or plywood frame - base;
- Scissors, glue;
- Pieces of wallpaper, golden braid, lace, beads.
The photo frame can even be decorated with broken branches
How to do:
- Ideal for crafts artificial branches lilacs or other flowers with small fluffy flowers. Arrange each flower into inflorescences.
- Paste over the base wallpaper, allow to dry completely.
- Place one inflorescence on a drop of glue from the top corner, bend the petal up a little and glue the second one next to it. Thus, fill the entire upper corner of the frame with flowers.
- We decorate the lower opposite edge with lace, gluing it with glue.
- We glue golden braid along the edges of the inner frame.
- Place the beads on the glue like flower cores. Glue beads of the appropriate tone to the lace ornament.
- Glue a piece of starched lace along the top of the flower corner of the craft.
How to decorate a regular photo frame
Photo frame design options:
- Worn discs. Since the material contains sharp corners when broken, it is more advisable to wrap the discs in an unnecessary towel. Break it with a hammer. Place small pieces in an interesting mosaic on the frame using glue. After drying, apply black paint to the spaces between the fragments. acrylic paint under gloss.
- Wallpaper. Pieces of wallpaper remaining after renovation are very suitable for decorating crafts, especially if they have pictures. Cut out a wallpaper pattern or flower and glue it to the corner of the frame.
- Old buttons. Collect all unpaired buttons. Decorate the product with them, gluing them with glue from the outer corners.
- Sea pebbles and shells. They look great when paired with starfish decor made from salt dough, rope threads and a figurine of a sea anchor. Such a frame with a joint photo is a wonderful gift for a loved one.
- Satin ribbons. When gluing the ribbon as a decorative element, decorate it with the remnants of lace.
- Puzzles. Pieces of the picture, laid out randomly around the frame, will be an amazing addition to a child’s photograph. For variety, add toy figures cut out of paper to your decor.
- Decorate the frame in the New Year style with Christmas tree tinsel and shards of balls.
- Paints. To paint frame parts, it is better to use gouache or acrylic paint.
- Pieces of fabric. Here you can come up with both finishing each detail of the frame with a fabric base, and weaving decorative elements from fabric strips.
- Quilling and beads. Paper swirls will make the photo frame very interesting. And beads and beads give the decoration a fabulous look.
- Colored threads. They harmonize well as decoration when creating frames from magazine pages. Tie each page with thread and glue it to the base of the product.

The photo frame can be decorated however you like
If desired, crafts can be decorated with decorative small flowers, knitting threads, pieces of wool, dry herbarium, colored pasta or seeds.
What can you use to make a photo frame with your own hands?
If you plan to hang a framed photograph on the wall, it is better to take it for making lightweight material- ceiling plinth, cardboard, paper.
- A very simple frame layout can be made from ceiling plinth. The smooth surface of the material will ensure that you do not make a mistake in size. Use a ruler to carefully measure the required measurements and cut with a utility knife. Further, according to inspiration, the product can be decorated with paints or decorated natural materials: shells, branches and leaves of a tree. After the glued decor has completely dried, carefully cover the craft with colorless wood varnish.
- Wooden frames are more durable in construction. For the craft, take two identical strips in size. Knock down with nails or glue in the form of a rectangle, open with varnish.
- A photo frame made of cardboard and yarn is a very easy craft to make. Fold into a rectangle or other shape geometric figure cardboard or thick paper in several layers. Carefully spreading PVA glue, we sequentially glue the frame with multi-colored yarn and buttons.
- A frame from a glossy magazine looks unusual. Roll each page of the magazine into a tube and glue it into a geometric shape.
You can involve your child in creating a frame from dough. An exciting activity will amuse the little fidget, and the product will turn out to be unusual.
- Mix flour, non-iodized salt and water. We take salt in half the portion of flour, and half as much water as salt.
- After kneading the dough, let it rest, then mold the craft. Keep the finished frame in the oven at 80 degrees until completely dry on both sides.
- The ornament for such a product can be molded together with the frame.
After drying, paint the craft with gouache and open it with colorless nail polish.
Photos are a wonderful reminder of life's happy moments. Some people like to print family photos, memorable moments with loved ones, or they like to decorate the interior with photographs of artistic value.
In this matter, it is important not only to choose a painting, but also to decorate it correctly so that it turns into an object that fits into the interior.

Supporters of minimalism can simply purchase ready-made photo frames, but some creative people are wondering how to make a frame with their own hands. Next we will consider interesting ideas such crafts for adults and children.

Materials for work
Before you do the most interesting thing - decorating your work, you will need to prepare the basis for the future original photo frame. You can buy it in the store, but we will also create it with our own hands.

If you decide to use wood, plastic, or other material for the base, the process will be similar to that described; we will consider making the base using cardboard as an example.

First, you will need to cut out two identical rectangles (or another shape) from cardboard; for this, use a ruler or stencil, a pencil and a stationery knife. Do not use scissors, this will ruin the cut.

The middle of one of the prepared figures is cut out; this will be the outer side of the frame, so the shape and size of the inner rectangle depends on the photo that you plan to insert.

It is important to note that it is advisable to cut a window slightly smaller than the photo so that it stays inside and does not fall out.


A loop or a leg is attached to the second rectangle, depending on how you want to position the frame. The leg can be attached by gluing its edge to the base and making a bend, or on a small hinge similar to a door, this way you can increase the durability of the product, the leg will not break over time. The material should be dense and not bend from the weight of the future frame.

Decoration options
You can decorate an original frame with almost anything, you only need your imagination. Now that the base is ready, you can take the frame itself with a photo window and start creating.

Application from scrap materials
For this type of decor, you can use colored chipped eggshells, pistachios or sequins. You will get an interesting stained glass effect from which any drawings can be created.

First, you can paint the future frame or cover it with a suitable film. It is better to use acrylic paint; it will not stain surrounding objects and will lay down in a nice, even layer;

Then the shells are crushed or just pistachios, sequins are taken, shells are also suitable. Can be pasted over outside them both in random order and creating the necessary relief or pattern.

The main thing is not to spare the material and place it tightly. If the decor will be painted, it is better to do it in advance, it is more convenient and the appearance will be more presentable.

If you coat the product with varnish, it will sparkle in the light and you will get the effect of a stained glass window.

Decorating with wallpaper or paper
The look will be no less impressive if you paste over the frame beautiful wallpaper, self-adhesive or newspaper clippings or comics. Here it is important to take a little more material so that when appliquing, the protruding edges are folded over reverse side frame, which will then be hidden by the back.

Also, do not use glue that is too liquid, because... Paper materials are easily soaked and the result will be messy. Even a simple glue stick will do.

Place a sheet of wallpaper or self-adhesive under the frame and make cuts at the corners so that the paper does not wrinkle when folded. This is the simplest way, but you can achieve a very stylish effect without going overboard with the decor.


You can also cover the frame with fabric, gluing the edges to the back side; if you add a little cotton wool or padding polyester, you will get a cushion frame. It will be possible to decorate with several buttons or seams.

Frames made from rolled rolls
The decor made from rolls looks very interesting. Can be rolled tightly colored paper and stick it evenly, you get the relief effect of a log wall. The main thing is to measure the length of future elements in advance so that you don’t have to cut them in a twisted state, this will ruin the whole look.

Twisted sheets can also be braided with beautiful threads or a rope, achieving a wide variety of effects from glamorous shine to a marine theme.

For example, a nautical frame can be made from blue rolls, complemented by small light ropes, like on ships, and decorated on top with several shells or ready-made elements anchors or steering wheels.

You can also simply color the paper. different colors creating a rainbow effect or a transition of shades. You can replace paper rolls with ready-made cocktail straws. Lots of options!

Shutdown
When the glue and dye have completely dried, you can join the outer and back parts of the frame along the edges. The main thing is not to forget to leave a gap on the edge in order to insert photographs.

Do-it-yourself photo frames are always original, in a single copy. If you understand general process manufacturing, you can create completely different variants, just by seeing a photo or coming up with your own design. Creative success!


DIY photo frames


