All mixers, depending on their design, can be divided into valve, ball and thermostatic.
Classic valves are equipped with two valves responsible for supplying hot and cold water. The water is shut off using a rubber gasket or ceramic plate (see "Shut-off valve material"). In order to turn on the water at full pressure, you need to make 4-6 turns of the valve, which ensures stable operation even with very different ratios of hot and cold water. That is why, if there is gas water heater Valve mixers are recommended. In addition, although the use of such faucets requires a lot of effort, it helps to save water consumption and allows you to more accurately adjust the temperature, unlike ball models.
Ball ones are considered more convenient, because... they are equipped with one handle that turns in different sides(up-down and left-right). Thanks to this, you can adjust the water temperature and pressure with one movement of your hand. The operating costs of valve and ball mixers, except for thermostatic mixers, are approximately the same. Therefore, manufacturers recommend that when using all types of mixers, except for equalizing the pressure of cold and hot water faucets, install water filters in the apartment.
Thermostatic mixers are equipped with a device for automatic maintenance given temperature and the same pressure force. A special thermostat controls the set temperature: if the water temperature changes, the ratio of hot and cold water automatically changes the right proportions. The second regulator is responsible for the water pressure.
To ensure that user-specified settings are saved, both regulators have built-in limiters, usually in the form of buttons: to change the setting, you must first press the button, after which you can turn the knob (in many models, the temperature can be changed without pressing the button, but only in the direction of decreasing it ). Thus, limiters allow you to control water flow. Thermostats have another undoubted advantage: if the supply of hot or cold water suddenly stops, the thermostat will turn off the water almost instantly.
Purpose
Depending on the place of use and design features, all faucets can be divided into faucets for bath, washbasin, sink (kitchen), bidet, shower, as well as universal models.
Sink (kitchen) faucets are mounted horizontally and have a long, high, movable spout to increase usable area sinks to make it convenient to wash tall containers. There are models with a pull-out spout (see "Pull-out spout") and with a shower head (see "Shower head").
Spout shape
The shape of the mixer spout can be traditional or cascade.
The traditional form is a spout in the form of a tube (round, triangular, oval, etc.). Such spouts are called classic and are used everywhere.
Cascade mixers are not yet very common due to their unusual appearance. Unlike traditional tube-shaped faucets, cascade faucets have a flat and wide spout; Dimensions vary depending on specific model. Cascade faucets are mainly installed in the side of the bathtub and the wall of the shower stall, and are less often used for sinks. In addition to the large capacity (for filling with water even large bath takes just a few minutes), cascading faucets are simply beautiful and actually imitate a mini-waterfall in your apartment.
Stop valve
A shut-off valve is a mechanism in a mixer that is responsible for the supply/shut-off and pressure of water. It can be a rubber or leather valve, ceramic or ball cartridge.
Valves made of rubber and leather are inexpensive and practical materials, but have low wear resistance, so they are often replaced. Now these materials are practically not used.
Ceramic plastinans (cartridges) are stronger and more durable. They are usually made of aluminum oxide and coated with metal ceramics on top.
Ball cartridges are made from of stainless steel. These are polished hollow balls with a pin in which water is mixed inside. By changing the position of the pin (using the mixer handle), you can adjust the pressure and ratio of hot and cold water, as well as turning the water supply on/off.
Housing material
The faucet can be made of brass, ceramic, stainless steel or bronze.
Brass is the most popular material for faucets because... it is distinguished by its high strength and practicality and, as a result, its high price.
Ceramic faucets look very beautiful and are expensive, but they are too fragile, so their high price is not entirely justified.
Stainless steel models are durable and inexpensive.
Bronze faucets are also very durable, but are not yet so common.
Coating
The mixer body can be coated with nickel, chrome, matte chrome, white or colored enamel. Less common are gold, platinum, marble, granite or bronze coatings.
Enamel looks very beautiful, but it is not so durable and is easily chipped; Nickel can cause allergies, gold or platinum finishes require special care, and marble or bronze finishes will put a significant dent in your wallet.
The best options are chrome and the now fashionable granite: they are beautiful, durable, and do not harbor microbes. The only drawback chrome - traces of drops, fingerprints and stains remain on the polished surface.
Often there are two-color models that combine two types of coating, for example, granite and satin.
Handle rotation angle, horizontal (degrees)
(from 25 to 160 degrees)
The greater the angle of rotation of the knob, the more accurately the user can adjust the water temperature. On the other hand, a shorter stroke helps to set it up faster. All modern ball mixers are equipped with a built-in hot water supply limiter (a removable silicone ring or a special mechanism) - it does not allow you to move the handle beyond a certain temperature level.
Handle rotation angle, vertical (degrees)
(from 25 to 120 degrees)
Vertical adjustment helps to set the optimal water pressure.
Manufacturers provide some faucet models with a built-in water flow limiter to save water consumption.
Swivel spout
The swivel spout allows you to choose the direction of the water flow - into the bath or into the washbasin. Its presence in kitchen faucets is no less important - it makes it more convenient to wash a large number of dishes and high or wide containers.
Check valve
A check valve is designed to prevent the reverse flow of water in a pipeline in the event of a sudden drop in pressure below a certain value. This device thus protects against air pops when the water is turned off.
Built-in filter
The built-in filter is designed for mechanical cleaning water from foreign impurities, which prevents breakdowns in the mixing unit. The filter is usually removable, making it easy to clean.
Watering can
Shower heads can be equipped with shower mixers and bidets.
Bidet showerheads are distinguished by their compactness and the presence of a water supply button on the head of the showerhead, which is not a shut-off valve and serves only for ease of use.
Using a compact retractable watering can with a flexible hose, it is very convenient to wash sinks of any size and shape. There are two modifications of pull-out sink spouts. In one version, an additional hole can be made for it to the right or left of the mixer; in the second, the hose is hidden directly in the spout of the mixer itself (thus we get a “2 in 1”).
Foot valve
The bottom valve is a special plug on the mixer body to close the drain hole. It opens and closes with a simple press of a button.
Aerator
The aerator is a mesh device located at the very tip of the spout. Its main purpose is to mix water with air, making it softer, and cutting the stream, making it softer and more uniform. Aerators are usually made of stainless steel, but it is better to give preference to models with an additional silicone coating - it is easier to clean.
Built-in
A hidden installation system involves embedding the unit itself into the wall (for example, in shower faucets) or into the side of a bathtub or sink (in bathtub, sink, and washbasin faucets). Only the controls and the spout/pull-out hand shower remain outside. Concealed installation is mainly intended for acrylic bathtubs(it’s easier to drill holes in acrylic than, for example, in cast iron). This installation is preferable for large bathrooms, because you will have to install an additional box. Although there are cases when communications take place precisely in " in the right place", and then you can kill two birds with one stone. The disadvantage is that if the mixer block leaks, you will not know about it right away.
Installation method
Bath faucets can be mounted vertically or horizontally.
Horizontal is the most popular and simplest, because... The device block is mounted on the side of the plumbing fixture.
The vertical method involves mounting the mixer on the wall (mostly these are devices for baths, showers and universal ones).
The choice of one installation method or another depends only on your personal preferences and the location of the communication pipes.
In addition to this division, a distinction is made between open and hidden installation (see “Recessed”).
Number of mounting holes
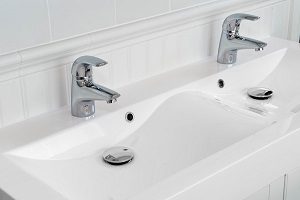
The number of mounting holes for installing a mixer can be from 1 to 5. We are more familiar with 1-hole mixers: the user can see a block with a spout and switches. Concealed installation with 1 hole is often done for bath and shower faucets.
2-hole faucets are also very popular (separate holes are required for hot and cold water pipes). As a rule, such mixers have a vertical mounting (see "Installation").
Recently, 3-hole faucets have become very popular. hidden installation(see "Built-in"): the block is hidden in the wall or plumbing body, and a separate hole is required for each element (spout and handles).
The rarest are models with 4 and even 5 holes (4th for the shower head and 5th for the shower/tub switch).
Quick installation system
The quick installation system assumes that you only need to insert the faucet fasteners into the hole prepared in advance for it and tighten it from above with a hex key (usually supplied in the kit).
Connection size
The connecting size of the tap to the mixer depends on the type of mixer. For example, a bathroom requires more powerful water pressure than a kitchen. And, accordingly, a pipe of larger diameter. Connecting sizes can be of several types: 1/2", 3/4", 3/8", 1 1/2", 1 1/4".
Mounting hole diameter
(from 10 to 60 mm)
The diameter of the mounting holes depends on the design of the mixer.
S-shaped eccentrics
S-shaped eccentrics of a special curved shape significantly simplify the installation of the mixer, as they allow you to adjust the center-to-center distance between the bushings by turning them.
Type of eyeliner
There are two types of eyeliner: flexible and rigid.
Flexible eyeliner It is a reinforced tube made of polyethylene or PVC with a plastic “skeleton” in a metal braid; it is easier to install, therefore it is more popular. On the other hand, it is less reliable, so it fails more often.
Rigid liner consists of metal tubes (copper or brass). With her more problems during installation, but then it is unlikely to cause any trouble.
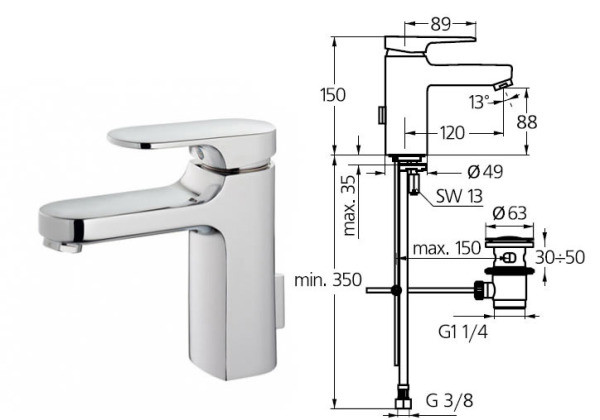
Spout length
(from 47 to 400 mm)
It is recommended to pay attention to the spout length, because... If the spout is too short, the stream may break against the side of the bathtub or sink, and if the spout is too long, it can reduce the comfort when using the faucet.
Spout height
(from 30 to 400 mm)
It is recommended to pay attention to the spout length, because... due to a very low spout it will be inconvenient to use (this is especially important for kitchen faucets), too high will reduce the usable space.
Handle length
(from 53 to 150 mm)
The length of the ball spout handle depends on the design of the mixer.
Thermostat
The thermostat built into the mixer serves to maintain the set temperature and pressure.
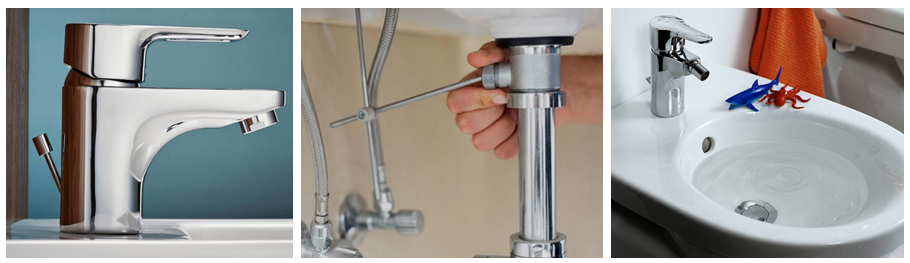
The bottom valve is a relatively young phenomenon in the Russian plumbing market. Faucets equipped with this device appeared in the assortment of specialized stores about 20 years ago. These were products from European manufacturers, and the presence of a bottom valve sometimes caused some confusion among the domestic buyer. Why increase the cost of a product with such a mechanism for a purpose that is not entirely clear?..
Today, bottom valves (in combination with faucets and separately) are produced by most manufacturers of plumbing equipment, including Russian companies. This device is no longer considered a curiosity; the popularity of bottom valves is steadily gaining momentum.
The increase in popularity is quite understandable. The bottom valve is convenient, beautiful and, most importantly, economical! For those who still have questions about this, we will try to provide as much information as possible about bottom valves for modern bathrooms.
The bottom valve appeared in England, where previously, in almost all houses, washbasins and sinks were equipped not with a faucet mixing water, but with two separate taps for cold and hot water. That is, the water was mixed directly in the sink.
In order to close the drain hole, a bottom valve was invented. Essentially, it is a modernized version of the regular plug that is used to close the drain hole. Sometimes you can hear another name for this device - traffic jam.
Despite the fact that in our country there is no such tradition as in England (to use separate taps for hot and cold water), bottom valves are in increasing demand in Russia, the CIS countries, and most European countries. They are fully equipped modern faucets already serving mixed water. This demand for bottom valves is associated with more serious attitude To natural resources our planet and rapidly rising prices for public utilities. Careful attitude towards environment and the desire to save money - positive traits, regardless of the person’s country of residence.
Foot valve– a great way to rationally use water resources and save family budget. After all, to carry out many processes using water, it is not at all necessary to pour tens of liters into the sewer.

Types of bottom valves.
Mechanical bottom valve. The mechanical valve is closed by hand - by pressing the top part (lid). The operation of such a valve is based on the operation of a spring mechanism. This type of product is sometimes called Click-Clack or Push Open. The disadvantage of a mechanical stopper is the fact that to open it you need to put your hand in the water. The main advantage of the system is the absence of technical connection to the mixer. Mechanical valves can be installed on siphons not only of washbasins and bidets, but also of bathtubs and shower trays. They are quick and easy to install and easy to maintain.
Automatic bottom valve. The automatic bottom valve is controlled using a lever located on the mixer body (on the side or back). This option is considered more comfortable and more hygienic, since you do not need to put your hands in the water to open and close the valve. The lever on the body and the plug itself are connected by a metal rod. Due to these design features Bath and shower faucets are not equipped with automatic bottom valves - only faucets for washbasins and bidets.

With or without mixer?
As mentioned above, bottom valves can be used to shut off the drain in a washbasin, kitchen sink, bidet, bathtub, deep shower tray. For washbasins and bidets, you can purchase a factory kit: a mixer with an automatic bottom valve. For a bath or shower you will need a mechanical option. A mechanical stopper for a bath or shower can be purchased separately or in a set with a drain siphon. Many manufacturers drain fittings Today they offer siphons equipped with a bottom valve of the Click Clack system.
Bottom valve design.
The design of the bottom valves is not very diverse. Most of the product is hidden; only one element remains visible - a round metal cap. Since the drain hole is always round, the bottom valve covers are almost always round in shape. Although sometimes you can find designer products with unusual lid shapes. The most significant way the models may differ is in the color of the coating. The bottom valve included with the mixer will have a coating identical to the mixer. If you purchase the faucet and valve separately, it is better to opt for a standard chrome finish. The bottom valve in some other color variant you'll have to look - 90% of all models are available in chrome color.

Pros and cons of foot valves.
So let's get to the important stuff. Does this modest and almost invisible device really provide a lot of additional convenience? It is worth taking stock before making a decision and purchasing.
Advantages.
- Saving. The bottom valve makes it possible to draw water into the sink during washing, hand washing, washing vegetables, food, dishes and other “water” procedures. At first glance, the savings are invisible, but in fact they turn out to be quite significant.
- Convenience and comfort. With the help of a bottom valve, you can quickly, efficiently and reliably close the drain with one movement of a lever or by pressing a button.
- Hygiene. The bottom valve is much more hygienic than rubber or plastic plugs. It does not mold, does not collapse under the influence of water, does not become slippery and sticky, and is easy and simple to clean.
- Aesthetic appearance. The stylish shiny lid without any chains or strings looks great modern interior much more aesthetically pleasing than old-fashioned traffic jams.
Flaws.
- Unusual option. In our country, the tradition of collecting water in the sink is not widespread. You need to accustom yourself to this method of using water and saving by developing certain habits.
- Requires care when using. If you have already closed the valve in the sink and are drawing water, be vigilant. If you are distracted for a few minutes, you risk finding a puddle on the floor. If you have installed a bottom valve on the drain, be careful when closing and opening the plug, turning the faucet on and off. To be on the safe side, it is recommended to purchase a washbasin or sink with an overflow.

The bottom valve for sinks, which appeared not so long ago on the plumbing market, quickly gained wide popularity.
This device is designed to block the drain hole when it is necessary to collect a certain amount of water in a bidet or sink.
England is considered the birthplace of the bottom valve, where the issue of economical use of water is quite acute. The device was originally used to mix hot and cold water from separate taps.
Varieties and device
There are two main types of foot valves:
- valve coupled with a mixer, with a control lever;
- Push Open system valve, sold without mixer.
The first variety is the most popular. When purchasing a faucet, it also comes with a bottom valve. The device is activated by a special lever; it is placed directly behind the base of the tap.
A number of manufacturers prefer to place the lever on the side; there is no fundamental difference in operation. The drain hole is blocked by changing the position of the lever.
A classic foot valve with a lever control system consists of the following parts:

- plug blocking the drain hole;
- a lever that controls the valve;
- rod for connecting the lever and the valve;
- threaded connection for installing a siphon;
- siphon directly.
The Push Open system device is used less frequently; in this case, the process of blocking the drain is performed by clicking the valve cover. The built-in spring controls the valve, preventing water from flowing out.
Note: It is believed that this design less hygienic, since if necessary, you have to put your hand into a sink with dirty water to drain the water.
On the other hand, the foot valve spring type looks more aesthetically pleasing due to the lack of levers.
Bottom valves for sinks are available in several style solutions. In general, the range of shapes and colors is small, since most of the fixture is located under the sink. Only the metal plug remains visible round shape. The shape of the cap is determined by the design of the drain hole, which, as a rule, also has the shape of a circle.
 Some designer sinks may use valves that are larger original design, this does not affect functionality.
Much more often used various options color coating - from standard silver to exquisite gold. The choice depends on color design the rest of the plumbing and bathroom fittings in general.
In addition to household bottom valves, there are devices more complex design- seat valves. Such equipment is used for food production and household chemicals and allows you to control the movement of substances through pipelines, reliably separating them if necessary.
Valves of this type are available in single-seat and double-seat types. The first option is designed to change the direction of fluid flow and block it. The second option is used where increased reliability of blocking substances is needed (chemical and pharmaceutical industries).
Benefits of use
 Installation The device has many advantages:
- The main advantage is significant water savings. The cost of cold and hot water is constantly increasing, and installing a bottom valve will help reduce costs.
- Easy to use. Even a small child can handle a small lever or button.
- The appearance of the sink becomes much more aesthetically pleasing; instead of an unsightly drain hole, a beautiful shiny valve is visible.
- The device does not need additional service, you can clean the valve in a matter of minutes.
Significant disadvantages this device doesn't have. Of course, it will take some time to get used to this method of saving water; washing in this way is not always convenient at first.
In addition, you will have to carefully monitor the water level in the sink; sometimes the pressure is too strong and overflow cannot be avoided in this case.
Installation procedure for the drainage system
 You can install the bottom valve yourself, and you do not need to have any special plumbing skills.
Since the installation of the valve is inextricably linked with the installation of the mixer, the necessary sequence of actions should be followed:
- First of all, the hoses connecting the mixer and the bottom valve are laid.
- The mixer is fixed to the sink; for sealing purposes, a rubber gasket of the appropriate size is required (usually included with the tap).
- Next, you should check the identical diameters of the pipes and hoses at the joints. If necessary, the connections are bored. This procedure must be done carefully; pieces of metal can get inside the drain mechanism and lead to its premature failure.
- Next, the pipes and hoses need to be connected to each other; for this, special nuts with rubber seals are used.
- A valve is inserted into the drain hole; the mounting spokes must be fixed parallel to each other.
- Lastly, the spokes are connected to the valve and lever.
It is important to know: before you use installed system, you need to check the reliability of the pipes that ensure the flow of water into the sewer.
When choosing a sink or bidet, it would be useful to have a so-called “drain-overflow” system". When installing a bottom valve, such a system is especially necessary. The fact is that when the drain is blocked, the risk of flooding the bathroom increases (they simply forgot to turn off the tap).
 To avoid trouble, there should be a hole in the top of the sink where excess water will fall. Often such a hole spoils the appearance of designer plumbing fixtures. In this case, provision is made for gutters along the perimeter of the washbasin, disguised with the help of decorative edges.
After completing the installation work and starting the water, you need to carefully inspect all connections for possible leaks. If leaks are found, they must be repaired, otherwise they can lead to more serious leaks over time.
Watch the video, which clearly shows how to properly install a foot valve with a mixer on:
This type of sink set, like a bottom valve, began to appear in our apartments quite recently, so not many people know about it. However, it is becoming more and more popular in our country. Next, we will look at the convenience of this design and how to install it on the sink.
What is a foot valve
The presented device came to us from Europe, or, to be more precise, from England. As you know, utilities in Europe are quite expensive. To save water, they came up with a bottom valve - a plug that retains water in the sink.
True, such water plugs are needed in England for another reason - it is not customary to install faucets there. Therefore, two taps are installed above the sink - hot and cold water. Get water desired temperature You can only mix it in the washbasin.
The valve is opened and closed using a button located on the body of the mixer or tap. This way, you can fill a sink or sink with a certain amount of water and, if necessary, drain it at the touch of a button.
As a rule, the bottom valve for a washbasin is sold complete with faucets. Of course, this entire device can be replaced with a regular rubber plug, but this is not so hygienic. In addition, such plugs spoil the appearance of the sink, and they are inconvenient to use.
Advantages of the device
The bottom valve has many advantages, among which the following are worth highlighting:
- Helps reduce water consumption.Considering that the price of utilities is constantly growing, this is one of the main advantages of the device.
- Ease of use. You can operate the valve with one finger by pressing a lever or button.
- Installing the structure gives the sink a more aesthetic appearance, compared to plastic and rubber stoppers.
- The valve is designed in such a way that it is easy to clean.
Installation of the foot valve
Installing the bottom valve yourself is not difficult. However, the work must be considered in conjunction with the installation of the mixer, since most often it is a single design that is supplied in one kit.
Advice!
When installing the mixer, it should be taken into account that decorative coating can be easily damaged.
Therefore, when working, it is necessary to use tools without teeth and with jaws.
If there is no such tool, then you can use a regular one, but at the same time lay cardboard, brass or copper gaskets.
Installing a faucet on a sink
Installation of the structure begins with the installation of the crane.
The instructions look like this:
- The flexible hoses that come from the mixer and the valve lever should be threaded into the hole.
- The faucet must be fixed above a special hole in the shelf (pedestal) of the sink. It is fixed using a clamping nut. In this case, a rubber gasket must be placed between it and the sink (on both sides mounting hole).
- If the water supplies are not straight, the hoses can be bent slightly. It is much more difficult to work with hard, copper tubes, which will have to be bent with special tools. This operation requires certain skills.
- If necessary, you need to cut the pipes and sand the cut points. Sanding must be done very carefully.
Often, chips get inside the structure, after which it becomes impossible to tighten or unscrew the tap. To eliminate this problem, under no circumstances should you try to forcefully unscrew or close the valves. The only way out is to dismantle the aerator (a device in which water is mixed with air), after which you need to turn on the tap and wash off the chips under pressure. - The hoses need to be attached to the cold and hot water pipes, using nuts with rubber gaskets for this. Care should be taken to ensure that the pipes do not become kinked. Only a U-shaped arrangement is allowed; an S-shaped arrangement of pipes cannot be used.
Installation of the foot valve
After the mixer is installed, you should immediately begin installing the bottom valve.
This procedure is even simpler and includes just a few steps:
- The bottom valve itself must be inserted into the drain hole of the sink.
- The valve spokes intersect crosswise. At the junction they are secured with a plastic cross.
- The spoke then connects to the lever and connects to the valve eye. Under the action of the lever, the spoke will close and open the valve.
Note!
Sinks come with or without overflow, depending on what is used different design bottom valve.
At this point, the assembly of the structure is completed, however, it is still too early to check its functionality, since it needs to be connected to the valve, which is used for draining waste water into the sewer.
The photo shows the bottom valve assembled with a siphon
Advice!
If the space under the sink is not covered by furniture, then it is best to use a chrome siphon, which looks aesthetically pleasing together with a chrome tap.
The siphon or corrugation is screwed from below, after which the flexible hose is connected to sewer pipe. After this, you can assume that you have completed the job, but you must first test the system for operability and absence of leaks.
The check should be carried out in a certain order:
- First of all, you need to connect the water supply and make sure that the tap is not leaking, and that the connections are not dripping. Otherwise, you need to “tighten” the connections; it is quite possible that you will need to use it for threaded connections sealing tape.
- Then you should completely unscrew the tap and check the siphon for leaks. At the same time, open and close the valve several times to make sure it is working, fill the sink with water and flush it. There should be no digging anywhere during the testing process.
If the testing was successful, then you have fully completed the task.
Conclusion
Additional information on this topic can be obtained from the video in this » width=»640″ height=»360″ frameborder=»0″ allowfullscreen=»allowfullscreen»>
Conclusion
The bottom valve is very convenient and useful device, which not only makes using the washbasin more comfortable, but also saves you money. Every home craftsman can equip the system independently, which makes the device even more popular.
For more information on this topic, watch the video in this article.
To begin with, we will explain what a bottom valve in a mixer is - this is a device that allows you to lock the drain valve in the bowl while water is being filled there. In fact, such a device can be a very ordinary plug.
But we are interested modern mechanisms, which are used in everyday life for plumbing equipment. We will tell you about such devices and their background below, and you can also watch a thematic video in this article.
Much about the foot valve
Where did he come from

Many argue that such a device was invented in Foggy Albion in the homes of rich people who could afford hot running water. Only, there were no mixers as such then, and two separate taps were used - hot and cold.
In order to mix, the drain, which is located at the bottom of the bowl, was simply closed with some kind of plug, which was removed if necessary. But when faucets appeared, and water from the tap began to be supplied at the required temperature in a particular case, prudent Europeans and Americans decided not to pour it straight into the sewer, but to use it as needed.
That is, the plug remained in demand, only it had already been modified, made beautiful and called a bottom valve.
Note. Although for some reason this locking device is more tied to the mixer, it directly relates to the siphon and is part of it, and to the supply running water has no relation.
Modern foot valve

So, currently the bottom valve in the mixer - what is it? This is the same plug that is driven by a lever on the mixer, located on the back of its body, and such a plumbing set is sold as a set - this is where the connection came from.
Considering the constant rise in prices for utilities, such a device is now more relevant than ever - it can significantly reduce water consumption, as well as save energy resources for heating it.
In addition, this headset is very convenient to use - you can move the plug by pressing the lever with one finger, that is, the ergonomics of the device are evident. The valve itself is easy to clean and has a rather attractive appearance compared to a plastic plug, therefore you benefit from an aesthetic point of view.
Installation
- Let's start with the fact that the instructions for installing a plumbing set of this type are practically no different from installing an ordinary siphon and mixer on a sink, therefore, we will adhere to the same rules.
- Let's pay attention to the hoses that connect the hot and cold water supply fittings to the tap itself - they usually come with a steel braided screen, but this wire is susceptible to corrosion and the coating can be damaged.
- The consequence of such damage will be the protrusion of the rubber wall of the hose outward, and then a breakthrough and all the ensuing consequences. For this reason, it is best to use metal corrugated hoses or metal-plastic ones with needles for connection - this option is the safest, even if you leave for a long time and do not cut off the general water supply.

- Get started installation work namely, by attaching the connecting hoses to the faucet body, and then one at a time, so that the end fittings do not interfere, pass them into the mounting hole on the sink. As a rule, such faucets are fixed with a shaped washer and studs with lock nuts to the bowl pedestal, but between the shaped washer and the ceramic pedestal, do not forget to put a rubber gasket, which is included in the kit.
- Do not overtighten the studs or locknuts so as not to damage the threads— just check the mixer for stability by hand — if it doesn’t turn, then everything is in order.

- Now let's start installing a siphon with a bottom valve - this is even simpler than installing a mixer; to do this, we insert the valve into the drain hole of the bowl. Please note that the knitting needles intersect crosswise there and are fixed at the intersection with a plastic cross.
- The spoke itself is attached to the valve eye and the lever on back wall crane- this allows the spoke to be moved using a lever, thereby opening and closing the valve.
- Please note that the bottom valve is screwed to the drain first, and a plastic or steel siphon is already screwed onto it, which is connected to the sewer pipe.
- In cases where the washbasin bowl is not covered by the walls of a cabinet or bedside table, it is preferable to install a stainless steel siphon rather than a plastic one - this will be a good aesthetic contribution to the interior of a given room (its price, of course, is higher).
- After assembling the kit and connecting it to the water supply and sewerage, turn on the hot and cold water, open the mixer and check the joints for leaks.
- Sometimes the leakage is too weak and a drop can collect within 10-20 minutes, but in order not to wait, you can simply run a dry toilet paper. In case of even the slightest leak, the paper darkens where water enters.
Note. If the installation is done correctly, there should be no leaks.
Also, you should not use various sealants for joints - the gaskets that come with the kit are sufficient for this.
Conclusion
In the same way, you can install a bottom valve for a shower tray with your own hands - it is sold together with a siphon complete with a cabin or box. Only there, instead of a knitting needle, there is a thin one steel rope, which is driven by a small lever, most often attached to a pallet. Good luck!


