How you want to relax on a summer day near a small pond where delicate water lilies bloom and a school of bright fish splashes! If such beauty is located on your site, then this is absolutely a dream! Fortunately, it is not difficult to implement. To do this, it is not at all necessary to initially purchase a plot of land with a natural reservoir, because you can make a pond in your dacha with your own hands.
Determining the location of the pond
If there is a free area on the site, not located in the open sun, but not shaded, then you can safely start creating a pond there. The first thing you need to pay attention to is the lighting of the area. The fact is that in poor lighting, aquatic plants will not be able to develop normally, which will negatively affect their appearance.
The sun is also not the best place for a pond. Firstly, light is greatly respected by unicellular algae, which will pollute the water, causing it to “bloom”. Secondly, if the pond is not too deep (and artificial reservoirs, as a rule, are just that), then plants and fish will also have a hard time in the heat. Even their death is possible. Thirdly, think about yourself: relaxing in the sun in the heat, even near a pond, is unlikely to give you pleasure. Thus, good place There will be a platform on which the shadow of a tree, house or fence falls at midday. Morning and evening cool sun rays will not harm the pond.

You should not place a decorative pond with your own hands in close proximity to trees, as growing roots can damage its base, displacing the edges of the shape or tearing the film.
If you plan to subsequently illuminate the pond at night, equip it with a filter, or connect a pump for the fountain, then consider the location taking into account the proximity to the source of electrical energy.
Option from a ready-made plastic mold
The simplest version of a pond can be made from a ready-made plastic or fiberglass mold cast in production. The plastic container will serve you for about 10 years; it is resistant to negative temperatures and ultraviolet radiation. During installation and other mechanical manipulations with plastic mold, you should be careful not to damage it. Unfortunately, once a crack appears on the surface, it cannot be repaired.

A more expensive material for the finished form is fiberglass, which is characterized by increased strength and durability. On average, the lifespan of your fiberglass pond will be 2-3 times longer than a similar one plastic version.

Thus, the first step to constructing such a pond will be to purchase a form, which is then dug into the ground.
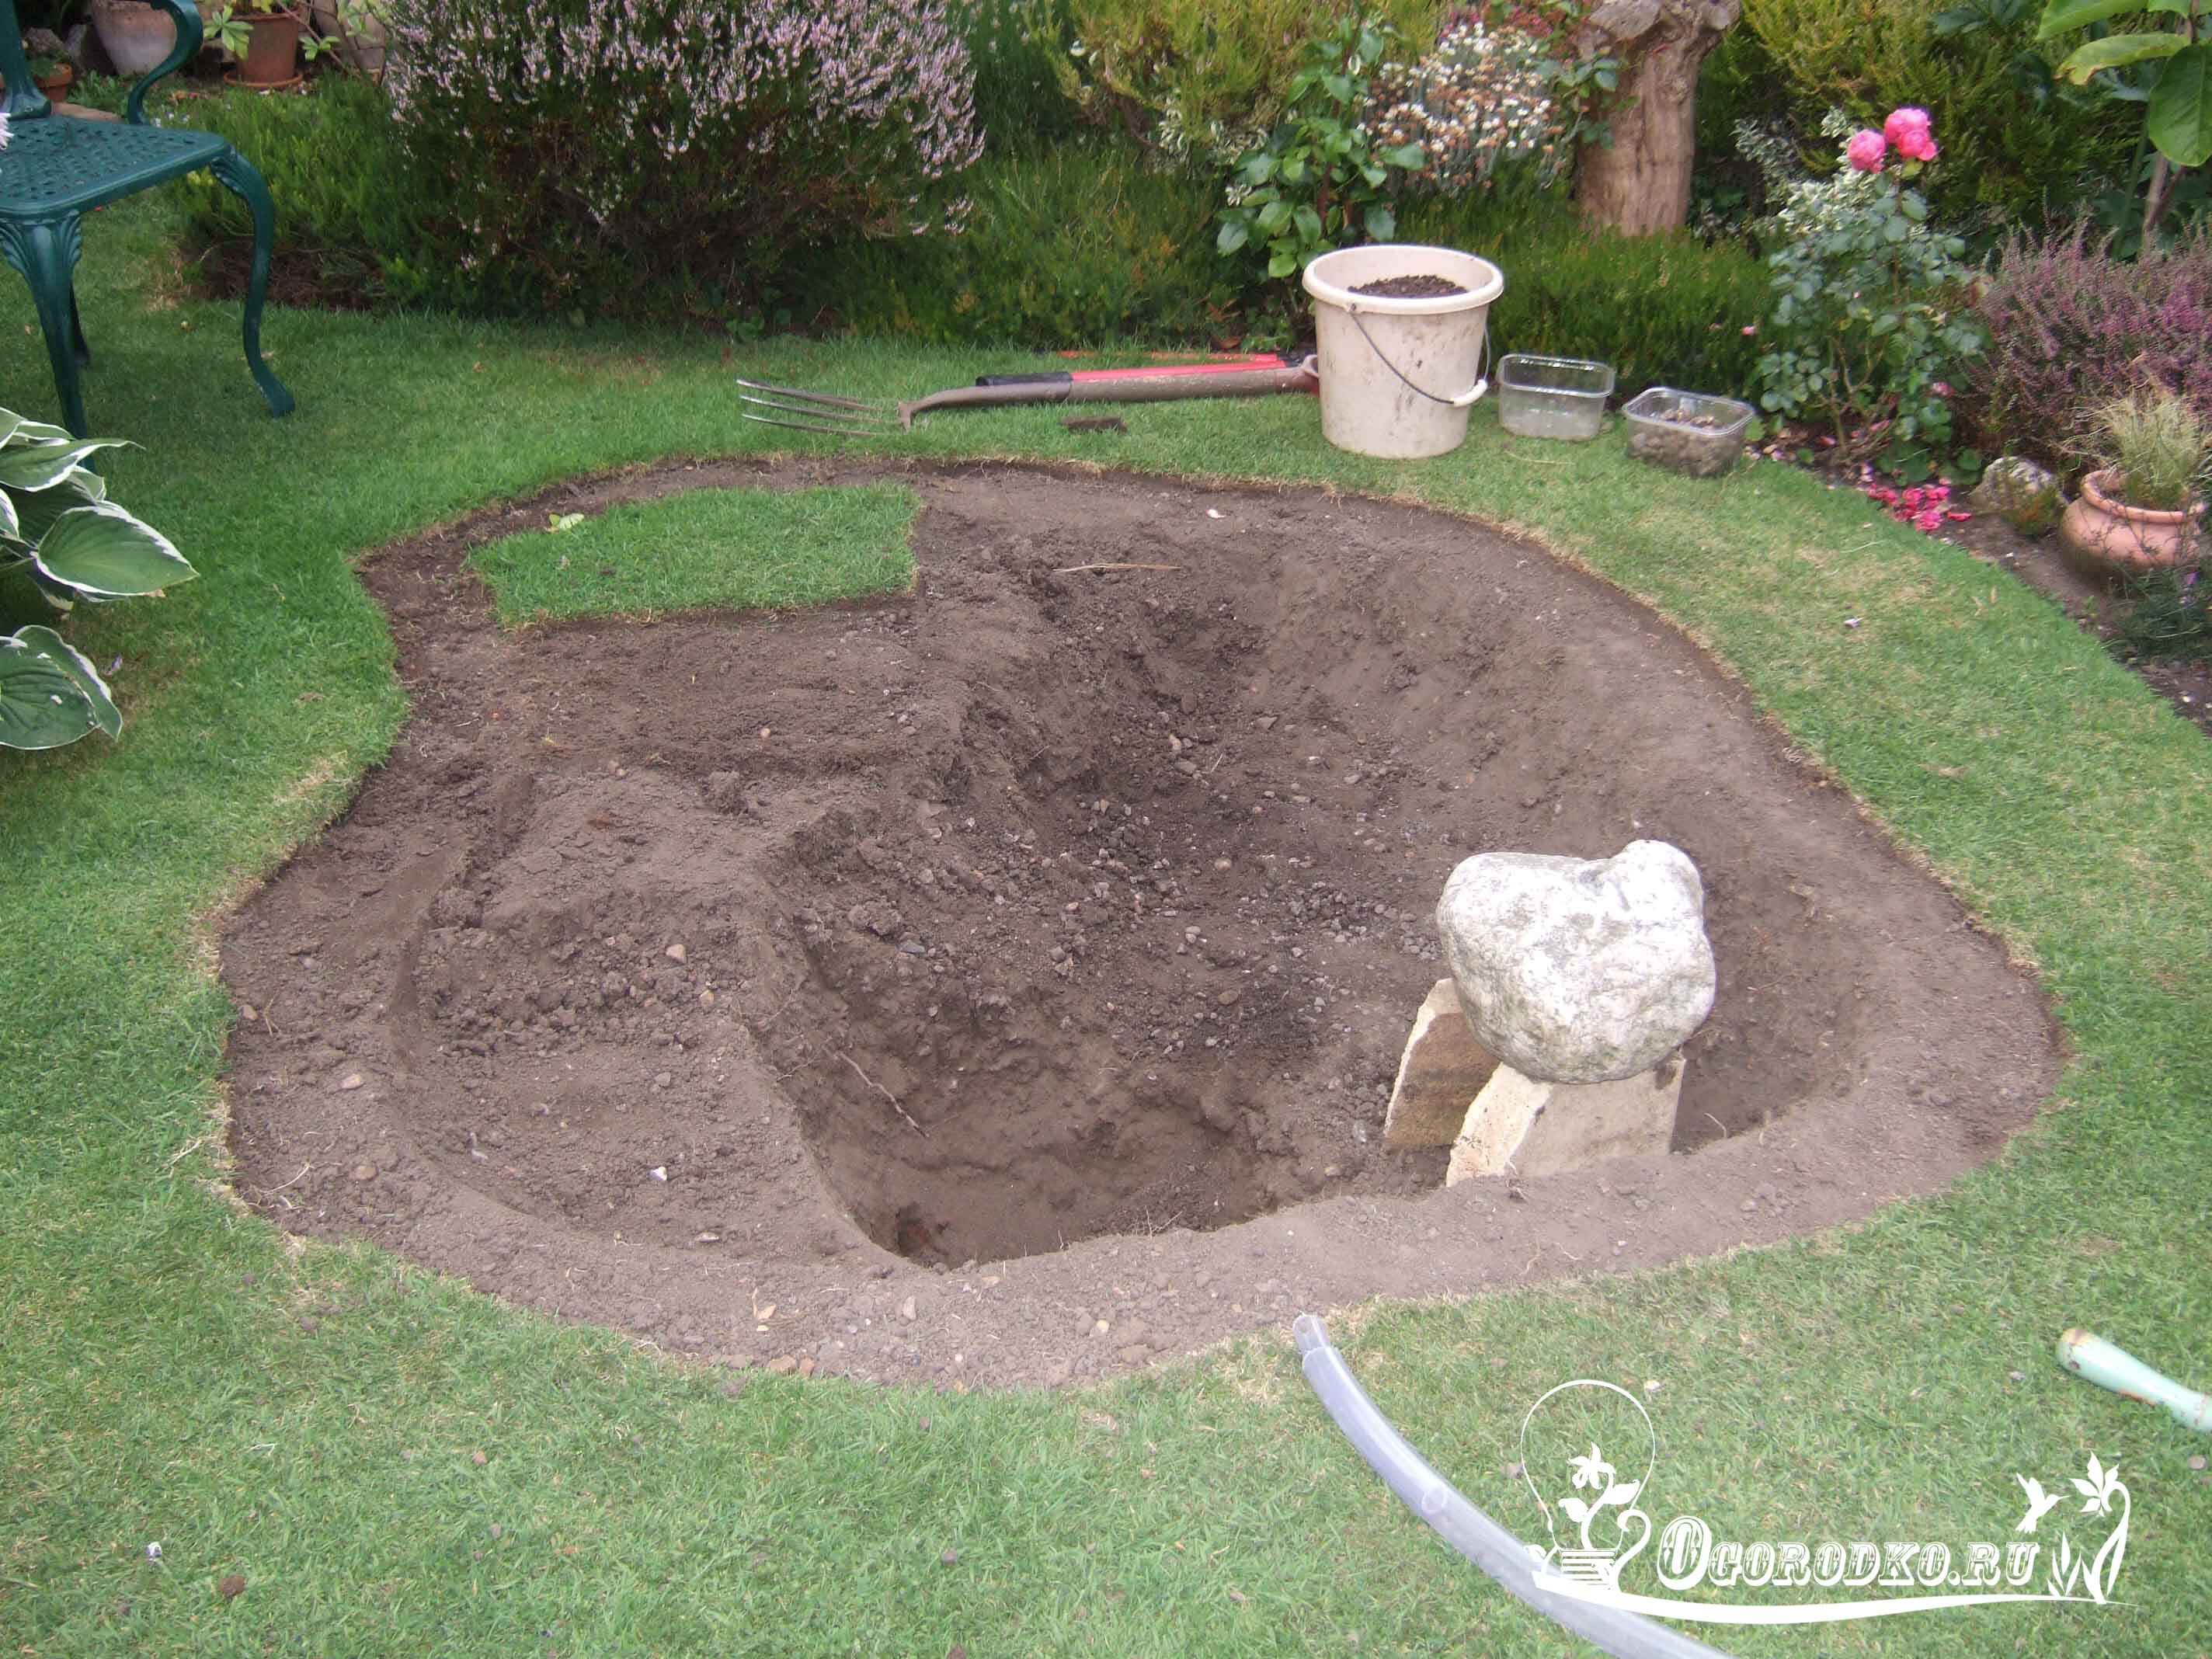
In order to dig a pit of the correct shape, it is necessary to transfer the contours of the future reservoir to the ground. This is done like this: a ready-made plastic bowl is placed on the ground, around which, moving 10-20 cm further from the outline of the shape, wooden sticks are stuck in and a rope is pulled. After this, the bowl is removed and they begin to dig a hole 20-30 cm deeper than the height of the form. You should ensure that the pit is horizontal, using a building level or a flat board.
A sand cushion is placed at the bottom, which will serve as a kind of foundation for the pond. A mold is placed in the pit, the resulting gaps on the side are also filled with sand and water is poured from a hose for shrinkage.

After this, the form is filled with water, the banks are decorated with stones and aquatic plants are planted.

Making a pond with your own hands from film
Using PVC or butyl rubber film you can create a pond of any size and shape. The film is sold in rolls, 2-10 m wide, 10-50 m long. The polyvinyl chloride fabric is resistant to ultraviolet influence, tolerates cold well, and does not fade for a long time. In addition, its service life is 10-15 years. Butyl rubber film is considered to be of higher quality due to its greater durability (at least 20 years) and strength. Naturally, such a film is more expensive than polyvinyl chloride, so its use is justified only in large bodies of water with great depth.

Before constructing a pond, you should calculate the amount of film using the formula:
W film = W pond +2 x D pond + W,
Where: W – width, D – depth, Z – stock.
W = 0.5-0.6 m.
The reserve is necessary in order to tightly secure the edges of the film to the shore of the pond.

When creating a pond, a pit is first dug. If you plan to plant plants directly in the water, you should provide them with ledges and shelves with a shallow depth - no more than 10-15 cm - along the edges of the future reservoir.

When digging, make sure that the walls of the pit do not collapse. In the event that the site is dominated by chernozem or clay soil, then the walls can be made vertical - they will not collapse, but if the soil is sandy, then it is necessary to provide for a slope.
After the pit is ready, all roots, stones and other large mechanical inclusions are removed from the bottom. In order to protect the film from tears, a layer of geotextile or sand (10-15 cm) is laid on the bottom.
The film is spread over the protective layer and secured with stones around the perimeter, as well as on steps and ledges.

It is advisable to dig a shallow groove around the reservoir, 20-30 cm wide, so that the stones securing the film to the surface are flush with the ground. In order to fix the stones, it is advisable to fasten them with cement mortar.

Now that the container is ready, you can pour water into it and plant the plants - that’s it, the pond is ready!

If your old bathtub has become unusable, you can try making a pond out of it.
The depth of the pit for the pond is equal to the height of the bath + 0.2-0.3 m. Thus, when you lower the bath into the pit, its edges will be below ground level. A groove is made along the perimeter of the pit, 30 cm wide and high. Next, lower the bath into the pit and level it horizontally using a level. We fill all the voids that have formed on the sides, between the walls of the pit and the bathtub, with sand. As a result, we will end up with a sunken bathtub with a groove around the perimeter.
After this, you need to mix the adhesive mass from tile adhesive, dark pigment (brown, for example) and water. Apply the resulting glue to the side internal surfaces baths, without trying particularly hard to level it. The main thing is that the bath acquires a dark, natural shade. After this, cover the bath with film and leave for a day so that the glue completely hardens. 
The edges of the bathtub must be fixed metal mesh. To do this, cut out pieces of the mesh and lay them around the entire perimeter of the bathtub, covering the edges and inner side surfaces to half the depth. In this case, the walls and edges of the container are covered with a mesh, and the bottom remains open.
After that, cook cement mortar from sand, cement and water. Apply it to the mesh without trying to level the surface. From time to time, insert stones into the cement surface - this will further strengthen the mesh and make the pond more natural. Carefully cement the drain.
On the surface of the ground, where the mesh covers the edges of the bathtub, place large stones in the groove that can emphasize the shape of the pond. By the way, it is advisable to move away from rectangular shape and lay out the stones not clearly along the edges of the bath, but in a wave-like manner, widen the banks. Change the topography, creating unevenness and hills, for example, add a pile of crushed stone in several places. Thus, visually you can give the pond almost any shape, not necessarily rectangular.

Pour dry clay into the bottom of the bath and mix the clay solution right there. Spread it on side walls, covering the cement mortar, fill the voids between the stones.
The clay will dry quickly - in a few hours and after that you can pour water in a thin stream. Plant aquatic plants in the grooves around the bathtub and on the bottom. After a few days, the water in the pond will become cloudy, take on a natural appearance and nothing will reveal its true origin. This is how a pond can turn out with your own hands: photo:

Do-it-yourself artificial pond and its “inhabitants”
Just digging a container into the ground and pouring water is not all. The pond will become truly decorative only after you plant plants in it, and maybe even get some fish.
Different types aquatic plants can develop normally only at a certain depth. At a shallow depth, up to 30 cm, you can plant marsh marigold, yellow iris, cordate pontederia, etc. A depth of 30-50 cm is the most appropriate place habitats for broadleaf cattail, common arrowhead, reed, etc. Well, the very “deep” inhabitants, adapted to life at a depth of more than 50 cm, are - water hyacinth, water lily, lotus, aloe vera, etc.

Among the most common and unpretentious fish for an outdoor pond are veiltails, koi carps, and crucian carps. If you decide to add fish to the pond, be sure to install a filter in it. Without it, the water in the pond will quickly deteriorate, which can affect not only its decorative features(the water becomes cloudy, unpleasant odor), but also on the health of your new pets.
01.03.2016
45 434
How to make a pond at your dacha with your own hands - step-by-step technology and errors

Beautiful decorative ponds, photos and pictures of which can be seen everywhere, have become an integral part of many garden and summer cottages. However, not everyone knows how to make such a decoration with their own hands. A pond is a decorative element, a place where you can relax and escape from the bustle of the city. Water is the most the best remedy from stress. Recommendations, a photo gallery, tips on arrangement will help you overcome the steps on the path to beauty, serenity, and will also teach you how to improve your home area with minimal investment. Installing a pond in the yard and decorating it will not take much of your time.
Which style to choose and where to place it?
The initial stages of landscaping a reservoir are important and necessary. Thoughtful stylization in harmony with the landscape design will be the basis for creating a reservoir. You need to select a style in accordance with the architecture of the house and buildings. In the interior of the garden, you can place a formal version (of regular geometric shape), or a free natural pond, forming an integral composition with other decorative elements.
Formal views are the main decorative element in the garden. They are suitable for small and large areas, there are different sizes, are located in the center. Free reservoirs are arranged in arbitrary shapes, giving a natural look, hiding artificiality.
 do-it-yourself pond at the dacha - in the photo
 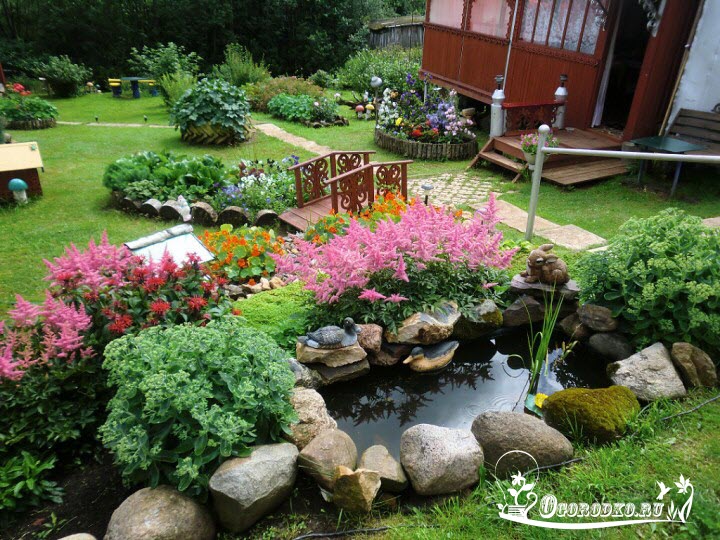 small pond in the country with your own hands
 in the photo there is a pond on summer cottage
  in the photo - a pond in the garden plot
When choosing a Japanese style, remember that stone, water and lanterns are the basis of the image. Think about the shape and location in advance. Bonsai-style trees and a tea house will complement and decorate the garden. Garden walls, windows, and moon gates are considered an indispensable attribute of Chinese manners. The entrance to the structure is being arranged entrance gate. The English garden strives to merge with nature, the French one is filled with majesty and large space with fountains, cascades, and sculptures. Italian mini-pits with fountains are located in front of the main entrance of the house and are the central composition.
Choosing a location and material for arrangement
Many craftsmen know how to make a pond with their own hands, taking into account the size, location, and choosing sunny open areas. Trees located in close proximity will create additional troubles. Fallen leaves and constant shadow of trees hinder growth ornamental plants, pollute the water. You can arrange the structure under trees, but you must be in sun rays 5-6 hours a day.

 DIY pond in the country house
Regarding sizes, consider the scale of the site. The pond should fit harmoniously into the landscape design. Small garden plots an area of 6 acres is equipped with small structures that are easier to construct, financial costs will be insignificant. Deep and voluminous are made for large territories and fish farming. If you don’t plan to introduce fish, don’t dig a big pit.
 DIY pond in the country house
  on the picture - country pond with your own hands
To build a pit with your own hands, you need to buy and prepare materials for future construction. This opens up great possibilities for your imagination. You can build a decorative lake on your site from any materials. A permanent reservoir with a concrete base will require time and money. Various plastic containers, a lake from an old bathroom, tires from large tractor wheels will cost less, and will look beautiful if done correctly. The design can be easily made using a special elastic durable film.
 in the photo - a pond on your site
Step-by-step creation of a lake using black film
— Schematically sketch out the design of the future reservoir, indicating the width, depth, location of the curtains (thresholds for planting). The drawn drawing will allow you to correctly arrange the plant, decorative elements, and avoid mistakes and alterations.
 step 1
  step 2
- Draw the contours of the lake using a garden hose, sand, spray paint, other available means. Uneven surface must be level.
- A pit is dug to the depth of the nearest threshold (for plants and flowers), the next tier is marked, and dug out. The lake can be made in several tiers. You can do without thresholds if it is small.
 step 3
- To buy a film of the required size, the finished pit is measured using a cord, and 40-50 centimeters are added on each side of the bowl.
- The next step is to pour sand and compact it. There is no sand, proceed to laying the next layer. Small option can be done without sand.
- You can protect the material from cuts and damage using geotextiles, which are laid on the bottom and walls of the pit after a layer of sand. You can replace purchased material with existing old unnecessary linoleum, carpeting, or roofing felt.
 step 4
  step 5
- It is more convenient to secure the material by digging a shallow trench along the edges. The edges of the film are placed in it and sprinkled with a layer of earth and crushed stone.
- A stream and a submersible pump, which is placed at the bottom, will help rid a large pit of stagnant water. The pump is connected to cleaning filters. The stream is located above the level of the lake so that the water flows freely down and rises with the help of a pump. You can hide it under beautiful stones and plants. A hill is being planted from a stream beautiful flowers, decorated with various decorative elements (sculptures, clay pots).
 step 6
  step 7
- The coastline along the entire perimeter is lined with decorative stones (natural cobblestones), preventing the earth from sliding into the pond. Place the plants, cover the bottom with small pebbles, and fill with water.
The construction of the lake with your own hands is completed, keep the reservoir clean and tidy, remove debris and algae in a timely manner. Use preparations to maintain biological balance, plant fertilizers, anti-algae agents, and to clarify water. Find the right place, do it right, decorate it beautifully. Mistakes and miscalculations can turn an attractive, good body of water into a complete problem, take this into account.

Having your own artificial pond at your dacha has ceased to be a luxury; now anyone can build such a masterpiece. Such a structure can be aesthetic and functional. Some ponds are designed to decorate the landscape, others are intended for swimming or fish farming. Even just watching the water in a pond calms you down and improves your mood. It’s easy to make a pond on your site, just understand the basic nuances.


Peculiarities
For some people, an artificial pond is not a decoration, but a necessity. If you have a pesky stream running through your property or have long put up with waterlogged soil, a pond will greatly improve your situation. It is best to build a pond in the spring. For self-built There are many options for ponds that involve the use of special expensive materials or affordable (even improvised) means. Such construction does not require much time, effort and money. All you need is attention to detail and strict adherence to recommendations.


Kinds
An artificial pond at the dacha is built for various purposes. It is by this criterion that the following types can be distinguished:
- Small. Water small size becomes part of the landscape design. It is designed to decorate a specific area in the garden. Near such a pond you can read a book in a chair, but it does not involve active recreation.
- Decorative. Deeper than the previous version. Such a pond has a fountain inside, lighting around the perimeter, an openwork bridge and other decorative elements. The purpose of decorative ponds is to attract all the attention. Such reservoirs are located near a gazebo or open terrace.
- For fish breeding. This pond will delight fishermen, children and cats. The beautiful fish are a pleasure to watch, and many species are great for dinner. It is important not only to launch the fish, but also to create comfortable conditions for them to reproduce.
- For swimming. Your own pond on the site is a good alternative to a simple pool. Such a pond is not limited only to aesthetic properties, but also provides benefits. A small pond will provide an opportunity to cool off in the heat, while a deep and large one will allow you to swim and play water games.
 Small
Small
 For fish breeding
 Decorative
Key issues such as location, size, shape and stylistic design are decided based on the type of reservoir. Therefore, first set a clear goal for yourself, only then move on to the next steps.
Material
Modern manufacturers offer a wide variety of materials for self-made pond. It all depends on your goals and financial capabilities. For the right choice it is necessary to study everything carefully possible options. For the construction of a swimming pond good option will be the construction of a concrete bowl.
Filling the pond allows you to use it for a long time. This option is quite expensive, but reliable. More suitable and affordable option– polyvinyl chloride (PVC) or fiberglass. The reliability of the materials allows the bowl to be used for 5 to 30 years, this directly depends on the work performed and the type of material. Both options for creating a pond allow you to create the desired depth and shape.


Purchased forms – simplified version. You just need to dig a pit, install a mold and reinforce the structure with sand. Plastic bowls are quite durable and can easily withstand winter frosts. Bowls made of polypropylene are afraid of ultraviolet rays and become unusable due to their prolonged exposure. The disadvantages of such structures are the rather high price and difficult transportation.
It will be difficult to bring a bowl under a large pond to its destination without damage. Moreover, you will need basic skills in installing such structures; it is difficult for beginners to cope with such a task without damaging the bowl.


The most reliable film is considered to be butyl rubber, made from rubber. Experts recommend using this material for those who have a pond of impressive depth, a bottom with many stones and roots. You can enjoy a pond with such waterproofing for 50 years. The great advantage of the material is its favorable reaction to repeated freezing and thawing. Specialized materials are the preferred option, but not the only one. Craftsmen offer the following options:
- Old bath. Such an object can be painted and installed on the surface, or it can be lowered into the ground to an arbitrary depth. You can easily install a small fountain along with a pond.
- Tires. Variably, tires or wheels are used as the frame of a small pond.
- Basin. The installation method is similar to a bathtub. The item itself is so light that such ponds are often made by children and women, whereas they cannot handle a bathtub. It is important to pay special attention to the decor so as not to overload the space with details.
- Plastic bottles . This material makes it possible to create small reservoirs with maximum speed. It is enough to cut the eggplant at the desired level and dig it in the right place.


Keep in mind that the material determines how long you will enjoy your summer cottage pond. It is important to choose materials that do not harm the environment. Otherwise, toxins will penetrate into the soil, and this will affect your harvest.
Size
It cannot be stated unequivocally that a large pond will cost more than a small one or will have better aesthetic properties. Optimal options you need to select based on your goals. Key Factors when choosing a size:
- Dimensions. This parameter depends solely on the location of the reservoir. It is believed that the reservoir should cover no more than 3-10% of the area of the entire summer cottage. There are no clear boundaries, it all depends on your preferences.
- Lenght and width. This criterion also largely depends on the size of the site, the purpose of the reservoir and your capabilities. The latter concerns digging a pit - you can dig a small one yourself, but for a large one you will need special equipment.
- Depth. The larger the pond, the deeper it can be made. Thus, a mini-structure can have a depth of several tens of centimeters, and a swimming pond - several meters.
- Zoning is relevant for large bodies of water. Design experts recommend dividing the pond into 3 zones. The coastal zone is 10-40 cm deep for approaching the pond and planting ornamental plants. Shallow water zone - from 40 cm to 1 m; at this depth you can plant a winter-hardy water lily or nymph. If this is a body of water for swimming, then this is the area that will make it possible to smoothly enter the water. Children can swim at shallow depths. The deep-water zone is more than 1 meter deep, adults can swim here, and fish are also bred at this depth.
- Biodynamic balance. It is necessary to take this factor into account if various kinds of living creatures live in the pond. Provide such a balance that the artificial pond can clean itself. Purification of water in a pond with fish or plants using chlorine or ozone is not provided.
- Care. As a general rule, the larger the pond, the easier it is to clean. Be sure to think about ways to care for plants, fish, and the pond itself.


Location
It is very important to position the pond correctly. Especially if we're talking about about a large-scale structure that will serve you for many years. Important Factors when choosing a place:
- Plot size. This factor is closely related to the size of the pond itself, and therefore to its location.
- Relief. It is important to consider the combination of the topography of the earth with the shape of the pond itself.
- Soil composition and groundwater. This factor is directly related to maximum depth pond. If the circumstances are unfavorable, you will face additional hassle and material costs.
- Illumination. Choose a shaded place. The sun should not be on the water for more than 5-6 hours a day. Neglect of this factor leads to active evaporation of water and to increased activity bacteria. To select the right location, observe the solar regime for 2-3 days. It is especially important to correctly evaluate this criterion when breeding fish. Heated water reduces the amount of oxygen, which can lead to the death of pets.
- Visibility. Choose a place so that the pond can be seen from a window or gazebo. Decorative pond will become the calling card of your site if it is noticeable at the entrance to the territory.


- Reflection. Oddly enough, it is better to think in advance what will be reflected in your pond. If the reflection includes a toilet in the yard or a shed, this can ruin the overall impression.
- Degree of landscaping. Make sure that tree roots cannot damage the pond bowl. Also keep in mind that in the fall, leaves and branches may fall into the pond and turn into sludge at the bottom. Carelessness when choosing the right place can lead to difficulties in caring for the pond. If you really want to decorate the perimeter of the pond with bushes, then consider the option of plants in barrels (tubs).
- Electricity supply. Some decorative elements operate on electricity. So, you can install an interesting fountain, make lighting and much more. The main thing is to carefully consider the option of supplying electricity to water. It is better to think through this issue at the design stage. It is safest to place the wires underground in a secure corrugation. For permanent access to them, equip a hatch.
- Future expansions and improvements. Plan ahead. You may want to expand the pond or develop a more detailed recreation area near it. Provide free space on at least one side of the pond.


Color
The waterproofing tone has great importance, affects the overall image. The black bottom creates the illusion of a mirror. In such a reservoir, plants and the sky are perfectly reflected. The brown and black material allows you to create an imitation of natural soil, which is usually located at the bottom of a reservoir.
Blue and cream ponds do not closely resemble the creation of nature, but are an excellent option for breeding colorful fish. Also, blue and grayish tones are great for the body of water in which you are going to swim. These colors imitate the bottom of the pool.


Thus, the color should be chosen based on the purpose. Decorative pond will approach natural look thanks to the dark bottom. For breeding fish and swimming, you should choose light colors, even white.
Forms
It is almost impossible to describe all the shapes of ponds, because the imagination of design masters knows no bounds. Conventionally, it is possible to identify the correct geometric shapes and fantasy. Among the first, the most popular designs are in the shape of a circle, oval, and rectangle. Fantasy forms are more whimsical, and this is their charm. Such ponds are most similar to the creation of nature, which does not tolerate severity. Among the popular forms, one can highlight the imitation of a natural form.
Style and design
Design specialists responsibly declare that a country pond can be made in two versions, but they can have many modifications. Design options:
- Formal. The name speaks for itself. Such a country pond has clear geometric shapes. This option is well suited for areas in the style of modern, high-tech, minimalism, and classic. Formal ponds include not only rectangular, square and round ponds. This also includes broken figures; they can be either symmetrical or asymmetrical. The design of such ponds is strict. Classic neutral colors are used. It is typical for a formal reservoir a small amount of additional decorative elements or their complete absence.
- Landscape. This option is more popular than the previous one. Such a pond has a fuzzy coastline, close to natural look. Exactly landscape style makes it possible to create a harmonious balance between an artificial reservoir and nature itself. You can realize your most bold ideas. Before choosing a pond style, evaluate the topography of the site. Level ground guarantees the embodiment of any fantasy shape.
Raises and depressions in the ground require careful design, but make it possible to easily build a cascade or waterfall. On intricate terrain, bridges and slides look more natural.


A suitable relief can be created artificially. Requires more than complex technologies when working with the foundation. Carelessness will lead to distortion due to subsidence of the earth. A high pond (located above ground) is also possible as part of the landscape design. There are many advantages of this design:
- Easy to care for.
- Minimum amount of excavation work.
- Safety of children and pets.


Bath pond is the most shining example such a reservoir. You can paint on the walls in Japanese style, which looks organic in the garden. This element will complement the overall landscape design of the site.
How to do it yourself?
The construction of a pond should be carried out according to clear instructions. This way you can properly dig out the boiler and lay down waterproofing. Construction of a pond using film step by step:
- Making a pond starts with a plan. Choose a convenient scale and draw absolutely everything, including the depth of each zone. It is recommended at this stage to think about decorative design. This is especially important if you are planning to build a pond with a waterfall. A detailed plan will help you avoid mistakes.
- Now you need to mark the future pit. This can be done using a rope stretched over pegs, a rubber hose, or even sand (draw an outline with it). It is important that the banks are at the same height. Start digging a pit based on the plan. Check their level from time to time.
- It's time for excavation work. Dig a hole the depth of which will correspond to the depth of the coastal zone. Make markings and fix the burial line. Arrange the second tier and make a line for digging the deepest zone of the future pond. Fulfill excavation It’s better to do it together, or even hire an excavator for a large pond.


- After the hole is dug, you need to measure the dimensions and depth. Do this with a cord. To the resulting number, add 50 cm on each side of the pit. Now you know how much PVC film you need to purchase.
- Cover the hole tightly with film. Geotextiles can be laid underneath to prevent tree roots from damaging the waterproofing over time. In addition, the structure can be strengthened using roofing felt or linoleum. You can also strengthen the shore and bottom using tightly compacted sand. It is recommended to perform this procedure on a sunny day, so the film will heat up and lie more tightly on all the bends of the pit.
- The edges of the film must be tucked into a pre-prepared trench around the perimeter of the pond. Next, you need to fill the trench with crushed stone or other stone. This way you will ensure reliable fixation of the film.


- The bank should be strengthened so that over time the earth does not crumble. Reinforce the edge of the pond with stone blocks or plastic pipes, they need to be nailed to the pegs. It is recommended to lay out the edge natural stone and complete the picture with large boulders.
- At this stage it is necessary place plants that will decorate the pond, into special baskets and install them in in the right places according to plan. Line the bottom with small stones or gravel.


- It's time to fill the pond with water. The best assistant there will be a hose for you. Carrying water in buckets is not convenient, especially if the reservoir is large. Standing water can cause many problems, including an unpleasant odor. To eliminate this complexity, you can make the pond a stream. To do this, simply raise the source slightly above the level of the pond, and supply water to it from the bowl itself using a pump. This device will save you from unnecessary hassle.
- Installation of a submersible pump, pipes to the stream source and filter connection - final stage technical work. It is recommended to use a pressure filter to purify water; it is more effective.


More household option pond from old bath can be done in such a way that the old plumbing will be unrecognizable in the magical composition. The process of constructing a pond can be performed according to the following instructions:
- Dig a hole for the bathtub so that the depth of the pit is 40 cm higher than the tank itself.
- Finish the edges of the hole. Remove 35-45 cm of soil around the perimeter.
- Deepen these strips so that the height is equal to the height of the bathtub.
Be sure to close the bathtub drain. You can use concrete or film for waterproofing. After this, lower the bathtub into the hole.


- Paste over inner part bathtubs with small tiles or paint them waterproof paint desired color. After this, cover the bathtub and leave until completely dry.
- Cover the perimeter of the bath with a chain-link mesh. This material is rightfully considered the best for reinforcement.
- Cover the chain-link with a mixture of sand and cement.
- Swipe decorative works. For this you can use stones, tiles, gravel and similar materials.


Required Tools
The amount of inventory depends on how complex and varied the pond you want to create. To build a simple pond, you will need:
- Shovel.
- Ground trolley.
- Building level.
- Cord for marking.
- Pegs.
- Water supply hose.
- Film for waterproofing a pond or any other base.
Such a minimum list is always needed. In addition to the above, you may need fencing. This will keep your animals and children safe. Decorative fences significantly affect the overall appearance artificial reservoir.
Technique
To create a more complex composition, you need to acquire additional equipment:
- Water purification filter. This is especially important if you are creating a fish pond.
- Water pump. This device is used for pumping and pumping water, operating filters, fountains and waterfalls.
- Sterilizer. This device guarantees crystal clean water in the pond.
- Aerator (compressor). The device saturates the water with oxygen. Relevant in a pond with fish and plants. It is important to choose a model specifically for the pond; models for aquariums do not have the required power. You may have to use an excavator to dig the pit.
 Water purification filter
 Water pump
 Aerator
Plants and additional accessories
As a decoration, you can install a decorative fountain in the pond. The structure can be purchased ready-made or built independently. A decorative pond is often supplemented with bridges. Garden figurines nearby will perfectly complement the composition. Flowers and plants in the pond require special attention. Plants are divided into deep-water and shallow-water.
The first ones are planted at the bottom in special baskets. They should occupy no more than 30% of the total area of the reservoir, otherwise it will turn into a swamp. Such excess can destroy other inhabitants of the reservoir, especially fish. Carefully plant flowers on the coast, keep in mind that they will grow over time.


First of all, nymphs are planted in the pond, and then the bottom is filled up decorative stone, starting from the deep zone. On the terrace you can plant marsh calamus, calamus, sedge, chastuha and susak. On the surface of the water you can place water hyacinth, bagel, pistia or swampweed.
On the shore you can place various types of iris, reed, buzulnik, aruncus, miscanthus. The composition can be supplemented with perennials: hostas, buttercups, primroses, astilbes or bathing flowers.
Look great next to artificial pond peltiphyllums, loosestrifes, rogersias.


Do you need fish?
A reservoir can be populated with different fauna. Ducks and even swans can live on the pond, it all depends on you. Most often, fish live in country ponds. The choice of residents of the reservoir should be taken carefully. The most common inhabitants of ponds are crucian carp, goldfish, carp and tench. Keep in mind that one fish up to 15 cm in size requires about 50 liters of water space.
How nice it is to spend time on a fine summer day on the shore of a picturesque forest lake, enjoying the coolness and beautiful views of aquatic vegetation. Knowing how to make a pond at your dacha with your own hands, you can arrange a similar corner on your own plot of land. You just need to decide on the design and clearly follow all the stages of work contained in the instructions given below.
Preparatory stage
Choosing a pond style
Before proceeding directly with construction, you should choose the design of the pond at the dacha - by going through many standard sketches and samples with your own hands, you can create a unique pond, adding individuality to it with the help of minor design changes or the use of additional decor.
Of course, the simplest option is a mini-pond made of tires, which, no matter what, will look great on a small summer cottage.
However, if you have enough space, and you are not bothered by the price of materials and the cost of services for constructing a pond, you can make an excellent decorative pond from concrete that will protrude central element landscape design of the entire site.

Advice!
Used as temporary housing country houses from block containers after construction capital structure can be converted into a bathhouse, for example.
In this regard, it is advisable to locate the reservoir not far from them, in order to subsequently organize a recreation area there, organically completing the entire ensemble.
When choosing a style for a pond, first of all, you need to take into account the architectural design that was used when building the house and laying out the garden.
OK, when small pond at the dacha - designed and built with your own hands - is combined with the following elements:
- coastline;
- design of garden paths;
- appearance of small garden forms and so on.
A gazebo or terrace looks most appropriate near a pond, sitting on which you can comfortably contemplate the calm surface of the water.
Let's look at some points in more detail:
- Stylistics. Features of a Japanese pond are stones various sizes and forms and conifers. This style does not accept the presence of a large number of multi-colored grasses. The Chinese pond is decorated with brighter and lush vegetation. There must be trees and a classic convex bridge. You can also plant a pond with local plants, without various exotic specimens. This style is called “ethno-garden”.

- Geometric shape. A strict rectangular or square pond looks good next to residential building, perfectly combined with its strict forms. In addition, this form is often used when arranging a reservoir in patio. Flower beds of the same shape and strict concrete paths organically complement the ensemble.
Advice!
Garden paths, regardless of the material used to make them, go well with ponds.
Looks organic terrace board, from which a bridge across the surface of the water is made, or concrete plates, as if floating above the surface.
Round ponds are suitable for decorating grassy lawns and neat ones. In this case additional element A pergola covered with ivy, as well as a separate group of low-growing trees, will serve.
It should be noted that it is easiest to build a round small pond at the dacha with your own hands. To do this, you can use many ready-made forms: from concrete rings for a well to the car tire already mentioned above.

Selection of location, size and material
The correct choice of the site where the reservoir will be located is the key to it normal functioning during the whole year. Otherwise, you may encounter a so-called bloom - a rapid proliferation of microscopic green algae that covers the water surface with an unaesthetic brown film.
- too much illumination leads to excessive development of harmful microorganisms in the water;
- Being in the shade negatively affects the growth of ornamental aquatic plants and the behavior of fish living in the pond.
The best option is lighting for 5-6 hours. The water surface should be open from the south. It is also inappropriate to arrange a pond in the shade of massive trees. The leaves falling from them will constantly clog the pond.
The ideal size for this hydraulic structure is 3% of the space land plot. However, not every summer resident is ready to sacrifice such an amount of land for him. In addition, you need to remember that it is easier and cheaper to make a small country pond with your own hands than a large lake.
As for depth, a three-stage system is most often used:
- coastal zone - for aquatic plants;
- shallow water zone - for growing water lilies and water lilies;
- deep zone - for wintering aquatic inhabitants (if their breeding is planned).
The maximum required depth is 180 cm. Below this level the soil does not freeze, which guarantees the presence of water under the ice layer in winter.
Note!
The deepest zone can occupy no more than 1/5 of the entire pond area.
This will be quite enough for the wintering of fish, and its increase will negatively affect the cost of work on arranging the reservoir.

Once you have decided on the size and shape, it's time to move on to choosing materials. The most expensive and reliable option– casting a concrete bowl reinforced with metal rods or mesh. A little less expensive is to use a ready-made plastic container, which can be purchased at a hardware supermarket.
However, the optimal and cheapest method is to make a pond using a special film that covers the bottom of the future pond.
Self-production
The sequence of actions for constructing a decorative hydraulic structure on a summer cottage is as follows:
- As with any other construction, first of all, you should create a sketch of the future structure. When drawing, you must adhere to the selected scale. Reflect the size of the pond, its depth, the width of the shelves on which coastal plants will be planted, as well as the design of the future landscaping. With this approach, you can avoid alterations and changes during the construction process.
It is also advisable to provide an accent detail - a tree, stone, bridge, sculpture or island, which will become the highlight of the landscape design element being developed.

- The contour of the pond is best chosen locally. To outline it, you can use twine, a garden hose or sand. Remember that the opposite edges of the reservoir must be at the same level with each other.
The bottom also needs to be made level. Measurements can be made using a special laser tool or an ordinary long board on which a building level is placed.

- Digging a pit.
The work should be done in the following sequence:
- the soil is removed to the first depth mark;
- a new line for deepening is marked;
- digging the pit continues to the next level;
- marking is done again;
- a small depression is dug, necessary for wintering fish.
Excavation work is quite a labor-intensive task, especially if the size of the future pond is large. It is best to hire an excavator for this purpose. Otherwise, be prepared that at a certain stage of digging, debris will accumulate in the bottom area. groundwater, and therefore you have to work in semi-liquid mud.

To avoid this, you can use a water pump designed for pumping suspended matter. Dirt is dumped into an auxiliary pit.
Advice!
If on personal plot If there is no electricity, renting a diesel generator for your dacha will help you.
This unit will provide the necessary electricity not only for the pump, but also for many other tools that make the work of creating a pond easier.
- As soon as the digging is completed, its dimensions are measured using a string, taking into account the resulting depth. To this value is added about 1 meter for allowances. The resulting value is necessary to purchase a film of the appropriate size.

Many people wonder where to remove the soil that was removed during digging of a pit.
In this regard, we can recommend the following:
- raise the level of the site by evenly distributing the soil throughout the garden;
- form an alpine slide out of it;
- make the basis for ledges along which the stream will flow.
- Then the entire pond bowl is carefully lined with waterproof film. In order not to tear the coating, it is recommended to first cover the pit with an additional layer of geotextile. Then pebbles and roots will not be able to tear the film after pouring water. Cheaper options – old linoleum or a compacted layer of fine sand.

Work should be carried out on a warm, sunny day. This weather makes the film more flexible; it stretches easily and follows all the irregularities and decorative curves of the pond.
- To secure the film, a small trench is dug along the edge of the pond. The edges of the material are lowered into it and covered with crushed stone. More reliable method you can't imagine.
- In order to strengthen the edge of the reservoir and prevent soil from collapsing, the edges of the reservoir should be strengthened concrete blocks or plastic pipes secured to pegs. Wild natural stone is excellent as decor.

- The bottom of the pond is formed with crushed stone or boulders. Plants are planted in special plastic boxes, which are installed in the right places in the reservoir and next to it.

- Next, water is poured. The water meter readings should be recorded before and after this process. This will allow you to calculate the volume of liquid in the depression, which will be useful later when purchasing equipment and chemicals to care for the pond.
- It is best to make a pond with circulation. In this case, the water in it will be constantly renewed and will not bloom. To do this, an embankment is made near the reservoir from which the stream will flow. Water is supplied upstairs by a submersible pump equipped with a cleaning system. The decoration of all elements is at your discretion.

Conclusion
Having carefully read the material presented above, you should not have any questions about how to build a pond in your country house with your own hands. Find out more about the construction process artificial reservoirs you can from the video in this article.


