Wall shelves 40mm with a side to prevent things from falling out with hidden fastening, veneered. Finishing with a spray gun paint booth Renner materials (primer, tinting, matte varnish). Color according to RAL, NCS (in in this case wenge tinting. The wood texture is preserved). The price depends on the complexity.
L-shaped 40mm shelves with hidden fastening, veneered with beech veneer (1.5*0.15m) with built-in lighting. Finishing with a spray gun in a spray booth using Renner materials (primer, tinting, matte varnish). Color according to RAL, NCS (in this case, tinted with light walnut. The wood texture is preserved). The price depends on the complexity.
Wall shelf 30mm solid with a side with hidden fastening. Finishing with a spray gun in a spray booth using Renner materials (primer, tinting, matte varnish). Color according to RAL, NCS (in this case, walnut tinting. The pores are closed). Price depends on size.
Shelves 18mm complex shape in a niche veneered with oak veneer (0.45*0.25m). Finishing with a spray gun in a spray booth using Renner materials (primer, tinting, matte varnish). Color according to RAL, NCS (in this case, wenge tinting. The wood texture is preserved). The price depends on the complexity.
Shelves 18mm in a niche veneered with beech veneer (0.5*0.22m). Finishing with a spray gun in a spray booth using Renner materials (primer, tinting, matte varnish). Color according to RAL, NCS (in this case, mahogany tinting. The wood texture is preserved). The price depends on the volume.
Colored shelves
Colored shelves of complex shape with hidden fastening. Finishing with a spray gun in a spray booth using Renner materials (primer, enamel, varnish). Color according to RAL, NCS (in this case Bordeaux color and glossy varnish). The price depends on the complexity.
Children's wardrobes to order
Built-in wardrobe in a niche for the children's room. Facades with patterns to match wallpaper patterns. Materials: laminated chipboard and painted facades in any color (20,000 shades). Finishing with a spray gun in a spray booth using Renner materials (primer, enamel, varnish). Color according to RAL, NCS. The price depends on the complexity. Price this option turnkey 31,000 rub.
Children's room the size of the opening for a child from 6 years old. Materials: laminated chipboard and painted facades in any color (20,000 shades). Finishing with a spray gun in a spray booth using Renner materials (primer, enamel, varnish). Color according to RAL, NCS. The price depends on the complexity. The cost of this turnkey option is 41,400 rubles.
Children's furniture in the size of the opening for a child up to 6 years old. Materials: laminated chipboard and painted facades in any color (20,000 shades). Finishing with a spray gun in a spray booth using Renner materials (primer, enamel, varnish). Color according to RAL, NCS. The price depends on the complexity. The cost of this turnkey option is 27,000 rubles.
Chest of drawers to order
Chest of drawers to order with the author's drawing. Materials: laminated chipboard and painted facades in any color (20,000 shades). Finishing with a spray gun in a spray booth using Renner materials (primer, enamel, varnish). Color according to RAL, NCS. The price depends on the complexity. The cost of this turnkey option is 25,000 rubles.
Custom-made wardrobe for balcony
From us you can order a balcony cabinet of any size and complexity.
Wardrobe storage room for the balcony. Materials: chipboard. Any sizes. The price depends on the complexity. The cost of this turnkey option is 18,000 rubles.
Cabinet under the countertop on the loggia. Materials: chipboard. Any sizes. The price depends on the complexity. The cost of this turnkey option is 6500 rubles.
Shoe racks
Built-in retractable shoe rack made of solid oak. Drawers Blum with closers. Finishing with a spray gun in a spray booth using Renner materials (primer, tinting, semi-matte varnish). Color according to RAL, NCS (in this case, mahogany tinting. The wood texture is preserved). Turnkey price 26,000 rub./sq.m. by façade area.
Shelves made of plasterboard now play a big role in the interior. They not only decorate it and make it unusual, but also allow you to significantly use everything possible options for organizing storage of things.
Shelves can replace some of the furniture. This will free up the space in the room and make it less cluttered.
So, what are the benefits of shelves in the interior:
- with them, the room design becomes more modern and original;
- replace furniture;
- allow you to change the layout of the house in some cases by replacing walls;
- increase the number of storage places;
- help keep things at hand without cluttering the space;
Shelf design
Using shelves you can build different design premises. They can be located as separate elements or be an integral part of built-in niches.
If there are ready-made niches in the room, it can be very difficult to play with them - they often become a dead zone in the interior. In this case, it is advantageous to place straight shelves made of plasterboard material in such a niche. In general, shelves made of modern plasterboard are good because they can easily be cut into any niche configuration.
Such shelves can be made as separate element in the interior. As wall hangings, they would be appropriate in the interior of a living room, bedroom, bath, or kitchen. Shelves made from regular plasterboard are especially relevant in children's rooms, whose design can be based on shelves. You can make them yourself along the entire perimeter, replacing cabinets with them.
Shelves can also be used as a zoning element. In this case, they separate one part of the room from another. They can separate the kitchen from the living room or differentiate the children's room into a bedroom and work area. In this case, the structures will not be wall-mounted - they will go from one wall to another. Such shelves made of durable plasterboard are often used in studios. They can have a straight or curved design. Curved designs will give the interior greater individuality.

What can shelves be used for?
Shelves of any configuration and thickness are made from plasterboard.

They can be used for:
- books;
- school supplies;
- storage of interior items and collections;
- dishes;
- storage of toys;
- installation of household appliances.
Important: you can safely install a TV on shelves made of thick plasterboard in the kitchen. In this case, it is necessary to provide a strong mount in the wall. In some cases, it is possible to glue several sheets of drywall together to make the shelves stronger.
Advantages and disadvantages
Why is it recommended to use drywall rather than wood as a material for making products with your own hands? The fact is that this material has a number of tangible advantages that make it indispensable for making shelves in niches and on the wall.
Advantages of drywall:
- drywall is easy to cut;
- it can be given any configuration;
- it is inexpensive;
- it can be painted with any paints or covered with finishing materials.
The material also has disadvantages - it is made of gypsum, therefore, it is not resistant to water. And although there is moisture-resistant drywall, the shelves will not survive long-term and constant exposure to moisture. In any case, it is advisable to carefully protect them with moisture-resistant materials. Only then can drywall be used for niches in the bathroom.

Corner shelves
Increasingly, corner shelf designs are being used in interiors. They are appropriate in children's rooms, kitchens, and bedrooms. Their main purpose is to use the corners of rooms, which, as a rule, disappear, for storing and displaying things.
Corner shelves are optimally made in small rooms, where every centimeter of space is important. For the manufacture of corner structures You will need to draw a template according to the measurements of the room. It is important to take accurate measurements so that the shelf fits neatly into the corner of the room.

Built-in shelves
Such shelves are built into niches - natural or made. In this case, the entire niche can also be made of plasterboard. Built-in shelves are appropriate in rooms of any purpose.
To make built-in shelves, it is necessary to measure the niche. After this, parts are cut from plasterboard according to the size of the niches. As a rule, built-in shelves have rectangular shapes.

What materials will you need?
If you decide to make a product with your own hands, you need to prepare everything necessary materials.
To make a shelf on a wall or niche made of plasterboard, you will need:
- sheet of drywall;
- galvanized profile;
- guides;
- fasteners - self-tapping screws and dowels;
- mounting mesh;
- primer;
- dye.
For a curved shelf in a wall and a plasterboard niche, arched profiles are useful.

Required Tools
You can make a shelf with a set of the most common tools that are found in almost any home.
To work with your own hands you will need:
- screwdriver;
- ruler;
- level;
- hammer;
- pliers;
- hacksaw;
- Bulgarian.

Shelf drawing
Before you make your own products from plasterboard, including shelves, you need to make a drawing. Having thought about the design of the room and decided where the shelves will be, measurements are taken and the design of shelves for niches or walls is developed. After this, the dimensions of the shelves are determined and an accurate drawing is created.
After this, the drawing can be transferred to a sheet of drywall.
Shelf parts can only be cut from existing drywall after making sure that all dimensions are met.

DIY shelves
Plasterboard parts for niches and shelves can be cut with a hacksaw or a sharp shoe knife. Curved shelves are made from thinner plasterboard, and they are secured using arched profiles. As a last resort, if there are none, you can bend ordinary profiles.
You need to make a base for the shelf with your own hands so that it holds well. A profile is used for the base. As a rule, in standard cases, a profile measuring 50 by 25 mm is suitable.
After this, holes for the shelf are marked on the wall and drilled. A profile is hung on the walls, guides are installed and a plasterboard structure is attached.
Important: if shelves in a wall made of thick plasterboard are intended for heavy things, then you must use special fasteners– butterfly screws and fasten the profile more often than usual. You can strengthen the structure with traverses or a frame.
If the shelf consists of composite parts, then it is covered with mounting mesh in order to hide traces of the joints. The corners of the shelves are reinforced with special corners made of plastic or aluminum. Thanks to this, the do-it-yourself design will not fray at the corners and will maintain its aesthetic appearance for a long time.
Finishing
Next comes finishing the shelf. It’s even more easy to do this with your own hands. Finishing may involve painting the product or covering it with wallpaper, self-adhesive film, tiles, mosaics. This finish will make the shelf look aesthetically pleasing. And at the same time it will protect the product from destruction, moisture, and mechanical damage. It extends the service life of the entire structure. At the same time, if desired, you can change the design of the finish during the next renovation by replacing one finishing material another.
Before wallpapering or applying paint, drywall is primed. Acrylic and water-based paints are used for finishing.
One of the design trends is to paint the shelves in the niches the same color as the room itself. But you can choose a different combination - the shelves and niche are painted in a contrasting color. Thus, the niche will act as an additional decorative element in the interior of the room.

Important addition
If you are making shelves for the first time, then it is best to start with simple designs. First you need to master making straight shelves. And only after that start experimenting with making niches and various shelves of complex curved configurations.

Gallery: plasterboard shelves (20 photos)


![]()


A shelf in a living room is a familiar attribute, practical, convenient, and sometimes irreplaceable.
Such shelves are often used to store a home library, some small items, accessories and decorative elements. The shelf significantly transforms the appearance of the room.

Types of racks and shelves
There are so many types of shelves that sometimes it’s not easy to make a choice.

By design, shelves are often used to store small items, but this is a little wrong, because the shelf, oddly enough, transforms the space.
The shelf can be made by hand, with built-in seats, from a designer, with a mirror, open type, like a partition, floating.
There are actually a lot of varieties. There are also modular shelves, transformable shelves, hanging shelves for the living room - they're all on sale!

Of course, book attributes are the most in demand, and they are chosen according to personal preferences.

Corner shelf
For the living room, a so-called transforming shelf is often purchased, which changes its size and shape. Its disadvantage is that it can withstand little weight, but despite this, it is often attached to the wall.

Another popular variety is shelving, which will perfectly complement any design, especially if the room is in a country or high-tech style. This rack takes up minimal space.

Construction types:
- The cylinder rotates around an axis, and therefore it is easy to have access to all the objects that are placed there.
![]()
- Built-in shelves in the living room in a specially created niche make it possible to use every centimeter.
- Stepped rack - sections, shelves. For numerous books this is the most the best option, as well as for dishes, for decoration. Used for zoning a room.

- Lattice - a combination of shelves diagonally, vertically and horizontally. Such shelves for the living room on the wall look chic in a room decorated in modern style high tech.

Modular shelves
It is most appropriate to use shelves covered with glass in the living room. Such modern living room shelves allow you to store some luxurious items.
What’s interesting is that glass doesn’t catch your eye at all, and therefore this option is applicable in small spaces, for example, in the living room in Khrushchev.
Open attributes are used near the window, because they can miraculously combine with a coffee table. Hanging shelves– space saving.

IN classic interior It is permissible to use objects made of wood of the correct shape, which are decorated with carvings and forging.

In country style, it is wise to use untreated, aged items. High-tech style uses glass or metal shelves. Their shape is most often irregular.


How to decorate a shelf with your own hands?
The apartment is most often decorated with your own hands, and shelves are no exception. To get the job done, you need to buy a regular shelf, no frills. Most often it is a piece of wood or plastic.

The decor is made using materials such as leather, additions from natural wood, forging, dyeing.

It’s not at all difficult to design a unique shelf; the main thing is to think through a work plan. It is best to make basic outlines on paper, and then design the product.

There are different options for how to design a shelf, and there are a lot of ideas on the Internet that are worth checking out. There are so many ideas that it’s not difficult to create beautiful ones even without designers. decorative shelves under the TV in the living room.

The furniture matches the style of the room, and is suitable in style, color, and material. It is best that some of the elements are selected to match the type of furniture.


When choosing, it is important to understand that the shelf must be stable, durable, reliable, and hold normal weight items.

Shelves in the interior of the living room are the main attribute, because they are used both as storage of small things and as decoration. The shelf does not take up much space, but at the same time it complements the interior.

If you have to choose a shelf, then you should make the choice according to its further purpose.

Of course, the appearance of the shelf is of no small importance, and therefore you can look through photos of shelves in the living room, see what varieties there are, maybe you will like something and make the choice easier.

Photos of ideas for placing shelves in the living room


![]()


![]()


![]()


Shelves and shelves play an important role in country interiors. In this article I will try to tell you about this. When I say “shelves and shelves,” I mean open (that is, without doors or glass) shelves that complement the main furniture in country-style rooms. Almost all country interiors are made up of fairly large pieces of furniture: cabinets, tables, closed shelves. Well, smaller shelves are present so that all the most beautiful things can be displayed on them.
Open shelves can be divided into several groups according to their inherent characteristics.
- floor
- mounted
- built into the wall
- desktop
Depending on the place of use:
- kitchen
- for bathroom and toilet
- for the hallway
- for living room
- for children's room
Let's look at some examples of use open shelves in creating a country style interior.
Let's start with floor open shelves, which are made in the form of tables and cabinets. As I said in previous stories about country interiors, all ethnic styles are similar in that they are formed from objects made from natural materials. Therefore, all shelves must be made of wood (or imitation wood) or metal (forging). This cabinet shelf is universal and can be used in any room in the house.

Several more types of universal floor shelves. They will be indispensable in any room.


These shelves are universal because dishes, books, and pots with flowers look equally appropriate on them.

Of course, the randomness of the objects displayed on the shelves does not mean at all that anything can be laid out on them. Just as the impression that country style is simple and unpretentious is deceptive. In order for a room to acquire the features of a country style, you need to work hard.

Floor-mounted open shelves combined with cabinets with doors are suitable for decorating country-style living rooms. Country style has rustic roots. And the life of villagers was never pretentious, so ordinary items that were used every day were displayed on open shelves.

European peoples became accustomed to cupboards, in which open shelves were used to display beautiful porcelain plates, teapots, tea pairs and trays.

Such tables with open shelves can be used in country interior design. V kitchen, bathroom and even children's room. The natural color of wood, the simple and laconic design of this table allows it to be used for interior decoration: , .


Country style is homey and cozy. Natural wood, wicker baskets, next to a ceramic jug. There are only terry sheets and towels missing, but they will appear on the open shelf of this table if you put it in the bathroom.
This open shelf with a rounded top and wavy edge will complement and enliven kitchen interior V.

Built-in shelves - This is a niche in the wall occupied by shelves.

Built-in open shelves best option equipment for niches in the walls. If there is a recess between two walls, then to create shelves, it is enough to attach shelf holders to two opposite beams and cut the shelves themselves to size. The back wall can be painted, wallpapered or plastered with structural plaster.

When decorating interiors in country style Special attention paid to the finishing of walls, ceilings and floors. After all, it is already clear that the same open shelves would be appropriate in the appropriate context.

When conducting modern renovation niches are constructed using sheets of plasterboard and metal profiles. But if you want the “spirit of country style” to reign in your apartment, you need external finishing make the appropriate one.

Now let's move on to hanging shelves. This wall cabinet has doors, but it can be left open if space allows. This way you can showcase the beautiful content you can fill it with. Such shelves are suitable for a Provencal style kitchen.

In some cases, when the kitchen area is small, do not clutter it with floor and wall cabinets. It’s better to attach open shelves to the walls, so the kitchen will become airier.

Open shelves free the kitchen from unnecessary and ugly things. After all, you can’t put old ones on public display plastic jars with cereals or a beaten enamel ladle.

Open shelves look great in a white furniture set. Simple lines kitchen furniture, the same simple shelves, a minimum of decorations, and the interior turned out to be cozy.

Open shelves are also incomparable in other country interiors. For example, in a room where there may be many open shelves. Some of them, which are located under the tabletops, can be curtained with curtains made of thin cotton fabric.

The person who invented the shelves was probably no less brilliant than the one who invented the wheel. Take a look for yourself and you will see what we would do without shelves? Everything would be under our feet and we would not be able to find anything. But on the shelves it’s a completely different matter! There is order, beauty and everyone can see what a good housewife is in this house.

Open hanging shelves, and even in combination with hooks, are very convenient, because everything is always at hand.

The number of open shelves that you hang in the kitchen depends on the availability of free walls and your desire to equip the kitchen with them. No one can give such recommendations as to how many shelves there should be in a kitchen, everything is individual.

An open wooden wall shelf is a great opportunity to display your most beautiful dishes. It is worth paying attention to the fact that such shelves do not have to be purchased ready-made. They are easy to make at home. You only need to have the necessary materials and minimal skills in working with furniture.

Country style furniture (Provence, American, scandinavian styles) looks a bit rough. That’s why there are open shelves in the background self made won't look any worse. Look at the photo of these cabinet shelves and you will see that they are not difficult to make.

But this is why the country style, which incorporates many ethnic styles, is valuable because it gives you the opportunity to create with your own hands something that you sometimes cannot buy in a store. And this item can become the center of attraction of the entire interior. , with its such recognizable “scuffs”, it is not difficult to recreate it on some grandmother’s shelf, which has been gathering dust for many years in the attic of a country house.

Look, simple decorative elements made of wood will decorate a handmade kitchen shelf. But you can’t paint it too carefully, because “unpainted” and “scuffs” are not considered defects in finishing in country style, but quite the opposite.

In addition to wooden open shelves, you can use wrought iron shelves to create a country-style interior.

They can be made of metal with or without painting.

Forged shelves can be combined: a wooden shelf is attached to a forged frame.


There are even options for combining a forged base and glass shelves, as you see in the photo below. This wrought iron floor shelf is suitable for a living room or bedroom in a country style.
According to the method of placement in the interior, forged shelves can be: floor, table and hanging.


According to the place of use: forged shelves can be intended for the hallway, kitchen, living room or bedroom.


Open shelves, both hanging and floor-mounted, have not only advantages, but also disadvantages. Some of them:
- they should not be placed next to the stove, because the grease that settles on the shelves will be difficult to wash off
- more often than in closed cabinets need to dust off
- keep the shelves tidy and don’t put everything on them
- they are less spacious than cabinets with doors

And such a corner wooden shelf, suspended and open, can be used in small-sized bathrooms or country-style kitchens.

Open shelves in the bathroom are more convenient than those with doors due to their accessibility. Bouquets of simple wildflowers look organic on country-style shelves.

Simple bottles made of transparent glass are suitable for colored salt, which is so nice to pour into the bath.

Attach this pink shelf with hooks and a hole for a metal glass in the bathroom and your daughter will surely like it.

A toilet room will be decorated with an openwork shelf that combines a holder for toilet paper and a shelf for magazines.

Above we looked at the options for floor, wall and built-in shelves. It's time to talk about table shelves. These are also wooden or forged metal shelves, but their main difference from other open shelves is that they are small in size. They are designed to be installed on a table and to place on them all sorts of little things that are always needed at arm's length.


This portable open shelf, made of wooden planks, can serve as a stand for pots of herbs. And then you need to move this shelf in order to install it on the window that illuminates the sun better.

Using metal fasteners, such as those shown below, you can make your own open shelves for any room in your apartment (or house). To do this, you need to attach a wooden plate made of natural wood or plywood to these fasteners.

The board can be painted in desired color or soak it with stain. Make sure that the fastenings are forged or made of high-quality metal, because the shelves must be designed to hold heavy dishes.


Except metal fastenings for shelves, wooden support strips can be used, which are made using a jigsaw, electric or conventional. A loop is attached to the support bar, on which the shelf will be attached to the wall. These strips are painted the same color as the shelves.

If you learn how to work with carpentry tools, you can make such beautiful shelves and shelves for your apartment or cottage, which are not sold in stores. And they can not only diversify the interior, but also transform it.

In order for open shelves to look attractive and fulfill their main purpose - to decorate the room with their presence, they should always be in order.

I wish you all success in arranging the external and internal world of your home.
Space reserves: shelves in structural nichesAgree, the idea of creating a couple of decorative niches in the house sounds tempting. But to make practical use of the space between the ledges and columns laid during the construction of an apartment or house is a much more interesting problem. And, oddly enough, it’s lighter.
We are talking about space reserves - in such structural niches you can place shelves or even compartments for storing things. On the other hand, you can “link” to such niches functional areas, if there are several of them in the room.
If you don’t find such protrusions in your house, but you like the idea, you can build niches during renovation - from brick or plasterboard. But in the latter case, it is worth informing the installers in advance about your plans so that they strengthen the structure in the intended locations for installing the shelves, especially if you are going to place something quite heavy on the shelves, including books.
Situations when it makes sense to highlight niches with color or decoration (for example, a different wallpaper pattern), i.e. add decorativeness:
if there are no more than 2-3 shelves in a niche from floor to ceiling;
if you plan to fill the shelves with no more than 30-40% of the volume (there may be more of them than in the previous situation);
if a niche is formed under the stairs.
In all other cases, you don’t have to worry about combining functionality with effectiveness; beauty can simply go unnoticed. But if the shelves in the niches do their job perfectly practical role, - this is no longer important.
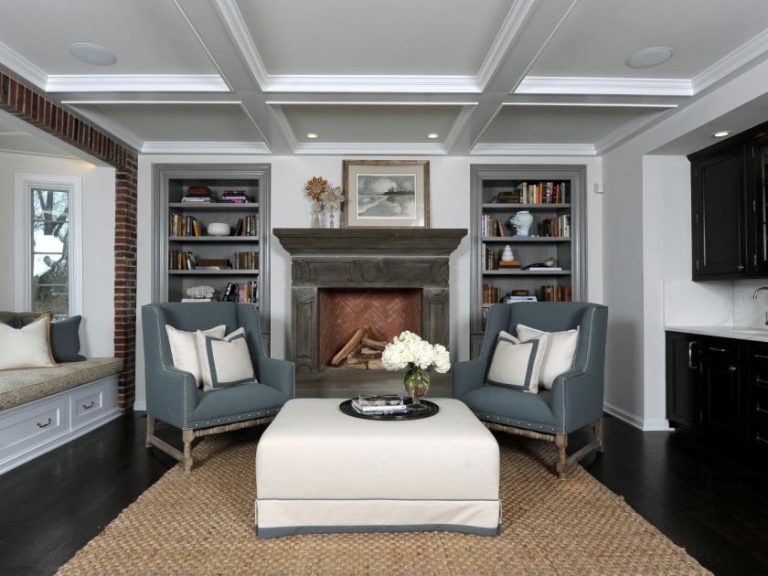
shelves in niches in the living room interior:
In the West, according to tradition, shelves most often appear on both sides of the fireplace, i.e. two symmetrical niches are used at once. In a reality closer to us, niches can be formed if you combine 2 rooms or remove part of the partition, after which support columns or communication boxes (shafts) remain.
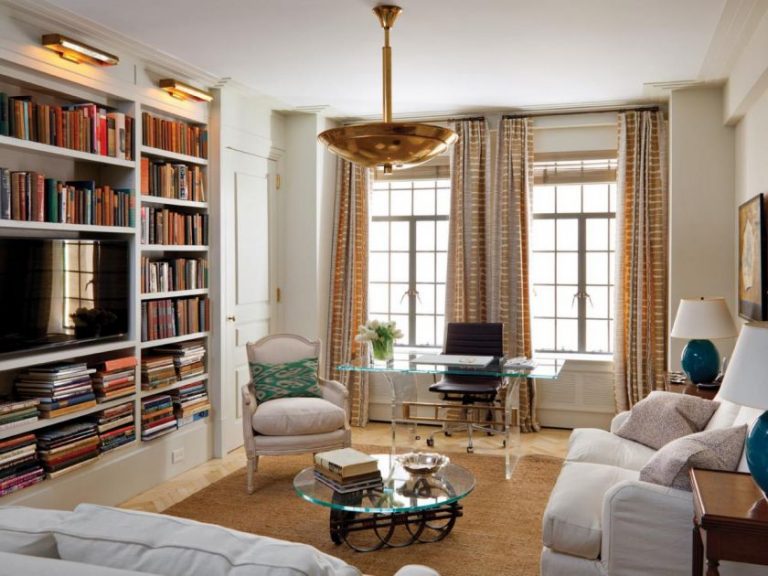
On the shelves in the niches of the living room you can place everything that is part of your family interests: books or magazines, collections or pleasant little things. If you want to find a place for a home office in the living room, place it in a niche (table or countertop + shelves). If the living room is combined with the dining room, you can place a chest of drawers in a niche, and shelves above it. And, of course, shelves can appear in the niche where the TV is located, but since this is usually the decorative center of the room, the functional use of this area can be very conditional.


shelves in niches in the bedroom interior:
Functional shelves in bedroom niches are usually created for one of two purposes: placing books or storing bed linen. However, you can use them to define a home office space (we talked about this in the living room section) or create an “inspiration corner” with little touches that please your heart.


shelves in niches for a children's room:
Two options for using the idea in a children's room: place it in a niche workplace child or create a compact place to store toys. In the first case, it is advisable to designate a niche with color or decoration (creating an “anchor” for study), in the second, this is not necessary, because a cluster of toys is already quite a bright sight.


shelves in niches for organizing a home office:


shelves in niches for the kitchen:
In spacious American kitchens, “organization corners” are often set up in structural niches, allowing you to take care of household finances or answer letters. Sometimes they move the home office there.
In other cases, shelves in niches can become a place to place dishes (if you don't mind open shelves in the kitchen) or any small items, including cookbooks.


shelves in bathroom niches:
Despite small sizes(compared to other rooms in the house), there are many ways to make practical use of niches in the bathroom by installing shelves in them.
For example, above the sink or on the side of it - for storing bath cosmetics. For towels and household chemicals you can use shelves in the niche above washing machine or above the toilet, as is customary among the Swedes. Unlike other rooms, in the bathroom it is easy to build shelves from plasterboard during renovation, and then cover them with the same tiles used for the walls, or contrasting ones.


Your home may not have a piano or floor lamp, rocking chair, loft bed or any other items. There may not even be a table or a regular stool. And there are probably wooden shelves.
And this is great, because it is the shelves that help to use the surfaces of the walls, further optimizing the space of your apartment or house.

What types of wooden shelves are there?
Surely you have never thought that wooden shelves are different. The most common type is the most common, straight shelves.

Essentially, this is a board (or a strip of some kind of board - chipboard, MDF or plywood) attached in a certain way to the wall). In addition, shelves can be suspended (as the name implies, they are not attached to the wall themselves, but are suspended from it or the ceiling).
Wooden shelves also come in corners - these are attached to two walls at once and allow you to effectively use the corners of rooms, which, as a rule, are not used in any way.
There are also various shelves of unusual shapes, but we’ll talk about them some other time.

What are wooden shelves made of?
Obviously made of wood. The most expensive shelves are made from solid wood. Not only their price is high, but also their weight. These are good for souvenirs or something else light.
Home craftsmen often use boards (often lining) to make shelves. This is what is called the path of least resistance.

After careful processing (grinding), the board is attached to brackets (many of these are sold in construction stores and hypermarkets). Depending on the width of the board, these shelves can be used in different ways.
Most shelves are made from sheet material– thick plywood, MDF and chipboard. MDF shelves look the nicest; these are often sold ready-made in stores.

How to fix a wooden shelf
Depending on the wall material, type of shelf and expected load, as well as taking into account the aesthetic preferences of the owners, wooden shelves can be mounted in different ways.
The most common mounting method is overhead brackets, on which the shelf rests on top. At the same time, the shelf supports are visible and complement the interior. They can be either wooden or made of another material – metal or plastic. Forged elements are often used.

Often shelves are attached to hinges - metal strips with holes resembling keyholes. This method is quite reliable and aesthetically pleasing - the fastening is hidden from view, and the entire structure acquires some airiness.
In addition to the types of fasteners mentioned, various pins are often used, with one side screwed into the wall and the other into special recesses in the back of the shelf.

It is believed that it is better not to overload such shelves - especially if they are made of cheap chipboard sheets.

Speaking about methods of fastening wooden shelves, one cannot fail to mention another, rarer, but very characteristic, method. We are talking about attaching shelves to floor supports.


Usually, we're talking about not about one shelf, but about a certain composition of them, while the supports can either be attached to the floor or not. In the latter case, the structure is supported by its own weight.

There are also shelves that are supported on guides attached to both the floor and the ceiling. This option, however, is essentially closer to stationary systems storage than to organizing shelves.

Our specialists know everything about wooden shelves - we will be happy to help you choose shelves according to your needs and aesthetic preferences, as well as taking into account the current financial capabilities of your family.

We interact both with serial Russian and foreign manufacturers of shelves, and with workshops that develop custom-made shelves.

Photo of wooden shelves in the interior


How in small apartment be able to fit a large number of things and maintain an uncluttered feeling? How to create original interior? Where to put the many souvenirs given by friends and brought from vacations? There is only one answer - pay attention to the shelves and walls. The best solution there will be plenty of shelves that can be placed in different ways.

Storage shelves can be placed:
- on the wall;
- in the wall;
- between the walls, dividing the space.
The easiest way to place shelves is on the walls. Hanging them is easy - just drive dowels into the walls and hang the shelves. The placement of shelves in this case depends on personal taste.


Shelves placed in a niche deep in the wall look more interesting and original. Wherein modern design suggests the niches of the most different forms and sizes. This solution gives the room individuality and originality.
The role of shelves in a niche:
- a niche allows you to increase the storage space;
- a niche in the wall allows you to increase usable area– if you cut a niche 20 cm deep in a wall 25 cm thick, then you gain an extra 20 cm, which can be put to good use;
- a niche decorates the room and makes it original.
Where niches can be made

A niche in an apartment is appropriate in almost any room. In the bedroom, niches can be used to store things and place lamps; in the living room, a niche can be used to place books and interior items, in the bathroom - to place towels; in the nursery - for children's toys.
Important: To create a special atmosphere, niches can be equipped with lighting that will illuminate the shelves. At the same time, such lighting will play the role of additional lighting.
Niches are:
- natural - that is, openings formed as a result of the layout of the apartment under the window, in the area ventilation duct and so on;
- specially made during construction: storage niches;
- artificially made by the residents themselves during renovations.
Niches without shelves are completely meaningless. It is the shelves that make the niches a separate storage system. It is not difficult to equip niches with shelves yourself. Here it is important to check exactly where the shelves are placed in the walls. It is important that no electrical wiring or pipe junctions pass through this area.
Can be located in a natural niche Appliances or shelves. Shelves are good decision for natural beggars. In this case, the dead space can be used to the maximum. The niche under the windows can easily be converted into organizing the storage of small items - to do this, it is enough to place 1-2 shelves under the window sill.
In specially designed storage rooms, the arrangement of shelves is more than natural. Closets can be reorganized into walk-in closets or shelving.


The most interesting and original are specially made niches. They may have non-standard shape. Shelves in such niches can also have an unusual shape. Such niches look good in bedrooms and living rooms. They give the interior an unusual sound.
Shelf design features:
- In the kitchen, shelves should be made of moisture-resistant material - moisture-resistant plasterboard or wood treated with impregnations and varnish to impart moisture resistance.
- When designing, it is necessary to take into account the purpose of the shelves and their expected load capacity - if the shelves are intended for interior items, then simple fastening is sufficient. If it is assumed that heavy objects will be installed on the shelves, for example, a TV and other equipment, then the structure of the shelves should be reinforced with a metal profile.
- According to the design concept, the shelves can have curly shapes. In this case, it is better to use drywall.
Examples of a niche in the wall in the kitchen (photo)


 |  |  |  |
What do you need for work?
In order to make built-in shelves in a niche in the wall, you will need tools and materials.
Tools needed
- screwdriver;
- jigsaw or electric jigsaw;
- grinder with discs;
- roulette;
- square;
- electric screwdriver.
Materials
- screws or nails;
- wood glue;
- shelf stops;
- wedges
Stages of work

So what you have to do:
- Determine the location of the shelves. Using a level, mark the location of the shelves and racks for the shelves.
- Make a mark.
- Cut out the shelves according to the size of the niche. The length of the shelf should correspond to the width of the niche. Process and sand the edges of the shelf.
- Drill rows of holes into which to insert shelf stops. Wedges or corners can serve as stops. These devices will serve as supports for installing shelves.
- Install the shelves in the niche on the stops.
The shelves in the niche can be varnished, painted, or covered with wallpaper or self-adhesive film. The method of decoration depends on the overall concept of the room.
How to make niches in the wall with shelves (video)
Conclusion
Shelves in the wall can create an original and extraordinary design concept. You can save significant money by making shelves in your apartment yourself. Here it is important to accurately observe the dimensions and carry out all work carefully. Then niches with shelves will look aesthetically pleasing.
Niche in the kitchen wall (photo)


It happens that there is not enough space for all kinds of household items, and there is an unused void in the niche of the bathroom or toilet.
This void can be filled with household items by attaching several shelves to the walls. To do this you will need: several boards of the size you need, metal corners, fasteners and tools.
Consider mounting to a concrete wall.
Initially, we select the location and number of shelves and make markings on the wall. We prepare required size boards or plywood.


We hammer pieces of wood greased with PVA glue into the holes prepared in advance in the concrete. Instead of dowels. I didn’t succeed with dowels, because they require holes of a certain size, but my wall crumbles very well and each hole has a unique shape and size. In addition, it will be easier to get the screw into Right place so that the corners hang evenly.


If the wooden “plug” does not fit entirely into the wall, then we simply break it off. You can use a more accurate method - saw off under the base.
There were 4 “plugs” in the wall for one shelf. Now we fasten the corners to the wall with self-tapping screws.

We place the blank of our shelf on the corners and mark with a pencil the places opposite the holes.


We will drill out the holes on the top side with a larger drill to hide the head in this place mounting bolt or a screw.

I didn’t have countersunk bolts, and I didn’t want to run after them, so I secured the shelves with screws.
But there was nothing for the screws to hold on to, so I screwed dowels onto them and carefully cut off the ends.


And so on with each shelf.

You can refine the shelves a little by covering them with oilcloth. The place for placing household items is ready.


