The ceiling in a steam room must have two qualities:
- High thermal insulation. Since, according to the law of physics, all heat goes up. And with a cold ceiling, all the work of the sauna stove will be aimed at heating the air space around the building. This will be especially noticeable during winter operation.
- Suspended strength. No other building element is located in such an aggressive environment. This is due to the fact that on the one hand it is affected by the humid heat of the steam room, and on the other by the severe winter frost.
However, making a ceiling for a bathhouse with your own hands is quite feasible. And in order to fulfill installation work qualitatively, we will consider its installation and insulation in this article.
Installation
The ceiling structure can be of three types: hemmed, panel and floor. In the case of a bathhouse, the implementation of a sheathed structure is most suitable. We will analyze it in more detail.
Compound

The ceiling design in the bathhouse looks like this:
- Load-bearing beams.

- The flooring is made of edged boards with a section of 2.5 cm by 15 cm.
- Waterproofing. Polyethylene film is quite suitable for this.
- Insulation. Sections of moisture-resistant basalt wool or other acceptable material.
- Vapor barrier and thermal insulation using foil.

- Planks for installation of lining.
- Pine lining with a cross-section of 1.4 cm by 9.6 cm.

Step-by-step work plan
To avoid mistakes and complete the installation correctly, the installation instructions will help you:
- We install the beams using the “paw” method as shown in the figure below. This will allow you to conveniently insert products from below and remove them if restoration work is necessary.

Tip: plan for a beam height of 2344 mm.
Then, after all the work, the net distance from the ceiling to the floor will be exactly 2.3 meters, which is ideal for a steam room.
- Let's take it unedged boards 25 mm thick and nail them to the beams with five-centimeter nails from above.
- We arrange waterproofing. For these purposes, using construction stapler We fix the plastic film to the boards from the bottom side, thus closing the beam openings. We leave a few centimeters of overlap on the sides. We glue the joints mounting tape.
- For the openings between the beams from below, first standing on a stepladder, we insert sheets of basalt wool, trimming it if necessary.

Can also be used for these purposes:
- Styrofoam. Its price is the lowest.
- Felt. Bath caps are also traditionally made from it.

- Extruded polyurethane foam. High water-repellent qualities.
- Penoizol. It is produced by spraying, which allows it to fill the most inaccessible places.
- We install a vapor barrier using foil. To do this, we fix it to the beams using a stapler, covering the insulation material. At the same time, we create overlaps on the walls in order to connect it with the waterproofing layer. This will give some tightness to the walls, protecting them from the harmful effects of excessive humidity.
We seal the joints with aluminum mounting tape so that aluminum sheets overlapped each other by 20 cm to create maximum tightness.

You should know: it not only performs the function of vapor barrier, but also the function of thermal insulation.
Because it has high reflective properties, which is why thermal radiation returns to the room.
- We fix the planks using seven-centimeter steel screws and an electric screwdriver.
- Installing the lining:
- Using a plane, remove the tenon from one side of the tongue and groove board.
- We fix it to the planks with the stripped side facing the wall, maintaining a gap of two centimeters. Such a gap is necessary for high-quality ventilation of the room. For fastening we use seven-centimeter self-tapping screws.
- We insert the clamp into the free side and screw it with self-tapping screws to the upper slats.

- We install the next board into it.
- We install the rest of the products using this method.
- We cut the latter so that after its installation there remains a two-centimeter gap to the wall.

- The do-it-yourself bathhouse ceiling is ready for use.
During finishing works It is advisable to know some rules to simplify the process:
- The cladding of the steam room should begin with the floor, then the ceiling, and only finally the walls.
- The structure of the suspended ceiling is strong enough to be used as an attic for storing brooms or other bath accessories. To do this, it is necessary to provide for the implementation of a hatch.

- Pay special attention to installing the first board, as it will be a beacon for all subsequent ones.
- If you need to correct the position of the lining, then place it additionally between the groove and the mallet. wooden block. This will keep the tongue intact.
- You can install the lining directly on the beams. But then it will be necessary to specially make holes for ventilation.
- For finishing you should choose deciduous trees. Because conifers contain a very large amount of resins, which, when exposed to high temperatures, will begin to release abundantly. And this will have a detrimental effect on the health of vacationers.
- It is especially necessary to carefully insulate the ceiling structure. Because all the heat of the steam room gathers under it. And if it leaks, this will lead to large financial losses in attempts to heat the room to the desired temperature.
- The attic part can also be used for installation bulk insulation, such as expanded clay.

Conclusion
The ceiling in a bathhouse is the most vulnerable place for heat to escape, since it is under it that its greatest accumulation occurs according to physical laws. It also experiences heavy loads due to the large temperature difference between inside and outside the room. What is especially sensitive in winter time of the year.
The best ceiling design for a bathhouse is a hemmed one. It best meets all the necessary technological requirements. In addition, it allows you to equip attic space for storing auxiliary equipment or for additional insulation.

The best tree species for lining are deciduous. They are quite waterproof, strong and do not produce any discharge when exposed to high temperature.
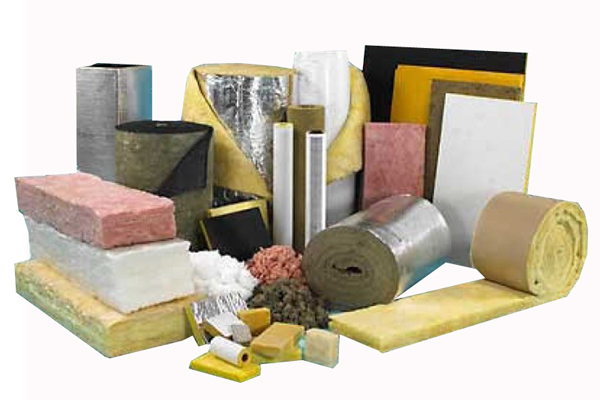
Suitable insulation materials include: mineral wool, polystyrene foam, penoizol, felt, extruded polyurethane foam. It is also very important to protect it from the harmful effects of excessive humidity by installing waterproofing and vapor barriers.
Using the instructions given in the article, it is quite possible to install the ceiling in the steam room with my own hands so that it fully meets all requests.

The video in this article will provide more information on the issue at hand.
Good luck with your finishing work!
The problem of how to make a ceiling in a bathhouse with your own hands worries many craftsmen who have decided to set up their own steam room in their suburban area in order to take healthy water procedures at any time.
The ceiling surface in the bathhouse is the most important part devices of this room, which is operated under extreme loads. High temperature and humidity put forward a number of special requirements for ceilings in steam rooms. Without taking them into account, there is little point in starting work. If you want your bathhouse to serve you for many years, you should wisely decide on the design of the ceiling surface and choose the right one Construction Materials for its installation.
Ceilings in the bathhouse
The ceiling in the steam room must:
- have high strength that will not decrease under the influence of moisture and high temperature;
- keep the room warm;
- be durable and visually attractive;
- do not emit fumes that can destroy all the pleasure of taking water treatments;
- eliminate the possibility of the insulation used getting wet.
Before starting construction work, you need to draw up a project according to which the ceiling will be made. First of all, you should decide on its height. It is calculated taking into account the height of a person who will regularly take a steam bath. Also, when determining the height, you need to pay attention to the fact that you can calmly lie on the top shelf of the room without touching the ceiling with your body. The height of the steam room recommended by experts is 2.5 m. You can make the ceiling lower, but then professionals do not guarantee the comfort of taking water procedures.
Having decided on the ceiling height, you can move on and choose optimal material for the manufacture of the design we are interested in. No particular difficulties are foreseen at this stage. If you are building a classic Russian bathhouse, all its elements should be made from natural wood. Better material simply doesn't exist. It should be understood that the tree needs additional protection from humidity. It will have to be treated with special impregnations, and then also equipped effective system vapor barriers.

Natural wood ceilings
Attic flooring (if provided in your bathhouse) and ceiling beams best made from coniferous species wood They are characterized by a high level of moisture resistance. But it is advisable to finish the ceiling using products made from linden or aspen. Such deciduous wood has an important feature - a low content of natural resins. Due to this, its use makes it possible to reduce the thermal conductivity of the ceiling and at the same time increase its thermal resistance and sound insulation.
Wooden materials for arranging the ceiling in a bathhouse with your own hands must be chosen very responsibly. Never buy poorly dried wood.
It is also unacceptable to use products with any defects, even the most insignificant ones in your opinion. And don't forget to treat the boards good antiseptic and fire retardant. These compounds will protect the wood from rotting and increase its resistance to fire. The next step is the selection of vapor barrier material. Its installation on wooden ceiling is a mandatory process. The most economical option for vapor protection of a surface under construction is to cover it with thick cardboard sheets treated with drying oil. But experts do not recommend using this technique. Cardboard is prone to rotting. Its additional processing only slows down this process, but does not completely eliminate the possibility of mold.
If you want to save money, use aluminum foil or polyethylene film as a protector. Such materials are affordable. And their efficiency is several times higher than cardboard sheets. The most reasonable option for installing a vapor barrier is considered to be the use of modern materials - Penoplex, Izospan and others. They guarantee excellent steam protection. The only point is that the installation of these materials must be carried out strictly according to the instructions attached to them.
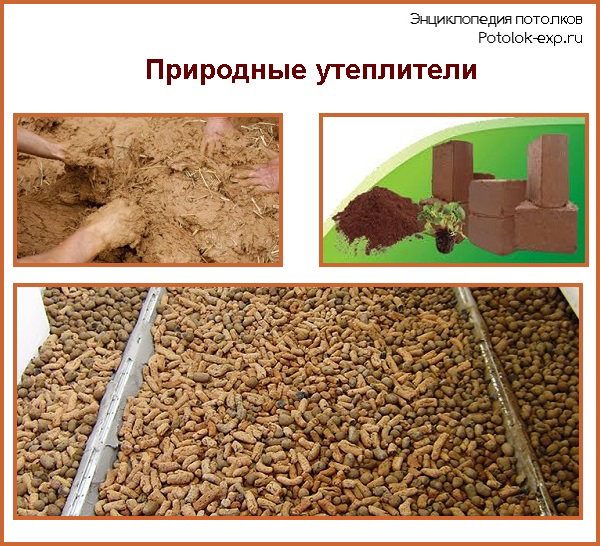
Installation of a bath ceiling without its thermal insulation is unacceptable! Our ancestors insulated steam rooms exclusively with natural materials - sand, earth, clay, sawdust, as well as a mixture of them. You can use a similar technique. Now the thermal protection of ceilings is folk method most often performed using a mixture of straw and clay. Well, fans of more modern insulation materials usually use the following materials:
- Styrofoam;
- mineral wool;
- penoizol;
- expanded clay

Mineral wool as insulation
Polyfoam is waterproof, has excellent heat-protective and sound-proofing properties, and is inexpensive. Installation of lightweight foam plastic does not cause problems for home craftsmen who decide to build a ceiling from boards. This material is sold in sheets of different thicknesses. To insulate the bath ceiling surface, it is advisable to use 5–10 cm polystyrene foam. The sheets are fixed to the base using glue, thick cement mortar or dowels. Polystyrene foam belongs to the group of flammable materials. When burned, it releases compounds harmful to humans, which often cause paralysis of the respiratory system. This should be taken into account when choosing polystyrene foam as insulation. If you are not one hundred percent sure of the fire safety of your bathhouse, it is better to choose a different material.
Mineral wool does not burn, is cheap, and does not harbor insects, rodents, or microbes. Anyone can install it. But when wet, mineral wool instantly loses its insulating properties. The latter, by the way, are lost on their own during the operation of the bathhouse. Over time, wool begins to settle, its density increases because of this, as a result, the insulating capabilities of this material are reduced to almost zero. Currently used for thermal insulation quite rarely. It was replaced by expanded clay. This one is environmentally friendly pure material of natural origin does not burn, is characterized by a high degree of heat and sound protection and affordable price. To insulate bath ceilings, expanded clay granules should be used. Their optimal sizes– 15–40 mm. In order for expanded clay to perform its functions efficiently, it must be poured with a thickness of at least 20 cm.
The bathhouse ceiling can also be insulated with liquid carbamide foam (penoizol). It's very easy to work with. You only need to evenly distribute the penoizol over the surface to be treated, after which it will fill all the gaps in the ceiling, providing excellent thermal insulation for the steam room. Note that for different ways When laying the ceiling surface for a bathhouse with your own hands, you need to select a certain insulation. That is, in in this case not everything depends on your desires and preferences. We will talk about options for arranging ceilings further.
You can build various ceiling surfaces yourself. Installation of three types of structures is allowed - floor, panel and hemmed. The easiest way to install a flat ceiling. It is built in cases where there is no attic in the bathhouse. For large steam rooms, a flat ceiling is not suitable. In such situations, it is impossible to guarantee its strength and reliability in operation.

Nastal ceiling structure
Installation of the flooring surface is carried out as follows:
- Mount with inside premises wooden boards. It is advisable to use products about 4–5 cm wide. The boards rest with their edges on the walls of the bathhouse (if we're talking about O wooden log house, their fastening is carried out on the last crown of the building). You need to create a solid board from wooden products with a minimum number of cracks (try to mount the boards as closely as possible to each other).
- Cover the made base with the selected vapor barrier (foil, film, modern materials) and fix it with a construction stapler using staples.
- Place a heat insulator on the vapor barrier layer. It is recommended to insulate a floor-type ceiling with expanded clay or mineral wool.
The work is completed. As you can see, the process of arranging a flooring surface is truly simple. But the quality of such a ceiling, frankly speaking, leaves much to be desired. The problem is that its thermal insulation layer is almost completely defenseless against external moisture. In addition, if replacement is required individual elements solid plank board, you will have to destroy the vapor and heat barriers, change the boards, and then mount them again vapor barrier material and insulation.
If the design of the bathhouse includes an attic space, experts advise making a hemming surface. It can be installed without serious difficulties and is characterized by high level operational reliability, but the financial costs for the materials necessary for its arrangement are objectively high. And such a structure takes much longer to build than a decked one. The scheme of work will be as follows. First, install wooden blocks on the walls (they will serve as load-bearing parts) with a diameter of 5x15 cm. There is small nuance. You need to build a separate frame around the chimney. This is not difficult to do.

false ceiling
Prepare additional bars - make special grooves in them for the main load-bearing elements, and then mount them across longitudinal beams. After constructing the frame, proceed to covering the surface from the inside. The optimal products for cladding are tongue and groove and eurolining. It is advisable to fasten these materials in grooves and along the edges, and not in the center of the ceiling. Then attach a vapor barrier film to the sheathing. It is mounted with a mandatory overlap (14–16 cm) on the walls. In cases where several separate sheets are used, the edge of each subsequent product should overlap the previous row by 20 cm. In this case, it is necessary to process the joints between the sheets of vapor barrier. This procedure is performed using a special aluminum self-adhesive film.
Foam plastic should be used as insulation for a false ceiling. Polystyrene foam does not fit around the smoke duct. This area should be insulated with expanded clay. The latter, by the way, can also be used for thermal insulation of the entire ceiling. If desired, it is also possible to use mineral wool. The main thing is that it is not wrinkled and cut exactly to the size of the ceiling surface. A waterproof polyethylene film or aluminum foil is additionally laid on top of the insulation. After this, you can cover the made pie with boardwalk. Wooden crafts attached to the beams with nails with special wide heads.
It is unrealistic to build a ceiling from panels yourself. In this case, you cannot do without 2–3 assistants. This is due to the fact that such a ceiling structure is assembled from pre-prepared wooden panels. They are heavy, which significantly complicates installation activities. Panel ceilings are arranged as follows:
- Lay (strictly parallel) at a distance of 0.5 m from each other two wooden beams. Their edges should rest against a strong wooden strip.
- Take 60-centimeter-long boards and nail them across parallel beams.
- Turn the resulting “box” over, line the inside with film or other vapor barrier, and secure the protective layer with staples.
- Make the rest of the panel blanks in the same way (their number depends on the area of the ceiling being installed).

DIY panel ceiling
After this, insulation can be laid into the manufactured structures. But then it will be very difficult to lift the “boxes” and secure them to the ceiling. Therefore, it is better to stop there and begin installing the panels on brickwork or on the top rims of a wooden bathhouse. To accomplish this task, you need to lay jute along the edges of the walls (it is also used to seal the gaps between the panels). After installing all the “boxes” on the ceiling, insulate them (it is better not to use mineral wool, opt for foam plastic or expanded clay).
Don’t forget to lay a waterproofing layer on the insulation (regular polyethylene film) and secure it well. The top of the mounted structure is covered with boardwalk. It performs an important function - it securely fastens the panels together. Described from the inside ceiling surface usually finished with clapboard. Choose your own method of arranging the ceiling from the proposed options and enjoy comfortable water treatments in your own bathhouse!
The requirements for installing a bath ceiling are: special requirements, because it works under conditions of constant changes in temperature and humidity. Not only the heating time of the bath, but also the service life of the entire structure depends on its correct installation. How to make a ceiling in a bathhouse? You will learn about this from today's article.
Requirements for a bath ceiling
The microclimate in a bathhouse and sauna is very different from residential premises. In the steam room, the temperature can reach 80-100 degrees, humidity - 90-98%. In addition, the bathhouse operates in a cyclic “heating - cooling” mode, so moisture condensation in the insulation, wood deformation and other unfavorable processes are possible in the ceilings.
Proper installation of a ceiling pie allows you to minimize the impact of harsh conditions and reduce the cost of firewood or other fuel.
The ceiling in the bathhouse must perform several functions:
- retains heat well inside the steam room and washing compartment;
- do not let moisture vapor into the attic;
- do not release harmful substances into the room when heated;
- have fire safety;
- work for a long time in conditions of high humidity and temperature.
These problems are solved using the right choice materials and technology for installing floors and ceilings.
What materials are suitable for the ceiling in the bathhouse
Choosing materials for a bath ceiling is a crucial step. Of all the variety offered on construction market, you need to choose the most reliable, environmentally friendly and fireproof.

What materials should not be used?
Materials that emit harmful substances when heated are not suitable for a bath ceiling; in particular these are:
- plywood, OSB and chipboard;
- polystyrene foam, polystyrene foam as insulation;
- polyurethane foam for sealing cracks;
- polyethylene films not intended for use at high temperatures.
Even when odorless, these materials release phenols and monomers. At high temperatures, the body absorbs them more actively, which can cause serious diseases, including cancer.

Plywood prices
Also, you cannot use a board affected by fungus - in conditions high humidity it will begin to actively multiply, destroy wood and release toxins. To extend their service life, wooden elements are treated with antiseptics intended for baths and saunas - they are environmentally friendly and harmless.
Table. Building materials suitable for baths.
| Ceiling element | Suitable material |
|---|---|
| Floor beams | pine and spruce beams or logs; edged board 50x150 mm |
| edged or tongue and groove board 30-50 mm |
|
| Board for interior cladding | linden or aspen lining of category A or B |
| Vapor barrier | glassine; aluminum foil or foil on paper based Alupap 125; foamed foil polyethylene (Izospan FX, Penofol, Izolon); membrane films (Izospan FS, FB and FD) |
| Waterproofing | membrane films (Izospan AS or AM or analogues) |
Installation of floors and ceilings in the bathhouse
Ceilings and the ceiling in the bathhouse can be made in various ways, the most popular of which are:
- hemmed;
- grazing;
- panel.
Their design differs in the materials and technologies used, and it is better to decide on the type of floors at the stage of constructing walls or a log house.
false ceiling
This design is used in traditional log construction of baths and is characterized by increased strength. It is suitable for baths of any size and layout, including two-story buildings with a recreation room in the attic.

The main difference between a false ceiling is the strong floor beams made of logs, the so-called matitsa. They are laid on the last crown of the log house. The beams serve as support for the attic floor and tighten the walls of the building, giving it strength. The ceiling is hemmed to the beams from below, the attic floor is installed on top, and the space between the beams is filled with insulation.
Design advantages:
- increased strength;
- good thermal insulation;
- durability.
- it is necessary to lay beams at the stage of wall construction;
- high consumption of material.
The false ceiling can also be mounted in a frame, brick bath and buildings made of foam blocks. To do this, when constructing walls, windows or grooves are left in the masonry, where beams made of logs or timber are installed.
Flat ceiling
The main difference between this ceiling is that the boards are laid on the walls or in grooves in a log, for which a quarter of the log is cut off. In this case, there are no floor beams, so the method is only suitable for small bathhouses, otherwise the boards will sag. It is difficult to install an attic on a floor; you will have to walk on the insulation. In such baths, the attic is often used as a technical room.
Prices for foam plastic
Styrofoam

- cheaper design;
- simple construction and repair.
- it is difficult to make effective insulation;
- Suitable only for baths and saunas small size with an unused attic.
Panel ceiling
A prefabricated structure of individual panels allows you to assemble a ceiling from scrap boards and leftover insulation. Boxes are made from tongue-and-groove boards, into which insulation mats are placed and sewn on top. The boxes are laid on a pre-prepared frame made of bars or boards close to each other.

Device Features panel ceiling in the bath
- you can use thinner boards and scraps; the prefabricated structure will ensure the required rigidity and strength;
- It is easy to replace individual elements during repairs.
- quite massive design;
- joints and cracks must be carefully sealed.
The choice of ceiling design depends on the size and type of structure and the availability of suitable materials.
The false ceiling is reliable and durable, which is why it is most often found in the construction of baths. Below is step-by-step technology its installation.
Prices for mineral wool
mineral wool
Step-by-step instructions for installing a false ceiling
Before you start work, you need to decide on the height of the ceiling. It is believed that for comfortable soaring its height is finishing must be at least 2.2 m.
In this case, the following features must be taken into account:
- In the first two years, a log house can shrink by up to 10-15% of its height;
- thickness draft ceiling is 30-50 mm;
- a ventilation gap of 50 mm is required between the rough ceiling and the finished cladding;
- The thickness of the skin is 10-20 mm.
To ensure the required height of the finished ceiling, the floor beams must be located at a height of at least 2.5 m during the construction of the bathhouse.
- Floor beams in classic bathhouse construction are made from the same type of log from which the log house is laid. They are laid along the short side of the log house in increments of 1-1.5 m. The logs are cut off on both sides for the convenience of filing the rough ceiling and attic floor.
- The mats are prepared from the log: they are marked and sawn to size, the upper and lower planes are trimmed to 1/8 of the diameter.
- In the logs of the upper crown - the comb and mats - grooves are selected for connection “in the fat tail”. This type of connection is generally similar to the “bowl” connection, but is characterized by increased wind protection and less airflow due to additional spikes.
- After adjustment, the mats are laid in place with caulk, moss, tow or inter-crown insulation. Mauerlats are laid on top of the last crown, on which the rafter system is then mounted.

Filing the rough ceiling
- The rough ceiling is made from edged or tongue-and-groove pine boards in such a way as to ensure a minimum of gaps and cracks. When using an edged board, it is recommended to select a quarter in it for better joining. The thickness of the board for the washing compartment is 25-30 mm, for the steam room - 40-50 mm.
- The board is hemmed to the matrices from below. To ensure a tight fit of the boards, logs are cut off to the crowns of the log house.
- The bars are nailed to the resulting plane in such a way as to align them with the top and bottom of the mats. The ends of the subfloor boards are nailed to them, and subsequently the attic floor.
- The rough ceiling is nailed to the mats from below, tightly joining the boards. The first board is laid close to the frame, having previously cut off a tenon or a selected quarter. They fasten the boards with nails to each matrix so that it does not move away or warp; use two galvanized nails for each intersection. You can use galvanized screws by first drilling small-diameter holes in the boards. The length of the nails should be 2-3 times the thickness of the board; usually 80-90 mm long fasteners are used.
- Each subsequent board is inserted with a tenon into the groove of the previous one and knocked with a hammer through the block until the lock is completely connected.
- If a stove is installed in the bathhouse, the chimney of which passes through the ceilings, it is necessary to prepare an opening for chimney at the stage of laying the subfloor. The mats at the location of the opening are cut off in the same way as the logs of the upper crown, and bars or boards are nailed to them, between which additional floors are mounted according to the size of the pipe penetration box.

Vapor barrier
The purpose of the ceiling vapor barrier is to prevent steam from the steam room and washing compartment from entering the insulation layer. Considering high humidity in these rooms, vapor barrier must be done in compliance with all the rules, without saving on it.
When heating a bathhouse, the ceiling can heat up to a temperature of 60-100 degrees, so vapor barrier is performed only with heat-resistant materials.
The traditional method of vapor barrier is to coat cracks and joints with a clay-sand mortar, which is also used for laying stoves. Its vapor barrier properties are not inferior to modern materials.
Make a solution like this:
- fine-grained dry quarry sand is sifted through a sieve to remove debris, stones, and organic matter;
- fatty oven clay is soaked in water for three days, after which the resulting solution of semi-liquid consistency is rubbed through a sieve;
- scraps and remnants of basalt or mineral fiber insulation are crushed by hand, it imparts plasticity to the solution;
- mix these components in equal parts to a paste-like mass with a construction mixer, adding water if necessary.
The resulting composition is used to coat the junctions of the subfloor with the log house and pipe penetration.

They also cover the subfloor from the attic side, the thickness of the vapor barrier layer is at least 5 cm.
Drying such a vapor barrier usually takes at least a week. This method is environmentally friendly and has been tested for years, but is not very convenient, and therefore is not particularly popular with modern developers - they prefer to make vapor barriers with modern materials.
Vapor barrier films
In this case, the contact of the subfloor boards with the log house is caulked with tow or inter-crown insulation. For vapor barrier use any heat-resistant and vapor-tight roll material, for example, foil or insulating film.
It is laid on top of the subfloor with an overlap of at least 10 cm on the mats, grabbing their edges with a stapler or small nails through thin wooden planks.
Prices for rolled vapor barrier
roll vapor barrier

You can completely cover the matrices from above. In this case, pieces of material are placed with an overlap of at least 10 cm, gluing the joints with metallized or aluminum tape.
Ceiling insulation
An important stage is the thermal insulation of the bath ceiling. It, like vapor barrier, can be done either using natural materials, and with the help of modern insulation materials. The purpose of thermal insulation is to save firewood and time for lighting the bath, as well as maintaining a high temperature in the steam room for a long time.
To calculate the thickness of thermal insulation, there are many methods that take into account the thermal conductivity of the material, the temperature difference between inside and outside the room and other factors. However, this calculation is complicated, so developers usually use ready-made solutions, based on experience in operating baths.
Table. Thermal insulation thickness for the bathhouse ceiling.
As can be seen from the table, natural insulation materials are effective only if their layer is thick enough. Therefore, when installing attic floor It is better to use modern materials above the steam room.
These include clay mixed with sawdust or straw cuttings, peat or black soil, and expanded clay.
Advantages of using natural materials:
- are not afraid of steam and moisture - they absorb and gradually evaporate it without loss of insulating properties;
- environmentally friendly;
- cheap or even available for free.
- low thermal insulation properties;
- backfilling with a thick layer is required;
These materials are usually used in combination with clay vapor barrier. They are poured directly on top of the dried layer of clay putty between the matrices to their top level.
If the attic is used as a technical room, you can not cover the insulation with anything; it is not afraid of getting wet even in the event of roof leaks. When installing an attic floor, a subfloor is laid on top of the insulation and finishing is done.
Modern insulation materials
More convenient and modern way- thermal insulation of the bathhouse ceiling using mineral and basalt wool. It is available in the form of rolls or mats of different densities and thicknesses. The thermal conductivity of the insulation and its ability to retain its shape depend on the density.
To insulate horizontal surfaces, you can use mats with a density of 30 kg/m³. Special insulation materials are produced for baths, one side of which has a foil surface - they additionally reflect infrared radiation. Such mats or slabs are laid with the shiny side down.
Cut the mats to size using a sharp knife or scissors. You can also use shredded scraps of material. They fill the entire space between the matrices, observing the recommended layer thickness. If slabs are used, they are laid in a checkerboard pattern, overlapping the joints of the previous row.
Mineral and basalt wool must be covered with a layer of vapor-permeable waterproofing. Even when wet once, the fibers stick together, the cotton wool settles and ceases to retain heat.
Video - Choosing insulation for a bath
Waterproofing insulation
It is laid on top of insulation under the subfloor of an attic room or as the top layer of a ceiling pie in a non-residential attic. As waterproofing, it is better to use modern non-woven membranes with one-way vapor permeability - they release moisture vapor from the insulation, but do not allow water to penetrate into the insulation from the outside.
Membranes on modern market are presented in a huge assortment, their characteristics are similar, so you can choose any one that suits its price and properties. Spread the waterproofing over the insulation and mats with an overlap on the mauerlats and top logs of the log house, placing the film with the pattern facing up.
The strips are joined with an overlap of at least 10 cm. The waterproofing is attached to the mats using a stapler, and strips of construction tape are glued over the attachment point. The joints are also insulated with tape.

Arranging the attic subfloor
The floor in the attic is made if you plan to use it as a room for drying and storing brooms or as a summer room. For the subfloor, use an edged board with a thickness of 25-40 mm of softwood. It is nailed onto the matrices using nails, 2 nails for each intersection.
A mandatory gap is left along all walls for ventilation of the insulation; its width is 2-2.5 cm. Any finishing coating, for example, laminate, can be laid on top of the subfloor. In this case, the ventilation gap must also be observed. For a technical attic, a subfloor is sufficient.

Floor ceiling technology - features
To make a flat ceiling, thicker boards are used that can withstand the load of insulation. As a rule, a 50-60 mm tongue-and-groove or edged board is used for this purpose. It is laid on top of the log house in the groove selected in the logs of the upper crown.
The boards are laid tightly against each other. The vapor barrier is attached to the bottom of the rough ceiling using a stapler, after which it is covered with clapboard or thin edged board. In this case, the insulation is laid out on top of the rough ceiling and covered with waterproofing, which is stapled to the mauerlat and the upper crown of the log house.
Bathhouse ceiling interior decoration
Using interior decoration, they hide flaws in the rough ceiling and add design and beauty to the bathhouse.. It should be immediately noted that a well-fitted rough ceiling can be used without cladding, but most developers prefer to finish the ceiling at the same time as cladding the walls.
Prices for lining

For ceiling cladding, linings made of hardwood are most often used: aspen, linden or alder. It has a light aroma of wood, which allows you to create a unique aroma in the bath. The lining is chosen from categories A or B - there are no knots in them, through holes, other defects.
50x50 or 40x60 mm bars are attached to the rough ceiling on top of the mats using 120 mm nails. For better vapor barrier, the rough ceiling is additionally sheathed with foil vapor barrier, securing it over the boards and timber with a stapler. The joints are taped with aluminum tape.

The lining is attached to the bars using finishing nails or galvanized screws. A ventilation gap is left from the edge of the walls, which is covered with a plinth after covering the walls. Through this gap, the space between the sheathing and the rough ceiling is ventilated, which allows you to extend the service life of the lining.

To prevent the cladding board from changing color and darkening from moisture, it is recommended to treat it with 1-2 layers of varnish or impregnation for baths and saunas. Bath compositions are made using water based, due to which they do not form a film, and the tree breathes. You can also use flaxseed oil.
A properly installed ceiling in a bathhouse will last at least 20 years without the need for replacement. Moisture does not remain in it, condensation quickly evaporates thanks to the maintained ventilation gap. Experts recommend inspecting the ceiling once every six months in order to promptly notice a violation of the vapor barrier layer, darkening and rotting of the wood and carry out timely repairs. In this case, the bath long years will give you health and good mood.
Video - Do-it-yourself bathhouse ceiling: step-by-step guide and tips
A sauna building is a rather complex structure with special operating conditions. The amount of fuel consumed in the room, the level of microclimate for bathing procedures, and the duration of warming up the room further depend on how well and competently the ceiling in the bathhouse is finished. This article will present step by step guide with photos and video materials that will help you make high-quality and reliable ceiling with your own hands.
Determining the height of the ceiling in the bathhouse
The ceiling in the bathhouse is one of the most important elements. After all, it functions in a special extreme conditions, when it can be frosty outside, but hot inside the room and clouds of moist steam rise.
In order for the ceiling to serve for many years, it must meet the basic requirements for its design and finishing:
- High-quality insulation that prevents heat leakage to the outside.
- Structural strength.
- Finishing that protects the insulation from getting wet.
But before choosing a design, you should decide optimal height for a bath ceiling.
To quickly determine the height, you need to focus on three points: your personal growth, the height of the shelf for the soaring person and the approximate wave of the hand with the broom of the soaring person. If the bathhouse will be built from timber/logs, be sure to add about 15-20 cm for shrinkage. We add all the obtained values together and get the required ceiling height. Usually it is at least 2 m. On average, it can reach about 2.5 m - this will be quite enough to make even a person with a height of 1.9 m comfortable in the steam room.
What is the best way to hem the ceiling? Choosing the best option
It is better to use “proven” materials as ceiling cladding. The undisputed favorite is coniferous species wood (aspen, larch). The wood must be carefully sanded, treated with high-quality impregnation and thoroughly dried. This will make it possible to significantly extend the life of the structure.
There are 3 most effective type ceilings used in arranging a bath ceiling: flooring, lining, panel. Let's look at each of them in more detail.
Floor option
Flooring is the simplest and cheap option ceiling installations for baths. It is ideal for small baths with a span width of no more than 2.5 m. The installation process is very simple: we make the flooring from boards no more than 5 cm thick, tightly joining them to each other. We lay a vapor barrier on top of the resulting flooring and cover it with insulation on top.
Yes, this type of cladding is very simple, but it has one significant drawback: the impossibility of functional use of the attic. And this already leads to a number of problems in the future:
- Insulation that is not protected from above can become saturated with moisture entering the attic over time;
- difficulties when repairing ceilings (here it is impossible to avoid moving on the ceiling, therefore, the thermal insulation layer will be damaged);
- impossibility of using the attic as a separate room.
Hemmed version
Its structure is attached to load-bearing beams ceilings: edged boards are mounted to them from below in the form of a continuous row. Then we move on to the insulating layers. We start with a vapor barrier, fill the space with insulation on top of it and cover it with a layer of waterproofing film. It is important to adhere to this sequence. AND The final stage- completely sheathe the ceiling from the attic side with boards.
This type of ceiling allows not only full use of the attic, but also perfectly protects the steam room of the bathhouse from heat loss. It is quite possible to make it yourself - there are no particular difficulties in the design. The only negative point is the high cost of the materials used, which makes a false ceiling one of the most expensive types of flooring.
Panel option
Significantly different from the previously discussed finishing options. It consists of separate panels, which are board troughs tightly adjacent to each other, filled with steam, heat and waterproofing. Small space Between such shields they are filled with waterproof insulation to prevent heat leakage. The top of the structure is covered with wood flooring.
The undoubted advantage of the panel ceiling is its cost-effectiveness. After all, it can be collected from leftover lumber. But the disadvantages include the significant weight of the shields, which makes it impossible to install the structure by one person.
Advice. Using bath room Over time, water may accumulate on the sheathing. To avoid this, sheathe the ceiling with a slope of 5 degrees.
Still good old school course fundamentals of physics convincingly proved that when heated, air rushes upward and that its main losses occur through the upper ceilings. It is in the bathhouse that heat leakage is extremely undesirable; its unreasonable consumption affects operating costs. In addition to heat, the upper floor is constantly exposed to moist fumes, due to which the structures require periodic repairs. This means that the ceiling in the bathhouse must be arranged with special care, it must retain heat, practically not react to moisture, not collect condensation and please the owners with its durability and neatness.
The traditional, most technologically advanced and easy to process material for the ceiling in a bathhouse is wood. It is also good for health, and can easily withstand the onslaught of hot steam, does not deform and does not collect condensation. Optimal choice tongue and groove board made of aspen, which does not emit resinous volatile components. To increase insulation and make work easier, tongue-and-groove elements are equipped with profile grooves and tongue-and-groove ridges. You can replace aspen lumber with spruce lumber; it is recommended to avoid excessively resinous pine.
The video will introduce you to the rules for choosing materials for the construction of bath structures:
First, let's decide on the priority type of bath ceiling design.
Types of ceilings for bath structures
In the list of listed tasks, the solution to all points is available to the most complex, expensive structures with a multilayer structure. However there is economical options, the implementation of which requires a minimum of funds and labor effort. The owner will lay the foundation for money or exploitation priorities; it is up to him to choose. And we will describe in detail how to make a ceiling in a bathhouse, focusing on design features structures, budgetary possibilities and labor costs.
Expensive false ceiling
The basis for its construction is wooden beams, from which it is made ceiling. All other components of the multi-layer cake are attached to them on both sides. From the outside interior spaces the ceiling is sheathed with tongue and groove or edged boards. First, a vapor barrier layer is laid on top of the peculiar pallets formed between the beams and the sheathing, then the insulation is laid and covered with a waterproofing film. Finally, a flooring of edged or unedged boards is installed on the attic side.
Note. Above the steam rooms and washing departments It is recommended to lay a double vapor barrier layer.
The generally recognized advantages of false ceilings are:
- simplicity of design, the installation of a bathhouse ceiling according to this scheme can perform House master without special carpentry skills;
- opportunity to use attic space, move along the upper flooring without fear of damaging the insulating layers;
- maintainability, the ability to change a failed component at any time.
There are disadvantages - the use of high-quality expensive materials: boards with a thickness of at least 50 mm with a length sufficient to fully cover the span between load-bearing walls.
It can be called a “lightweight” analogue of a hemmed structure with a reduced number of layers. It consists of boards joined together, the ends of which can only rest on load-bearing walls. After installing the roll-up, the cracks between the boards are sealed with clay from the attic side or the ceiling is completely covered with a 1.50-2.00 cm layer of crumpled clay. The flooring is covered with a layer of vapor barrier on top, followed by a layer of insulation.
If the owner decides to use expanded clay as insulation, moistened cement mortar sawdust or a mixture of peat and earth, before laying the vapor barrier film you will need to make a copy of a small fence around the perimeter. The laid layers are covered with a slab in approximately half a meter increments. 
Regardless of the fundamental differences in the structure, the height of the ceiling in the bathhouse is determined by the position of the top shelf. In a sitting position, a person should not touch the plane of the ceiling with his head. With slight deviations, the height value usually varies around the standard mark of 2.20 meters.
The advantages of this option are:
- This is the simplest ceiling - the owners can build a basic structure with their own hands without helpers and without experience in construction.
- The device will require a minimum of not the most expensive materials.
- Installation requires a minimum of time.
The disadvantages are that people are prohibited from moving through the attic, which is only suitable for storing bath brooms. The repair process will also be very difficult, since the insulating “layers” will inevitably be damaged.
Applicable floor option mainly for the arrangement of compact bathhouses with a single- or gable roof without an attic. The flooring can only rest on load-bearing walls. Cannot be used as a support internal partition, unless it is a permanent wall between the steam room and the relaxation room. There cannot be more than 2.5 meters between the supports, since the boards simply “sag” under the influence of gravity.
Panel ceiling and its specifics
The panel type of ceiling structure will require the most labor effort. It is assembled from panel elements, each of which is made separately. The finished panel resembles a pallet with insulating layers and layers laid in it. Since the panel ceiling component turns out to be quite heavy and difficult to lift upward, all the layers do not fit into it initially.
Panel ceiling assembly
Work order:
- Before installing the panels, a sealant is placed on the walls of the bathhouse at the points of contact with the timber. 5 cm of the panel should rest on the beam, 10 cm of the beam is left for the installation of the rafter system.
- When installing panels between them, due to the presence of overlaps, a “pocket” should form. It contains a vapor barrier layer and insulation. The panels are not connected with ties, and the ends resting on the beams are not nailed down. To connect them, transversely laid boards are used.
- In panels installed tightly to each other with a vapor barrier they are placed thermal insulation material. Most often it is mineral or glass wool.
- The “boxes” equipped with insulation are secured using transverse boards. The starting board should span the entire width of the ceiling. The transverse boards are nailed to the bars of the panel boards.
- Next, you can nail several short cross boards, then a long board again. Such alternation also promotes savings by reducing the consumption of long lumber.
- The joint lines are covered with overhead boards.
The ceiling assembled from the panels is ready, but most often the work does not end there. If not very presentable remains were used to make shields, you will need interior decoration bath ceiling. But it will need to be done after modernizing the rafter system.
Changes in truss structure
According to precisely calibrated dimensions in the rafters, it is necessary to select corner recesses so that the leg can rest on the upper crown. The notches made will slightly reduce the load-bearing capacity roofing system. Strengthening will be required by installing two vertical supports with a horizontal crossbar. To install the support beam, you will need to cut a recess and install a support in it. The rafter legs will need to be attached using cap screws to the upper lintel and to the crown in the area of the sawn corner. Screws fix the point of intersection of the crossbar and the support, and the intersection of the crossbar and rafter leg.
 The three methods of installing a bath ceiling are distinguished by both technology and load bearing capacity, and the cost of lumber. The owner of a small family bathhouse with a pitched roof will most likely be satisfied with a simple flooring. But the owner of a solid bath structure has a choice: hemmed and panel type. The first type will help save effort and time, the second - financial investments.


