Profiled sheet (corrugated sheet) is made of steel sheet coated with zinc, aluminum and protective polymers. Widely used in construction in the form roofing material, for the construction of gates, fences and other structures.
The material acquires corrugation when passing through a profile bending machine, and the edges of the sheet can be in the form of a wave or in the shape of a trapezoid. The width of the corrugated sheet is 113-120 cm, length 30-1200 cm, thickness 0.4-1.2 mm.

Advantages of corrugated sheets
Before we move on to installing a profile sheet roof, let’s consider the advantages of the material:
- Not subject to corrosion;
- Long service life;
- Ecologically pure;
- Variety of colors and shapes;
- High resistance to environmental influences and mechanical loads;
- During installation, a minimum number of joints are formed;
- Universal.
Disadvantages include the formation of condensation and low sound insulation.
Corrugated sheet overlap and roof angle
If corrugated sheeting is used as a roofing material, the sheets must be installed with an overlap.
- If the slope exceeds 30°, the sheet overlap will be 10-15 cm;
- 15°-30° – 15-20 cm;
- less than 15° – up to 20 cm.
Calculation of roofing material
To correctly calculate the roofing material, you first need to calculate the roof area, taking into account design features. To do this, the surface is divided into geometric figures, all data is subsequently added up.
Each type of roof shape (triangle, trapezoid or square) uses its own formula to calculate the area. Eaves, end overhangs and bends (ridges, ridges and abutments) are measured. Corrugated sheeting has two widths: total width – 118 cm, and working width – 110 cm; this fact also needs to be taken into account when calculating.

To calculate the required number of sheets running horizontally, you need to divide the length of the ramp by dividing the working width. The size of the overlap is also taken into account. The number and length of sheets is equal to the sum of the overhang from the cornice, the overlap and the length of the slope.
2 meters is the standard length of the additional element to determine required quantity material, sum up the length of the slopes, and then, taking into account the 10 cm overlap, divide the resulting figure by 1.9. To fasten the corrugated sheeting, self-tapping screws with rubberized gaskets are used, their number is 8 pieces per 1 m2. On last stage determine the amount of insulation and waterproofing.
Roofing installation from corrugated sheets
Thermal insulation, vapor barrier and waterproofing indicators in a roof structure largely depend on the correct installation of the “pie”. The entire roof structure is called a roofing “pie”. The system may be different, depending on the room: whether it will be residential or not.
Pie device:
- Profiled sheeting;
- Lining or drywall;
- Insulation;
- Vapor-proof material;
- Lathing;
- Rafter leg;
- Ridge seal;
- Skate and rail;
- Rafter strip;
- Waterproofing film.

The first sign of damage to the roofing “pie” will be the formation of ice at sub-zero temperatures.
Tools and material for installing corrugated sheets
- Film or thick polyethylene;
- Stapler;
- Glass wool or mineral wool;
- Silicone;
- For gluing waterproofing seams, connecting tape;
- For waterproofing, membrane in rolls;
- Paralysis film;
- Self-tapping screws;
- Screwdriver;
- Beam;
- Lining.
List required quantity building materials are compiled when calculating the estimate, and will depend on the type of roof structure.
Correctly covering the roof with corrugated sheets with your own hands
At the first stage installation work The waterproofing is laid starting from the bottom edge of the sheathing. The film is laid with an overlap of 10 cm to 15 cm. The material should not be stretched too much, and a construction stapler is used to fasten it.
Installation of counter-lattice

It is necessary to leave a gap between the waterproofing and the corrugated sheet to drain moisture. The counter-lattice is installed afterward; the structure consists of planks 5 cm high, they are placed along the sheathing, parallel to the cornice and rafters.
Installation of corrugated sheets
To ensure that the mounting hole is tightly closed, use self-tapping screws with sealing gaskets. Silicone sealant The horizontal overlap of the corrugated sheet is processed.

If the installation takes place in a flat roof, then the sheets are installed with a vertical overlap in two waves. If a sealing gasket is used, the sheets may be installed with an overlap in one wave.
Installation of corrugated sheets on gable roof comes from the bottom row. Place 5 sheets and fix them in the center with a self-tapping screw. And then, in increments of 50 cm, the corrugated sheets are connected to each other with self-tapping screws. If everything is aligned along the overhang, then final fixation is made.
Installation of end strips
The end strip for most sheets is 2 m; installation begins at the bottom with an overlap of 5-10 cm. When correct installation at least one wave of the corrugated sheet will overlap. In increments of up to 1 meter, fastening occurs with self-tapping screws.

The ridge strip with an overlap of 10 cm is fastened using smooth elements; they must be included in the kit. It is advisable to install a layer of breathable seal between the corrugated sheets; fastening occurs in increments of 30 cm using roofing screws.
Installation of the junction strip
The abutment strip is laid with an overlap of 20 cm, fastening occurs with self-tapping screws in increments of 40 cm. Using a ridge seal, the connections between the ends of the wall and the roof are sealed, this will help prevent moisture from getting into the cracks.

- The roofing process is considered high-altitude work, and before starting installation you need to take safety measures;
- During installation, it is better to lay corrugated sheets on boards rather than on the ground;
- The corrugated sheeting should go down from the eaves by about 5 cm;
- The waterproofing should sag a little.
- Use a taut string to lay the profile sheets evenly along the cornice.
The roof is one of essential elements building. The reliability and service life of the entire building depend on its correct installation. Commercial network building materials has a large selection of roofing products. Profiled flooring is in a leading position. The technology for laying corrugated sheets is not difficult. Before starting work, you need to familiarize yourself with the features of this material and the rules for its installation.

Profiled flooring is universal material, which has found its application in the construction of fences, light structures, finishing of wall and roof coverings. Blanks are used even in bold experiments in the absence of experience in roof construction.
Description of material
The corrugated sheet is made from cold-rolled steel raw materials and coated with polymer protection. The height of the workpiece profiles can be 8-75 mm. Wave, rectangular and trapezoidal shapes provide additional rigidity. Corrugated sheeting can withstand mechanical stress and high loads.


Advantages of profile flooring:
- The optimal thickness allows you to withstand intense wind loads.
- Resistant against rain, snow, corrosive stains and the damaging effects of aggressive substances thanks to paint and galvanized coatings.
- No difficulties when installation work Oh.
- Convenience during transport.
- Light weight, placing little load on the foundation.
- Possibility to choose from a palette of shades polymer coating, gives individual appeal to the roof.
- Low price compared to other coatings used for roofing.
After cutting the workpieces to specified sizes, it is necessary to treat the cuts with a special anti-corrosion primer to extend the service life of the covering corrugated sheet.
Lightweight roof with slight slope covered with blanks NS 35 or C 44 with a trapezoidal or sinusoidal profile.


The length of one sheet is 2-6 meters, or you can order the production of corrugated sheets with custom sizes 0.5-12 meters.
The pitched roof is covered with elements of the most common brand NS 35 - profile height 57-114 mm. The letter “H” denotes flooring used for load-bearing structures.
To get a more detailed idea, you can watch the video:
Required Additional Items
The selection of self-tapping screws with a polymer coating is made according to the color of the main corrugated sheet and its structure. The tip in the form of a drill makes it possible to use it in working with metal structures having a thickness of no more than 2 mm. Self-tapping screws are sold complete with sealing washers made of neoprene rubber.
Get tips on the right choice self-tapping screws can be used when watching the video:
When sealing the under-roof space, in particular, to seal the ridge, a special sealant is used that follows all the bends of the corrugated board. The function of the ridge is to provide protection for joint connections, as well as to create decorative decoration roofs. The ends of the skates are inserted into special plugs.
The installation of corners is carried out for the purpose of connecting corner parts.


Selection of tools


Before you do it yourself, you need to prepare mandatory set tools:
- laser construction level;
- long tape measure;
- construction knife;
- marker or pencil;
- metal scissors;
- high power screwdriver;
- construction stapler and staples for it;
- electric drill;
- hammer;
- sealant gun;
- fastener
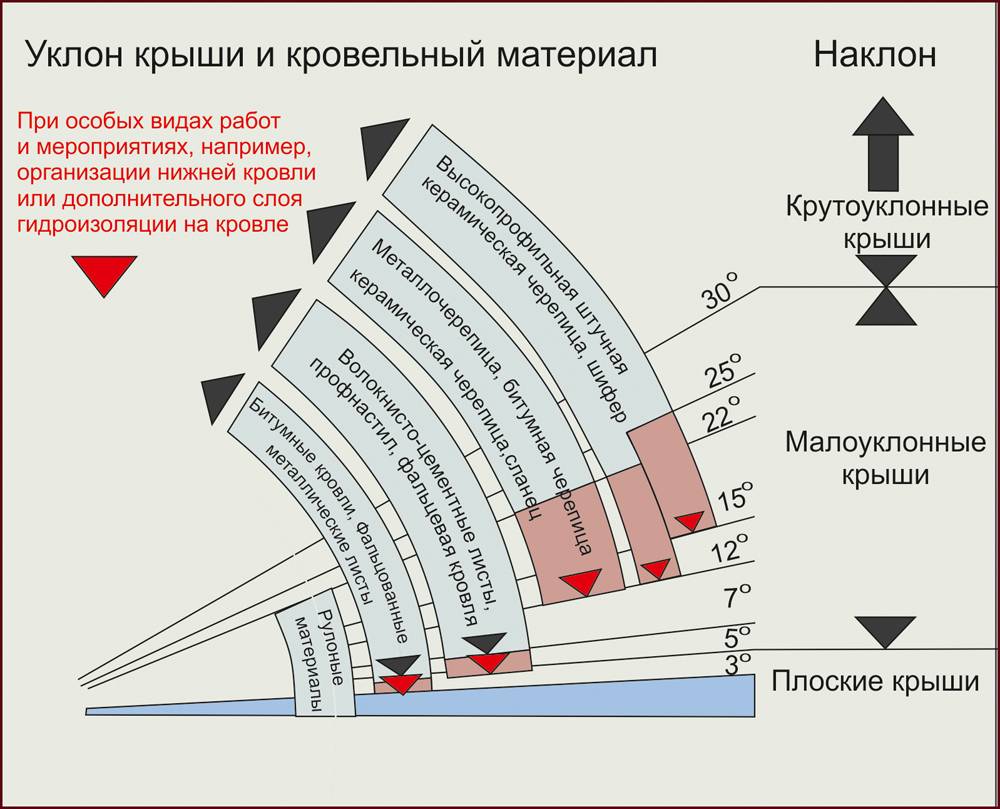
Providing roof slope
Buildings are constructed with a mandatory roof slope of at least 12˚. Depending on the angle of inclination, installation is carried out with overlapping edges of adjacent parts: - less than 15˚ - overlap is 200 mm;
- less than 30˚ - 150-200 mm;
- over 30˚ - 100-150 mm.
In areas of overlap, the seams must be sealed using mastic or sealing tape.
Preparatory calculation work
At the first stage, measures are taken to measure the roof:
The length of the slopes along each diagonal is determined, and the planes are checked in parallel using a level.
The estimated length of the workpiece should correspond to the roof slope plus 40 cm for the overhang.
The required number of profiled sheets is determined using simple mathematical calculations, not forgetting to add tolerances on the size of the edge overlaps.
For complex roof geometry, calculations are made for each unique figure, and then the sum of the results obtained is determined. When calculating the amount of corrugated sheeting, you need to remember about ridges, pipes, windows, ends, etc.
Roofing pie device

In addition to the covering layer, the roofing composition has several required elements:
- thermal protection;
- waterproofing;
- vapor barrier layer;
- ventilation.
The calculation of each layer is made using a method similar to determining the number of profiled sheets.
Features of laying corrugated sheets


Laying of profiled flooring is carried out in compliance with simple rules:
- When raising the flooring upward, wooden logs are used.
- The work is carried out in calm weather to prevent damage to the sheets if they accidentally fall.
- It is possible to move along the profile only along the deflections of the waves in the area of the sheathings.
- Places of cuts or other violations of the integrity of the corrugated sheet are treated with special enamel to prevent metal corrosion.
- It is recommended to use thick protective gloves to avoid injury from sharp edges.
- Remaining debris after installation work is swept away with a brush or washed with a soap solution.
- The installation of the roof covering is completed by the mandatory removal of the packaging film.
Algorithm for covering a roof with profile decking
The elements are laid on a sheathing that has a continuous or stepwise character. The size of the step may depend on the degree of roof slope. When the bevel is less than 15°, the distance between the slats made of metal or wood is from 300 to 400 mm; above 15°, the pitch is increased to 600 mm.
To prevent rain or snow from getting into the gaps between the sheets, installation is carried out from the bottom layer, gradually moving upward.
Important! Corrugated sheeting with a wavy profile is laid on the side exposed to the least amount of wind.
If the slope is of sufficient length, a solid corrugated sheet is used, and it is laid from the end part. Alignment is carried out focusing on the cornice, providing an additional 40 cm for overhangs.
Installation of the coating is carried out very carefully, step by step checking the plan drawn up in advance:
- Installation of the first element is accompanied by fastening with a self-tapping screw in the middle.
- When laying the second part, the edge overlaps (overlaps) the previous fragment. The fastening method is repeated.
- After preliminary laying of the parts completely over the entire roof, they are aligned, focusing on the horizontal eaves.
- The connection of corrugated sheet elements with each other at the very ridge, falling into the deflection of the wave through a step.
- Final fastening. Self-tapping screws are installed in the sheathing along a vertical line through one board, and along a horizontal line - at intervals of two waves. At the ends, the sheathing layer is secured at each step. At the top near the ridge and at the bottom at the cornice, self-tapping screws are inserted in each deflection.
- The joints are strengthened at all mating points.
- Excess parts must be trimmed with scissors on all sides.
- Installation end strips. Starting from the lower level towards the ridge, an increase in length is made, creating an overlap of 50 mm. Mounting self-tapping screws are installed one meter apart.
- After laying the self-adhesive sealant on the corrugated sheet, the ridge element is attached. The overlap of the edges of the ridge strips should be 100 mm, the distance between the fasteners should be no more than 300 mm.
Watching the video will give you a more accessible idea of roof installation:
Features of installation in difficult areas

Difficult areas are characterized by the presence internal corners, they are called valleys. Complicated places are considered to be the junction of two slopes, the areas where ventilation outlets and chimneys are located. Internal joints need careful sealing to protect areas under the roof from moisture penetration. The lathing here has a continuous appearance.
The joints between the profiled flooring and the planks need to be sealed using a sealant or mastic. The valley strips are secured together with the profiled sheets. Upper bar installed on the profile to cover the edge joints and protect them from rain and snow.
The trading network has additional elements, having non-standard forms to avoid the hassle of covering a complex roof.
A video in a more visual form can demonstrate the process of laying corrugated sheets:
The costs of installing a good roof are always quite high. They often account for about a third of the total construction costs. However, in this case it is still possible to save a little when building extensions, a house or business facilities. Shed roofs made of corrugated sheets are quite economical; they perfectly protect buildings from external influences, since they are able to withstand various weather conditions. Yes, and you can make such a roof yourself, since the design is quite simple.

Before we talk directly about the construction of such a roof, you need to familiarize yourself with its advantages. This design is quite light due to the simple rafter system. And this indicator is relevant when constructing buildings with far from powerful load-bearing walls. Therefore, this type of roofing is often chosen when constructing sheds, garages and other household buildings.

Also, one of the main advantages is the simplicity of the design itself, which allows you to do all the work yourself without involving specialists. In any case, you will have to make a number of calculations required for design, but they are quite simple and you can limit yourself to a simple drawing.

On a note! Shed roofs can be installed with or without an attic. If this room is not planned in the project, then the installation of a roof of this type is greatly simplified. Here you can do without creating a rafter system by simply mounting the top floor at a certain angle.
As noted above, such a roof is economical. Its arrangement will require much less materials than for the construction of even the simplest two pitched roof, since its area is smaller. And you will need not only a little corrugated sheeting or boards for rafters, but also insulation, waterproofing and other materials. Although the area of the building may remain quite large.

Another advantage of the shed roof type is that it can withstand the effects of wind and therefore is often built in regions where wind load is critical. The main thing is to choose the correct direction of the slope in accordance with the wind rose, which has long been determined by scientists in all territories of the globe.

The advantages include saving heat indoors– a pitched roof has exactly the shape that the best way affects air circulation, but at the same time forms under it special zone, where heated air masses accumulate, giving off their energy to the roofing materials and heating it.
Why is it recommended to cover such a roof with corrugated sheeting? It's simple - this material is inexpensive, lightweight, easy to install, but at the same time durable and strong - service life at correct installation amount to decades. Also, corrugated sheeting can be purchased in absolutely any color, since the color range of the material is quite rich.

The main disadvantages of such a roof are the following:
- the need to clear snow masses in winter, since the roof slope is small and does not allow the snow to melt off on its own;
- when it rains, the corrugated sheet makes quite a noise and if not provided good sound insulation, then staying under such a roof for a long time will not be easy.

Prices for corrugated sheets
Corrugated sheet
Calculation of elements
Before starting work, it is worth not only studying the materials used for construction from the point of view of their operational features, but also making the required calculations that will allow you to determine the roof structure and the amount of required materials and consumables.

First, the load of the roof on the foundation or walls is calculated. Everything is simple here - the calculations are made for a single slope, whereas for a hip or gable roof it would take longer to calculate the load.
In the case of a pitched roof, you will need to use only two formulas. This C = Axtg(B), where C is the height of the wall, A is the length of the upper floor, B is the angle of inclination of the roof. The second formula looks like this: E = C/sin(B), where E is the length of the rafters, C is the height of the wall, B is the angle of the slope. The pitch between individual rafters is selected depending on the level of wind load and is usually 50-80 cm. During the calculation, do not forget about the roof overhangs, which will protect the walls of the building from precipitation.

In this article we bring to your attention detailed guide for installation of a corrugated roof. After studying the technology of work and watching a thematic video, every homeowner will be able to correctly lay and secure roof covering with your own hands.
Installation of roofing from corrugated sheets
The first step is to select a brand of profiled sheet suitable for roofing. There are products on sale with the following markings:
- C – low profile material for walls and fences;
- N – sheets with an increased profile and stiffeners;
- NS, MP, MK – universal corrugated sheeting.
Reference. An example of complete marking looks like this: H60-845-0.5. The number 60 indicates the height of the profile in mm, 845 – the width of the sheet, 0.5 – the thickness of the metal.
The division into wall, roofing and universal corrugated sheets is quite arbitrary. Therefore, when choosing a coating, adhere to the following recommendations:

On a small country house or the garage will use galvanized metal without a polymer coating, it is significantly cheaper. To independently cover a private home or bathhouse with colored corrugated sheets, prepare additional materials:

Important point. Immediately exclude the grinder from your toolkit. Powder-coated metal can only be cut with electric or manual scissors.
Lathing requirements
Before covering the roof with corrugated sheeting, it is necessary to install rafter system and prepare the sheathing. What should be done:


An important question is the step of laying the slats into which the corrugated sheet will be screwed. The interval depends on the slope of the roof: the smaller the angle, the greater the snow load and the more often boards are installed. It is recommended to maintain the following distances between the slats:
- slope less than 10° - continuous sheathing or step up to 10 mm;
- roof angle 10-15° - interval no more than 45 cm;
- tilt over 15° - installation step of boards is 60 cm.
Advice. Adjust the distance between the slats to the length of the profiled sheets to securely fasten them at the edges.
Under the lining of valleys that provide drainage for large amounts of water, it would not hurt to place additional waterproofing made of roofing felt. In the case of insulated mansard roof do not forget to provide ventilation of the under-roof space, as shown in the diagram.
Installation instructions
Before you start covering the roof with corrugated sheets, you should install the internal shaped elements. These include valleys and chimney pipe framing - the edges of these parts must be covered with corrugated sheets on top.
The chimney is lined using the following technology:

It is easier to cover the drains in the corners with valleys - attach the shaped parts to the sheathing, starting from the cornice. The pitch of self-tapping screws screwed along the edges is 30-40 cm, the amount of overlap of the upper parts on the lower parts is 300 mm.


Now about how to properly cover a roofing structure with your own hands:

Note. Corrugated sheeting can be laid either in rows or as a “ladder”, so that you do not have to constantly move the stepladder. The principle is simple: put 3 sheets in the 1st row, 2 in the second, one in the 3rd, then move to the side and continue installation, starting from the cornice.

After covering the entire area of the slopes, all that remains is to attach additional parts (flashings), which cover the gaps from precipitation and give the roof a finished look. Let's list these works:

Installation of solid sheets of custom length is much easier - you need to maintain a side overlap and clearly align the sheets before fastening. To avoid damaging the powder paint when lifting long elements, it is recommended to tie them to wooden frame or use more modern devices - construction suction cups and clamps.

How to properly cover a roof with corrugated sheeting is demonstrated in the video:
Pros and cons of profiled coating
If you decide to cover your roof with corrugated sheets, you should be aware of the advantages and disadvantages of this material. The advantages of profiled painted sheets include the following qualities:
- reasonable price of building materials (cheaper than metal tiles);
- relatively light weight;
- ease of processing and installation compared to other traditional coatings;
- wide choice of colors;
- service life is from 15 to 30 years.
Note. Galvanized corrugated sheets without a colored coating are cheaper than painted ones. The material is well suited for various outbuildings and other ancillary structures in the country.

Judging by reviews from homeowners, the operational drawback of steel profiled sheets on the roof is “sonority.” Even with insulation and sound insulation, the coating always “notifies” the owners of the house that rain has begun with the dull thud of drops on the iron. Other disadvantages look like this:
- Metal conducts heat well, protecting attic space from the wind. If the roof is not insulated, the attic will be quite cold in winter, and too hot in summer.
- The polymer coating fades in the sun and loses appearance after 3-4 years of operation.
Conclusion
Since the advantages of corrugated sheets outweigh negative sides from its use, the material is in demand among homeowners with low incomes. Polymer-painted sheets allow you to save on installation if you do it yourself. As you can see, this task is completely solvable.

Design engineer with more than 8 years of experience in construction.
Graduated from Eastern Ukrainian National University them. Vladimir Dal with a degree in Electronics Industry Equipment in 2011.
Related posts:

If you decide to build a small garage, outbuilding or make a shed, then you can build the roof of such a structure yourself. Ideal option there will be a pitched roof made of corrugated sheets. This type of design is not only simple to implement, it is quite easy to maintain, strong, durable and aesthetically pleasing. Before installing such a roof, it is important to choose the correct slope, choose the thickness of the corrugated sheet and the cross-section of the load-bearing elements. We will talk about all this in our article.
In order for a corrugated roofing to be strong and durable, it is necessary to understand the types of this material. On sale you can find the following types of profiled sheets:
- Products marked “C”- these are wall sheets with a thickness of no more than 0.06 cm and with a wave height of no more than 1 cm. Such corrugated sheets are not required special requirements in terms of rigidity, since it is used for wall decoration.
- Sheets marked "NS"- This is a more durable material that can be used for walls and roofing. The height of the corrugation is 1-3.5 cm, and the thickness of the sheet reaches 0.85 mm.
- Profiles marked “H”- this is a load-bearing corrugated sheet. The wave height is 4 cm and above, and the minimum sheet thickness is 3 mm.
It is better to make the roof of a pitched roof from profiled sheets marked H and NS. Profiled sheet marked C is only suitable for covering small outbuilding provided that a continuous sheathing is installed.
Important: because single-pitch structures They are distinguished by an impressive surface area of the slope; the roof takes up a significant snow load. In this regard, for a pitched roof it is recommended to use corrugated sheets of the following brands: NS44 and NS55.
Selecting the angle of inclination
Before making a pitched roof from corrugated sheets, you need to decide on its slope. This is important for effective abduction melt water and water during rain. Most often, for corrugated roofing, a sheet with a corrugation height of 3.5 cm and a thickness of 0.07 cm is chosen. This coating can be laid on lathing installed in increments of 1.5 m. This design of a pitched roof can withstand a load of no more than 60 kg/m² . Moreover, you can walk on this roof while carrying out repair work or clearing snow.
If you decide to make a pitched roof from a profiled sheet, then the angle of inclination largely depends on the following indicators:
- At an angle of inclination within 5-10° continuous sheathing must be performed. The overlap along the longitudinal joint of the sheets is made into two waves, along the transverse one - at least 30 cm.
- The slope angle is around 10-15° requires the arrangement of sparse lathing with a step of 0.45 m. The longitudinal overlap is made by one wave, and the transverse overlap is at least 20 cm.
- Roof with a slope of more than 15° is done along the lathing installed in increments of 0.6 m. The longitudinal overlap is equal to one wave, and the transverse overlap is at least 17 cm.
It is also worth considering that when covering a pitched roof with corrugated sheeting grade S-8, the angle of inclination must be at least 15°, and the sheathing must be continuous. If profiled sheets C-10 and 20 are being installed, then continuous sheathing is needed for a slope of less than 15°. In other cases, the sheathing is installed in increments of 30-50 cm. Sheets C-21 and NS-35 can be mounted along a sparse sheathing even with a slope of less than 15°. In this case, the greater the angle of inclination, the greater the pitch of the sheathing will be.
Attention: profiled sheets of grade N-60 and modification N-75 can be mounted on the sheathing installed in increments of 3-4 m, but the angle of inclination should not be less than 8°.
Installation sequence

We will consider the installation of a pitched roof made of corrugated sheets using the example of a combined roof (without an attic). We begin the installation of the structure with the manufacture of the Mauerlat. To make it, you will need a beam with a cross-section of 0.15x0.1 m. If your structure is built from timber or logs, then in this case the role of the Mauerlat will not be taken over by the final crown.
If the walls of the building are made of fragile gas or foam blocks, then under the Mauerlat it is necessary to make monolithic belt, into which steel pins will be placed at the installation stage to secure the beam. Do not forget to isolate the horizontal beam from walls made of another material using roofing felt.
Rafters and sheathing

Further installation of a pitched roof made of corrugated sheets involves marking the rafters. We carry out the work in the following sequence:
- We lay the board on the Mauerlat beam in such a way that there are overhangs 400-500 mm long along the edges.
- Using a level and a square, we mark the places where the lower and upper cuts will be made. The width of the cut must exactly match the width of the rafter, and the depth of the cut should not be more than 1/3 of the height of the rafter.
- Next, using this cut, we make a template, with the help of which we transfer the markings of the cut under the rest of the rafters.
After this, you can begin laying the rafters and fixing them to the mauerlat beam. To do this, you can use two nails 150 mm long, which are driven in a cross direction, or steel staples.
Laying waterproofing

The construction of a pitched roof implies the mandatory use of waterproofing. To do this, use a special film, which is laid across the direction of the rafters from the bottom of the slope upward. The material is laid without tension with an overlap of adjacent strips of 10-15 cm.
The waterproofing is attached to the rafters using a construction stapler. After that, counter battens are placed on the rafters on top of the waterproofing. They are needed for ventilation of the under-roof space.
Advice: if you are making a non-ventilated roof, then use a special vapor-permeable membrane instead of a waterproofing film. This way, moisture from condensation will not accumulate under the roof.
Lathing

Single-pitch design roof system depending on the angle of inclination and the type of corrugated board used, it provides for the use of continuous or sparse lathing. We fasten the sheathing boards from the bottom of the slope, moving upward. For fixation, use a staple or nail.
After this, we proceed to install the fillies that will form the roof overhangs. If desired, you can not install fillies, organizing overhangs due to protruding walls rafter legs. Subsequently, the roof overhang can be hemmed to protect wooden elements from dampness.
Laying corrugated sheets
To install the profiled sheet you will need the following tools and accessories:
- metal scissors;
- screwdriver;
- rope;
- roofing screws with rubber sealing gaskets and hex heads;
- staples;
- stapler;
- two stairs (longer than the length of the slope and from the ground to the roof).
To lift the corrugated sheet at the two ends of the ladder, you need to make loops from a rope, the length of which should be four times greater than the ladder itself. We put corrugated sheeting into the resulting loop and lift it to the roof using a ladder.
We lay corrugated sheeting from the bottom corner along the horizontal overhang of the roof. To fix one sheet you need to take about 9 screws. In this case, screws can be screwed into the rib if its height does not exceed 20 mm, or into the deflection if the corrugation height is greater.
Attention: when screwing in the screw, watch the sealing gasket. It should be pressed tightly against the sheet, but not too tight or too loose.
We lay the sheets in vertical stripes so that adjacent elements in a row overlap each other by the width of one wave. The overlap of adjacent rows is 150-200 mm.
Now you know how to make a roof from corrugated sheeting with your own hands. It is equally important to take care of the organization of drainage. Otherwise, unorganized drainage can lead to premature wear of the base, foundation, and damage to the facade.