— your guide to the world of scale modeling!
Diorama is, at its core, the essence of modeling craftsmanship. And not only model ones, strictly speaking. To make a good diorama you need to have a wide range of theoretical knowledge: from artistic to materials science.
That is why diorama gives the most extensive pleasure from work. Both from the process and from the finished result.
But how to build a diorama correctly? Where to start building a composition? What should you pay attention to first?
You can learn about all this from teaching aid"Diorama Technology". This is Tamiya's book, translated by Oksana Dubinina specifically for the magazine of bench modeling "Standmaster". The magazine, as far as I understand, is no longer published. It's a pity…
It was a good start. But like any business, it requires financial investment. And they probably weren’t found.
But be that as it may, dear colleagues, I suggest you familiarize yourself with the first part of this very interesting tutorial.
Diorama world
A diorama is a world created by magnificent, masterfully made models.
At first, the diorama was a perspective image located in a box. It was possible to look at her only from one side. This is the center of symmetry taken from the panorama, but it can be viewed from any angle as long as you are in the center of the panorama. Dioramas also include displays of stuffed animals in museums.
A modern diorama differs from a box diorama in that it can be viewed from any angle. Therefore, when making it, it is necessary to make with great realism all the elements that will be visible to the viewer. In addition, when photographing or filming, this principle is the key to the authenticity of the image.
Diorama concept
When we're talking about about making a diorama, what is the most important? Manufacturing technology? Ability to model human figures? Or maybe it’s a good knowledge of history and accumulated factual material?
Of course, the higher the skill and the more knowledge, the more perfect the diorama. However, one cannot help but pay tribute to the idea itself. What can happen when it is implemented in a limited space?
At first the image is very vague and unclear, but when it takes on certain features, all kinds of tools and materials are needed to implement it. Only with their help can you realize your plan and produce real works of art that can surprise. And, of course, one cannot do without researching the era recreated in models. After all, only a diorama with its three-dimensional space contains information that cannot be obtained from flat photographs and illustrations.
Diorama plan
Probably many people don’t know where to start making a diorama. Some people begin to realize their plans with ready-made models, trying to build a diorama by combining them. However, if you look closely at the excellent works in the diorama genre, it becomes clear that they were made through careful calculations.
Definition of space, choice Vehicle, their placement, facial expressions and gestures of human figures, accessories, trees, buildings - all this is carefully selected in order to recreate a complete scene that has a single meaning.
 |
 |
 |
It is important to bring all existing factors into mutual conformity. This can be compared to staging a scene in a play or film, and this is probably the most beautiful moment in making a diorama.
However, how do you make this production truly good? First, a plan is drawn up. First of all, we need to clearly define what exactly we are going to make, while knowing that the possibilities regarding time are endless.
 |
 |
 |
Era? Place? Event? If there is already a sketch, then we are dealing with a specific solution, and if not, then very often the topic can be found while looking through photo albums or a collection of accumulated material.
So, if a theme has been found, then, when starting to make a diorama, it is important to give a finished form to the idea and make the necessary notes and a sketch. This can be considered a start in building a diorama.
To perform an approximate arrangement, let us take as an example of making a diorama the events on the front line in France in the last months of the Second World War. The main theme here is “tension.” Let's accurately capture the image in the sketch and once again carefully study the as yet unfinished diagram.
This is the start of the operation.
Making diorama parts
Once the theme and details of the diorama have been determined, it is necessary to decide in what space it will be enclosed. To do this, we will connect all the parts of the diorama: cardboard buildings and vehicles, changing their places as necessary. It is necessary to correctly grasp the density of three-dimensional space and distance in order to obtain a specific composition with a clearly defined theme.
An important point in the meeting between “Horch” and “Panther” is the tension of the situation, which conveys the intent of the diorama. This requires a minimum surface area for buildings and trees. We put all this into practice by placing the parts on 8 cm thick foam plastic, as shown in photo 2. In general terms, we will tilt the surface so that the hulls of the Horch and the Panther tilt towards each other. It is most convenient to cut polystyrene foam with a knife with a long flexible blade. At this stage, try the machines on the surface again in full accordance with the sketch.
Let's cover the foam with clay to create a ground surface. Before the coating has had time to dry, we will give the surface of the earth the necessary expressiveness. By pressing with your hand on the tracks and rollers, we make a track, as shown in photo 3. But before that we need to finish with the arrangement of the Panther rollers. When the suspension parts of the tank and car are in the desired position, it is necessary to check how well everything adheres to the ground surface.
As for the suspension stroke, it must be done simultaneously with the arrangement of the ground surface. This is done by placing the Panther tracks on the surface of the foam, already covered with a layer of clay. The dead weight of a real tank is forty-five tons, and therefore the considerable immersion of the tracks into the ground looks very natural. After applying the clay, try installing the machine again. After this, spray water with a spray bottle and dry it slowly; to avoid cracks, you need to make sure that there is not too much water.
Before the clay dries completely, add crushed stone on top. After it has hardened, in order to protect it from possible shedding, it is necessary to insert several pins, retreating a few millimeters from the edge of the foam. Use sandpaper to scrape off excess clay. If the ground surface is finished, now is the time to plant the pre-painted grass and trees. The grass is made from loose rope, cut into pieces about 1 cm long, as in photo 6.
To attach the grass to the ground surface, pour glue directly onto the foam, spreading its layer over the surface. Having made holes in the foam, stick pieces of rope there in bunches. The top edge of the grass can then be trimmed with scissors for a more authentic look.
As for trees, you need to select the root of a real tree and use it in this form. After a direct hit from a shell, trees are broken along with buildings. We install the trees according to the sketch, and add soil around the roots, securing it all with glue. Remove excess soil with air from a spray bottle.
Construction of the Panther
Having established the initial position of the Panther and Horch and determined the overall plan, as shown in photo 1, you can begin to refine them. At first this may cause a feeling of discomfort, but it is necessary to adjust all the vehicle parts and surface unevenness to each other again and again. We will try to construct the “Panther” in a diorama with the same authenticity as in museums and exhibitions.
To give serious meaning to the action taking place, in our case it would be good appearance make cars shabby. This will give the diorama historical realism. The car bodies are covered with camouflage paint from the last months of the Second World War.
The Panther suspension assembly diagram is shown in the figure below. Now let's move on to installing the track. In places where there is natural sagging, you need to press it to the rollers using fishing line or pins.
Dents on the gun mantlet, indicating battle damage, can be made by pressing with a hot knife. The surface should be finished in a metallic color, with an emphasis on reddish rust. The tank's wings, which were easily bent, were also damaged.
To get something similar to sheet steel, you need to scrape with a knife reverse side wings to thickness sandpaper, heating with a dryer and bending with your fingers. To avoid fingerprints, use thin gloves. Then we will make holes in the exhaust pipes using a drill. We will show the oil deposits around the engine grille using red-brown paint. Finally, we will paint the rollers dark yellow.
TO BE CONTINUED…
That's all for today!
Good luck to you!
And wonderful models!
Did you like the article? Be sure to tell your friends:
Looking for more resources on this topic? Read:

Making a diorama begins with planning. It is necessary to make a sketch of the finished scene, estimate the scale of the diorama, and select models that will be placed on it. When selecting a scale, it is necessary to take into account that the larger the scale of a homemade diorama, the more expensive the models and materials used in constructing the diorama will be. In addition, on a larger scale there will be more work itself, for example - at a scale of 1:72, the facial features and small details of clothing of the character models used are practically indistinguishable, but at a scale of 1:35 you will have to work on them without fail.
A diorama must have a plot! T-34 on a pedestal is not a plot. But pulling the T-34 out of the swamp is quite a story. Story line dioramas are what all the work is for. Think it through in advance. Keep in mind that a diorama is not a painting and it should look different sides. On either side there must be some kind of emphasis, some kind of action.
The scales of the models can be comparable, for example 1:35 and 1:32 or 1:76 and 1:72. This is due to the fact that it is not always possible to find the right model in the right scale. For example, historical aircraft in the “land” scale of 1:35 or, say, “railway” scale of 1:87 are almost impossible to find.
When overall plan dioramas have been worked out, you can start selecting prefabricated plastic models. Today the catalog of plastic models is very rich, so you can choose almost any model you need from one manufacturer or another.
It is better to start assembling a diorama with a stand. The base is the basis of the diorama in general and the plot in particular! A poorly made base can ruin masterfully made figures and equipment, and kill the plot. The base is usually either multilayer plywood or a homemade box made of slats. It is advisable to make the base heavy enough so that the future diorama can stand confidently and be difficult to dislodge if it moves awkwardly or wipes off dust.
Materials for diorama construction

It is recommended to use extruded polystyrene foam as the main material for the construction of objects on a diorama (houses, soil foundations, etc.). These are insulation boards measuring half a meter by one and a half and a thickness of 10 to 100 mm. You can buy such a sheet at a construction market or store. building materials.
The advantage of this material is its ease of processing - it can be cut well with a knife, sanded, and retains marks of indentation. It's easy to imitate brickwork walls, sidewalk paving stones and the like. One sheet will last you a very long time!
As boards, you can use thin veneer, which is also sold in building materials stores.
Bricks can be made from self-hardening children's creativity, it happens various colors By mixing colors with each other you can get any shades. The production is simple - roll it into a flat cake and cut it into the size of bricks. In general, they can greatly change the appearance of a diorama.
Automotive putty is also an indispensable item for those who build dioramas. Until it hardens, it allows you to give it any look. It is convenient to use for masking flaws in the processing of polystyrene foam, creating small objects, etc.
Various garbage on the dioramas - stones, roots, etc. are easy to pick up on the street. Of course you can buy ready-made kits the same stones, or you can just go outside and collect small things.
Small changes on models can be made using thick cyacrine (glue “Second”, “Moment” in 3-10 gram tubes) and baking soda. Using a needle, apply a line of glue and sprinkle with soda. Soda and cyacrine react instantly, creating a strong conglomerate. Excess soda is carefully brushed off with a brush.
Preparing models for a diorama

It is not enough to assemble a model for a diorama; it needs to be modified. Any equipment has signs of wear; military equipment that has been in combat conditions usually bears the results of military clashes. Well, the most important thing is that no matter how you clean your equipment, there will be dirt on it! Drive a car along a rural dirt road after the rain, get out and look at the car - lumps of dirt, splashes from puddles - it all looks natural. This is, naturally, how the equipment on dioramas should look.
It is also worth considering that prefabricated plastic models often do not fully correspond to the original. And they will need to be refined so that the eye of an expert does not reveal any serious shortcomings.
Plastic models of people for the diorama are also being finalized. As I already wrote at the beginning of the article, the larger the scale of the models, the more elaboration is needed. Often several are purchased different sets and one plastic man in a diorama may consist of several original models. The head is taken from one model, the arms and legs from another, and the torso from the third. However, it all depends on your imagination. However - the more small parts and the more the diorama person differs from the original one from the set, the better the diorama will look.
Fantastic space diorama made of paper with your own hands. The template was found in an old magazine from France, the picture was published before the flight of the first Sputnik in October 1957.
 Paper diorama
 According to the authors, this is what the panorama of lunar exploration should have looked like. The volume of the diorama immerses us in the fantastic world of space exploration. The diorama is assembled from two sheets of paper. An excellent paper craft for Cosmonautics Day on April 12. There is a template for downloading. The master shares all the secrets of assembling the diorama in the presented video. Such a diorama can become an interesting gift or a noteworthy craft for Cosmonautics Day.
How to make a fantastic diorama out of paper with your own hands
A diorama (from the ancient Greek διά (dia) - “through”, “through” and ὅραμα (horama) - “view”, “spectacle”) is usually a ribbon-shaped semicircular pictorial picture with a foreground subject, giving the diorama volume and completeness. To assemble the diorama you will need: two sheets of thick A4 or A3 paper (recommended), paper glue and scissors. Assembly steps:
- Download by link
diorama template and print it on a color printer.


- On printed sheets, trace all bend lines with a blunt object (indicated by dotted lines)
- Cut out all the blanks with scissors.


 Paper diorama space exploration of the moon
If the diorama, as an art form, has existed for a long time, then its younger sister, the mini-diorama, or what we, modellers, understand by this word, was born, developing and “growing up before our eyes.” We call both of them the same term, but there is a very significant fundamental difference between them. And it's not about size. In a “macro” diorama, the submitted artistic object is a painting, and in a “mini” diorama it is the volumetric composition itself; the presence of a painting or photo backdrop is not expected! Those rare cases when it is still used are not, in my opinion, convincing and justified. To paint a good pictorial background you must have extraordinary artistic talent and professional education. In painting, illiteracy cannot be masked by anything, and any task must be done either well or not at all!
This means that our diorama is more of a tabletop object with an almost all-round view. And this also means that we have a limited range of means at our disposal. We, for example, are deprived of the possibility of effort, the emotional mood is thickened by clouds, dark sky or vice versa with a ray of sun, as in a large panorama. Again, because we limit ourselves to small scales, it is difficult for us to achieve the same emotional impact in it. But I think that in our area not all means have been tested yet! There's still quite a lot here large field for experiments. If a diorama is one of the types of art, and is built according to general artistic laws, then it should be figurative and may contain a certain amount of convention. At the same time, to achieve greater expressiveness, we have every right to use some techniques from such artistic movements as expressionism, impressionism, surrealism, etc.
Recently, a lot has been written in specialized publications for modellers about the technology of making dioramas, but one rather significant point has been missed - its composition. But the diorama, as a synthetic art form that combines sculpture, painting, architecture, engineering knowledge and props, is subject to the same general laws of art. Failure to comply with them can negate the titanic work of the author, causing subconscious irritation in the viewer instead of delight.
The science of constructing a work from individual parts (components) and their relationship to each other, i.e. composition is taught, and for many years, in art and architectural institutes, but you can start with at least a few simple rules. By following them, you will avoid typical mistakes that sometimes hurt the eye even at reputable exhibitions, and then are also replicated in print.
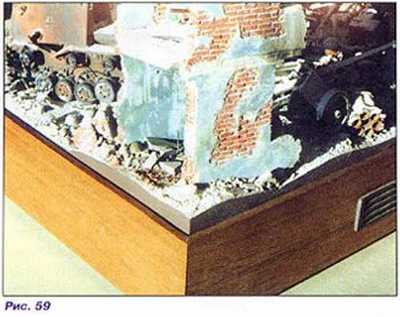
Rule one: not a single object of our diorama should repeat the direction of the sides of the base of the stand (Fig. 57.57a).
In accordance with it, such placement options should be avoided when any structure “emerges” exactly from the corner of the base (Fig. 58,59). A single standing object with a dominant height (tower, tree, pillar) cannot be placed in the geometric center (at the intersection of diagonals). This “mathematical correctness” should be violated by moving the object in one direction or another. It is important not to be tied to the geometry of the stand because, firstly, you avoid deliberateness and artificiality, and secondly, you make it clear that our diorama is part of space, as if accidentally snatched from reality (by making the trench parallel to the frame, you thereby, as it were, including the frame itself in the line of defensive structures).
The only exceptions to this rule can be cases that, strictly speaking, are not a diorama, when the stand plays the role of a kind of pedestal, for example: a tank-monument, a tank or a car on a fragment of a road.
When choosing the size of the base, you must take into account what equipment and what structures will be on it so that the contents on it are not “crowded” (unless “crowdedness” is an independent artistic device.
It also happens: the stand seems to be proportionate, but the tank standing on it is somehow “uncomfortable”, because its place has been found incorrectly, it is unjustifiably located towards the edge, and a visual sensation is created of it “slipping” from the base. Conclusion: you cannot place “characters” - soldiers, equipment - too close to the edge of the stand. This will cause a feeling of instability, unsteadiness, a desire to pick up, and therefore subconscious irritation in the viewer. Imagine if an artist painted a portrait of a person standing on the frame of the painting itself. Our gaze needs “acceleration” so that it does not immediately run into the essence, but has the opportunity to smoothly enter the plot through a neutral environment.

Don't be afraid of empty spaces in dioramas. On the contrary, they are necessary because, and this is another feature of our perception, the eye needs to “rest.” For comfort, he needs a contrast of volume and plane.
No matter how interesting and textured the equipment or buildings themselves are, the content, the plot for us is still what the animated characters - the soldiers - “act out”.
A composition with people united by some common plot is called a genre composition. Let's look at this in a little more detail. When building a genre scene you should use odd number characters.
Our consciousness perceives odd numbers as aesthetic, comfortable, “alive”. Having one incomplete pair, the odd number is, as it were, constantly in motion. On the contrary, even is ugly, but aesthetically pleasing, “dead”. In this regard, let's remember the tradition of giving bouquets of an odd number of flowers, and an even number of them is brought to... you know who.

This rule applies to both equipment and other objects in the diorama. The relative position of the actors among themselves should not be monotonous; they should not be placed at the same distance from each other, even if they are in a chain.
A group of people should look picturesque, combine standing and sitting figures, arrange them together using your taste and artistic flair (Fig. 60).
When thinking over the overall composition of the diorama, depending on what role the characters will play in it, main or secondary, arrange them accordingly. (In this case, it is preferable to place them in the nearest quarter of the base, if we cut one hundred diagonally.

The main action of a diorama does not have to take place in the foreground. Perhaps in the middle, then some objects in the front will emphasize the depth, smoothness will appear, and our task is precisely to, among other things, create the illusion of space: a minimum of means, a maximum of expressiveness.
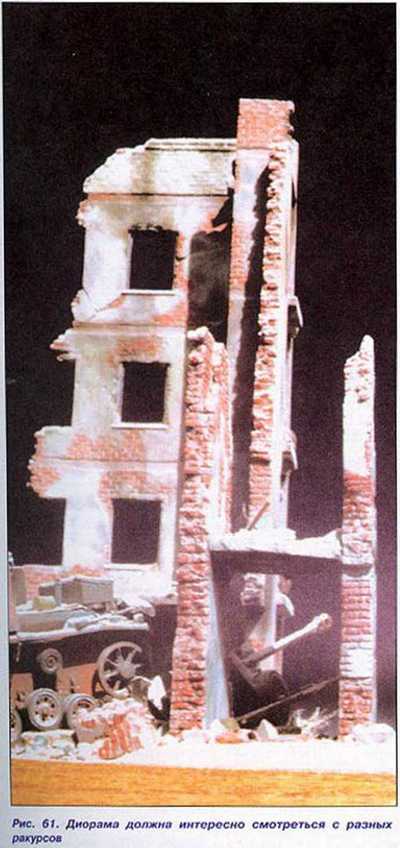
Decide on the direction of viewing the diorama, there may be options here. More often - on three sides, less often on four or on one side (Fig. 61).
Even a monument intended for all-round viewing has one or two most spectacular points. Therefore, you also need to decide where the “back” is and where the “front” is, and, based on this, subordinate the secondary to the main (Fig. 62).
Due to the psychology of our perception, movement directed from right to left is perceived as occurring with resistance, with difficulty, with effort. On the contrary, she is blind to the right with ease, with speed. This is also worth taking into account for the greater psychological impact. For example, a “rushing” vehicle will most likely appear to be moving if you position it from left to right, but to emphasize the difficulty of soldiers’ roads, it is preferable to orient an infantry column from right to left.

True, in our perception not everything is so simple. To what has been said, it should be added that in a diorama, right-left can also be associated with the cardinal directions: west-east. Therefore, for example, “Hitler’s armadas” crossing the borders of the USSR on June 22, 1911, may be worth giving the direction “east” from left to right.
It was on the tip of my tongue to say: “That’s all......
But no, this, of course, is far from her. just some general initial concepts. It is important to understand that the problem exists, you cannot jump over it. Tests are given in all disciplines. There is nothing worse when your mistake is visible to everyone except you.
Making a base for a diorama
How to make a diorama floor base? Here everyone has their own recipes, we only consider foam plastic, which beginners often use, to be unacceptable for this purpose. Apparently they are attracted by the ease of processing, but in relation to our tasks, it has more disadvantages: texture recognition, fragility, complexity with subsequent texturing and... contact with polystyrene of the model can cause unexpected chemical reaction. Let's use it for its intended purpose - as packaging and in some auxiliary processes. And you and I will master another universal material plaster (its construction variety alabaster is like the same gypsum but of worse quality; before using it, it is advisable to sift it through a fine sieve; to achieve the same strength, sprinkle more, it sets more slowly).
Gypsum is ideal for our purposes: it is available (in building materials stores you can buy it either packaged in bags or in bags); durable, molded into any shape. It is easy to process, paint, and almost does not shrink when dried.
First, you need to think through the composition in detail: what kind of soil relief will be on your diorama, where the equipment, “men”, and vegetation will be located. Draw a plan and actual size on a sheet of paper and, in accordance with it, on a sheet of glass, fence off the perimeter you need with glass strips, fastening them with plasticine. Check the perpendicularity of the walls to each other and to the base.
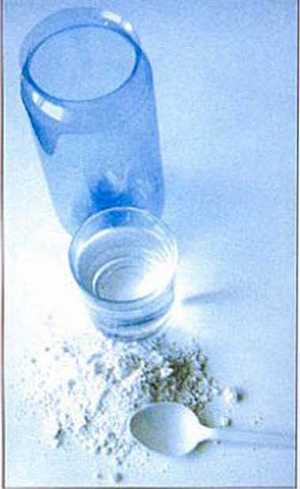
To dilute gypsum, we need a container made of flexible plastic, for example plastic bottle with a cut throat (Fig. 63). Since castings from pure white gypsum are required in modeling quite rarely, it is advisable to dilute the plaster in clear water. and tinted with black gouache. In this case, the casting will turn out to be the color of the soil, and in the future the finished diorama will not be afraid of random chips, treacherously sparkling with whiteness.
Pour water into the container at the rate of 2/3 of the required volume, thickly tint it with black gouache (you can add a little orange or brown so that the “soil” acquires a warm honey fungus) and pour gypsum until a slide forms above the surface of the water. Now quickly stir everything and pour into the mold. Until the plaster has set, within about five minutes, you can form the desired relief - rake somewhere, rake somewhere. If something didn’t work out in one step, then the operation can be repeated - where necessary, add more, or vice versa, cut it off with a knife. The minimum thickness of an average diorama plate should be approximately 12-15 mm, which will provide it with the necessary strength. And the maximum thickness is not limited. because as we said, gypsum is not subject to “shrinkage-shrinkage”. If the base is thick, it can be made hollow to lighten the weight. Also in the formwork, stepping back from the edges, make a smaller copy of the relief from plasticine. Then, after the plaster has set, the plasticine is removed. Or, what’s even simpler, use foam plastic as a filler; it can then not be removed (Fig. 64).

We disassemble the glass formwork. Please note that the casting at the ends has almost mirror surface and does not require additional processing, which is another advantage of this technology.
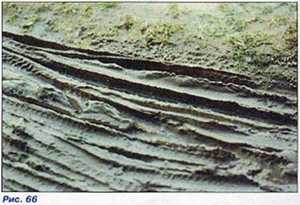
If you need to imitate a dirty, rutted road, with traces of wheels and tracks, then this work can be done in one step on an already prepared landscape. Prepare dies in advance: caterpillar tracks, wheels with treads, put on the axle (Fig. 65). Then you pour the diluted plaster into the rut and quickly roll it out with wheels. Of course, in in this case The quick setting of gypsum is not to our advantage, but we have to put up with it and work quickly. Dexterity is needed, but the task is doable (Fig. 66). Track marks are best obtained by submerging strips of vinyl tracks into fresh mortar and removing them only after the plaster has completely set.

The dirt can then be blown out from an airbrush with paint of a suitable “wet” shade and covered with varnish (you can use hairspray).
There is a great temptation to pour epoxy into the ruts to imitate puddles, but practice has shown that after polymerization the surface of such “water” takes on a concave lens-shaped shape, which means we lose reliability (Fig. 67). Both myself and fellow modelers often use epoxy to simulate puddles.
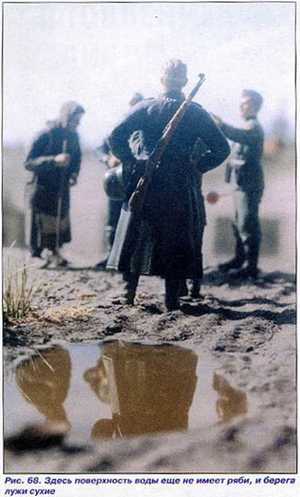
It’s better to do it differently: first, embed a piece of window ash in the soil as well. To prevent the tablet from showing through from below, paint the inside of the glass with opaque “swamp” paint. Embed it in the soil, make jagged edges. Imitate ripples on the floor with an oil painting varnish, clouded oil paint. Apply 2-3 layers and when dry, at the viscosity stage, stamp out “waves” with a wooden stick. You can “sink” helmets into a puddle and scratch concentric lines and ripples around them. When drying, the varnish layer will float slightly, the scratches will be reliably smoothed out without losing their relief. The paints, of course, must be pre-prepared: the dome is cut to the “immersion depth” (Fig. 68-70).

The texture of dry soil can be imitated with natural sand and dust. To do this in the summer, in dry weather, you need to collect roadside dust on the side of a country road. Choose a fine fraction, almost fluid, like cement. Take it for future use; this is one of the rare cases when you don’t have to pay.
For sanitary and aesthetic reasons collected material can be washed: empty the container and fill it big amount water, stir and let sit for a day. Drain the water and place the material on a cloth until completely dry. Then you sift through various sieves: the smallest one and you get “earth” directly, the larger ones – “small crushed stone” and even larger ones – “large pebbles”. This is your kind of “palette”.
It is advisable to complete the soil texture work in one step. We cover the entire surface of the relief with some slow-drying glue - casein, dextrin or wallpaper and first sprinkle with pebbles, crushed stone haphazardly, islands or according to your plan and finish with the finest fraction. Sweep away the excess with a soft brush after the glue has completely dried (Fig. 71).


Large stones must be selected “personally” and they must look like real boulders, reduced to scale, i.e. have texture, relief, small cracks, can be covered on the “north” side with moss - sawdust from a jigsaw, painted in bright green color on glue. Stones made from common minerals, such as garnet, are not suitable. Their structure is recognizable and not large-scale. Look for suitable ones made of sandstone or marl. At worst, cut out what you need from plaster and texture it.
Using the described method, you can create any type of landscape with a section of dirty, dry dirt or asphalt road. And if you need a road paved with stones, then best way- cast it also from plaster in a plasticine countermold. Roll out the plasticine into a thin, smooth layer, prepare the stamp to look like a pebble (you can use one from a sprue) and press it with it, trying to press it into the plasticine with equal force. At the same time, pay attention to the pattern of stone laying. They can be laid in strips along, across the road, diagonally, or in an arc. They especially like to be sophisticated about this in Europe to this day, despite the fact that for a long time asphalt was invented, and it was elevated there almost to the rank of art.
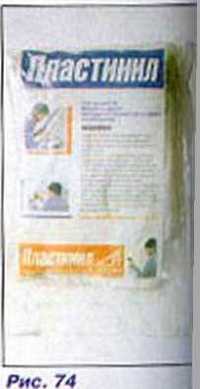
The base for the diorama can also be made in the form of a tablet from slats and fiberboard with glue. The terrain in this case is also either gypsum or made of a new material that recently appeared in Plastinila building materials stores (Fig. 74). It is a fibrous mass with a water-imulsion binder. those. similar to good old papier-mâché. Advantages: allows you to sculpt any relief, after drying it causes shrinkage, cracking, and warping. Complete drying and within a week, which allows you to work for as long as you like while applying tread marks on the road. Disadvantages: pronounced fibrous structure, which can be corrected by adding a fair amount of chalk powder without any visible effect on strength.
In plastinyl, the relief is smoothed out; it is impossible to achieve the effect of, say, fresh, greasy road mud, but it can be imitated by thickly mixing cement with PVA glue and then rolling wheels around puddles. In a word, “Plastinyl” is a material that modelers should pay attention to.
It is impossible not to mention this type of “covering” as snow. Diorama reflecting winter period has a special psychological mood. Snow, feeling cold, may become additional means expressions emphasizing the hardships of war. Or, on the contrary, in contrast to the optimistic plot, it will more clearly reveal the heroism and unbending will of our characters in overcoming difficulties. In any case, a piece of winter looks very impressive in the apartment, especially if it’s July heat outside.
In principle, snow can be imitated using any white powder. Let's try the elimination method. Salt, sugar, and nitrate strongly absorb moisture from the air; flour is very similar to itself. So, sorting through, we stopped at baking soda(sodium bicarbonate). I covered my winter diorama with soda and for two years now it has been preserved in its original form without changes.
First, wet the surfaces that will be covered with snow with water. We apply it from the airbrush strictly from top to bottom (or at an angle, in accordance with your plan, if you want, say, to show that there is a snowstorm). From the same direction, pour soda through a fine sieve. It will stick to a wet surface, absorb it and, when dry, retain the same shape and volume. In wet Footprints and wheel marks can be imprinted on the surface. To make the “snow” sparkle in the sun, you can crush it from above through the same sieve with crushed glass.
The thickness of such a soda coating is relatively small: 2-4 mm. And if you want to depict deep snowdrifts and snow drifts, then their volume should first be made of plaster.
Continuing the topic, it should be said that snow rarely looks like it has just fallen, especially in war. It becomes contaminated with gunpowder fumes, earth thrown out of craters, on roads in cold weather it looks like dirty candy, and in thaws it mixes with dirt. The roofs of houses are often framed with icicles; they can be imitated from drawn transparent sprue.
After all the work is completed, the final finishing is to putty the ends, if required, and paint them and use a brownish conventional “soil cut color,” which is a kind of model etiquette rule. One more thing important rule: the work must be reversible - do not glue the equipment, the soldiers, tightly to the base, so that later, when you need to change the composition or restore some parts, you do not have to tear them out “with meat”. Place them on pins - pieces of wire, inserting them under tension into the drilled hole.


