To improve a site, either mortar or concrete is often needed. Kneading it by hand is difficult and time-consuming, and the quality of the solution is far from the best: it is difficult to achieve uniformity. Not everyone wants to buy a concrete mixer for periodic use. A good solution is a DIY concrete mixer. You don’t need much money; in terms of performance, homemade units are no worse than Chinese ones, and sometimes even better.
Manual concrete mixer
At a construction site there is not always electricity, and large volumes of mortar and concrete are not always required either. The solution is to make a small volume concrete mixer that will rotate manually (with manual drive). The designs of these models are simple and straightforward.
From a milk flask
The simplest manual concrete mixer can be made using an ordinary metal flask (milk used to be sold in these). You will also need pipe cuttings or other scrap metal. The design is simple, such a concrete mixer can be built with your own hands in a couple of hours. The main thing is to weld the frame. Assembling the concrete mixer itself will take a couple of tens of minutes.
Make a frame from round pipe bend the handle. In the upper part of the frame, weld two water couplings (for example). Their internal diameter is slightly larger than the diameter of the pipe used for the handle. The pipe is passed through the flask and welded to the body.

In order for the barrel to spin easily, you need to find the center of gravity. To do this, you can put it on some thin object, and move it forward/backward to find this very center. This is where you will need to pass the handle. Having passed the handle, it is attached to the walls of the case. This is where difficulties can arise: flasks are usually made from aluminum alloy, and the handle can be made of steel. It will not be possible to connect them by welding. The only available way out is cold welding. He is quite real. The remaining modes - with bimetallic gaskets or argon-arc welding at home - are not implemented. Another way out is to weld plates onto the handle, which are riveted to the sides of the flask.
To prevent the handle from playing too much and falling out during operation, nuts are welded to it on both sides of the coupling.
In general, this is all about making a manual concrete mixer with your own hands. For one batch in a 40 liter can you can get 2.5-3 buckets of solution. For use in a country house or on a plot near a house (without construction) it is more than enough.
If there is no can, you can adapt a barrel (thick-walled). Then the problem with welding the handle disappears, but you will have to come up with a system for fixing the lid. You can make something similar to the one that the can has.
The video shows an example of a handmade homemade concrete mixer made from a milk flask. The design is a little different, but not too different. There is an interesting idea - dividers are welded to the pipe inside the container, which speed up mixing.
From a barrel (manual and electric)
The author called this design a “drunk barrel” because of its unique trajectory. The whole point is that the axis of rotation goes obliquely through the container. Because of this, the solution rolls over from one wall to another. The design is also simple and effective. What is important is that there are no problems with welding dissimilar metals. A drawing of a manual concrete mixer from a barrel is shown below.

In the upper part of the frame, bearings are installed in the center, into which the handle is threaded. Thanks to them, a 200 liter barrel rotates easily. Just choose a container with thick walls - it will last longer. No additional blades are welded inside: they only retain the components, interfering with mixing and complicating unloading.
IN original design The loading/unloading hatch is located in the bottom. This is a cut piece (about 1/3), attached with loops to the bottom, equipped with sealing rubber along the perimeter and closed with two locks. When loading the barrel, turn it so that the hatch is at the top. When unloading, turn down. The solution moves by gravity into the substituted container, and the stuck one can be removed by knocking on the body with a hammer or sledgehammer.

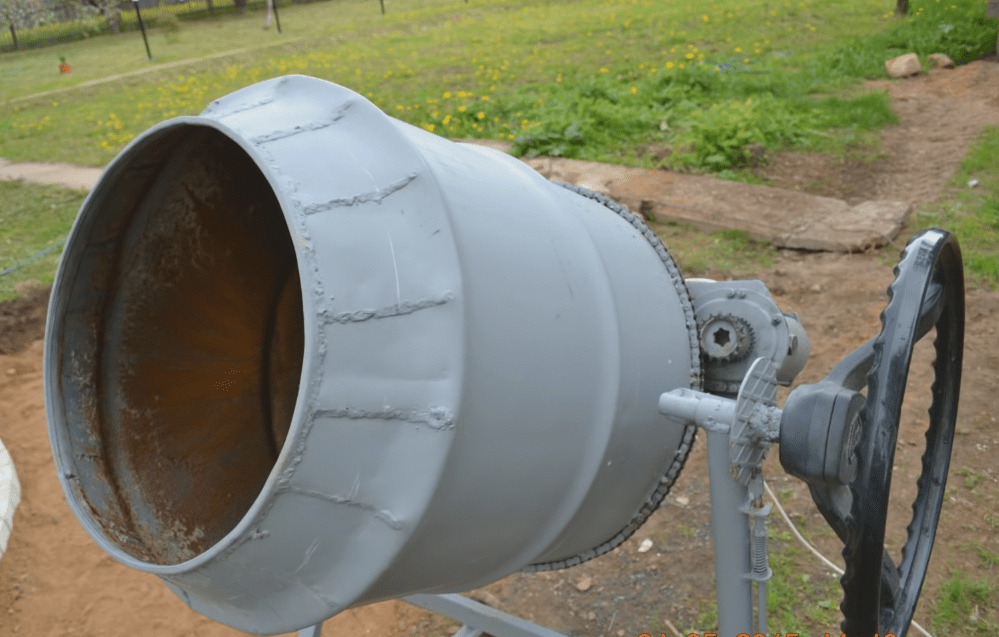
This design served the author for 10 years, although it was made for a one-time job, but it turned out to be very successful: 2.5 buckets of solution are mixed well in 20-30 revolutions. During this time, it was repeated and improved by neighbors and acquaintances. Most of the modifications concerned the hatch. Experimentally, its most successful design was identified - similar to the one used in a milk flask. This “neck” is welded to the body of the barrel on one side (look at the photo above). They also make handles on both sides so that two people can work.

This design can easily be converted into an electric homemade concrete mixer. A not very powerful engine is installed - 1 kW is enough for a 200 liter barrel, a small sprocket is attached to the axis of which, a larger sprocket is welded to the axis-pipe (to reduce the number of revolutions), they are connected using a chain (from a scooter, for example).
DIY electric concrete mixer from a barrel and a washing machine engine
This concrete mixer is gear type. To make this model you needed:
- galvanized steel barrel 180 liters (diameter 560 mm, height 720 mm);
- engine washing machine— 180 W, 1450 rpm;
- flywheel and starter gear from Moskvich 412;
- two pulleys from a washing machine with a diameter of 300 mm and 60 mm;
- wheels from a garden cart;
- scrap metal for the frame.

Gears, wheels - everything is old, everything was in the garage

First of all, we clean everything from rust, treat it with a rust converter and cover it with primer.

We make a frame from pipes and channels. We strengthen the corners of the frame by welding metal plates. Everything must be tough and reliable. We are making a serious crossbar: a barrel of solution will “hang” on it, and everything will vibrate and spin.

The frame is the basis of the structure. The pipes are almost new))
We weld the pins and the seat for the transmission gears. We remove rust, treat it with a rust converter, and prime it.

We fasten the wheels from the cart. They have wide treads and they have justified themselves: it is not difficult to drag a concrete mixer even just across the site.

We also make structures from pipes for support and installation of all the “filling”.


The second is for greater stability
We begin to assemble the drive. First we place the large gear on the previously welded pin.

We install an assembly in the seat - a small gear connected to a wheel for a belt drive.

We attach the engine to the plate welded in advance.

We hang it so that the two wheels of the belt drive are at the same level. It is also necessary to ensure normal belt tension.

All that remains is to attach the barrel. We make a hole in the center for a large pulley and drill a hole for fasteners. Let's put it in place.


Only the electrical part remains. We connect the cable via

Several photos of the main components. Maybe someone needs to take a closer look.


The second transfer option is from a car disk
The barrel is 200 liters, its edges were cut, bent and welded, forming the usual “pear”.

They made a “pear” from a barrel
The car disk was bolted to the bottom (with rubber gaskets). It was selected so that a recess was formed for the belt drive. A hub was pre-attached to the disk.

Blades were welded inside the barrel to mix the solution more efficiently.

All this equipment was attached to the frame.

Where the plate is welded is the place for the engine. We set it so that the belt runs smoothly. Power was supplied through a toggle switch, and a timer from the washing machine from which the motor was removed was turned on in series.

In general, the rotation speed turned out to be 35-40 rpm. Should be enough.


Homemade mixers in video version
If you understand the general principle of how to make a concrete mixer with your own hands, you can modernize and remake it, adjusting it to the existing parts. The videos collected in this section will help.
Crown type
Another option, but not a gear type, but a crown type. By the way, you can buy a crown (cast iron or plastic) and install it on the barrel.
With rollers as support
Collapsible mixer from a barrel


Photo of homemade concrete mixer units (may be useful)
Each or almost every self-made concrete mixer has some original solutions. Few people repeat the design completely without making any changes - you have to adapt to the parts and components that are available. Some interesting solutions is in the photo.


Organization of transmission using a motorcycle chain and a second belt

The shape of the blades is a complex thing. They need to improve mixing and not stop the concrete from falling down


Good concrete mixer construction site needed like air. A simple device allows you to get rid of the lion's share physical activity, at the same time significantly improve the quality of the batch and speed up the mixing process. For a private home, you can buy a Chinese concrete mixer, rent a unit, or make a concrete mixer yourself. Each of the options has its pros and cons, but perhaps making a concrete mixer will be more profitable, since there is no point in paying ten thousand for a relatively simple structure that can be built with your own hands.
Operating principle of a concrete mixer
When choosing a diagram and method for making a concrete mixer with your own hands, you need to focus on main characteristic concrete mixer – mixing quality. Despite the apparent simplicity of the design and operating principle of the device, when mixing the components of the solution in the mixing tank, several rather complex processes occur:
- The distribution of sand and cement in the batch is leveled and becomes as uniform as possible;
- Heaviest components concrete mortar, gravel and sand, rise from the bottom of the container and are thrown into the upper layers of the batch. With proper mixing, heavy particles are broken down and poorly mixed water and powdered cement are converted into cement laitance;
- At the final stage of mixing, it is necessary to squeeze out air bubbles as much as possible from the already homogeneous mass of concrete solution, while at the same time preventing the mixture from separating.
Essentially, during the mixing process, a properly made concrete mixer mixes the components, activates cement microparticles and fuses them with water, while simultaneously squeezing air out of the concrete solution.
Important! Therefore, to obtain the maximum quality of cement mortar, cutting blades are installed in the container on a manual or electric concrete mixer, working to cut the mixed mixture.

The quality of mixing is primarily influenced by the main parameters - the shape of the mixing container, the angle of its inclination relative to the horizon and the rotation speed. Therefore, not every homemade concrete mixer built with your own hands is capable of producing decent quality concrete mortar.
Options for homemade concrete mixers
Before you start designing and manufacturing a homemade concrete mixer with your own hands, it will be useful to look not only at diagrams, photographs or drawings of the device, but also to get acquainted with their work in practice or at least on video. This will allow you not only to understand the principles by which the best homemade concrete mixers are made, but also to evaluate the advantages and disadvantages of most of them, as in the video https://www.youtube.com/watch?v=LadkBUK5Zu8.
Anyone who has prepared a concrete solution by hand at least once in their life can confirm that cylindrical or rectangular containers are not suitable for proper mixing. No matter how hard you try to mix the sand and cement efficiently and correctly, there will still be a zone of clean sand or cement dust in the corner joints of the tub, barrel or bucket, which will be lost to the bulk of the solution.
From this point of view, the design shown below in the diagram looks more than problematic.

Typically, such a homemade design is attractive for its simplicity and ease of manufacture. In practice, the quality of the resulting concrete solution will be significantly lower than mixing in a trough of cut two hundred liter barrel.
More high quality The mixture can be obtained using a homemade concrete mixer with a diagonal axis of rotation.

Working with such a concrete mixer is not easy, but the quality of the concrete solution obtained homemade mixer, will be significantly higher. Such a concrete mixer has a significant drawback that limits its use - unbalanced design and high load onto tubular supports welded into the bottom of the barrel. To prevent the homemade structure from falling apart on the tenth batch, steel rings from a pipe bent like a donut will need to be welded into the bottom of the barrel. Tubular supports should be welded to these rings.
If the possibilities for designing and building a homemade manual concrete mixer are limited, you can make the simplest paddle version of the mixer. There are practically no disadvantages to such a design; in addition, using such a device it will be physically difficult to prepare heavy grades of concrete.

The best option for a homemade concrete mixer
Despite the large number of homemade concrete mixer designs, nothing new has been invented for high-quality mixing of concrete solutions. Almost all of them are copies of an industrial mixer for mixing concrete.

The reason is quite simple - the principle of mixing concrete mixtures in an inclined round tub has proven to be the most effective and efficient in practice. Forget about vibrating options and trying to get a high-quality concrete solution using a drill and a mixing attachment. Homemade vibration structures, even with a very high level of manufacturing, “live” very briefly, and with an electric drill you can mix a maximum of half a bucket of solution.
The best option for a homemade concrete mixer
The main problem that one has to face in the process of manufacturing a homemade concrete mixer is selecting the optimal design characteristics in such a way as to ensure the reliability and endurance of all its components.
A homemade concrete mixer design will be reliable and durable only if the following conditions are met:


For your information! For a small capacity concrete mixer, for 15-25 liters of solution, the mount can be made using a cantilever design without roller supports.
Often, when building homemade concrete mixers with a capacity of 50-70 liters, craftsmen neglect installing rollers, motivating their decision by the fact that the bulk of the solution is in the lower, bottom part of the bucket, so the large weight of the concrete solution does not lead to overloading of the gearbox bearing.
In practice, if you are making a cantilevered tub with an inclination angle of 45° for a batch weighing 70-100 kg, then be prepared for the fact that overloads during rotation can break the drive shaft and, as a rule, quickly destroy the bearing cages. To increase the service life, many “experts” advise reducing the inclination of the mixing tank of the concrete mixer to 60°, as in the photo.

This solution will really help reduce distortion, but the quality of mixing will decrease significantly, so a homemade concrete mixer will work at least two to three times longer.
The optimal angle of inclination can be seen in the kinematic diagram of a home-made small-volume concrete mixer, published in one of the printed publications.
Design features of a homemade concrete mixer
The frame of the concrete mixer can be built in a four-support version, as in the diagram above, or in a two-support version, as in the photo.

The dimensions of the corner or channel are selected based on the weight of the tub and the volume of the mixed solution. The height of the side posts, as a rule, is 110-120 cm. Steering knuckles must be installed at the top of the vertical supports, allowing the bucket to be tipped into a receiving container.

The tub is hung on a swinging frame, at the bottom of which support rollers are installed, as in the photo.

As a rule, a gear drive for tilting the container is installed on the swing axis of the frame. This is an extremely useful element if you need to carefully tilt the tub and drain the solution in parts. If you try to simply overturn the container, the flying concrete mass will sweep away the buckets and splash everything around.
The most important part of a homemade concrete mixer is the drive and reduction gearbox. There are a variety of options for manufacturing the drive unit. For heavy concrete mixers, a gear or chain drive from a gearbox is usually used.

For lighter models, transmission via a toothed belt is used.
Advice! Power take-off from the electric motor is organized only through V-belt transmission, this greatly simplifies the assembly of the drive and reduces the load on the motor.
For a homemade concrete mixer, with a bucket load of up to 40 liters, an electric motor power of 500-700 W will be sufficient; for heavier mixers, an electric motor of up to 1000 W will be required. The optimal rotation speed for a homemade design is 40-70 rpm.
Conclusion
The easiest way to build a homemade concrete mixer is to copy its design from a finished sample that has already proven itself in operation. This will simplify the selection of spare parts and components for a specific structure and significantly reduce the cost of its construction. The cost of building a homemade concrete mixer, as a rule, does not exceed 2.5-3 thousand rubles without an electric motor.
This article is suitable for any amateur builder who, in his free time from his main job, is trying to arrange a home for himself. summer cottage. In construction you cannot do without concrete. Even if you make a house out of wooden beams, reinforced concrete foundation or you will definitely need piles. And after kneading the concrete solution in a bucket or trough with your hands a couple of times using a drill or shovel, an inquisitive mind begins to look for less labor-intensive methods.
There are several options. You can order home delivery and the very next day a concrete mixer truck will deliver the required number of cubic meters. Perhaps this option is not entirely economical. More industrious owners can buy a concrete mixer; it is compact and equipped with an electric motor for mixing the solution. Throw cement, sand, water and crushed stone into it in the required proportions, and only have time to empty the concrete mixer by pouring the solution out of it. It's cheaper, but you still have to buy such a concrete mixer.
But there is another option: make a concrete mixer with your own hands. Yes, this is possible if there are drawings. You will spend time on this, but it will more than pay off for you. Moreover, the device is not as complicated as it seems at first glance. The concrete mixer has a simple principle:
- there is a tub or something like a flask in which the solution is mixed;
- drive, that is, the mechanism due to which the tub rotates and mixing occurs;
- the frame that holds it all together.
The concrete mixer has additional small parts, which will be discussed below, but these three are the main ones. Now let's delve into the nuances of making a homemade concrete mixer.
What types of concrete mixer are there?
Based on the mixing method, concrete mixers are mainly divided into four types: gravity, mechanical, vibration and combined. Let's tell you a little about each one so that you have a little idea about it and so that you can choose the one that suits you. After all, it can be used for completely different needs: mainly as a foundation (for a house, a fence, and much more), but it can be used to mold various building materials. Blocks made of cement, wood concrete and other things.
Gravitational
A unit of this type is the simplest option both to manufacture and to use. Manual concrete mixer with your own hands, the tub of which simply rotates along an axis, and the components of the solution are mixed under the influence of gravity. This option is not suitable for large volumes because it does not provide good mixing. But if you have always mixed the solution in small quantities and did not need more, then this option may well be suitable.

Mechanical
Such a homemade forced-action concrete mixer in its pure form is rarely used because it has a number of disadvantages. It looks like this: a barrel in a horizontal position with a hole at the top along its entire length. The axis runs through the center of the barrel, and metal parts are welded to it, which mix the solution. The hole does not allow the barrel to be rotated in only one direction and you have to swing it from side to side. Compared to gravity, it has a larger volume, which is a plus. The disadvantages are: poor mixing in the corners and splashing of the solution with high vibrations.
Sometimes mechanical concrete mixers are made absolutely motionless; only the axis inside it moves, to which metal dividers are welded. This design is well suited for the manufacture of wood concrete blocks. We'll talk about this below.

Vibrating
Making this type of manual concrete mixer with your own hands is not such a simple matter. The basic principle is that the solution remains stationary and all the work of mixing is assigned to the vibrator. There are many nuances here, which, if not taken into account, will only lead to wasted time.
The tub must be round, not wide, but high, similar to the shape of a Soviet washing machine. The vibrator must be of a strictly defined shape, similar to two low plates placed together. Actually, at home, two metal plates - the best option. The vibrator should not be too large; its size depends on the volume of the mixing vessel. If you overdo it in choosing the size, then even with visible work it will still not mix. And the last thing: the location of the vibrator inside the vessel is strictly along the axis, the distance to the bottom of the barrel is equal to the diameter of the vibrator.
If all these conditions are met, the ideal solution from your barrel is guaranteed. But if the quality of sand or cement is poor, you will have to mix it a little longer. One drawback: high power consumption. And under no circumstances try to use a hammer drill as a drum vibrator. Many craftsmen have tried to make a concrete mixer, but most often they fail.

Combined concrete mixer
This type of concrete mixer is a combination of gravity and mechanical installation. The solution rotates in a horizontal or inclined plane, and protrusions are made inside the vessel itself, which further help to mix the components. They are usually made from metal plates different forms, which are welded to the inside of the flask. This type of concrete mixer allows you to mix a large volume of solution, and the mixing quality is also good. It is not difficult to weld the plates into a concrete mixer, which is why this type is the most widely used. In the future, we will talk specifically about this type of concrete mixers.
We make a concrete mixer
The theory is over. Let's start practicing. Now we’ll take a closer look at how to make a concrete mixer with your own hands. This process must be divided into several stages. We know that a concrete mixer consists of three main components: the mixer bucket, the drive and the frame. If everything is clear with the drive, it can be either manual or mechanical, when a concrete mixer uses a gearbox and an electric motor, then we will dwell on the manufacture of the bucket and frame in more detail. If you have drawings at hand when working, that will be great.
Making a tub
The most popular item used as a mixing vessel is standard 200 liter barrels. With some reservations, it is suitable for any type of homemade concrete mixer. You can use the washing machine body if it is strong enough. But that would be too simple; our goal is to make the tub ourselves.
Firstly, the material. For walls we take metal with a thickness of at least 2 mm, for the bottom - at least 5 mm. Secondly, the form. It is cylindrical, but at the top in the neck area it should taper into a cone.
Let us describe the sequence of actions point by point:
- We make a hub flange. You can find its drawings and make it yourself, but it is better to buy a ready-made one. The part is important, but not easy to manufacture.
- We make the bottom from sheet steel with a thickness of at least 5 mm. We drill holes in the very center and attach the hub flange.
- We cut out five main parts of the body from metal 2 mm thick - the shell (it is rolled up to form a cylinder) and four petals, which are then fastened together to form a cone.
- We connect the bottom, shell and cone using welding machine and get the base of the barrel for mixing.
- We strengthen the neck so that it does not become deformed later. To do this, we weld a 10 mm reinforcing rod to its circumference.
- We weld cutters crosswise inside the barrel. Usually two or three are enough. They are also made from reinforcement, but more durable, or from metal plates. The main thing is to bend them at a right angle. They will mix the solution. In addition, due to them, a homemade concrete mixer will be stronger.

When the mixer tub is ready, you can begin making the frame.
Frame making
The frame is the support of the entire structure. The tub, drive and gearbox are attached to it. For good stability, the support legs are welded, and to make it easy to move the concrete mixer, even when filled with mortar, wheels are installed. The design of the frame itself can be different, the main thing is that stability is maintained during operation of the entire device. For this purpose, many craftsmen adapt various unnecessary metal parts collected from the corners of their summer cottage.

- The concrete mixer is based on a T-shaped structure, due to which the homemade concrete mixer will stand stably on the surface. The first post is welded vertically to it.
- A transverse beam is welded to the second rack, along the edges of which the wheels are attached.
- Both racks are fastened together at the bottom with a beam (this makes the structure more stable) and at the top with a subframe, which will subsequently serve as the basis for attaching the tub.
- The frame is reinforced with an inclined stand, to which the capacitor box and starter are attached. These two devices are used to turn on the rotation mechanism.
- The subframe is made of two pipes and a corner. It looks like a double frame held together by lintels.
- The electric motor and gearbox are installed on the subframe.
- The hub flange, which is already attached to the tub, is placed on the gearbox. To fix the mixer, a key is used and it is finally secured with a bolt through the hole on the shaft.
- A handle is attached to the stretcher, which allows you to tilt the mixer tub at different angles.
- Finally, the frame is protected from scale and coated with metal paint. The tub can also be painted, but only on the outside, there is no need to paint the inside of the barrel.
Now your DIY concrete mixer is ready to use! You can pour a foundation, install pillars, fill molds for wood concrete building blocks, and much more.

Drive for a homemade concrete mixer
In practice, it often happens that the master already has an electric drive and gearbox of a certain power, and the concrete mixer and its parameters are selected based on this. The ratio of the volume of mixed components and the power of the electric motor should be approximately: 20 W per 1 liter of solution.
That is, if you have a 1 kW engine at your disposal, then the maximum volume of the mixture should be 50 liters. Considering that the tub needs to be loaded at 30-40%, its approximate volume can be from 125 to 160 liters. For a standard 200 liter barrel, a gearbox with a 1.2 kW electric motor is suitable; the load will be equal to 60 liters of solution.

The number of revolutions is also important. Optimal value: from 30 to 50 rpm. If you do more, the solution may splash. You can do less, of course, but then the mixing process will be long and excess electricity will be consumed.
If there is no electricity
There are times when you need to start construction on a site where electricity has not yet been installed. Then we don’t need the engine, but we will use manual force. The sequence of actions during manufacturing remains absolutely the same, only the drive is replaced by two handles - on one side and the other. The disadvantage is that you have to put more effort into mixing and it will take longer. But for short and small jobs this option can be considered quite acceptable.
Washing machine tub
You can make a tub from a washing machine if you have one lying around from Soviet times. Moreover, the body of almost any washing machine is suitable for this. You just need to solder all the holes in the drum of the old washing machine. A machine with both horizontal and vertical loading is suitable for this. There is one more feature of this option. If the amount of mortar that you are going to mix in the future concrete mixer is not too large, then the washing machine engine will be quite suitable as a drive.

Using a concrete mixer
The concrete mixer is rarely used in one place. Often you have to carry it or roll it around the entire area, so prepare an extension cord of sufficient length in advance. The components are loaded into a tub with an inclination of 20-40 degrees in the following order: water, cement, sand, and lastly crushed stone, gravel, and expanded clay are poured.
To completely mix the concrete solution or wood concrete mixture, 3 to 5 minutes are enough, then the tub is tilted using the handle and the solution is poured into the place prepared for this. You can immediately add a new portion of components and continue working.
After a day of work, the device, all its connections and seams must be thoroughly washed. Usually this happens in the evening, when there is not much strength left and you want to leave everything, because the next day you will have to get it dirty again. Don't be lazy. Even in such a situation, it is better to wash the concrete mixer, this will increase its service life.
Wood concrete blocks consist mainly of two components. In addition to various chemical additives, this sawdust and wood chips, as well as the hydraulic binder Portland cement. Such blocks are valuable because houses made from them retain heat well. Therefore, wood concrete blocks - perfect solution for the construction of walls of a warm house. As for the properties of wood concrete, it is low thermal conductivity, increased bending strength, does not support combustion, and is easy to process.

Imagine that everything worked out for you and now you are the owner of a very useful thing in construction - a concrete mixer. But so that its service life does not end with just a foundation or a fence, but that the thing serves you for a long time and for a long time, you will have to follow safety rules and take care of it:
- Pay close attention to cables and contact connections. They must be securely insulated. The work takes place in conditions of high humidity and splashing water, so the requirements of the rules electrical safety at the first place;
- The vibration that accompanies the work of a concrete mixer relaxes threaded connections your makeshift tub. Therefore, periodically check them and tighten them. And don’t forget about welds, they can also break;

- Before turning on the device, make sure it is stable. All standard stands should rest firmly on the ground, and it is advisable to install wheel chocks under the wheels;
- It is impossible to check the quality of the solution while the concrete mixer is operating; cases of serious industrial injuries are not uncommon;
- Use skin and eye protection;
- Never leave a running concrete mixer unattended.
Conclusion
In conditions of total economy, when the budget for construction work is limited, and this is no wonder these days, many save on quality building materials or using the services of third-party masters. But there are craftsmen who also save on construction equipment. Of course, making a drill or electric plane is a dubious task. But the concrete mixer, despite its apparent complexity and bulkiness, is ideal for this, even for home production wood concrete blocks. You could see this in our article.

Let's summarize. A small number of parts, some of which can be found right on your site. A homemade concrete mixer has simple diagram, drawings and manufacturing sequence. You also need a few tools: a grinder, welding, work with a drill, and possibly a soldering iron. From Supplies: bolts, nuts, washers, metal sheet and angle. The main thing is to clearly define in advance why you need it and what you want to see as a result of your work. Then your concrete mixer will not be inferior to any industrial production, even if it is made from the body of a washing machine.
People who are planning to build a house for themselves make a list necessary equipment. And it turns out that you can’t do without a concrete mixer. Purchasing such a device involves a lot of money, so craftsmen have developed instructions on how to assemble such a device yourself. An important factor is that this product is designed for long and repeated service.
You can be sure that if you follow the instructions carefully, assembling the concrete mixer will not take much time. Here's a list of the benefits you get:
- the design involves the use of economical materials (i.e. you won’t have to spend a lot).
- even a person without special skills can assemble this product.
- the component parts are not particularly rare. They are not difficult to find, but be prepared that if you don’t have them in your possession, you will have to either ask friends or buy them.
A homemade concrete mixer includes the following parts: a handle for throwing concrete, a motor, a frame, and a container for concrete. If you intend to transport a concrete mixer from place to place, then you should also assemble a corresponding mobile structure based on a cart with wheels.
First, you need to think about the plan for the upcoming work, namely, draw a drawing of a concrete mixer, decide what components it will consist of.
There is no doubt that part of the concrete mixer will be a bucket. You will have to find a container or vessel of large volume.
— Perhaps it will be one of those barrels that often sit on personal plots(both metal and plastic will do).
— Sometimes there are very large, multi-liter pans that are also suitable for concrete.
— Round, capacious tanks, like the “titans” used for making tea on trains.
If you couldn’t find a similar container at home or with your friends, then you’ll have to work hard to make it yourself. At the same time, you will save a lot of money, because such products are not cheap in the store.
It’s worth noting right away that for comfortable operation of the concrete mixer you will need a capacity of 200 liters. and more. Then you don’t have to unload and unload it, but immediately prepare the required amount of the mixture.
 In particularly unfavorable conditions, people manage to make concrete by persistently mixing the mixture with a shovel. But this is hard, exhausting work. After all, the mixture contains cement, sand and water - the substance turns out viscous, and the end result may be worse than if you use a concrete mixer. But some old container (for example, a 200-liter barrel) will become an essential part of the concrete mixer and will save you from suffering.
Let's consider two options for making such useful device. So, in the first case, you will rotate the concrete mixer with your own hands. Which, however, is much easier than doing it without this device at all, with a shovel. The second option is more “advanced”; it uses an engine (electric or gasoline), but, accordingly, more costs will have to be incurred.
If you decide to make a concrete mixer without additional traction, then you will need a shaft and a barrel. Handles are attached to both sides of the shaft. You rotate these knobs, and the shaft rotates along with the barrel of mixture mounted on it.
The assembly sequence is as follows:
Now consider the option if you decide to use an engine. 
In this case, the engine torque will go through the belt to the pulley, and from the pulley, fixed instead of the handle, to the shaft. The rest of the details are the same as when using manual traction.
You might like it better vertical version this design. To do this you need to do the following:
- Place the frame with the motor on the base. It will provide turns.
- The rotation of the barrel occurs thanks to the shaft and special rollers on which it rests.
- To avoid the difficulty of turning the device over, a handle is welded to the axis of the frame, and the frame itself is removed.
Typically, such an advanced model of concrete mixer is stored and used for its intended purpose in a special protected place. It could be a garage, a barn, a spacious utility room - the main thing is that there is electrical wiring there.
Not everyone has welding equipment, and not everyone knows the skills of this craft. In this case, the frame is made of an iron angle, and the concrete mixer itself is bolted. If you have an old washing machine, then the motor from it will fit this device. Also, if you find an unnecessary drill with a 1.3 kW working motor, you can use it. A regular gasoline engine will also work.
Frame
 The greatest loads of our structure will be borne by its frame. After all, when the tub rotates, a load is generated that significantly supplements the mass of concrete. At the base of the frame, a steel angle with parameters of about 110-130 mm is required.
If welding equipment is not available, you will have to make do with 27 mm bolts (or better yet, even larger ones). It is highly not recommended to use bolts of a smaller caliber, because... they may not be able to withstand the heavy loads ahead. But in any case, welding the frame remains a more reliable option.
Try to find a 1.3 kW motor. Some craftsmen who do not have such a device manage to connect two motors with identical speeds and torque. But a small failure of one of them can lead to a general breakdown.
Gearbox
Rapid mixing of concrete is unacceptable. It is recommended to do about 35 revolutions per minute. Most engines are designed for high speed. Slow engines are extremely rare in specialized stores. So it would be optimal to use a fast motor complemented by a gearbox.
Belting
 This is the most economical and simplest way to manufacture a gearbox. You will need pulleys and belts.
If you need to reduce the speed from 1000 to 35 per minute, then you need real number divide by what you want. So, 1000/35 = 28. Therefore, the diameter of one pulley should be 28 times greater than the diameter of the second.
Suppose the diameter of a small pulley is 3 cm, then 3*28. It turns out 84 cm - this is what a large pulley should be.
Chain transmission
If you decide to use a chain drive, then the principle of its design is the same as with a belt drive. The only difference is that the calculations take into account not the diameter, but the number of teeth in the small gear.
Gear
If you have a ring gear from an old car engine, or better yet, a gearbox, then it can be used for a gear drive.
The sequence of actions is as follows:
- Turn the barrel over.
- Place a hardened steel disk (crown) in the middle of the bottom
- Mark the required places.
- Set the crown aside and use a drill to make holes in the marked places.
- Screw the crown as tightly as possible with bolts.
But if it is possible to weld the crown, this would be the best option.
If you have already installed the crown, then to install the gearbox you need to carry out the same steps. Those. you make marks, make holes as tightly as possible and secure with suitable bolts.
The next step: installation of the barrel, inside of which the blades are already welded or screwed. Metal corners or sheets are used for this.
For reliability, it is necessary to replace the last pulley or gear with a special gear located on the starter (Bendix) of the car. If you haven’t done this before and don’t want to make a mistake, dig into the documentation. It is this gear that is designed to take and withstand the greatest load when the bucket loaded with concrete rotates.
Steering wheel
If you are making a vertical concrete mixer, then to unload concrete from it you need to make a steering wheel
You have the following options to create it:
- use a pulley or wheels (you can use old ones)
- A piece of pipe with thick walls will do.
If you have selected a suitable pulley or wheel, then drill several holes around their circumference (your choice - 6 or 8). Minimum diameter 6 mm, but it is better to do more. The holes are threaded. Even long bolts can act as handles (but in this case you need to cut off their heads and cut threads of more than 10 mm), but threaded rods or metal handles are better suited. They must be screwed into the holes on the wheel or pulley.
Making a steering wheel from a thick-walled pipe is almost the same as in the case of a pulley and wheel. Sometimes, if the pipe diameter is too small, some handles are installed offset.
If it is not possible to make a steering wheel at all, then the concrete is removed with a shovel. This is a more labor-intensive, but also effective method.
The most important part of the concrete mixer will be the bucket. She needs some attention Special attention. It's good if you have a suitable container. And if not, you have to do it yourself. You will need a metal sheet 2 mm thick. On the back of this sheet a development of a large truncated cone is drawn, and on the back - a development of a small truncated cone. You also need to draw a circle for the bottom.
Then you need to cut out this development, bend it and connect all the components of the tub. Before final welding, it is necessary to study how accurately the parts fit together.
Unit frame
 You need to determine whether you expect the concrete mixer to have a long service life or whether one season will be enough. In the first case, you can assemble a frame from wood, but for a durable structure it is necessary to make it from metal.
If you choose the option with wood, then prepare self-tapping screws - they will be needed during assembly. In addition, you need to find a beam (its parameters can be chosen from 10×10 or 15×15 cm). The connections are carefully glued at the joints.
A concrete mixer that will last you long years, there must be a metal frame. For production you will need a 45x45 mm corner or channel. As with other operations, more in a reliable way The fastening will be done by welding the base, but in extreme cases, riveting or tightening with bolts will do.
Concrete mixer frame
Whatever type of construction you choose, you must drill holes in the frame of the concrete mixer for all devices that ensure operation.
Engine
As you know, Soviet washing machines, like refrigerators, despite their long operation, serve faithfully. Therefore, a motor removed from an old washing machine can serve as a motor for a homemade concrete mixer. To ensure an acceptable speed for the concrete mixer, a gearbox is used.
You can also connect a gasoline engine. This option is more mobile, because does not require electrical wiring. The engine can be taken from a moped. The transmission is carried out using a chain, which can also be taken from a moped or scooter.
Despite providing more mobility, the use gasoline engine involves risk. If there is a spark or other accidents, an explosion is possible. But using an electric motor also carries potential dangers.
 To protect yourself and others, remember the following rules:
- because If you are going to work in a damp environment, you need to check the insulation of the cord.
on the contrary, you cannot check the solution when the tub is rotating. - because The concrete mixer will vibrate during operation; it is necessary to install a reliable support for the wheels (if we are talking about a mobile version). Otherwise, she may unexpectedly move away, causing injury to someone.
- the same vibration weakens the tightening of the nuts. Therefore, check them regularly and tighten them if necessary.
- Mittens would also come in handy. They will protect you from getting the solution and causing allergic irritations.
- Do not leave a running concrete mixer unattended. It is unacceptable for children to approach her.
From all this it follows that even such a seemingly complicated unit as a concrete mixer can be made with your own hands. The main thing is to follow the instructions carefully and responsibly. And because Since no construction is complete without a concrete mixer, it can be rented out, which will not only recoup costs, but also make money.
As a rule, construction work is rarely completed without the use of concrete. It is quite difficult to mix the solution with your own hands, using only a large container and a shovel, and, given the significant scale of the upcoming work, it is completely impractical. It is much more convenient to mix concrete using a concrete mixer. Such a unit can be purchased at any specialized store, but still many, in an effort to save money, try to make it themselves. A do-it-yourself concrete mixer is an excellent opportunity to acquire such a useful device at minimal financial cost. How it can be made will be discussed in today’s article.
Popular DIY concrete mixer designs
Let's look at a few simple options which are the most popular.
Option #1. Mechanical
You can see the design of this simple mechanical mixing unit in the image below. The main advantage of such a concrete mixer is that it has an impressive volume. As for the drive, it is in this case can be either manual or electric. To unload concrete, the bucket must be tilted to one side.

But there is also a disadvantage inherent, in principle, to all units with a cylindrical tub - this is poor-quality mixing in the corners. The mixture also sprays if the speed is more than 35 revolutions per minute. But the second problem can be dealt with if, after completing assembly, you weld that part of the barrel that was cut back into place and make a hatch in it.
Note! This DIY concrete mixer mixes a simple solution in no more than 5 minutes, and a dry solution in 1-12 minutes.
Video - Manual concrete mixer with a cylindrical bucket
Option #2. Horizontal combined design, which is equipped with combs
This design, as well as the one described above, can also be either manual or electric. The advantages include high mixing homogeneity, as well as high speed and the quality of the procedure. A similar concrete mixer is made from old barrel, but its quality is not much inferior to the best modern models industrial purposes. What is characteristic is that the mixing speed is determined by the number of revolutions, and not by time (to prepare the solution, you need to turn it only three to four times).

Although there is a minus - it is that the design is quite complex. For making even manual option you will need several dozen different elements. In this case, special attention should be paid to the unloading hatch - all seals, latches with hinges must be of exceptional quality and reliable. However, if you have a lot of work to do in record time in a place where there is no electrical power, then such a concrete mixer will come in very handy. Finally, we note that similar structures are also manufactured on an industrial scale.
Option #3. Electrical design
This is perhaps the most common option, which in most cases is copied by home craftsmen. Therefore, there is no need to particularly explain anything. You can find the diagram in the image below. There are many varieties that have certain design differences, and finding detailed drawings is not difficult. In a word, we will give only some explanations.
- The neck and bottom of the container must be reinforced with strips welded crosswise.
- Most suitable in this case is a frame mixer, which is welded to the axle.
- It is recommended that the container rotates along with the axis - this will make the frame design more complicated, but you will not have to seal the shaft in the bottom (the latter is precisely one of the reasons for the short service life of the mixers).

Video - The process of assembling a concrete mixer
Option number 4. Vibration unit
Quite often, people, having a hammer drill with a power of 1-1.3 kilowatts with a percussion mechanism that is forcibly turned on, tried to make a vibrating concrete mixer on their own, but in most cases they did not get the desired result.

Let's take a look at common mistakes.
- First of all, this is the wrong selection of container. The latter should only be round, not too wide, but high.
- The vibrator is not positioned correctly. It should be positioned on the axis of the container, and the distance from it to the bottom should approximately correspond to its radius. There should be a solution above the vibrator itself with a height that does not exceed its (again) diameter.
- A flat vibrator is used. The fact is that if it is made of a sheet of metal, it will not be able to excite the required system of waves in the concrete. It is important that the profile of the element is at least approximately the same as shown in the image. The best option– a pair of saucers or plates (preferably metal ones), which are folded together.
- And the last thing is that the vibrator is too big. Its diameter should be 15-20 centimeters for each kilowatt of power. Simply put, if the power of the hammer drill is the same 1.3 kilowatts, then the device will cope with plates with a diameter of 25 centimeters. If the diameter is large, then a concrete mixer simply will not be able to “pump” the solution with its own hands.
If you follow all these requirements, you can get concrete of excellent quality.

Video - Making an original concrete mixer
Making a concrete mixer - step by step guide
To make the design described below, you will need, first of all, patience, since you will have to work hard. The process consists of several successive stages; let’s look at the features of each of them.
Stage one. Capacity
To make a mixing bowl (also known as a mixing bowl), prepare a ready-made tub or the materials you'll use to make it. There are a lot possible options– a drum from a washing machine, an old can, a barrel. Although if you are pushing towards a future design special requirements, then it is preferable to make the pear yourself. Prepare sheet metal(can be new) with a thickness of 2 to 2.5 millimeters. Then get to work.

Make 3 or 4 constituent elements future capacity. A pair of truncated cones (this will be the bottom and top), a base (in other words, the very bottom part), and also fastening the cones in the center (if this is even necessary).

After this, weld all the elements together to obtain a pear (it, according to preliminary calculations, has a volume of about 200 liters). In addition, it is desirable that there is a double weld at each attachment point. It is worth noting that craftsmen often advise attaching metal rivets between a pair of welds to increase reliability, although this point is not necessary.

Stage two. Body and base
As for the body, it is often made of wood, but if you are serious about durability, then it is better to use metal corner. Give preference to durable material that has a minimum of rust (if scrap metal is used), and also take care of designing the most convenient base. The future body must withstand the planned weight with a margin of 20-50 percent, since during vibration and mixing, the load will accordingly only increase. Moreover, take into account that in addition to the concrete itself weighing 100-200 kilograms, you also need to hold the container itself, with the necessary additional accessories.

All fasteners are carried out by welding and auxiliary bolted connections. At the same time, it is recommended to take care of the practicality of the future unit. The concrete mixer can be placed on a frame with wheels for more convenient transportation of the “miracle of technology.” You can also take care of a convenient handle, with the help of which the body will move around the construction site.
Stage three. Engine
This stage is rightfully considered the most difficult, since it is quite difficult to calculate what characteristics and parameters the future equipment should have. Therefore, the power must be determined based on the requirements for the volume and weight of the concrete being mixed, as well as the ability to extract a particular engine. Some use a motor from a washing machine or a scooter for these purposes, while others prefer less expensive equipment (for example, a motor from an electric drill or any similar tool).

We also note that both the power and the speed at which the concrete mixer will rotate with your own hands must be taken into account. It is important that it is not very high - say, about 15-20 revolutions per minute. There are several ways to adjust the speed - automatic, gears with shafts, a homemade device, and also the use of belts.

Stage four. Direct assembly of the concrete mixer
The assembly procedure itself is not complicated and includes several successive steps. Let's look at each of them in more detail.
Step one. First you need to make sure that all connections - both pears and housings - are strong enough. Fasteners should be provided in advance, the same applies to the connection location and installation of the motor.
Step two. After this, you need to install the engine and gearbox on the frame, and then carefully fix all the parts of the rotating mechanism.
Step three. The next stage is installing the container on the axis and base. This should be done so that the pear is located at an angle of 35 degrees.
Step four. Now all that remains is to check how the concrete mixer turns on/off, whether the fastenings are secure, and how well the rotation occurs. Gears or a belt are used to adjust all parameters.

Note! The procedure described above is more clearly demonstrated in the thematic video below. After watching it, you will finally understand how to make and launch the device described in this article.
Video - Homemade concrete mixer
It is worth noting that any of the designs described above can be a good alternative to expensive “store-bought” equipment. Although, of course, in the absence of the required consumables, the cost of such budget equipment may increase noticeably; although the experience is in any case very interesting. In addition, the design of a concrete mixer can be made cheaper, and the principle of its operation can be simplified. This can be done, for example, by replacing automatic rotation with manual rotation. In this case, instead of dozens of complex parts, you will only need bearings, a handle, a lever, and also a “comb”, which will be located inside the pear.
Another option for making a concrete mixer
The design presented below is very similar to that described in the previous section, and therefore no detailed explanation is required here. The manufacturing procedure itself can be understood from the step-by-step illustrations provided. Let us only note that in this example, a ready-made 200-liter barrel, a 250-watt electric motor with 1430 rpm, a motorcycle wheel, and a pair of rings welded together are used. The finished pulley will be welded to the bottom of the tank. You will also need a pair of belts, a channel and pipes 59 for the frame.


Feasibility of the solution
So, we found out that cement mortar is required for almost all construction work. And if, for example, to fill the foundation, it is advisable to use a purchased ready mixture, then in the case of work involving the periodic use of relatively small portions of the mixture, it is advisable to rent/buy a concrete mixer (can be manual, but preferably electric).

Of course, you can use the same trough with a shovel for kneading, but this approach, in addition to being labor intensive, has other disadvantages. In this case, the quality of the concrete will not be high, the mixture will be heterogeneous, which, in turn, will lead to unnecessary consumption of dry cement and low strength characteristics of the finished concrete.
Note! The term “concrete mixer” refers to a number of special construction mixers (manual/electric), that is, devices designed to obtain a homogeneous cement-containing mixture by mixing ingredients with dissimilar fractions.

As a rule, dry cement is mixed with water, special additives and fillers (the latter can be sand, expanded clay, screenings, crushed stone).

How does a concrete mixer work?
Standard design includes:
- bed (it can be either on a chassis or stationary);
- kneading working bodies;
- the container in which the mixing process takes place;
- unloading mechanism;
- transmission;
- driving unit (it can be, for example, gasoline or electric).

Let's take a closer look at each of the structural components.
- So, the frame is a structure made of profiles/pipes and is intended to connect all parts of the concrete mixer into one system. If the unit is small, then the frame can be equipped with two/four wheels to make it easier to transport.
- Mixing organs often include blades, augers and other parts that directly act on the ingredients of the concrete being mixed.
- The container is the element in which all these ingredients are mixed. Its volume and dimensions depend mainly on the productivity of the concrete mixer.
- Unloading mechanism - as the name suggests, it is intended for removing concrete for further use in construction work. It can also be different.
- Finally, a transmission with a driving unit is needed to convert this or that energy into the movement of the kneading organ. As noted earlier, the engine can be electric (used most often) or gasoline.

Main types of concrete mixers
There are several classifications of the unit described in the article, according to which it is divided according to one or another parameter. Thus, according to the principle of their operation, concrete mixers come in five varieties.

- Gravitational. They differ in that the drum for mixing the solution rotates under the influence of gravity. The best option for preparing viscous and rigid concrete.
- Forced. A more difficult to make concrete mixer with your own hands, where the container does not move, and the blades inside it mix the components of the mixture. Such units are rarely used in private construction.
- Periodic. They are characterized by low power and therefore require frequent stops. But for private construction this is a completely acceptable option.
- Geared (better known as crown-type).
- Permanent. Such concrete mixers, as their name suggests, operate continuously, and therefore are used primarily for large volumes of work.

In addition, depending on the type of concrete being produced, equipment can be of two types
- mortar mixers;
- concrete mixers.
Let's look at each of these options in more detail.

Option #1. Mortar mixers
Simple equipment designed for private construction. Designed for mixing components whose fraction size is more than 2 centimeters. Also, units can be industrial (if the volume does not exceed 1200 liters) and for private use (over 30 liters).

As a rule, all ingredients are mixed in mortar mixers forcibly, for which a horizontal auger is used, which rotates in a fixed container. If the volume of the unit is more than 100 liters, then it must be equipped with dispensers. And if the volume of equipment exceeds 250 liters, then, as a rule, it will include the following elements:
- engine;
- mixing container;
- drive unit;
- a rotating shaft having blades.
Note! Small mortar mixers with a volume not exceeding 65 liters are emptied by tilting the drum. If the volume is larger, then a hatch is used for this, which is located at the bottom of the device.

Option #2. Concrete mixers
They are designed for use with components whose fraction size is no more than 7 centimeters. All units of this type are classified in the same way as described in one of previous sections articles.

In addition, depending on the installation features, they can be:
- mobile (this includes both concrete mixers with a chassis and units without it);
- stationary (often for industrial purposes, characterized by increased productivity);
- automobile.
Note also that, depending on the type of drive and energy source, all concrete mixers are divided into several types.
- With manual drive. They are characterized by the fact that they are capable of converting human muscular efforts into rotation of the kneading organ. The transmission in most cases is chain gear or belt. Such concrete mixers are not very common, since their volume is insignificant, and they do not facilitate labor very much.
- With motor drive. A concrete mixer (including a self-made one) of this kind operates on a diesel/gasoline engine.
- With pneumatic and hydraulic drive. The kneading organs in this case move due to the conversion of energy compressed air or liquids that are supplied under high pressure. Such equipment is exclusively for industrial purposes, since it requires powerful additional devices.
- Electrical. The most popular types of concrete mixers today, not only for industrial, but also for domestic use. The range of such units is quite extensive, and their volume varies from 30 to several thousand liters.

Benefits of use
There are several of them, let’s look at each of them in more detail.
- Aggregates manual type, in fact, are completely autonomous.
- But the crown concrete mixer is quite easy to use and, if necessary, repair.
- Equipment with a motor drive is also quite autonomous, since it only needs fuel.

Disadvantages of use
- U electrical appliances this is the opening of the hatch some time after the power supply has stopped and, as a result, the dumping of concrete (otherwise it will harden).
- In addition, concrete mixers are, in principle, seasonal. For the most part, they (especially small units) cannot be used for sub-zero temperature. As a result, in winter it is necessary to additionally use a steam generator.
- Separately, it is worth highlighting the disadvantages of motor-drive devices - the high cost of the fuel used, high level noise during operation, as well as toxic emissions.
- A simple mortar mixer, capable of operating at a temperature not lower than +2 degrees, does not have equipment that ensures heating of the mixture.
- The productivity of manual units is quite low, while the labor intensity of mixing, on the contrary, is high.

As a conclusion
As we see, self-production Concrete mixers are nothing complicated, you can handle it. And the costs are completely justified, since the speed of any construction work with such equipment will increase significantly. That's all, good luck with your work and have a warm winter!


