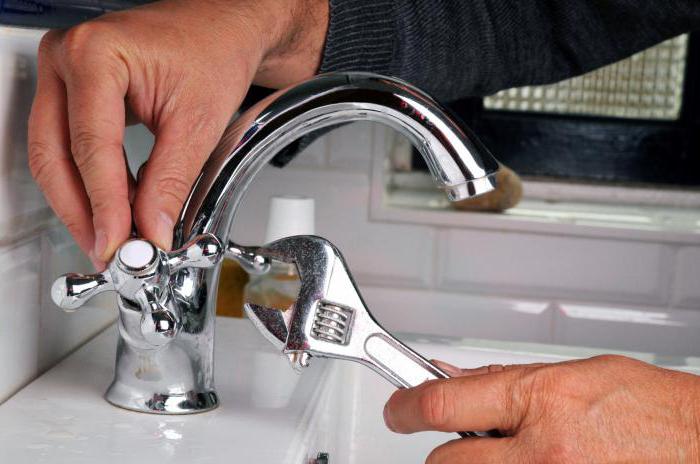
Any owner may encounter a faucet breakdown, so everyone should know how to disassemble the faucet. This is the only way to identify and establish existing defects. Anyone, even someone unrelated to plumbing, can disassemble the mixer.
First you need to prepare necessary tools. Take several screwdrivers (including a flat head), pliers and rubber pads purchased in advance from the store. Be sure to turn off the water supply and get to work.
Ball mixer device
Before you understand how to disassemble it, you need to learn about its structure.
The reliability and durability of the named mixer is ensured by a ceramic non-separable cartridge. There are no seals in the design - this is explained by the precision of the located parts. A classic ball valve consists of:
- plugs;
- rod;
- screw;
- adjustment ring;
- rubber seat;
- hollow ball (necessary for mixing water);
- aerator;
- water inlet;
- steam and regulating cuff;
- ball sleeve.

Disassembling a ball mixer
So, how to parse ball valve? To remove the lever of a single-lever mixer, remove decorative overlay and unscrew the screw located directly below it. Don't be afraid to use force: in most cases the screw is securely fixed. Some models may have a lever on the rod, then you don’t need to unscrew anything, just move the lever to the upper position and everything can be easily removed.
Once you have removed the lever, open the faucet housing cover. You will see carvings on it. Take a screwdriver and remove the cover. If you did everything correctly, the clamp nut will appear. Take a wrench and select the correct diameter. Unscrew the nut to expose the cartridge. It contains a ball, under which there is a rubber gasket. Crane failure occurs due to its deformation and wear. To fix the problem, you need to replace this element.
Two-valve mixer device
There are currently two types of two-valve faucets available for purchase. The first contains a crane axle box as an elastic gasket. The second has a locking mechanism, which is a ceramic plate. Disassemble bathroom faucet will not be difficult in both cases. The two-valve mixer is also equipped with:
- spout-spout;
- housing and fastening.
Analysis of a two-valve mixer
Are you interested in how to disassemble a faucet that has several valves? The design of this mixer is simple, so you can easily cope with this task.
First, remove the plugs on the faucets. Once you have removed them, you can see the screws. Remove them using a screwdriver. You will see rubber gaskets, but it is quite difficult to tell from their appearance whether they are damaged. Most likely, they need to be replaced or all connections tightened so that the faucet does not dangle.
Another reason for the unstable operation of the mixer is the scale that forms on it. To fix it, use a flathead screwdriver. A similar method, by the way, is used in disassembling a ball valve with two levers.
Single lever mixer device
Different devices may be equipped with ceramic or ball cartridges. In the first case, the model will be equipped with a hollow ball, in the second - with two tightly ground ceramic washers, displaced when the handle is turned. It is thanks to this that water is mixed and directly supplied. This crane is supplied with:
- frame;
- lid;
- rotary handle;
- cartridge mechanical cleaning replaceable type;
- gaskets

Analysis of a single lever mixer
To understand how to disassemble a faucet with one handle, you just need to use our tips. These faucets have a core and a hollow ball made of of stainless steel. The ball is equipped with three holes: two of them supply liquid, and one discharges it into the pipe. The device is located in a ball sleeve in which rubber seats are located. The water creates pressure, the ball and the seats are in close contact, as a result of which the device moves. Pressure replacement and fluid supply are regulated using this particular element.
The described mechanism cannot be repaired; if a breakdown occurs, most likely you will have to repair it yourself. You can only fix it yourself by weakening the jet at the outlet, which occurs due to clogging of the aerator. This is why you need to disassemble the tap.
First, unscrew the nut that is located in the faucet spout itself. Take out the mesh, blow it out and rinse it well. Then place it back and tighten the nut. Now you know how to disassemble a faucet with a single lever system.
Nuances of analyzing mixers
Plumbing stores offer us a wide selection of different modern models faucets that are installed in the kitchen or bathroom. Some may be equipped with a timer or sensitive parts. So, how to disassemble a faucet in the kitchen or bathroom in another way:
- Turn off the electricity along with the water.
- Get rid of the cover that is needed to secure the batteries.
- Disconnect the sensor wire from the control control.
- Remove the gasket (you can find it between the control box and the mixing tube).
- Disconnect all nipples, remove springs and clamps. The same must be done when analyzing products with a thermostat and timer.
- If you are sure that you did everything correctly, proceed with the repair. If the problem is in the control unit, the best solution would be to contact a specialist - there may be fragile parts inside the unit that can be easily damaged.

Single lever faucets boast for a long time services. If you want to buy correct option or increase faucet operating time, follow these tips.
- If you chose a cartridge faucet, remove old disk before the purchase. This will save you from problems with exchanging the product: cartridges are different, and therefore the sizes can be mixed up.
- When repairing a ball mixer, seal each threaded connection with fluoroplastic tape. Before disassembling, purchase thread seal in cassettes.
- Buy products from trusted companies.
- For preventative purposes, change gaskets and cartridges.
- Install high quality filters on the pipes.
- When cleaning the faucet, choose a product in the form of a gel or cream. You can also use a powder designed for metal.
- Do not use metal brushes or alkaline or vinegar based products.

Mixer installation
Now you know how to disassemble after necessary repairs should be installed back. To do this you will need a Phillips screwdriver, a level, a tape measure and a mounting kit. If the mixer has a rigid fit, it must have eccentrics in order to adjust the landing distance between the nozzles. If the tap was supplied with flexible hoses in a metal sheath, you do not need to calculate anything.
Before tightening the nuts, lubricate internal thread Vaseline for technical needs. Screw on the nuts slowly, carefully, use your hands - parts good quality should give in easily. After this, you can use the key (but no more than 2-3 turns). When installing the faucet, you can use a level - make sure that the product is installed level, without distortions, otherwise the faucet body may crack.
Check that each threaded connection is wrapped with sealant and that the tape is wound evenly along the threads. After you install the faucet, run the water and check the connection to ensure there is no leakage. If you find it, don't be discouraged, but try again. Turn off the water and replace the seals.
Like any sanitary product, the mixer may become unusable over time. Do not rush to throw it away and buy a new one; first disassemble the faucet and determine the cause of the breakdown.
We hope we have helped you understand how to disassemble a faucet in the bathroom or kitchen, and now you can do it with ease.
Every homeowner must know the structure of a kitchen faucet so that they can promptly carry out the required repairs or replacement of this plumbing element. In order to disassemble a faucet in the kitchen, you first need to know the features and operating principle of each type of this device.
In the classic design, a distinction is made between single-lever and double-valve faucets.
The classic design of the mixer can be of the following two types, depending on the principle of operation:
- two-valve;
- single lever.
In addition to the above classification, all mixers can be divided into several types:

- Standard. The devices only perform mixing of cold and hot water. This type of device is the simplest and most common.
- Filtering. Devices equipped with built-in membrane filters that are capable of trapping large particles. In addition, such devices can be equipped carbon filters, purifying water from organic impurities and chlorine.
- Thermostatic. Devices capable of adjusting water temperature.
- Multifunctional. Faucets that are equipped with filters and multiple spouts for separate washing of dishes and hands. Sometimes they have separate taps for connecting household kitchen appliances consuming water.
The most expensive are multifunctional devices.
Differences between double-lever and single-lever faucets
The single-lever faucet design is considered the most convenient and practical. Models of mixing devices of this type compare favorably with others by the minimum time it takes for the jet to reach a given operating temperature and the convenience of adjusting the jet pressure and its temperature with one hand. Such devices have gained popularity among housewives, since very often only one hand is free during the cooking process.
The device with a two-valve design has now become less popular and is most often used in retro-style kitchens.
Double-valve faucets, which have ceramic faucet axleboxes in their design, can easily compete in many respects with single-lever mechanisms, but they are definitely inferior to the latter in terms of practicality. The two-valve mixer is simpler in design. But this does not affect the cost of repairs, since the price of two crane axle boxes is almost equal to the cost of the cartridge used in the single-lever version.
One of the most important performance characteristics mixer are the coordinates of the location of the spout. The most practical devices are in the following cases:
- the outlet of the device spout is located relatively high, which allows you to place large containers or a large number of dishes for washing into the sink;
- the center of the flowing stream coincides with the center of the sink, which makes washing dishes more comfortable;
- The mixing device is equipped with a retractable spout, which allows the mixer to be used outside kitchen sink.
Many devices have spouts that allow you to create a thin and powerful pressure using an aerator and a soft, wide flow, convenient for washing vegetables and fruits.
Some multifunctional options that have a complex for water filtration are equipped with two spouts, filtered water is supplied through one of them, and regular water is supplied through the second.
Single lever kitchen faucet design

As a rule, a person’s reaction to a sudden failure of a faucet is to call a plumbing specialist and call him to the house to carry out repair work. However, repairs can be carried out independently. For this purpose, you need to know how to disassemble the faucet in the kitchen.
In the design of a single-lever device, two main assembly parts can be distinguished:
- a mechanism that activates the water supply and ensures its mixing;
- a mechanism that provides spouting; it can be in a single housing with a mixing mechanism.
The design of a kitchen faucet includes the following details:
- an axial element for fixation with an external thread located on it;
- handle;
- decorative housing cover;
- a nut designed for fixation;
- cartridge;
- silicone or rubber gaskets;
- device body.
The cartridge, designed for mixing water flows, can be made of ceramic; in addition, models are available that have a more affordable ball version. A cartridge having this design consists of the following elements:
- a hollow ball equipped with a lever for connection with the handle;
- removable element, inner surface which is made in the shape of a truncated sphere;
- an element for fixing, which has a cut thread on the surface;
- two spring-loaded bushings;
- plastic case.
The ball has three holes. Two of them, in the process of turning the lever, are combined with channels for water supply. The mixed liquid from the cavity of the ball is fed through the third mixing hole into the spout. An analogue made using ceramics is most often non-separable. The body of such a device has two plates with holes, and water is supplied by aligning these holes in the plates.
The removable spout is equipped with an internal threaded connection; an aerator is attached to its opposite end, which consists of a fine mesh and a nut for fixing it.
Single lever device repair
To carry out repair work you will need the following tools and materials:

- screwdriver;
- hex key for the mixer mounting screw;
- rubber or silicone gaskets to replace old ones that were previously installed in the mixer body.
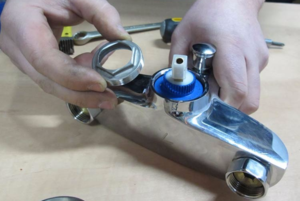
Disassembling the mixer begins by disconnecting it from the cold and hot water supply lines by shutting off the valves located on the pipelines. After this, you need to open the mixer tap and release the remaining water from it. Then the fastening screw on the handle is unscrewed using a hexagon, and the handle itself is removed by lightly rocking from side to side.
After removing the handle, access to the threaded connection opens, which must be unscrewed. This connection, once disassembled, leads to the cartridge. Located on top of the cartridge plastic part, which can be removed with a screwdriver. Under this part there is a rubber seal ring, which must be checked for damage or absence and, if necessary, replaced. Very often it is necessary to clean the sealing ring from the deposits that form on it during operation of the mixer.
While disassembly is underway, the holes in the cartridge are checked for blockages. Rubber seals in the housing are checked for their integrity and replaced if necessary. The seals can be easily removed using a thin screwdriver. Installing new rubber seals carried out using the same thin screwdriver. The device is assembled in reverse order.
Repairing a mixing device is a fairly simple procedure that can be performed by anyone with minimal knowledge and skills in using tools.
Kitchen faucets come in a huge variety. They have distinctive design features, appearance. Today, faucets have become not only a device that allows you to comfortably use the water supplied through the plumbing, but also a decoration that complements the design of the sink and looks great against the background general interior kitchen area. You can read more about the structure of mixers, their types, design differences, advantages and disadvantages right now.
There are not many main types of kitchen faucets. Below are the main models most commonly found in the kitchen.
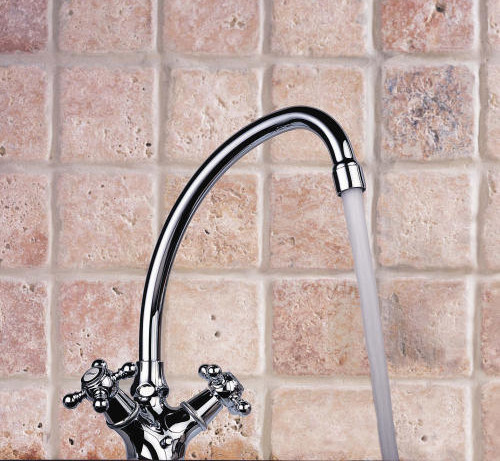
Double valve kitchen faucet
Although active use single lever ones began to be found in everyday life kitchen devices, valve type mixers remain the most common today. With such faucets, one valve is used to control the supply of hot water, the other - cold. The valves can be positioned horizontally and at a certain angle to each other.
Types of two-valve mixers
Two-valve mixers are available in two types. They differ from each other by various locking elements. These can be crane axle boxes with elastic gaskets or ceramic plates.
In mixers of the first type, a reciprocating faucet closes or, on the contrary, opens the hole through which water flows from the pipe. In other types of faucets, water supply or blocking is possible by aligning the holes of a pair of ceramic plates.
The advantages of faucets with the first type of locking mechanism include:
- Lower cost;
- Ease of operation;
- Ease of obtaining water desired temperature by adjusting valves;
- Versatility - over time, the elastic crane axle box can be replaced with a ceramic one, provided that they were produced by the same manufacturer.

The disadvantages of valve-type mixers with an elastic gasket are the need to make several turns of the valve until the water supply holes are completely open, and rapid wear of the rubber gasket.
Faucets with ceramic valves have the following positive qualities:
- Increased wear resistance and, as a result, a longer service life;
- Easy to adjust water temperature due to the fact that the angle of rotation of the valves is 90 and 180 degrees;
- Easy to control the mixer.
Design of a two-valve kitchen faucet with ceramic gaskets
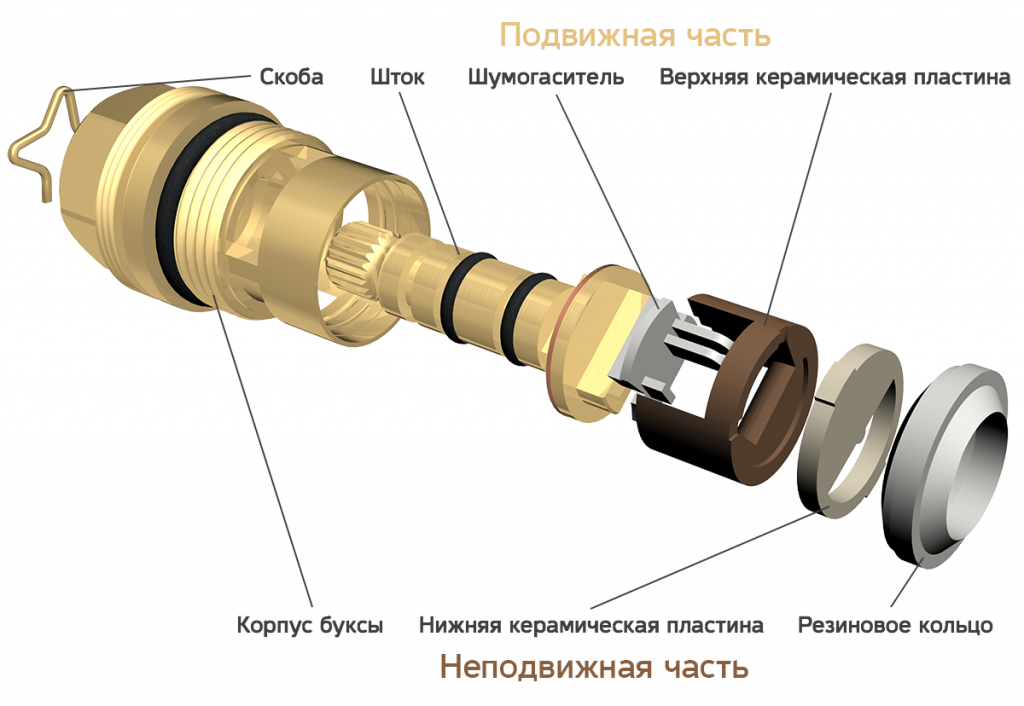
Structurally, a mixer with two valves consists of a body, a faucet-axle made of ceramic or metal, valves, a spout with an aerator. The ceramic axle box consists of:
- Housings
The body is made from alloys of certain types of non-ferrous metals. It has a rubber gasket in its design. It is needed so that the faucet axle box fits closely to the mixer body and water does not leak out. The lower part of the faucet housing has holes through which water enters the chamber and mixes there. To unscrew the faucet box made of ceramics, you need to use an adjustable wrench, gas wrench or wrench.
- Rod lock
The retainer is a small part that is needed to tightly connect the valve axle housing and the rod. It snaps into place when the rod is inserted into the body. To separate them, just use a regular screwdriver.
- Stock
The mixer valves are connected to the stem and then secured with special screws. There is a groove on the rod body that serves to snap the lock into it, and at the bottom there is a recess for the turn signal.

- turn signal
It is necessary to transmit torque from the mixer valve to the ceramic plate, against which it actually rests. The turn signal can be either plastic or metal; it is better if it is made of metal, since the plastic one quickly breaks if the valves are tightened too tightly;
- Top and bottom plate
The top plate is movable; it serves to control the flow of water into the drain spout. It has holes for pouring water and fixing the turn signal, and can be rotated at different angles, so using the tap is easy and convenient. The upper plate fits quite tightly to the lower one, which in turn is motionless. It has holes similar to those on the top one. When these holes coincide when the tap valves are turned, water begins to flow into the drain hole.
- Rubber gasket
It is necessary so that the faucet box is closely adjacent to the mixer body and water leaks only through the hole in it. The gasket can be damaged by over-tightening the valves.
Lever kitchen mixer

Lever mixers are actively gaining popularity. They look stylish, are easy to use, and come in a variety of designs. A sink with such a mixer attracts attention primarily because the faucet is strikingly different appearance from the already familiar two-valve analogue.
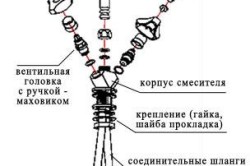
Lever kitchen mixer design
Structurally, a lever-type mixer consists of the following elements:
- Handles that control the water supply (its pressure and temperature);
- Jet regulator (a special nozzle that is screwed onto the end of the spout using threaded connection, otherwise this nozzle is called an aerator);
- Decorative casing of the mixer cartridge;
- A cartridge that is fixed through a nut. The cartridge mixes the water coming through the pipes and then pours it into the drain hole. He himself is hidden in the case;
- Fixing bracket.
The design of a kitchen faucet may differ slightly, but the principle of supplying water to the spout is approximately the same.
Varieties in design

Lever type mixers may differ in the design of the mixing unit. Its device can be ball or cartridge. In the first case, inside the ball sleeve there is a hollow metal ball that has three holes - two small ones through which hot and cold water enters it, and one large one for discharging water into the spout. Mixing of water occurs precisely in the spherical cavity.
Advantages of mixers with this design:
- Durability;
- Ease of operation;
- Ease of obtaining water at the desired temperature.
One of the few disadvantages is the need to periodically replace the o-rings, which wear out two or three times in 2 years.
Lever mixers with a ceramic cartridge differ in the principle of supplying and shutting off water coming from the pipes, but this difference is only constructive. The cartridge body contains ceramic plates that are made of aluminum oxide. There are two of them. The bottom plate has three holes through which water passes - two small and one larger. In order for water to enter the drain, it is necessary that the top plate occupies a position in which one or the other hole is open separately or at the same time halfway. Accordingly, cold or hot water or warm, mixed water will flow into the spout. Mixing of water occurs inside the chamber.

The advantages of faucets with a ceramic cartridge include a long service life, ease of mixing water to a certain temperature, and the use of one hand to operate the tap. As for the disadvantages - in some models of mixers of not very good quality, it is problematic to get water comfortable temperature(it takes a long time to find the position of the lever).
Touchless faucet
Touchless faucets are an undoubted know-how. Thanks to the constant development of technology and affordability, they are increasingly being installed in private homes and apartments. Their main advantage over their mechanical counterparts is that there is no need to turn the valves to allow water to flow into the drain and obtain its comfortable temperature. All you have to do is place your hands near the drain hole and enjoy the flowing water.

The main advantages of a contactless (touch) faucet:
- Saving water. In order to wash your hands or draw water into the kettle, you do not need to unscrew the valve and then spend some time screwing it in, into which water will continue to flow;
- Ease of use - no work required to open and close the tap;
- Constant temperature of the water poured out. Despite periodic changes in water temperature during central heating, the sensor mixer will maintain it at the same level;
- Hygiene. When using a classic faucet, many people touch the valves, which reduces the hygiene of the procedures. In a touch mixer, you don’t need to touch anything except the regulator;
- It is easy to customize the operation of the mixer using the buttons on the body or the control panel. With a few keystrokes, you can program the water temperature, the speed of its flow and the flow time after the person’s hands are removed from the sensors’ coverage area.
How a kitchen faucet works - how it works
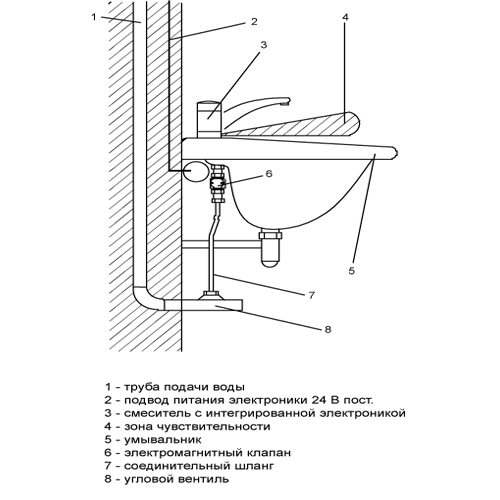
The design of the sensor mixer consists of the following components:
- Housings and spout;
- Battery;
- Electronic filling, touch sensor;
- A small valve located at the bottom of the housing;
- Shut-off valve;
- Filter and connecting hose.
As you can see, the design of a kitchen faucet is quite ordinary, and the main work here is done by electronics. Its principle is as follows: the human body emits heat, this heat is captured by a motion sensor installed in the body. Through electronics, the signal is transmitted to the shut-off valve, which immediately opens and water flows into the spout.
The water pressure and temperature can be adjusted in advance using a screw located behind the body or an external lever. There are models that change the ratio of hot and cold water automatically when a person brings his hands closer to the drain hole or further.
Now you know how a kitchen faucet works, and if you wish, you can figure out how to repair it.
Functional and stylish single-lever faucets have almost completely replaced modern baths and kitchens have standard herringbone taps. But, despite the fact that shut-off valves are durable, over time the structural elements still wear out. You can repair a broken faucet with one handle yourself.
To do this, you need to understand its structure and follow the advice of professionals. The video instructions will help you understand how to quickly and better disassemble and repair the faucet.
Single lever mixer device
Single handle taps very easy to use. Control of water pressure and temperature is easily accomplished with the movement of one hand. By lifting the joystick up, you can increase the water pressure, and by turning it left or right, you can make the water hotter or colder.
Such easy adjustment explained by the design of the crane, which consists of the following parts:
Single-lever mixers differ in design and appearance.
Types of single lever faucets
According to their design, faucets for bathtubs of this type can be of two types.
Ball mixers
Main structural elements is a hollow steel ball that is equipped with three holes for water flow. It is installed into the housing using a cartridge sleeve. PTFE inserts of the structure create the necessary seal.
Water pressure is ensured by opening and closing holes in the body and ball, and the temperature is regulated by the options for combining them.
The disadvantages of ball mixers include:
However, ball single lever taps Excellent resistance to pressure drops and hydraulic shocks.
Designs with ceramic cartridge
In mixers of this type a cartridge is used instead of a ball with a block of ceramic plates. These are smooth parts that fit perfectly work surface. The discs are located one above the other and have holes through which water passes. The bottom plate is located in the cartridge body, and the top plate is connected to the control rod. When the faucet handle is turned, the discs and their holes move relative to each other, and the liquid is mixed. As the top plate moves, the pressure changes.
 Modern single lever taps with replaceable cartridges are very popular and are readily installed in the bathroom and kitchen. This is explained by the durability and relatively low cost of mixers of this type.
TO disadvantages of designs with ceramic elements refers to their sensitivity to various inclusions in water. Scale or small particles of sand quickly damage equipment. Installing filters for water purification significantly increases the service life.
Ball mixer repair
If installed in the bathroom or kitchen If the faucet is leaking or has low water pressure, then you can disassemble and repair it yourself. To do this, you need to prepare the following tools:
- adjustable and spanners;
- set of hex keys;
- Screwdriver Set;
- pliers;
- hammer.
If the tap leaks, you will need to replace the seals, which should be purchased.
Disassembly and repair are carried out in the following order:

Single lever repair ball mixer finished. When disassembling the crane, you should keep in mind that the designs may vary, but you can disassemble each one yourself.
Disassembling a faucet with a ceramic cartridge
By internal content bathroom and kitchen faucets practically no different. However, to remove the unit from the sink, it is enough to unscrew two nuts from the mounting studs or a large brass nut located on the back of the sink. And to dismantle the structure above the bathtub, you will need a plumbing gas wrench, with which you unscrew the nuts securing the eccentrics.
Having turned off the water and removed the mixer, you can begin to disassemble it:

Disassembly and repair of single lever faucet with cartridge finished. In cheap kitchen taps the main body may crack. In this case, disassembling the structure is pointless. A cracked single-handle faucet needs to be completely replaced.
Shower/Bathtub Switch Repair
IN single lever mixer For the bathroom, there is a switch that regulates the water supply to the shower and bath. When its stock spring wears out, it becomes impossible to return to the starting position. And the unsuitability of spool gaskets can lead to the simultaneous supply of water to the shower and faucet.
Spring replacement
The stretched spring in the switch can be replaced with a new one:
- Remove the adapter and remove the rod with the wound spring from it.
- Take off old spring and use pliers to screw a new one onto the rod.
- Assemble the switch and install it in place.
A new spring for the switch should be selected with a diameter smaller than the previous one. It should be made of galvanized steel.
Replacing rubber seals
The switch is equipped with two gaskets. If it has fallen into disrepair upper gasket, then it can be replaced without disassembling the structure. You just need to remove the decorative cap, pull out the worn rubber band and install a new one in its place. But if the cause of the malfunction lies in the lower seal, then the spool switch will have to be disassembled. To do this you should:

Difficulty in replacing spool gaskets The problem is that they are not on sale. The mixer usually comes with a spare set. If it is lost, the gaskets can be cut from rubber 3–4 mm thick. However, homemade gaskets will not last long.
Disassemble the ball or cartridge ceramic single lever mixer everyone can do it. These taps have quite simple design, which makes it possible to repair them yourself, without resorting to the services of plumbers.
Nowadays, every apartment has stylish single-lever faucets, both in the kitchen and in the bathroom. Unfortunately, sometimes this equipment fails, although it does not have a single “old-fashioned” axle box. In fact, it is quite easy to repair such a mechanism, so below we will describe the procedure for completely disassembling such a “device”.
The device and principle of operation with a cartridge
At first, it may seem to an ignorant person that there must be a complex mechanism inside such a mixer. However, you just need to make up your mind and start disassembling. As the famous saying goes: the eyes fear, but the hands do. But first, to understand the essence, let’s consider the structure and operating principle of a “one-armed” mixer. The internal “filling” of this important plumbing equipment comes in two types: cartridge or ball. The most common in modern line plumbing can be called the first type. Let's start with him.
The main element of such a working mechanism is the cartridge. It usually breaks. It’s just that, in fact, mixing of hot and cold water occurs in it. The cartridge itself is a cylindrical plastic body.
Inside there are three ceramic discs with holes. They are so precisely processed by ultrasound that they act flush against each other, preventing water from passing through.
In fact, only one disk works - it moves relative to two stationary ones located one level below. In this case, its hole moves towards the disk with a hole for supplying either cold or hot water, since the moving plate is directly connected to the switch lever. This is how the liquid is mixed in the housing.
In addition to the cartridge, the mixer contains other important spare parts:
- Lever arm.
- The metal case in which the cartridge is located.
- The housing cover, which screws on top and presses the main mixing element.
- Spout with aerator at the end.
- Required gaskets.

The device of a mixer with a cartridge: a simple and clear diagram
The cartridge is inserted into the housing and pressed against the lid, which is screwed onto the thread. But the mixing mechanism has a white plastic pin in the center that protrudes upward from the lid. It is on this “column” that the inner part rotary lever. However, in the disassembly instructions we will discuss this point in order of priority. So let's get started.
Instructions: how to disassemble this type
Faucets with a cartridge for the bathroom and for the washbasin, as well as for the kitchen sink, differ little in their internal contents. Therefore, let's consider a certain general case. However, to dismantle the “apparatus” above the bathtub, you need to take a plumbing gas wrench and unscrew the two large nuts securing it to the eccentrics.
But to remove the unit from the kitchen sink, just unscrew the large brass nut on the back of the sink or simply unscrew two small nuts from the mounting studs. Only the nuts of the flexible hoses must first be unscrewed from the water supply using the same gas wrench.
Do not forget: before such work, be sure to turn off the water in the apartment. Usually, a smart owner knows where the inlet taps are located.
So, let’s imagine that the mixer has been removed and lies in front of us on a table suitable for repair. Let us first list the tools that need to be prepared to disassemble the mechanism:
- Spanners.
- Gas plumbing or adjustable wrench.
- Fine-tipped pliers.
- Hexagons included in the set.
- Flat blade screwdriver.
We begin the dismantling procedure.
As for kitchen faucets, cheap models also experience the following breakdown: the main body in which the cartridge is installed cracks. In such a case, complete disassembly is also pointless. It is necessary to completely replace such a “one-armed” faucet.
Single lever ball mixers
Equipment in which a special ball is used instead of a cartridge is less common. However, disassembling it is not much different from the procedure we have already described. Still, there are nuances that need to be paid attention to.
So, let's describe the instructions for the ball mixer. The same tools are used.
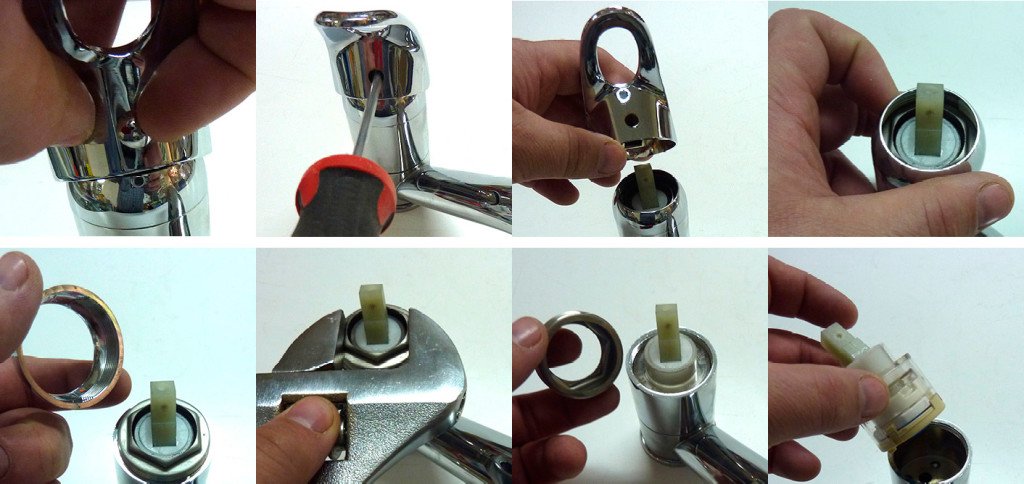
Disassembling the ball mixer
- First, they also pry it up with a screwdriver and remove the multi-colored plug.
- Then loosen the opened bolt.
- Now you can take out the lever under which the cap is located.
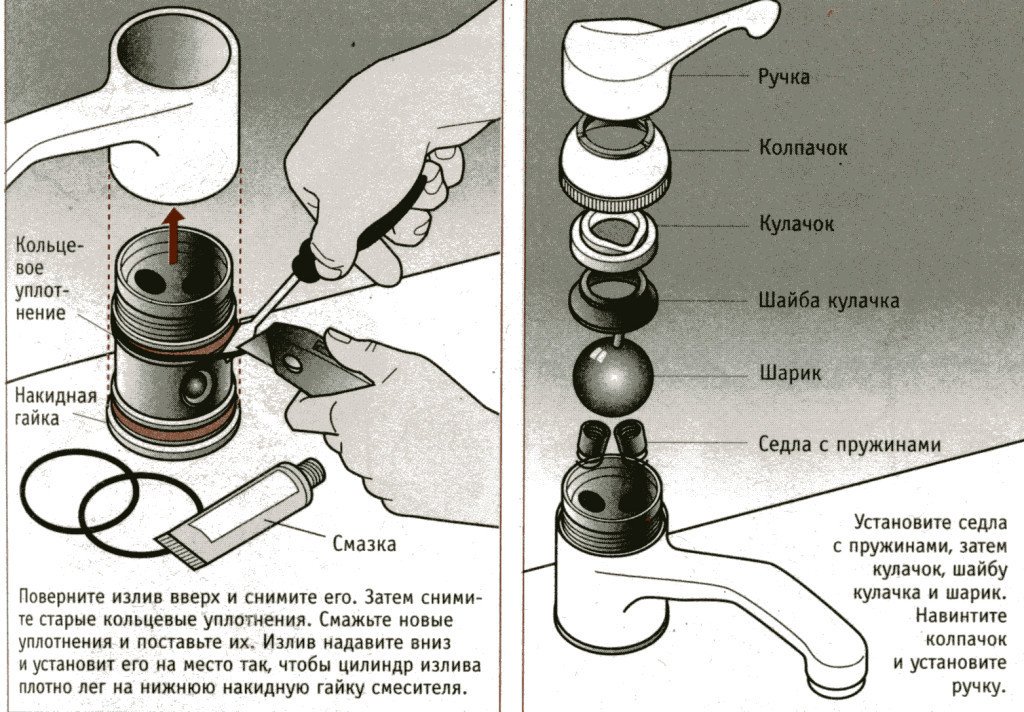
- This sealing link is unscrewed, then the cam and washer are pulled out.
- Finally, they take out the ball.
- But that is not all. Like the cartridge, this “organ” is the main one in the process of mixing hot and cold water. Underneath there are two valves with springs.
- We carefully take out these elements, which serve to introduce the contents of the pipes into the mixer. If necessary, we clean them. It is their contamination that is the most common type of failure of the described unit.
- Next, you can remove the housing and replace the rubber sealing rings. They are strung on a plastic base.
- We reassemble in reverse order. All operations can be done without removing the faucet from the sink.
The process described more clearly is shown in the following video.


