- I’ve had the idea of drawing on a PC for quite some time now, and dabbling in Photoshop and illustrator.
- Yes, there are tablets for this, but I think buying, ala, “try and forget” is an inappropriate solution))
Therefore, it was decided to make from what was at hand...What do we have? That's right - mouse)
We also have a marker that you can try stuffing her insides into.
- As it turned out, not everything is so simple, There are usually more parts in mice than fit into a marker.
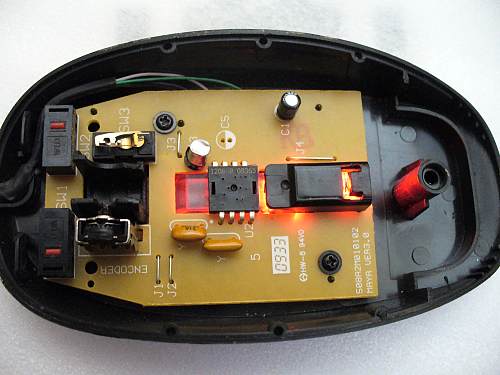
- However, if you look, then you can find a SINGLE-CHIP mouse, inside the kit - 2 electrolytes of 47 uF/10V (one on the power supply, and the second on the button) + a 100nF ceramic capacitor.
- It connects directly from the PC, all buttons also go directly.
- This chip already contains a sensor + controller.
- Size – DIP chip.
1) How does the mouse work?
This is a CAMERA that “photographs” the surface. The information enters the chip, it compares this “snapshot” with the previous one and determines the movement.
- She just shoots at high speed.
- In order for the “camera” to see what it is filming, it is illuminated by an LED (usually red), you CAN install any one (of a different color/size). And power it from anything.
- Light-emitting diode not synchronized, and the change in brightness is done to save energy, protect the matrix (camera) and aesthetics.
- Important point– optics. The meaning is simple - you need the “picture” of the surface to be sharp (otherwise there is no comparison), in general, just like in your favorite soap dish.
2) What do we need in order to repeat?
- Mouse with one chip(Which one is above). Price – 3 dollars. From it we will take a chip, a body kit and a lens.
- Marker (also above). It's for 50 cents))
- Hot melt adhesive.
- LED 3mm (any color)
- The button is not fixed (there is a photo below). It will be analogous to the left mouse button.
- Something for decoration (a pen for design should have a design;))
3) Let's get started:
- Disassemble the mouse (you can even break the case, we don’t need it). Suitable for us like this, it's cheap and single-chip!

- Draw the pinout of the microcircuit ( the picture below is an example). The pinout can be copied from the board.
- Cut off the unnecessary part of the optics and glue the remaining part to the sensor with hot glue:

- Disassemble the marker. We don't need the upper part.
- Make a hole for the button

- Pull the wire through the marker.
You can take the following buttons, for example:

- Using overhead soldering, assemble the MK + wires + for the button + attachment. Should fit in the marker.
- Fill with hot glue (it’s better to check how it works first)
You'll get something like this)) No drivers are needed, the mouse is still:

It was called Mousebot, and its main highlight is that it is able to see light and then turns towards it. All this thanks to two LEDs that capture the light.
Materials and tools for manufacturing:
- one ball mouse;
- two small motors;
- one toggle switch;
- microcircuit LM386;
- one DPDT 5v relay (you can also use Aromat DS2YE-S-DC5V);
- transistor PN2222 NPN (2N3904 is also suitable);
- one LED (color does not matter);
- 1 kOhm transistor;
- 10 kOhm resistor;
- 100 mF capacitor;
- tape cassette;
- floppy disk or CD;
- 9V battery with equipment;
- rubber strips and wires.
Tools you will need: multimeter, Phillips screwdriver, pliers, drill, knife, soldering iron, wire cutters, glue or epoxy, hot glue with a pistol and a hacksaw.
Manufacturing process:
Step one. We disassemble the mouse and take out some parts
Having disassembled the mouse, you need to remove the switch from it, as well as infrared emitter, they will be needed to make the robot. The IR emitters and switch need to be unsoldered. The emitter is marked in the pictures with numbers 1 and 2, the switch is marked with number 3.


Step two. Preparing the robot body
To get as much as possible more space in the robot body, all unnecessary protrusions need to be cut out from the inside of the mouse. The easiest way to do this is with a Dremel. If the mouse is small, you may have to remove the protrusions into which the connecting screws are screwed. A short cylindrical type Dremel works well for cutting. When in a vertical position, it will cut at right angles with good quality.


Step three. Making robot wheels
Since the motor axles are very small, they need to be equipped with wheels to move the robot. Rollers from cassettes, which were once tape recorders, are ideally suited for these purposes. The wheels are attached to the axles using superglue. Then take a strip of rubber and wrap it around the wheel, you need to make three turns in total, and for each half turn you need to add glue. Now a second one is glued on top of the already glued rubber band; it should be installed as in the photo.


Step four. Creating a layout and installing a relay
It is best to use a standard layout, while the mouse layout will be simple, since printed circuit board takes up little space. You need to install the relay and solder the wires, contacts 8 to 11 and 6 to 9 are crossed with connecting pins. Next you need to connect pins 1 and 8 and add stranded wire for pins 8 and 9.
Then you need to take the transistor and solder the 16th contact to its collector. Subsequently, the wires soldered to pin 9 are connected.


After this, the relay can be glued to the housing. The wire that connects the 9th contact to the emitter contact must be soldered to the power wires. Pin 8 is connected to the positive pole.

pins 1, 4, 6, 8, 9, 11, 13, 16;

1 – emitter; 2 – collector; 3 – base
Step five. Installing a switch button
Now you need to take the switch and connect it as shown in the diagram. The resistor used is 10 kOhm. To prevent a short circuit from occurring, it is best to insulate the contacts using heat-shrinkable tubing.


Step six. Connecting the robot's brain
The LM386 chip is used as the brain for the robot. It needs to be turned upside down and then pins 1 and 8 bent so that they touch, then they need to be soldered. Then the chip is installed in the case and connected. You need to add stranded wire to pins 2, 3 and 5. And pins 4 and 6 are connected to positive. In the end, everything should look as shown in the photographs.


Step seven. Creating the upper part of the robot
You need to take a drill and drill holes in the top of the mouse body. Two holes are needed for connecting the eyes, and one for installing the LED. At the back of the mouse you need to do big hole under the toggle switch. At this stage the switch can be installed.


To create eyestalks, you need to twist copper wire, and then solder IR emitters to their ends with one contact. An LED can now be installed in the central hole, and a 1 KOhm resistor is soldered to its positive contact.
Step eight. Fixing elements
To ensure that the motors and switches are held securely, they must be secured using hot glue or epoxy resin.
This very simple robot can be made from inexpensive materials, which can be purchased at regular store. basis of this device is an old computer mouse.
Mousebot is a simple bot that uses two "eyes" with which it sees light and turns towards it. One large "antennae" is mounted on the front of a computer mouse to detect collisions. When it hits a wall, the mouse moves backwards and turns in the other direction.
This project is pretty cheap, if you have an old mouse lying around the rest of the parts will cost you less than ten dollars.
Step 1: Parts and Tools:
Materials:
- 1 ball mouse
- 2 small DC motors
- 1 toggle switch
- 1 DPDT 5v relay (Aromat DS2YE-S-DC5V is also suitable)
- 1 LM386 chip
- 1 2N3904 or PN2222 NPN transistor
- 1 LED (any color)
- 1 1 KOhm resistor
- 1 10 kOhm resistor
- 1 100mF capacitor
- 1 cassette for tape recorders (were common in the 80-90s)
- 1 CD or floppy disk
- 1 9V battery equipment
- 1 9V battery
- 2 or 3 wide rubber strips
- 22 or 24 wires.
- Multimeter
- crosshead screwdriver
- Dremel
- Small pliers
- Wire cutters
- Sharp knife
- Soldering iron
- Any dismantling tool
- Super glue or epoxy resin
- Hot glue and a gun for it
- Hacksaw.

Mousebot requires a body with some parts from a computer mouse, as well as additional eyes and whiskers.
Open the mouse and find the components you need to take, namely the switch and the infrared emitter.
Remove the switch PCB and unsolder it like the IR emitters.

1 - IR emitter; 2 - IR emitter; 3 – momentary switch;


1 - a Phillips screwdriver will make this task easier


Step 3. Prepare the body:
Next, you need to make sure there is plenty of space inside the case, so use a Dremel to remove all the internal plastic structures from the top and bottom of the mouse. If your mouse is small, you may need to remove the connecting screws that hold the two parts of the mouse together.
Now use your Dremel to cut down the holes for the switch on the front of the mouse and the motors on the sides.
It is better to use a short cylindrical type Dremel; it will cut efficiently at right angles while in a vertical position.


1 - if this connecting screw is in the way, remove it


Step 4. Make the wheels:
The axes on these motors are very small, and if we want the Mousebot to move stably at high speed, we need to put some wheels on it. Tape cassettes have perfectly sized wheels in the right and left corners. You may have to go through a lot of cassettes to find the right wheels for your axles. Glue them to the axles with superglue.
Cut the elastic and glue it to the edges by wrapping it around the wheel three times, adding superglue every half turn to hold the structure together. Cut off the remaining rubber.
Now glue another rubber band to the one you just completed. Do the same and cut off the excess. Make sure there is enough glue to hold the elastic securely. Repeat this process for the other wheel.


1 - add another layer to soften the touch of the wheels;

1 - elastic band is fixed
Step 5. Make a layout and install the relay:
There are quite a few good layouts for mousebot. It is best to use the standard layout. The mouse circuit will not be complicated, since the printed circuit board does not require much space.
Install the relay and solder the wires by crossing them with connecting pins 8 to 11 and 6 to 9.
Then connect pins 1 and 8 with wire along the body and add stranded wire for pins 8 and 9.
Solder the transistor's collector (right terminal, looking from the flat side) to pin 16 and attach the short end. Then connect the wires that are soldered to pin 9 (the left pin, looking from the flat side), leaving a little space.
Now glue the relay to the body. Here you can use the cut wires as positive and negative voltage poles, which will help you get rid of problems with the engine. Use sharp knife to remove the protection from the contact wire connecting pin 9 and the emitter, and solder it to the power wires. Then connect pin 8 to the positive voltage pole.

1 - This mouse does not have enough space in the back, so install the motor in the front for more free operation;

pins 1, 4, 6, 8, 9, 11, 13, 16;


1 – emitter; 2 – collector; 3 – base

1 – don’t pay attention to this blue wire, you won’t need it; 2- It seems like a clunky connection, but it frees you from extra wires;
Step 6: Set the radio button:
Now add the Mousebot antenna. Do this by soldering the positive terminal of the capacitor and a 10K resistor to the end, which is usually open. You can check which side is the open part of the pushbutton switch using the continuity test function of your multimeter. There should be no connection between the middle and normally open contact while the button is pressed. After this, add a stranded wire to ground the capacitor and the center contact of the switch.
Connect the resistor on the switch to the base (center pin) of the transistor and wires from outside capacitor. Then connect the middle pin to the positive voltage pole. To make your connections more secure, you should use heat shrink tubing to insulate the connections and bend the capacitor to the side to create some space.

1 – resistor 10 KOhm; 2 – usually open contact; 3 – usually closed contact;

1- this connects to the guide end
Step 7: Build the Mousebot's Brain:
The brain for Mousebots is the LM386 chip. Turn it over with the pins facing up and bend pins 1 and 8 so they touch and solder.
Now place the 386 in the case and connect pin 4 and pin 6 to the + end and add stranded wire to pins 2, 3 and 5.
We are almost ready to connect the engines. It remains to solder some stranded wires to pins 4 and 13 of the relay. At this point your Mousebot should look like the third picture to this step.

1 - pin1; 2 - pin 8


Step 8: Build the top half of the Mousebot:
First, drill small holes in the front of the mouse, two for the eyes and one for the light emitting diode (LED). Next, drill a large toggle hole on the back of the mouse and install a switch to operate the on/off function in the tail of the robot.
To create the robot's eyestalks, twist two pieces of wire together and solder an IR emitter on one end. Place the LED in the middle of the hole and connect the positive end to a 1K resistor.


1 – resistor 1 KOhm; 2 – GND end of the LED;


Step 9. Glue the bottom elements:
Use hot glue or epoxy resin to securely attach the switch and motors to the mouse chassis. Make sure that the angle of the motor is approximately straight, and then lift the front of the mouse slightly off the ground.


Step 10. Getting closer to the finish line:
Connect relay pin 13 to the left motor and relay pin 4 to the right motor. Now connect pin 5 of the IC to the bottom connection and the motors. If you are not sure which side is + and which is –, connect the motor to the battery, and watch the direction of rotation. The right motor should spin clockwise when looking at the wheel, and the left motor should spin counterclockwise.
Locate the wire coming from pin 2 (green) + to the end of the left eyestalk and from pin 3 (blue) + to the end of the right eyestalk. Then connect a 1K resistor to the + voltage direction.
Connect the battery, solder the black wire to the cover battery compartment to the negative voltage pole. Connect the red wire from the battery cover to the switch, and then connect the switch to + voltage.
Close the lid of the mouse and then cut a thin strip of rubber material using a hacksaw. Glue the strip on one side so that you apply pressure when pressing the buttons. If you have a streak that “pats itself on the back,” then you’ve done it.


Now turn the switch and enjoy!
You constantly use a computer mouse (or to put it “pretentiously” mechanical manipulator, which converts movement into a control signal), have you ever thought about what you can do with a computer mouse? It turns out not so little. Select an object or copy it, move or delete, open or close a file or folder, everything and much more can be done with the computer mouse. That's what we'll talk about.
In this lesson we will get acquainted with the computer mouse, learn some of its secrets, and also learn what you can do with the mouse in the browser. You, using the mouse, can select a folder, file or some program and perform some actions, move in the desktop area, open a folder or run a program. You can copy or delete a word or entire text.
Computer mice come in ball, laser, wired and non-wired types. But the principle of operation is the same for everyone. When you move the mouse across the surface of your table, the cursor moves on the monitor screen, duplicating your actions. There are only three main buttons needed to work with a computer mouse. These are the left and right keys and the scroll wheel (scroll). Using a computer mouse and additional keyboard buttons, you can significantly simplify and facilitate many operations on the desktop, when working in programs and in browsers. Let's get acquainted with some tricks of working with the mouse.
The simplest operation that you have probably already had to perform is to select some text. To do this, simply add a vertical slash at the beginning of the text. It is also called in English - pipe(in Russian you can safely pronounce "pipe") To do this, use the left mouse button to click at the beginning of the text and hold down the left mouse button and drag (without releasing the button) to the place where the desired text ends. What to do if the length of the text exceeds the page size? The following combination will help you here. Place the cursor at the beginning of the text, hold down a key on the keyboard, Shift and click the left mouse button, without releasing the key on the keyboard, go to the end of the desired text and press the left key again. All text is selected, you can perform further actions with it.
Copy and paste the text.
You need to transfer part or all of the text to another location or folder. We already know how to highlight text. Now, on the selected text, right-click and in the contextual (drop-down) menu find “copy” and click on this item. All the necessary information is saved in your clipboard (the clipboard, if you don’t go into details, is temporary storage where the files, folders, and text you copied are stored). Now find the place where you need to paste what you copied, right-click on it and select “paste” from the drop-down menu. These operations can be done in another way. Select what you need, then hold down the keyboard keys CTRL+C. Everything has been copied. Select the place where you want to paste what you copied, put a slash (one click with the left mouse button) in the desired place and press CTRL + C. That’s it - the text is pasted.
Let's change the scale.
Sometimes, when you open a website or page, you see that the font is very small. Not everyone, especially older people, has good eyesight and it is difficult for them to read such a font. It turns out that this can be fixed quite simply. To do this, hold down the CTRL key and scroll the mouse wheel forward or backward. The font size will increase or decrease accordingly.
Open link in new tab.
You've already had to work on a page and move to another page or tab without closing the first one. At the same time, you performed the following action: “Click on the link with the right mouse button and in the menu that opens, select - Open page in a new window.” But this whole process can be simplified. Hold down the CTRL key and click on the link. That's it, the link will open in a new window.
Move using the right mouse button.
You already know how to move a folder or shortcut on the desktop. If you don't know, I'll tell you. Hold down the selected object with the left mouse button and, without releasing, move it to the selected location. But it turns out that this operation can be performed using the right button. The principle is the same. Right-click and drag to Right place. When you release the key, a menu will open where you will be asked about your next actions. Choose what you need.
Select a word or text.
If you need to highlight a word, just hover your mouse over it the right word and double-click the left key. Is it possible to select the desired paragraph in this way? Certainly. Place the cursor at the beginning of the text again and left-click three times. The required paragraph is highlighted, you can perform further actions with it.
Third button.
Most users don't use the third mouse button. Few people know about its capabilities. But nevertheless, she can do something. For example, when you open a browser page and click on the wheel, the cursor will change its appearance to round. Now you can, by moving the cursor in different directions, the movement of the page on the screen will also scroll in all directions, and the further the scroll pointer moves, the faster the page will scroll. Sometimes very convenient when scrolling pages with large text.
These are the little tricks of a computer mouse. We'll stop there. Of course, the topic is much broader than stated, but throughout all subsequent lessons, we will return to this issue.
In the next lesson, we will introduce the concept of keyboard shortcuts. These are combinations of two or more keys that can be pressed to perform tasks that typically require the use of a mouse or other pointing device. Keyboard shortcuts make using your computer easier, saving you time and effort when working with Windows and other programs...
In the meantime, I say goodbye to you. As always, you have questions, reviews and of course comments. If you have not yet subscribed to my news, then welcome!
What can you do with an old mouse? and got the best answer
Reply from User deleted[guru]
But it’s better to make the lamp LED, since incandescent lamps get very hot, and the plastic of the mouse will probably melt.
P.S. Very good LEDs can be taken from lighters with flashlights. Lighters can withstand only 2-3 refills, and the LED is almost eternal.
Source: We don’t throw anything away, don’t sell anything, and try not to buy anything. But we give and select, repair and do it ourselves!
Answer from Yashpa[guru]
take a three-liter jar, fill it with sawdust, cut an apple, a carrot and put your mouse in it - let it live on
Answer from Dimon XXX[expert]
You can make it interesting table lamp: At the place where the wire is attached, attach a stand (you can use one made from an unnecessary lamp), and instead of a ball, a light bulb. A switch can be made from the inside of the mouse itself at the press of a button. You can also change the lamp intensity with a scroller and much more.
In this matter, everything depends on imagination and knowledge of electrical engineering.
Answer from Linza[guru]
Just look at what company it is. Go to their website and offer them to buy the rarity from you! Will there be money!?
Answer from Nikolay Davydov[guru]
hang it on the wall (cut and glue glass beads - let your imagination run wild)
Answer from Deathwatch[active]
leave it of course....I have a row of mice, so I take out the good old ball mouse and go...
Answer from SHP!ON[guru]
Draw eyes with a marker, cut the wire shorter and you can put it on the shelf
and you will be happy!
Answer from Nasty[guru]
throw it away and buy a new one, where is your logic?
Answer from Owl[guru]
Wow! A real RARITY. Since 1999, so many mice have died of natural causes, but here is a long-lived one. We must definitely find a worthy use for such a veteran.
Answer from Above Me[master]
Take it apart to find out what's inside, I've already taken 3 pieces apart
Answer from copperhead[guru]
Don't throw it away! She can still survive three new ones!
Answer from Neohuman[guru]
You can, for example, paint it in a folk or other style - make it exclusive.
You can then varnish it so that the paint does not rub off (this is what they do)
Answer from Mark slavin[active]
give it to the old cat
Answer from User deleted[active]
Throw it away!!
Answer from User deleted[guru]
give it to the cat
Answer from Elena Starky[guru]
Hang it in the refrigerator :) And show guests “My mouse hanged itself” :)
I’ve been dreaming of doing this for a long time, but I just can’t get around to it :)
Answer from 2 answers[guru]


