Country life attracts the opportunity to enjoy fresh air and unity with nature. Outside the city everything is fine, except for difficulties with hygiene procedures. Agree, would it be nice to make a heated summer shower with your own hands to solve this problem?
This option will help increase the comfort of staying at the dacha, but will not greatly affect family budget. We will show you how to realize this idea.
The article discusses in detail the best Constructive decisions and cabin construction technologies. Effective help will be useful tips on the choice of materials required in construction, arrangement of drainage, simple and quick heating of water. The information presented is supported by photo and video applications.
The comfort and ease of use of the structure depends on how well the summer shower is designed. The task of a thrifty owner is to build an economical, easily constructed and at the same time maximally functional shower, equipped with heating.
The easiest option to implement is an open shower.
An open summer shower is a frame-collapsible block or modular container, one of the walls of which is adjacent to the main building
When choosing this arrangement option, the tank is installed on load-bearing wall buildings, positioning it in such a way that the sun's rays hit it at right angles.
Do you prefer closed designs that are convenient to use both in the warm season and in the cold months? Build a stationary outdoor shower with the simplest system heating It may represent frame structure or capital construction.
The main advantage of this solution is that in warm times the water in the tank is heated by the sun's rays, and in cold months by means of a heating element
Traditionally, when building a shower with enough space for an adult to bathe, they focus on the following parameters:
- height– 2-3 m;
- width– 1.5 m;
- length– 1.9-2 m.
The indicated dimensions are convenient when constructing a structure from wooden planks. Taking into account the wall thickness in finished form The area of the structure is approximately 2 * 1.5 m, of which an area of 1 sq. m will be allocated for the shower stall. m, and for the locker room - 60*40 cm.
When using boards standard sizes the material is consumed with virtually no residue.
In addition to wooden planks, the most commonly used building materials for the construction of cabins are:
- polycarbonate sheets;
- moisture-resistant plywood;
- sheet metal;
- flat slate;
- lining;
- brick.
When choosing facing material It is important to focus on the exterior of the site so that the building harmoniously complements the already created architectural ensemble.
Polycarbonate shower cubicle:
Image gallery
Purchasing the necessary materials
In addition to making or purchasing a heating tank, you must purchase plastic water pipes D 50 mm. It is convenient to use a flexible silicone hose to supply water.
To set up a system of materials you will also need:
- gutter reinforced with metal mesh;
- valve with float;
- divider
To perform foundation pouring during construction cesspool, you will need cement marked M150 and higher. The drain can be covered with waterproofing roll materials or hydroglass insulation.
To make a wooden floor in the shower, it is best to use a tongue-and-groove board, treated with a water-polymer emulsion or oil white.

For the final finishing and arrangement of the bathroom, you will need paint for exterior and interior work, spacious shelves for bathroom accessories and hooks for clothes
To erect the structure you will need the following tools:
- building level;
- roulette;
- corner;
- screwdriver;
- self-tapping screws
To pre-mark the area, you also need to stock up on a skein of twine and wooden pegs.
Instructions for building a summer shower
There is no particular difficulty in building a summer shower in your dacha yourself. The only stumbling block for a novice master may be the question of how to install a heated tank and how to organize a wastewater disposal system.
Step 1: Carrying out preparatory work
The scope of work during site preparation depends on the type of building being built. If you plan to build a temporary frame structure, to prepare the foundation, it is enough to remove a 15-centimeter layer of earth from the marked area, and then level the bottom of the dug “pit” and fill it with sifted sand.
When installing a shower stall on very heaving soils, in order to reduce the risk of it tipping over, the thickness of the non-heaving “cushion” of gravel and sand should be increased to 30-40 cm.

When constructing a wooden pouring floor over a gravel fill, be prepared for the fact that while swimming you will experience some discomfort due to a slight draft
Are you planning to build a major heated country shower? To erect it, you will need to lay the foundation. The depth of the foundation depends on the type of materials used. For example, for brick building A foundation buried 30-40 cm is quite sufficient.
The foundation is laid in the following sequence:
- Territory marking. For creating the right basis Wooden stakes are driven into the outer corners of the future building and string is pulled between them.
- Digging a pit. A layer of soil is removed from the marked area, going 15-40 cm deep depending on the type of building.
- Preparing the site for laying pipes. Dig trenches and level the bottom in such a way as to ensure unimpeded flow of waste water in the direction of the drainage hole.
- Installation of drain and discharge pipes. A reinforced gutter is installed on the leveled and compacted bottom, not forgetting to maintain the angle of inclination.
- Fill concrete mortar . To create level base, filling is carried out using a level and guides.
For interior decoration choose facing materials with increased moisture resistance: PVC film, linoleum, plastic. When choosing wood paneling The surface must be treated with drying oil and painted.
To make hygiene procedures more convenient and safe, a grid made of wooden boards is installed on the floor, on top of which a rubber mat is laid.
The grate is assembled from wooden slats size 30-50 mm. Wood preparation is the same. If you want to increase its resistance to shoe wear, treat the material with an acrylic compound used for repairing bathtubs.

It is advisable to separate the dressing room and the bathing compartment with a curtain made of waterproof textile fabric or polyvinyl chloride film
If desired, both the internal and external walls of the facing material can be painted and decorated with designs. Original design will allow you to turn the shower not only into a place for taking water procedures, but also into decorative element suburban area.
Additional interesting options Arrangements for a garden shower are suggested in these articles:
-
The heated summer shower is ready. To prevent water stagnation, it is advisable to operate the shower at regular intervals. Before a long break in use, so that sediment does not clog the watering can, it is recommended to completely empty the tank.
How nice it is to escape from the stuffy metropolis and find yourself at your own dacha! Fragrant greenery, birdsong and the friendly sun are wonderful. But, if there is no summer shower on your site, hot days will turn from relaxation into torture. But to build garden shower for a heated dacha with your own hands is not at all difficult. You just need to approach this process in detail.
Choosing a place for a shower in the country
Before you start building a summer shower, you need to determine exactly where it will be located. Basic selection rules:
- Place the shower stall in a sunny location. It is advisable to find an area where the sun penetrates throughout the day. Then you can rinse off with refreshing water at any time.
- The shower stall should be located on a hill for the best drainage of water. When using a shower, you will use a large amount of water. Stagnation of water under the cabin is fraught with erosion of the soil and, as a result, loss of stability of the structure. Also, stagnant water will lead to unpleasant odors.
- No drafts or visibility. Despite the fact that the wind is warm in summer, the presence of airflow can bring you a lot of trouble.
It is worth considering that the location of the shower in the most visible place is not desirable from an aesthetic point of view.
Organization of warm water drainage
The best solution would be to connect the drain to the gutter. If it is missing, dig a hole not far from the shower stall. Using a hose or pipe, connect the drain hole to the hole. The platform for a summer shower should be inclined towards the drainage pit.
In this case, the used water will flow freely through the inclined pipe.
Provide the bottom of the shower stall with a tray or make a container for water drainage yourself. To do this, fill the area of the required size with concrete. Place bricks around the perimeter that will serve as a side.
The shower drain cover must be provided with a waterproof coating. The following materials are suitable for this:
- roofing felt,
- hydrostekloizol,
- concrete with the addition of PVA,
- PVC film.
It is a mistake to use a clay covering for drainage. Such flooring will be washed away by water over time.
How much it will cost is detailed in this article.
How to build a country shower and toilet so that they do not interfere with each other is described in detail in.
Shower and changing room
Designing a cabin for a country shower
The width and depth of the shower stall should be at least 1 * 1 m, and the height should be 2 m and above. The space inside the finished structure should be enough to turn around, raise your arms and bend over without obstacles.
It should also be taken into account that there should be a place in the booth for a changing room, where water will not penetrate. For the locker room it will be enough to allocate 60 cm. Thus, optimal size the shower room will be 1.6 m * 1 m. The material for the frame can be wooden beam. Standard diameter racks for such a structure are 100*100 mm.
To impart stability, you can use different methods:
- Concrete every detail of the frame;
- Attach the lower corners of the structure to pegs driven deep into the ground.
When designing a shower stall, consider the design of the buildings in your yard. The shower room should not stand out from the general style.
Installation or how to do it yourself
Cut the timber to the length you need. Connect the side parts of the frame in the form of frames. Strengthen each frame in the middle with jumpers to prevent distortions. The lintels are made from the same timber and should be installed at an angle of 45 degrees.
If you decide to make a shower stall measuring 1.6 * 1 m, then the side parts will be 1 m, the back - 1.6 m, and the front - 1 m, since in the front part you need to leave a space for the door equal to 60 cm. It is not recommended to make a door less than 60 cm for convenient passage to the shower room. Then you should connect the frames.

Before fastening the frames together, make sure that their diagonals match.
Having fastened the frames, reinforce them with jumpers at the top and bottom. This way you will get a solid frame, which can be covered with polycarbonate or any suitable material. It will be interesting to know that along with a shower, you can also build a toilet, as well as a utility unit, but the content will help you figure out how to do this correctly.
Install the resulting structure above the prepared inclined platform for water drainage. Use a spirit level to level the shower stall frame horizontally and vertically.. Stuff the strips on the bottom jumper. Leave a distance between them so that the water flows freely down onto the sloping platform.
For the shower door, make the frame in the same way: assemble a frame from 4 strips of timber and reinforce them with crosswise lintels to protect the door from distortions. The size of the frame should be approximately 1 cm smaller than the opening for unhindered opening of the doors.
- slate,
- lining,
- moisture resistant OSB,
- cellophane,
- plastic,
- glass.
Please note that any of the materials listed must be opaque.
Having chosen the base, cut out the walls the right size and install them on the frame frames. The top and bottom of the booth do not need to be completely closed for good ventilation. The door must be cut separately. Place the doors on their hinges and line the door with cellophane to prevent water from getting onto the timber. But so that this would not be difficult and very simple, it is indicated in the article.
Capacity: tank, barrel or water tank
The minimum volume of the water tank should be 100 l, the maximum – 500 l. Installed on support posts above the shower.
Please note that the material from which the summer shower tank is made should not be susceptible to corrosion. The best option will it be plastic or stainless steel. If you choose the plastic option, you need to not only install it on the supports, but also tie it to them. Because in the event of strong gusts of wind, the empty container may fall.

Best to buy flat tank with landing thread for screwing in the tap. If you don’t find one, make a hole for the faucet yourself.
It is good if your container is equipped with a lid, thanks to which the water will not become clogged. The lid can be made from metal, plastic, glass or cellophane.
Water can be supplied to the container manually or using a pump. The last option is preferable.
Sources for heating water in a summer shower
The water in a garden shower can be heated in various ways.
Firewood
To increase the temperature of the water in the summer shower using firewood, install a stove next to the cabin. Place an expansion tank on its surface, which will push hot water into the main shower tank. The principle of the expansion tank is constant circulation of water.
Hot water from the heating system will flow upward, cold water from the container above the shower stall will go down. The connection between the expansion tank and the main tank will be a metal pipe.
With a wood heating system, you need to use a metal water container, not a plastic one.
Electricity
Install a boiler or heating element with a power of 2 kW or more in the water tank. If you use a heating element to heat water, it must be embedded into the bottom of the water container. The boiler is lowered into the tank from above. But be sure to monitor the water level during the heating process. Otherwise, your appliances may burn out.
Whatever happens short circuit, the wire stretched from the outlet to the shower must be one piece. You need to install a thermometer on the water tank, which will indicate when the heating devices can be turned off. Or purchase a container with automatic heating, where there is control not only over the temperature, but also over the water level.
A good option for a summer shower with electric heating will use 2 tanks at once: large - for cold, small - for hot water. In this case, each family member will be able to choose for themselves comfortable temperature. For mixing hot and cold water buy a mixer.
As with heating with wood, plastic tank use along with heating devices Not recommended.
Sun
The most economical and hassle-free heating option is solar rays.
It is more convenient to rinse off in the midday heat - this means that the shower stall should be in the place where the rays penetrate in the morning; If you prefer an evening shower, choose an area where the sun illuminates during the day so that the water has time to heat up. How to do country toilet without a cesspool, find out.

The shower stall should be located in a place where the sun heats it all day long. If this is not found, decide at what time it will be more comfortable for you to use the shower.
How to enhance the heating effect of solar rays?
- Paint the water tank black. Sun rays It is dark colors that warm up the most.
- Wrap the shadow side of the tank with foil, as this material will retain heat inside the tank.
- Using an additional frame, pull over open tank plastic film, which will create a greenhouse effect.
Conclusion
After final installation summer shower can be formed certain style, adding a few details to it. Plant moisture-loving plants around the booth that will not only please the eye, but also promote accelerated drainage. Decorate the shower with decorative elements so that an ordinary stall turns into bright accent your his garden plot. Read about a country shower with heating and a changing room.
shower tray
pump, equipped shower mixer
, shells
perforated container with a sealed lid.
In this version, the country shower is no different from the city shower… Show more
Country shower D-1, device and configuration options.
Country shower D-1, universal country shower cabin, inner size which is designed for installation: shower tray 900*900 mm. separated by curtain; instantaneous storage electric water heater horizontal arrangement of the well-known company Thermex is located in the attic niche, which contributes to effective heating from solar radiation(remember the interior of a car after a long stay), connects to a water supply or pump, equipped automatic switching unit when the pressure in the system decreases, separate supply of hot and cold water requires installation shower mixer, shells with a mixer, the internal supply is hidden between the double wall cladding.
There are various options for draining used water: connection to a sewer; septic tank; in the absence of such, it is buried in the ground behind the product perforated container with a sealed lid.
In this version, the country shower is no different from the shower in a city apartment.
Minimum care requirements as, outer side country shower is finished with siding beige colour, which does not require periodic processing, compared to those produced from wood elements, with inside PVC panels white, ideal for finishing premises for this purpose.
Orders for spring work in 2019 are accepted and will be executed according to the order of receipt.
You can buy a country shower D-1 directly from the website by filling out the appropriate form, or order it by calling the numbers provided.
This price includes the price of the product in disassembled form: the base area is covered with linoleum; wall panels with sheathing on both sides; roof assembly.
We will deliver selected products throughout Moscow and surrounding regions, delivery cost is 40 rubles/km. from the warehouse: Shebantsevo street, Russia, Moscow region, Domodedovo, Belye Stolby microdistrict; the cost of assembling the product is 2000 rubles.
Determining the delivery distance in Yandex.Maps (in the “routes” sign to point A that opens, enter the name of the delivery point).
Installation is carried out on screw piles within one day on the specified site (at least one meter free around the perimeter from the boundaries of possible obstacles, to allow movement when assembling the product) and the presence of a supplied water source (enough watering hose 3/4" (19 mm) connected to the water supply or pump).
dimensions of this product: 1520x1020x2600 mm.
Product warranty - 1 year, components - manufacturer's warranty.
Scheme of a pile-screw foundation for a country shower
Producedby our forces, consists of four screw piles (the customer is required to indicate an installation location that is free from possible obstacles for screwing in piles), in the section: Accessories for shower and toilet .

Equipment optionsIn chapter Accessories for sanitary cabins
Instructions for use of country showers and toilets.
Start of the operating season:
1. Replace all dismantled elements of the system in preparation for the winter season
2. Before turning on the water supply to the instantaneous storage electric water heater,
turn the hot water taps open until the water comes out, close them,
the system is filled and ready for the season of operation.
3. Turn on the water heating button (the thermostat maintains the temperature automatically
mode).
4. Upon reaching desired temperature start using it (the water source to the system must be turned on).
Closing of the operating season:
1. Turn off the water supply, open the water drain valve from the system, turn on the mixer taps
in the middle position and do not close until spring, to ensure complete drainage of water from
system, unscrew the shower head and blow through the system through the shower hose.
2. Drain the water from the toilet barrel and wipe dry, using a pear or any small container,
pump out the water from the toilet water seal (approximately 0.5 liters) dry.
3. Remove the cleaning caps from the siphons (if any) and leave them removed
until spring.
4. Maximum drainage of places where water accumulates guarantees an increase in time
operability of system elements.
Not so long ago, providing more or less comfortable conditions for summer cottages was quite problematic due to the lack of communications. But, fortunately, progress does not stand still, due to which the situation has recently changed dramatically. Proof of this is the country shower cabins with heated water, which allow you to fully take water procedures, even while in the countryside.
Below we will get acquainted with the design of such shower cabins and their types. Guided by this information, you can choose the most suitable cabin for your dacha.
In the photo - heated tent shower stall
Features of heated showers
General information
Previously, a shower in a country house, as a rule, was a booth made from available materials, with a tank located on the roof. The water in the tank was heating up in a natural way, i.e. due to solar heat.
Of course, such a shower is still better than washing from a bucket, however, it cannot be called comfortable for a number of reasons. Therefore, recently, ready-made booths equipped with a container with a heating element (heating element) have become popular. In addition to the fact that they provide comfortable water procedures, they also look quite attractive on the site.

In addition, these products have other advantages:
- Garden shower cabins with heated water are easy to install, and assembly requires significantly less time than self-construction soul.
- The equipment is quite durable.
- If necessary, the booth can be moved from place to place or even transported if you move.
- The price is quite affordable, especially for models from domestic manufacturers.
- Easy to use.
In terms of convenience and ease of use, such designs are much closer to apartment showers than summer showers with natural heating.

Types of shower cabins with heated water
There are different types of heated summer shower cabins for summer cottages.
Below we will take a look at their main differences and features:

| Differences | Kinds |
| By configuration | Depending on the configuration, finished products can be divided into two types:
|
| Heating method | Depending on the method of heating water, structures are divided into the following types:
|
| Material | According to the type of material, garden shower cabins are divided into:
|
| Tank capacity | As a rule, shower cabins are equipped with tanks with a capacity of 100 to 300 liters. The power of the heating element depends on their volume. |

Note!
In addition to the basic configuration, a shower cabin for a country house with heated water can have additional options, such as automatic water heating, drain and fill devices, hygienic devices, additional attachments etc.

What to look for when choosing
When choosing a shower stall, you need to pay attention to the following points:
- Capacity volume- depends on the number of people living in the dacha. If the family is large, then it should be at least 250-300 liters.
- Water heating method– selected depending on the availability of energy. For example, if there is a forest nearby, then it makes sense to purchase a wood-burning titanium shower stall.
- Convenience– the dimensions must be sufficient for comfortable swimming.
- Environmental friendliness– all materials from which the structure is made must be safe for humans.
- Design– must fit harmoniously into the surrounding exterior. For example, if the dacha is registered in rustic style, then a plastic booth is unlikely to look nice on the site.
- Easy to install – detailed information The instructions for assembling the product are included in the kit. Therefore, you need to familiarize yourself with it before purchasing.
- Options– it should be taken into account that additional functions Although they make the booth more comfortable and functional, they affect the cost of the product.
Note!
The shower stall must have mesh elements or a window for ventilation and intake fresh air, which will prevent the formation of mold.

Conclusion
Shower cabins for outdoor dachas with heated water can significantly increase the comfort of staying in country house. The main thing is to choose the right design and install it in accordance with the recommendations given above.
Acquainted with additional information You can learn more about this topic from the video in this article.
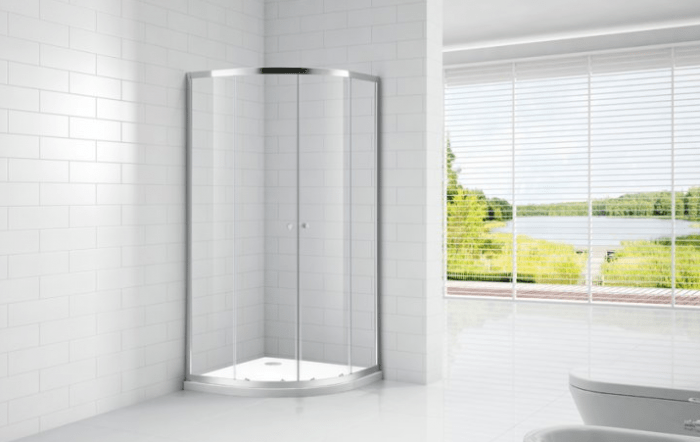
Cramped plastic shower cabins are gradually disappearing from the bathrooms of our apartments and houses, giving way to the once leading position of a new word in arranging the interior of a home shower. Today, a shower without a tray is becoming not only interesting, but often minimized and maximized functional device a tray-free stall allows you to throw out a clutter of plastic from the bathroom and make it more comfortable and spacious.
What is the secret of a shower stall without a tray?
Most lovers of new ideas who have built a shower cabin in their home without a tray note not only Beautiful design new shower, many problems associated with operation old system, gone forever. The new design of the shower cabin has become much more convenient and safer to use thanks to three main innovations:
- Instead of a slippery acrylic tray raised 15-20 cm above the tiles, in the new shower design a person stands directly on the floor;
- The functions of collecting water flowing onto the floor are performed by the floor surface made of tiles laid with a drainage slope in the direction of the drain or sewer drain;
- Instead of inconvenient curtains, sliding doors or shower curtains without a tray, a more aesthetic and practical glass fence is used.
All communications, water supplies and drain pipes are hidden in concrete walls and floors, under tile cladding and double waterproofing.

Important! A simple, at first glance, design of a shower cabin without a tray in practice turns out to be a rather complex structure that requires high-quality and careful planning and installation of all structural elements.
Often, a floor drain is supplemented with built-in heating of the “warm floor” type. This device becomes especially useful for showers. country houses, in which heating and water heating is carried out using coal or wood stoves or boilers.
Installation of a shower stall without a tray
If the laying of cold and hot water supply pipes hidden under the tiles has been used for quite a long time, and any competent person familiar with installation can build the wiring according to such a scheme plastic pipes in the wall channel, then it is better to entrust the assembly and installation of the drain ladder for the tile tray to professionals.
The main problems that one has to face in the process of planning and installing a shower structure are as follows:
- To install a drain ladder, it is necessary either to alter and lower the level of sewer pipes in the house, or to raise the surface of the shower floor by 10-15 cm and equip it with side skirts that prevent water from spilling throughout the bathroom;
- When using a shower without a tray, a large amount of water can scatter in the form of splashes and drops of water throughout the room, so a corner location is most often chosen for a shower stall;
- If in a plastic booth most of the splashes and spilled water were absorbed by the polycarbonate walls, then in the new design the water flows onto the wall tiles. Therefore, very high-quality waterproofing of a shower without a tray is required, laid directly under concrete screed tile bases.
In addition to the above, you will need to make the correct slope of the tiles and maintain the angle of inclination drain pipe water seal. The drain itself has double waterproofing and a special flange mount, which ensures a stable position of the drain even under the weight of a very heavy person.

Features of the design and design of a shower cabin without a tray
Refusal to use a bulky plastic tray in the shower and the use of a floor-mounted water drainage system allowed us to take a completely different look at the design and design of the shower compartment. First of all, the shower space has become open and transparent, even if you install light-permeable partitions, a small structure made of glass and tiles will look much more elegant and attractive than a box made of acrylic and polycarbonate.
Layout diagrams for a shower without a tray in the interior of a bathroom and apartment
In the process of development and design appearance For showers without a tray, several solutions have been developed that can be called classic, widely used in arranging cabins for apartments and private houses.
For example, it is enough effective solution is the use of mosaics and small tiles for finishing the walls and floors of the shower compartment. This cladding scheme makes the floor less slippery and eliminates the need for special safety silicone gratings or mats.

Advice! Making your shower floor safer can be easier and easier. in an accessible way, for example, install a grille made of polished wood, oak or walnut.
A wood surface polished and covered with waterproof varnish will reduce slipping and at the same time serve as a heat insulator if the shower room does not have a heated floor.
The design of the floor drain can be made in the form of a recess in the floor or equipped with side skirts, as in the photo. This is the most rational decision for the construction of a shower stall in a small bathroom for an apartment with a standard layout.

Very often, designers try to hide a shower stall without a tray in a dedicated niche. Even if there are no niches in the layout of the room, they are equipped with the help of additional walls and false partitions.

A relatively new solution in the arrangement of shower cabins is the use of ceiling water dividers. Refusal wall structures allows you to reduce water consumption and at the same time reduce the scattering of drops and foam around the shower.
Forms and methods of arranging a shower enclosure without a tray
To protect the space from flying drops of water, sheet glass, molded polycarbonate or ordinary silicone shower curtains are most often used. This technique allows you to visually increase the light content relative to small space shower stall and make it more comfortable.
When using glass partitions to enclose shower stalls without a tray, an inherent drawback of this kind of solution appears - the remains of soapy water and salts are very clearly visible on the clean transparent glass surface. Therefore, shaded, frosted or textured glass will be more practical.

In private homes, a shower compartment without a tray is often equipped with a transparent ceiling, or the room is supplemented with a small window. This solution eliminates the need for additional lamps and light sources.

Often the most daring designers end up with a glass shower enclosure without a tray.

This solution makes sense for relatively small or combined bathrooms, where the use glass partition not always justified. This is not to say that such a solution is very convenient, since flying spray can flood the room and make the floor wet and slippery even with the most careful use of the shower. Therefore, for apartment options, it would be more preferable to install at least the simplest through glass partition without a back wall.

This layout option allows you to block the main direction in which drops of water predominantly fly away; the absence of side panels makes it possible to effectively dry the surface of the tile and glass from residual water with a draft. Often, this scheme is used for the simplest shower designs that do not produce large amounts of moisture-saturated steam.
Corner or completely enclosed showers lose in this sense open circuits fences, so often the cabin, sealed on three sides with glass panels, has to be equipped with its own ventilation system.
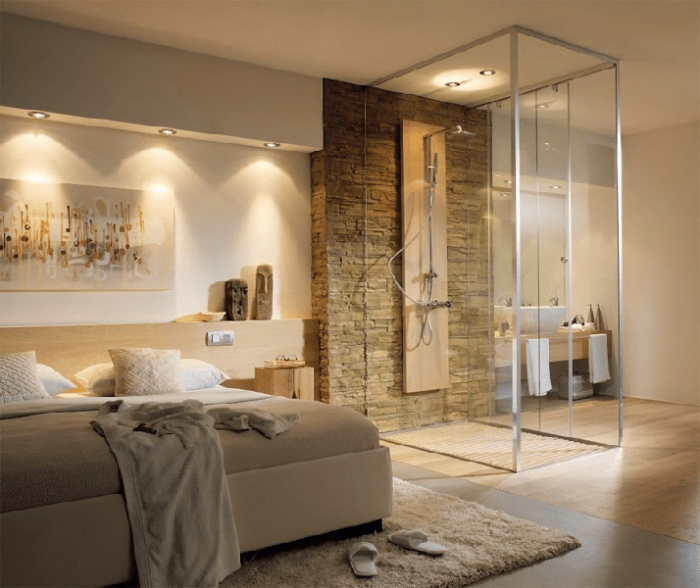
It is worth mentioning that completely enclosed shower cabins without a tray have their advantages. For example, such a design can be installed even in a residential area, in a studio apartment, where most of the space is designed as one large room. In addition, in a closed shower without a tray, you can install a steam generator for a steam room or equip a massage shower.

Conclusion
Today, a shower room without a tray is becoming the de facto standard for a comfortable modern living space. Most of the new apartments and houses are designed taking into account the wiring and arrangement of communications under floor option plum, without the use of special podiums or sides. Even if the apartment owners decide to move the shower stall from the bathroom to any other place, this will be quite simple to do due to the low level of the drain into the sewer pipe. For apartments with an old layout, it is almost impossible to carry out such a re-equipment without a radical and expensive re-laying of communications.


