Availability walk-behind tractor in personal farming you won’t surprise anyone. This is very valuable unit in operation allows for cultivation and plowing land plots of varying length.
However, if we apply additional attachments, then you can significantly expand the potential range of work of your walk-behind tractor.
It is not surprising that after spending a certain amount Money to purchase a walk-behind tractor, many want to make optional equipment with his own hands, thus wanting to save money on their purchase.
Of course, no one is talking about making an exact copy of the equipment that is sold in specialized stores, but the principle of operation and general design features will be the same.
Most people in our country use own vegetable gardens for planting potatoes, which are no less popular in our country than in Belarus. Therefore, the requirements for the walk-behind tractor must be appropriate - it must plow the ground for planting, and also help plant and care for potato bushes.
By courting we mean hilling, which is why potato hillers have become very popular, the methods of making which we will talk about.
About the device of the hiller
The design features of the hiller directly depend on the type of device, of which there are several.
- Disc hiller. Already from the name itself it is clear that the design of this hiller uses disks, or rather two disks, located to each other at a certain angle. In addition, these discs are attached to a special frame, which is directly coupled to the walk-behind tractor via a hitch.
For more information about the disc hiller, watch the video:
- Active hiller. This type The hiller is also called a propeller hiller, because its operation uses translational and rotational motion. Such hillers are installed on walk-behind tractors that have two forward gears.
- This is necessary so that in second gear it is possible not only to loosen the surface, but also to transfer soil from the inter-row spaces.
- This is the simplest type of hiller, which is gradually losing its popularity due to its lower efficiency compared to the two previous types of devices. Structurally, they are two sheets connected to each other; their shape is similar to something like wings.
Using these tools, you can form furrows, and then plant the potatoes themselves. In the future, when the bushes have formed to optimal sizes, you can perform hilling with the same tools.
Thus, the rows are very even and neat, which not only improves visual perception, but also helps the potato tubers form better and ripen faster in the bush.
Potatoes are one of the most popular agricultural crops, which are grown not only here, but also in many countries of Eastern Europe. Over the course of the three hundred year history of potato cultivation, agronomic technologies have been created, with the help of which they tried to facilitate the cultivation of the crop and increase its yield. If in industrial scale When growing potatoes today, tractors with replaceable cultivator attachments are used for hilling plants, then on personal plots You can use a home-made hiller for a walk-behind tractor.
The hiller is the second most important tool after the plow and winch. With its help, you can first cut furrows for planting, and subsequently fill them with planting material.

When moving the hiller along the row-spacings of evenly planted rows of potatoes, you can observe how the wings of the tool quite quickly pour soil into the holes with tubers
On sale you can find several variants of models of this instrument.
Option #1 – lister hiller
This is the simplest type of tool that has a fixed working width. The design consists of two fixed wings connected and slightly extended. Since the wings of the tool are stationary, it is impossible to adjust the working width by adjusting the hiller to the row spacing. Therefore, when working with such a tool, the row spacing is adjusted to the capabilities of the hiller, and not vice versa. Traditionally, manufacturers produce products with a working width of 25-30 cm, which is also far from the most convenient option, because the technology for growing potatoes provides for a row spacing of 50-60 cm.

Such tools are designed to work with motor cultivators whose power does not exceed 3.5 hp, and the total weight of the unit is 25-30 kg
A design feature of lister hillers is also the presence of thin racks that prevent the motor cultivator from being overloaded when the hiller is buried in layers of dense soil.
Some models of lister hillers have a streamlined shape, which is more preferable, since when working with such a tool, the soil is less turned out and dried out.
You may also find useful material on how to monitor the condition of the soil at your dacha:
Option #2 – products with variable working width
Such tools are more convenient to use because they are equipped with an adjustment mechanism with which you can change the position of the wings. This allows you to adjust the tool to different row spacings.

Such hillers are designed to work with more powerful walk-behind tractors with an engine of 4.0 hp or more. or more, whose weight exceeds 30 kg
A significant disadvantage of such structures is their high energy consumption. The reason for this is that during operation, the wings of the tool push the soil to the side, part of which, after its passage, still crumbles back into the furrow. As a result, your back and arms get tired faster, and part of the engine power is wasted on useless work. But despite this, they are one of the most popular models among most gardeners.
Option #3 – disk models

Disc hillers are an order of magnitude more expensive than their traditional counterparts, but the efficiency of working with such tools is many times greater
The main advantages of disc hillers are:
- A successful combination of a walk-behind tractor with the tool itself. Using a disk hiller, when the speed of the motor cultivator decreases, its power increases. This not only increases the efficiency of cultivation, but also has a positive effect on the operation of the unit itself.
- Ease of use. To work with such a tool you need to put in a minimum of effort: it propels itself forward without requiring additional pushing from behind.
- Versatility of use. Using this tool, hilling can be done both after planting tubers and during the period of active growth of the above-ground part of the crop.
When choosing among the variety of assortments, it is advisable to give preference to models made of alloy steel, equipped with rolling bearings (rather than sliding bushings), with a large diameter and thickness of discs.
Option #4 – propeller-type hillers

The principle of operation of the tool is the operation of special propellers, under the influence of which the soil is first crushed and combed out weeds, and only after that the beds are covered with loose soil
Such hillers are designed for equipping motor cultivators that have two forward gears. This is necessary so that in second gear, with the power increased to 180 rpm, using the tool you can not only loosen, but also transfer the soil into the beds from between the rows.
An example of self-made lister hiller
As you can see, hillers are quite simple designs. There is nothing complicated about making a hiller with your own hands for a walk-behind tractor.

To create a traditional non-adjustable hiller, you need to cut out halves of the product using a template from metal 2 mm thick
These halves should be bent until the radii match, and then welded in 2-3 passes. Weld seams should be processed with a grinder and, if necessary, selectively welded and re-cleaned. The result should be perfect even layer metal

The wings of the instrument are also cut from metal 2 mm thick and connected according to the same principle
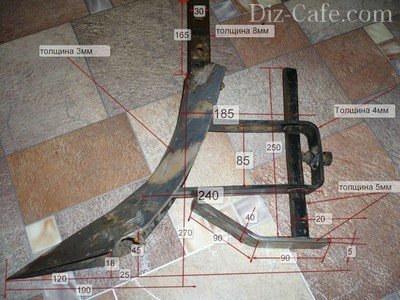
The result should be a design like this. For clarity, the thickness of the elements and all dimensions of the tool base are indicated.
A simple model of a disk hiller for a walk-behind tractor
To make a tool, you need to select the type of wings. Disks, or plowshares, are steel sheets 1.5-2 mm thick, with bent lower edges.
An important condition: the disks must be strictly symmetrical. Otherwise, the structure will “lead” to the side, which will significantly complicate the work.
When arranging the structure, you can use shares removed from an old seeder.

The plowshares are installed at an angle, maintaining a distance between the lower points corresponding to the width of the wheel track, equal to the row spacing
Connect elements together using bolted connection or by welding. The disks themselves are connected using adjustable adapters. In addition to the discs, the main elements of the tool are: a T-shaped leader, screw lanyards and stands. Turnbuckles are necessary for adjustment along the vertical axis of rotation of the disks. The tool is attached to the walk-behind tractor using a beam with wings.
When manufacturing and assembling parts based on a drawing, it is important to consider the dimensional ratio and fastening design. There are two options for making the tool: with a fixed or variable wing width. With the second arrangement method, the distance between the disks can be changed by symmetrically rearranging the racks.

Main assembly elements: 1 – row to be processed, 2 – disk, 3 – fist, 4 – T-shaped bracket, 5 – stand, 6 – steel scraper, 7 – bridge beam, 8 – locking bolt, 9 – rod handle
To make working with the tool easier, it is necessary to provide sliding bearings. By installing bearings rather than sliding bushings, the reliability of the product can be increased.
Material on how to make an adapter for a walk-behind tractor yourself will also be useful:
During the assembly process, a hitch bracket without a beam is used to attach the tool to the walk-behind tractor. To do this, attach the hiller leash to the bracket using a stopper and bolts with flat washers. The stopper is inserted inside square pipe and pressed tightly to its outer surface.

The hitch bracket itself is rotated using bolts, and the leash is placed along the longitudinal axis of the walk-behind tractor
The unit is ready for operation. Working in first gear, by reducing the forward speed, you can increase the traction of the walk-behind tractor. If the wheels slip during the hilling process, they must be paired.
In order to simplify and facilitate the technology of growing potatoes as much as possible, it is advisable to make a hiller with your own hands. It is very necessary on the farm, since potatoes have long been the basis of our diet. This simple agricultural device can be of great help to gardeners.
A hiller is necessary to simplify the procedure for growing potatoes.
Timely and high-quality hilling is an indispensable condition for obtaining high yield. Potato seeds, after being sprinkled with a thick layer of soil, can develop to their fullest potential. favorable conditions. Previously, hilling in vegetable gardens and dachas was carried out exclusively by hand during weeding. Now, thanks to the availability of walk-behind tractors, this process has been greatly simplified and takes much less time.
In addition to its direct purpose, the hiller can be used to control weeds, and the lister design can be successfully used when planting potatoes and other row crops. To work in field conditions There are cultivators with a large working width, mounted on tractors. On small land plots hillers for walk-behind tractors or manual options agricultural machines.
The principle of operation of hillers

The hiller allows you to dig a furrow of the required depth with a dump of black soil on both sides.
In terms of its importance in processing potato plantations, the hiller ranks second after the plow. The design of its working body allows you to dig a furrow of the required depth with a dump of black soil on both sides of it. When planting, the groove must be made larger, since potatoes need a thick layer of soil on top. Then the tubers are evenly laid out and the row is filled up. During hilling, it is not necessary to provide a large depth, which significantly reduces the load on the walk-behind tractor engine.
Weed control will occur both between the rows and on the potatoes themselves. The working parts of the hiller, cutting off the soil in the inter-row space, will simultaneously weed it, and the soil that the mouldboard wings will feed onto the row will completely cover the crops and weeds. If this is only good for potatoes, then for unwanted plants it is guaranteed destruction.
Types of hillers and their features
Existing hillers can be divided into several categories based on design features and technology of application:
- Lister (head) hiller.
- Point hiller with adjustable working width.
- Hiller with propeller-type working parts.

The disc hiller is superior in efficiency to lister and adjustable models.
Lister (head) hiller. This is the simplest and most cost-effective representative in its class of agricultural machinery. Its main feature is the constant working width of the working body. The hiller is made in the form of two curved wings, connected in the front and spread apart at the back. The distance between the tips of the blades sets a constant working width during operation. The simplicity of the design makes it possible to produce relatively lightweight working parts that at the same time have sufficient strength. The absence of an adjustment mechanism has a positive effect on the cost of the product and reduces the likelihood of breakdowns when exposed to work loads.
The main disadvantages include the need to take into account the working width of the unit when planting. Potatoes are very demanding of unhindered access to oxygen. In field conditions, the row spacing for it is taken to be 70 cm. In summer cottages and garden plots, it is from 50 to 60 cm. In this case, the working grip of the hiller does not exceed 30 cm.
The racks of the working buildings are made of thin-walled metal. This engineering solution is one of the options for protecting the walk-behind tractor from overload. Even in cases where its power does not exceed 3.5 liters. With. and the weight is 30 kg, if an excess load occurs, the stand will bend and prevent breakage.
Recently, hillers with a streamlined shape have become widespread. work surface. This innovation significantly reduces the load on the walk-behind tractor engine and does not cause excessive drying of the soil.
Point hiller with adjustable working width. At the moment it is one of the most popular. The presence of an adjustment mechanism allows you to change the distance between the ends of the dump wings. This technical solution makes it possible to configure the unit to work at any row spacing. However, it is necessary to take into account a number of significant disadvantages.

The main feature of the lister hiller is the constant working width of the working body.
During movement in the working position, part of the soil will fall back into the furrow after passing through the body. Operating such a unit will require a lot of physical effort and will cause you to get tired quickly. As the distance between the dumps increases, the load on the walk-behind tractor will increase significantly. Based on this, to use such an agricultural implement you will need equipment with a power of at least 4 hp. With. and weighing more than 30 kg. In addition, the presence of an adjustment mechanism increases the weight of the structure and reduces its reliability.
Disc hiller. It is superior in efficiency to lister and regulated samples, but at the same time has a higher cost. The price will depend on the following factors:
- disk size and thickness;
- quality of steel used;
- presence of a regulatory mechanism;
- use of bearings or bushings.
This hiller is most successfully combined with walk-behind tractors that have at least two forward gears. Operation at reduced speed ensures optimal use of engine power and minimal effort when operating the entire unit.
Hiller can be used at all stages of potato growth and development.
When purchasing, you should give preference to models made of high-strength alloy steel, with large thick disks mounted on bearings.
Hiller with propeller-type working parts. Such a unit has working parts, the design of which allows you to crush the soil and destroy weeds. After this, the softened soil is transferred to a row of potatoes. Propeller hillers should be used in conjunction with walk-behind tractors that have at least two forward gears. Working in first gear will allow for loosening and weeding. When the second one is turned on, hilling will also take place.
Making a hiller with your own hands

The design of a hiller of any type is not particularly complex or intricate. Making such a device at home is a real task and will save a lot of money.
When producing a lister hiller, at the first stage, templates for the hiller body are made. After this it is selected sheet metal thickness of at least 2 mm. Using templates, both halves of the body are cut out and bent until the curvature of the planes completely coincides. The workpieces are combined and welded at least twice. The weld seam should be cleaned with a grinder before each pass.
Then they move on to making the wings of the hiller. To do this, use metal of the same thickness. The planes are marked, cut and bent using the same technology. Mounting to the body can be done in two options to choose from. The wings can be welded or bolted on. The second option will allow you to replace the damaged part without cutting the metal.
When working together with a low-power, lightweight walk-behind tractor, the housing stand is made of a pipe with a small wall thickness. It is bent forward at the bottom and welded to the body of the hiller. If necessary, holes are drilled in the upper part of the rack for installation of fasteners.
Features of assembling a hiller with disk working bodies
Let's consider a hiller with disk working parts. In order for the assembly of a homemade hiller with disk working parts to be successful, it is necessary to select two disks in advance. IN ideal they must have a convex spherical shape and a thickness of at least 2 mm. No less an important condition is their same size. Discs of different diameters will cause the walk-behind tractor to turn to the side during operation. It is best to use spare parts from old agricultural machinery. They can be removed from disc harrow, huller or, at worst, from the coulters of a grain seeder.
In the latter case, you can also get hold of bearings required size. From thick wall pipe two racks are made for installing working parts. At the lower ends, axles are welded for fastening bearings that work together with the disks. The design of the hiller should allow for adjustment to different row spacings. For this purpose, it is necessary to use a strong metal channel 1.2 - 1.4 m long as a frame, horizontally fixed behind the walk-behind tractor.
To install the racks on the frame, you will need two brackets that will allow you to change the angle of attack of the disks during operation. They are attached to the channel using a pair of brackets with threaded ends. The presence of such fasteners will allow you to easily and quickly move the racks along the frame and set the required working width. Adjustment of the depth of travel of the disks is carried out by raising or lowering the rack relative to the bracket. Installation of a channel on the suspension of a walk-behind tractor depends on its brand and is done individually.
Technologies in all spheres of human activity are rapidly developing, progress has not bypassed Agriculture. New agricultural technology is being designed, new methods of planting this or that crop are being created, and every day there are more and more new ones. But even in such conditions, many gardeners have a conservative attitude towards everything. You can even take the process of hilling potatoes as an example; the aforementioned gardeners carry it out using hoes, which makes the process more difficult and energy-consuming. What can replace the “favorite” choppers? There are many possible answers to this question, but the best is a manual hiller.
The hiller is a universal tool that any gardener may need; with it, hilling will become much more effective. Using such a tool saves your time and effort.
Manual
Manual hillers (disc) are designed for loosening and hilling. Using such a tool can guarantee high-quality processing soil.
This tool can help the gardener carry out hilling and will avoid energy-consuming and tedious work.
The cost depends on the configuration. On average, a device with two disks costs around 2,500 rubles.
To the tractor
They are used for automated processing. The device is capable of immediately removing weeds from the cultivated area and, in fact, successfully hilling the tubers. After manipulating the tractor hiller Potato yield levels increase sharply.
They consist of: a metal frame, attachment, which is responsible for the coupling, two stamped wheels, iron pointed paws and dumps.
The load on the hiller is reduced by tractor wheels, in turn, the paws cut the soil (up to fifteen centimeters). A steel support attaches the legs to the frame. Used for hilling lattice dumps.
Basically, tractor ones can be attached exclusively to the T-25 tractor, which has a rather small traction force, unlike the MTZ. It is not able to work with a device that has more than 3 cases.
If the gardener’s goal is to simply hill up the potatoes, then he needs unscrew the pointed feet.
The cost of tractor potato hillers varies from 20,000 to 30,000 rubles.

To the walk-behind tractor
The device is installed on the walk-behind tractor in place of the opener.
How it works: during transitions between rows, the device pours soil with its wings directly onto the tubers. You can attach a disc hiller to the walk-behind tractor.
In fact, “hillers for walk-behind tractors” are not a separate species. We used this to let you know that the device can also be mounted on a tiller.

The potato hilling plow is designed to facilitate the work associated with growing potatoes. With the help of such a plow, furrows and beds are cut, the soil is loosened, crops are planted, and hilling is done.
According to its configuration and mechanism of action, the plow similar to a disc hiller. At least their mechanism of action is absolutely identical.

Hilling up potatoes
How to hill potatoes using a disk
The mechanism of action of manual hillers is quite primitive. Two gardeners should grasp the device from both sides (front and back). One rests on the front link handle and sets the hiller in motion, another— presses the discs into the ground by pressing on the rear linkage handle.
The disc passes through the soil, leaving a noticeable trail behind it. Using such a device, you can hill up plants located in close proximity to each other. But you can also adjust the distance between the disks; you just need to install a few additional parts.
Why is it necessary?
If you are reading this article, then you definitely know that you need potatoes. But why?
Now we will explain everything in detail:
- When loosening the soil, air flows to the roots, thanks to which they grow much faster.
- Again, when air reaches the roots, potato tubers quickly form
- If you hill up potatoes, you can increase harvest by 20-30%
You also need to follow some rules:
- Loosening needs to be done in a timely manner
- You need to loosen in cloudy weather. Most best option— after rain, irrigation or morning dew
- You cannot hill up potatoes during hot weather, as the plant may simply burn out.
As a rule, hoes, hoes and rakes are used; their use is energy-intensive and time-consuming. Compared to the hillers, the above tools simply pale into insignificance.

And most importantly, you can make the hiller yourself.
Pros and cons of homemade devices
The list of advantages of homemade devices includes:
- accessibility - since anyone can make such a hiller
- free- there are no cases where a person paid himself
- efficiency- usually, homemade devices are in no way inferior to market analogues, but this depends on the design
- raising self-esteem - it’s better to hill potatoes in a good mood
But the disadvantages include:
- safety of operation - but this depends on how well the hiller is designed
- quality - again, depends on how well the hiller is designed

Facts about the instrument
What materials are needed
To create your own hiller you need:
- water pipe— it serves as a stand (Diameter — 1 inch, length — meter)
- 0.37 inch tube- it is necessary for the front and rear links
- steel sheet(thickness - 2 mm.) - dumps will be made from it
- lanyard- which will secure the front linkage and strut
Instead of a lanyard, they also use a steel plate; you must drill holes in it to adjust the tilt.
You also need to have with you: any tools for bending pipes and blowtorch(you can use regular gas-burner). She needs to heat the metal parts where they are bent. You will also need a welding device and a grinder.
Where can I find the drawings
The Internet has answers to all questions, even these ones. Drawings for making a manual hiller can be found online or in any gardening magazines.
Installing a homemade hiller on a walk-behind tractor
To install a homemade hiller on a walk-behind tractor, you will need bracket. A homemade leash is attached to the bracket using a stopper and bolts to flat washers. The stopper is sent inside the pipe in the shape of a square and securely pressed against its outer surface
Do-it-yourself hillers for a walk-behind tractor
Vertical stand
Multifunctionality - must-have feature any device, and therefore you need to pay attention to adjusting the device.
Height can be adjusted through the telescopic apparatus of the central part. The pipe needs to be inserted into a tube that is smaller in cross-section than the other, it goes into the rear link. If you use this method, you can easily adjust the hiller to the gardener’s height level.
Adjustment

Tool bed must be mobile. To fulfill this condition, the front link is attached to the main post with a hinge; adjustment is made using a lanyard, which allows you to change the angle of inclination. In the case where there is no lanyard, use metal plate, it is fixed in the desired position and secured with bolts.
Welding
The rear link and blades need to be welded to the rack, then the front link is attached. Rear link width - 0.5 meters. Handles - 0.2 meters. A pipe 0.3 meters long is welded to the center of the fork; with this end the structure is inserted into the cavity of the vertical rod.
To adjust the height of the rack, you need to drill out the openings that are located at its upper end. Exactly the same manipulations must be done with a vertical fork. The front and rear links should be identical in width.
Manufacturing of a double moldboard plow
To make a double moldboard plow, you will need plates, each two millimeters thick. They need to be given semicircular bends. Then the process of welding the two halves to the stand is carried out.
Two important aspects work: the seam in the place where the parts are joined must be smooth, the plates must be sanded using a grinder.

Making a scoring knife
To make a pruning knife, you need to get steel with a high carbon concentration.
Then you should cut out a knife, which should be shaped like an arrowhead, and sharpen it carefully (the angle between the surface and the knife should be 45 degrees)
Why 45? If you grind a knife at this angle, it for a long time will not lose its sharpness. Next, you need to weld the trimming knife to the bottom of the post and grind it.
Discs
First you need to cut 2 plates from steel sheet, then you should give them the shape of a semicircle. Both disks are fixed on the rack. Welded the seam must be even.
First, all parts that are to be welded must be ground with a grinder, and the discs must be carefully sharpened. The cutting part takes on almost all the soil resistance.

There is no need to purchase store-bought discs, since the grinder is not capable of sharpening the metal from which they are made.
Okuchnik - almost indispensable tool, which is a must-have for every gardener who respects his time and energy.
As for garden tools, hillers are quite an expensive pleasure, which can really help in the household. In any case, even this expensive equipment can be made with my own hands, it is enough to be able to use tools and use drawings.
One of the most popular crops in the world is potatoes. To reduce labor intensity and facilitate the care of planting material, many manual and mechanized devices have been invented. On an industrial scale, these are tractors with various types of attachments. In the private sector good help will become a motorized cultivator, for which it is quite possible to make hillers with your own hands. After all, with the help of a walk-behind tractor, you can cultivate the area for potatoes much more efficiently. Therefore, let's look at the main types of potato hillers for walk-behind tractors.
The hiller greatly simplifies the work of caring for potatoes
Listed version
The simplest type of hiller. It consists of two half-wings made of metal fixed together. The working parts of the tool cannot be adjusted because they are tightly connected. This factor affects the width of potato rows, which is adjusted to the dimensions of the hiller. In the factory version, the tool has a grip width of 250-300 mm.
It is not difficult to make such a model with your own hands from all kinds of materials. You will need a sheet of two-millimeter metal, from which working halves in the form of wings are cut. They are bent until the desired radius is obtained, processed with a grinder, and welded at the points of fixation. The drawings show a simplified diagram of the manufacture of a homemade lister hiller.
After bringing the edges of the metal parts of the tool to a perfectly even state using a grinder, you can consider it ready for use.

Lister hiller drawing
Disk model
To manufacture this design, you will need the same tools and material as in the previous version. The elements are fixed to radius union, the points of contact are processed by welding and polished using a grinder. Before you start making a disk hiller for a walk-behind tractor, you need to carefully study the drawings. Making the model in question with your own hands is a little more difficult than its listed counterpart, but it is quite accessible with some skills.
To obtain a high-quality tool, you must choose the right type and size of the disk. In steel parts of the base, the lower edges must be bent. When making a hiller for a disk-type walk-behind tractor, take into account the symmetry of the arrangement of the disks. Otherwise, the cultivator will tilt, which will significantly complicate the work. To assemble the structure in question with your own hands, you will need plowshares. Elements from non-working or old devices are suitable. The parts must be installed at an angle, taking into account the pitch at the lower points, the length of which can be determined by the dimensions of the wheel track.
Parts are mounted using bolting or welding. The disks are connected using adapters. A T-shaped leash, racks, and turnbuckles are installed, which make it possible to stabilize the rotary axis of the working elements. They are attached to the walk-behind tractor using a beam method.
A homemade disk hiller can be made in two variations. The first is aimed at creating a design with a fixed grip width, while the second option uses a model with an adjustable width. To facilitate the operation of the tool, it is advisable to install plain bearings that provide control and direction of the axes. Experts do not recommend mounting an analogue in the form of bushings.
The model in question is attached to the walk-behind tractor using a clutch bracket. The hiller's reins are bolted to it, inside which a stopper is inserted, and the part is tightly pulled to the surface. Below are drawings for making a disk structure that will help you make the tool yourself.

Disc hiller diagram
Advantages and features of different types of hillers
Depending on the model, hillers can be divided into the following categories:
- Lister model, the peculiarity of which is ease of manufacture, the presence of thin racks that prevent the walk-behind tractor from overloading when buried in dense layers of soil.
- Disk option. The advantages of such a tool are effective combination structures with the main unit. Reducing the speed of the cultivator increases its power, which improves the quality of cultivation. In addition, such designs are easy to use and are versatile in use.
- Samples with a grip of variable width are used in double-row processing, with tool adjustment for a specific row spacing. Despite their popularity, such models are quite energy-intensive, since the sliding blades push part of the soil to the side and then fall back, which puts a large load on the person operating the walk-behind tractor.
- Propeller-type hillers are used to equip units with a pair of frontal gears. This allows you to not only loosen the soil at higher speeds, but also throw it into the furrows from the row spacing.

Variable width hiller consumes a large amount of fuel
Devices for hilling up a walk-behind tractor from improvised means
It is worth noting that a homemade hiller can be made without spending money on purchasing metal. This will allow you to minimize its cost and show additional imagination and creativity. Any suitable size can be used as a starting material. metal product. For example, an unnecessary lid from an old saucepan.
The main thing when using this approach is not to forget about the drawings and the required disk diameter. It must be at least 400 mm. This is due to the subtleties of soil cultivation, taking into account the root part of the potato, planting depth and ground clearance. As a rule, the maximum planting depth is about 60-80 mm, the length of the roots is up to 200 mm. The cover is sharpened on all sides, slightly modified by bending and installed on the cultivator.

Drawing and dimensions homemade disks for the hiller
Nuances
When choosing the type of hiller, especially when making it at home, you should take into account certain nuances:
- Attachments with a variable grip width are usually used with equipment weighing at least 30 kg and a power of 4 horsepower or more.
- When choosing a material for a device, preference should be given to alloy steel with the required sheet thickness.
- For efficient work It is better to use streamlined hillers, since they turn out the soil less, which reduces the degree of its drying.
- If the wheels slip during the hilling process, they should be paired together.
As you can see, it is quite possible to make a lister hiller and a more complex disk-type model with your own hands. After carrying out simple manipulations, in a few hours we get a removable attachment that is suitable for most domestic walk-behind tractors, will greatly facilitate the work associated with growing potatoes and will not require a significant investment.


