In the article you will find assembly instructions original models pumps that you can make yourself, without specific skills and knowledge. The cost of the above models is minimal, and sometimes they can even be assembled from scrap materials and household waste.
A water pump is almost an essential item in a country household. Manual and mechanized pumps are also used for pumping other types of liquids - fuel, solvents, oils, etc. It is not always possible to purchase an expensive, reliable pump, and cheap models usually break down at the most inopportune moment. We will consider options for creating pumps from scrap materials and parts that can be found in every workshop, and their market price is simply insignificant in comparison with a new factory product.
Option No. 1. Water pump for water overflow
A primitive design for pumping water, which can be assembled in 10 minutes, will serve as a convenient tool for working in the garden. This is especially convenient when you need to repeatedly draw water from a barrel with buckets. Essentially this is check valve, attached to a tube with an outlet.

To make it you will need a tube, a hose and several assembled necks from plastic bottles.
Progress:
- We remove the gasket from the cork and cut it 2 mm less than the diameter of the cork, leaving a 3 mm segment untouched.
- Drill a 10mm hole in the center of the lid.
- Place the petal in the lid and screw in the cut neck. It will press the remaining segment.
- We insert the valve into the stem tube and put on a “skirt” from a cut plastic bottle.
- We put on the outlet hose from the opposite end.
This device is activated by several clicks along the axis of the rod when the intake part with the valve is immersed in water. Then the liquid will flow by gravity as long as there is a difference in levels. The water can then be raised by plunging the rod into the barrel.
This is the only product with a “negative cost”. When creating it, you not only won’t spend anything (except time), but you will also recycle household waste.
Do-it-yourself check valve. Step by step video for assembly
Option number 2. Simple DIY hand pump
In this instruction we will give an example of a manual water pumping system, which can be taken as a basis when creating a stationary water-lifting station on a well or well.
 A - Classic scheme hand pump. B - Option for a homemade pump made from plastic pipes. Device diagram: 1 - inlet pipe; 2 - check valve; 3 - piston; 4 - check valve; 5 - rod; 6 - rod combined with outlet pipe; 7 - pump drain
For work we will need:
- Pipe sewer PVC 50 mm with bends, plug and sealing cuffs - 1 m.
- Check valve 1/2" - 2 pcs.
- PPR sewer pipe Ø 24 mm.
- Rubber, bolt/nut pairs with washers Ø 6-8 mm.
- Clamps, bends, fitting clamps, other plumbing parts*.
* The pump design can be customized depending on the availability of spare parts.
Method 1. Drain through the handle
This model is the simplest of the home ones - water rises along the piston rod, which is made of PPR pipe and pours out from above.
- We cut a pipe Ø 50 mm with a length of 650 mm - this is the basis for the sleeve.
- We make an end reed valve. To do this, drill 8-10 holes Ø 5-6 mm in the plug and cut out a round piece of rubber (3-4 mm) with a diameter of 50 mm. We secure the flap in the center of the plug with a rivet or bolt (a self-tapping screw is not suitable!). The reed valve is ready.
- We install the plug into the pipe (sleeve) on the sealant through the seals and additionally fix it with self-tapping screws through the pipe wall.
- We install a check valve in the PPR pipe (700-800 mm). This can be done using the “hot” method - heat the end of the pipe and insert a fitting with a valve into it, which should allow water to flow in the direction of the pipe (piston rod). Strengthen the connection with a worm clamp while it is warm (before it cools).
- The piston head can be made from a used 330 ml sealant tube, or rather its nose part. To do this, you need to pre-heat it and place it in a sleeve - this way the head will fit perfectly the required form and size. Then it should be trimmed and installed on the check valve in series using a coupling with external thread or an “American” union nut.
- We insert the piston into the sleeve and make the top plug. It doesn't have to be sealed, just keep the stem straight.
- We install a 90° bend on the free end of the rod (pipe). In the future, a hose is put on the hose.
Assembling a hand pump on video
Such a pump is very reliable, but not entirely convenient - the water outlet point is movable, and is also located close to the operator. It can be slightly modified for convenience.
Method 2. Side drain
A 35° elbow tee should be included in the sleeve. The design is identical to the first option, but we make large holes in the piston rod pipe without disturbing the structural rigidity, or use a rod rod. In this case, water will flow into the sleeve and rise by the operator’s reverse force to the point of spouting.
Video of water pump with side discharge
The main advantage of the described pumps is the low cost of the finished design. Repairs are made in a few minutes by replacing (or gluing together) “penny” parts.
Option No. 3. Spiral hydraulic piston
Behind this formidable name lies an ingenious device for supplying water from a river over a short distance. This device is based on a carousel with blades - similar to the wheel of a water mill. The carousel is powered by the river flow.

The pump in this case is a spiral made of flexible pipeØ 50-75 mm, secured with clamps to the wheel. In the intake part (closer to the outer contour) a bucket made of a larger diameter pipe (150 mm) is attached to it.
The main unit is a pipe reducer through which water will flow into the pipeline. It can be taken from factory equipment or a sewage pump. The gearbox is located along the axis of the wheel and is rigidly attached to a fixed base.
Maximum height the rise of water will be equal to the length of the pipe (from the intake), which is completely immersed in water during operation. That is, this is the distance in plan from the immersion point to the exit point that the water intake bucket travels. At the moment of immersion, a closed system with air sections, and water passes through the pipe to the center of the spiral.
Of course, such a pump is not suitable for everyone - after all, the activator is the river. But for watering in summer it is great option. The cost of such a device is difficult to predict - great importance has the availability of available materials.
Video of how a volute pump works
Option No. 4. Pump from a compressor (airlift)
If your household already has a compressor, do not rush to purchase an additional pump. You can assemble a simple water lift from literally two pipes.
The first pipe serves to supply water. For household needs, Ø 30 mm will be sufficient. The second is needed to supply air from the compressor. Diameter 10-20 mm.
The efficiency of an airlift pump directly depends on the compressor power, immersion depth and delivery height. It cannot exceed 70% due to design features. The efficiency will be equal to the immersion depth divided by the sum of the immersion depth and the ascent height (the entire water path). In most cases, the optimal compressor power is set experimentally.
Visual video of the operation of a pump from a compressor
Water supply has been the number one priority for the survival of entire cities since ancient times. Today, saving energy and natural resources comes to the fore - they are becoming less and less, and they are becoming more and more expensive. Therefore, a partial return to original technologies without electricity and gasoline is a natural phenomenon. Perhaps in the future this will be the key to a healthy and harmonious life on our planet.
Selection of pumping equipment to create autonomous system water supply for a private house or summer cottage is extremely wide. Modern electrified installations are capable of lifting water from great depths, supplying it from shallow wells or wells, and organizing intake from natural reservoirs. Pumps can either be installed on the surface, be a completely autonomous unit with its own automation system, or be an integral part of a single water supply station. The operational capabilities of such equipment, that is, the pressure created, productivity, power consumption and others, also lie in a wide range for a wide variety of use cases. In short, the range is able to satisfy the requirements of even the most discerning consumer.
It would seem - what else is needed? But all these devices have one weak point - their operation is only possible if there is a power source. Power outages can paralyze the water supply at home, and, you see, in holiday villages or in “pioneer” territories where development for private construction has just begun, instability of power grids, alas, is not a rare occurrence. So you often have to rely on a good old assistant - a manual one, who definitely won’t let you down in any situation.
A good owner will not fail to install it in any case. It does not take up much space, the price is affordable, and installation on a specially drilled well for a hand pump will provide another backup source of clean water.
Manual water pumps have been used by people since ancient times, and what’s interesting is that their fundamental design has remained virtually unchanged. Those who are older probably remember the usual landscape of small towns and villages, when, before the arrival of running water in every house, the main source of water was just these pumps, which served a group of buildings or even an entire block.

With the widespread use of electrical equipment, such pumps began to disappear from view, but in a private home or summer cottage they still remain in great demand due to their simplicity of design and operation, independence from the energy source and high reliability.
There are several types of hand pumps for water, differing in the features of their design. But in all types, a mandatory, one might say, the main element of the scheme, is the valve system, since with the help of muscular force it is simply impossible to create a long-term stable pressure capable of lifting water from a significant depth.
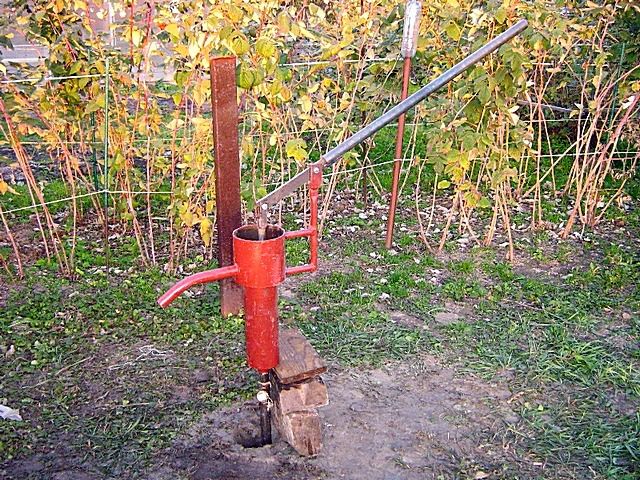
Piston hand pumps

All piston pumps have a similar layout, although outwardly they can differ greatly in their design - from simple smooth cylinders to artistic cast iron casting.

Of the visible parts and assemblies, one can immediately note the cylindrical body (sleeve), made of cast iron, of stainless steel, and sometimes even a polymer outlet (spout), a rocker arm, hinged on an axis and connected to a vertical rod that goes inside the pump.
Now let's look inside the pump and understand the principle of its operation:

So, the body-sleeve, which has already been mentioned (item 1). It contains a piston (item 2), which has seals around its circumference that fit tightly to the inner walls of the liner. The piston on top is rigidly connected to the rod (item 3), which, in turn, is connected to the lever of the pump rocker arm.
There is an outlet pipe cut into the housing on top (item 4) or there is simply a hole (a window for the free exit of pumped water into a pipe, gutter, etc., from where it is disassembled for consumption.
A pipe from the well (item 5), that is, a suction pipeline, approaches the pump from below. Required condition– a check valve (pos. 6) must be installed in front of the pump on this pipeline. Some industrially produced manual piston pumps already have a built-in valve of this type.
The piston itself has channels for the passage of water, but they are closed with a valve(s) that prevent water from flowing from top to bottom.

Now let's look at the three main phases of pump operation.
- The left fragment of the diagram is the pump in a calm state.
After previous use, the chamber usually remains filled with water. The valves on the piston are closed and do not allow water to go down. In addition, the check valve on the suction pipeline is also in the closed position. (For clarity, a ball check valve is shown, although poppet type devices are more commonly used.)
- The central fragment of the diagram is the user pressing the lever down.
The rocker arm transmits translational movement to the piston in the upper direction through the rod. Moving along the cylinder, the piston displaces the water located above it into the outlet pipe, and it is drained into a container placed under the column.
The valves on the piston are closed, and the flow of displaced water downwards is excluded.
Below, under the piston, a vacuum zone is simultaneously created. But “nature does not like emptiness,” and this vacuum ensures the suction of water from the well pipe into the cavity of the working cylinder. The pressure created lifts the ball check valve (or presses the poppet spring), and water fills the internal volume of the pump without interference.
- The right fragment of the picture - the piston goes down.
The cavity under the piston is filled with water pumped from the well, and when it is lowered, a overpressure. This leads to the closing of the check valve - there is no way for water to flow down. At the same time, this pressure opens the bypass valves on the piston itself, and water flows upward, filling the above-piston cavity of the working cylinder. The completion of this phase is a return to position No. 1, and then the cycle repeats exactly.
The scheme is very simple and trouble-free, and its only weak point can be considered the fairly rapid wear of the seals on the piston, and sometimes the valve devices, especially if you have to pump water with small solid inclusions, which create an increased abrasive effect on rubber or plastic parts.
By the way, ship pumps, which were used in the sailing fleet to pump water from holds, and fire pumps to supply water from reservoirs or wells, were assembled using exactly the same principle. The difference was that usually such pumps used two working cylinders operating in antiphase - this doubled the productivity.

Sometimes some changes were made to the design of the pump, which did not change its operation in principle. For example, you can still find models that have a wheel instead of a rocker handle. The rotational movement of the wheel through the gearbox and crank mechanism is converted into reciprocating movement of the piston, and otherwise the pump operates exactly the same as described above.

The performance of piston pumps directly depends on the diameter of the working cylinder and the stroke height of the piston, and for different models it can range from 0.5 to 1.5÷2 liters per cycle. The height of water rise usually does not exceed 10 meters.
Pumps are manufactured in various options design - from strict, unobtrusive speakers to products with decorative cast iron bodies and handles weird shape– such models can become a real decoration of a site designed in a certain style.
Rod (rod) pumps
If the aquifer lies at a depth of more than 10 - 12 meters, then the piston pump may no longer be able to cope with the supply of water upward - the possibilities of the suction circuit are not unlimited. For such cases, there is a special type - rod or rod pumps.
The working body of such pumps is the same cylinder with a piston, that is, the process of pumping water is carried out approximately according to the same scheme. but there is also a fundamental difference - the pump part itself is located at a depth, directly in the thickness of the aquifer. Approximate diagram shown in the figure below:

As a rule, installation of such pumps requires at least 4 inches (100 mm) of casing (item 1). The working cylinder (item 2) must be located in the thickness of the aquifer, usually so that the intake hole is at a depth of at least 1 meter from the water surface. The cylinder is connected to the upper part of the pump by a pressure pipeline (item 3). Inside of which there is a long rod-rod (item 4), which ensures the transmission of reciprocating movements to the piston. Otherwise, everything is the same: the piston has its own valve apparatus (item 5), and there is a check valve on the intake pipe of the cylinder.
It is obvious that the supply of water upward in this case does not occur due to its suction from depth. The cylinder below creates a column, and each working cycle this column is “propped up” by a new volume of pumped water, ensuring its exit to the outlet spout. This allows you to lift water from significant depths - up to 30 meters.
Naturally, such a pump requires more force, so the working rocker arm is usually made long, providing maximum piston stroke with minimal muscular effort.

Of course, such pumps are much more difficult to install and carry out maintenance and repair work. But their productivity is much higher. However, if the aquifer on the site is located at great depth, then such a device becomes the only possible option of all mechanical ones.
All piston pumps mentioned have general disadvantage– water does not move continuously, but cyclically.
Other types of hand water pumps
Much less frequently, but still sometimes, other types of hand pumps are used to pump water from households.
- Vane pump
Vane pumps are more compact and are often used for technical purposes, in production or warehouses. But they can be installed in a shallow well, about 5–7 meters.
All pumps of this type have approximately the same layout, as shown in the illustration:

The operating principle of such a pump is shown in the diagram:

The metal body (item 1) has two pipes with a flange or coupling connection - suction (item 2), through which water flows from the well, and pressure (item 3), connected to the disassembly point.
Instead of a piston, the main role in this case is played by the impeller - two oppositely located wings, moving radially in a certain range relative to the central axis. The movement is carried out due to the application of human muscular efforts to the handle (position 5), rigidly connected to the wings by a central rod-axis.
At the bottom there is a jumper (item 6), which divides the lower cavity in two. Valves are installed on the wings (pos. 7), and similar ones, but working in the opposite direction to them, are located at the entrance to the lower chamber (pos. 8).
Thus, the impeller and the lower bridge divide the pump cavity into three compartments. The upper one (“A”) is pressure, and it has a constant volume at any position of the impeller. The lower ones (“B” and “C”) are suction. Moving the handle and, accordingly, the impeller alternately changes their volume and, accordingly, creates alternating areas of rarefaction and increased pressure. The valve system is configured in such a way that it ensures the movement of water in only one direction - from the intake (suction) pipe to the outlet (pressure) pipe. Any movement of the operating handle corresponds to a certain volume of pumped liquid.
Such pumps can even be used for pumping fairly viscous liquids, but they do not like contaminated water. For a clean shallow well, this is a completely acceptable option, especially if the well is equipped, say, basement, where the requirements for compactness of pumping equipment may come to the fore. Advantage - water flows in an almost continuous flow, regardless of the direction of movement of the working handle. The disadvantage is that such pumps usually have very low efficiency.
- Diaphragm hand pump
Another type that can be found in household conditions for drawing water from a well is diaphragm pump. All products of this type are also distinguished by their characteristic shape - a round body with a working handle located above it.

They can be made of metal (cast iron) or even plastic. Many models are designed for placement on the wall - they are equipped with a support platform with eyes for fasteners.
The operating principle of such a pump is simple and is well understood from the diagram below.

The pump housing (item 1) consists of two halves, which are fastened with a special screw connection (item 2). An elastic membrane is installed between the two halves of the housing (item 3).
The membrane divides the internal cavity of the pump into two chambers - the air chamber (position “A”), which in principle does not participate in the operation of the pump and is not sealed, and the water chamber (position “B”).
In the center, the membrane is connected to the rod (item 4), which, in turn, is connected to the working lever handle (item 5).
In the lower water chamber “B” there are two valves operating in antiphase. One of them, inlet (item 6) is located on the suction pipe, the second, outlet (item 7) - on the pressure pipe.
Moving the handle down causes the rod to rise, which pulls the elastic membrane along with it. A vacuum area is formed under it, and water fills the cavity of chamber “B” through the opening inlet valve. The exhaust valve is closed in this phase.
When the handle is raised, the rod lowers, and an increased pressure is created in the working cavity of the pump. The inlet valve closes, and the water has only one exit - through the opening outlet valve into the pressure pipe.
Pumps of this type allow creating a suction vacuum to lift water from a depth of best case scenario up to 6 meters – you can’t expect more from them. The weak point is always the membrane - it wears out quickly, over time it can lose elasticity, and any, even a small tear in it leads to a loss of performance, water flowing through the housing, and then to complete failure of the pump. True, the maintainability of such pumps is very good. If you have a spare membrane, then replacing it will not be difficult.
However, such pumps have not become particularly widespread specifically for water supply purposes. They are more widely used for technical purposes, for example, for pumping fuels and lubricants or other liquid products from one container to another.
What to look for when choosing a hand pump?
If there is an urgent need for a hand pump, then you should know how to correctly choose the optimal model.
- First of all, the parameters of the well (depth of the aquifer) and the parameters of the pumps offered for sale are compared. As already mentioned, most hand-held models are capable of working with sources located on the forehead at least 6 ÷ 8, rarely 10 meters. If the burial is deeper, then there is no alternative: you will have to install only a sucker rod pump.
- It is important to know the performance of the pump - how much water it is capable of pumping per cycle (or per unit of time - a minute, under intense load))
- The next parameter of the planned (or existing) well - the diameter of the casing pipe, also affects the choice of pump. If the pipe has a nominal bore of 4 inches (100 mm) or more, there are no problems, and you can purchase any pump. But in the case when the casing is narrower, the rod pump may no longer be suitable - it will simply be impossible to lower its working pump assembly into the water column.
- It is necessary to know the degree from the well - usually the pump’s passport characteristics indicate permissible level, with which the equipment is capable of working.
- It would probably be worthwhile to evaluate the ease of working with the pump. It is necessary to keep in mind that among the users there may be people of advanced age or children - will their efforts be enough to collect at least a small volume of water.
- It is necessary to think about how the pump will be installed - what mounting platforms or mounting holes, brackets or lugs, etc., are available for a particular model. It is also important to know the weight of the device being purchased in order to foresee in advance possible methods of its installation - whether it will be a metal welded frame, a concreted platform, a flange connection to a casing pipe coming out of the ground, wall mount or just some lightweight option for seasonal use.

- Based on the expected operating conditions, it is possible to determine design features products. So, for installation only in the summer, you can purchase a lightweight plastic version. If a permanent installation is intended, then the choice is made in favor of cast iron or stainless steel. In addition, for temporary use you should purchase a model that is easy to quickly install and dismantle on your own.
- Finally, for many owners, the determining factor is also the external decorativeness of the pump - this has already been mentioned in the article. Of course, purchasing a pump that can decorate a site will entail much more serious financial costs.
The value of the pressure created by the pump is very often not assessed - such devices, as a rule, are not designed for pumping water through external pipelines. Water from them is most often collected into placed containers.
Brief overview of hand pump models for wells
The table below shows the characteristics of several popular models that can be found in the assortment of our stores.
| Model name | Illustration | Brief description of the model | average price |
|---|---|---|---|
| Hand pump “Dachny” | A very popular model among owners of their own plots. Piston type. Stainless steel housing. Height with fully raised rod – 750 mm. The height of the spout above the mounting level is 330 mm. The outer diameter of the cylinder is 125 mm. Provides lifting of water from wells and boreholes with a mirror located at a depth of up to 8 meters. Support platform with 10 mm mounting holes. The diameter of the suction pipe is 1 inch. Productivity per 1 cycle – 1.25 liters. The guaranteed service life of the piston seal is 3 years. Weight – 5.9 kg. | 5900 rub. | |
| Well pump "NR-3M" | Inexpensive hand pump with average performance. The cylinder and piston are impact-resistant polymer. Valves and seals are rubber. The remaining parts are primed steel. Productivity for a full cycle is 1.5 liters. Provides lift from a depth of 2 meters, and when installed at the lower end of the suction pipe of a check valve - up to 5 meters. The diameter of the connecting pipes, inlet and outlet, is G 3/4, or, in another option, fittings for a 20 mm hose. Pump dimensions – height – 350 mm, outer diameter of the cylinder – 150 mm. Weight – 4.6 kg. | 2500 rub. | |
| Well pump “RN-01 NZh” | Hand pump in stainless steel housing. Handle and lever holder – primed and painted steel. Check valve – brass. Allows you to lift water from a depth of up to 5–6 meters, and with the installation of a check valve at the end of the suction pipe – up to 9 m. Productivity – 1.0 liter per working cycle. The diameter of the pipes is G1. A flange connection to the suction pipe is possible from below. Height – 1000 mm, outside diameter cylinder – 150 mm. Weight – 8 kg. The kit includes a spare piston ring. | 6500 rub. | |
| Manual well pump type “BSD” | Manual borehole pump in cast iron. Feature– open spout in the form of a trough. The height of water rise is up to 6 meters, and with the installation of a check valve at the bottom of the suction pipeline - up to 9 meters. Productivity – 0.5 liters per working cycle. The installation platform has a side window, which allows the suction pipe to be brought in from the side. The connection pipe for the suction pipe is G1¼. Pump dimensions – 390 × 240 × 200 mm. The height of the spout above the installation plane is 200 mm. The diameter of the mounting holes is 7 mm. Weight – 7 kg. | 3200 rub. | |
| Hand pump type “BSB-75” | Cast iron borehole piston pump, consisting of the pump itself and a base that allows the working parts to be placed on comfortable height. The height of water rise is 6 meters, and with a check valve at the end of the suction pipe - up to 9 meters. The height of the pump assembled with the base is 1320 mm, with the height of the spout above the mounting plane being 930 mm. Weight – 31 kg. | 6800 rub. | |
| Hand pump for wells type “BSK” | Cast iron pump with decorative design using artistic relief casting. It becomes not only a source of water, but also a decoration for the site. Lifting height – 6/9 (with check valve) meters. Productivity – up to 30 liters per minute. The connecting size of the suction pipe is G1¼. Pump dimensions - 600×240×160 mm. The height of the spout above the installation plane is 230 mm. The diameter of the mounting holes is 10 mm. Pump weight – 15 kg. | 6400 rub. | |
| Hand pump type "BSM" | The largest sample of manual borehole piston pumps on sale has an additional cast iron base. Fastening to the prepared site is a support flange with 10 mm holes. The connecting size of the suction pipe is G1¼. Water lift height – 6 or 9 m (with check valve). Productivity – 0.8 liters per working cycle. Height when assembled - 1560 mm. The height of the spout above the base is 1010 mm. The weight of the assembled pump is 33 kg. Convenient ergonomic handle. Artistic casting of the body. | 14800 rub. | |
| Manual sucker rod pump "NR-4-16" | A hand pump for wells that allows you to lift water from a depth of up to 16 meters. The minimum diameter of the casing pipe is 100 mm. The kit includes 8 pieces of two-meter connecting pipes and rods for increasing the immersion depth. Pump capacity is 1 liter per operating cycle. Overall dimensions – 17560 × 230 × 1430 mm. Assembled weight – 127 kg. Fastening - to the head of a well with a diameter of 150 or 160 mm, with bolt fixation. | 27600 rub. | |
| Hand pump "RK-2" | Vane type hand pump. Cast iron body, steel working handle. The maximum height of water rise is up to 7 meters using a check valve on the suction pipeline. Productivity – 0.4 liters per double stroke of the handle. Connection – coupling or flange, 1 inch. Dimensions (including the handle) - 210×210×500 mm. Weight – 8.5 kg. There are lugs for wall mounting. | 5500 rub. | |
| Manual diaphragm pump “D40” | Diaphragm type pump, self-priming. The maximum height of water rise is up to 6 meters. Productivity – up to 50 liters per minute. The body and pipes are cast iron, the membrane and valve parts are oil- and petrol-resistant rubber. Ball valves are wear-resistant and self-cleaning. The operating position of the pump is vertical, with the handle down. For fastening to vertical surfaces, there are eyelets on the body. Dimensions - 250×250×650 mm. Weight – 13.5 kg. When purchasing, it is recommended to immediately purchase additional replacement membranes and valves. | 7200 rub. Replacement membrane – 1500 rub. Ball valve assembly - 500 rub. |
How to construct a well for a hand pump
It would be logical to conclude this publication by considering the question of which well hand water pumps are most often installed.
A very common situation is when a plot acquired for private construction does not yet have any communications, and a natural reservoir is located too far away to organize a water supply from it. But water is needed not only for drinking or washing - it is still quite possible to take a small supply with you for these purposes. But water is, in a certain sense of the word, also a “building material”, since many construction operations involve its use in one capacity or another.
The most reasonable solution is to try to organize an “Abyssinian” well on your site. If this is successful, then the water problem will be completely removed - a good “Abyssinian” will satisfy construction, and then, after settlement, many household or agricultural needs.
What is its meaning? If you look at the diagrams of sections of soil layers, you can often see the following picture:

Under the fertile soil layer there is usually a clay layer. “The floor below” is sandy loam, and under it is a layer of sand saturated with water - perched water. This is the first water horizon, but it is unsuitable for useful use. Firstly, the water here is highly saturated with organic matter and other contaminants that fall on the soil, and secondly, this layer is extremely unstable, and is highly dependent on both the time of year and the prevailing weather.
Below, underneath there is a water-resistant clay layer, but if you go through it, then there is a high probability of getting into the horizon of aquifer sand, located at a depth of about 5 - 8 meters.. The water in it has already undergone high-quality natural filtration, and, as a rule, it is quite suitable for a wide variety of applications.
If this layer is thick enough and well saturated with water, then you can immerse a thin pipe with perforated walls covered with a filter mesh into it so that the channel does not become clogged with sand. Water will penetrate into the cavity of the pipe, and from there it can be pumped out with the same hand-held well pump.
The main element of the “Abyssinian” well is the so-called “needle”. This is a piece of pipe about 1200 mm long, with holes drilled in the walls, which are covered with a thin metal stack (galvanized or stainless steel). At the end of the needle, a cone-shaped tip machined from durable metal is welded - it is necessary for driving the needle into a drilled hole.

The driven needle is gradually expanded by “packing” on top of sections of pipes of the same diameter and driven to the required depth. From above, to the part of the pipe protruding from the outside, after carrying out the necessary “commissioning” operations, you can connect a pump - manual or even surface electric.
On sale you can find kits for “Abyssinian” wells, of various overall lengths, with a diameter of 1, 1 ¼ or 1 ½ inches.

The probability of getting into a high-quality shallow sand aquifer is extremely high. By the way, this technology even got its name because expeditionary troops in Abyssinia (Ethiopia) were supplied with water using a similar method. And this is in a hot, almost semi-desert climate!
How to find the optimal location for a well or borehole?
Specialists come to the rescue in finding the aquifer folk signs and methods, analysis of obvious and hidden signs of close water occurrence. You can learn more about this by reading the article on our portal dedicated to.
The scheme for creating an “Abyssinian” well is, in principle, simple and proven, but the main snag is drilling a well and getting to the aquifer. It is almost impossible to do this without special equipment. It is better not to take on such a task yourself, but to invite a team of craftsmen who have a special compact drilling rig and have relevant experience. Moreover, when drilling, it is necessary to make sure by certain signs that a full-fledged aquifer has been encountered, and without practice in this matter, it is not surprising to make a mistake and ruin the purchased kit.
For example, the process of creating “ Abyssinian well»:
| Illustration | Brief description of the operation performed |
|---|---|
 | The typical picture is a development area, without any “benefits of civilization.” Someday there will be a lively village here, but for now there is no water or electricity. It’s difficult to build without water, so the decision was made to build an “Abyssinian” well. |
 | The team's usual equipment is a compact drilling rig. The design may vary slightly, but usually it is a frame with two vertical guides along which a caliper with an electric drive and gear moves. A 1 meter long drill is inserted into the gearbox and secured with a pin - and drilling begins. Power supply is provided by a mobile gasoline generator. |
 | The drill gradually “bites” into the soil. |
 | The passage of soil layers can be judged by the rock lifted upward by the auger. In the beginning it is fertile soil |
 | The drill went almost a meter deep. Passes through a layer of loam and clay. |
 | The drill has almost completely sunk into the ground, and it’s time to build it up. First, the pin that secures the drill in the gearbox coupling is knocked out. |
 | The installation support rises up, and a new section is inserted into the lower drill. |
 | The connection is ensured by a special clamp-bracket. |
 | Then the caliper is carefully lowered so that the gearbox coupling fits onto the installed drill. The connection is fixed with a pin. |
 | Next, the drilling process continues. All links have a standard length of 1 meter, and this is very convenient from the point of view that you can clearly see how deep the drilling has reached. |
 | Accumulating selected rock is regularly removed to the side |
 | Drilling continues in the same order - with a gradual increase in the total length of the drill. As you deepen, the first signs of water will begin to appear. At first they will be almost invisible - just lumps of slightly moistened clay. |
 | At a depth of about 5 meters, the signs become more clear - liquefied light clay begins to rise to the top. |
 | The deeper, the thinner, and soon the selected liquid rock has to be scooped out with a ladle |
 | Another meter - and the slurry is literally flowing like a stream: this is clearly the beginning of an aquifer. |
 | At this time, the master constantly checks the emerging pulp by touch. It is important to catch when there are no signs of clay left in it, but clean, fine sand. |
 | Finally, the master is satisfied with the result. The number of drills used for drilling tells him exactly the depth of the well - this will be necessary for further operations. In the meantime, you need to carefully remove the drills from the well. The electric drive with gearbox is removed from the caliper. Now moving up along the guides will be used to gradually pull out the drill. The drill is locked with a special bracket, and by moving the caliper up, it is pulled out by one section. |
 | The section is separated from the one below and removed to the side. |
 | The caliper goes down, the next section is engaged - and so on until everything is removed, until the very bottom drill. |
 | Here it is, a well, although for now it’s just a hole in the ground. The drilling rig is carefully moved to the side - it has already fulfilled its role. |
 | You can move on to casing. To begin with, a “needle” is prepared. |
 | It is carefully “packed” with pipes using couplings. To ensure connection reliability, it is better to use flax tow and Unipac paste. You can immediately assemble a “column” from a needle and 5 ÷ 6 meters of pipe. As a rule, such a section enters the well “with a whistle”, without much effort. The only difficulty is to give it a vertical position at first, but with several hands it can be done. |
 | Here it is, the end of the casing protruding on the surface. But according to the depth of the well, the pipe must be lowered another approximately one and a half meters. |
 | Another one and a half meter piece of pipe is packed on top. |
 | As far as possible, it sinks down through the efforts of workers. |
 | The last section of the deepening always has to be hammered in by force, using a headstock or other devices - craftsmen have their own methods for this. When driven, the needle tip will enter dense soil and securely fix the casing in the well. |
 | When hammering, it is very important not to damage the threaded section of the pipe at the end. Various devices are used, and in this case a special coupling was screwed onto the end, which took the blows, leaving the thread intact. In fact, here it is, a finished well. But for now it is of little use - it is necessary to “breathe life into the well, that is, pump it, achieving a stable supply of water to the top. |
 | This is best done using a self-priming surface pump. A pressure hose is screwed onto the pipe - at this stage it will be connected to the pressure pipe of the pump. |
 | The second suction arm of the pump is lowered into a bucket, which is filled with water. |
 | Now the task is to pump a good portion of water into the well, so that when it is pumped out, it will cause the effect of self-filling of the needle with water from the surrounding aquifer sand. Water from the bucket (depending on the depth - more may be required) is completely pumped into the well. |
 | Next comes switching hoses. The suction one is screwed onto the head of the pipe, and the pressure one is temporarily directed into the bucket. The pump is turned on, and at first clean water comes out of the sludge. It’s too early to rejoice - it’s just that the previously filled water has been pumped out. |
 | As a rule, after this there is a painful pause: the pump works, but nothing comes out of the hose. “Moment of Truth” - will it work or not? It should work! After several “spits”, water begins to come out of the hose - at first it is cloudy and dirty. |
 | It is advisable at this stage to switch the short pressure hose on the pump to a long hose. It will take quite a long time to pump the well, and there is no need to spread dirt around it - better water drain away. At first, the flow of water looks, I must say, somewhat frightening - it is so muddy. |
 | But the well works – and that’s the main thing. Gradually, the dirt around the needle is washed upward, and the flow of water begins to lighten. Wait a little longer and it will become clean, that is, the well is ready for further use. |
 | Victory! An uninterrupted source of clean water has been obtained on the site! |
Now it’s quite simple. All that remains is to attach a downhole hand pump to the threaded head of the pipe, not forgetting to put a check valve between them. If there is an urgent need for water, you can install a pump on a quick fix, directly connecting to the pipe and placing it on temporary supports or a welded stand.
Over time, of course, a good owner will carefully consider the stationary installation of the pump, with full fixation of the protruding section of the pipe, with a beautiful and reliable pedestal. And it is best at this stage to immediately provide a branch for the surface electric pump ().

Now the most will be achieved optimal solution: the main water supply to a residential building will be provided. Well, for gardening, household work, or in cases of problems with the power supply, it will be quite possible to get by with the capabilities of a hand-held well pump.
And at the end of the publication, for those who always try to make everything on their own, we offer an interesting video in which House master shares his experience in making a hand pump for a well.
Video: experience of self-manufacturing a borehole hand pump
Pumping water with a hand pump, of course, is not as convenient as its electric counterpart. The speed of work is not even close to comparison. However, there are situations when a hand pump for water is necessary, and sometimes the only thing possible solution. For example, as a temporary type at the stage of installing water supply at home. It is unwise to buy a device for short-term use. Do you agree?
We offer extensive information on options for making your own hand pumps. We present practice-tested methods available to home craftsmen in terms of costs and methods of implementation. A homemade product created according to our advice will reliably serve its intended duration.
The main purpose of using the equipment pump type– pumping water from a source to certain points: to a residential building, bathhouse, garage, garden. On suburban areas The source most often is wells, less often – ponds and other bodies of water.
All residential or country houses can be divided into three categories: permanent, seasonal and periodic residence. Not all of them have electricity, and some are supplied irregularly.
If we summarize all these factors, we can draw the following conclusions:
- in houses permanent residence by default, electricity is used, so the main equipment for pumping water is an electric pump, and the manual model is a spare backup unit;
- if the dacha is used only in the summer and power lines are connected, then the energy-dependent option is also ideal, and hand tool plays a minor role;
- a summer cottage without electricity most of all needs manual equipment.
To irrigate 2-3 flower beds, you can still draw water with buckets, but to ensure complete and daily watering of beds, greenhouses and lawns, a pump is needed. This is where a model that requires a pair of hands to operate comes in handy.
Do the simplest column you can do it yourself by using the skills of welding and assembling metal or plastic parts.
An example for making your own model can be a factory product assembled from durable cast iron or steel parts, with a comfortable handle for use
Some craftsmen build reliable equipment for wells and wells that serves well for years. We present an overview of homemade products, for the manufacture of which scrap materials were used.
Types of devices for pumping water
Physical force alone used to lift water upward is not enough, since the process becomes difficult and labor-intensive. Therefore, mankind has long ago invented many devices that facilitate the rise of liquid from a well or natural reservoir to the surface.
All devices are combined general principle work, which is based on the interaction of the valve system.
There are many varieties of hand pumps, but four main types can be distinguished:
- piston;
- rod deep (varieties of piston);
- winged;
- membrane
For manufacturing at home, they usually choose the first type if it is necessary to service a well of shallow depth (3-6 m), or the second if it is necessary to lift water from a well from a depth of 10-12 m.
These models are considered to be the most productive, easy to assemble and install, and reliable. The rest have significant shortcomings, the biggest of which is considered to be insufficient productivity.
It was piston instruments that occupied the main niche among factory manual equipment, they are popular among home craftsmen.
Image gallery


The advantage of piston column pumps is their ease of assembly and installation. All the parts necessary for the manufacture of the body and dynamic parts can be found on the farm or purchased in addition.
And to connect elements into a single device it is usually enough home tool: drill, circular saw, hacksaw, pliers, wrenches. If necessary welding machine, then you can rent it or borrow it from your neighbors.
Popular handicraft pumps
To pump water from one place to another, all kinds of hand pumps are used. Their operating principle is based on the simplest laws of physics, according to which water can move through pipes and vessels due to differences in temperature, pressure, height, etc. Let’s find out how devices made by amateur craftsmen operate.
Option #1 - piston apparatus from casing pipe
The homemade product was invented by a master for a specific purpose - for. However, it turned out to be quite productive, so it was later used for pumping water out of the pond and as a backup pump during a power outage.

To make a pump, you will need a minimum set of tools: a grinder for cutting metal parts, a welding machine and a drill for drilling holes for fasteners
All work on cutting steel elements is carried out with an electric circular saw. If you use hand tools, the production will take a long time.
Experience is required to connect metal parts welding work. If you are new to this business, we recommend that you familiarize yourself with.
Parts Overview homemade pump:
Image gallery


For installation on the ground, a kind of base is used - a structure made of metal pipes 20*40 mm and 20*20 mm. Thanks to the long welded pipes, the pump stands firmly in a strictly vertical position.
Option #2 – rod pump for a well
The model, made from a ready-made fire extinguisher body, differs from the previous one in reliability and greater performance.
A homemade “samovar” can be safely installed in a well up to 15 m deep. It does not have to be used constantly, however, in the absence of electricity or for cleaning the well, it will be simply irreplaceable.
The principle of operation is the same: thanks to the vacuum in the zone of movement of the piston, water flows from the well into the pump housing, and from there through the outlet pipe - out into the substituted container.
The device is suitable for servicing a well, borehole, pool, pond or other body of water. It can pump not only clean water, but also dirty liquid with silt, sand and dirt.
For manufacturing, you will need a tool for cutting and processing metal parts, as well as a welding machine. Let's look at the distinctive features of the model in more detail.
Image gallery


Everything on top metal parts treated with a primer to protect against corrosion, since the pump will be located outdoors, in the open air.
On top of the primer, it must be coated with metal paint to make the protective layer as durable and airtight as possible.

This is what the piston looks like, which is responsible for the movement of water. This is a 5mm+thick perforated metal round plate rubber compressor. Hole diameter – 10 mm
It is difficult to judge the exact performance of the device; testing is necessary. However, we can say that with one press of the lever, about 2-3 liters of water are pumped, that is, with just 3-4 presses you can fill a bucket.
If the given instructions for assembling a homemade product seemed complicated to you and you do not want to waste time on manufacturing, but you need a pump to pump dirty water, we advise you to take a closer look at ready-made models sold in stores. To make it easier for you to choose suitable model, we invite you to familiarize yourself with those presented on the market.
Option #3 – collapsible model for the summer season
If the well is shallow, an economical and easy-to-use plastic model can handle the delivery of water to the top.

A summer version of a hand pump, completely assembled from plastic pipes with a diameter of 20 and 50 mm. Only the check valve and filter are made of metal
For self-assembly you will need:
- sewer plastic pipes 50 mm - 2 pieces 3 m each;
- mesh filter for mounting on the end of the pipe;
- thin PP pipe 20 mm with thread for attaching a check valve;
- factory-made check valve;
- fastening the handle from a tee 25*20 mm with a soldered thread;
- metal tube for handle;
- fluoroplastic gasket for making a piston;
- clamps with dowels for attaching the pipe to the walls of the well.
The assembly proceeds as follows. First, a fluoroplastic piston is screwed onto a flexible PP pipe with a diameter of 20 mm, through which water will move, and then a check valve.
They insert it into the sewer plastic pipe with a diameter of 50 mm, on the side of the check valve it is closed with a nozzle with a filter. The result is a “pipe-in-pipe” structure that must be immersed in the well.
A tee is screwed onto the other end of the PP pipe and a handle is inserted into it. To pump water, you need to hold the handle with both hands and move the pipe up/down.
In appearance and in the way the handle moves, the pump resembles a manual analogue for inflating bicycle wheels.
The outer part is supplemented with a spout made from a piece of sewer pipe and two fittings - a tee and a 90º angle. As the handle moves up/down, water pours out of the spout into the container underneath.
One of the advantages of a simple plastic model is that it can be quickly disassembled. With the onset of cold weather, the outer parts are removed, and the PP pipe is simply pulled out. As a result, only one element remains - the sewer pipe, but in the well shaft there is no threat to it.
If you change your mind about making a homemade pump, you can always purchase ready-made equipment in the store. Tips for choosing a pump for a well.
Less popular manual modifications
In addition to piston models, which have proven themselves well in factory and homemade versions, other devices are also used.
They are less productive, but interesting from the point of view of design and operating principle.
Image gallery
Conclusions and useful video on the topic
Before you start making your own hand pump, study the experience of home craftsmen. This will not only help you learn new technologies, but will also help you avoid annoying mistakes.
Diaphragm pump operation:
And to assemble a useful device yourself, you don’t need to study complex technologies or look for special materials - you will find everything in the household.
Have you decided to assemble a homemade water pump from scrap materials? Maybe you would like to clarify some points that are not fully discussed in this material? Ask your questions in the comments block - we will try to help you.
Or maybe you want to supplement our article with clarifications or useful recommendations? Please write to us about this and express your opinion.
Arranging a personal garden or summer cottage is the first priority for every owner. Of course, the primary task is to solve the water supply problem. If there is any reservoir in the nearby area, you can purchase a pump. The modern specialized market offers a wide range of different models of water pumps that can satisfy the wishes of any, even the most picky and scrupulous, customers.
However, such devices can be made with your own hands, while avoiding significant costs.

Using wave energy
This option is most optimal for areas that overlook the shore of a body of water. To construct the pump structure, you will need a log about 3 meters long and two stakes, a small piece of corrugated plastic pipe and two valves.
It is necessary to attach several loops of wire to the log, the diameter of which should be 6 mm at the ends. You need to attach a prepared piece of corrugated pipe to it from below. Valves are pre-attached to the pipe at the end holes.
The operating principle of such a pump is based on the action of waves. The wave of water lifts the log, the length of the pipe increases, and the liquid is sucked through the lower inlet. Accordingly, when a wave lowers a log, the size of the corrugated tube decreases, and water is squeezed out through a special upper valve. This process is repeated periodically depending on the fluctuations of the waves.

This design allows you to lift water from a depth of about 25 meters. When producing this design, it is important to properly process the float using special means to protect wood from constant exposure to moisture. The best option would be to use regular drying oil for these purposes.
To achieve greater effect, it should be used warmed up. The surface of the log must be treated several times.


Wave water pump (option)
This design will help to significantly simplify and facilitate the process of pumping water from any reservoir. Managing it is not very difficult.
The production of this device can be divided into several stages.
- At the first stage, it is necessary to prepare the main pumping element of the structure. This element is a hollow cylinder in the form of an accordion. During the process of compression and stretching, the volume of this part will change significantly, while creating the pressure necessary for pumping out water. As a material for making of this element you can use the usual car tire required diameter.


- The second stage in the manufacture of the pump will be the creation of a special “floating” platform. For this you can use wooden material, the dimensions of which must correspond to the dimensions of the chamber, or ordinary plastic bottles, closed with lids. The selected material should be carefully secured with electrical tape or construction tape on the bottom of the chamber.
- Next, on the top of the camera you should fix a small wooden board. It will help the camera always stay afloat.
- After this, you need to secure the wave pump. Two pillars need to be driven into the bottom of the reservoir; the upper platform of the structure is rigidly attached to them. For the lower platform of the device, it is necessary to provide special wire loops. This is necessary for the free movement of water.
To make such a design you can use various materials, the main thing is that they perform all the necessary functions. Repairing such a water pump can be done at home, if you take our advice into account.


Using solar energy
This homemade water pump is very easy and simple to make. To make such a design you will need a regular hose made of plastic. The best option is to use a 2-inch plastic hose.
The hose can be installed in two ways:
- spread in the form of rings on the surface;
- hang the hose with a wire using several vertical posts.


The operating principle of this design is based on heating the water in the device by the sun. As the hose fills, the water in it will gradually begin to heat up from the sun's rays and rise.
The connection between the hose and the tank or any other container must be covered with a special material to ensure reliable protection from various negative influences. Any material with a reflective surface is suitable for this.
This design is capable of lifting water from various reservoirs from a depth of about 8 meters.

Solar pump: always running (optional)
The design of this pump consists of a special grid containing propane-butane in the tubes. The grid is connected to a rubber bulb lowered into the container. There are two special valves in the lid of the container: the first is designed to allow air into the structure, the second releases it under a certain pressure into the air pipe.
To set the pump in motion, in the warm season you just need to pour cool water over the grill. In this case, the liquefied propane-butane cools, and its vapor pressure decreases. This helps compress the rubber bulb, and the container is filled with air. After a certain period of time Sun rays dry the grate and it will heat up again.
The resulting liquid vapors will inflate the rubber bulb, as a result of which the pressure in the container increases, and the air will escape through a special valve into the pipe. The resulting plug of air will act as a piston and drive the water in front of it towards the shower head. The liquid then falls back onto the grate and cools it.


Such a system works not only in summer, but also in the cold season. In this case, the cyclicity changes slightly. Cold frosty air cools the lattice of the structure, and its heating occurs due to the influence of underground waters. Therefore, if your garden or summer cottage is located on the shore of a body of water, it is not at all necessary to carry water to water the garden using buckets. You need to make a pump for pumping water with your own hands from scrap materials. In this case, the sun's rays and the flow of the river will do the main work themselves.
A more complex and time-consuming process is the manufacture of wind pump structures for pumping out water. Here you need to show maximum ingenuity and imagination. Such devices often contain complex elements such as flexible actuators, various shapes wind catchers and so on.
In addition, the design may include a piston pump or a diaphragm pump, which are needed for pumping water.


Manual pumping devices
Distinctive feature The advantage of these devices is the ability to use this device without electricity. The option can be vacuum or plunger. You can make such a mini-pump with your own hands; for this you will need several parts.
- Base. The main component part, which serves as the basis for fixing the entire device. For this you can use textolite or fiberglass. Thickness of this material should be 20 millimeters.
- Flange. To connect the casing to the base of the structure, you will need a special threaded part. This is important, since it is necessary to prevent water leakage.


- Bottom valve. To ensure reliable closure of the main pipe opening, it is necessary to install a valve.
- Limiter. This detail will help to avoid displacement of the valve during operation from the main axis of the structure.
- Frame. All the main components of the pump structure are located inside the housing, which ensure pumping and draining of water.
- Piston with valve. This element plays an important role in the design of the pump; it is necessary when pumping liquid from the main pipe into the housing to the hole intended for draining using a special reed valve.
Similar structures are used for pumping water from wells or wells.


Working principle of a hand pump
By applying a slight force to the special lever in the upper direction, it is necessary to start its movement. In this case, a certain pressure is created inside the pipe, which acts on the check valve, and the process of drawing water from the casing into the structure body begins.
When the pressure inside the pipe is equalized, the check valve gradually lowers and closes the hole to the casing. This creates required pressure To open the petal valve, water enters the upper cavity to the hole intended for drainage and is poured into a previously prepared special container.


DIY manual water pump
Such a design is the best option for pumping water from various wells, unlike the wind model.
To manufacture this device you will need a small amount of quite accessible materials:
- a small amount of wire;
- a car camera, such products can be found in almost every person;
- brake chamber;
- balloons small sizes of steel;
- several copper tubes;
- special epoxy glue.


After everything necessary materials will be prepared, you can begin assembling the pump. First you need a brake chamber; you need to carefully plug all the holes in it except one. The hole should be located on top of the chamber; this is where the rod will be placed. In addition, special outlets should be provided for the valves at the bottom of the chamber.
Next you need to drill into the prepared copper tube on the inside there is a small hole, the diameter of which should correspond to the size of the steel ball. To prevent the ball from falling out of the tube while the pump is running, on top copper pipe you need to weld a special wire.
The next stage in pump production is the manufacture of a check valve. This process is completely identical to the previous stage, but there is a slight difference. A small special spring should be installed between the steel ball located in the copper tube and the wire welded to the end of the tube.
Then the finished inlet and check valves must be firmly fixed in the brake chamber.


You need to cut a small circle from a car camera and make a hole inside it. Next, you need to glue two washers with epoxy glue to the hole. different sides. A special threaded pin, secured with nuts, is threaded through this hole. This design will be used as a sealant in the manufacture of a water pump. The finished seal should be fixed to the brake chamber and glued using special epoxy glue.
The final stage in the manufacture of a water pump is the installation of the rod. It must be threaded through a specially prepared hole located on top of the brake chamber. All parts of the water pump are connected using a rod.
The structure is ready, you can install it in a reservoir and start pumping out water.

Pump from a regular plastic bottle
This is a very popular design among summer residents, since its manufacture does not require a motor or pressure level meter. The popularity of the device is due to its low cost and simplicity of design. This device is the best option for pumping water both from a reservoir and from special tanks and barrels. The operating principle of the design is based on the principle of communicating vessels and does not require connection to the electrical network. This is also a strong argument in favor of the use of this design by many summer residents and owners of personal plots.
Making such a device with your own hands is very simple; it will require ordinary materials that can be found in every home.
First you need to take plastic bottle and make a small hole in the lid with a diameter of about 8 millimeters, and remove the gasket located in the plug.


Having purchased a house with a beautiful garden plot, many people, first of all, think about how to improve it as quickly as possible and make it comfortable and cozy.
In many ways, this depends on the supply of electricity, heat and water supply, which plays a key role in the improvement and care of a summer cottage. But what to do when the house is located far from public utilities, but the garden needs to be watered? In this case, some summer residents try to buy all kinds of pumping units that will provide water supply to their summer cottage.
But more experienced and skillful summer residents try to save money even on this equipment, so they try to make a water pump with their own hands. And the point here is not only about saving, here is the opportunity to show your imagination to its full potential, and with benefit.
As a rule, a summer resident who is interested in making a water pump with his own hands goes to the Internet to search for a diagram homemade device. And what does he see there? The entire network is replete with various drawings and diagrams of all kinds of pumps and pumps, sometimes even completely incomprehensible. And it can sometimes be very difficult to choose just one unit.
To save a summer resident’s time searching for the right device on the Internet, in this article we tried to summarize all the information about homemade pumps. Therefore, we will describe the most interesting and low-cost options for hand-made water pumps.
Suitable species
The most popular water pumps that you can make yourself are the following pumping mechanisms:
Let us describe in more detail the manufacturing technology of each of the indicated options for homemade pumping units.
Piston pump
A piston water pump is also popularly known as a “pump pump”.
As a rule, the design of such a mechanism consists of the following elements:
- working cylinder;
- piston;
- intake and exhaust valves.
The operating principle of a homemade piston pump consists of the following important points:
- when the piston moves, the inlet valve opens and water is sucked into the pump;
- when the piston moves back, the inlet valve closes, and the outlet valve opens accordingly, and water comes out.
As you can see, the structure and operating principle of this homemade pump is very simple, so its manufacture will not be difficult, the main thing is to prepare all the necessary materials.
To do this you will need:
The manufacturing procedure consists of the following important steps:

Worth considering: A piston pump is used only for pumping water from shallow wells or other shallow sources.
Wave pump
 This type of pump is considered the simplest design, easy to assemble, and at the same time, is a fairly effective pumping mechanism.
For a summer resident who has a pond near his property, a wave pump will be an indispensable source of moisture.
To make this type of pump you will need the following materials:
- heavy log impregnated with waterproof mastic;
- 2 valves;
- a piece of corrugated pipe;
- flexible hose for water supply;
- thick wooden plank;
- 2 brackets.
Installation of a wave pump consists of the following important points:
- a wooden plank is firmly driven into the bottom of the reservoir;
- two brackets are fixed on top of the plank and at a distance of 50–60 cm from the water level;
- a corrugated hose is fixed between them, both ends of which are equipped with valves;
- the lower end of the corrugation is stably fixed on the log.
The principle of operation of such a pumping mechanism will be that the log, under the influence of waves, will move up and down, while corrugated pipe will collect water, which will be supplied directly to the summer cottage through a flexible hose.
Stove pump
 For some people, the name of the pump is misleading.
It is worth understanding that this design is not intended for heating - it can be used, for example, for watering garden beds.
To make such a pumping mechanism you will need the following materials:
- metal barrel with a volume of 200 l;
- outlet with shut-off valve;
- rubber hose;
- mesh filter;
- blowtorch.
The manufacture of a stove-pump is carried out in the following several sequential steps:

The operating principle of such a pumping mechanism consists of the following important points:
- the barrel is filled with 5–10 liters of water, and a blowtorch is lit under it;
- the generated steam through the hose will displace air into the reservoir;
- the blowtorch is extinguished, and, accordingly, the barrel begins to cool, and as a result, the pressure in it begins to drop;
- the result of these actions will be that water from the reservoir will begin to flow into the barrel.
Mini shower pump
 To begin with, it is worth noting that a mini-pump of this design is also commonly called a “treadmill shower.”
The manufacturing process for a mini-pump is quite simple.
For its construction the following materials will be needed:
- foot auto pump;
- container with a tight lid;
- check valve;
- 2 pieces of rubber hose or any flexible tube.
The operating principle of the mini-pump consists of the following points:
- the pump, hermetically connected to the container, begins to create excess pressure in it;
- under the influence of increased pressure, water begins to flow out through another sealed hose, while the check valve prevents water from entering the pump.
It is worth noting: The pressure of the outgoing water can be adjusted by the frequency of pressing the pump.
Solar Powered Water Pump
 It is important that the water supply to personal plot can be done using alternative sources nutrition, in particular solar energy.
To make a solar water pump, you will need the following materials:
- milk can;
- rubber balloon in the shape of a pear;
- 2 check valves;
- flexible hoses;
- a set of sections of thin-walled metal pipes.
The procedure for manufacturing a pumping mechanism of this type consists of the following important points:

The operating principle of this type of water pump consists of the following points:
- the grill heats up well under the influence of the sun;
- the air heated inside begins to flow into the rubber bulb, thereby inflating it;
- Thus, excess pressure is created in the can, which is forced out into the reservoir through hoses;
- after cooling the circuit with water, the pressure in the can begins to drop, which in turn entails the supply of water from the reservoir.
In this article we described the most popular devices for supplying water to a personal plot, and also talked about important nuances their manufacture. We hope that by using the information presented in the article, you will certainly provide your summer cottage with the necessary amount of water.
Watch the video in which an experienced user explains in detail how to make a manual water pump with your own hands:


