A pouf is a small and very functional piece of furniture. Its popularity has not diminished at all over time. recent years. Now this useful item interior design is as popular as ever. Making it can be the first step towards starting self-made upholstered furniture. This will allow you to first try your hand and work out the technology.
This short review will describe how to make an ottoman with your own hands. The assembled product will be a wonderful addition to the interior of the living room or hallway.

Choice of design and construction
This item is the easiest to produce, so even the most novice craftsman can handle its production. Before starting work, you first need to decide on the design of the future product. Studying photos of various ottomans will help with this.

The ottoman can have a rigid frame or do without one at all. Can be used as a frame various materials. The most commonly used classic carpentry materials are boards, plywood, and chipboard.

Poufs with a frame can also be made from old plastic bottles, buckets or car tires. Poufs without a frame are a neatly sewn bag filled with polystyrene foam.


Ottoman frame
Assembling this item is not difficult. Let's figure out what and with what materials you can make a pouf with your own hands. Depending on the design used different instruments and materials.

Frameless pouf
Simplest soft ottoman without a rigid frame, it is manufactured using a minimal set of tools. To do this, you need to sew a bag with a lining and fill it with granulated polystyrene foam, specially produced in the form of balls for stuffing furniture. Therefore, it is easy to purchase in hardware store or on the market.

Tire pouf
A new and quite popular model now are ottomans from the old car tire. Making them is also very simple. This will require old tire preferably mounted on a metal disk for rigidity.

If the tire does not have a disk, then the structure can be given rigidity wooden partitions installed inside the tire.

In order to make such an ottoman, you need to cut two circles from plywood 3-5 millimeters thick and attach them with screws to the tire at the top and bottom to create horizontal planes. Then, using quick-drying glue, glue the rope to the surface from the center to the edges in a spiral.

The top is covered with rope wooden surface And side surface made of rubber. Before purchasing material, you need to calculate the length of the rope and estimate its cost.


Perhaps such a piece of furniture will not fit into the living room or bedroom, but it may be suitable for a home workshop or office. In this case, you can try not to decorate its surface with rope, but only stick it on the upper surface soft seat, leaving the rubber untouched.


Pouf made from plastic bottles
You can make such furniture from the most different materials. For example, you can even use plastic bottles and old buckets as a frame, but it is better to use more durable materials. They are not so expensive in price and their consumption is very small.

With their help, you can create an ottoman of any size and shape and add additional structural elements: assemble an ottoman with a hinged lid, a drawer for various small items, legs or casters.

Pouf made of plywood, chipboard
Poufs with a frame made of chipboard, wood or plywood are quite simple to make. Such products can be heavily loaded and can be used as an ordinary stool

To create it, it is first cut in accordance with the drawing. sheet material. It is fastened with screws and wooden blocks fixed along the edges of the sheets. Small irregularities will be hidden soft upholstery and finishing fabric.


The pouf may have a liftable lid attached to hinges. It will be possible to store small things in it, but for this you need to make a bottom. The lid, depending on the base, may have different shape: round, square.


Lining
The next step is to attach the soft lining. For these purposes, padding polyester or foam rubber is used, which is attached using construction staples and glue. Decorative coating made of fabric or leather is attached in the same way over soft upholstery.

The color and type of coating determines the design of the product as much as its frame. The finish of a product defines it overall design, so it depends on how well the product fits into the interior. Since the product turns out to be quite small, it is quite possible to use the most daring color solutions, which will almost always be appropriate.

For convenience, the pouf can have legs or casters. They are installed on last stage. If you decide to make it without rollers, then in order to avoid scratching the floor, you should glue four small pieces of felt from regular insoles to the bottom.

When making any furniture, the main thing is to patiently complete all the work, carefully following each step. You can make an ottoman with your own hands from almost anything; you can use a wide variety of materials and ideas.

The most important thing is that for this you will be rewarded with a new piece of furniture that will serve you long years, delighting with a pleasant appearance.


Photos of do-it-yourself ottomans


Banquette- This is a decorative element of furniture that can decorate any room. This multifunctional product can serve as a seat, a decorative element, or a place to store things. Furniture showrooms offer a huge range of banquettes made in different styles and using a variety of materials. You don’t have to go to the store to get this piece of furniture. Many craftsmen are quite capable of making a banquette with their own hands - at home. To do this, you only need to be able to work with tools, sew and have a good imagination.
What materials will be needed?
Almost anyone can make a banquette with their own hands. For a beginner in this business, it is better to start working with wood rather than iron, since it is much easier with such material. Wood materials will not require professional skills or significant experience. For the frame you will need wood material– for example, chipboard or plywood. If the product will stand on legs, you will have to purchase wooden blocks. Their size depends on the height at which the master plans to place the banquette. You can buy ready-made legs in a store or unscrew them from an old stool.


The structure must be secured using furniture corners, screws and glue. Foam rubber is used for filling, and any fabric you like is used for upholstery. But you need to understand that the fabric must be wear-resistant and very durable so that it does not wear out over time. If you are planning a carriage screed, then it is better to use not only foam rubber, but also padding polyester.

Required tools:
- drill;
- a screwdriver suitable for the selected screws;
- furniture stapler;
- sewing machine;
- screwdriver;
- sandpaper;
- furniture varnish.

Main stages of preparation
You can begin work only after creating a drawing of the banquette. Many may think that it is not needed, because the product is simple and does not require many structural parts. However, a drawing will be needed to determine the parameters of the product and compare them with the dimensions of the room in which it will be located. When choosing the type of product, it is better to focus on simple version. It is harder and longer to assemble a bench with a back or a drawer, so for the first time you need to limit yourself to a simple design. Having decided on the model, you need to draw a sketch. It is necessary to mark all the elements and their sizes. Wooden parts are cut out with a jigsaw, and rough edges are smoothed over with sandpaper. Then they can be varnished.

Master Class
To approach the matter correctly, a beginner will need step-by-step instruction for the manufacture of such products:
- You will need to cut the seat out of plywood or chipboard. For the first time, you can choose round or square shape. A shape with many angles or curls is too difficult task for the beginning master.
- If the future product should have legs, then four slats need to be attached to the bottom so that they protrude a couple of centimeters beyond the edges of the bench. The legs need to be secured using furniture corners and self-tapping screws, which are screwed in with a screwdriver.
- If the product will rest on the sides, then all parts of the structure are cut out in advance. This is necessary in order to pre-plaster them - only then can they be assembled onto pins. Each part must have special holes at the ends.
- A hand router will help make the legs unusual.
- The softness of the seat should be provided by foam rubber. They cut him out the required form, and then attach it to the bottom of the product.
- It is best to first attach burlap to the bottom, and then glue the foam cushion.
- For upholstery, you must first make a pattern. The fabric is draped over the finished product and secured with staples.


The production of parts and their assembly must be carried out in stages, because assembling everything is a very serious job. To avoid mistakes and not damage a piece of furniture, you need to follow some rules. For example, holes for screws must be made in plywood. A drill is used for this. The lid should be the same size as the perimeter of the body, so as not to interfere with later sheathing of the product. Assembling the frame begins with assembling a square from blanks on a workbench and connecting them using self-tapping screws. The pre-cut bottom is attached to the frame with self-tapping screws, after which the structure is painted from the inside with stain.


The body should be two centimeters larger than the base for the bench. The blanks are connected with self-tapping screws and varnished. To install the lid, the piano hinge is sawed off five centimeters less than one side of the body. This is necessary so that the fabric does not tear. The piano hinge is fixed on the edge of the workpiece, and then the box is attached to one of the sidewalls. At this stage of work, the bench should be positioned bottom down. The covering begins with the lid. For this purpose it is created required form foam rubber and with the help of paper clips and glue is fixed on the outer surface of the lid. If the bench does not have a lid, then foam rubber is attached to the top of the product. Then you need to cover the side parts with foam rubber.


Unusual ideas
Talented craftsmen have long been using old products that have either become unusable or simply lost their relevance to create new pieces of furniture. Therefore, it is not at all necessary to create a product from scratch; you can restore unnecessary coffee table or a stool. The main thing is that you have enough imagination for it. Interesting option creating a banquette - using old wooden box. To do this, you need to remove the locks and hinges from the box. If there are any irregularities, they need to be sanded. The box itself can be painted bright color, and cover the lid with leather (previously with foam rubber). The inside of the box also needs to be tidied up: sanded and painted.


A banquette made from old chairs will look original. To do this, take two chair backs with rear legs and connect them using two bars. The bars need to be secured with corners and self-tapping screws. Then a seat is made from plywood and covered with foam rubber and fabric. A bench made of plastic bottles is this year’s trend. To make such a product, you will need to prepare approximately 40 bottles, cardboard, tape, glue and foam rubber. The bottles are fastened to each other with tape, and then glued to the cut cardboard on both sides: on the bottom and top. After this, the structure is covered with foam rubber and covered with fabric. An old shoe rack can become a multifunctional product. To do this, it needs to be sanded and painted. Then at the top you need to make a seat from a synthetic padding pillow, which is first placed in a cover and attached to the shelf.


Decorations
To update old furniture and make a banquette out of it, you don’t have to spend a lot of time and effort. The main thing in such a product is softness and the availability of storage space (drawers, shelves). When the transformation old furniture already finished, it's time to think about decorations. When translating your ideas and fantasies into reality, you should not limit yourself. After all, the finished banquette should please the eye, and not stand sadly aside. Therefore, it is important to decorate it in such a way that it simultaneously catches the eyes of guests and harmonizes with the interior.


For a hallway, a product made in classic style. This is especially important if you also need a shoe rack. The purpose of the banquette is in this case– more for storing shoes than for comfort while wearing them. At the same time, it should be noticeable and covered in leather or leatherette. In a children's room, such a product can have any style. The main thing is that he takes into account the situation. For a girl, the banquette can be decorated with velvet and voluminous flowers. It will be very interesting if the cover is knitted by mom. For a boy, a product in the shape of a soccer ball will be original. It will be even more interesting if there is space inside to store toys.
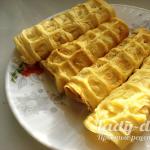
To make an ottoman with your own hands in a classic style, start with legs. Two boards 48 cm long and 5x5 cm in cross section are cut at an angle of 45 degrees. They are knocked down with a cross.
A block 35 cm long is glued to the resulting cross. Additionally, it can be secured with a self-tapping screw.

Another similar cross is attached to the top.

how to make an ottoman with your own hands. Photo
For seats take plywood 1cm thick and 40x60cm in size. Under the plywood they put foam rubber 10cm thick and a layer of synthetic padding with a margin so that it can be bent.

We bend the synthetic winterizer and nail it to the plywood. Then they take upholstery fabric and are also attached from the inside out.

For decorations The ottoman uses decorative nails, which additionally secure the upholstery.

DIY ottoman. Master Class
Cross boards are added to the legs. The entire structure is treated with stain.

Screw the seat to the base with legs. It turns out a comfortable, hand-made ottoman.


DIY wheel ottoman
To make an ottoman from a wheel, you need to take a wheel of the desired size and wash it thoroughly.

DIY tire ottoman. Photo
From plywood cut out two circles. One along the diameter of the inner part of the tire, and the second along the outer part, but so that it does not protrude beyond the boundaries of the tire.

To make legs take sample, traced, and then cut out of the board. A total of four legs are required.


The legs are attached to the base circle. They are placed at equal intervals and reinforced bars.

The legs are painted and glued to the base, and then secured additionally using corners.

Glue is applied to the base and the wheel is placed on top.

Glue is spread on top of it and the top cover is glued.


The tire is pasted over rope using hot melt glue. Rope can be used in different colors.


Finally, the legs are additionally painted.


Plywood ottoman

DIY ottoman step by step. Photo
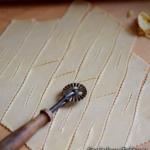
Step-by-step instructions will help you make an ottoman with your own hands. They take plywood sheets with dimensions 45x45 cm and cuts of 45 degrees.

Vinyl is cut to the size of the plywood with an addition of two or three centimeters of margin. They put it on top soft cloth, you can take thin foam rubber and then cover it with a plywood sheet.

The vinyl upholstery is folded and secured with a stapler, and the excess is cut off.


Corners are used for fastening. The screws should be less than the thickness of the plywood.

Paper with a pattern is placed on the surface of the vinyl.

DIY ottoman. Master Class
Decorative nails are used to complete this design, creating an interesting pattern and additionally securing the upholstery. The paper is then easily removed. The result is a beautiful plywood ottoman with an original pattern.


How to cover an ottoman?
An old plywood ottoman can be updated sheathing his new materials. To do this, remove the bottom part of the cover.


The new fabric is cut, tried on and secured, stapled at the corners.


The bottom is re-screwed to the top cover.


Measure the amount of fabric, making a reserve.
Textile mark. It is more convenient to do this on the ottoman itself, marking the seams with needles.

They try everything on the ottoman.

Excess fabric is cut off, and the joints ironing iron.

Attach the fabric to the top of the ottoman, wrapping it.


Then wrap it on inner side products.

After this, the fabric is stretched at the base and nailed staples. The result is new do-it-yourself ottomans made from old ones.

Ottoman made of plywood and fiberboard

From pine timber making ribs for the pouffe.


From Fiberboard cut out squares same sizes. The bottom and seat will be made from them.


Assembled using self-tapping screws frame products. Its sides are covered with sheets of plywood.


First the base is pasted over polyurethane foam. To give the ottoman made of fiberboard and plywood additional softness, it is supplemented with padding polyester.


While the structure dries, they cut it out case. You can take flock or leatherette.

The details of the cover are stitched using strong threads.


The finished cover is placed on the pouf.

It is secured from below with a furniture stapler or pneumatic gun.


To make the product look more aesthetically pleasing, the bottom is sealed non-woven fabric

Finally, the legs are attached.


DIY cylindrical ottoman

Consider a master class on making a cylindrical ottoman. To do this you need to cut out circles Chipboard required sizes and timber parts of a certain length.

We connect the circles and timber with self-tapping screws frame.

A sheet of chipboard is attached to the frame around the perimeter, making a wall.


They take foam rubber and synthetic winterizer. The latter is needed to smooth out the folds.

Foam glue is applied to the frame.


A layer is attached to the seat foam rubber four centimeters thick. Then the entire structure is tightened padding polyester.

The case is made from a suitable material.


The cover is put on and secured from below with a stapler or nails.

The legs are attached to the underside.


Making a cylindrical ottoman with your own hands is not difficult if you follow the instructions.
Ottoman with storage box
To make your own ottoman with a storage box, you need to follow the instructions. First, prepare the material: cut out two blanks from Chipboard with dimensions 37x40 cm and 37x37 cm, as well as one square 40x40 cm.
From timber With a cross-section of 4x4 cm, four parts 37 cm long are cut out.

From the resulting fragments they collect box, whose height is 37cm.
The timber is secured in the inner corners with wood glue. WITH outside The corners are fixed with self-tapping screws or metal corners.
Glue is applied to the bottom and timber. Glue the bottom and leave to dry.
After drying, the bottom is secured with self-tapping screws.
To do cover, four locking bars are attached to the square sheet to secure the lid in the box.

All that remains is to upholster the lid soft material. For this purpose, foam rubber, batting, synthetic winterizer, and upholstery fabric are used.


Fluffy foot ottoman
A master class on making an ottoman will help you make such a product. It will require four ready-made furniture legs and a circle of plywood or natural wood.

Cut out the size of the circle foam rubber, and then cover it with padding polyester. The excess material is cut off, and the main one is secured on the wrong side.

To secure the legs, four holes are drilled. The legs are screwed into them and the finished ottoman can be used. But to make it look more attractive from the bottom, a circle with holes for the legs is cut out of the fabric. It is placed on the base and secured with furniture nails.


How to sew a soft ottoman?
To sew a soft ottoman you need to proceed in stages. First, an inner case is made, which will contain filler. To do this, cut out two circles from thick fabric. Their diameter should be approximately half a meter. If you need a square ottoman, then two squares. These will be the top and bottom parts of the product.
Then a strip is cut out with a length equal to the circumference or perimeter, and a width equal to the height of the pouf. Be sure to take seam allowances into account.
The resulting strip is sewn from the inside out. First sewn to the bottom and then to the top of the ottoman. The finished cover is turned inside out and stuffed suitable material and the hole is sewn up.
The only thing left is the ottoman decorate To do this, a decorative cover is sewn on it. The procedure is the same as indicated above. Only in the middle part they do not sew up the hole, but insert a zipper into it, sew on Velcro or buttons. Absolutely any fabric can be used for a decorative cover.
DIY ottoman made from a plastic bottle
Let's look at how to make an ottoman out of bottles with your own hands. Take two big ones plastic bottles from water. They are cut and the two parts are combined to form a part of the desired height.

Details on how to make an ottoman from bottles with your own hands can be seen in the photo.
For the base and seat, take circles from Chipboard. A plastic base is attached to one, and the second is attached on top.


DIY plastic pipe ottoman
Consider a master class on making an ottoman from plumbing pipes.

First the pipes cut into pieces approximately thirty centimeters long. You will need about nine of these pieces.

Color pipes acrylic paint golden color. It is necessary to paint in several layers. Allow each layer to dry for about twenty minutes before applying a new one.

Top painted surfaces process protective varnish. This makes it resistant to water.

The pipes are secured with an adhesive gun. The glue will set quickly, so everything must be done without delay.


Polyurethane mats for the bathroom, they are folded in half and cuts are made in them along the perforations. The length of the cuts is approximately five centimeters.


The rug is rolled up and a kind of bud is obtained.

Such rolls with buds are inserted into pipes. They should fit tightly. In this case, additional fastening will not be necessary.


The result is an original ottoman that will look great in the bathroom.
Ottoman made from plastic bottles. Step-by-step instruction
Let's look at a master class on how to make an ottoman out of bottles with your own hands.

Bottles first connect using tape into a round piece.
From cardboard cut out circles of sufficient density and thickness required diameter. This will be the seat and bottom of the pouf.
The bottles are connected to the cardboards with tape.

The surface of the resulting frame is covered padding polyester or foam rubber.

Two circles and a rectangle are cut out of the fabric. The cover is partially sewn on a machine, then put on the structure and finished off by hand.
The top and sides are knitted from pile yarn, and fabric is used for the bottom.
All parts of the decorative cover are connected manually.
A banquette can be called a popular type of furniture for the hallway. Over time, its design has not undergone fundamental changes. This is not only a comfortable pouf on which you can seat guests, but also a stylish piece of furniture; it will look great in the hallway, kitchen, bedroom and living room.
In shops huge selection these soft poufs: with cabinets, shelves, drawers. Each manufacturer designs the banquette at its own discretion. But what if suitable option Still haven’t found one that suits your interior? In this case, the question may arise: how to make a banquette with your own hands?
The basic design of a banquette is quite simple - a stool with a soft seat.

The fabric is folded inward at the edges and secured with staples.
Anyone who has minimal carpentry skills and is good with a needle can make a bench.

Often the basis of the product is actually a stool.

This product looks very decorative and is quite simple to make.
Let's consider the advantages of a homemade pouf.
- Firstly, you can independently choose the shape, color, and size to your liking. It all depends only on your imagination. Then you can create a banquette that is unlike other factory-made analogues, which will add originality to your interior.
- Secondly, a DIY pouf will cost you much less than a ready-made one from the store.
- Thirdly, you can make a banquette from old furniture that you were already planning to throw away (stool, coffee table), but in this way give it new life.
- Fourthly, creating something useful and beautiful always brings moral satisfaction to the creator. Having done such a thing yourself, you will be able to present your work to guests and receive many compliments as a reward for your work.

A larger banquette, if the size of the hallway allows, is no less easy to make.

From the selected fabric, a fragment of the required size is cut out with an allowance.
Before starting work, you need to think through the design of the product and see what types there are. The bench can be selected according to shape, material and size.

This will require minimal carpentry skills and the ability to hold a needle and thread.

Let's look at the main types.
- Forged.
More suitable for an interior in Baroque or Empire style. The product will have forged, twisted bases. More often than not, these specimens do not have built-in shelves, drawers and cabinets. A pouf made in this style will look best in the hallway.
- Made of wood.
These types of products are often very functional: with built-in drawers and cabinets. They will look great in the hallway, kitchen or living room.
- With a backrest.
This small sofa will immediately create an atmosphere of comfort, especially if you decorate it soft pillows made in the same style. This is the most comfortable and convenient option.
- Collapsible.
This type is more functional: it can be quickly disassembled. All elements are secured with bolts. Therefore, for quick disassembly of the product, the design will be ordinary and not have decorative functions.
- With boxes.
A very useful item for the hallway that will save space.

The “raw materials” for the product are wood materials.

For a soft seat, cut out a piece of foam rubber of the required size.
To make a bench, you also need to familiarize yourself with the types of upholstery that can be used during work.
- Textile.
The bench can be covered with silk, cotton, linen fabric. Textile poufs are easy to care for. A variety of shades is an advantage of this upholstery.
- Leather.
This material is not suitable for every interior, but it will look very expensive and elegant. Disadvantages include high price and difficult maintenance.
- Faux leather.
This option is cheaper than the previous one. It will look as noble as a pouf made of genuine leather. At the same time, leatherette is not capricious in care. Although its service life is significantly shorter than that of its natural “brother”.

Forged models or furniture with an iron frame will require much more serious skills and experience.
The easiest way to make a bench is from old furniture or wood, since forged models and having iron frame will require more serious skills and experience from the master.

The filling material, as a rule, is foam rubber - it is quite elastic and holds its shape for a long time.

An attractive look to your legs will be ensured by using hand cutter.
Necessary materials
To work you need to have the following materials.
- For a pouf with legs you will need wooden beam– 30*40, 30*50 mm. or, if available, you can use old screw-in legs from a stool, table or bench.
- Plywood.
- Fastening materials: staplers, self-tapping screws.
- Varnish, stain or paint.
- High foam.
- Fabric or leather for covering.
- Fabric for finishing the invisible side of the seat.
- Buttons.
- Fabric for the cover (if required).

If a very soft seat is being built, especially with a carriage screed, then in addition to foam rubber, padding polyester is also used.

If a model with legs is being implemented, then 4 are attached to the bottom wooden planks so that they protrude beyond the edges by 1–2 cm.
Required Tools
To work you need to have the following tools:
- drill, screwdriver;
- screwdrivers;
- hammer;
- construction stapler;
- sandpaper of different hardness;
- hand cutter (if the base of the pouf is made of timber);
- level;
- thick threads and a large needle;
- scissors;
- roulette;
- sewing machine (if you need to sew a cover).

In addition, paint or stain and varnish may be needed.

The seat is cut out first - its dimensions serve as a starting point, and all other parts, if necessary, are adjusted to fit the seat.
If you do not have sufficient experience in making furniture, then it is better to split the whole process into several days so that every detail is given due attention.
Step 1: Finishing the Legs
If you have ready-made screw-in legs, then they need to be restored. Sandpaper clean the surface. Then we apply new paint or varnish and stain. It is better to apply in two layers.
If you don’t have ready-made legs, then they need to be made from timber. They will be attached to the seat using screws and corners. If possible, it is better to process the timber using a hand cutter. Such a tool can make non-standard protrusions, and the product will turn out more interesting. We also cover the timber with stain or paint it.
Step 2: Plywood and foam
It is necessary to cut the foam rubber of the required size around the plywood. In this case, it should protrude 2-3 cm on each side. We select sizes individually.
Step 3: Mark the plywood
We glue the foam rubber to the plywood, placing the glue closer to the edges. Using a tape measure and chalk, we will draw markings along which we will later sew on buttons. We make several holes in the plywood at the same distance. We try not to touch the foam rubber.
Step 4: Assemble the product, cover it with fabric or leather
We cut out a square or rectangle from leather or fabric according to the shape of the product. It is necessary to carefully calculate the dimensions of the upholstery and fit them under the seat, leaving a margin of 2-3 cm on each side.
You can start installing buttons. Using a needle, thread the thread first through the button and then out into the hole in the plywood under the seat. For better fixation, you can secure the thread with staples.
It is necessary to close the rough finishing with reverse side seats using textile fabric. Sew the cut piece along the edge of the bottom part.
If the legs were from another product, then choose a place to place them, fasten their bases with self-tapping screws and screw them in. We attach the timber legs to the seat using self-tapping screws and corners.

The process consists of several stages. All of them are quite simple to implement and require only accuracy and due care.

Decoration
It is better to choose buttons to match the color of the upholstery. The quantity depends only on personal preference. You can diversify the banquette decorative cover, which you can also sew yourself. All you need is skill with a sewing machine.
If you do not have cutting skills, then it is better to use a ready-made product pattern found on the Internet or watch a master class on making it yourself.

The capacity of the banquette is calculated: one person occupies an area of 45*55 cm.

The parts are cut out with a jigsaw and the edges are sanded.
For an Empire or Baroque style interior, you can make a carriage screed. This model looks very interesting and presentable.

The parameters of the hallway and the maximum possible dimensions of the product are determined.

If there are a lot of parts - partitions, shelves, back, it makes sense to make a pattern and then start cutting the plywood panel.
So you learned that making a banquette yourself, with minimal carpentry skills, is quite possible. The main thing is not to rush and pay due attention to each stage. Then the product will turn out neat and beautiful. This type of furniture will not only be useful in terms of comfort and space saving, but will also become a stylish and original addition to the interior.

Choose a model: with a back - quite difficult to implement with a minimum of experience, with shelves, drawers, on legs or supported on the sides, and so on.

Based on the dimensions of the seat, the parameters of the remaining elements are determined and a sketch is drawn.
VIDEO: Making a banquette at home
People are designed in such a way that at times they want to change something. The interior will immediately change if you make your own ottoman for the bedroom.
An ottoman is an indispensable item in the interior. You can sit on it, put your feet on it and even lie down.
It is simply indispensable in the house: it’s good to sit on, it’s comfortable to put your feet on it, sitting on the sofa, or sit your baby on it. How to do this without having any preparation for this, we will consider further.
Tools and materials
The basis of any good furniture is strong lathing and good upholstery.
In order to make an ottoman, you will need the following materials:
In order to make a frame for the ottoman, you need a sheet of chipboard.
- Sheet Chipboard size 2400x1750x16 mm. You can use the old one wardrobe or thick plywood, at least 13 mm thick. The material should not be thin so that both adults and children can sit on the ottoman.
- Beam 40x40 mm – 1.5 m.
- Rollers for furniture – 4 pcs.
- If the ottoman has an opening lid, then you need 2 hinges.
- Batting, padding polyester or foam rubber - whatever you have.
- Some thick fabric for upholstery - plush, tapestry or something else.
The most popular sizes for an ottoman are 400x400x500 mm. In the process of work you cannot do without the following tools:
- hacksaws with fine teeth;
- hammer;
- self-tapping screws;
- pencil with ruler;
- a screwdriver, an electric drill, or at least a screwdriver;
- construction stapler or furniture nails with caps;
- wood glue.
The work, of course, can be simplified by making an ordinary box on legs made of timber and screwed with self-tapping screws, but making an ottoman on wheels, and even with an opening top, is worthy of respect. You can hide slippers, children's toys and other small things in the niche of such an ottoman, and it is much more convenient and easier to move it around the room if it is on casters. Although you will have to work hard to make such a piece of furniture.
Return to contents
Manufacturing instructions
To upholster the ottoman you will need a construction stapler.
First of all, using a ruler and pencil, we make markings on a sheet of chipboard. We draw 5 squares with dimensions of 400x400 mm, these will be 4 walls of the ottoman and the bottom. There is no need to save money and make the bottom out of thin plywood, since a child can get into the ottoman, he can break the bottom and get injured.
The ottoman cover can have any shape: round, square or oval. For ease of work, let's try to make a square one. The lid must be made a little larger than the box so that it does not fall inside, so its dimensions will be 430 x 430 mm. The final height of the pouf will be 532 mm and it consists of:
- the height of the box itself is 400 mm;
- roller heights – 50 mm;
- bottom and lid thickness – 32 mm;
- upholstery – 50 mm.
So far, no difficulties have arisen in the work. We take a hacksaw and cut out the planned blanks. If you're not quite experienced master and somewhere you make a mistake by a mm in one direction or another, it’s not scary. The upholstery will hide these small flaws. We cut the block into 4 equal segments, each 400 mm long.
The next step is to form a structure 400 mm high from the sawn walls. In everything internal corners Using glue, we glue the beams for reliability of the structure. On the front side of the box, we screw self-tapping screws into the bars for greater rigidity. In this case, it is necessary to deepen the caps so that in the future they do not break through the upholstery. You can strengthen the ottoman with metal corners. You need to fasten the sidewalls with them even before you glue the blocks.
Then coat the perimeter of the lower part of the box and the ends of the beams with wood glue. We attach the bottom to them, and for strength we screw self-tapping screws into the ends of the bars. After this, let the box dry thoroughly.
We are approaching the finish line. The sheathing of the pouf is done, let's move on to making the seat cover. Around the perimeter of the seat from the inside you need to screw 4 stopper blocks so that the cover does not move to the sides. But before this, you need to make sure that the side reinforcement bars will not interfere with the lid closing. Turn the finished pouf over and attach the wheels with self-tapping screws. They should be attached through the bottom of the ottoman to the ends of the beams. To do this, small holes are made in the bottom.
After this, carry out the test. Sit on the seat and ride on the ottoman for a little while. If it is stable enough and holds well, you can continue working. All defects must be corrected before you begin upholstering the box.