Even if a dacha is a place where work comes first and then rest, we do not forget about the beauty that helps us not to lose heart and enjoy every day spent there. Therefore, today we invite you to feel like landscape designers and build a pond in your dacha with your own hands.
Rules for creating a pond with your own hands and requirements for materials
A pond in the country is not a luxury, but in some ways even a necessity. As the ancient philosophy of Feng Shui says, water near your home brings financial well-being and calms you down.

In addition, it allows you to maintain relative humidity in a particular area, pleases the eye and allows you to create original solution in a designated area. Therefore, more and more often, summer residents create ponds and small ponds with their own hands, as in the photo.


Not everyone has a pond on their territory that can be tidied up, surrounded with stones and made an element of the landscape. More often, we create a pond at our dacha with our own hands from scratch, faced with many issues that have to be resolved during construction.
Let's start with the fact that you need to decide on the location of the reservoir. For this the following factors should be taken into account:
- relief of the territory;
- the location of trees and other plants with a powerful root system and foliage;
- illumination of the selected area.
Carefully study the terrain of the area. You may already have well-placed indentations, holes, or ruts that you have made in the past. All of them will simplify the process of digging the pond itself.
In addition, do not forget that plants tend to grow and occupy everything underground. more space. Over time, the roots can spoil or even destroy the bottom of your pond, and the leaves, seasonally falling into the water, will rot and bleed bad smell. Which will require more attention from you to care for the pond, but not the joy of having it. Therefore, before you start digging, it is worth considering how far away the trees and bushes are located.
Most landscape designers recommend placing a pond near the house. This will make it easier for you to illuminate it without requiring separate lanterns and lamps. In addition, there is always enough free space near the house with natural light, because not nearby tall trees and dense vegetation blocking the light.

If you have found a place that meets the above requirements, then you can begin work.
But first, you should stock up on materials and a rough design for your future artificial reservoir.
Exists several ways to create a pond with your own hands in your dacha area:
- from the finished bowl;
- made of PVC film, polyethylene or rubber;
- using available materials.
Besides in addition to materials to make the bottom, you will need:
- shovel,
- measuring instruments,
- finishing and decorative materials,
- water.
After creating a pond, you can put fish there. But then the depth of your artificial reservoir must be at least a meter so that the fish do not freeze in winter.

The procedure for constructing a pond
If you have decided to arrange a landscape, have chosen a location and are thinking about the appearance of your future pond, then first decide the main question - what will it be like? Will you choose a ready-made bowl or cover the dug pit with film? It's up to you to decide. And we will help you create it according to all the rules.
Dig in the finished bowl
A ready-made mold cast at the factory is an excellent and simple solution for those who want to enjoy a charming and calm view of the pond after a busy day at the cottage.


Nowadays, specialized stores offer bowls different sizes, type and content. They may be:
- simple plastic baths;
- containers with several depth levels;
- bowls with complex contours of the shore.
Therefore, everyone will be able to choose the shape that best suits the territory and landscape without wasting extra time.
In addition, there are others advantages of ready-made bowls:
- the plastic form is durable and not susceptible to ultraviolet radiation;
- the bowl is non-toxic and easy to install;
- The average shelf life of this form is tens of years, which makes the pond durable and of high quality.
The main thing is not to damage the bowl when installing it in the future pond. The form cannot be repaired or restored. However, if you are building to last, you can choose a fiberglass bowl; it is famous for its strength and lasts 2-3 times longer.


So, you have chosen a bowl, found appropriate place, cleared it and are ready to create a pond with your own hands at the dacha. What's next?
First you need to transfer the contours of the bowl to the ground so that it fits exactly into the dug pit. For this you will need:
- bowl;
- pegs;
- shovel;
- rope.
To make the contour as similar as possible to the shape of the bowl, you need to place it on the ground and retreat 10-20 cm from its edge. Following the shape of the bowl, stick the pegs into the ground and stretch the rope along them.
This way you will get the outlines of your future pond, under which you need to dig a pit 20-30 cm more than the height of the bowl.
Don't forget to keep an eye on the top level. It is very important that the surface of your pit is level, otherwise the ground around the pond will always be wet and sticky, spoiling appearance shores.
When you achieve the desired depth and shape, be sure to sprinkle everything with sand and compact it thoroughly. This sand bed will become the foundation for your pond. Afterwards, you can install the mold and fill the free space between the side of the bowl and the ground with sand.
When your future pond becomes stable, you can begin filling and decorating it.
You can line the bank with decorative stones and plant water lilies or other water-loving plants along it. Install small figurines of swans or others created by yourself.


Making a pond from film
If for some reason you do not want or cannot buy a ready-made bowl, then you can always make a pond with your own hands without it.


Enough to stock up:
- Shovel;
- a rope or hose to outline the contour of the future pond;
- thick film.
The rest (water, decorative elements and figures) you will need later, when the main stage is completed - creating a pit for a pond.
As when creating a pond with a finished bowl, first you need to decide on the size of the future reservoir and its contour. Afterwards, mark its borders on the ground using a rope or hose, which can simply be laid along the drawn border, or can be wrapped around driven pegs.
Once you are sure you like the shape and approximate view future pond, you can start digging. Here the process will always be the same, because we just need a foundation pit.
The pond level should be the same. Therefore, check the evenness of the banks using a building level or timber laid on both sides of the pit.

When you reach the desired depth, fill the bottom with sand, compact it well, and then lay it with geotextile so that the film does not tear over time. To do this, you can use special material sold in construction stores, or you can do it yourself. Take, for example, old carpets, rugs, roofing felt or linoleum that fit the area of the dug pit.
Now that the bottom is ready, measure your future pond and calculate the size of the film you need to create it. Usually for this it is enough to know the area of the pit and its depth. Then add an allowance of 50 cm on each side to strengthen the film along the shore. And you can already go shopping.
The film must be very strong and dense in order to withstand the weight of the water that we will eventually pour into the pond. Therefore, do not skimp on this primary material and choose it wisely - the film thickness should be at least 300 microns so as not to tear under constant pressure.

So, as soon as the film is laid out on the bottom:
- Level it out it so that there are no folds and swellings.
- Line the shore with stones so that when filling it does not gather at the bottom.
- Prepare the plants, if you want the pond to have water lilies or other living decorations.
He will share with us a trick on how to arrange plants and flowers in a film pond. Maxim Maximov in your master class:
The film pond is quite economical and allows us to create it of any shape and depth, which is impossible to do with a ready-made mold cast at the factory. That is why many choose this option to create their own pond in the country with their own hands.


But do not forget that the deeper you want to make the pond, the more likely it is that the shore may crumble. That is why we recommend that after the pit is dug, you strengthen its walls. Depending on their height, you can use tiles or slate. And how best to do this, he will tell us Talla Khukhrianskaia in your master class:
When all technical points solved, the pit can be filled with water. To do this, just throw a hose connected to the water supply into it.
In addition to the stone, which has an important function and holds the film on the shore, you can place decorative figurines, flower pots and crafts that you made for your garden with your own hands. Design the pond so that it reflects your creative nature and pleases the eye.
Don’t get carried away with the decor, because the pond needs to be cleaned periodically so that the water in it does not die out and turn a beautiful country pond into a large puddle. And to do this, be sure to leave a place on the shore so that you can approach the pond. Better yet, provide a stream that will drain the water.
We create a pond at the dacha from scrap materials
Unfortunately, it is not always possible to find the right and high-quality Construction Materials, but if the desire to create a pond with your own hands does not go away, do not despair. Simple materials at hand will also come to the rescue, of which any summer resident has enough.
A pond can be made from a variety of things:
- from an old car tire;
- from an old bathtub left after renovation;
- from a barrel, basin or bucket.

Bath pond...

...from old tires...

...and from an old barrel
If you truly want to create an unusual and original pond, then the lack of capacity will not stop you.
We use old containers
As we have already said, a pond can be made even from an old bathtub. After all, in essence, it is no worse than the finished form.


The process of creating such a pond will be similar to the previous ones:
- dig a pit for the form;
- fill it with sand and make a cement screed;
- insert bathtub;
- fill with water.
Due to its weight, the bathtub will sag greatly in the pit, which is why it is recommended to tighten its bottom with cement to strengthen it. So that over time the pond does not go deeper.
Also, use sand and soil to stabilize the bathtub inside the pit. To ensure a tight fit of our improvised bowl to the banks, fill in all the voids.
And do not leave the side of the bathtub open, it will not look aesthetically pleasing and will spoil the appearance of the future artificial pond.

And he will clearly show and tell you how to dig a bathtub and shape it into a pond with your own hands. Vitaly KIY in your video tutorial:
However, if your summer cottage plot is not large enough to place full pond, don’t be upset - you can make a pond with your own hands at the dacha from small containers, as in the photo.


Take an old metal or wooden basin, a small barrel or tub. All of them can become an original decorative pond, which does not even have to be submerged below ground level.
U small pond from an old basin there are many advantages, so don’t deny yourself the joy of creating a modest artificial pond if the area of the site does not allow for more:
- does not require excessive costs - everything necessary for its installation is at hand;
- it will take a little time to arrange it - from a few minutes to a couple of hours, but not a day or more;
- it can be placed anywhere;
- if you installed the pond on the surface and did not dig it in, then you can always move it to another place by simply pouring out the water and filling it again after moving it;
- he doesn't require special attention for care - it is enough to change the water from time to time and wash it from the inside so that the bottom is clean.
Ponds made from a basin or small barrel can be installed on a reinforced, flat surface, filled with water and decorated with decorative figures or flowers.


But if your basin has long lost its decent appearance and there is no way to return it to its former luster, then simply dig a small pit to suit its size, install it there like an old bathtub and cover it with pebbles along the shore.

As you can see, old containers allow us to fantasize and create incredible ponds with our own hands in a dacha of any size. And this helps us realize our creative potential.
Pond for the dacha made from a tire
However, if renovations in the apartment are not planned, and the old basins have long since become leaky or turned into flower beds, do not despair, you still have a chance to get your own pond.
And for this you will need the most irreplaceable and available material – car tire. Tires in modern country society have long turned into a universal substitute for building materials.

And it’s not surprising - the strength and shape of the tire allows you to make anything out of it, including a pond. And the size of the future reservoir will depend only on the size of the tire you choose.
First you need to prepare your future container - cut it along the top edge so that only the sides remain. For this you will need a jigsaw or sharp knife(if you chose a tire from a passenger car).
Afterwards you can move on to the pond itself.
Installation steps:
- Outline the outline of the tire and dig a pit to the height of the prepared bowl.
- Fill the pit with sand and compact the bottom.
- Insert the tire inside.
- Cover the tire and the bottom of the future pond with thick film.
- Fill the edges of the film with sand, and then decorate with turf, stone or embankment so that the film is well fixed.
- Fill the pond with water and decorate it with pre-designed decor.
Your tire pond is ready. And it is not inferior in beauty to either ready-made bowls or large film ponds located over large spaces.

In addition, it is easier to care for and keep it clean, and it does not require a lot of water or effort to arrange it.

As you can see, if you have long wanted to feel like a landscape designer in order to turn your dacha into a nice place a vacation where you can not only work, but also enjoy nature away from the noisy city - you can always create a pond with your own hands without much expense.
If you liked our ideas, read other articles in the series!
For beginners, it seems that making a pond from a ready-made plastic mold is easier than making a pond using flexible waterproofing. It's an illusion. At first, the molds seem huge in the store, but after they are installed in the ground, they look about half the size, and when filled with water they look very tiny. Such containers are good for raised bodies of water geometric shapes, for installation on slopes.
The most durable plastic forms for a pond are structures made of fiberglass; they are not inferior in strength to containers made of reinforced plastic, but the edges of the latter can be deformed if the structure is not provided with reliable external support on the ground. These forms are imported and quite expensive. Containers made of ordinary plastic are cheaper, but they are not rigid enough, often have deformed edges, and their sizes are small. Only black forms are suitable for ponds.
Often, plastic molds for ponds in the country are deformed after filling with water; this is due to improper filling of the gap between the wall of the pit and the wall of the mold with soil.
The correct thing to do is this: pour 5-7 cm of sand onto the horizontal base of the pit, compact it tightly and install a plastic mold, then pour 10-15 cm of water into it, then pour sand into the gap between the walls of the pool and the pit to a height of about 20 cm, watering it with water from a hose, or pour a mixture of earth, sand and water into the crack and wait until the liquid mass hardens. Then pour another 10-15 cm of water, and into the gap - sand with water or mash, repeating this until the pool is completely filled with water, and the gap is filled with sand or soil. As a result of these actions, the form will stand rigidly in the ground, and its coastline will be in a horizontal plane.
Water from plastic molds artificial pond it is never drained for the winter, this is an unnecessary and even harmful operation; in the spring the empty bowl will be squeezed out and mangled.
The best way to design a pond in the garden, made in plastic form- is to decorate it with a rockery or blooming retaining wall. IN modern gardens Most often, a pond is built in which aquatic plants grow and fish and frogs live. The shape of a natural pond should be as smooth as possible. The smaller the pond, the fewer all kinds of bends there should be, which is why ponds in rigid shapes look so unnatural, the “banks” of which are excessively indented and resemble shaped cookies rather than a natural structure. If you end up with just such a body of water, the situation can be improved by thoughtful planting of plants that will camouflage the unnaturalness of the banks in plastic form. Do not forget that an excessive number of coastal plants, especially large ones, visually significantly reduce the size of the reservoir.
Another one not an easy task- design of the banks of garden reservoirs: a lawn can come close here, in some places of the coastal zone you can plant coastal plants such as loosestrife, loosestrife, marsh and Siberian irises, daylilies, etc. The choice of coastal plants is inexhaustible, your taste is ennobled by the study of nature and the best samples - that's your judge.
In the process of decorating a pond in the garden, remember that there should not be a lot of vegetation around the geometrically shaped pond; one large plant of an architectural shape, for example a clump of marsh iris or a large hosta, is enough.
Look at the photo on how to beautifully decorate a pond in the garden in regular style: around it, trimmed shrubs and plants in containers are quite logical; if there is no fountain, you can plant a nymphea.
When designing a pond at your dacha, you shouldn’t hold back the flight of your imagination - everything is permissible here: both frivolous cascades and heavy boulders covered with mossy vegetation.
It all depends on how you imagine your country pond, and in what style the nearby ones are decorated.
But here, too, everything is relative - even outright dissonance can be presented as a special idea of the author.
There are two main styles for decorating a pond at your dacha with your own hands: landscape (as close to nature as possible) and designer (deliberately artificial and more fantasy).

There are also landscaped swimming ponds - these are ponds designed in a landscape style, but you can also swim in them. They will be discussed in more detail on another page of the site. In general decorative design the pond must correspond to its shape and size.
How to decorate a pond at your dacha with your own hands in landscape style

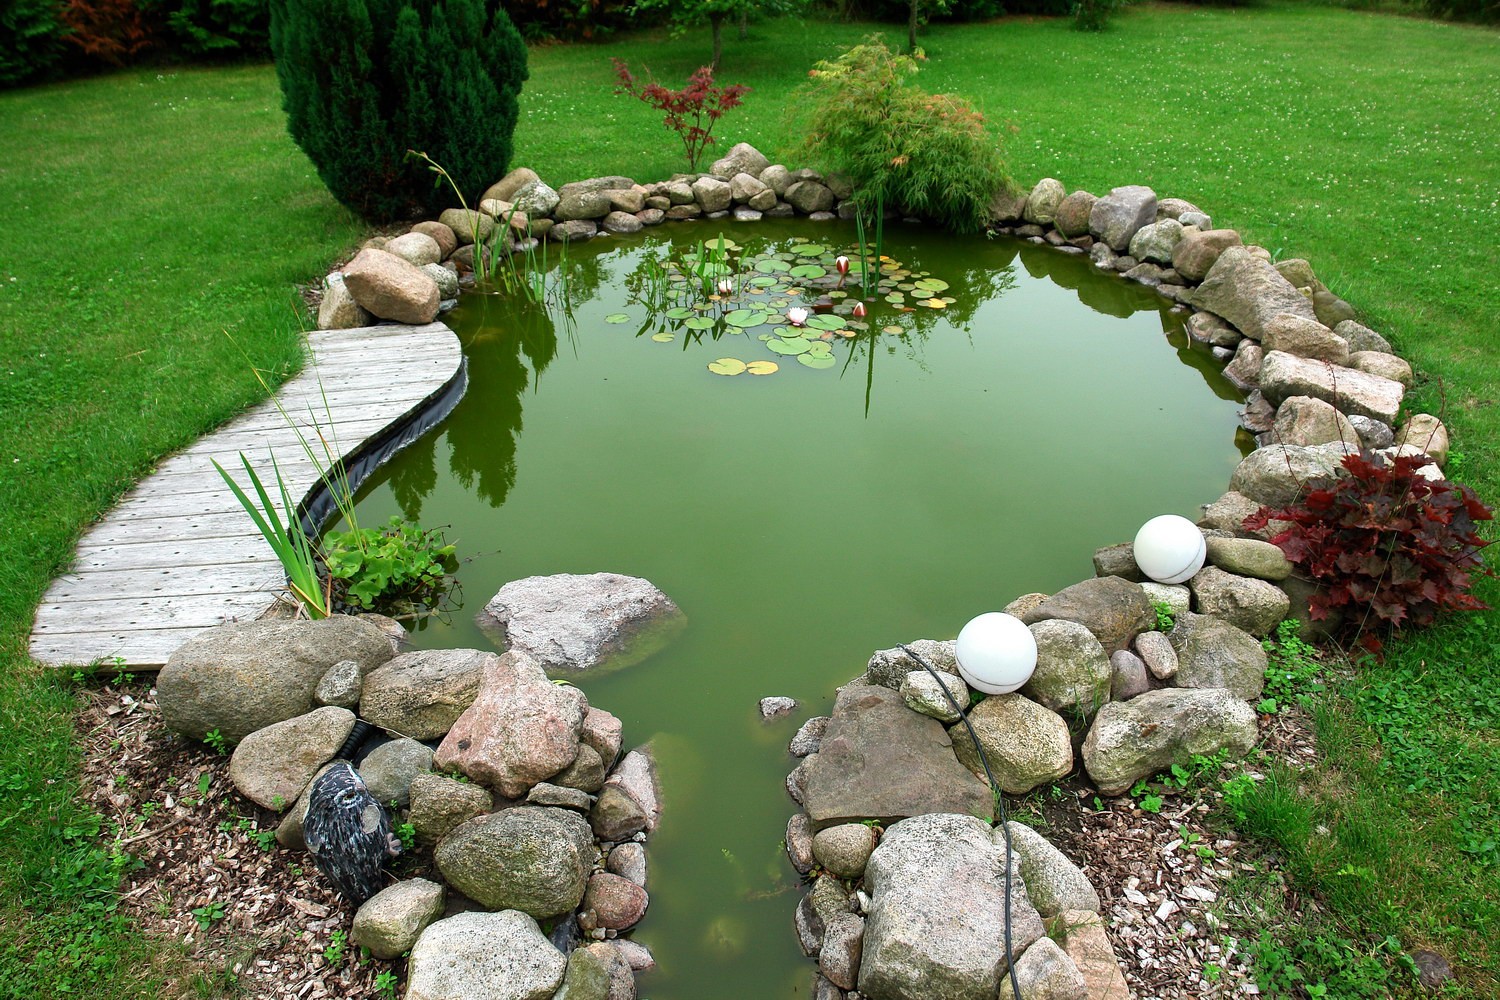
How to decorate a pond with your own hands in a landscape style, if the existing situation on the site allows for a free design style that is close to natural? In this case, the reservoir is made of any shape with a curved coastline, which can then be decorated with natural stones.

From existing species natural and artificial stones For decorating ponds at a summer cottage in a landscape style, preference should be given to crushed granite, river pebbles, and decorative onyx.

Beige sandstone is also suitable, decorative tiles and similar materials. The size of the stones should depend on the size of the pond: for a small pond you need to use stones average size and small ones, and for large ones - larger stones, in combination with medium and small ones, then the shore line will look more natural than if you use stones of the same size.
Look at the photos of decorating ponds with your own hands - each of them is beautiful in its own way:
Photo gallery

You can take the landscape style as a basis. In the ancient Japanese garden, the pond had strict forms, but with a carefully thought-out composition of stones. None bright plants were not used here. In Japan, due to the limited territory, there has always been a desire for minimalism, which was reflected in the design of the reservoir.

According to tradition, all the elements must be present in such a garden, including water, so the reservoir here existed in the form of a tsukubai - a small vessel with water. True, it was necessarily accompanied by a stylized stream flowing from hollow bamboo tubes, as well as dwarf trees along the banks of this stream.

Sometimes the pond in the garden took the shape of a square or rectangle, which was also supposed to emphasize the asceticism of the Japanese.
Here you can see the design of a pond on a summer cottage in Japanese style:
Photo gallery
When decorating a country pond, you can achieve a special effect if you line the bottom of the reservoir with small pebbles. Especially if the pond is shallow, then the stones, beautifully laid out over the entire surface of the bottom, will be visible through the layer of water.

Such a pond, in addition to stone, can be lined with decorative strict tiles, making a pond path from the same. Another idea on how to design an artificial pond is to make a path that runs above the surface of the reservoir: either in the form of a monolithic bridge made of concrete, or by installing stones or slabs raised separately above the water, which create a single line of movement.
Decorating a pond at your summer cottage with plants (with photo)
Composition from natural stones should be complemented by carefully selected plants so that the overall picture creates the illusion of natural beauty.

When decorating a pond with plants, before planting them, you need to draw up approximate diagram placement, distributing crops according to type different levels and steps. Coastal plants can also be placed in the free space between the stones.

The main thing is not to plant too many plants. Ferns will fit perfectly into the coastal landscape, and you can let water lilies float along the surface of the water.

In order for the composition to look beautiful and complete, it is necessary to use cultures that are different in appearance. Heavily overgrown aquatic crops should be partially weeded out to avoid large piles and thickets.
These photos of decorating a pond at your dacha with your own hands show what plants can be planted in a garden pond:
Photo gallery
If the depth of the pond is more than 50 cm, then aquatic crops need to be planted in pots and then placed on the bottom of the reservoir. Deep plants grow well in the shade, and at sufficient depth they will purify the water well.

How to apply decorative pond at the dacha, if the pond is of modest size? A small pond also requires careful decoration; it is important not to overload it too much. big amount elements.
In this case, it is recommended to select simpler plants. You can use deciduous: perennial herbaceous or shrubs with hanging shoots, tall ornamental cereal grasses, as well as wild species that in nature always grow near water bodies.
These may include creamy white or pink meadowsweet, aquilegia, basilisk and daylily.
It is also good to plant marigolds and forget-me-nots, Siberian and mints along the edge of the pond - they will perfectly decorate the border of the pond.
As you can see in the photo, when decorating a country pond with plants, you can place a frog or snails in a small pond, which will help maintain the natural balance of the ecosystem:
Photo gallery
Frogs will eat midges and mosquitoes, which usually live in bodies of water, and snails are known to feed on underwater debris, which means they will come in handy.
How to make an artificial pond with your own hands

When designing an artificial pond large sizes The reservoir can be divided into three main zones: for coastal plants, for shallow-water plants (water lilies), for deep-water plants.

At great depths, fish can live that will perfectly complement the style of a landscape pool. If the reservoir is not very deep, then you need to dig a hole 1.5 m deep especially for wintering fish.

You can complement the landscape pond with a decorative stream, waterfall, cascade, build a rock garden nearby, design the coastline and path to the pond in the same style, using the same tile material, which will also reveal the concept of the entire garden plot.

You can create multi-level ponds with cascades, then an unusual pond will not only decorate the landscape, but also fill the garden with a pleasant and soothing murmur of water.

Before you design a pond at your dacha, consider where in the garden it is located. A landscape pond with natural contours can be located near the terrace of the house or in the depths of the garden next to the gazebo (where all the necessary communications for the pond are also connected).

Conveniently sitting in a gazebo or on the terrace of the house, you can comfortably and with pleasure watch water surface and listen to the splash of water.

Choosing style decision to design a garden pond, you need to focus on the existing architectural, plant and design design summer cottage, but you can also trample on these norms by creating a bright oasis in a strict territory.
How to decorate a decorative pond at your dacha in a designer style

Another idea on how to decorate a pond at your dacha with your own hands is to decorate it in a designer style.

The designer pond is distinguished by the correctness of its forms and the rigor of its design. Usually it embodies some general concept (for example, a Japanese-style pond with a rock garden) or is made in the same style as country house and plot.

If there is no specific style solution at all, then it is better to choose a free one landscape style and for designing a pond.

A designer pond can be strict classic shape or, for example, in the shape of a flower or butterfly - but respecting the geometric lines.

The most laconic in shape is a formal pond with rectangular outlines - it will go well with patio or patio, especially if there are rectilinear or round flower beds nearby, linear paths, etc.

Round ponds also fall under the category of formal ponds. They can decorate a lawn or open lawn, they can be complemented by a pergola or placed near a picturesque group of trees.
Everyone dreams of recreating a miniature paradise on their site. We associate it with beautiful landscape, garden trees and bushes, a gazebo for relaxation, entwined with plants, and a fireplace for cooking over a fire. An addition to this idyllic picture will be. A pond can organically fit into the natural ensemble and become its decoration, because water is the fourth element that a person needs to feel harmony.
Creating an artificial pond is not so difficult; the main thing is to decide on its size, design and place where to place it.
Pond dimensions
The determining factors here are the area of the site, how you see the reservoir and the place that can be allocated to it. Conventionally, home ponds are divided into three categories:
- small decorative ponds, which decorate the site and serve as an addition to the landscape design (up to 5 sq. m.);
- pond that performs decorative function, but at the same time in it (from 10 m. kV.)
- landscaped pool where you can swim. The sizes depend on the capabilities and free land that can be allocated for these purposes.
Ecoponds, as an alternative to a tiled pool, are becoming increasingly popular. Apparently, this is caused by a subconscious craving for pristine nature.
- Small decorative ponds are made from different materials.
At the dacha or site of the house, you can make it from big tires, plastic containers, old bathroom, ready-made forms that you can buy. If desired, equip them pump for water circulation and filter, make a cascade or waterfall. You can run a small amount of decorative fish, koi carp or shubunki.
The design of the pond and plants will become the basis of the water composition. The beauty of small ponds is that you can make them yourself. You will be able to realize your fantasies and tastes in design, so that you can subsequently enjoy your work. 
- Medium-sized ponds are more labor-intensive to manufacture and require certain professional skills.
Making a medium sized pond, basics


This is a rather complex ecosystem where it is necessary to properly install equipment and select plants that would maintain the natural balance and purify the water.
Important. There are several rules for choosing a reservoir location:
- trees should not grow nearby due to falling leaves;
- avoid planting plants with a strong root system near a pond;
- The pond should not be in the sun or get too hot. You need to choose a place so that it is in the shade during the hottest part of the day.
Decoration of the shoreline of the pond
The most interesting and pleasant moments in landscaping a water garden is the design of the coastline. This is where your talent and creativity can shine. Before you start decorating, you need to decide on the style.
What techniques are used for decoration:

Terrace board is one of the elements for decorating the shoreline of a pond; it fits well into landscape composition reservoir A bridge or path across a pond will become a detail that will add additional originality.
These rules are general character. The main thing is to bring your vision and creative energy into pond decoration. The main thing is that it is beautiful and pleasing.
Plants for pond decoration
When choosing vegetation for a pond, you need to focus on the size of the reservoir and its depth.
Important. On 1 square meter plant 2.3 plants. 1/3 underwater to maintain ecological balance.


The optimal time for planting is spring, early summer. It is better to line the containers with film and sprinkle with pebbles to prevent the soil from being washed away. As it grows, excess vegetation is caught and thinned out. As it evaporates, water is added to the pond.
Making a pond at your dacha with your own hands is not difficult if you work a little and take into account the recommendations.
- It is better to choose a place in the shade of a house or near a fence. This is the optimal location for a pond and relaxation during the hottest part of the day.
- Nearby you can put a gazebo for relaxation, a barbecue, and benches.
- A pond made of film would be optimal and less labor-intensive.
- Try to locate the pond close to the water supply point.
- When digging a pit, pay attention to how close the groundwater lies. If the water is shallow in the ground, it can accumulate and squeeze out the bottom of the reservoir.
- Buy film with a reserve. You can measure it using an ordinary cord, which is pulled through the bottom of the pit from one edge to the other.
- After filling the pond, let the water sit for a while.
A pond at your dacha or at home will become your favorite relaxation spot. If it is made with your own hands, then it is a source of pride. It's nice to spend a summer evening on the shore of your own small lake.
Creating a pond on video
Photo gallery of pond design examples


A decorative pond is not only one of the most beautiful elements of landscape design, but also ideal place for relaxation - water soothes, relaxes, saturates the air with freshness and coolness. Making and equipping a pond is not easy, but with desire and perseverance, you can easily overcome any difficulties.
Having a beautiful pond in the garden is the dream of any summer resident. In order for the reservoir to be original and easy to maintain, it is necessary to think through all the details: choose a location, select materials, select residents and plants, and then begin construction.
A pond in the garden: how to choose a site and not make a mistake with the shape and size
On initial stage, often due to their inexperience and ignorance, gardeners make mistakes that can cause many problems in the future. Only correctly selected terrain, size and shape ideally suited to the area of the site is the key to successful construction. That is why, before carrying out such work, a diagram is drawn up and planning of landscape design objects and buildings in the garden is carried out.
Site selection
- Best suited for a pond open area, since tall trees and shrubs will constantly clog the water. Alternatively, you can cover the surface with a net during leaf fall, but in the summer the protection will have to be removed, and debris from surrounding plants will still end up at the bottom of the reservoir. A pond placed in the shade will take a long time to warm up, especially in early spring.
- It is very important that the selected area is under the influence sun rays either in the morning or in the afternoon.
- The surface of the construction site must be perfectly flat. Even a slight difference in height can spoil the entire appearance; for example, waterproofing protruding from high banks does not look aesthetically pleasing.
Form
The laws of landscape design state that for a small palisade in natural style optimal solution- sinuous, intricate shape. As practice shows, placing such a pond in a small area is quite problematic, and it will look comical.
But this is not a reason to abandon the reservoir; you can make a waterfall with a height difference or a small semi-fountain. With proper decoration, even the simplest geometric model will fit into all kinds of plantings without disturbing the landscape.
If the palisade is designed in a certain style, then the pond should correspond to it. Yes, for English style a round pond is suitable, for a classic one - with strictly defined corners, and an oriental design will allow you to choose a completely arbitrary shape.
Size and depth
It is not necessary to make a pond in the garden large, even if the area allows it. Properly placed small size a pond will look much more impressive than a lake in the middle of a lawn. Although the larger ones are easier to care for, easier to decorate and can be used for swimming or fishing.
The optimal depth of the pond is from 30 to 50 cm; under such a thickness of water both vegetation and living creatures will be comfortable. But it is worth considering that such a reservoir will freeze, and fish and plants will have to be relocated for the winter. It is much easier to install and design a shallow reservoir with gently sloping banks.
DIY pond in the garden
Garden ponds are installed from a wide variety of materials: plastic, concrete, stone, film, geotextiles. You can also buy a ready-made base - it is relatively easy to install, it is suitable for wintering aquatic plants and has a fairly long service life.
The purpose of a pond can be different:
- mini pond from cast iron bath or garden cart;
- a decorative swamp with which you can drain a problem area;
- home to local flora and fauna;
- a haven for exotic fish and plants;
- pool with iridescent water.
Arrangement of a pond from a ready-made mold
Using a specially designed container made of polyethylene or fiberglass, creating a small mini-pond with standing water is quite simple. They come in a variety of shapes and types and are sold in specialty stores and at themed landscape design exhibitions.
- Place a two-level base in a predetermined place and outline its contours on the surface of the ground, adding 15 cm for seams. Dig a pit for one level, and then, after re-trying, for another, but 15-20 cm deeper than the bath itself
- Thoroughly clean the recess from stones and plant debris and compact it well. Next, make a layer of dry sand, 10 cm thick, and level it. Using a level and a ruler, ensure that the container is installed correctly.
- Fill the resulting air space with sand, moistening it until it stops seeping down. At the same time, fill the pond with water and monitor its level. If necessary, twist until the position is even.
- After 24 hours, check to see if the pond has subsided. If this happens, add sand and compact it. Then empty the container, wash and pour clean water.
- That's it, the pond is ready for decoration. Place pebbles around it or make paths from colored gravel, plant plants in containers.
Original do-it-yourself pond in the garden photo
Often the main determining factor when choosing one of the decorative pond options is the financial side. We offer several very original and relatively inexpensive ways build the treasured water feature.
Second Life
Old barrels located in a secluded place will serve as an excellent habitat for aquatic plants. The principle of laying such a mini-pond is the same as in the previous method. Wooden barrels It is better to use oak, the main thing is that they are not dry. But with metal containers you will have to tinker a little: wash them, cover the outer surface with bitumen, and paint the inside oil paint black to add visual depth.
Man-made lake
What could be more charming than a small lake next to a country house? You will need plastic film, which can be used to cover 3 by 3 meter pieces of cardboard and plywood or similar pieces of plastic (5 pieces).
You'll have to work hard:
- dig a pit with a volume of 3*3*3 m;
- secure the ground (using thin plywood or construction cardboard); if the plastic compound will not be installed, then cover them first plastic film;
- install the plastic covering perfectly evenly inner surface and bottom.
As a result, your creation will delight the eye for many years.
raised pond
If the garden area is very small, this is not a reason to deprive yourself of the pleasure of admiring the water composition. The basis can be the usual old bath, the sides of which will be successfully disguised by wood or stone. This design is not recommended for breeding fish, but it is ideal for aquatic plants and snails.
For ease of cleaning in the pond and masking the white enamel, use black film, securing its edges decorative stones so that the bathtub is not visible at all.
DIY pond in the garden photo: choosing plants for compositions
Without a doubt, a pond made with your own hands is a great achievement, but in order for the pond to attract the eye and invite you to relax, you should choose the right vegetation.
Floating crops
The key place in every garden pond is occupied by the well-known water lily or nymphea (lat. Nymphaea). Many small-flowered and large-flowered varieties allow you to beautifully decorate a pond of any size.
For example, for a small pond, the most suitable are dwarf water lilies (Pygmaea Alba, N. tetragona, Marliacea Rosea), as they can visually increase the area. It is not advisable to plant other floating plants next to the nymph, or to erect a rockery or fountain (splashes can damage the leaves).
Marsh buttercup (Hottonia palustris) and water buttercup (Ranunculus aquatilis) will look very impressive on the water. These species are unpretentious; a piece of shoot is enough for their reproduction, but they are completely unsuited to wintering under thick ice, so during the cold period the plants should be moved to the basement.
Shallow water plants
The peculiarities of the root system of amphibian crops make them most suitable for landscaping ornamental swamps, reservoirs located in low areas, as well as shallow waters. This group includes: iris, marsh marigold, manna, arrowhead.
Coastal zone
The selection of plants for edging the pond depends on the level of soil drainage and the depth of the pond. groundwater. Heuchera, daylilies (Hemerocallis), bathwort (Tróllius), Siberian iris (Íris sibírica), and cornflower (Thalictrum) will take root on a gently sloping, damp bank. Numerous varieties and the most unusual color schemes allow you to combine these aquatic plants advantageously.
The coastal zone, framed by rocky hills, involves planting drought-resistant, light-loving plants, such as saxifrage (Saxifraga) and young (Sempervivum), as well as low-growing bells and cereals, edelweiss and phlox. When planting crops, it is necessary to regulate the layering of plantings: plant low-growing perennials at the top, in a kind of water plateau, and tall ones - several levels lower.
Bottom line
garden pond not just a water feature - it is a real architectural structure, the erection and arrangement of which will require a lot of effort and time. But thanks to our practical advice and instructions, the creative process of constructing and landscaping a pond will bring a lot of pleasure.