A tabletop jigsaw is an indispensable item for any owner who is used to doing household work on his own. Electric jigsaws are especially good for residents of the private sector, hobbyists manual labor and country holidays. From its prototype, an ordinary hand jigsaw, a tabletop electric model gone far enough. A desktop jigsaw makes it easier and faster to cut, not to mention improving quality.
Concept of a tabletop jigsaw
A jigsaw is a saw, which is characterized by reciprocating movements of the saw blade, which acts as a working body. It has a ski designed to guide the saw blade when moving along the surface that is being processed, and makes movements at a frequency of up to 3000 vibrations per minute.
This instrument was invented in 1946. Its creator is Albert Kaufman, who replaced the needle in sewing machine on the blade. The instrument went on sale already in 1947. A manual jigsaw has a body with a flat platform and a handle. Main difference electric jigsaw from the manual one lies in its greater functionality and cutting quality.

Located inside Electrical engine and a special mechanism that drives the blade. In stationary jigsaws there is no handle, and the platform is located on top. At the front of the mechanism there is a guide, at the bottom there is a retractable blade that moves and makes cuts.
The tool works as follows: a tabletop jigsaw file is securely secured with clamps in the slide. The reciprocating movements have a frequency of up to 3000 strokes and can be adjusted. The support platform allows the jigsaw to focus on the part being cut, so the work is carried out very accurately.
The purpose of a desktop jigsaw
A jigsaw is an integral part of every workshop and every hobbyist. Its thin file can successfully cut plywood, copper, iron, thick boards, brass, and steel. Tools come with motor, foot or manual drive and are more productive. An electric jigsaw is simply indispensable for carpenters, wood workers, furniture decorators, and drywall workers who produce complex parts.
An electric jigsaw can make straight and curved cuts on workpieces with complex shapes and various sheet materials without disturbing the external contour. Most often, tabletop jigsaws are used for cutting wood and wooden boards, figures with complex outlines made of laminate and plasterboard, plastic blanks, and also for cutting sheet metal.

Benchtop electric jigsaw makes clean cuts complex shape and works with small
details. Due to the stable and fixed position during operation, it is achieved high accuracy cutting The file has a stable motion thanks to the tension system and guides, which manual jigsaws lack. The large size of the table makes it stable, so the precise sawing direction is maintained.
Types of jigsaws
Today, the power tool market offers a wide variety of jigsaws, which differ in the nature of their application, technical specifications, type of power supply and design features. IN construction stores You can buy a desktop jigsaw to suit every taste and budget.
It is difficult to classify by design features, because each manufacturing company strives to provide its products with features that are designed to facilitate and improve the operation of the tool. In this regard, the shape of the handle is a significant parameter.
There are two established types of handles - mushroom-shaped and D-shaped. A jigsaw with a staple handle requires one-handed operation. This increases the possibilities of using a jigsaw, but has a somewhat negative effect on the quality of cutting the material.

Mushroom-shaped handles allow for more accurate cuts when holding the jigsaw with both hands, having previously secured the workpiece to be cut. The choice of a jigsaw with a specific handle shape depends on the financial capabilities and personal preferences of the buyer. You should choose the jigsaw that will be more convenient to work with.
Household jigsaws are not intended for intensive use, but the low price of a desktop jigsaw and the power that is enough for household needs, make them indispensable in the household.
Professional jigsaws are characterized by high wear resistance and the possibility of daily long-term (up to 8 hours) use. The significant power of such jigsaws allows processing of materials of large thickness. Expanded equipment and improved characteristics are reflected in the price.

Among professional jigsaws Industrial ones are also distinguished, which are characterized by greater adaptability to complex operations and drive features - for example, increased power supply voltage. Industrial models are machines that are designed for the woodworking industry.
Depending on the type of power supply, there are mains and cordless jigsaws. Network models are powered from a power supply network with standard voltage. If productivity is important to you, then you should choose a corded power tool.
Cordless jigsaws provide independence from the presence of sockets and greater mobility during operation. When purchasing a battery model, you should pay attention to the type of battery. Elevated performance characteristics inherent in lithium-ion batteries. The battery capacity is responsible for the duration of operation without recharging.
Advantages of desktop jigsaws
A tabletop electric jigsaw is a stationary design, so this type of cutting tool has many advantages. Modern models can work with wooden materials 40-50 millimeters thick. The working body is a narrow saw, which makes vertical translational and reciprocal movements. Due to the peculiarities of the notching of the teeth and the mechanics of the movements of the saw, the material is cut out by moving upward.
A tabletop jigsaw allows you to cut out complex decorative parts, make longitudinal, straight, inclined and transverse cuts. The wide tabletop allows you to process large parts and make cuts inside wide workpieces. Reliable fastening protects the housing from unnecessary vibrations and allows the material to be well positioned, so the motor can operate without overload.
The advantages of desktop jigsaws include good accuracy and clarity of cuts, high safety and ease of use, wide customization options depending on the material and the required detail of the cut workpieces.

If you need to cut small parts, a manual jigsaw will not be very convenient. It is quite heavy, so you will have to hold it with one hand and guide the workpiece with the other. A table jigsaw does not have this drawback. Perhaps the inconveniences are too big sizes and the difficulty of working with large parts.
A tabletop jigsaw is a kind of mini-machine for cutting workpieces. If you purchase a jigsaw in a store, most likely it will provide the ability to select power and adjust the frequency of saw strokes. However, you can make a simple homemade tabletop jigsaw, and very quickly. You will need a hand jigsaw, a few screws, a piece of plywood small sizes and only an hour of work.
Making a tabletop jigsaw
A carefully made jigsaw will be little inferior to one made in a factory, and in some respects even superior to it. Assembling such a jigsaw is not difficult if you have necessary materials. Next we will describe simple diagram such manipulations.
The design of the jigsaw includes the following components: handle, switch button, insulating washer, power cord, frame, heating filament, screw clamp and earring. First you need to make a frame. You will need a duralumin pipe with an outer diameter of up to twelve millimeters.
You can also use textolite with a thickness of at least ten millimeters or thick plywood for the base. But keep in mind that the lighter the frame, the more convenient the jigsaw will be to use. Be sure to provide a channel so that you can lay the power cord later. Most best shape a frame is one whose sides are tilted 45 degrees.

Next you need to make an earring. It is made of copper sheet one millimeter thick. After this, it is attached with screws to the frame where it connects to the handle. In this way, the screw, wing nut and shackle will form a clamp in which the heating filament can be fixed. The thickness of the duralumin sheet should be up to 0.8 millimeters. It is necessary to make pressing cheeks from it, between which there is a switch button.
After this, you need to cut a gap in the plywood that the saw can fit through. It can be done using a drill. To do this, you need to drill holes along the marking line and smooth out the transitions. Instead of plywood, you can use plastic, metal, plexiglass and others. Next, you place and drill mounting holes on the plywood and jigsaw base plate.
Then you need to secure the jigsaw with screws to plywood base so that the file can pass through the gap. You attach the structure to the table using a clamp so that the file is pointing upward. You can also secure the platform in any way possible.
The jigsaw file remains a regular one, but the possibilities for good cutting are expanded by freeing up your hands.
You can use a nichrome spiral from any household heating device(iron for example) as a heating thread. It must be secured with tension between the ends of the frame bends. In order for the thread to heat up, you need to apply a tension of about 14 V. To control the operating mode, you can use a rheostat.
The current is determined by the thickness and length of the nichrome thread. Using a rheostat, you can set the optimal current strength (no more than 3-5 A), which will affect the temperature to which the filament is heated. Before starting work, it is necessary to determine the current strength. But keep in mind that if too high strength The material being cut can be caught by the flame, but if it is insufficient, it will not be taken. A self-made desktop jigsaw will allow you to cut out shapes with complex contours from various types materials.
Rules for using a desktop jigsaw
When working with a table jigsaw, you must adhere to some rules:
- When cutting, do not press too hard on the tool, otherwise the needle will break at best, or you will ruin the work at worst.
- Replace saw blades from time to time. old saw can spoil and destroy the surface of the material.
- If you work with organic glass and non-ferrous alloys, the surface of the product must be moistened with water. This operation will speed up the process and extend the life of the saw.
- If you are cutting a surface with a thickness of less than one millimeter, place a sheet of wood or plywood under the material being processed.
- Before cutting, it is necessary to secure the material. It is better not to make long cuts by hand; the line may turn out to be crooked.
- For cutting different materials appropriate blades are required, with a special pitch and length.
- Rotate the tool by turning only the back of the tool.
- When cutting laminate, tape is applied to the cut line, which protects the material from chipping.
- If there is a need for curved cuts, set the jigsaw pendulum to minimum.
If you have not yet fully understood how to make a tabletop jigsaw, watch a video about this procedure. This tool allows you to cut complex parts from wood and other materials, make longitudinal, inclined, straight and transverse cuts. Using a jigsaw, you can process large parts, wide workpieces and small products, which is not superfluous at home.
Since childhood, we have been familiar with the technology of sawing with a jigsaw. The principle is simple - a stationary part is placed on a stand with a technological cutout, the cut is made by moving the saw. The quality of work depends on the steadfastness of the hands and the skill of the worker.
In this way, you can literally cut lace from thin wooden or plastic blanks. However, the process is labor-intensive and slow. Therefore, many craftsmen thought about small-scale mechanization.
A simple design from the last century
More in the magazine Young technician“Drawings were offered on how to make a jigsaw machine with your own hands. Moreover, the design does not involve an electric drive; the drive operates from muscular force, like a knife sharpener.
The machine consists of main parts:
- bed (A)
- work table (B) with slot for canvas
- lever system (B) for holding the saw blade
- flywheel (G), which is the primary drive pulley
- crank mechanism (D), combined with a secondary drive pulley, and driving the levers (B)
- pedal assembly (E) with a crank mechanism driving the flywheel (D)
- saw blade tensioner (W)
The master uses his foot to move the flywheel (D). Using a belt drive, the crank mechanism (D) connected to the lower arm (B) rotates. A file is stretched between the levers; the degree of tension is regulated by a lanyard (G).
With a well-balanced flywheel, sufficient smooth running of the saw blade is ensured, and such a homemade jigsaw machine allows you to massively cut out the same type of workpiece, saving time and effort. In those days, jigsaw files were produced in the form of a flat, unidirectional strip.

Therefore, to obtain patterns of complex shapes, it was necessary to rotate the workpiece around the canvas. The dimensions of the workpiece are limited by the length of the arms (B).
From a mechanical jigsaw to an electric one one step
Foot drive cannot give real freedom of action and uniformity of the saw stroke. It makes more sense to use an electric motor for the crank mechanism. However, if you use a tabletop jigsaw occasionally, there is no point in making a stationary structure with its own motor.
You can use home power tools. For example, a screwdriver with a rotation speed controller.
The materials used are literally scraps of wood and old trash. The only critical part is the bed. It is better to make it from durable plywood with a thickness of at least 18 mm.

We make all connections using wood screws; the joints can be coated with PVA glue. From the same material we assemble a support pedestal for the lever rod. The design of the support should not have any play; the subsequent accuracy of the entire machine depends on its strength.
Having made a jigsaw with your own hands, you will not only be able to purchase practical tool, but also save cash: it will be much cheaper than the factory analogue, while possessing a full range of functions. A homemade jigsaw will allow you to create products of complex shapes from wood, plastic and other materials, the production of which with hand tools under normal conditions would take a lot of time and effort.

A homemade jigsaw allows you to make cuts of complex shapes.
You should consider the structure and sequence of manufacturing a simple tabletop electric jigsaw, assembly features and the procedure for working with it.
How does a tabletop jigsaw work?
As the name suggests, this tool is designed to be placed on the surface of a desktop or workbench. Compact dimensions allow you to work with a jigsaw both in a workshop or garage, and at home. The electric jigsaw is an indispensable tool for making complex wood decorations, figured plywood carvings and similar works.

Kinematic diagram of the jigsaw drive.
It is necessary to consider the structure in more detail table jigsaw factory production. This will allow you to understand the main features of the device and apply them in a homemade model.
The components of an electric jigsaw can be divided into 3 parts:
- movable frame with saw;
- fixed base;
- Electrical engine.
The operating principle of the tool is as follows: an electric motor rotates a crank mechanism, which converts rotational movements into reciprocating movements. The movements are transmitted to a movable frame on which the saw is tensioned.
The homemade device works using the same principle. To simplify the design, the movable frame can be replaced with a regular hand jigsaw.
Return to contents
Parts for electric jigsaw
When assembling an electric jigsaw, it is important to find a suitable motor that will drive the working tool - the saw. A motor from a drill, blender, etc. is perfect for this purpose. food processor or other equipment of the same type.

It is better to make the jigsaw frame from aluminum pipe.
The movable frame is made from metal profiles, wooden planks or slats made of durable plastic. It is most convenient to work with aluminum tubes square section, since they are easy to process, have low weight and a significant margin of safety.
To fix the jigsaw in the desired position, you should make a reliable frame for it from wood or metal. The dimensions of the frame do not have much impact on the operation of the jigsaw. They depend only on which version of the tool you need - a compact tabletop or a full-size one installed on the floor.
The jigsaw table is made from a thick sheet of plywood, in which a small diameter hole is made where the file will move (Fig. 2).
A gasket made of elastic material - rubber or leather - is placed between the body and the table, which will dampen vibration.
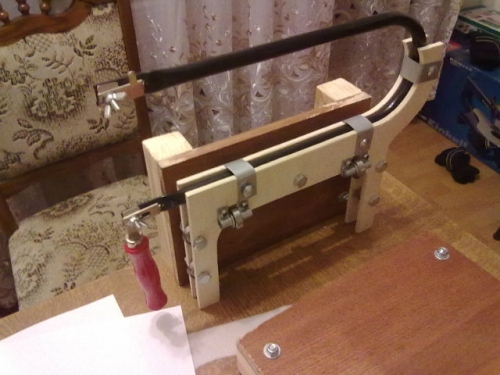
There is also a simpler option on how to make homemade jigsaw. It consists in the fact that a hand-held electric jigsaw is mounted in a vertical position on a table-stand, while its file is tensioned to the movable guide bars - levers.
Return to contents
Assembling a table jigsaw
The construction of a homemade jigsaw begins with assembling the body, which can be made of plywood, chipboard or metal. The most simple model This tool can be used without a housing, but in this case strong vibrations occur, which can significantly affect the ease of use. In this case, two holes are made in the jigsaw - one for attaching the crank to the tool, the second for movably fixing the jigsaw itself to the table. After starting the engine, the jigsaw begins to produce reciprocating movements that facilitate sawing of the material.

Such a spring will provide the necessary tension on the jigsaw saw.
A more sophisticated model includes two separate strips with wing nuts installed at the ends. At the opposite end, the planks are pulled together by a strong spring, ensuring constant tension on the saw. Such a device operates from a separate motor or, for example, from a drill.
There is a vertical bar running inside the case, which is fixedly attached to its bottom or one of the walls. Two holes are made in it, the distance between which should be 2-3 cm less than the length of a standard file. Bolts or pins are inserted into the holes, onto which strips are placed that hold the file.
The engine is built into the housing and is attached to the bottom bar by means of a disk with a connecting rod mechanism. A table with a hole for a file acts as a cover for the case.
The main disadvantage of a jigsaw with a separate motor lies in its most intricate part - the crank mechanism. The file with it makes not only vertical, but also oblique movements, which cannot but affect the cutting accuracy. If you need to get a precise tool, then it is better to replace the motor with an inexpensive factory-made manual jigsaw. It is secured under the surface of the body and a file is passed through the table, clamping it with one end in the jigsaw and the other in top bar designs. This design ensures sufficient cutting accuracy, bringing this parameter closer to factory models.
Return to contents
Advantages of using an electric jigsaw

A jigsaw allows you to make complex cuts very accurately.
Unlike hand tools, an electric jigsaw has clear advantages, including:
- more high speed work;
- the ability to work with two hands, which increases accuracy;
- safety - with proper organization A stationary labor tool is much safer because it cannot break out of your hands.
Besides, self-production An electric jigsaw will save money, since factory machines of this type are quite expensive.
The article will primarily be useful to those people who often work with wood as a hobby, without making money from it. The author presents quite budget project desktop jigsaw, which can be assembled in one day, with minimum costs for materials.
To create the machine you will need the following materials:
- Working manual jigsaw;
- Plywood;
- Self-tapping screws and bolts with nuts;
- Guides for furniture drawers;
- Two bearings;
- Compression spring;
- Spray paint;
- Self-adhesive paper.
Materials and tools are standard, available in every workshop.
Step 1. Body.
The first step is to create a body for a manual jigsaw from plywood. Here you need to think in advance where the holes for the switch and speed controller will be located.
It should look something like this:

Step 2. Tabletop.
It is better to take a thick piece of chipboard with a good coating as the base of the tabletop, since the workpieces being processed will rub against it during operation of the machine.
A hole for a saw blade is drilled in the chipboard. The jigsaw itself will be attached to the back of the tabletop.
A stem for attaching the boom is also made from furniture guides:

Here's what it looks like assembled:

And the tabletop is attached to the body:

Step 3. Arrow.
The boom itself will be made of two furniture guides. They are bolted together to increase rigidity.

The boom supports are made of chipboard. Before painting and installing them, the point at which the boom is attached to the support is measured. Before doing this, they need to be installed in their place:

After this, it is necessary to drill holes in the support for the bearing seats.

Step 4. Painting.
The prepared supports are spray painted.

While they dry, the machine itself is covered with self-adhesive tape.

Step 5. Assembly.
Bearings are inserted into the supports and screwed into place.

The boom mounting axis will be made of two bolts screwed into the guides as shown in the photo. The diameter of the bolts is selected in accordance with the diameter of the inner race of the bearing.

The bolts are tightened securely, after which the two halves are screwed to each other.

This clearly shows how the boom will be secured in the supports:

The boom is installed in its place and secured with nuts.

Next you need to install the garter spring. It is necessary in order to return the arrow to its original position after the jigsaw pulls it down. This is how the saw will move back and forth. It must be adjusted so that it is not too soft (this will complicate the operation of the machine) and too hard (this can lead to overheating of the jigsaw motor).
How to secure it is shown in the photo:


Then, from a thin strip of metal (1 mm), it is necessary to make fastenings for the file to the arrow. They must rotate freely on the axis, since during operation the boom changes its angle of inclination to the jigsaw, and if they are static, this can lead to breakage of the saw.
This is what the mounts should look like:

The boom supports are additionally reinforced with a long bolt, it can be seen in the photo:

Step 6. Electronic part.
Since access to a manual jigsaw is limited, it is necessary to place the controls on the outside of the body.
To adjust the rotation speed of the jigsaw electric motor, the author used a phase power regulator. Here is its electrical diagram.
In life home handyman, periodically there is a need to make figured and simply decorative cuts, including inside the workpiece. Gasoline, circular and regular hand saws they cannot cope with this task, due to their design features. To solve this problem use manual jigsaw, specially designed to perform such operations. This tool undoubtedly copes with its task, but when working with large volumes or dimensional materials, it definitely loses to its more professional brother - a jigsaw.
Purchasing a brand new, shiny, and functional benchtop jigsaw is absolutely effortless. Store shelves are filled with products from various manufacturers aimed at professional and amateur work. At first glance, the stationary jigsaws on sale seem to be very complex in terms of design, the assembly of which is carried out only by selected expert technicians. In fact, this is quite simple devices that you can do yourself if you have the desire and step by step instructions. And if the first point depends only on you, we will definitely help with the second and provide detailed instructions on how to independently assemble a homemade jigsaw machine.
Scope of application
The special design and thin saw blade make the tabletop jigsaw a unique device, indispensable when performing certain types of tasks. This device has gained the greatest popularity in the woodworking industry. It is often used in delicate work on making jewelry, souvenirs, musical instruments and furniture.One of the main features for which the wood jigsaw is so valued is the ability to carry out internal cuts on the workpiece without damaging its contour. Not the least role in the usefulness of this device is its ease of use, when both hands of the operator are free and can the best way control the position of the product on work surface. To everything else, it is worth adding the accuracy of the resulting cutting line, as well as the ability to work with plastic and metal. All of the above advantages make a tabletop jigsaw the best tool for sawing decorative elements.
The working principle of a jigsaw machine
To form the clearest possible picture of the structure of a tabletop jigsaw, you need to understand what it consists of. Next, we will list all the design elements of an elementary apparatus of this type, without additional functionality (removing sawdust, speed control, tilting the working surface and other gadgets). So, a stationary jigsaw consists of the following components:- Stable base
- Electric motor
- Crank assembly
- Desktop
- Upper and lower arm
- File clamping device
The whole process originates from the motor, which transmits rotation to the crank mechanism, which converts the circular motion into reciprocating motion. The connecting rod, which is part of the mechanism, transfers movement to the lower arm, causing it to move up and down. The entire structure described above is located under the desktop. The upper lever is located above the table surface and is connected to the lower spring, which serves as a saw blade tensioner. At the ends of both levers opposite to the spring there is a clamp where a saw is installed to cut the workpiece.
For greater clarity of the entire process described above, we present the following drawing of a jigsaw machine with the function of a saw blade tension regulator. Although this feature is one of the main ones, we did not present it in the description of the design of an elementary device, since it is possible to work without it.

Jigsaw machine from electric jigsaw
Not everyone has a need to regularly carry out decorative figured cuts. Often, to solve such problems, home craftsmen only need a regular hand-held electric jigsaw. Not everyone wants to purchase a bulky and rather expensive device for one-time use and further collection of dust. Still, in everyday life, sometimes there is a job that requires the most accurate and accurate cutting. In this case, you can assemble a fairly simple jigsaw machine with your own hands, using a minimal set of materials and a little imagination.
Today, the network offers many different options for desktop jigsaws, with varying degrees of complexity and efficiency. After reviewing dozens of products, we settled on the most interesting and at the same time simple assembly that meets the main requirements for cutting quality. Even a beginner who has at his disposal can assemble such a jigsaw machine from a manual jigsaw with his own hands necessary tool. For assembly you will need:

- Chipboard sheet (3 pcs): 600x400x20 (length, width, height)
- Spring
- Profile pipe (1.5 m): 30x30x2 (length, width, thickness)
- Jigsaw
- Flat washers (4 pcs)
- Bolts for washers and connections
- Self-tapping screws for countertop assembly
Required tools:
- Welding machine
- Grinder with a metal disc
- Screwdriver
1.First of all, you should assemble the base of the future machine. To do this, take 3 prepared sheets of chipboard or other thick enough wood material and make a structure out of them that looks like the letter “p”. We fix it at the edges with self-tapping screws. For greater reliability and stability, you can make a back wall.


2. In the center of the surface of the assembled tabletop, we outline future holes for a file and several fasteners for a jigsaw. To do this, remove the sole from the jigsaw, apply it with the opposite (not flat) side to the future attachment point and make several points through the grooves of the sole. At this stage, it is necessary to maintain accuracy, since the jigsaw installed from below must have the most accurate, perpendicular location to the side edges of the table, in order to avoid distortion of the file during further work. We drill the marked points with a drill 3-4 mm, and the central one (for the file) by 10 mm. As in the photos below.


3. After fixing the jigsaw under the tabletop, we proceed to assembling the upper arm from square pipe, serving as a saw blade tensioner. As a fixed base, we cut off a part of the pipe, 300 mm long, and weld fixation elements (corners or ears) at one of the ends. The moving part should be slightly longer (about 45 cm). The connection of two elements is carried out using a bolt with a nut and a U-shaped metal element, welded to the end of the post, as in the photo below.


A washer is welded to the end of the movable lever, which will be located directly on the file, which will serve as the upper fastening element.

4. Before installing the assembled tensioner structure to the surface of the table top, be sure to make sure that the end of the boom is located directly above the hole drilled for the file. If the top fastening moves too far to the side, the file will often tear, complicating the cutting process. When the ideal location of the tensioner has been verified, we fasten the structure to the tabletop with bolts.

5. Since the jigsaw is not suitable for working with thin files, we make a simple adapter fastener for it. To do this, take an old saw blade, grind off the teeth with a grinder, cut them to 3-4 cm in length and weld a regular nut to the end, into which the saw blade will be clamped using a second nut and bolt.

When making such an adapter, pay attention Special attention to its length. If it is too large, the nut will hit the bottom of the tabletop, which may cause the tool to break.
6. When the file is clamped in both fasteners, all that remains is to tension it and start working. The implementation of such a function is simple. We attach the spring to the back of the movable lever using a bolt and nut, and fix the opposite part to the tabletop to the required length. Determining the tension is very easy. To do this, just run your finger along the file, like a guitar string. A high sound will indicate that the device is operational.

At this stage, the assembly of the elementary device is considered complete. To more clearly understand how to make a machine from a jigsaw, we recommend watching the following video.
Homemade jigsaw from a drill
A screwdriver and a drill are among the most common power tools in any household. These devices are quite powerful, have a wide range of applications and are sometimes even used as drives for various mechanisms. The author of the following manual on assembling a tabletop jigsaw with his own hands uses a drill as a motor.
The manufacturing process of a classic machine presented below does not require welding and cutting metal with a grinder, but at the same time perfectly demonstrates the principle of operation of such a device. The device is based on a simple crank mechanism, which can be made in a couple of minutes, having at your disposal a piece of plywood and a short steel rod with a diameter of 6 mm. Unfortunately, the author did not provide detailed drawing jigsaw machine, but answered many questions by editing a visual video instruction.


The entire assembly process includes quite a lot small parts, easy to understand and do not require additional comments. For this reason, we decided not to explain basic things in words, but to touch only on the basic details of the design. By tradition, we begin the instructions by listing the required materials.
- Wooden slats (2 pcs): 500x40x20 (length, width, thickness)
- Chipboard for base: 400x350x20
- Chipboard for work surface: 320x320x20
- Chipboard strips (2 pcs): 350x50x20
- Aluminum sheet: 400x400x1
- Drill (screwdriver)
- PVC pipes (4 pcs): 300 mm in length
- Self-tapping screws, bolts, washers and nuts
- Wood glue
- Steel rod, 6mm diameter (for crank assembly)
- Spring
Required tools:
- Screwdriver or drill
- Pliers
- Metal scissors
- Hammer

In place of the presented saw tension mechanism, you can install a small lanyard with a fixing nut. This way, the tensioning process will be more convenient and efficient.

The author uses steel wire as a file for survival in the forest. Of course, a perfectly even cut cannot be obtained with such an element, so at the ends of the upper and lower arms, you should make fastener. You can clamp the file between two washers, tightened with a screw and a pair of nuts.

For the most durable and convenient fixation of the crank, it is better to use a drill chuck with a key. If you have this element, you can quickly remove the drill or screwdriver when you need it in another place. You can just as easily tighten it back.

We hope that the presented manual was useful and clearly conveyed the principle of operation and manufacture of the device. You can watch more clear instructions on how to make a homemade jigsaw in the video below.
Save this page on your social media. network and return to it at a convenient time.


