Men or guys want to look good, but this requires spending time and money. Wasting time to improve physical fitness- this is completely normal, and you can avoid spending your own money on this if you make sports equipment with your own hands.
Barbell for sports
A sports barbell is one of the most important items that is useful for a variety of exercises. The barbell is also the main object that makes it possible to exercise with heavy weight, and this, in turn, will give results from sports activities. And this result will be much better than from other sports equipment, although other sports items are also very important.

If a person wants to exercise at home, but does not have the equipment for this, then you can make a barbell at home with your own hands and start exercising with barbell exercises.

Making a rod
If the decision to make a barbell has been made, you need to decide on the material that will be the basis for the barbell - this is the most important point. The base for the bar must be strong; you can use metal or wood.
A metal bar will add extra weight, if this is not desired you can use wooden base for the fingerboard. It is important that the diameter of the bar is at least 4 centimeters, otherwise it will be difficult to grasp the barbell.


Material options for a homemade barbell
There are two most simple options materials for the neck, it is iron or wood. WITH wooden base for the bar it is easy to determine, since you can use, for example, an old wooden rake. Advantage this option, there is something that the tree won't add excess weight barbell if not needed.

To turn a rake into suitable form for a projectile, you need to remove their stalk with any in a suitable way, the main thing is that there is one stick left from them, which will be used as a basis for pancakes. We’ll look at what else you can use to make a barbell and weight plates below.

Another option for the bar could be, for example, a metal rod if you are planning classes with a weight of more than 50 kilograms.

The length of the rod should be 2 meters, and the cross-sectional diameter should be 35 millimeters; these are the optimal requirements for comfortable playing sports. You can also use a metal pipe with a diameter of 4 centimeters, but it is not suitable for the heavy weight of the pancakes.

Making weight plates
Making pancakes for the bar is not difficult, since even ordinary plastic bottles are suitable for pancakes. These bottles need to be filled with something heavy, it can be cement, sand and stones, and even plain water. What the bottles will be filled with depends only on how much weight is needed, large or not.

You can use 1.5 liter bottles, as well as 2 liter ones, it all depends on the desired weight. To make such pancakes, just fill them with the desired contents, and then put them on the ends of the bar and securely attach them with tape.

Cement pancakes
Here you need more time and patience, you need to find a large container where the cement will be poured, then pour it there and insert the bar at one end. It is advisable to use paint cans. True, the weight of such a barbell is difficult to predict, so this option is suitable only for those who are confident in their abilities and can lift a lot of weight.


When the cement is poured into the container and the bar is inserted into it, you need to create a support for the bar and wait for the cement to completely harden. Optimal time waiting four days. Everything that was written above was best ideas how to make a barbell, as well as these options are easy to implement.

An important element are the racks for the barbell. They are needed to make it more convenient to use. How to make a barbell and a barbell rack with your own hands will be described below point by point.

Materials for making rods and stands
- Wooden or iron base for the fingerboard.
- Plastic bottles for making pancakes.
- Any bottle filler.
- Cement if you need a lot of weight.

To specifically see a homemade barbell, you need to go to any website and look at photos of homemade barbells, this will help you better understand the process of working on the design.

Bar racks
Racks are needed to make it easier to use the barbell, easier to pick it up and put it in place. You can use drawings and dimensions for the bar to understand how much space the entire structure, including the bar racks, can take up.
Note! 

Conclusion
You can find many options for materials for the bar and barbell, as well as many options for how to make plates, but there are the simplest ways to do it.


To understand how to do this, just read the instructions on how to make a barbell with your own hands and start working on the design.

It is important to decide on the desires and goals that are set, since this will determine your approach to work. And what materials may be useful.

Photo of a barbell with your own hands


Note! 


Note! 


Everything you need, and at the same time avoid exorbitant expenses? There is only one way - to make simulators yourself. They may look unsightly, but in terms of functionality they differ little from those sold in sporting goods stores.
If you are a regular reader of our site, then you have probably seen among my previous notes articles on how to make your own and. Today I will share with you very in a simple way make a barbell from all the junk lying around in the closet.
 DIY barbell - it's easy
How to make a barbell with your own hands? You will need half a bag of sand, metal pipe or a rod 1.5 m long and 4 cm thick, a rubber hose of the same length and diameter, tape and several plastic bottles- one and a half rubles. We pour sand into the bottles up to the neck, and then fill them with water to increase their weight. The mass of each such weighting agent is about 3 kg. Calculate how many you need. Beginners usually need 6-8 pieces, experienced ones take more. The main thing is that there are bottles even number, since the load on both hands should be the same.
Don't be tempted to build a barbell "for growth." If it turns out to be heavier than necessary, training with such a simulator will not contribute to faster growth. muscle mass– but they may well cause injury. Sprains, dislocations, wear of articular cartilage, displacement internal organs… For athletics to be beneficial, you need to balance your ambitions with your capabilities. It’s better after a month or two of training, when the body gets stronger, to add a couple more weights to your homemade barbell - it’s not difficult. And for the most stubborn jocks, I’ll leave here a motivating link just in case: Hernia - symptoms and treatment. As an illustration to all of the above.
Using metal reinforcement as a barbell in its original form is not very convenient: the rough surface rubs your palms. To avoid minor injuries, we pull the hose onto the rod. This is perhaps the most difficult stage of the work - but you shouldn’t make it easier for yourself by taking a hose of a larger diameter: the bar will begin to dangle in the casing and slip out of your hands. No, the rubber should fit on your shaft like a second skin: only in this case will training with a barbell be enjoyable.
We made “pancakes” for the bar with our own hands - now we attach them to the pipe. I highly recommend using construction tape rather than office tape, as it holds much stronger. First, we tighten the bottles tightly with adhesive tape, then we thread a rod between them and fix the weights.
 How else can you make a barbell at home?
There is another way. Instead of bottles, you can use a pair of plastic bottles with a capacity of 3-6 or more liters as weighting agents. And instead of wet sand - mortar(cement and sand in a ratio of 1:2). After adding water to it, prepare a solution and pour it into the first eggplant. We insert a rod into its neck, previously “dressed” in a hose. Make sure that the bar sinks to the very bottom and stands strictly vertical. Now you need to wait a couple of days for the solution to dry thoroughly. Then we make the second weighting material in exactly the same way. The disadvantage of this method is that you cannot make a concrete rod in one evening - but it also has its advantages. The neck will sit very firmly in the hardened cement - no additional fastenings will be needed. If you paint the eggplants, the product will look quite decent appearance. It will be more pleasant to train with him - and this is additional motivation for regularly working on your form.
There are no similar articles.
The bench press can be used for development pectoral muscles, as well as other auxiliary muscles. This is one of the most common and effective exercises.
The article offers a drawing and a guide that will help you do everything you need to do this exercise at home. This option is relatively cheap and simple, but at the same time very reliable. In addition, it will look high quality.
In addition to how to make a barbell at home, this article will also describe how to make a bench press. After all, in order to perform this important exercise, both are necessary. To begin with, it is advisable to read at least the introduction of the article “”, as this will help you learn the main nuances and difficulties homemade sports equipment, incl. and where you can get the material.
It should be understood that the specifics in the question of how to make a barbell with your own hands or how to make a rack for a barbell are not very important. The main thing is to understand the essence, dimensions, proportions and approximate appearance. The Internet is full of drawings for making a bench press bench and the barbell itself in the same form as it is sold in the store. But if you need to exercise yourself, or just make a small home gym, then there is no need for such a complex and expensive option. Here is a durable, effective and easy-to-manufacture option. This is what you should get (Fig. 1):
Rice. 1. DIY barbell and bench press
Of course, it is not the most basic, because you can also find how to make a barbell from wheels, bottles, or one where instead of pancakes there is a poured concrete mold. But if you want to exercise seriously, then it is better to make a barbell at home and a bench for the bench press so that it is normal, and not such that you will not even be in the mood to exercise over time.
In order to make a barbell at home and make a bench press bench, the main thing you need is:
- standard steel pipes(preferably square);
- tools that most people have at home (a grinder or a hacksaw, an electric drill or even a hand drill, a screwdriver, screws);
- knowledge of the basics of metal cutting;
- knowledge of basic welding or a familiar welder.
As for knowing the basics of welding, you can do without it if you fasten everything with screws or cheat something and simplify it (I’ll give an example of how later).
Now let’s take a more specific look at how to make a barbell at home and a bench for it for bench press. Let's start with the bench.
In the notation (Fig. 2), the upper number means the serial number of the part in the table, and the lower number means the number of exactly the same parts.
Rice. 2. Homemade bench for bench press.
Materials needed to make a bench press:
1. Square pipe 50x50x4. That is, the sides are 50 mm and the metal thickness is 4 mm. We need approximately 8.2 m, this is already with a small margin (8 cm). If everything is done carefully and exactly according to the drawing, then it should be enough almost right next to each other. The price of such a pipe is about 5-6 USD. per meter That is, you will have to spend approximately 45 USD on it. You can replace it wooden blocks, if you do not plan to train with very heavy weights. This will help save money, but increases the risk of injury if the tree fails. It is worth choosing strong wood species.
2. Wooden sheet or just a board measuring approximately 1.3 x 0.3 m. It is necessary to lie on while performing the exercise. You can upholster it with dermantine or leatherette, placing a layer of foam rubber or some fabric folded several times underneath. But it shouldn't be too soft.
3. Holders, as in drawing (10), which can be made from a strip of steel. Or simply arches in the form of stags in the form of the letter “U” or “Y”, which will be easier. These stags can be made from reinforcing rod. The main thing is that the bar lies securely in them. You need 2 of them.
4. Lids or, so to speak, plugs - small metal plates measuring 50x50 mm (thickness is not important). You can do without them, they are only for aesthetics. But there is (11) on the diagram. If you decide to use them, you will need 6 pieces.
5. Fastenings, as shown in the figure (Fig. 2), welded from rectangular and triangular plates. This is practically the only place where welding is necessary if you do them as in the picture. But you can do without this. Instead, you need to take 3 metal or wooden plates measuring approximately 90x40 mm. Or it is possible in other sizes, the main thing is that the pipes to which the board is attached protrude a couple of centimeters on both sides. We fasten these plates with screws to this pipe, drill holes in them and screw the board on top. What is meant is shown in the figure below (Fig. 3).
 Rice. 3. Simplification of attaching the board to the bench frame.
 6. Screws, nuts and spring washers (grovers) 12 pcs. each to keep the homemade bench press bench in the pile.
All these parts are shown in the figure above (Fig. 2).
Now it’s time to make a homemade barbell.
Rice. 4. DIY barbell.
Materials needed to make a barbell at home:
1. Round pipe with a diameter of 32 mm, with a metal thickness of at least 6 mm, a length of 1.6 - 1.8 m. A standard steel bar is 2.2 m long and weighs 20 kg. With the help of improvised materials, that is, round pipe, unfortunately, it will not be possible to achieve such weight and strength as his. The maximum that can be found is a metal thickness of 8 mm. But even with this thickness, the weight and strength will not reach those of a standard bar. With a steel thickness of 6 mm (the most common pipes), the weight will be about 7 kg if its length is 1.8 m. Why you should not take a pipe length for the bar more than 1.8 m to make a barbell at home, I think it’s clear . After all, as already mentioned, its strength is less and its weight is the same as a standard bar will not withstand. It is better to take a pipe, of course, with as thick a metal as possible, but this will not add much weight, although a homemade rod will be stronger. Look at the price and the ability to get it. Round steel (“pipe without a hole”) is an expensive option, although more effective and reliable, because the main disadvantage of the pipe is that it will not withstand a lot of weight, unlike it. But, for example, a crowbar found in the yard is unlikely to be suitable due to its insufficient length. To make a homemade rod, you will need to cut a 20 cm thread on the edges of the pipe on each side.
2. The so-called separators, that is, 2 obstacles for the pancakes so that they do not cross the territory allocated for them. These delimiters can be implemented in different ways. The most reliable way, of course, is to weld on the pipe in in the right places pieces of steel. But you can do without welding, for example, make small holes and carefully wind wire or electrical tape in the right places. If appearance is not very important, then simply drill 2 through holes in the pipe and insert screws there, screw nuts on them, and the pancakes will not jump over such an obstacle. The distance from the edge of the neck (pipe) to the separator should be 20 cm.
3. Pancakes. The picture shows pancakes that have a total mass of 51 kg. But, when doing a barbell at home, it will be difficult to guess with the weight. And also the weight of 51 kg of pancakes + 7 kg of the bar will be too small for a homemade barbell. If not now, then soon. But it is important not to overdo it so that the pipe can withstand it. Also, the pancakes are the most expensive part needed. The recommended steel thickness for them is 3 cm. You can buy such a sheet, but not cheaply, or you can look for suitable pancakes or their substitutes in the yard or scrap metal collection points. The main thing is symmetry in weight. That is, so that a load of 25 kg does not hang on one end of a homemade barbell, and 30 on the other.
4. Nuts for fixing pancakes. Two nuts suitable for the selected pipe. If the pipe is 32 mm, then the nut is 32 mm accordingly. The second option is to drill several through holes with a small distance between them, and insert screws into them - into those holes that are as close as possible to the inserted pancakes. The third option (the most aesthetic and simplest) would be to buy 2 special spring clamps for the neck. They are not very expensive, but it will be very practical.
Everything is shown put together in the picture above (Figure 4).
Not everyone who wants to exercise has enough time to attend gym, and home workouts require certain equipment, the cost of which is quite high. The most popular are dumbbells. They are involved in almost all exercises. And if you don’t plan to purchase sports equipment in the near future, you shouldn’t give up exercising. You can make dumbbells with your own hands from fairly cheap materials. To do this, just read the instructions on how and what they are made from.
Conventional plastic bottles allow you to short term make dumbbells that you can use right away. The main thing is to secure the structural elements well so that it does not collapse during training.
To assemble one plastic projectile you will need: 2 bottles, adhesive tape or insulating tape, filler.
Step-by-step instructions for making dumbbells from plastic bottles:
- Cut out the middle part of the bottles. The separated elements (upper and lower) are fastened with adhesive insulating tape.
- Filler is poured into the container. If the projectile is made of light weight, cement and sand are used. Dumbbells with greater mass require the addition of metal inclusions, which can be balls from bearings, nails, or various metals. The choice depends entirely on the availability of a particular material.
- When the necks of the bottles are filled, insert a pipe or stick made of metal or wood. Wrap the joints with electrical tape or tape. Thanks to this manipulation, you will get a non-slip, soft and quite comfortable handle.
Before starting classes, you should carefully check all connections so that the filler does not “leak through.”

Regular plastic bottles are suitable not only for collecting dumbbells, but also barbells. This projectile weighs much more, so the amount of starting material increases.
To assemble the bar you will need: at least 8 plastic bottles, a bar, filler material, electrical tape or tape.
Instructions for making a plastic rod:
- Bottles are filled in the same way as dumbbells.
- Select the material for the fingerboard. It is better to take fittings or pipes that fit comfortably in your hand.
- At each end of the bar, ready-made weights from filled plastic bottles are placed and wrapped with adhesive tape. There are four weights on each side.
- Check the quality of fastening. The neck should not move or form any play. If the connection is weak, add more electrical tape.
- The weight of the bar can be increased by placing additional weights in the form of bars between bottle weights and so on.
- Each additional load must be wrapped with a new layer of electrical tape. The load can be increased up to 100 kg.
It is quite difficult to navigate the choice of material. The approximate weight of a dumbbell or barbell can be calculated based on the data presented:
Weight of a two-liter plastic bottle with various fillers:
- water - 1.997;
- compacted sand - 3,360;
- wet sand - 3,840;
- crushed stone (peastone) - 2,600;
- lead - 22,800.
Weight is given in kilograms.
We collect shells from concrete

The cement base allows you to get heavier dumbbells and barbells than using plastic bottles. The pancakes are not only more impressive in weight, but also look much more solid. They are cast from cement mortar in a special form, inside of which there is a fingerboard. The disadvantage of this design is that the load of the projectile cannot be adjusted or adjusted to suit someone else.
To start working with a different weight, you will need to make a new barbell or dumbbells. Weighting agents, in fact, are individual, and also quite fragile and “free-flowing”. The last drawback is eliminated by introducing PVA glue into the solution. And if the classes are not conducted according to the principle of powerlifting, when the apparatus is thrown onto the floor, then it will last quite a long time.
To make concrete dumbbells (bars) you will need: a metal pipe of the required length, bolts or screws, cement mortar, PVA, and a mold for casting the weight.
Step-by-step instructions for making cement projectiles:
- At the ends of the pipe, holes are made in four directions using a drill. Screws are screwed into the holes made so that they are fixed as securely as possible at the ends and form a peculiar cross shape. They become the framework that holds the cement.
- The pancake pan is made from a flat mayonnaise or paint bucket. You can use another container. The main thing is that the weight be selected so that it is necessary for training and suits the body of the student. Glue is added to the solution for hardness or oil paint is introduced.
- Place a pipe in the poured mixture and wait about four days until it completely sets. Repeat the manipulations described in the previous paragraphs for the second side. Make a support. The structure is tied up or suspended for another four days.
- When the cement has completely set, over the next week the projectile is soaked at least twice in water so that it gains even greater strength.
Shells poured into a two-liter mold can weigh about 5 kg. Exact weight due to the composition of the mixture involved.
To do the Farmer's Walk, you don't need to make any apparatus. It is enough to take two ordinary cans and hang them on a stick. You can use tires filled with sand or any other filler. It is difficult to perform other exercises with a similar design. They require the use of full dumbbells.

When sports activities become regular, the need arises to purchase more professional equipment or make them from metal. They are practically no different from the factory ones. The difference is that homemade dumbbells are much cheaper. From one pipe you can simultaneously make both a bar and plates. It is best to make stacked dumbbells from metal.
To make projectiles, you need to prepare in advance: a thin-walled pipe with a diameter slightly larger than that of the bar, for which it is better to take a metal rod, locking locks and sheet steel. Work on the manufacture of dumbbells should be carried out in a locksmith workshop.
Step-by-step instruction:
- Approximately 35-40 cm of the neck is sawed off from scrap metal with a diameter of about 3 cm. To make the projectile comfortable to hold in your hands, from thin wall pipe cut off about 15 cm. The resulting piece is put on the bar. Further, if desired, it can be covered with relief or wrapped with electrical tape.
- Pancakes are cut using an autogenous machine from sheet steel. The weight of one disk with a diameter of 18 cm and a thickness of 1 cm is 2 kg. This makes it easy to calculate the required number of pancakes to get a mass of 10, 20, 30, 40 kg. The dimensions of the discs also make it quite easy to change the weight of the weights from small to maximum. Cutting a whole set of pancakes allows you to constantly work with different weights.
- The next step is the locking locks. The diameter of the pipe is larger than that of the neck. Rings with a width of 3 cm are cut from the product. They should move freely along the bar, but not slip off. One hole with a diameter of at least 1-1.20 cm is drilled into the rings. They are necessary for screwing in screws, which allows the rings to hold the plates and press against the bar. The main thing is to take care of the high-quality pressing of the screw so that there are no backlashes.
- On last stage start assembling the dumbbells. Weights are hung on the bar with a piece of pipe in the middle and secured with locking locks.
Dumbbells made using the described method are not inferior in quality to factory ones and allow you to work with both light and heavy weights.
General tips and tricks for assembling dumbbells at home

The best without any doubt are metal shells, but they are much more difficult to manufacture than other designs. It is necessary not only to make the disks, but to choose the correct width of the pancakes, and to make the locking locks in a quality manner according to the calculations. It is recommended to increase not the width, but the diameter of the disks. You can make several heavy and several small pancakes.
To make the dumbbells look presentable, the parts are sanded and painted. This will only slightly complicate the creation process and increase the cost of the shells, but they will look no worse than factory ones and have a much lower price. Exercises with such equipment will bring more pleasure, and, consequently, motivation and the effect of training will increase.
You should not waste time and effort on creating dumbbells weighing up to 100 kg. There are plenty of instructions for assembling such structures on the Internet, but it is better to immediately make a barbell with a capacity of 200-300 kilos in order to perform deadlifts. Dumbbells are not suitable for such loads. And if you lift iron, then with a serious apparatus, that is, a barbell.
If such an opportunity exists, you can purchase a bar with a handle in a store, and either make the pancakes yourself or order them from a workshop. A high-quality handle contributes to comfortable training, and homemade pancakes significantly reduce the overall cost of the projectile.
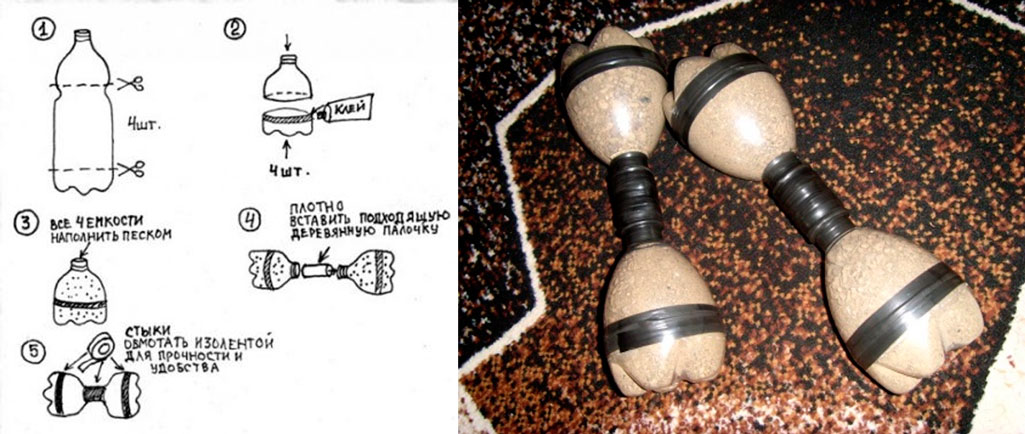
All larger number Young people have become more attentive to their health, but most gyms are inaccessible for a number of reasons. Since many people cannot afford the purchase of sports equipment, the question arises: is it possible make a barbell with your own hands? Of course yes, because nothing is impossible for us.
What is needed to make a barbell
Barbell at home made from ordinary plastic bottles that are found in every home. Usually eight pieces are enough, but in our business we also cannot do without a pack of wide stationery tape. These are our main production materials.
We will also need a shovel handle, 4 or 5 meters of aluminum wire and two buckets of clean, dry sand. Why does it have to be dry? Because wet sand is heavier, but when it dries, it loses its weight. To have a clear idea of the weight of the resulting barbell, you must have any scales for weighing. The barbell we get is guaranteed to be in no way inferior to a professional barbell in the gym.
A method for making a barbell at home
Before you start creating a barbell, you need to determine how much should she weigh. To do this, you will need to carry out basic mathematical calculations. A regular liter plastic bottle holds about two kilograms of dry sand, which means now you can independently calculate how much the bar we created will weigh. More specifically, 3 kilograms and 750 grams of sand are placed in a two-kilogram jar, which means the home barbell will weigh thirty kilograms or more, depending on the strength of our handle.

The most important thing in our business is to make sure that homemade the barbell had the same weight on the improvised bar. To do this, the first bottle after filling must be weighed so that all subsequent bottles do not turn out to be lighter or heavier. Uneven distribution weight can affect the muscles and lead to injury, which is extremely undesirable.
Having filled all the bottles, let's move on to the main part of creating the bar: four bottles of sand should be placed side by side and tightly wrapped with tape. You shouldn’t skimp on the material; it’s better to cover the bottles with extra so that the bar will last longer. The axial rigidity of our structure will be provided by aluminum wire, which we prepared in advance. The same must be repeated with the remaining four bottles. And at the end we take the stem and thread it between the bottles. Thanks to their narrowing, it fits perfectly.
To prevent the rod from breaking at the most inopportune moment, you need to check whether the handle sits tightly between the bottles. If it does not fit tightly enough, you need to either cut it down or increase the volume, depending on the thickness of the cutting. Be sure to lift the barbell and check that the load is evenly distributed.
If you are not new to the sport, then the weight of the barbell may seem too small to you. In this case, its weight can be increased by replacing the wooden handle with scrap iron. This barbell will weigh much heavier than the original version and will be perfect for your activities.


