Any business man needs his own equipment workplace for storing tools and performing carpentry and plumbing work. In that case, just necessary element your workplace will become a workbench, and now we will tell you how to make a workbench on your own.
In contact with
Classmates
Indeed, to buy it, you will need to shell out a significant amount and, in addition, select right size it seems quite suitable for your premises challenging task. But if you do it yourself, you can choose the required size of the workbench to the nearest centimeter.
What kind of workbenches are there?
A workbench is a work table on which a craftsman performs manual work on processing wooden, metal and other parts. Self-made workbenches are installed in the garage, at the dacha and even in the apartment. The workbench is equipped with various additional devices that may be needed during work, such as stops and a vice. In addition, workbenches are equipped with containers for storing various tools and even documentation. Based on the type of work, there are carpentry, carpentry and metal workbenches.
DIY workbench video:
Carpentry workbench
A standard carpentry workbench has this design. The main parts are the bench plate and the bench. The underbench looks like a stand (usually two), which are connected to each other by wooden blocks. The material of this table element is usually pine or other softwood.
The bench board or cover is made of hard wood, such as oak, and has a thickness of up to 8 cm. The surface of the board is covered with drying oil. If you are going to assemble a workbench with your own hands, then you should know what additional devices need to be installed on the tabletop.
Note!
First of all, it should be a vice located in the front part and used to fix parts.
It is necessary to make a recess in the back to store tools in it. small sizes. There are holes on the edge of the bench board into which wooden blocks and metal combs are inserted. A standard workbench is mainly suitable for self made, and if you also want to use power tools, then for this you need to choose a workbench with big amount holes for stops.
Mechanic's workbench
A mechanic's workbench is a more powerful structure. It has metal carcass, on which it fits wooden cover up to 6 cm thick and covered with an iron sheet. The lid is edged with a three-sided edge and, in most cases, a bench vice is installed on it. The tabletop on such workbenches is made powerful so that it can withstand high impact loads, including sledgehammers.
The material is chosen at will, but the most popular is MDF with galvanization, which allows you to protect the countertop from the influence of aggressive environments such as gasoline, oils or solvents. In addition, such a tabletop is easy to clean from dirt. The bench is equipped with several pull-out drawers for storing tools.

Carpenter's workbench
Another type of such structure is the carpenter's workbench. This workplace is designed for processing boards and has dimensions significantly larger than the two previous options. Its dimensions are up to 6 m long and 1 m wide. A stop for processing the board must be installed on the carpentry workbench. It has a triangle-shaped cutout for securing the board with wedges, and is used when processing its edges.
Making a construction workbench
Let's figure out how to make a carpentry workbench with your own hands. First you need to make a frame from beams, and between the legs, for strength, install a jumper and drawer ( connecting element, holding the structure together). It is advisable that they be located at a distance of about 45 cm from the floor. Installation of the workbench frame occurs in this order. First you need to prepare the grooves, then we assemble the structure and coat the connection points with glue. The final fastening is carried out using clamps.

Workbench table top
It is worth recalling that the production of any design occurs more quickly and efficiently if you have at least the simplest drawing of a carpentry workbench or part of it at hand. Below we show a drawing of the tabletop, top view.
If the tabletop is made of several boards, then it is necessary to ensure that there are no gaps between them, in order to avoid dust getting in there during subsequent work. The dimensions of the tabletop should be 3-5 cm larger than the workbench itself, for greater ease of cleaning the tool. The tabletop must be sanded and varnished. This will serve as protection against getting splinters into your hands.
Installing a vice and creating stops
After we have installed the tabletop, we need to mount a vice on them. To do this, you need to cut a recess on the working surface so that you can place a vertical plate in the same plane as the tabletop. We place the vice in the place where it will stand in the future, preferably not at a corner, and make a mark for drilling. Then fasten it with nuts.
Note!
Stops can be purchased at the store, or you can make them yourself.
Then we advise you to make them rectangular shape with height adjustment. It is advisable to make holes for the stops at a length of 50% of the vice stroke. In this situation, you will be able to fix various workpieces well. Video instructions for making a workbench can be viewed in our article.

Wooden workbench
Making a metal workbench
Let's look at how you can do it metal workbench with your own hands.
- Let's determine the height of the future table. It can be different for each person, for example, if a man is 180 cm tall, then the height of the workbench is 90 cm. But still, for the final decision you need to focus only on yourself.
- Do not forget that the drawings of the metalwork bench drawn by you will be useful for faster and higher-quality assembly.
- For a metalworking workbench, the frame is best welded from profile pipe and corners, but in extreme cases it can be made in the same way as a carpentry structure, from beams.
- To make the structure as strong as possible, you need to place spacers between the legs. Sometimes, instead of spacers, a shelf is installed, into which you can later put tools, paint and varnish liquids, or other necessary items.
- For structural stability, you can attach the legs to the floor. This will prevent the workbench from wobbling while working.
- Build a countertop from MDF and galvanize it if possible. This will significantly increase its strength.
- If you want your workbench to be equipped drawers, then place runners under the upper beams, similar to those installed for drawers in. Then you will have storage space for small parts, screws and nails.
Folding workbench
There is another type of workbenches that are used for both carpentry and plumbing work. This is a folding workbench. It is very convenient when there is no extra space in the room. After working on it, you can always fold it and put it in a corner to wait next job. In addition, when folded, it can be transported to the country house. This workbench consists of two parts: a removable workbench board and a folding table. It is usually made in smaller sizes than a stationary table.
DIY workbench video:
In contact with
See inaccuracies, incomplete or incorrect information? Do you know how to make an article better?
Would you like to suggest photos on the topic for publication?
Please help us make the site better! Leave a message and your contacts in the comments - we will contact you and together we will make the publication better!
Home craftsmen sawing off wooden blanks on a stool - sooner or later they come to the need to make their own workbench for carpentry work. When performing simple tasks, you can get by with a universal work table and a couple of good clamps.
If you are serious about carpentry, you need the appropriate equipment. It doesn’t matter whether you make custom-made products or do something for your home. A homemade carpentry workbench will allow you to complete any product at a high technical level and save you a lot of time.
IMPORTANT! When discussing this issue, it is assumed that you have free space for work. Ideally - separate room in the form of a workshop. As a last resort - a high-quality canopy in the yard.
If you are going to do carpentry in an apartment, or on a spacious loggia, the only way out is to purchase a folding metal workbench. Of course, it won’t be possible to process large wooden workpieces on it, but the quality of work and convenience will increase by an order of magnitude.
The main task of such a device is to securely fix a workpiece of any shape on a flat tabletop. Instead of a carpenter's vice, a system of sliding halves of the working plane is used.
The product is fixed using adjustable stops. There are holes in the table for their installation. The thoughtful design allows you to secure even round workpieces.

The presence of a longitudinal groove in the tabletop (also with an adjustable width) allows you to saw flat products without leaning on the edge, which requires the presence of an assistant holding the free side. The cut can be made in the middle using electric jigsaw, controlling both halves of the workpiece.
Such tables can be supplemented with an electric plane, circular saw or milling machine, which expands the possibilities.

A similar folding workbench can be made from wood. True, the stability will not be the same as that of a stationary product.

And yet, full-fledged carpentry work cannot be performed on such devices. Firstly, the apartment is not very suitable for this. Secondly, the dimensions of folding workbenches limit the dimensions of the processed products.
Therefore, most craftsmen who take a responsible approach to their work will prefer a full-sized homemade carpentry workbench to a store-bought universal table.
In addition, the finished machine does not provide for the individual characteristics of the master:
- Height, arm length;
- Whether the master is left-handed or right-handed;
- Preferences in processed products - the tabletop can be square or rectangular;
- Features of the room or area where the workbench is used.
How to make a universal carpentry workbench with your own hands
Before you look for a project or develop a drawing of a workbench of your own design, you need to understand how the system works. I would like to immediately have a platform for cutting large workpieces, a milling cutter, and drilling machine.
IMPORTANT! Any versatility impairs the specialized capabilities of the product. Some devices are still better used as separate devices.
Construction of a carpentry workbench

There are a great many designs, but the main components must be present:
Durable tabletop (working surface) made of hard wood.
Oak, beech or hornbeam are suitable. The density of the top plane should be higher than that of the wood of potential blanks.
Options like a lattice made of timber covered with 12-20 mm plywood are not suitable. The flat surface will wear out quickly, and during work the workpiece will constantly catch on uneven surfaces. In addition, an ideally flat workbench in itself is a standard for aligning product components, or a coordinate system for marking.
Most home craftsmen, which are the bulk of subscribers and visitors to our site, have, to one degree or another, already solved the problem of organizing their workplace by arranging comfortable workbenches in their workshops and on the balcony.
But there are also those who are looking closely at home handicrafts and are trying out this universal profession, which includes many specialties and is becoming a very useful hobby for the family.
First of all, this article is for them, but perhaps it will also be useful for those who have already found themselves in the role of a DIYer and, having decided on the main types of work, can competently set about arranging a home workbench for the workshop with their own hands.
Types of workbenches for the workshop
A workbench is a table for carrying out various specialized processing work different materials. Accordingly, depending on what material you have to work with and what operations to carry out, workbenches differ from each other in size, configuration and material of manufacture. Based on the type of materials processed, workbenches are divided into:
- carpentry;
- metalwork;
- combined.
Based design features, the following types are added to them:
- universal;
- folding.
Folding universal workbenches are produced different companies with a different list of functions, and distinctive feature, first of all, is their mobility. Therefore, if you have experience home handyman convert into banknotes outside your apartment or the yard of your house, you can either choose a factory-made universal folding workbench, or, after analyzing a number of design features of a particular model, make it yourself.
But for a home workshop, more massive workbenches are suitable and here there are three options:
- carpentry workbench with the ability to perform a number of metalwork operations;
- a metalworking workbench with the ability to perform a number of carpentry operations;
- combined workbench.
Let us immediately note that the last option is not the best solution, since it does not allow full high-quality performance of both carpentry and plumbing types of work, but is only relatively adapted for their production, therefore the first 2 options, in our opinion, are preferable. It is these options that we will consider in examples for self-production.
Making a simple DIY garage workbench
The simplest workbench for a home workshop will be a fairly powerful table with a small set of additional functions: drawers, shelves, etc. for storing tools and remanent.

It’s good if it is possible to slightly transform it to perform work on metal or wood, but more on that below.
To create such a workbench we will take wooden blocks 40x80 and cut out 4 legs: 2 pcs. 700 mm long, 2 pcs. 750 mm long and 2 lower jumpers 500 mm long. For the 2 upper jumpers of the same length, we used a 40x100 block available on the farm.

It will also go for top harness the base of our workbench is from the front, with a length of 1400 mm at the bottom and 1600 mm at the top. And at the back we use edged board 40x150x1600, but we will need all the long pieces later.
If you have a tenoning tool, use it like we did.

If not, make them by hand or you can butt the pieces together using overhead metal fasteners.
Assemble the side posts as shown in the photo below.

After this, you can begin assembling the entire frame.
The central jumper inside the frame, made from the same 40x80 block, fixed on small wooden brackets 40x40x180, in addition to strengthening the structure, serves as a support for two bedside tables with drawers from old desks, which we decided to use in our workbench.

For the working surface of the workbench, we also used our existing laminated fiberboard surface. We screwed to the leading edge metal plates a board that will protect its edge from peeling during use. It will also serve as the basis for attaching a small bench vice with a clamp.

We attached the working surface to the bed using metal corners and got a fairly powerful workbench general purpose for our home workshop.
Manufacturing of a carpentry workbench with modifications for performing metalwork work
If you primarily work with wood, then the logical thing to do would be to build a woodworking bench and make some modifications to the design for metalworking operations.
A traditional carpentry workbench for a workshop has a design that has been proven over centuries, which has undergone virtually no significant changes until the present day. Its basis is a massive frame with tenon joints, using wedges for tightening in case of drying out, a powerful (often stacked) tabletop with a recessed tray for collecting chips and tools, and two vice-clamps for fastening workpieces.

The dimensions of such a workbench are selected depending on maximum length workpieces that will be processed on it. If you are planning to make your own wooden doors, then the length of the workbench must be at least 2.5 m and the width at least 0.8 m, otherwise your work on it will turn into hard labor. The workbench of my grandfather - the best carpenter in the area for at least 50 km in all directions - was 3000x1000 and he said that to make large frames for verandas he was missing 20 centimeters in width.
The dimensions of the school carpentry workbench are 1200 x 500 x 750. If the plan dimensions suit you and you are willing to spend about 13 thousand rubles on it, then the height can be adjusted by screwing bars of appropriate sizes to the legs. But you can also consider alternative options.
As a matter of fact, these are variations on the theme of the same carpentry workbench for a workshop with various materials for the countertop, the presence or absence of drawers, shelves and different vice mechanisms. Now in order:
1. We make the bed from dry pine lumber 40-50 x 80-100 mm, calculating the height to suit your height. If your workbench will be installed in a room where there will be no sudden changes in humidity, then the connection of its elements can be done in any way in a convenient way, albeit end-to-end using fixing metal plates and corners.
2. The tabletop can be made from ready-made glued wooden shields, sold in most construction supermarkets, or glue them together from planed bars with a thickness of at least 50 mm yourself using PVA glue, constructing a simple clamping device. It is important to remember that the top side of the future workbench should be as flat as possible. You can also use thick-layer plywood for the tabletop, but it is still advisable to paste over its ends wooden slats made of oak, beech or ash.
3. To fasten the clamping mechanisms, the bottom of the workbench tabletop is extended with bars of appropriate sizes. The most popular are these clamping fixtures:
— carpentry lead screw with two guides made in Czech Republic Tr 24*5, 390/205 at a price of about 3 thousand rubles.

Spanish Piher carpentry vice, 150 mm, costing approx. 2 thousand rubles;

You can also make something similar yourself, using a pin with a diameter of 14 - 16 mm, which, of course, will not transfer the same forces as a vice, but will make your clamp extremely economical and repairable, due to its low cost;

Or make an even simpler clamping device from the same pins, but due to the lack of guides, put 2 of these clamps on one vice.

4. Make holes for stop pegs in two directions opposite the vice lead screw. It is also useful to make them across the entire surface of the tabletop parallel to each other for secure fastening of large products.

5. Attach the workbench tabletop to the base using strong metal corners and, if you do not plan to move it, use them to secure it to the floor.
And you have successfully completed the first task of the workbench version described in this section of the article.
Now, several options for devices for performing metalwork work on such a workbench.
- The simplest of them is to make a plate of steel 3 - 5 mm thick with a frame of steel angle, kept separately from the workbench or attached to it on hinges and lowered onto the tabletop if necessary.
- The main attribute of a metalworking workbench is a metalworking vice. In this case, we recommend using a vice with fasteners that do not require going through the workbench top.
You can, of course, adjust the holes for the stops to fit the vice fasteners, but with a thick pad you can do without it. Also interesting is the option of attaching a bench vice directly to the table top of a carpenter's workbench using an adapter bar-stand and a powerful clamp.

And the overlay should not cover the entire area of the workbench. There are a lot of options, the choice is yours.
Modification of a metalwork bench for carpentry work
Often, especially if the household has a car and a garage, the main workbench is a metalworker’s.

We will not consider the process of its manufacture in this article, but about simple ways We’ll tell you how to adapt it for carpentry work, especially since it’s not at all difficult. To fully use your bench as a carpenter's bench, you will need to dismantle the bench vice and make several simple devices.
Let's take a closer look at them.
1. From the first picture below, when modifying a bench, we will be interested primarily in the side stop (1), which is not difficult to make removable. And together with the holes for the dowels (14) along the front end of the workbench (and this can be a one-piece removable structure) and a suitable wedge, we get a simple and reliable device for attaching the board to the workbench. You can simply make a wooden plate secured with recessed clamps, with the entire set of workpiece fastenings shown, and understand that the level of the working surface will rise by its thickness, which can be compensated for by the corresponding height with a ladder at the workbench.

There is nothing to say about the back stop; it simply performs a supporting function for long workpieces.
2. You can make an overhead planing board with a universal stop, shown in the second picture. By increasing the height of the stop (or changing it depending on the height of the bar being processed) and screwing the bar from the bottom to the right edge of the workbench, we get the simplest device that turns a metalworker's workbench into a carpenter's workbench.

3. A slightly more complex overlay with a fairly powerful option for securing the workpiece also allows you to solve this problem. The only thing we would recommend in this case is to also screw it with right side select a stop and thickness of at least 50-70 mm for more reliable fastening of the front pegs and sufficient depth of the lock and clamp.

The method of installing the last two planing devices on the workbench is shown in the diagram:

Dear readers, if you have any questions, please ask them using the form below. We will be glad to communicate with you;)
It is not difficult to assemble a carpentry workbench with your own hands.
A good workbench should be in the household of everyone who works with wood or performs carpentry work.
Before we look at the drawings and start assembling the workbench, let’s get acquainted with its structure and manufacturing nuances.
The workbench consists of a workbench board and a base (underbench).
The board has a vice - one or two, in which the master clamps the parts with screws.
You can place the emphasis directly on the working board of the workbench using wedges that are inserted into holes in the board itself, thereby you can adjust the length of the emphasis in accordance with the length of the workpiece.
The bench board is made of dry wood or plywood up to 8 cm thick. The bench board is made of bars with a thickness of 6 cm.
The underbench is supported by 2 racks, which are transversely fastened together by beams with screws/wedges.
This is necessary so that the workbench does not “move” from side to side when planing and sawing.
Workbench structure in detail:
- The worktop is made of solid wood/plywood with a thickness of 6 to 8 cm;
- Vise on the front of the table top;
- The workbench supports are made of solid wood/plywood, connected cross bars for stabilization;
- You can install shelves and a tool box on the supports;
- Holes for wedges are drilled in the tabletop to support the workpieces;
- You can make a recess on the side or back of the work board to store tools.
The complete structure of the workbench is shown in the photo below.
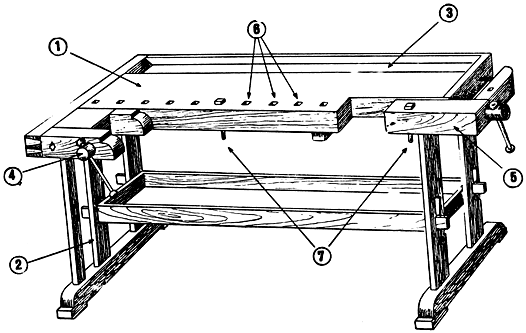
1 - cover; 2 - subsurface; 3 - tray; 4 - front clamp; 5 - rear clamp; 6 - sockets; 7 - adjustable wedges (combs)
Workbench dimensions
Here we meet the first important nuance, which cannot be ignored when making a workbench with your own hands - its height and length.
The minimum permissible height of the workbench is 130 cm, length is no more than 260 cm.
The height of the workbench is adjusted to the height of the person working on it:
- too high will not allow you to push hard, which is important when planing;
- a low workbench will force you to constantly hunch over, which will have a bad effect on your back health after just a couple of months;
- the height will be normal if you stand straight, have your back straight and can place your hands on the board without bending your elbows.
Manufacturing nuances
Making a workbench has its own nuances, the observance of which guarantees the production of a workbench that will perform its functions flawlessly.
There are a lot of nuances, so we structure them in relation to each stage of the future assembly process:
- Initial stage of work. You need to start with a working board. Someone will rush to look for an expensive solid wood, and not just any kind, but according to science - oak, beech or ash. Experts will advise you to take a ready-made wooden table top, which will cost an order of magnitude less;
- Working with the future work surface workbench. The surface must be made smooth, therefore any wood prepared for the role of a workbench board must be properly sanded. To varnish or not is up to you;
- An important point is that a workbench is a type of table. Your task, in essence, is to make a table on which they cut not sausage, but wood. Therefore, having assembled the workbench, fasten it thoroughly on four legs and then connect them with transverse slats to each other for stability;
- Drawers – important element comfort. Take the drawer out of the bedside table and pay attention to how it is installed: there are a pair of guides in the shape of the letter “P” along which the side slats of the drawer slide. Nail two guide rails at a distance from each other equal to the width of the drawer and you’re done;
- You need a sawing table if you are going to saw. The table is placed 20-30 cm beyond the board itself. It is a small board that is attached to the desktop with screws (see photo);
- The bench board should be straight. Planing, sawing, burning, carving and other manipulations can be carried out strictly on a flat surface and nothing else;
- Don't forget the wedges! Wedges are needed to provide emphasis when planing the workpiece. In the table, at a certain step (10-15 cm), you need to drill a row of holes (several rows in a row), into which you will then insert rounded wedges. If possible, use a drill bit square holes– wedges square section They hold the stop better due to their shape than rounded ones, which are prone to deviation of the vector of the applied load - the workpiece will fly out of the stop every now and then.
Practical instructions for creating a workbench
So, it's time to make your own carpentry workbench. Each stage of assembly is accompanied by a description and photo of the process.
At the end practical instructions Watch the video summarizing the assembly process step by step. We do not provide drawings of the folding version, since it is much more difficult to manufacture.
Let's look at the assembly step by step.
Step 1 – take measurements
Is your back very tense or not? If everything suits you, measure the distance from your palm to the floor - this will be overall height workbench.
Step 2 - making the legs
Take ready-made bars required height, or buy plywood and cut the sheets into strips of the required width.
Now they need to be glued together: take wood glue or powerful epoxy, put several layers on top of each other, simultaneously gluing them together.
You may need 10 of these strips of plywood for each leg. It is better to glue together 10 sheets of plywood at once and, after drying, cut them into 4 parts.

Step 3 - making the frame of the workbench
We take a ready-made board, 4 cm thick - 4 pieces, which will be the sides of the frame-box and assemble the box, placing the sides on the screws.
In another case, you can also take several sheets of plywood, glue them together and then saw them evenly.
But in order to properly connect them together later, it is better to use a router and lamellas.
Drilled out required holes, collecting wooden box: we place it on PVA glue using the dowels of the board, clamp it with clamps. After drying, we attach the legs to the box with self-tapping screws.
Step 3 – assembling the tool shelf
From glued plywood (5-6 sheets) we cut out a shelf that is placed in the grooves.
The shelf needs to be secured with confirmations: use a special drill (see photo), which simultaneously chamfers and drills.

The confirmation must be recessed, since this part of the shelf will be used as a guide for the drawer. Now the base of the table is ready.
Step 4 – making a drawer for the countertop
We take a sheet for the bottom and again 4 strips of plywood from several glued layers. By internal parties We will make grooves on two side walls for the bottom of the box.
And on the outside of these walls we make grooves by milling so that the box can move freely on the shelves. We select the cutters as follows: the smaller one is the thickness of the bottom, the larger one is the thickness of the side strips + 1-2 mm.
To secure the side wall, we install dowels: drill holes for the dowels at the ends of the walls, mark a point for drilling on the adjacent wall with a pencil and drill to a small depth.
Then we place the dowels in both holes using PVA glue. For final assembly When installing a drawer, you should use countersunk screws that will not interfere with the opening and closing of the drawer.
Step 5 - making the tabletop itself
Again we cut strips of plywood glued together in several layers for the base of the tabletop. We connect the strips into a box using dowels and PVA.
If you use round dowels, then you need to take at least 4 of them for each connection.
While the tabletop box is drying, we assemble its working board: we take wide sheets of plywood and glue them together in several layers.
You can also choose a tabletop from an old one desk and then just adjust it to size. We glue the tabletop onto a box reinforced with dowels.
Step 6 - install the vise
As soon as the glue has set and the tabletop is ready, we drill holes in it for wedges for stops and for attaching a vice.
Typically, the vice is placed on 3 holes: two for fastening with bolts, one for the screw that imparts pressure when the handle rotates.
The vice can be taken from an old workbench or purchased ready-made and then simply adjusted to the tabletop by drilling holes of the required pitch.
A bench vise is a metal screw with guides and a wood clamp.
You can take several layers of plywood about 5-7 cm thick and simply drill holes in it and put it on a screw - you will get a stop, then put snap brackets so that the vice does not fall out and you're done.
You can drill holes in the stop to match the dimensions of a large-diameter dowel, then attach it with a screw to a square of plywood, having previously drilled a recess in the square.
Make 4 such stops and place them all over the tabletop to fix the workpieces with the stop in a vice.
Our workbench is ready!
(All the above steps are shown separately in the video of the assembly process)
Rules of care and use
There are a number of rules that must be strictly followed in order for the workbench to last as long as possible:
- Clean the surface from dust and glue after each use;
- Wipe the surface once a month with hot drying oil;
- Do not flood the workbench with water or place anything adhesive on it, including parts to be glued.
- The chopping workbench is not used under any circumstances;
- Place a board or plywood under the workpiece if you want to use a cutting tool.
- Do not over-tighten the vice screws;
- When the screws are tightened, do not hit the vice;
- The workbench is attached to its permanent location using strips with screws or nails;
- The bench board should not move. Otherwise, strengthen all its connection points;
- Wipe wooden screws with dry soap, paraffin or graphite, and metal screws only with machine oil.
A home handyman must have a convenient place; this is the key to not only convenience and speed of work, but also safety. High-quality European-made workbenches cost as much as industrial equipment, Chinese and handicraft assemblies are not reliable. However, you can make a good workbench with your own hands, because, in essence, it is a table equipped with various fasteners, stops and space for storing tools.
Workbench project
The height of the workbench depends on the height of its owner; it should be comfortable to stand, without slouching, to perform basic operations. For average height, this is usually 70-90 cm. The configuration of the workbench and the necessary fastenings and devices depend on what operations are most often performed on it, but it is worthwhile to provide several stops and a pair of screw vices or clamps (). You also need to take into account which hand the owner of the workbench uses.
 Workbench diagram - first option
The width and length of the workbench depend on the area of the workshop; it is convenient if the length of the workbench is at least 2 meters and the width is 80-100 cm. It is convenient if drawers or cabinets are mounted under the workbench for storing tools and consumables.
When designing a workbench, you need to consider whether it will be permanently installed in the workshop or constantly assembled and disassembled. In the second case, it would be reasonable to lighten the structure due to a material of less thickness. In a collapsible workbench, you can make a tabletop that can be unscrewed, or you can also provide folding legs.
It is better to place the workbench near the window; additional local lighting is also required. Directly next to the workbench you need to provide several electrical outlets for equipment. All wires nearby working area must be enclosed in a box or corrugated pipe.

Selection of materials
The optimal material for a workbench is planed timber, from which the frame frame and legs will be made. For legs, you can take it with a size of 100 * 70 mm, and for jumpers - 100 * 50 mm. The tabletop can be made from flat boards 5 cm thick. It can also be made from a solid piece, for example, an old blind door or laminated chipboard with a fairly durable coating. For a workbench, it is better to choose hard wood, preferably beech, oak or maple. Thicker bars and boards will make the workbench heavier and more stable, and will be more comfortable to work on.
Fasteners for making a workbench are selected taking into account whether it will be prefabricated or dismountable. Self-tapping screws, nails and nuts with bolts will come in handy.
Before building a workbench, you need to select a vice. It is convenient if there are 2 of them - on the right side and on the left in front. In the first, you can fix long boards, and in the second, you can clamp short parts. The most universal jaw width is 175 mm.
 Scheme of the second version of the workbench
We are building a workbench. Base
The production of a workbench occurs in 2 stages: assembly of the base and installation. At each stage and during each operation, you need to control the size of the parts and the evenness of their installation using a level.
The base is a frame of beams fastened in such a way that the structure is as rigid as possible. To do this, a horizontal jumper is placed between the legs of the workbench, and a drawer is provided in the middle, along the length. The lintels and drawer are placed 40-50 cm from the floor, then shelves for storing tools can be installed on them. The beams for the base are combined using a tongue-and-groove connection, gluing it. In places where this is not possible, self-tapping screws are used. If the workbench is expected to be disassembled, then the parts of the support frame can be connected using metal corners. Usually, the grooves and tenons are first prepared according to the drawing, and then the entire structure is assembled at once, gluing the joints with wood glue and fixing them with clamps.

A good option for a stationary workbench, if one or more parts of the support frame can be screwed to the wall, the structure will be even more reliable. Strength can be increased using diagonal jumpers or wedge-shaped inserts between the legs and the upper part of the frame from the same timber, which are fastened with self-tapping screws. The narrow ends of the upper part of the frame also need to be connected with a jumper.
Tabletop and useful accessories
If the tabletop is constructed from separate boards, then they need to be properly fitted to each other so that debris does not get into the cracks. The size of the tabletop should be a few centimeters larger than the base to make it convenient to work and clean. The boards are nailed or screwed to 3 bars located across the boards with reverse side countertops. In the base you need to provide grooves for these bars.
The board table top is carefully sanded several times and coated with a protective solution, preferably oil or drying oil, to avoid injury from chips during further work. The tabletop is screwed to the base using metal corners.
A vice is attached to the finished tabletop; a recess must be provided for it at the end of the tabletop so that the vertical plate forms one plane with it. You will also need a plywood pad on the underside of the workbench. The jaws of the vice should be flush with the surface of the countertop. Applying a vice, mark the location for the holes and secure them with bolts and nuts (M12 is suitable). The holes for the bolt heads must be pre-milled so that they sink completely into them. The vice should not be located in the very corner, so as not to tear it off under heavy load.
In addition to the vice, it is necessary to provide stops on the workbench. You can secure the finished ones by drilling a hole in the tabletop required diameter, or make them yourself. You should not use bolts or round dowels instead of stops, since the bolts can damage the workpieces with their heads, and the dowels do not fix the parts well enough.
It’s easier to make rectangular stops, or pegs, which can be adjusted in height to fit different parts and securely fix them. Under them you need to make holes in the tabletop or build it up using blocks of suitable thickness, screwed to its edge, and covered with a strip on the other side. The nests should be located from each other at a distance of half the travel of the vice so that any workpiece can be fixed.
The pegs themselves are cut out of hard wood; you can make them with a “spring” that is screwed to the base, or you can simply make them rectangular. The rectangular stops can be slightly expanded at the top, then they will be fixed in the sockets more reliably.

Building a carpentry workbench with your own hands is not an easy task, but then this workplace will be able to serve the owner for a long time, acquire useful parts and devices, and adapt to the specific needs of each craftsman.


