Any water supply system, even assembled perfectly and from the very quality equipment, may experience problems with operation.
The most common problem is a decrease in pressure in the system, due to which water cannot reach the water collection point.
To solve this problem, a device is used that accumulates water and contains compressed air.
It is due to the latter that it works: water is drawn into the battery by a pump, after which it is pushed into the system due to air pressure. This allows the water pressure in the water supply system to always be at the same level.
In order for everything to work without problems, you need to correctly connect the unit to a water source - a well, a well or a water supply system. There are several ways you can do this yourself.
Installation with submersible pump
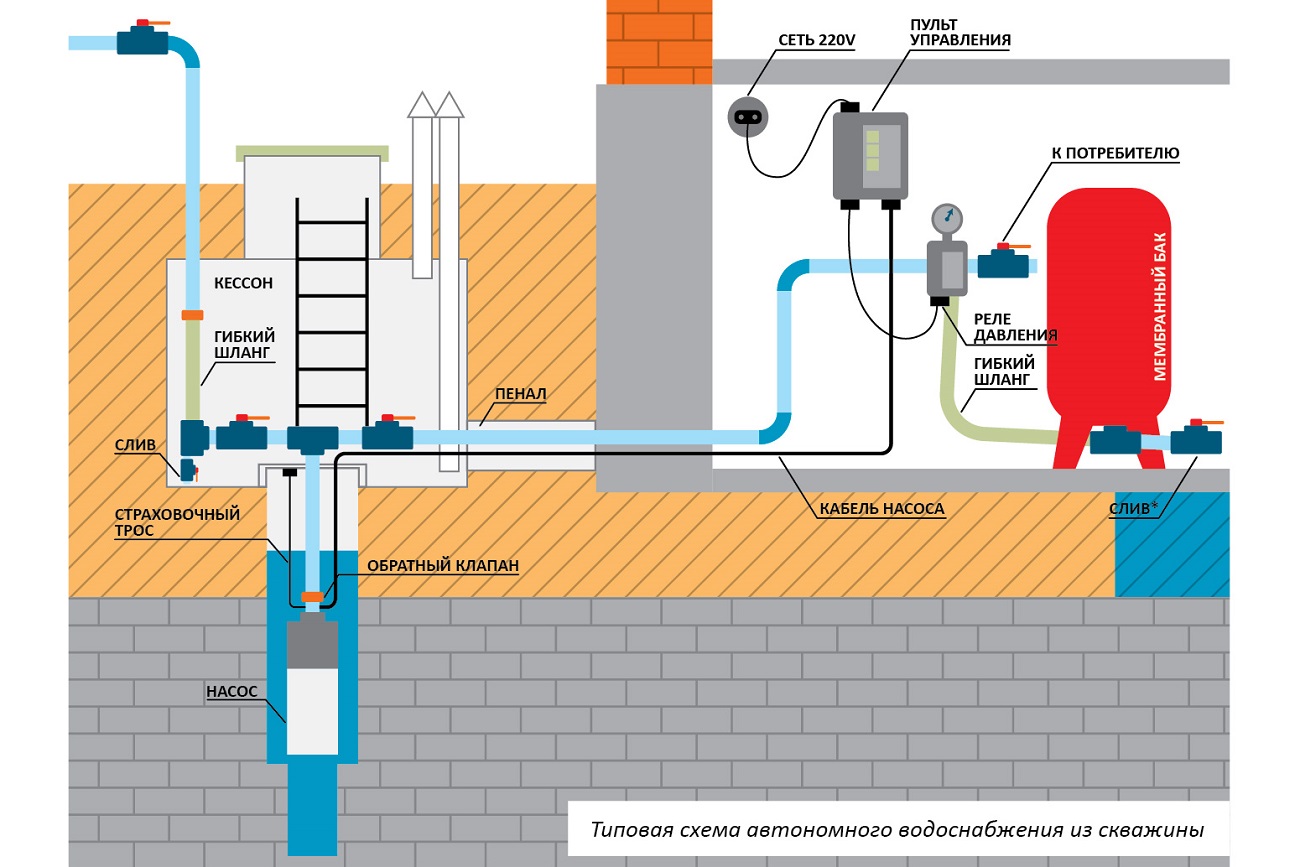
Connection diagram of the hydraulic accumulator to borehole pump. (Click to enlarge) If the water in the water supply system is taken from a well, the pump pumping water into the accumulator is located underground.
The main feature of this connection scheme is the presence of a check valve in the system.
Thanks to this device, the pumped water will not be able to flow back into the well.
Installation of the check valve is carried out before connecting the remaining elements of the system. It is installed directly on the pump at one end, and the pipeline leading to the hydraulic accumulator is connected to the other.
happens in the following order:
- The depth to which the pump is to be lowered is measured so that it does not reach the bottom of the well or well by about 30 cm. A rope with a load is used for measurement.
- The pump with the connected valve is lowered into the well and secured with a safety rope.
- The pipe from the pump that goes to the surface is connected to through a fitting.
- A hydraulic accumulator, a water supply and a control system are connected to the same fitting. Thus, you will need a five-plug fitting.
Take into account: It is very important to make all connections airtight, for which you can use FUM tape or ordinary tow impregnated with sealant.
Installation with surface pump
If water is pumped into the system from a water supply and submersion of the pump is not required, it can be installed next to the battery itself.
In essence, the connection diagram does not change, but there are some nuances that are important to know.
Before connecting, it is necessary to calculate the operating and minimum pressure. For different systems Different water pressure may be required, but the standard for small water supply systems with a small number of water intake points is a pressure of 1.5 atm.
If the system has equipment that requires high pressure, this figure can be increased to 6 atm, but not more, since higher pressure will be dangerous for pipes and their connecting elements.
Determination of critical pressure
Based on the operating value, it is determined what the minimum pressure should be, that is, the indicator at which the pump will start operating.
This value is set using a relay, after which the pressure in the empty accumulator must be measured.
The result should be 0.5 - 1 atm below the critical value. After this, the system is assembled.
Its center, as in the previous case, will be a five-connector fitting, to which the following are connected one after another:
- the accumulator itself;
- a pipe from a pump connected to a water source;
- domestic plumbing;
- relay;
- pressure gauge
Connecting a pressure switch
 In order for the relay to work correctly, it must not only be correctly connected to the fitting, but also configured.
It requires electricity to function.
The top cover is removed from the device, under which there are contacts for connecting the relay to the network and to the pump.
Usually the contacts are signed, but may not have any designations. If you're not sure where something connects, it's best to contact a professional electrician.
Pumping station
 A pumping station is a complex of equipment that includes powerful pumping equipment, a hydraulic accumulator and control devices.
As a result, the connection diagram in this case does not differ from the connection to a conventional pump.
If the station is designed for large volumes of water - for example, in the case of powering several houses from one well - the connection becomes somewhat more complicated.
In this case, several pumps and two fittings are used - the pumping system is connected to one, and the first fitting and the rest of the equipment are connected to the second.
The hydraulic accumulator can be connected not only to a well or water supply system, but also to heating system. The functions of the unit in this case will be somewhat different, although the principle of operation does not change.
Watch the video in which a specialist explains in detail how to connect a hydraulic accumulator to the water supply system with your own hands:
A correctly selected hydraulic accumulator connection diagram for water supply systems will ensure ease of operation, as well as durability and cost-effectiveness of the system. The hydraulic accumulator is important node water supply system, which contains water and compressed air, separated by a membrane.
When the water flow parameters change (pressure decreases), the pump turns on and water is pumped into the accumulator, restoring the parameters of the required maximum pressure and then turns off. Further consumption water is coming from hydraulic device, preventing frequent switching on of the pumping unit, which occurs until the next moment the pressure drops to minimum threshold. In addition, hydraulic accumulators can ensure the operation of the system for some time (depending on the volume of the tank) in the event of a power outage or damage to the pump.
IN general view All hydraulic accumulators consist of the following main parts:
- body with legs,
- membrane (in some models it is replaced by a rubber bulb located in the body according to the “vessel within a vessel” principle),
- air injection nipple, usually equipped with a protective cap.
Some products have distinctive design features:
- horizontal models are supplemented with a tap or valve for bleeding air,
- equipment for drinking water supplied with “pears” made from special grades of rubber, chemically neutral and not giving the liquid any foreign odors or tastes,
- hydraulic accumulators for heating systems are expansion tanks.
Based on the type of location, there are two types of models:
- Horizontal products are more often used for external pumps. In such cases, pumping units are installed on hydraulic accumulators.
- Vertical models are often equipped with water supply systems with submersible pumps.
The choice of configuration and installation of a hydraulic accumulator for water supply systems at the same time can be carried out based on the availability of free space for the installation of a particular model.
According to their purpose, the following types of hydraulic accumulators are distinguished:
- for cold water supply (the most popular option, used not only in houses with permanent residence, but also at dachas),
- for hot water supply, made of materials capable of withstanding high temperatures and installed during the installation of a full-fledged system, including cold and hot water supply
Heating accumulators are painted red, and equipment for water supply systems (hot water supply and hot water supply) are painted blue.
Connecting a hydraulic accumulator to a submersible pump
The connection diagram of the hydraulic accumulator to the submersible pump must be include. Its presence will not allow compressed air to squeeze water back into the well through the membrane. The valve is mounted directly on the pump, before connecting other elements of the system.
 The photo shows a diagram of connecting a hydraulic accumulator to a submersible pump
 The first step is to install a submersible pump. To do this, use a rope and a weight to determine the depth of the well, after which a place on the rope is marked to which the pumping unit will need to be lowered so that it is at a distance of 20-30 cm from the bottom. After fixing the pump, its pressure pipe or hose that goes to the surface is connected to the pressure switch using a manifold (fitting) with five connectors. A hydraulic accumulator and water supply system are connected in series to the same collector for supply to points of consumption. The remaining connector is used to connect the equipment control system.

Connecting a submersible pump to a hydraulic accumulator, like the other systems described below, necessarily requires sealing of all connections. For this purpose it is used FUM tape or tow with sealant.
Connection to surface pump
Before you begin connecting the hydraulic accumulator to the surface pump, you need to determine the required water supply parameters, in particular, decide what pressure is needed in the system. It is believed that water supply from a small amount points of consumption can operate at a pressure of 1.5 atm. Depending on the presence of equipment that requires high pressure, this value can increase to 6 atm; higher pressure is considered dangerous for communications and connecting elements.
Considering the selected pressure to be nominal, it is determined what reduction should be considered acceptable, that is, At what value will the pump turn on?. The critical value is set on the control relay, and from the nipple side the air pressure in the accumulator is measured when there is no water in it. The resulting value should be 0.5-1.0 atm below the minimum acceptable value.
 The connection diagram for the hydraulic accumulator to the surface pump is the same as for connecting pumping station, which already includes a hydraulic accumulator
 If no adjustment is required in this direction (for example, pumping), a hydraulic accumulator connection diagram for water supply systems is assembled
using a five-input collector. The hydraulic accumulator is installed first, then sequentially: pump pressure pipe, household water supply, pressure switch, pressure gauge.
Connecting the pumping station
An indispensable device in modern systems water supply is not only a pump. Very often it is supplemented with a hydraulic accumulator, which can be included with the pump or purchased and installed separately.
Installing a hydraulic accumulator is very useful solution which improves the quality of work. Let's take a closer look at exactly how this mechanism works, how it works and how it is mounted.
1 The design of the hydraulic accumulator and the principle of its operation
First, we will describe the device of a hydraulic accumulator: it is a container with a metal casing, inside of which there is a membrane (or a cylinder, depending on the design). Pressure is created between it and the walls of the housing - thanks to compressed air pumped into the space.
Most often, the installation is used in water supply, but it is also important to use a hydraulic accumulator for heating - it is also suitable for this.
The objectives of the mechanism are as follows:


- Water accumulation.
- Maintaining stable pressure in the system.
- Providing water to the system when the pump is not running.
The operating principle is as follows: water enters the membrane, pumped by a pump. The membrane is filled and fills the space inside the housing (naturally, to a certain volume).
On the other hand, the pumped air begins to put pressure on the water, thereby displacing it into the water supply system. In this case, the pump operates up to a certain point - until the water pressure inside the tank reaches a certain limit.
After this, the unit turns off, and the air acting on it begins to “squeeze” water into the network. Well, when the liquid leaves the container and the pressure drops to a certain (only now minimum) level, the pump will start working again from the automatic control unit.
1.1 Classification
The range of products on the market is quite extensive, so it will be useful for the buyer to find out in advance what exactly they are, how they are classified, and which model is best to choose.
The differences lie in a number of factors, each of which should be mentioned.


According to the location of the container, the device can be either horizontal or vertical.
There may also be differences in the type of working part. In this regard, there are two variations: membrane or balloon. In the first case, the space inside the container is divided into two parts by a membrane: water flows into one, air is pumped into the second.
In the second case, an elastic cylinder is contained inside the container, into which liquid flows, and air is pumped into the free space between its walls and the walls of the body.
Separately, it is necessary to mention the volume - this is, in fact, the key parameter of any capacity. The most popular sizes are 24, 50, 100 and 200 liters. However, you can also find containers of other sizes on sale - 6, 12, or vice versa - 300 liters.
There are also larger devices - for example, the Aquasystem hydraulic accumulator, which can have a volume of up to 2000 liters. The Reflex hydraulic accumulator has a smaller capacity - the largest model has a volume of 1000 liters. The Wester hydraulic accumulator has the same limits.
The material from which the membrane (balloon) is made also deserves detailed attention. It can be either butyl or rubber. The differences are quite serious:


- butyl has an upper temperature limit of +99 degrees;
- for rubber this mark is lower - only +50 degrees.
This is very important nuance for those who choose a heating device. However, most often devices modern manufacturers(the same Aquasystem hydraulic accumulator) use butyl.
And finally, we need to mention the manufacturers of products of this type. Several items that are most popular have already been mentioned above. This is a Wester and Aquasystem hydraulic accumulator. Models of these brands are included in the high-budget segment, but the quality is appropriate.
The Reflex hydraulic accumulator is already cheaper, but at the same time it is practically not inferior in quality. In addition to these names, we can also highlight Gilex, which is quite popular on the Russian market for its positive qualities: low cost and reliability.
1.2 How to correctly calculate the volume of a hydraulic accumulator?
In principle, the main point that deserves attention is the volume of the tank. The material of the membrane (cylinder) was also mentioned above, however, such devices are used less frequently for heating, so we will focus on capacity.
It should be said right away that models with a capacity of several hundred liters (for example, the Aquasystem VAV 2000 hydraulic accumulator for 2000 liters or the Wester Line WAV 1000 hydraulic accumulator for 1000 liters) are suitable for providing water to large buildings (hotels, hospitals - for example).

For an ordinary residential building, this volume will be a lot, and buying such a model will be a waste of money. Moreover, they cost quite a lot: for example, the mentioned Wester Line WAV 1000 hydraulic accumulator will cost more than 10 thousand dollars, and the Aquasystem VAV 2000 hydraulic accumulator will cost three dozen.
For a cottage in which 3-4 people permanently live, a capacity of up to 100-200 liters will be sufficient (and this is with a huge margin). Often, buyers in such conditions are limited to models of 24-50 liters (for example, the Aquasystem VAV 50 hydraulic accumulator or the Wester Line WAV 50 hydraulic accumulator).
An increase to 100-200 liters is relevant if there are more residents in the house, and/or there are a large number of water intake points (2 toilets and 5-10 taps, for example). In this case, you should pay attention to the Wester Line WAV 100 hydraulic accumulator or the Aquasystem VAV 100 hydraulic accumulator.
For accuracy, we provide a more detailed calculation that will help the buyer more accurately select the appropriate device.
2 Stages and nuances of installation
We figured out how to perform the calculation and how to choose a device. Now we need to mention how exactly the hydraulic accumulator is connected to the water supply system. If you wish, you can do this work yourself - if you follow the tips below, then there should be no difficulties.
In this case, it does not matter which model is connected - a Reflex hydraulic accumulator for a couple of tens of liters or a tank for 300 liters.
The preparation looks like this:

- First of all, you need to choose the place where the equipment will be located: the station automatic water supply and, in fact, the tank itself. They do not have to be placed next to each other, but most often this is how it is done.
- The pressure inside the container is checked. It is necessary that this indicator be approximately 0.2-1 atmospheres lower than the parameter set on the automatic pump start relay. Otherwise, you can (and should) adjust it yourself.
Now you need to take care of necessary details to connect:
- A fitting with 5 outputs: for the tank itself, for the automatic switch-on relay, for the pressure gauge, for the pump and, in fact, for the water line itself.
- Pressure gauge (with a scale up to 10 atmospheres).
- FUM tape (for sealing joints).
Now let’s look at how you can make the connection yourself:
- The fitting is connected to the container using a hose.
- A pressure gauge, relay, pump, etc. are connected to other outputs of the fitting. Each connection is pre-sealed with FUM tape.
Upon completion of work, you should perform trial run pump - to determine the tightness of the system. To do this, you need to carefully inspect the connection points: there should be no leaks along them.
When connecting the pressure switch with your own hands, be sure to look very carefully at the marks that are marked under its cover. There are two of them - these are "Network" and "Pump", and under no circumstances should they be confused. It is possible that these marks will not appear at all (this happens with some models) - in this case, it is recommended not to make the connection yourself, but to use the help of an electrician.
2.1 How does a hydraulic accumulator work? (video)
To prevent the pump from turning on every time the tap is opened, a hydraulic accumulator is installed in the system. It contains a certain volume of water, sufficient for a small flow rate. This allows you to practically get rid of short-term pump starts. Installing a hydraulic accumulator is a simple procedure, but you will need a few more devices - at a minimum - a pressure switch, and it is also desirable to have a pressure gauge and an air vent.
Functions, purpose, types
Installation location - in a pit or in a house
In the water supply system of a private house without a hydraulic accumulator, the pump turns on whenever water flows somewhere. These frequent starts lead to wear and tear on the equipment. And not only the pump, but the entire system as a whole. After all, every time there is an abrupt increase in pressure, and this is a water hammer. To reduce the number of pump starts and smooth out water hammer, a hydraulic accumulator is used. The same device is called expansion or membrane tank, hydraulic tank
Purpose
We found out that one of the functions of hydraulic accumulators is to smooth out water hammer. But there are others:

It is not surprising that most private water supply systems have this device - there are many advantages from its use.
Kinds
A hydraulic accumulator is a tank made of sheet metal divided into two parts by an elastic membrane. There are two types of membrane - diaphragm and balloon (bulb). The diaphragm is attached across the tank, a pear-shaped cylinder is secured at the inlet around the inlet pipe.
According to their purpose, they are of three types:
- for cold water;
- for hot water;
- for heating systems.
Hydraulic tanks for heating are painted red, tanks for water supply are painted blue. Expansion tanks for heating are usually smaller in size and more low price. This is due to the membrane material - for water supply it must be neutral, because the water in the pipeline is potable.

Depending on the type of arrangement, hydraulic accumulators can be horizontal or vertical. Vertical ones are equipped with legs; some models have plates for hanging on the wall. It is the models elongated upward that are most often used for self-creation water supply systems of a private house - they occupy less space. The connection of a hydraulic accumulator of this type is standard - through a 1-inch outlet.
Horizontal models are usually equipped with pumping stations with surface-type pumps. Then the pump is placed on top of the tank. It turns out compact.
Principle of operation
Radial membranes (in the form of a plate) are used mainly in gyroaccumulators for heating systems. For water supply, a rubber bulb is usually installed inside. How does such a system work? As long as there is only air inside, the pressure inside is standard - the one that was set at the factory (1.5 atm) or that you set yourself. The pump turns on, begins to pump water into the tank, and the pear begins to increase in size. Water gradually fills an increasingly larger volume, increasingly compressing the air that is located between the wall of the tank and the membrane. When a certain pressure is reached (usually for one-story houses this is 2.8 - 3 atm) the pump is turned off, the pressure in the system stabilizes. When you open a tap or other water flow, it comes from the accumulator. It flows until the pressure in the tank drops below a certain level (usually about 1.6-1.8 atm). After which the pump turns on, the cycle repeats again.

If the flow rate is large and constant - you are filling a bathtub, for example - the pump pumps water in transit, without pumping it into the tank. The tank begins to fill after all the taps are closed.
A water pressure switch is responsible for turning the pump on and off at a certain pressure. In most hydraulic accumulator piping schemes, this device is present - such a system operates in optimal mode. We’ll look at connecting the hydraulic accumulator a little lower, but for now let’s talk about the tank itself and its parameters.
Large tanks
The internal structure of hydraulic accumulators with a volume of 100 liters and above is slightly different. The pear is different - it is attached to the body both at the top and at the bottom. With this structure, it becomes possible to fight the air that is present in the water. To do this, there is an outlet in the upper part into which you can connect a valve for automatic air release.

How to choose tank volume
You can choose the tank volume arbitrarily. There are no requirements or restrictions. The larger the volume of the tank, the greater the supply of water you will have in case of a shutdown and the less often the pump will turn on.
When choosing a volume, it is worth remembering that the volume that appears in the passport is the size of the entire container. There will be almost half as much water in it. The second thing to keep in mind is dimensions containers. A 100 liter tank is a decent-sized barrel - about 850 mm high and 450 mm in diameter. You will need to find a place somewhere for it and the harness. Somewhere - this is in the room where the pipe from the pump comes. This is where all the equipment is usually installed.

If you need at least some guidelines to select the volume of a hydraulic accumulator, calculate the average flow rate from each water intake point (there are special tables or you can look at the data sheet for household appliances). Sum up all this data. Get the possible consumption if all consumers work simultaneously. Then figure out how many and which devices can work at the same time, calculate how much water will be consumed in a minute in this case. Most likely by this time you will have already come to some decision.
To make it a little easier, let’s say that the hydraulic tank volume of 25 liters is enough to meet the needs of two people. He will provide normal functioning a very small system: faucet, sink and small. If you have other household appliances, the capacity must be increased. The good news is that if you decide that the current tank is not enough for you, you can always install an additional one.
What should be the pressure in the accumulator?
One part of the accumulator contains compressed air, and water is pumped into the second. The air in the tank is under pressure - factory settings - 1.5 atm. This pressure does not depend on the volume - it is the same on a tank with a capacity of 24 liters and 150 liters. More or less may be the maximum permissible maximum pressure, but it depends not on the volume, but on the membrane and is indicated in the technical specifications.

Preliminary check and pressure correction
Before connecting the accumulator to the system, it is advisable to check the pressure in it. The settings of the pressure switch depend on this indicator, and during transportation and storage the pressure could drop, so monitoring is very desirable. You can control the pressure in the hydraulic tank using a pressure gauge connected to a special inlet in the upper part of the tank (capacity of 100 liters or more) or installed in its lower part as one of the piping parts. Temporarily, for control, you can connect a car pressure gauge. Its error is usually small and it is convenient to work with. If this is not the case, you can use the standard one for water pipes, but they are usually not very accurate.

If necessary, the pressure in the accumulator can be increased or decreased. There is a nipple at the top of the tank for this purpose. A car or bicycle pump is connected through the nipple and the pressure is increased if necessary. If it needs to be vented, the nipple valve is bent with some thin object, releasing the air.
What air pressure should be
So should the pressure in the accumulator be the same? For normal operation of household appliances, a pressure of 1.4-2.8 atm is required. To prevent the tank membrane from tearing, the pressure in the system should be slightly higher than the pressure of the tank - by 0.1-0.2 atm. If the pressure in the tank is 1.5 atm, then the pressure in the system should not be lower than 1.6 atm. This value is set on the water pressure switch, which works in tandem with the hydraulic accumulator. These are the optimal settings for a small one-story house.
If the house is two-story, you will have to increase the pressure. There is a formula for calculating the pressure in the hydraulic tank:
Vatm.=(Hmax+6)/10
Where Hmax is the height of the highest point of water intake. Most often this is a shower. You measure (calculate) at what height relative to the hydraulic accumulator its watering can is located, substitute it into the formula, and get the pressure that should be in the tank.

If the house has a jacuzzi, everything is more complicated. You will have to select it empirically - changing the relay settings and observing the operation of water points and household appliances. But at the same time operating pressure should not be more than the maximum allowable for other household appliances and plumbing fixtures (indicated in the technical specifications).
How to choose
The main working body of the hydraulic tank is the membrane. Its service life depends on the quality of the material. The best membranes today are made from food-grade rubber (vulcanized rubber plates). The housing material matters only in membrane-type tanks. In those in which a “pear” is installed, water comes into contact only with rubber and the material of the body does not matter.

The flange should be made of thick galvanized steel, but better - stainless steel
What's really important about bulb tanks is the flange. It is usually made of galvanized metal. In this case, the thickness of the metal is important. If it is only 1 mm, after about a year and a half of operation, a hole will appear in the metal of the flange, the tank will lose its tightness and the system will stop working. Moreover, the warranty is only one year, although the stated service life is 10-15 years. The flange usually rots after the warranty period expires. There is no way to weld it - the metal is very thin. You have to search in service centers new flange or buy a new tank.
So, if you want the accumulator to last a long time, look for a flange made of thick galvanized or thin, but made of stainless steel.
Connecting the accumulator to the system
Typically, the water supply system of a private home consists of:

This scheme may also include a pressure gauge for operational pressure control, but this device is not necessary. It can be connected periodically to carry out test measurements.
With or without five-pin fitting
If the pump is of a surface type, the hydraulic accumulator is usually placed next to it. In this case, the check valve is installed on the suction pipeline, and all other devices are installed in one bundle. They are usually connected using a five-pin fitting.

It has conclusions with different diameters, just for the devices used for tying the hydraulic accumulator. Therefore, the system is most often assembled on its basis. But this element is completely optional and you can connect everything using ordinary fittings and pieces of pipe, but this is a more labor-intensive task, and there will be more connections.

How to connect a hydraulic accumulator to a well - diagram without a five-pin fitting
With one inch outlet, the fitting is screwed onto the tank - the pipe is located at the bottom. A pressure switch and pressure gauge are connected to the 1/4 inch outlets. The remaining free inch terminals are connected to the pipe from the pump and wiring to consumers. That's all for connecting the gyroaccumulator to the pump. If you are assembling a water supply circuit with a surface pump, you can use a flexible hose in a metal winding (with inch fittings) - it is easier to work with.

A visual diagram of connecting the pump and accumulator - use hoses or pipes where necessary
As usual, there are several options, the choice is yours.
The hydraulic accumulator is connected to the submersible pump in the same way. The whole difference is where the pump is installed and where the power is supplied, but this has nothing to do with the installation of the accumulator. It is placed in the place where the pipes from the pump enter. Connection is one to one (see diagram).

How to install two hydraulic tanks on one pump
When operating the system, sometimes owners come to the conclusion that the available volume of the accumulator is not enough for them. In this case, you can install a second (third, fourth, etc.) hydraulic tank of any volume in parallel.

There is no need to reconfigure the system; the relay will monitor the pressure in the tank on which it is installed, and the viability of such a system is much higher. After all, if the first accumulator is damaged, the second one will work. There is one more positive point- two tanks of 50 liters cost less than one per 100. The point is more complex technology production of large-sized containers. So it is also more economical.
How to connect a second accumulator to the system? Screw a tee onto the input of the first one, connect the input from the pump (five-pin fitting) to one free output, and connect the second container to the remaining free one. All. You can test the circuit.
To organize normal work water supply in country house from a borehole or similar source, a number of special equipment must be installed. The package includes a pump, automation, hydraulic accumulator and other equipment. In this article we will tell you about how to connect and install a hydraulic accumulator for do-it-yourself water supply systems. We will offer you several working connection schemes. But first, let’s find out what this equipment is.
Hydraulic accumulator - why is it used?
There are several main purposes that a hydraulic accumulator serves in a water supply system. First of all, its installation allows you to create required pressure online. The hydraulic accumulator also stores a small supply of water. For example, if for some reason the pump cannot pump water, then you will be able to use it. The volume of water determines the internal volume of the accumulator. And most importantly, its presence in the water supply system of a private home prevents the formation of water hammer.
A hydraulic accumulator means a special metal tank. To maintain stable pressure inside it, it is equipped with special equipment. The water supply scheme for a well with a hydraulic accumulator is relatively simple, and if you follow all the instructions in this article, you can make the connection yourself.
In most cases, a hydraulic accumulator for water supply systems uses the operating principle of compressed air energy. It consists of a partition, for example, it can be a rubber membrane or a rubber bulb. So, the essence of the operation of the entire water supply system with a hydraulic accumulator comes down to the following. Pumping equipment pumps water into the tank. As the tank fills, pressure builds up inside it as the water presses on the bulb. This entire process is controlled by a pressure sensor. This is important so that the pump can be turned off. As soon as the tap is opened in a room with water, the water is pushed out using the energy of a rubber bulb or membrane.

As soon as the pressure in the accumulator drops, a sensor is triggered, which sends a signal to the pump, and it turns on. This way the accumulator is filled with water again. Pumping is carried out until the shutdown signal is triggered.
As you can see, in addition to connecting the accumulator itself, it is important to correctly calculate the pressure in the water supply accumulator. For this purpose, you can use the manufacturer’s recommendations, which are indicated in the passport.
Today there are two types of accumulator designs:
- Open type.
- Closed type.
Concerning open type then it is used extremely rarely. And this is not surprising, because he has a number of negative aspects, among which:
- High coefficient of water evaporation. As a result, it is necessary to constantly pump up water.
- Moreover, installing a hydraulic accumulator for open-type water supply systems with your own hands will be much more expensive. This is explained by the fact that it is necessary to take measures that will eliminate the possibility of water freezing. Moreover, it is necessary to install additional automation, which will eliminate the possibility of water overflow.
- An important disadvantage is that when water comes into contact with oxygen, its aggressiveness towards metal parts. As a result, this leads to the formation of corrosion on the metal, and this significantly reduces its service life.
Among other things, there are different models that are placed in a vertical or horizontal position. If the area of the caisson or other room where the installation and connection of the hydraulic accumulator to the water supply system is minimal, then the vertical direction is chosen. For horizontal, a special platform is required. The tank itself has special mounting legs for installation.
Important! On sale you can find a hydraulic accumulator for the water supply system in blue and red colors. Blue color for cold water supply. It differs from red in that the tank itself is capable of operating under conditions of much higher pressure. Plus, food-grade rubber is used inside the structure.
Placement method

Before connecting, it is necessary to understand the installation method, or rather, location. The choice of location will depend on the power of the unit. To create the best possible pressure, it is recommended to choose the most highest point in the house, for example, there is an insulated attic.
The selected location should be dry and free of air humidity. Otherwise, condensation will appear on the surface of the accumulator for the water supply system, which can cause corrosion. And although the tank is covered paint and varnish material, sooner or later rust will take its toll. Plus, the chosen surface must be durable and smooth.
Connection diagrams
Now let’s take a closer look at how you can install a hydraulic accumulator for water supply systems with your own hands. Let's consider two schemes with a submersible and surface pump.
Connecting a hydraulic accumulator with a surface pump

First of all, the pressure level in the container is checked. As a rule, it should be less than that of the pump, which is set on the relay to 1 bar. To connect, you need a special fitting, which has 5 different outputs. Each output is intended for specific purposes. Plus, you should buy a pressure switch.
As for the special fitting for five outputs, the following elements are connected through it:
- To connect the pump.
- Pressure switch.
- Pressure gauge.
- To connect the water supply.
To begin with, the connection can be made through a rigid hose. After this, a pressure switch and a pressure gauge indicating the pressure level are screwed to the fitting. You should also connect the pipe that will be directed to the pump.

When connecting a pressure switch, it is extremely important to consider following points. The device itself has a top cover. It should be carefully removed. Below it you will find four contacts. Each contact will be labeled pump and network. This makes it much easier to connect the device to the network of wires coming from the pump. The connection is made strictly according to the specified labels.
However, not all manufacturers put such signatures on relays. This is done on the assumption that the installer fully understands this. If you are new to this business, then be sure to take this factor into account. For example, when purchasing, make sure that the inscriptions are there. In this case, you will not need to call a specialist in this profile.
Important! Absolutely every connection on the device should be made using sealant. It is necessary that each joint is airtight. Typically, FUM tape or tow is used for this purpose.
Upon completion of these manipulations, all you have to do is turn on the pump to the network and adjust the pressure level in the accumulator. Plus, you should make sure that there are no leaks at all joints.
Connecting a hydraulic accumulator with a submersible pump

In this case, the pumping equipment is lowered into the water. All water coming from the well will be pushed out through a vertical pipeline by a pump. With this design, the well water supply circuit with a hydraulic accumulator must include a check valve. As a result, water will not flow out of the membrane to the pump. In most cases, a check valve is installed immediately after the pump. Then there is a pressure pipeline to the surface.
Some pumps may have a female connection. In this case, it is necessary to purchase a special adapter, which will have two external threads of the corresponding diameter. This is important, because check valve Also internal thread. Otherwise, the connection is the same as in the previous case. A special adapter for five outputs is used.
We determine and set the pressure in the accumulator

Regardless of the method and option for installing a hydraulic accumulator for a water supply system, correct pressure regulation in the entire system and in the tank itself plays an important role. So, in one part there is compressed air, in the second there is water. When purchased, the manufacturer sets the pressure in the air chamber at the factory to 1.5 atmospheres. It is important to note that this is a basic installation regardless of the type of model and cost of the accumulator.
Checking and correcting pressure
So, immediately before connecting, it is recommended to check the pressure level in the accumulator itself. Using this information, you will be able to correctly configure the pressure switch. Moreover, it is extremely important to carry out future monitoring of blood pressure levels. A pressure gauge is intended for this purpose. Some DIYers temporarily use a car pressure gauge. Its error is minimal, so it is a completely normal option.

If necessary, the pressure level can be reduced or added. For this purpose, there is a nipple on the top of the accumulator. A car or bicycle pump is connected to it. Due to this, the pressure rises. If the air pressure, on the contrary, needs to be reduced, then there is a special valve in the nipple. You should take a sharp and thin object and press on it.
What pressure should it be
So, it is important to decide what pressure should be in the accumulator. If used in a private home Appliances, then the pressure range should be in the region from 1.4 to 2.8 atmospheres. To eliminate the possibility of a membrane breakthrough, the pressure in the system should be slightly higher than in the tank itself, at least 0.1 atmospheres. That is, if the accumulator for the water supply system is set to 1.8 atmospheres, then the system should have about 1.9 atmospheres. To set this, use special device, known as a pressure switch.

When determining the pressure level, it is important to take into account the number of floors of the building. If you have cottage, then the pressure will be lower than if you had to raise the water to the second floor. Also taken into account is the number of water intake points in the house, how many people live and what is the likelihood that several taps will open at the same time.
If all these nuances are not taken into account, then the following picture may occur. You take a shower while someone else is washing dishes or using the water for other purposes. As a result, the level of pressure and water pressure in the tap will drop sharply. Agree, this is not a very pleasant situation. To prevent this from happening, it is important to correctly set the pressure on the hydraulic accumulator and other equipment. And this will be possible if we take into account all the listed details and more.
Conclusion
So, here we have looked at the features of using a hydraulic accumulator in a water supply system. We also brought you simple circuits connecting the hydraulic accumulator. As you can see, there is nothing complicated in this matter. The most important thing is to correctly calculate the pressure level and select the tank itself to suit the needs of the home. We hope that this article will help you understand this difficult matter. We are confident that you can handle this job yourself. To consolidate the entire theory provided, we invite you to watch the prepared video material. It will help you visually see how the process of connecting the accumulator to the water supply system occurs. If you already have personal experience in this matter, then be sure to share it by leaving comments on this article.


