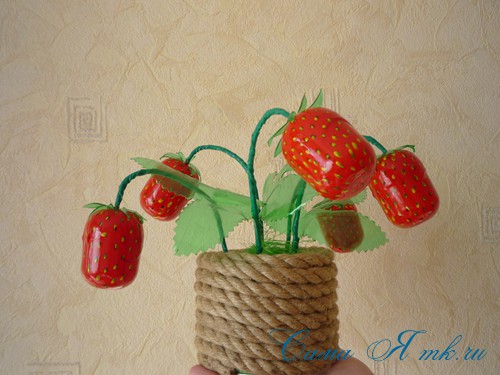
A very cute craft can be made from a plastic bottle Green colour and containers for kinder surprises. This will be an almost real delicious strawberry that can decorate your home or country cottage area. A whole bush of such luxurious strawberries with berries and flowers looks beautiful.
To make this craft we will need a lot of things:
- wire,
- cases for kinders – 5 pieces,
- green plastic bottle – 1 piece,
- scissors (for leaves you can use curly scissors),
- acrylic paint red, black and yellow,
- brushes for applying paint (medium and thin),
- green insulating tape,
- a little foam (so that it sits tightly in the pot you are using),
- a small flower pot or any suitable jar,
- a little green sisal
- candle,
- decor of the pot - optional.
So, let's begin:
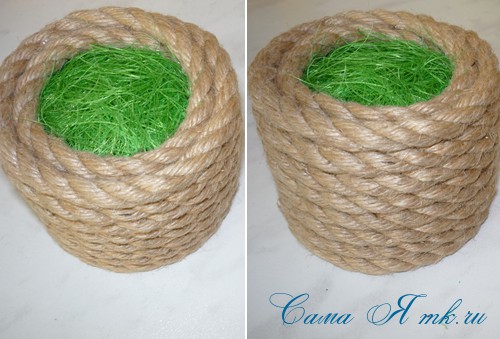
To begin with, I prepared a pot for planting our strawberries, which can be decorated in any way in an accessible way. First we place a piece of foam inside and decorate it. I decorated it with jute rope; for children's crafts, you can use corrugated paper and other suitable materials.
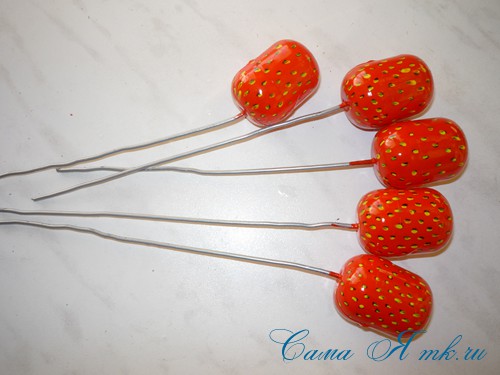
Each Kinder Surprise container must be pierced with scissors or an awl and a wire inserted into this hole and bent slightly.
Close the container and so on for all 5 pieces.

These are the preparations...

Coloring acrylic paint…

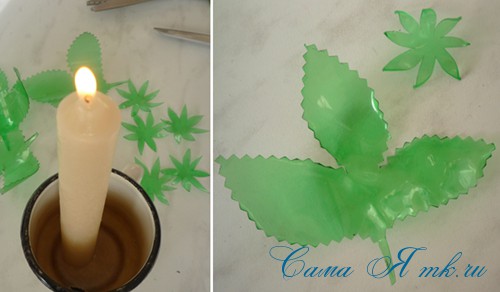
The leaves must be cut with cuttings to make it easier to attach them to the stem.


The sepal and leaf blanks can be slightly heated over a candle so that they are slightly deformed and take on a lively appearance.
We pierce the sepals with an awl or scissors in the center and put them on a wire for each berry.

Then, using green insulating tape, we wrap the stem-wire in a spiral, attaching the leaves. Insulating tape can be replaced with corrugated paper, tape or green yarn.
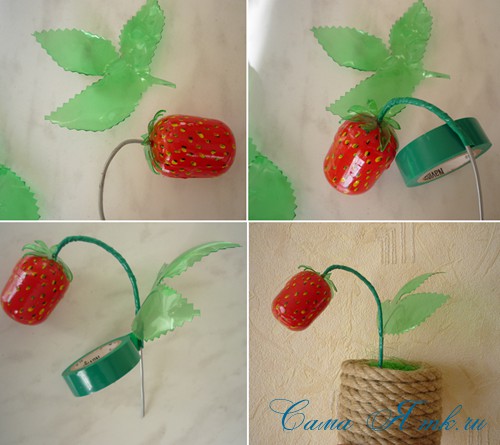
From such blanks we make a bouquet by piercing the foam in the pot with wire.
Let's add a few flowers for beauty.
They can be made from any available material; I have white felt and ready-made flower centers. You can use a white bottle or yogurt jars. We also use any suitable material, you can even cut it out of a bottle and paint it with yellow acrylic paint.
We fix the flower on the wire... Depending on the material used, the wire can be slightly bent at the tip, and the middle can be glued on top of the glue. We wrap the wire stem with electrical tape and plant it in a pot.
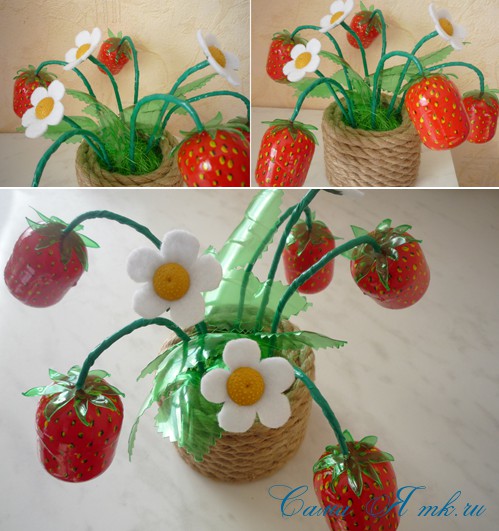

An attractive strawberry bouquet of kinder surprises will look good both in the interior and on personal plot. It can also be a wonderful handmade souvenir gift, for example, for March 8th!
Have fun creating!
I was glad to help!
Don't rush to throw away used plastic container, because you can still find one for it useful application. In a new review, the author has collected the most interesting and practical examples of what else you can use unnecessary plastic bottles for.
1. Decoration in a marine style

To create a unique decoration in nautical style you will need a small plastic or Glass bottle, which should be filled with plain water and attributes of the seabed: sand, shells, large pearl-like beads, coins, shiny beads and glass fragments. When all the components of the composition are folded, drop a drop of blue food coloring into the bottle, a few drops vegetable oil and some glitter. All that remains is to tighten the cork well and the stunning decoration is ready.
2. Stand for books and magazines

Simple manipulations will allow you to turn an unnecessary milk or juice canister into convenient stand for books, newspapers and magazines.
3. Faucet attachment

You can cut a convenient faucet attachment from a shampoo bottle, which will allow your child to outside help wash your hands or wash your face without getting all over the floor.
4. Napkin holder

A bottle from detergent can be used to create a bright and practical napkin holder, the design of which is limited only by your imagination.
5. Stationery organizer

Instead of just throwing out regular bottles of shampoo and shower gel, make them into bright and cheerful coasters in the form of funny monsters. To begin, simply cut off the necks of the bottles and mark the locations of future cuts. You can cut out a variety of different things from colored paper or fabric. decorative elements, like eyes, teeth and ears, and attach them to the bottles using superglue. It is best to attach finished products to the wall using double-sided tape.
6. Containers for cosmetic accessories

Cut-down plastic bottles are perfect for creating adorable containers for storing makeup brushes, makeup, ear sticks and other small items.
7. Poof

From a large number of plastic containers you can make a charming pouf, the creation process of which is quite simple and straightforward. First you need to make a circle from plastic bottles the same height and secure it with tape. The resulting structure must be well wrapped with a sheet of foamed polyethylene, securing all joints with tape. The base of the ottoman is ready, all that remains is to sew a suitable cover for it.
8. Bracelets

Plastic bottles are an excellent basis for creating original bracelets. Use fabric, thread, leather and any other materials to decorate the unsightly plastic base.
9. Stand for sweets

The bottoms of plastic bottles of different sizes, painted in the desired shade, can be used to create an impressive multi-level stand for convenient and beautiful storage of sweets.
10. Scoop and spatula

Plastic milk and juice canisters can be used to create a practical scoop and handy little spatula.
11. Protective cap

A simple cap, which can be made in no time from an ordinary plastic bottle, will help protect your phone from snow or rain.
12. Lamp

A small plastic canister can be a wonderful base for creating an original lamp.
13. Jewelry organizer

An amazing multi-level organizer that can be made from several bottoms of plastic bottles strung on a metal knitting needle.
14. Pots
Containers for storing spare parts.
Capacious containers made from unnecessary items will help you clean up and maintain order in your garage. plastic canisters, which are perfect for storage small parts, nails, screws and other small items.
17. Toy

Armed with scissors, felt-tip pens and paints, you can turn unnecessary plastic containers into fun toys, the creation process of which, as well as the result itself, will undoubtedly attract the attention of children.
Continuing the theme with your own hands.
Every housewife strives for ideal cleanliness and order in the house, so all women try to get rid of excess trash as quickly as possible. But you don’t need to be so categorical; for example, plastic food packaging should be saved.
Today we will share with you the secret of creating a charming little thing from plastic containers. Children will be delighted with this idea; by the way, they can be involved in joint production.
YOU WILL NEED
plastic box
scissors
hole puncher
colored permanent markers
PROGRESS
Cut out the bottom of the package. All you need is the flat part of a plastic container. 
Print any outline picture. You can use coloring for these purposes. 
Redraw the picture onto the plastic using permanent markers. Please note that the final size of the figurine will be reduced by approximately 70%. Therefore, initially the drawing should be large. 
Using a hole punch, make a small hole above the design and cut out a plastic figure along the outline. 
After preheating the oven to 165 degrees, place the plastic figures on a baking sheet lined with parchment paper. Bake the figures for exactly 3 minutes. 
After baking, each of the figures will become smooth and denser. Now they can be attached as decoration to the bracelet. 
These figures can also be used as New Year's toys to the Christmas tree! If you liked this craft idea, share the article with your friends.
My name is Irina, I live in Germany - in a country where absolutely everything is sold in plastic packaging, which migrates in tons from stores to garbage bins. I've been doing it for a long time different types handicrafts and am constantly faced with the issue of optimal storage of a bunch of little things that accumulate all the time and require new boxes, caskets, etc. In this master class I want to show several ways to create convenient storage containers from various plastic packaging. The advantage of this kind of containers is that they are easy to make at home, they can be made in any size and in any quantity, the transparency of the plastic allows you to quickly find the right thing, material for containers can be found in every home, such containers for small items can also be used in the country house, in the garage, etc...
So, first we’ll make the simplest mini-container from a plastic bottle:

We heat the tip of the knife to make it easier to start cutting the bottle. 
Cut the bottle into two parts with a knife. If the bottle does not have edges, in order to avoid large errors when cutting, required height glue the tape and cut the bottle exactly along the edge of the tape.


Melt the edges of the bottle a little to avoid cutting your hands when using it. further processing. The bottle should be kept at a distance of 0.5-1 cm from the flame, turning evenly. The unevenness of the edges after heat treatment will hide the crocheting.

We heat up a steel knitting needle and make holes along the edge of the bottle, which will have to fit the size of the hook with which we will tie the edges of the bottle. 


When piercing plastic with a hot knitting needle, sharp and dark traces of plastic often remain on the surface... They can be removed different ways, I use a regular grater to clean my feet (the sandpaper is too sharp - it damages the surface of the plastic, it’s not very convenient to use a knife) 
Now we proceed to crocheting the edge with a single crochet. 

We thread the tip of the thread and glue it inside the container. 
Then we thread a thick thread into gypsy igloo and sew the entire row with colored thread, without missing a single hole. 

We thread the end of the thread and glue it again. 
If desired, our small container can be decorated. The easiest way to decorate is with double-sided tape, ribbon and rhinestones. You can also use thread winding on double-sided tape.

Cut the tape to the required length and glue it with double-sided tape. We cut off the excess tape. 


We make a bow at the junction, you can stick on a rhinestone and the mini-container is ready! 
We make different containers of the required height and glue them with a gun into a larger and denser plastic package (the photo shows the packaging in which we sell food products) 

Apply to the bottom hot glue and quickly glue the container to the package (hold it a little so that it sticks properly) 


We paste double-sided tape, any tape, or wrap it with thread on our box, decorate it with small things, and our first box for small things is ready! I made this box for the dacha to store various little things that you are always looking for in different drawers: pencils, small tools, keys, etc. 
If we make a high strap on our containers from plastic bottles and thread a cord, then we will get pencil cases that can be either placed or hung. They take up little space and are easy to see 


Another option for making boxes for storing small items: in it I used thick plastic cups from Danone yogurt. 
The principle of making a box is the same; if the height of the box allows, you can make two tiers from cups, using cardboard (or thick plastic) for the bottom of the second tier, onto which I hot glued the plastic bottom from the packaging. 

If desired, boxes for small items can be made with lids. For these purposes, I took old plastic folders, cut them to the size of the box and, after making holes with a hole punch or a hot knitting needle, stitched them together with the edge of the plastic box. Since in the photo I have a two-tier plastic box, for convenience I made a handle from scraps of the folder, which I also glued with hot glue to the bottom of the second tier. 


The finishing elements are glued with hot glue. 

Large plastic bottles can be used to make excellent containers for storing small toys, designer parts, etc. for a children's room and kitchen. The finishing of such containers can be joint creativity for parent and child. The principle of creating such a large container is exactly the same as shown above. 


From the remaining top parts of plastic bottles we can make a lot of exotic flowers and decorate our balcony or summer cottage with them. But this is a topic for another master class! 


The site contains a number of materials on the recycling of seemingly unnecessary and useless things. In hospitals and clinics you can find vending machines for shoe covers. You put five rubles into the machine and at the exit you get a small plastic box with a couple of shoe covers stuffed into it. After using the shoe covers, an unnecessary container remains. One of the options for extending the life of the container is making a toy for a cat, cat or kitten. How to make such a toy?
Constructions homemade toy There can be a wide variety of options, but to give you ideas, I will give two options. To make it yourself, we will need a container from shoe covers, a shoe lace, a piece of soft insulated wire or a piece of twine, a rattle on a clothespin for a fishing rod (costs 10 rubles). A pair of scissors with a sharp tip will suffice.
The first version of a toy for a cat
Using the tip of scissors, make a small hole in the lid of the container with your own hands. For other piercing methods, watch the video. We thread twine or shoe lace into it and inside We tie a knot in the lids so that the lace does not jump out. We put one ringing ball taken from the rattle inside the container. Close the container with a lid with a tail. Shorten the lace to a length of 10-20 cm. For decoration, draw identification marks of the mouse’s face on the container with a permanent felt-tip pen. We check the result on a cat.
The second version of a toy for a cat
Use the tip of a pair of scissors to make a small hole in the lid of the container. We tightly insert a spring with a rattle ball at the end into this hole (see photo), and the rattle can be hidden in a container or brought out. With this mounting, the sound from the toy will be louder. As an option, you can attach a tail. We also check the result on a cat.
Spring rattle


