Despite the fact that Soviet-era furniture is quite reliable and strong, it is not considered beautiful, much less competing with modern furniture. In addition, by this time it was pretty worn out and required repairs. Even in such conditions, the owners feel sorry to part with her. To buy a new, modern one, you need a lot of money, since furniture has always been not cheap, and it is not cheap now. IN in this case there is one Alternative option leaving old furniture and not buying new is to try to update the furniture with your own hands, giving it an attractive and modern appearance. Cabinet furniture can be remade quite easily, especially since all the materials necessary for this are available. In any case, purchasing materials for remaking furniture will be much cheaper than buying new furniture. One of the easy and accessible techniques is changing the color and replacing the fittings. There won’t be any special problems with the fittings, but changing the appearance is much more complicated. There are several options, but the two most common are painting and gluing special film or wallpaper.

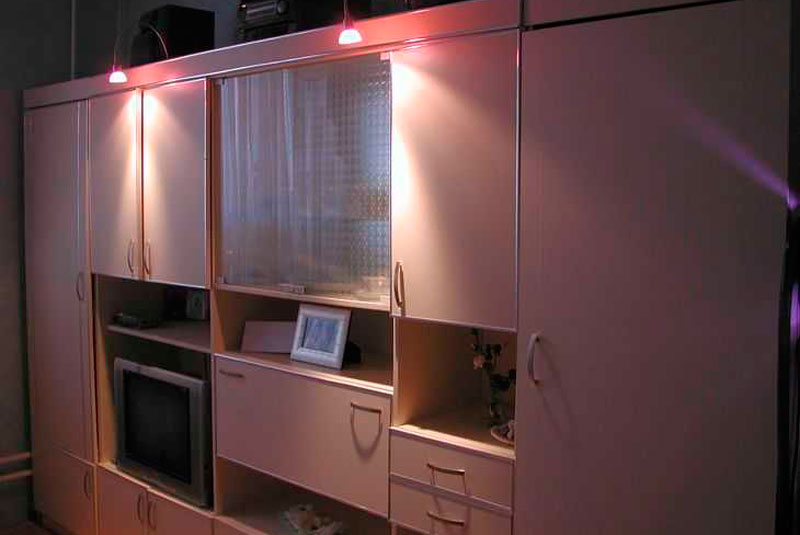
The most affordable and simplest option is to cover old furniture with self-adhesive film. On sale you can find film for every taste, both colored and monotonous, in various colors, shades and textures. Many people prefer wood-effect film, but there are other options that meet the spirit of modernity. This approach can really turn an old wall into furniture that will have an attractive and modern appearance. It’s not difficult at all; it’s enough to do your work slowly and carefully, which will allow you to get an interesting result that deserves attention. To verify this, just look at 2 photos. The first photo shows an outdated Soviet wall made of chipboard, and the second photo shows the same wall, but after updating.

The wall received a new appearance thanks to the use of compacted furniture self-adhesive film, cream color with a matte surface. Where there was an open part of the wall, there were glass doors covered with a translucent matte film. For the edging, a furniture layout was used, chrome-colored, and also self-adhesive.
The work consists of the following stages:
- The old wall is disassembled, everything that is not needed is removed, including the fittings.
- All surfaces are cleaned of dirt and degreased. To do this, use a soft cloth and detergent. After this, the product is washed off warm water with vinegar and finally wipe the surfaces with a dry, clean cloth.
- Fragments are cut from the film required size, with a margin of up to 1 cm. After pasting, the excess film is cut off with a stationery knife.
- Before pasting, the surface is irrigated with water from a spray bottle. A wet surface will allow you to accurately position the film, since it can be moved, or even peeled off if it was not possible to glue it properly the first time.
- Before pasting, remove from film protective film, after which it is laid on the surface. Having correctly positioned the film fragment, begin to smooth it with a soft cloth in the direction from the middle to the edges. The main thing is that there are no air bubbles left under the film. In this regard, all work is performed slowly and very carefully.
- When bubbles form, they are pierced with a thin needle and the air is expelled from them. This operation is also carried out using a rag, moving from the edges to the puncture point. After this, this place is thoroughly rubbed with a rag.
- After the film is glued, a thin cotton fabric is taken and placed on top of the film, after which an iron with medium heating temperature is used. The fabric is ironed together with the film.
- Finally, the trim (edging) is glued and the fittings (handles) are installed.
- This technology is applied to every part being glued. Glass is glued in the same way, only from the inside. After complete assembly, you will get a completely new furniture wall. In this way, you can breathe a second life into items such as bedside tables, chests of drawers, cabinets and kitchen furniture.
After the wall was successfully pasted over, it was also updated old wardrobe and installed on the right. The result is that the entire wall is filled with updated furniture. Using the same technology you can update the old one kitchen furniture– apply self-adhesive film and replace the handles.
There is a second option for upgrading furniture, which is less expensive and, what’s most interesting, does not require disassembling anything. IN this option Only furniture doors are covered, not with film, but with non-woven wallpaper. For gluing, PVA glue is used. To prevent the edges of the wallpaper from lifting, they are cut into blanks, the size of which is 5 mm smaller size door Judging by the photo below, the result is not bad at all.

The advantage of such a finish is that the finish can be replaced with new wallpaper at any time.
As a rule, a surface covered with wallpaper lasts for five years. A similar technology was used to decorate the kitchen set. To make the surface washable, the wallpaper is covered with two layers of PVA glue. The most important thing here is to do everything carefully so that no smudges form, since you will have to work with a brush.
Alternatively, the wallpaper can be opened with varnish, but before that it is better to experiment on unnecessary wallpaper. It is important to determine what the reaction of the wallpaper to the varnish will be. When choosing a varnish, you need to know that acrylic and cellulose provide a transparent surface, while polyurethane will turn yellow after a certain time. Polyurethane varnish It is practically unaffected by solvents and, if it needs to be removed, you will have to resort to mechanical action. Typically, coarse sandpaper is used for this or an electric drill with an attachment is used.
How to update a chest of drawers
An old chest of drawers can sit in the attic for several years and lose only its appearance. Typically old varnish coating cracks, but otherwise he can be envied modern furniture. It does not dry out and remains as reliable and strong as it was before. In this case, the chest of drawers undergoes a more complex renovation, using painting and decoration, using polyurethane molding and wallpaper.

Stage No. 1. All fittings are removed from the chest of drawers, after which the old covering is removed. As a rule, the old varnish coating is removed mechanically, using sandpaper (coarse) for this. All sinks, cracks and chips are sealed with putty and wait until it dries. After complete drying, the surface is sanded with fine sandpaper. The result is what is shown in the photo below.

Stage No. 2. Installation of polyurethane moldings. The main task is to choose the right moldings so that they are neither small nor large. Basically, products are selected up to 5 cm wide and very narrow if you look at them in profile.
The purchased moldings are very carefully and accurately cut into pieces of the required length, and the corners are cut at an angle of 45 degrees. At the same time, you need to make sure that the drawing matches. The molding is attached using PVA glue. Alternatively, you can use self-tapping screws for reliability. At the same time, before screwing them in, recesses are made for them. All recesses are filled with putty very carefully, otherwise there may be problems when the putty dries.

Stage No. 3. All surfaces for gluing are treated with a primer. As a primer, it is possible to use PVA glue diluted with water in a ratio of 1:2. After the primer has completely dried, begin painting. As a rule, 2 layers of acrylic paint are applied to water based. The color is coffee with milk, although the color in the photo does not correspond to that indicated due to poor color rendering.

Stage No. 4. Decoration is carried out on the basis of wallpaper made using silk-screen printing technology. Sections of wallpaper are cut precisely according to the dimensions of the inner part, bordered by the molding. The wallpaper is glued with PVA glue. After complete drying, the entire chest of drawers is coated with water-based varnish in 2 layers.

Stage No. 5. Finally, modern legs in the form of furniture wheels are screwed onto the chest of drawers and handles are installed.

If you carefully study the technology, everything is much simpler than it might seem. Although, all stages require a certain accuracy, otherwise there will be problems with the appearance. In the same style you can update wardrobe. The result is not a bad set for a room or bedroom. It may not be entirely modern, but it is original and stylish, and most importantly, very cheap.
If old furniture has a varnish coating, it is very difficult to get rid of it. If there are no obvious flaws, it is better to use a primer for complex surfaces and only then start painting. This approach will minimize the effort to update old furniture.
Updating an old bedside table
The photo below shows the process of updating an old polished bedside table. First, the polish was removed, after which the surfaces were filled and sanded. After that, it was painted acrylic paint in two layers. Finally, the paper from the gift bag was pasted onto the door, thanks to which we managed to get original drawing. After this, the entire bedside table is covered with two layers of semi-gloss acrylic varnish.

All stages are not particularly difficult if you have the slightest skills. All processes correspond to the sequence of actions described during the restoration of the chest of drawers. The result exceeds all expectations.
 This old nightstand is due for an update.
 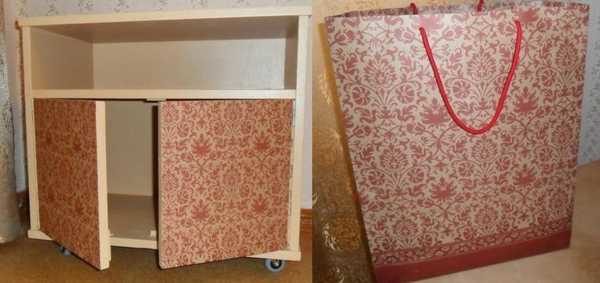 This bag will serve as an excellent decor for doors.
 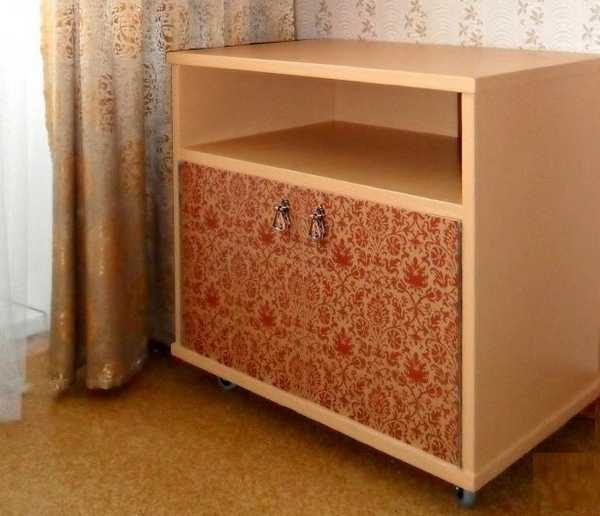 The result of updating an old bedside table.
 Remaking furniture with your own hands is simple and accessible to everyone, if desired. Unfortunately, without desire nothing will happen. Below in the photo, you can see a bedside table that was redone using a very simple method: the bedside table was simply covered with embossed wallpaper and varnished twice.
How to remake a table
By adopting such technology, it is enough to simply transform an ordinary Coffee table IR into an object modern interior. They simply take it and cover it with wrapping paper. This is thick paper that sticks without problems and does not become limp under the influence of varnish.
First you need to work on the legs and edges of the tabletop. They need to be painted light color so that they fit better with the new style. After this, you can begin further work.
Before pasting, you should cut out a piece of paper slightly larger than the size of the tabletop. PVA glue is used for gluing. The surface is well rolled with a roller so that there are no air bubbles. The result should be a perfectly smooth surface.

After this, remove excess material by running a fine-grit sandpaper along the edge of the tabletop, pressing the paper against the tabletop. This method allows you to remove excess material very smoothly, which is more like a professional action.
Finally, the surface is covered with two layers of varnish. At the same time, the layers should be thin. Each layer is applied perpendicular to the previous one.

Furniture remodeling: photo ideas
Soviet-era furniture - walls, cabinets, chests of drawers - is not beautiful, but reliable and strong. Well, I just can’t bring myself to take it to the landfill. And rightly so. It is very easy to update it, giving it a completely new sound and modern look. Remaking cabinet-type furniture may not be very difficult: there are materials that can significantly change the appearance with little effort. Most easy way— change color and accessories. Everything is clear with the fittings - choose what suits your style best, and the color can be changed in two ways - paint and glue film (or wallpaper).
Remaking an old wall: changing the design
Covering old furniture with self-adhesive film is the easiest option for changing the decor. Film is available today in both plain and color, different colors, textures and shades. There is no point in gluing a film with a wood pattern; otherwise, it is in trend today. But plain or patterned ones are what can turn an old wall into new furniture. The steps are simple, but the work requires accuracy. But the result is excellent. See two photos. The first one shows the old Soviet wall before the renovation, the second one shows it after.
Updating an old furniture wall - before and after
Now about how it was updated. Compacted furniture self-adhesive film was used, “cream” color, matte surface. Open part old wall closed glass doors, for glass we took a translucent matte film. The edging is furniture layout (also self-adhesive) chrome color. The order of work is as follows:
- Everything that can be removed, you remove and disassemble. Remove old fittings.
- Surfaces must be clean and free of grease. This is easier to achieve with a soft cloth soaked in dishwashing detergent. Then everything is washed off with warm water big amount vinegar. Wipe with a dry cloth.
- Cut out the details. It is better to cut the film 8-10 mm larger. The remains are then cut off with a paper knife.
- Spray the part to be glued with water from a spray bottle. On a wet surface, the film can be moved if something goes wrong. You can even peel it off without damaging it.
- After removing the protective layer from the film, carefully lay it out. Once leveled, begin to smooth soft cloth from the middle to the edges. Try not to have any bubbles. To do this, you need to move gradually, without jumping from place to place.
- If there is still a bubble, you can pierce it with a thin needle approximately in the middle. Then expel air from the edges of the bubble to the hole and rub the puncture site.
- Having glued the film, take a clean thin cotton cloth, spread it on top and iron it with a warm iron (medium heat).
- We glue the trim and install new handles.
This is the sequence of work with every detail. With glass it’s the same, you just need to glue it on inner surface. After assembly you have a renewed wall. This technique can be used for any item: chest of drawers, bedside tables, wardrobe, etc.

For example, after a successful experiment with a wall, we remodeled an old cabinet in the same way and added it to the right. Now the entire wall is occupied. You can update your kitchen set in the same way: apply self-adhesive film and replace the handles.
There is a second way. It is a modification of the proposed method, but it is simpler and not so labor-intensive. Only the doors are covered, not with film, but with non-woven wallpaper. The wallpaper is glued with PVA glue. To prevent the edges from riding up, the parts are cut 5 mm smaller on all sides. It turns out a kind of edging. Everything looks good (example in the photo below).

What's good about this method: it's easy to change the decor. Tired of the old appearance, they tore off the wallpaper and put on new ones. Despite the fact that the method seems frivolous, the appearance is maintained for several years. Its author even tried it on kitchen set. Only the wallpaper on top is coated twice with PVA glue. In this case, the cabinets can be washed. It is important to apply the varnish layer evenly, without sagging; there are no other difficulties.
Sometimes wallpaper is varnished. But before you do this, try it on a scrap piece: see how they react to it.
When choosing a varnish, you need to remember that acrylic and cellulose varnishes remain transparent after drying, while polyurethane varnishes turn yellow after time. Also, polyurethane is almost not softened by solvents: it can only be removed mechanically (from wood - cleaned with sandpaper).
Dresser update
The old chest of drawers had stood for who knows how many years in the attic, but it was very strong and reliable, it had not dried out one bit, only the polish was cracked. It is much stronger in strength than modern products. This is a feature that is inherent in old, Soviet-era furniture. It is not very detailed (to put it mildly), but after standing for several decades in bad conditions, remains strong. Remaking a chest of drawers is more complex: two techniques were used: painting, and then decorating using polyurethane moldings and wallpaper.

Step 1. We remove the fittings and remove the old coating. In some places the polishing was scraped off, in others it was sanded with sandpaper. The chips were covered with wood putty and waited until it dried. At the final stage, everything was cleaned with fine-grain sandpaper. At the same time, the chest of drawers became the same as in the photo below.

This is after it was puttied and leveled sandpaper
Step 2. Installation of polyurethane moldings. When choosing moldings, make sure that they are not bulky: too thick ones will look very rough on a small chest of drawers. They should be no wider than 5 cm and as narrow as possible when looking at them in profile.
Purchased polyurethane moldings neatly cut, corners filed at 45°. (). The pattern match must be perfect. We glue them on PVA. For reliability, you can additionally secure it with screws with wide heads. A small recess is made under them, after the self-tapping screw is screwed in, the hole is covered with putty. Try to ensure that the putty immediately lays down perfectly (you can correct it with a wet finger), since it is problematic to clean off dried putty.

Moldings are glued and mounted on self-tapping screws
Step 3. Everything is treated with a primer. You can use PVA glue diluted with water in a ratio of 1:2. After the primer dries, paint (two layers). For this case, water-based acrylic paint was chosen. The color is coffee with milk, although it looks completely different in the photo. Color rendering is inaccurate.

This is after the second application of paint. Cute
Step 4. For decoration, wallpaper was chosen whose coating was made using the silk-screen printing technique. Pieces are cut to the size of the inside of the frames from the moldings and glued to PVA. After the glue has dried, the entire chest of drawers is coated twice with water-based varnish.

Step 5. And the last to be installed are new legs (furniture wheels) and handles.

We install the handles and legs)) The updated chest of drawers is completely different from the one you saw in the first photo.
As you can see, complex work No. Everything is really elementary. But all processes require accuracy - the appearance depends on it. You can update in the same way old wardrobe. Get a set for the room. Stylish and original.
When updating furniture, the worst thing is if the surface is varnished. The varnish takes a long time and is difficult to remove. If the surface is smooth and the polishing is not damaged, you can apply primer for complex surfaces and paint after drying. This greatly speeds up the process of painting lacquered furniture.
If you have children and a cottage or yard, you may be interested in reading with a lot of photos. And about
How to update an old nightstand
In the photo gallery below you can see the process of restoring an old polished bedside table. First it was removed old polish, puttyed, sanded and after processing it was painted twice with acrylic paint. Then paper with an interesting design was glued to the doors (it was a gift paper bag). Once dry, the whole thing was coated with two coats of semi-gloss acrylic varnish.
The sequence of work is not difficult if you know how to do it. All processes will repeat the sequence of actions that you saw in the example of updating the chest of drawers. The result is also impressive.
Remodeling furniture with your own hands is a painstaking task, but the result is worth it. Below is a photo of a bedside table restored using a simple method: it is covered with embossed wallpaper, and varnish is applied twice on top.

Table makeover
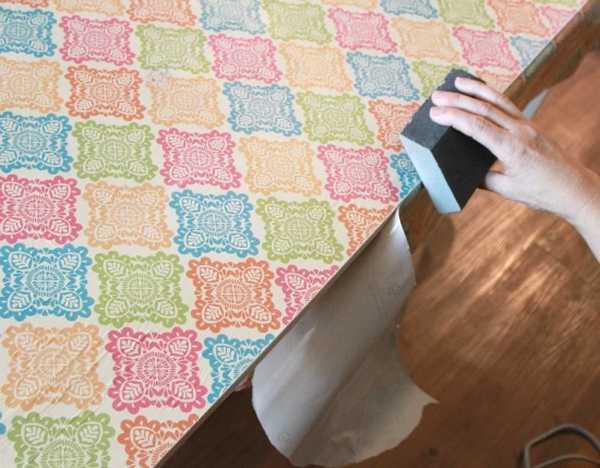
Using the same technology, a banal coffee table can be turned into a modern piece of furniture. In this case, it was covered with wrapping paper. It is dense, adheres well and does not become limp when applying varnish.
Before starting work on decorating the tabletop, the legs of the old table and the edges of the tabletop were painted in a light color: this way it fits better with the new design style. Then the process of its transformation began.
When pasting, the panel is cut out significantly larger than the dimensions of the tabletop. It's necessary. The paper is glued to PVA and rolled with a roller so that there are no lumps or blisters. The surface must be absolutely smooth.

After gluing, take sandpaper with fine grain (it is more convenient to work if it is attached to a block). By running it along the edge, they bend and at the same time separate the excess paper.

Even cutting with a guillotine will not give you a fairly even edge. And with this method, it turns out professionally designed. There is no smell of amateur activity.

After the glue has dried, the surface is coated twice thin layer varnish It should be applied with a soft brush small quantity. Layers are applied in different directions: first along the long side, then across.
Furniture remodeling: photo ideas
Remaking furniture with your own hands is a creative endeavor. Even something boring can be turned into something great. And it is not at all necessary to repeat exactly what you saw. A lot of useful ideas comes during the execution of the “project”. It’s just a pity that some of what was planned turns out to be not as attractive as it seemed. Try it, experiment. Good modern technologies allow this to be done at minimal cost.
A chest of drawers is perhaps the most versatile piece of furniture. It can be found in the bedroom, in the hallway, in the living room, and sometimes even in the kitchen... But stores usually sell standard models - without any special design frills. And this means everything is in your hands. Want to update your old dull chest of drawers? Have your eye on a new one, very comfortable, but outwardly banal? Take a look at this selection of master classes to learn how to decorate this piece of furniture in an original way. And also a low cabinet with doors and even a bedside table.
So, how can you decorate the front of a chest of drawers? We have divided the options selected for this release into 2 categories:- decoration methods that do not require painting (the first five);
- original ideas with coloring (five more).
What will you choose?
1. Photo wallpaper

They are suitable not only for walls, but also for the front of the chest of drawers. Especially one with a lot of drawers and no handles (for example, MALM from IKEA). Measure each of the drawers, then cut the wallpaper to size and apply it to the fronts. It is especially impressive when combined with wall wallpaper on the same theme. If you want more practicality, coat the top with furniture varnish.
2. Sticker with large flowers

Vintage watercolors of flowers make the perfect decoration for anything, including your chest of drawers. Find a suitable picture on the Internet (the photograph must be in high resolution), download, order printing of the image on self-adhesive film, and then attach it to the front of the chest of drawers. If your chest of drawers does not have doors, but drawers, cut the film into equal parts before gluing. If you want to make this process as easy as possible, just buy a large multi-color sticker with a matte surface.
3. Classic sockets (for cabinet doors)

Love classic stucco and decorations in palace style? Then this idea is for you. Decorative rosettes made of polystyrene foam or (better) polyurethane foam can be found in any hardware store. Paint them white and cover the centers with lilac (to get desired color mix purple paint with white). And then glue it to the front of the chest of drawers. It looks elegant and unobtrusive.
4. Fabric with a pattern

Looks like an expensive designer chest of drawers. But in fact it is very easy and inexpensive to do. All you need is a fabric with a cute pattern and double sided tape. Cut the fabric into pieces the right size, glue to the facades, leaving an allowance of about a centimeter. Don't forget to cut a small hole for the handle. This idea is perfect for any furniture - a chest of drawers, a bedside table (as in the photo), a low cabinet. And even for a large closet, as you can see for yourself by looking at the master class from our other selection - (see guide No. 3).
5. You can see better from above

Did you inherit a low chest of drawers with a wide tabletop from your grandmother? Elevate this retro furniture by gluing several pieces of wrapping (gift) paper with an interesting pattern to the tabletop. If desired, the remaining elements (facade and legs) can be painted to match the paper. Tip: use masking tape as an edging to avoid unevenness.
__________________________
If you are ready to actively use paints, here are 5 more ideas for decorating a chest of drawers with an original coloring of its facade.
6. Colors of the sky

Shades of blue are calming, balancing too bright colors and fit almost any interior. If you have a tall chest of drawers with lots of drawers, paint each one a different shade of blue to create a gradient effect. In addition to being beautiful, it is also practical - now you won’t forget which drawer contains what.
7. Sunset on the coast

Remember vacations at the seaside, with picturesque sunsets and catching the sun in your palm? This beautiful natural phenomenon can also decorate your home - in the form of a drawing on the chest of drawers. Anything you need - spray paint matching colors and masking tape. Paint one half of each drawer, covering the other with tape, then repeat for the second. To complete the look, replace the handles with beautiful driftwood sanded by the sea.
8. Sea waves

Subtle patterns, like ripples on the water from a light breeze, are easier to make than you think. You will need an embossed paint roller (made of rubber), which is used to paint the walls, turning them into texture, plus two types of paint - blue (about 1 cup) and white (1 can). To begin, paint the chest of drawers White color(in 2 layers), wait until completely dry. And then apply the pattern to the surface of the drawer fronts, moving the roller along the long side. Your chest of drawers is already white, but do you like the idea? The task is simplified to the limit: just make the patterns!
9. Hot streak

Zigzag is a universal pattern for anything. And it's much easier to do than you think. Apply masking tape to the desired places and use a cutter to give it a zigzag shape. Prime the exposed area with white. When dry, remove the tape and paint the remaining part bright green (using masking tape for the finished part).
10. Under the mask

Do you want to paint your chest of drawers with an interesting design, but you don’t have artistic talent? Use stencils. Apply paint to the workpiece, press it, remove when dry. In this way you can create even those patterns that seem complex to you.
The times of furniture shortages are long gone, and today we can buy whatever we want for our apartments and houses to suit our tastes. But still many owners of pieces of furniture from the era of socialism are trying to repair them, give them new life. And this is not from greed or acute attachment to things. Just a thing like old chest of drawers, may not turn out to be rubbish, the place of which is perhaps in the country, but a challenge to one’s own imagination and ability to create with one’s own hands.
Restoring an old chest of drawers: pros and cons
The processes of repair and restoration are similar, but have several significant differences. When repairing old furniture, we simply transform it most often: we remove peeling paint, sand it, apply a new layer, and fasten loose elements. Restoration – more deep work, significantly beyond the boundaries cosmetic repairs. In addition, a restored chest of drawers can become more valuable if it was originally a fairly original, exclusive product.
Before deciding to restore an old chest of drawers, conduct a thorough assessment of its value. Inspect the item for tags or stamps indicating the name of the craftsman and time of manufacture. It may turn out that your chest of drawers is an antique piece of furniture art, and by starting to process it, you will lose a truly valuable item.
An old chest of drawers may have antique value
Signs of antiquity may be as follows:
- sharpness internal corners as a result of long-term use of the chest of drawers;
- uneven notch on the fastening screws;
- different distances between notch turns.
The last two signs may indicate that the fasteners were made by hand and not industrially.
All of the above can be detected with the naked eye. A more in-depth analysis will be carried out by a specialist whom you invite to evaluate the product. It is not recommended to begin restoration or repair work until the final conclusion.
The restoration process from start to finish
So, you have decided to restore an old chest of drawers with your own hands. The work ahead is painstaking, requiring attention and time. Every step is extremely important, so try not to miss anything.
Old chest of drawers in need of restoration
To work you will need:
- wood putty and glue;
- sandpaper of different grits in the set;
- hammer;
- Screwdriver Set;
- rubber mallet;
- gloves and respirator;
- toothpicks, toothbrush;
- means for cleaning accessories (tooth powder will do);
- tassels;
- paint and varnish.
Cleaning the product
The old chest of drawers must be cleaned so that the surfaces and decorative parts are not damaged. First, wipe the product with a sponge and soapy water. The water should be warm, but not hot, but detergent– laundry or stain-removing soap without chlorine.
Antique pieces of furniture, especially chests of drawers, are often decorated small details and carved inserts. A toothbrush will help you clean them well.
Remove furniture fittings (this will give you access to the surfaces underneath the pieces for better removal dirt) and rub with cleaning agent. For example, tooth powder works well for silver.
Such hard to reach places, like cracks and corners, clean with an awl or toothpick. Plaque and stubborn dirt can be removed with fine sandpaper. It must be used very carefully, otherwise the finish may fade due to strong pressure.
If you decide to change the color of an old chest of drawers or cover it with a new layer of varnish, the surface must be thoroughly sanded.
Preliminary preparation
After the old chest of drawers is washed and thoroughly dried, repair or replace damaged elements. Finding suitable parts will most likely be difficult. To do this, it is better to contact an antique shop or carpentry workshop to order production necessary items decor. There you can also get professional help installing parts.
Check how well the screws and bolts are tightened and whether the wood is cracked. Remove rusty or loose bolts: they need to be replaced with new ones. Grip small cracks on the surface wood glue; Cover the larger ones with wood putty, matching it exactly to the same tone. If you plan to subsequently cover the chest of drawers with stain, then use a special putty.
Painting work
Nowadays you rarely see furniture from natural wood on wide sale. An old chest of drawers may not match modern style your home. Therefore, in addition to a fresh look, this product can be given a new image. The easiest way is to paint it one color, for example white.
First of all, remove the old coating from the surface. Do this carefully so as not to damage the wood or leave traces of the old coating in cracks and corners.
Thoroughly clean the surfaces of the dresser so that there are no uneven spots left.
Now sand the surface to get rid of roughness and minor imperfections.
Sand the surface well
After sanding, move on to putty. Carefully repair all chips and unnecessary holes. After the putty has dried, sand it with fine-grained sandpaper.
To paint the chest of drawers, use a special wood paint. You may need to sand the surface again. To give the chest of drawers a glossy look, you can apply a layer of varnish on top of the paint (after it has completely dried, of course).
Replacing old parts
The old chest of drawers used in our example had iron handles. Of course, they are beautiful and give the furniture an antique look. But unfortunately, some of these pens are hopelessly damaged. The easiest way out is to completely replace them with new ones that are more suitable in style. It's easy to do: drill holes required diameter V suitable places and insert the fittings.
Replace old dresser handles with new ones for a modern look.
As you can see, the chest of drawers has become completely different: new, modern and exclusive.
New life for old furniture
Decoupage chest of drawers
If you don't think pure white is enough to breathe new life into an old chest of drawers, do decoupage.
- Paint the surface with white acrylic paint. Let dry thoroughly.
- Cut out pattern pieces from decorative paper napkins. Glue them to the chest of drawers with PVA glue.
- After everything is dry, coat the chest of drawers with varnish.
That's all, your chest of drawers has sparkled with new colors! The good thing about decoupage is that you can choose any pattern and design that your imagination allows.
Master class on decoupage of a chest of drawers (video)
Another repair option
This method will help you turn an old and boring bulky chest of drawers into a light and elegant piece of furniture. For the transformation, we will take a classic model without any special decorative ornaments: three wide drawers and two small ones.
Classic chest of drawers with three large and two small drawers
You will need the following tools and materials:
- means for removing old layers of varnish or paint;
- sandpaper;
- chisel;
- matte putty;
- PVA glue;
- self-tapping screws;
- polyurethane foam decorative moldings;
- wallpaper;
- paraffin;
- water-based acrylic paint;
- transparent water-based varnish;
- 8 decorative handles.
Preparation
Unscrew the handles on the chest of drawers. Examine it carefully from all sides. Special attention Pay attention to the lid and legs: these are the places where the wood is usually subject to the most damage.
If the shortcomings are minor, it is not necessary to eliminate them. But if more serious damage is detected, sometimes it is necessary to replace some parts completely.
Free the chest of drawers from old varnish or paint. The top layers can be removed with a chisel; they usually come off easily. Rub the residue thoroughly with sandpaper until clean wood is visible. Clean the product thoroughly from old paint
In places where noticeable irregularities and dents are found, apply mastic with a spatula and level the layer. Once dry, sand these areas with fine-grit sandpaper. Do this carefully, do not press too hard, otherwise you will damage the fresh layer of mastic.
As a result, the surface should become perfectly flat. The new dresser handles you purchased may be smaller or bigger size than the old ones. In this case, you need to fill the holes left by the old handles that you removed with mastic and make new ones in in the right places
using a drill.
Note! There are handles that are attached to special screws. There is no need to drill holes for them. If you have the opportunity, purchase such accessories to make your work easier.
Dilute PVA glue with water. Using a brush, treat the entire surface of the chest of drawers. You can replace the glue with any primer. When the surface is completely dry, you can begin decorating.
Decorative elements First of all, prepare the main decorative elements - frames for the sides and drawers. They can be made from ordinary polyurethane moldings. The main thing in this work is correct measurements. Frame for drawer
should be located strictly along the edge. It is better to make a small indent on the sides.
Correctly calculate the dimensions of the decorative frames on the drawers
It is also very important to trim the corner portions of the molding correctly.
Once you have all the parts for the frames ready, start attaching them. For greater reliability, screw the frames with screws, and then seal the places where they fit into the moldings with mastic so that the caps do not stand out.
Apply mastic to the areas where the screws enter the moldings. Now paint the installed frames with acrylic paint. Choose any color that you like or matches the interior of the room. For example, for a chest of drawers french style
Light coffee or beige will work well. Apply the paint in several layers, each time waiting until it dries completely. Paste wallpaper inside the frames. It's good if they have a thick texture and fancy pattern
. The ornament should be darker than the general background. After you finish pasting the wallpaper, carefully screw the handles into place.
For original decor, use wallpaper
The final touch is to coat the chest of drawers with clear varnish. It should be applied in several layers.
Chest of drawers after restoration in the bedroom interior To make the drawers slide out of the grooves easily, lubricate the wooden parts with paraffin retractable system
How to restore an old chest of drawers (video)
As you can see, turning an old bulky chest of drawers into a completely new and attractive interior element is not at all difficult, although it is troublesome. But all the difficulties pale before the result of the work. Tell us in the comments about your ideas for restoring and repurposing old furniture. Good luck and comfort to your home!