The abundance of materials intended for cladding and insulation of private houses, and presented on construction markets and in specialized stores, amazes with its diversity.
Typically, the cladding and insulation of an object are carried out by builders in a sequential order. Usage facade panels helps to combine these construction stages into one.
Installation of facade thermal panels can be done with your own hands on any surface: brick, wood, aerated concrete and concrete walls.
What are façade thermal panels?
Facade panels are the latest development in the field exterior finishing buildings. The strength of such a product is comparable to granite, but unlike it, it has a lower radiation background.
The panels include polyurethane foam and polystyrene foam, which are almost 90 percent consist of air masses . The material component is clinker, porcelain stoneware and glazed ceramics.

Thermal panels for framing facades have many options to select under individual project. The choice is so great that even the most demanding owner will be satisfied and will definitely choose exactly the model that will decorate his home.
The range of colors in the presented panels is varied and is produced by single or multiple firing of the product.
Properties, advantages and disadvantages
Facade panels are becoming more popular every year, thanks to the properties which they have:
- increased resistance to flammable materials manifests itself due to the action of the substance included in the product.
- the aesthetics of this material lies in extensive selection color solutions and various textures;
- safety;
- panel weight allows you not to strengthen the foundation;
- material resistance to fungi and mold;
- reliability in fastening. Fastening is done with special locks;
- tight fit of material to the wall prevents the appearance of bridges from the cold.
Another important component of a sandwich panel is polyurethane foam;
Manufacturers state that the service life of the material exceeds one hundred years.
 Panels made using polyurethane foam, poured into clinker tiles, ensure the reliability and strength of the product, and have high thermal insulation.
Using ceramic tiles
The production of porcelain tiles has brought sustainability wall panels for the façade to a new level. This happened thanks to a special manufacturing technology, which consists in firing the product high temperatures and strong pressure on him.
The result of this process was a special compressed material, which not scary external influences . In terms of strength, it can compete even with natural minerals.
Among the owners who prefer this type of panels, most often there are lovers of a textured surface on the facade.
It is usually chosen by designers to give the home a Scandinavian or Mediterranean feel.
It is used in the decoration of restaurants and holiday homes to emphasize the special flavor of the building. Porcelain tiles– material large sizes, and outwardly resembles not brickwork, but stone.
Despite the fact that individual parts in the material are large, they cannot be called heavy. They are light in weight and simply mounted to the wall surface.
With glazed tiles
 Wall panels with glazed tiles began to be used in the middle of the last century for cladding low-rise buildings. They have proven themselves with positive side, thanks to the heterogeneity of the surface and stunning imitation of the real one brickwork
.
Wall panels with glazed tiles began to be used in the middle of the last century for cladding low-rise buildings. They have proven themselves with positive side, thanks to the heterogeneity of the surface and stunning imitation of the real one brickwork
.
Today, this type of cladding does not lose popularity, and valued for its positive characteristics material and simplicity.
Such tiles are easy to clean and allow you to maintain their appearance for forty or even fifty years in its original form. This is convenient for those home owners whose plots are located next to dusty highways.
The advantages of such tiles are: glossy surface, How distinctive feature this type of panels.
DIY making
Before starting work, you need to understand the structure from which the future material will be created.
Thermal panels made of three layers: facing, metal profile and insulation:

Manufacturing of terpopanels carried out as follows:
- Clinker tiles and fasteners are placed in a pre-prepared form. The surface is filled with foam granules from above.
- After filling, the mold is heated at high temperature.
- The resulting tile is cooled.
- After cooling, the resulting thermal panel is stored in a specially designated place and is not touched for 24 hours.
When exposed to steam, the tiles increase significantly in size. When heated, the mold is completely filled. After this procedure, the tile is ready.
This is not surprising, because in both one and the other technology foaming technique is used over polystyrene granules.
Before purchasing special equipment for the production of such panels, it is important to know that before obtaining them, you must first create the material for them.
Thus, in the home workshop there will be two directions at once: the first for creating polystyrene foam, and the second for manufacturing.
For making foam plastic You will need the following tools:
- special dispenser for raw materials;
- sediment to create foam;
- set of forms;
- Vacuum type installation;
- steam generator;
- pre-foaming device.
To carry out work on creating clinker tiles required:
- oven for firing products;
- Press forms.
If it is not possible to purchase a device and tools for creating foam plastic, then it can be purchased already in finished form from other manufacturers. Such a purchase will significantly increase the financial costs of production.
You can purchase an expensive device and produce more than three hundred parts per day. If we're talking about To produce panels not for sale, but for your own site, you can buy small equipment capable of producing one hundred products per day.
Equipment can be purchased both from foreign manufacturers and from production facilities in large cities. It is possible to buy it second-hand, but then the risk of getting a low-quality product and incurring the costs of repairing it will increase.
Before making your own, you need to calculate how much would such a solution cost?. For finishing own home, most likely, it will be cheaper to buy ready-made and high-quality panels.
Watch the video to see how thermal panels of varying complexity are produced by professionals:
Installation instructions
Fastening technology The installation of clinker panels to the building wall is carried out using special frame structures.
Execution of the skeleton is allowed from various materials: metal, steel with a galvanized surface, aluminum or even wood that has undergone special treatment.
The type of frame is chosen based on the individual building and the financial capabilities of the owner.
If the owner chooses metal frame, it is worth remembering that such structures require considerable financial investments, but they become a reliable framework for the entire structure.
Installation of clinker-type slabs is carried out in an invisible way and secured with clamps and clamps.
In the presence of wooden sheathing, fastening should be done using screws with a simplified head, the diameter of which does not exceed one centimeter.
If wooden structure has not been pre-treated with special impregnations, the reliability of such a product is called into question. With time moisture ingress will destroy the structure of the wood, and harmful fungi will attack its entire surface.
Without treatment, it is impossible to avoid the appearance of mold in the depths of the structure.
Frameless mount
Today, designs with frameless fastening are very popular.
They secured with dowels and self-tapping screws, directly to the wall surface, as shown in the photo on the left.
After carrying out there should be no defects or scratches.
This method is chosen by owners of houses made of silicate mineral materials. Such walls do not require constant ventilation due to the peculiarities of their manufacture.
If after installation there is an unfilled space between the wall and the slabs, it is customary to fill it tightly with construction foam.
The entire installation process of such panels is shown in the video below:
The facade is the face of the house. If it is in unsatisfactory condition: old, dilapidated, in need of repair, then it is inconvenient to live in such a house, and it is almost impossible to sell. Materials of varying cost and quality are used for cladding facades.
Natural stone and ceramic granite, it's expensive and quality materials, not available to everyone. the foundation must be carefully prepared.
“Wet” finishing is a labor-intensive and expensive process, limited in time warm period. Creating a textured plaster pattern involves additional difficulties and costs.
The way out is to decorate the house with facade panels.
Unlike natural stone or metal siding, cladding the façade of a house with panels economical way repair. They come in two types:
- Single layer.
- Multilayer.
 Made from polyvinyl chloride. Single-layer panels imitate brick or stone masonry, tiles made from expensive varieties of basalt and granite.
Thanks to modern equipment, the drawing looks natural. Distinguish from a distance of several meters artificial material from natural it is almost impossible.
PVC panels are made with fillers that significantly increase performance characteristics material.
Artificial cladding is very strong and durable. Panels are made from non-flammable material, practically do not lose shape under the influence of sunlight.
PVC wall panels can be mounted either on a clean base or on a frame with insulation.
Multilayer
Another name for thermal panel. They should not be confused with. Sandwiches are used to construct walls and partitions. Thermal panels are used only for cladding load-bearing walls; they cannot be used as a full-fledged building material. 
The multilayer panel consists of solid insulation and a protective outer layer. For insulation, extruded polystyrene foam, polyurethane foam, foam glass, and basalt mineral wool are used.
The protective and decorative layer must be durable, wear-resistant and beautiful. The coating of thermal panels is made of stone-based plaster, concrete-polymer plaster, concrete-polymer monolithic finishing layer.
How to cover a house with facade panels with your own hands
Facade panels can be mounted in several ways different ways. The choice depends on several factors:
- Condition of the base. The panels are attached to a well-prepared wall without the use of glue or mounting foam using self-tapping dowels and anchors. If the base is uneven, then the panels are mounted with glue or construction foam. The frame mounting method is also used. It consists of creating from metal profiles or wooden slats a level and solid base for installing single-layer or multi-layer panels.
- On walls covered with insulation sheets, single-layer facade panels are installed only along the frame. This technology is called a ventilated facade. There is a narrow layer of air between the insulation and the cladding. This ventilation duct for ventilation internal part suspended facade.
Installation is preceded by material calculation and preparatory work
The calculation is made according to the sketch of the facade. A scan is drawn on the sketch indicating all overall dimensions, number of windows and doors. For an accurate calculation, it is better to contact a sales consultant. In large stores they are taught to quickly complete the calculation.
Preparatory work begins with sanitizing the façade and identifying problem areas. Then the surface is cleaned of remnants of the old coating. Everything that is hung on the facade from the outside is dismantled. Large cracks and the chips are expanded and sealed with cement-sand mortar.
If the facade is affected by fungus or mold, then disinfection is carried out. Most effective way for etching - this is impregnation of the surface with soil with copper sulfate.
Copper sulfate is poisonous. It is dangerous for the human body, so work is performed in a respirator and rubber gloves.
Do-it-yourself installation of façade thermal panels
They can be installed in two ways:
- No glue.
- For glue.
No glue
An absolutely level base is required. One panel slides over the other and snaps into place with a special lock. This installation method reduces the overall time and complexity of the work.
Before attaching thermal panels in any way, markings are made. By using laser level or a level on the facade, the horizon line is determined. It may or may not coincide with the blind area line. If the lines match, then there will be no problems. Use sandpaper to mark the junction of the panel and the base.
If the house is on a hill and the blind area is not horizontal, then the starting line is drawn parallel to the blind area. The second dimensional line is set at the horizon level, to a height equal to the size of the panel from the bottom point of the facade. Thus, cutting the bottom of the panels of the first row, the top goes strictly horizontally. 
The panels are cut with a grinder and a diamond wheel. Goggles are used to protect the eyes. Grinder can only be cut through protective covering. To cut the insulation, use a regular hacksaw for wood.
The starting profile is set at the bottom mark. It is attached to the wall using self-tapping dowels.
Installation starts from the corner of the house. To fix the façade panels, disc dowels with a large flat head are used. For each dowel, a shallow hole is drilled in the insulation to match the diameter of the head. So that after installation the dowel is flush with the insulation and does not interfere with the joint of the panels.
For additional fastening of the panels, self-tapping dowels are used. Holes are drilled for them in the seams between the tiles. After installation, the traces of fastening can be easily matched to the color of the wall.
After securing the first panel, the second one is locked to it. In this way the entire façade is covered. The external corners between the panels are closed with additional elements.
If they are not there, then the corner ends are cut at an angle of 45 degrees. After installation is completed, the joint is sealed with putty. To connect the elements, you do not need to press hard on them. If it doesn’t work, then one of the panels is warped or there is a bump on the wall. Both defects are eliminated, continue installation.
On glue
Installing panels with glue is relevant when the base is wavy with deviations of 10-30 mm in horizontal or vertical plane. The glue acts as a leveling material. After finishing the façade, there are no air gaps between the wall and the panels.
Marking and sawing of facade thermal panels is carried out according to the algorithm for the dry method.
The starting profile is fixed along the lower horizontal line. This is the support of the facade system. To improve the connection between the panel and the profile, apply polyurethane foam. The first row of panels is mounted on the foam.
Installation starts from the bottom corner of the house. To install thermal panels, special glue is used, which is purchased along with the cladding elements. If it is not there, then a dry mixture for installing foam plastic or mineral insulation on a brick, concrete or aerated concrete base.
Glue thin layer Apply to the entire surface of the panel using a notched trowel. For additional fastening, disc dowels are used. When joining panels, you must ensure that the size of the seams between the tiles at the joints does not differ from the neighboring ones.

All joints between the site and the installation site of self-tapping dowels are sealed with putty in the color of the surface.
We must remember that the material from which the wall is made affects the selection of insulation for the thermal panel. Porous structures such as foam concrete, silicate blocks, it is better to cover it with thermal panels based on mineral insulation.
Removes moisture well. For brick and concrete walls, you can use polystyrene foam cladding.
Installation technology of external wall panels
We will talk about constructing a façade from single-layer polyvinyl chloride cladding elements. The panels are mounted on an uneven base on a frame made of galvanized metal profiles.

Mounted at almost any temperature. Installation is prohibited only in severe frosts, when the thermometer drops below -15°C. Facade cladding work consists of several stages:
- Preparation.
- Fastening of facade panels.
Preparation
Ground preparation work must be completed before installation begins load-bearing frame. Excess elements, such as external ones, are removed from the facade. The ebb and flow are removed from the windows. If the facade is wooden, then it must be treated with an antiseptic to inhibit the processes of decay and fungal development. If the facade is stone or concrete, then such treatment is not necessary.

It does not provide for cladding without insulation. If it is planned, then the wiring is carried out at the preparation stage.
Lathing for mounting panels
The sheathing for the façade panels can be made of wood or a U-shaped profile. The second option is preferable, since the galvanized profile does not corrode or collapse. It does not need to be further protected.
By flat base It is allowed to mount the profile directly on a bare wall. If the facade is curved, then a frame is mounted under the facade panels.

Frame and load-bearing profiles. Using brackets, the frame is leveled. The profile is mounted on the pre-marked surface of the facade. Marking is carried out using a laser level and measuring tape
The first horizontal element is installed 50 mm from the ground. The starting strip for the façade panels is attached to it. The installation step of the vertical guides is 500-600 mm, and the horizontal ones depend on the height of the facing element. Horizontal guides are made of J-profile. For fastening, self-tapping dowels are used with a pitch of 300-400 mm.
Facade panel fastenings
Installation of facade panels begins from the bottom corner strictly from left to right and from top to bottom. The first row is installed on the starting bar. The left end, which goes to the corner, is cut exactly at a right angle.
Then it is secured with self-tapping screws, which are screwed into the nail holes and the body of the wall. The second panel is connected to the first to the junction of the temperature compensators and secured in a similar way. To increase the strength of the structure, the panels can be glued to the starting strip with polyurethane foam.

The construction of a facade from single-layer and multi-layer panels can be done with your own hands. The work is not particularly difficult if the rules and technologies are followed.
The facade panels will be complemented by a wide range of additional elements that allow you to hide minor flaws of a novice installer.
Owners of private houses are often looking for the simplest, but most beautiful and individual way to decorate walls. More recently, façade panels have appeared that, at a low cost, can perfectly cope with the assigned tasks. Installation of facade panels is so simple that you do not need to invite a specialized team, but you can do everything yourself.
This finishing method external walls so popular that you immediately want to figure out what the secret is. Those who have already been lucky enough to sheathe a house in this way give extremely positive reviews.
- Price. The cost of the panels themselves, as well as all necessary materials for fastening and arranging the frame is significantly lower than for natural materials.
- Installation. The whole process is quite simple. If you carefully read the instructions and strictly follow the recommendations, you can cope on your own. For installation you do not need to buy special expensive tools. There will be enough of those that every owner has. Well, as a last resort, you can borrow it.
- The ability to heat and sound insulate the building. Do-it-yourself installation of facade panels is carried out according to the principle. That is, first the frame is installed, and then the cladding is attached to it. Insulation can be laid in the space that has formed between the main scrap wall and the sheathing. It will retain all the heat indoors and not release it into the atmosphere. This same layer will help protect yourself from external noise.
- Weight. Natural materials create a greater load on load-bearing walls, and not every design can withstand this. Facade panels weigh relatively little, so they are an excellent option for those houses. Which lack strength.
- Lifetime. Thanks to synthetic components, facade panels last a very long time - up to 50 years. But this figure will depend on the correct installation and the quality of the chosen material.
- Variety of colors and textures. Manufacturers, trying to conquer a wider range of the construction market, create a wide variety of shades and textures. Thus, among the facade panels you can find a wide variety of imitations, ranging from brickwork to wood or stone.
- Easy to care for. To wash the cladding, just spray it with water from a hose, but also rainwater will cope with this task perfectly.
Types of finishing materials
For cladding use different types facade panels. They differ in the materials used for production, some technical characteristics and, of course, the price. On construction market The following varieties are found:
- Fiber cement panels.
- Sandwich system.
- Thermal panels.
- Siding.
Fiber cement panels
The base includes cement, wood and synthetic additives that give the material plasticity. This option is the most environmentally friendly. It perfectly allows moisture to pass out, does not burn, resists putrefactive processes and reliably protects the main structure.
Do-it-yourself installation of facade panels on the frame is carried out in 2 ways:
- Open. Mainly used for fiber cement boards up to 14 mm thick. In the element are made through holes, through which galvanized screws are screwed into the frame. After the whole process is completed, the caps need to be painted suitable color. This will help both disguise the fasteners and protect them from moisture. A small gap is left between the tiles for filling with a sealing compound.
- Hidden. Suitable for heavier tiles whose thickness is greater than 16 mm. In this case, clamps are used as fasteners. This method allows you to more securely fix the element and hide the horizontal seam.
Sandwich system
This is one of modern methods finishing. This finish consists of 2 sheets of metal between which there is pressed insulation and a vapor barrier membrane.
The main advantages of these facade panels are:
- Soundproofing.
- Resistance to fluctuations in external temperature.
- Protection from precipitation and mechanical damage.
- Inert to biological effects.
Installation of facade panels is carried out on the frame open or in a hidden way. To begin, attach a starting profile where the elements of the first row will be placed. The joints are treated with sealant. The corners are closed with special external and internal profiles.
Thermal panels
This material is for exterior finishing solves 2 questions at once:
- How to insulate?
- How to update the facade?
Facade panels consist of insulation and facing material. They are securely fastened to each other. A house finished in this way retains heat, allows steam to pass out, and does not feel the influence of external environment. The decorative layer can be an imitation of brick or stonework, in different colors.

The installation technology differs from the previous two options. In this case, a special adhesive composition. The panels are fixed directly to the previously prepared wall of the house. Installation begins from the bottom corner of the house. To securely fix each row, take short breaks of 20-30 minutes.
The glue is applied to the panel with a notched trowel. The element is mounted to the wall and comes off after 2 minutes. After waiting another 2 minutes, it sticks back. If the façade panel adheres well, it means that no errors were made in the technologies for mixing the solution and applying it to the slab.
Siding
- Metal - used for finishing small private houses or garages.
- Vinyl - has wider application.
PVC siding is the most affordable option for finishing the facade. It is lightweight, reliable, and protects the main structure well from atmospheric influences. But you need to be careful with this material. During installation of façade panels, the fasteners are not tightened too much, leaving a small gap.
This is necessary so that the material can move freely when exposed to temperature. Otherwise, the element may become deformed and ruin the entire cladding.
Installation stages
Before finishing your house with façade panels yourself, you need to read the instructions and do everything without skipping a single step.
- Preparation. Clean the walls from the old cladding, remove all fasteners, lampshades and other protruding parts. Inspect the base for dirt, traces of fungus and mold. Seal cracks and holes.
- Treat the surface with deep penetration primer.
- Cover the walls vapor barrier film. Protects the insulation from excess moisture.
- Install the frame for the ventilated facade.
- Lay insulation.
- Protect the insulating material with a waterproofing membrane.
- Install façade panels.
If all the steps are done correctly in the exact order, then the cladding will last for many years and will delight the eyes of both the owner and passers-by.
Ventilated facade
Facade panels should be fastened according to the principle of a ventilated facade. To do this, install a frame made of wood directly on the wall of the house. wooden beams or metal profile. Professionals recommend using the second option. Metal is more resistant to aggressive environments and can withstand heavy loads.
The tree, in turn, needs to be processed protective equipment to extend service life. When installing, you should definitely make sure that the lower sections do not touch the ground, otherwise they will absorb moisture from the soil and quickly become unusable.
The sheathing is created from vertical and horizontal guides. First, the vertical parts are installed. 10-15 cm are retreated from the corners of the wall and the first elements are attached. Each subsequent part is placed every 40-50 cm. It all depends on the width of the insulation and the size of the panels that will be installed. Then they work on the horizontal guides.
It is imperative to monitor how smoothly the profiles are attached. To do this, use a building level and a plumb line. When all the parts are securely fastened, you can begin laying the insulating material.
If the owner is afraid to install the facade panels himself, then it is better to use the services of a professional team. They know how to do everything right and in the shortest possible time.
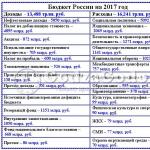
Reading time: 6 minutes
Landscape designer with 4 years of experience
Today they offer many systems and options for facade finishing: you can cover a house with brick or wood panels, and achieve an effective imitation natural stone. Houses with Japanese materials look neat and presentable. Is it possible to install façade panels with your own hands? What features need to be taken into account?
How to install siding correctly
It is worth taking care of the equipment in advance. Installation of facade panels will definitely require the following things:
- For marking surfaces: ordinary mounting level, tape measure, plumb line, water level or laser level, chalk cord, square, pencil.
- For sawing and cutting panels, sheathing: fine-toothed saw or hacksaw, jigsaw and grinder to speed up the process, metal scissors, cutter knife.
- To install facade panels: screwdriver, screwdriver.
 Siding installation
 Before starting work, it is wise to sketch out a drawing of the building for the correct distribution of panels over the entire surface, determining required quantity to avoid a large number of unusable cuttings. The most important event in the installation of facade panels is preliminary preparation planes: marking the vertical guides of the frame in steps and according to the pattern recommended by the manufacturer, installing the sheathing with a starting horizontal strip exclusively according to the level. Further actions are primitive and do not cause any particular difficulties.
 Building drawing for correct distribution of panels
 Step-by-step instructions for installing siding
The entire technology for installing facade panels can be divided step by step into 6 parts:
- wall preparation;
- installation of vertical sheathing guides, laying insulation if necessary;
- fastening the lower starting horizontal trim of the facade;
- installation of J-profile;
- arrangement of corners;
- covering with facade panels.

Preparing the wall surface
If wooden wall If it is even, which is rare, the siding can be attached directly to it, without sheathing. By smooth we mean not ideal smooth surface, and the absence of bulges and dips, which are detected with careful visual inspection. Walls made of logs must have caulked seams, wooden surface must be treated with an antiseptic and dried. On an old building, the wall surface is cleaned of previous finishing, nails, crumbling blocks or rotten boards, and weak points are strengthened. Work is underway to insulate the building.
Basic installation rules
The bars under the frame must be dried and treated with bioprotection, otherwise over time the entire siding will fail. In this regard, it is more reliable to install facades with lathing made of galvanized metal profiles, using corrosion-resistant nails or screws. Beacons with a stretched rope are installed for the outermost vertical guides, then the remaining planks are plumbed.
 Correct and incorrect installation of siding
 The easiest way to achieve perfect evenness is with metal profile and drywall fasteners, with the help of which the gap between the guide and the wall is adjusted. Installation of basement siding from Docke vinyl panels under brick or a natural stone implies a step between vertical slats of no more than 400 mm. In general, you need to calculate so that the sheathing strip corresponds to the attachment point in the middle of the panel - there should be a total of three fastening points along with the central one.
In this matter, it is better to follow the recommendations of the siding manufacturer, especially for heavy materials or with long length, for example, porcelain stoneware, wood, steel. For the less common vertical arrangement of façade panels, horizontal lathing is performed in the same way. Siding installation is done from left to right, rows from bottom to top.
If installation is carried out metal siding, then at the attachment point it is important to leave a gap of 1 mm between the screw head and the perforated strip, taking into account the thermal expansion of the material. Before mating the panel with the corner, a gap of at least 6 mm must be maintained. If the temperature during installation is below +5 C°, the interval should be increased to 9 mm. Such amendments are especially true for vinyl siding(Deke or Viola), which “walks” when heated, but warps in the absence of space for “walking”. Temperature clearances must be observed at all points of connection with the profile.
 Siding installation rules
The starting strip, from which the fastening of the façade panels will begin, is marked along the entire perimeter of the building with a chalk cord secured to nails driven into the corners. The place of driving in is determined by the water level with alignment to the “horizon” from the lowest point of the wall. The profile is fastened from this point. If the house is on a slope, it may turn out that in some places the length of the sheathing is not enough. To make adjustments, cut the slats required size and build up the frame.
 Installation of the starting profile
 At the corners, mark the width of the corner profile, after which you can begin installing the starting strip indented from the corner marks. When joining and fastening the profile, the rules for observing temperature gaps apply. It is necessary to control the evenness horizontal installation normal level. If the mounting of the base ebb is provided, then the starting profile is placed on top of it along the horizon line.
 Installation of a universal J-profile
 For edging window slopes and doorways, the façade panel factory produces the J-profile, which can also replace the internal corner profile. When making openings in the profile, cuts are made from the mounting side in increments of 50-100 mm. External joining can be done either directly or at an angle of 45° using cuts and bends, having previously analyzed required parameters external appearance. Internal corners are connected using one or two universal J profiles.
Mounting corners
 Mounting corners
 Last preparatory stage before installing siding - installation external corners. The fastener should extend from the roof eaves by 3 mm, with the lower end protruding beyond the starting strip by 4-6 mm. Verticality is checked with a level. The joining is done at the same distance at all corners of the building, overlapping with the upper element overlapping the lower one.
- Start installation from the least visible wall of the building, which will give you the opportunity to “get your teeth into” and eliminate shortcomings.
- Every 2-3 row cladding panels check the facade structure for horizontalness with a level.
- 2 days before installation, store the panels in a warm room to begin installation with optimal thermal expansion of the material.
- Screw the screws into the center of the mounting hole.
 Recommendations for installing siding
 Where to order and how much does installation of facades cost?
Services for the installation of facade panels are provided by construction and repair teams specializing in the external cladding of buildings. You can find them through the recommendations of friends, advertisements in news publications, or online, using the services construction portals. In June 2016, the following prices for siding installation were established:
- installation of wooden sheathing per sq.m. from 100 rubles, metal - from 380 rubles, the cost of performing work on brick or concrete wall increases by 20-50%;
- installation of vinyl panels per sq.m. – from 250 rubles, metal – from 210 rubles, fiber cement boards – from 680 rubles, basement siding – from 300 rubles.
Video: DIY siding installation
Very detailed instructions for covering a house with façade (basement) panels using the example of the Imabel brand. If you bought panels with a similar fastening, these instructions will suit you.
The Belgian manufacturer, Tecos Europe NV, has developed the ImaBeL brand for polypropylene facade panels. Currently, ImaBeL offers two models of facade panels called “Brick” (“Brique de Bruges”) and “Stone” (“Pierre d’Ardennes”). Brick panels get their name from the shape of brick used in the world famous city of Bruges in Belgium, known for its magnificent architecture. The name of the panels “Stone” is associated with the stone mined in quarries in the forests of the Belgian Ardennes.
Prepared by Tecos Europe installation instructions for Imabel façade panels, however, the company itself does not install ImaBeL facade panels, nor does it monitor such installation. Therefore, you need either install façade panels with your own hands, or Contact us to carry out work on the cladding of your home.
When working with facade panels yourself, you should remember that polypropylene expands and contracts under the influence of temperature changes. The proposed Installation Guide allows you to take into account the expansion and compression properties of the material.
ImaBeL consists of the following elements:
Panel - Panel; Starter strip – Starting strip; Corner - Corner; J-Channel – J-profile
Tools and Fasteners:
To install facade panels you will need a hammer, measuring tape, hacksaw, a circular saw, drill, screwdriver and stainless steel nails or screws.
Installation of panels must be done from left to right, from bottom to top. Installation should begin from the lowest part of the structure. Everything that is recommended regarding nails also applies to screws (self-tapping screws), depending on the fastening method you choose. Nails should be installed horizontally in the center of the prepared holes. The holes are specially widened to accommodate the expansion and contraction of the panel. Nails should not be driven in completely. A gap of approximately 1.5mm should be left between the nail head and the panel to allow for some movement.
It is necessary to use only stainless steel nails or screws and drive (screw the screws) into the hard surface at least 1.9 -2.0 cm. Use five nails for each panel and drive them at intervals of no more than 40 cm.
To achieve good quality sheathing must be provided correct connection panels and accessories with each other.
Facade panels have variations in shades and colors, which gives them natural look. Once the panels are installed, the company will not accept any claims regarding color matching.
Installation of facade panels and accessories is considered as acceptance of the product in all respects. Do not start installing panels without checking the quantity of products, their quality, appearance and other parameters that are significant to you.
At the first stage of work, it is necessary to install a wooden or metal frame. For metal sheathing You can use a galvanized profile, and all wooden parts of the sheathing must be treated with anti-rotting compounds.

Accessories (starter strip, external corner, J-profile) are attached throughout the house before the panels are installed. At this stage, you once again have the opportunity to check the quantity of purchased material.
You can often encounter a situation where the walls of a house are not level in different planes. This is due to the materials from which the houses are built, the age of the house, and possible uneven subsidence. Therefore, you should first install the starting bar at the lowest point of the structure. It is necessary to leave a gap of 10 cm along each edge of the wall to more conveniently secure the outer corner. Drill holes in the starting strip, or drive nails directly through the strip with a maximum distance of about 40 cm between them. It is very important to maintain the horizontal position of the strip, because this will be where all the façade panels on this wall will be attached. Use a large and accurate level.


Make sure that the starter strips are horizontal on the adjacent wall. Start by installing the outer corner of two adjacent walls.

Install J-profile on the sides of the window or door or internal corners. Leave a gap of 0.6 cm (for expansion / contraction) between the panel and the base of the J-profile.

Measure the length of the wall to determine where to cut the first panel. Trim left side panels in a straight line. Insert the panel into the starter strip and slide the panel into the outer corner. You need to leave a gap of 0.6 cm (for expansion/contraction) between the panel and the base of the corner.

After correct installation panel, hammer a nail into the center of the hole in the panel. Then drive a nail into the last hole at both ends of the panel.
If in some part of the panel there is no drilled holes, drill a hole where necessary, aligning it horizontally with other holes.
Install the next panel by sliding it over the previous panel.
Because polypropylene tends to expand and contract, you must be sure to leave enough space between the panels as they slide one on top of the other.

To calculate the distance that must be left between ImaBeL façade panels, both horizontally and vertically, please refer to the instructions for temperature conditions.

Tecos Europe has developed a special temperature device, ImaBeL, to calculate the correct gaps to be left between panels.
The temperature during installation determines which side the temperature device should be installed horizontally or vertically between the panels.
For example, when installing ImaBeL panels at an outside temperature of -5 o C, it is necessary to select the sector of the ImaBeL temperature device from -20 o C to 0 o C and use it to calculate the correct distance between the panels.
If you do not have an ImaBeL temperature device, you must refer to the temperature instructions in the table presented in this Manual for installing Imabel façade panels with your own hands.
Start laying the second row. Make sure that the ImaBeL façade panel is cut one at a time to avoid repetition and to maintain the natural brick/stone effect. Check that the corners are always at the same height as the façade panels.

Repeat the above steps for installing the panels until the top of the facade is reached, the J-profile is installed. You may need to trim the last row to height.

The result is a very beautiful, very natural brick/stone effect wall that is not only easy to install but also very good value for money.