5834 0 0
Wherever I want, I fly there: butterflies in the interior
June 8, 2016
You can talk at length about canons in design, but every day the existing canons are becoming less and less stable. Aesthetics and harmony, balance, colors, materials brought together in order to obtain such a long-awaited result are the essence of your knowledge, practice and self-development. My motto is to learn, see, touch something new every day, and I’m sure that’s the only way to keep correct course in "high design".
Decorative butterflies in the interior are not a new and popular technique, but are beloved by designers because unlimited possibilities combinations. In the hands of a professional, a vinyl disc, genuine leather, or even a tin can can turn into a butterfly. Is it possible to create an interior that will obey butterflies? Yes! But I’ll tell you more about how to create it.

The case of one butterfly
Butterflies for decoration can be artificial or real. The latter are often presented in the form of paintings, securely hidden under glass. But artificial moths have no restrictions; they successfully take root in the decor of walls, furniture, chandeliers, etc.
We can say with confidence that such decor has no restrictions on style; even in monochrome high-tech you can find appropriate place a simple moth.

An equally popular option is table decor. What could it be? Designs in which butterflies are attached to a small spring, forming something like a mobile that moves even with slight air fluctuations.

If the area of the room does not allow the use of volumetric options, choose vinyl stickers. They can be glued not only to walls; they are no less attractive on doors, curtains and table lamps.

Butterfly, know your place!
When looking for a place for decoration, remember that butterflies are light and free creatures, they fly wherever they want, but it still wouldn’t hurt to secure them.
- Walls. The most popular option, implemented more often through vinyl stickers and paintings, allows you not only to add a touch of naturalness to the interior, but also to hide wall defects.

- Table lamps, sconces and floor lamps. Here I would advise you to make a choice in favor of volumetric decor, which, under the influence warm air coming from the lamps will be set in motion.

- Cushioned furniture. You have two options - incorporate butterflies into the furniture upholstery or choose the shape of the chairs in the form of wings. The last option will require you to have an impressive area of the room so that the butterfly has room to “turn around”.

If you are not ready for a radical proximity to moths, choose prints on small area, for example, on sofa cushions.

- Curtains. This could be a light print on curtains in a children's room or massive bright embroidery for the living room. Remember, the world of butterflies is diverse, so its representatives will successfully fit into both light country and pompous art deco.

- Floor. Yes, it can be a printed carpet or decor installed in large floor vases.

- Ceiling. Why not? However, in in this case remember that the surface is quite large and requires well-thought-out placement of decor. I would advise choosing a large number of small butterflies in a room with a modest ceiling height and a few large butterflies for spacious rooms. The latter option can be implemented using printed stretch fabrics.

Butterflies on transparent surfaces
If you consider yourself to be the lucky owner of a sunny room, try placing butterflies directly on the glass. You can do this with your own hands using a stencil and paints.
No less interesting solution There will be the creation of a stained glass window with paints and finishing the outline with gold or silver leaf.

Butterflies can be created on the mirror and glass surfaces of doors and partitions using sandblasting technology, which is best left to a master.

How and from what?
Today, butterflies are no longer limited exclusively to plastic and paper; mirrors, glass, leather, fabric and wood, tin cans and old photographs, polystyrene foam and foam rubber are used.
Painted moths are no less attractive. For children's classic room You can safely use wallpaper with butterflies, which can be successfully combined with a single-color coating or stripes.

In the office in colonial style they can take root in the form of oil paintings.

But for this it is preferable to use butterfly wall decor based on vinyl stickers. In addition, choose a bedside rug in pastel shades and bed linens with exotic moths.

A little about Feng Shui
The ancient teachings of Feng Shui also paid attention to butterflies. Almost all nations associate moths with well-being, sensuality and carefreeness. And in Chinese teachings they are called a talisman of joy and they say that love always lives with butterflies, so feel free to decorate your bedroom with them.

Hang your butterflies so that they create the most natural feel possible. Imagine how a swarm of moths would spread if they accidentally flew into your room.

Watch out for butterflies!
Decorating with butterflies should be dosed and well thought out, otherwise there is a high probability that your apartment will turn from a stylish home into a colorful meadow.
Rule 1

To prevent butterflies from being perceived by the colorful insects that fill the walls, choose bright shades and pastel background. It is better if the emphasis is on the texture of the finish rather than the shade. The same rule is relevant when using printed furniture.

Rule 2
If you have chosen wallpaper with a print, decorate only one of the walls with it, the rest should remain plain.

A slight deviation from this rule is the use of a duet of butterflies and stripes; such a tandem is suitable for fairly large rooms with a minimum of furniture of a single color.

Example of a finished design “About butterflies, birds and sisters”
I hasten to show you butterfly decor in action using the example of a children’s room for two sisters.

- To divide a room into two functional areas a small partition with a bay window was erected. In this part, the work/play area has found its refuge. For storing things, a niche was built into which a wardrobe was placed.
- The second part of the room is given over to the sleeping area. Stretch ceiling with photo printing and vinyl tile carpeting made it possible to obtain a fairly harmonious combination.
- The choice and location of sleeping places deserves special attention. A loft bed was chosen for one of the sisters, and a comfortable sofa bed for the second.
- The spring mood is set by butterflies that are located on the ceiling and walls of the work area.
- The natural theme was continued by a fabulous tree made of durable plastic. In the first layer I hid it LED backlight, in the second I placed magnetic leaves with birds, and from the third I formed a crown.
Photo gallery:


Used:
- decorative plastic products – 3A Composites;
- suspended ceilings – “Europe”;
- interior door – NewLayProduct;
- marker paint – IdeaPaint;
- furniture and accessories - IKEA;
- vinyl tiles – Allure flor;
- radiator screen – Premier Profile.
Making butterflies
Decorative butterflies for textiles and walls

Instructions:
I cut out butterfly wings from silk. The shape and size can be arbitrary. I make a drop-shaped hole in the center of the wing.

I paint the wings with purple and gray, trying to blur the boundaries of the two shades as best as possible.

After the wings have dried, I use PVA glue to glue a wire wrapped in paper to the underside of the parts.

Using a single knife attachment on the front side, I draw veins on the butterfly’s wings.

On the wrong side, using a narrow heel attachment, I create volume around the perimeter, and also go along the edge of the holes.

It's time to move on to assembling the butterfly. I take an awl and wrap gray colored wire around it. In a few turns we will get the body of the future butterfly. The antennae are created in the same way.

I lubricate the wire with PVA and dip it in glitter. As a result of such simple manipulation, the butterfly’s body acquired an interesting shine and texture.

I apply the prepared parts (wings and mustache) to the body one by one and secure them with thread. I apply PVA glue to the wire leg and wrap it with a silver paper ribbon.

Using polymer glue I glue the pin. I straighten my wings and straighten my antennae.

The photo shows the process of attaching the pin
As an addition, you can use lace, feathers and beads.

Ready-made decor - butterflies on the wall
If you do not have special impregnated silk, prepare it yourself.
For this you will need regular food gelatin.
- I cut the silk into ribbons up to 70 cm long and no more than 40 cm wide.
- 3 teaspoons of gelatin pour into 200 ml cold water and leave for 1 hour.
- Melt the resulting mass in a water bath until a homogeneous consistency is formed.
- In the bathroom I stretch a thread or fishing line, arm myself with slightly cooled gelatin and set off to create magic. Almost Hogwarts!
- I dip the silk pieces into the solution and wait until they are completely soaked. I take out the fabric, taking it by the corner, and stretch it between slightly clenched fingers, removing excess gelatin.
- I carefully straighten the piece and hang it on a fishing line, securing the edge with a needle or pin.
If you gelatinize the satin, as it dries, systematically adjust the edges that tend to curl.
- Fabric blanks are not ironed and stored in the form of scrolls.
Butterflies guard your “time”
Operating procedure:
From plywood I cut out three figures in the shape of concentric clouds. In the central “cloud” I make a blind hole for the clock mechanism. I connect the parts of the structure together with glazing beads.

IN white paint I add Intanako powder, which will give the watch texture. I cover the product with the resulting mixture.

I am preparing a mixture of gypsum (30 grams), epoxy resin(15 grams) and hardener. I pour it into a chocolate mold and insert the cut pieces of wire.

I take out the butterflies and paint them in White color.

WITH reverse side I insert the clock mechanism into the main element of the watch. I attach butterflies to the base instead of numbers.

I tint the butterflies with silver paint. Ready!

Summing up
Undoubtedly, butterflies are worthy of being considered as decoration. They bring lightness, spring, a piece of nature into the room, and can revive even a rough wall. They are successfully combined with all styles from rustic Provence to elaborate baroque and can rightly claim the title of a universal decorative element.
Are you ready to let moths into your life? Share your thoughts in the comments, but all I can do is offer you an interesting video in this article.
Good afternoon friends!
I know that many people like butterflies in the interior; such decor is always in fashion and recently this topic has become relevant again.
I myself decorated the bedroom wall with butterflies last year after renovation. I made double butterflies from wallpaper and glued them to a free wall painted white. It turned out very well.
Butterflies in the interior according to Feng Shui
Butterflies bring joy and love, positive mood. They personify freedom and are considered a symbol of the beginning of life and immortality.
Entering a room with butterflies, you want to take a deep breath; it seems that the air here is unusual.
In this case, they should be used in pairs and flocks; the more butterflies, the better.
It is believed that butterflies will help lonely people attract love.
Butterflies are very appropriate in a children's room; they look very beautiful and will bring joy to the baby.
In principle, you can decorate any room with butterflies, because they bring positivity. It's just important not to overdo it.
And you should also keep in mind that butterflies should be positioned so that they fly into the room, and not vice versa.
Therefore, you cannot use them on curtains so that love and happiness do not fly out the window.
Butterflies are used to decorate anything: walls and ceilings, pieces of furniture, pillows, lamps; they make paintings and panels, various compositions.
They are made from paper, cardboard, plastic, fabric and other materials. But Feng Shui does not recommend using live dried butterflies, as they spread the energy of death around themselves and destroy relationships.
Here are some photos of interior design ideas with butterflies.
Butterflies on the wall and ceiling
Making butterflies in the interior on the wall with your own hands is very interesting.
They are usually cut out of colored or black paper; also suitable.
Use your imagination and place butterflies on the wall at your discretion, flying in a flock in one direction or circling in a friendly round dance.
To arrange the butterflies in a circle, you can use a small plate. Attach it to the wall, trace it with a pencil, and then attach butterflies along the edge.
You can attach the butterflies to the wall using glue, or pieces of double-sided tape, or pins.
You can come up with additional decor in the form of a heart or a frame that gives the impression of a painting.
Paintings and panels with butterflies
It’s probably best to buy ready-made paintings. I especially like modern version as modular picture with butterflies in the interior, although you can try, for example, from photographs.
And to create panels there is unlimited scope for imagination.
A great option is to make a panel of paper butterflies on the wall using a piece foam panel or even .

And a very cute idea - framed butterflies. Look how original the passport made from newspaper was, it turned out very stylish and elegant.

By the way, panels can be made not only from paper butterflies, but, for example, also.
Chandeliers and pendants with butterflies
The simplest option is to issue old chandelier butterflies, hanging them on a frame on chains.
But very interesting chandelier from butterflies to wire frame, which you can try to make with your own hands.

Various butterfly pendants can be placed above the door or hung on the same chandelier.
Wallpaper with butterflies
Such positive wallpapers with butterflies are best suited for a nursery. But I also like the idea of using them for the bathroom, as in the photo.
Nowadays photo wallpapers are back in fashion. You can also choose a pattern with butterflies.
Textiles and furniture with butterflies
Bed linen with butterflies is a dream! I love everything so beautiful.
And pillows can be easily decorated, even with fabric appliqués.
Unfortunately, curtains are not allowed, I wrote about this above.
Butterflies can be planted on shelves and cabinet doors, and used to decorate lamp shades, vases, and mirrors. Yes, and mirrors in the shape of butterflies can be found on sale.
Compositions with butterflies
Wonderful interior decor with butterflies can be created using a variety of simple compositions.
Composition with butterflies on the wall and a vase
A vase decorated with paper butterflies, placed next to the wall, on which the same butterflies are also pasted so that it seems as if they are flying out of the vase onto the wall, will look beautiful.
You can decorate a wall with a clock in a similar way: butterflies scatter across the wall and land on the edge of the clock.
Songs in a jar
- Cut out a circle of cardboard with a diameter equal to the diameter of the jar (put the jar on the cardboard with the neck down and draw a pencil around it).
- Glue moss onto the circle.
- Place the circle on the bottom of the jar.
- For an additional effect, we make a mound by crumbling pieces of foam.
- We place and glue a twig on the embankment, or you can use ordinary wire to create a composition.
- We hang butterflies on a branch.
- We close the jar with a lid, after placing a piece of burlap under it.
Another option: make a composition on a piece of cardboard and cover it with a jar turned upside down.
Another method: pour some pebbles into the bottom of a jar or vase and place twigs in it.
We make holes on the butterflies with an awl, insert strings into them, and hang them on the branches.
Very interesting compositions in the following photos. Inside the glass vessel, wire with stringed beads is placed randomly and butterflies are attached to the wires. Can be used as a base old disk SD.


You can also make a tree of happiness with decorative butterflies - a topiary.
I have this in my plans, but for now I did it.
Butterflies for the interior: patterns
There are, of course, a wide variety of templates for cutting out butterflies on the Internet. You can pick them up in magazines, in children’s coloring books, or even draw them yourself.
I will only offer a few photos as an example.


You need to download the template from the Internet to your computer, enlarge it to the desired size, print it on a printer and cut it out with scissors.
If you don't have a printer, just hold a piece of paper to the monitor screen and trace the template.
How to make butterflies for interior decoration
The most convenient and easiest way to decorate the interior is with paper butterflies. Let's look at how to make them with your own hands.
We will need stencils, colored or black paper.
Place the stencil on colored paper and cut it out required quantity butterflies. Fold the paper in half, just like the stencil, then when cutting out both halves of the butterfly will be perfectly identical, and the process will go faster.
It is convenient to cut out small details and elements inside the butterflies with nail scissors.
The butterfly can be slightly bent in the middle so that it flutters its wings.
Fashionable ideas for creating butterflies
Option 1 – spectacular paper butterfly
Let's create a three-layer paper butterfly.
In addition to the main butterfly cut out of paper, you will need two more blanks from newspaper. We make them using a stencil a little bigger size. To do this, when cutting, we retreat 0.5-0.7 cm from the contour line of the butterfly.
We glue two layers of newspaper in the middle with regular stationery glue, and on top of them we glue a paper butterfly in the middle part.
This three-layer butterfly is voluminous and very impressive.
Option 2 – elegant openwork butterfly

A very elegant butterfly will be made from two layers of paper; an openwork butterfly is cut out for the top layer. And the bottom layer of the base also creates a shadow effect.
Option 3 – fabric butterfly
Again we use two layers of material. The bottom one is made of paper, and the top one is made of fabric. We carefully attach the fabric butterfly along the edge to the paper blank using a machine.
A checkered or floral fabric will help create butterflies with incredible, cheerful colors and a pleasant texture, while paper will add rigidity to the product.
A creative version of fashionable interior decor - with lace trim.
Option 4 – butterflies from a plastic bottle
Such butterflies are not very suitable for a wall, but they are excellent for making compositions in jars, pendants for a chandelier, and can also be used to decorate flower beds.
Using a template, cut out butterflies from a bottle and paint them with nail polish or paint regular paint. The butterflies will turn out bright and shiny.
An important role in the creation cozy atmosphere decorative items and compositions play. But not always and not everyone may have enough money to adequately decorate their home with expensive decorations. Creating such interior items with your own hands is often the best way out of the situation; moreover, such handicrafts bring a lot of pleasure - both in the process and in the end result. Today, moths and butterflies have become a popular type of home decoration. These creatures fluttering along the walls are capable of causing a mass positive emotions, reminiscent of beautiful sunny days. We will devote our article to an overview of the various possibilities for decorating walls with butterflies yourself, and will also consider methods for making them.
Wall compositions from butterflies
Butterflies in the interior of a particular room can be presented in different ways: they are placed in the form of panels, scattered in chaotic or ordered compositions, and used to decorate certain areas (for example, around lamps, artificial trees etc.) or paint on the walls, often using luminous paints. One has only to look at the photo of a beautiful panel in the form of a scarlet heart made of butterflies, and you will immediately want to place this romantic composition in your bedroom.
The advantage of decor from moths is their ability to complement the interior of any room, regardless of its functional purpose and style present. It is important to choose the right color scheme so that it matches overall design. For example, on beige wall Red or green moths will look great, and black ones on white. In the children's room you can create colorful paintings of butterflies fluttering merrily over the crib, and in the living room decorate an empty wall with a swirl of plain butterflies.
Glowing moths created using special paints look incredibly beautiful. In the evening they become original decoration rooms, enlivening it and filling it with mystery.


DIY butterflies on the wall: manufacturing methods
If you decide to decorate your apartment with such decorations yourself, we suggest you familiarize yourself with the various methods of making butterflies. Although the work will require some expense, time and perseverance, the result, believe me, will undoubtedly please you. To make the composition look more natural, it is better to make moths for it different forms and sizes, using templates that you can draw yourself or take ready-made ones from the Internet.
How to make butterflies from paper and cardboard
The easiest way to make paper butterflies. To do this, you can take white sheets and decorate the winged beauties at your discretion, or get a set of colored paper. Advantage of this material lies in the ease of working with it, so it is quite possible to involve a child in its production by decorating, for example, a panel of butterflies in a nursery. In addition to paper, you will need supplies such as scissors, templates, pencils, and PVA glue (for bulky items).
There are two ways to make a paper butterfly. The first is to take a ready-made template and use it to transfer the outline of the moth onto a sheet of paper and cut it out using scissors. The second method is simpler. First, cut out a square (rectangle) from paper, fold it in half, apply a half butterfly template to the fold line, trace it with a pencil and cut it out. Then we unfold it and get a beautiful moth. The advantage of butterflies cut out of paper is their airiness - if a slight draft blows, their wings will move as if they were real.
You can make the butterfly wings more elegant by cutting them out using nail scissors or stationery knife pre-drawn internal parts. To make a lush butterfly, cut out two identical paper blanks different colors or the same, and then glued together. In this case, the lower plane - the base - can be simple, and the upper one can be decorated with patterns or cutouts. Double-sided tape is used for fastening.
The cardboard butterfly is also cut out in two ways - using a full or half-template. As a base, you can use not only ordinary colored cardboard - multi-colored moths cut out from old postcards and magazines look beautiful.


Corrugated paper butterflies
One of good ways making a three-dimensional moth - using corrugated paper. To do this, you additionally need to prepare a needle and thread. On sale you can find material of various variegated colors and create a real colored butterfly cloud.
First you need to cut out a strip of paper measuring 7x10 cm (you can use other sizes depending on the desired size of the butterfly). Using a needle and thread, we form an accordion in the central part and tighten it, as shown in the photo. We fold the resulting side panels, connect them and, slightly stretching them to the sides, get rid of the folds - we have two wings, which now need to be given a beautiful wavy shape. You need to cut out two wings at the same time, not forgetting to also highlight areas for the antennae. In this case, templates are not needed - you can give the shape at your discretion.
At the final stage, we unfold and straighten the workpiece, and twist the antennae with our fingers. The butterfly is ready!


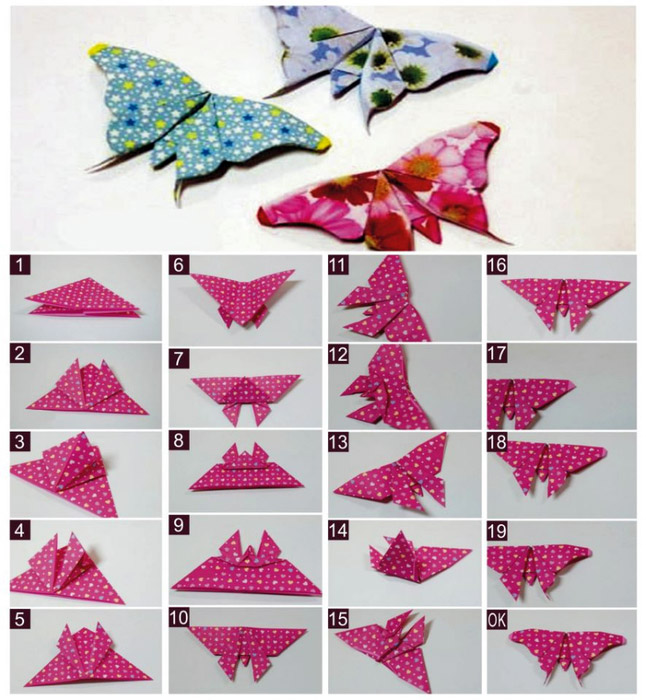
Paper origami butterfly
A beautiful, voluminous butterfly can be made using the origami technique. Making it is a little more difficult than in previous cases, however, when you make a couple of these beauties, things will go much faster. Beginners need to use schemes for such work, of which there are quite a lot on the World Wide Web, and be patient and persevering. The art of origami does not stand still, constantly evolving, so there are various ways to fold butterflies - from simple to modular, capable of moving wings, etc. Since we are learning how to make an origami butterfly for wall decor, you can use a simplified technique.
First you need to cut out a paper square, bend it along possible diagonals and twice through the center. We fold the opposite sides, bend the lower corner tops, turn them over - we get a double triangle. We bend its tip so that the tip is located above the entire part, after which we wrap it and fold it in half along the central guide. On final stage fold the part twice. When making a voluminous butterfly in this way, you do not need to intensively smooth out the folds.


Making butterflies from fabric
Knowing the origami technique, you can make a magnificent butterfly from fabric. To do this you will need two rectangular pieces of different fabrics. same size. We sew them together along the perimeter - we get a base fabric, from which, following step by step diagram, presented below, we form the product. To fix all the necessary folds and the final structure, use an iron. Butterflies made of fabric will be an excellent decoration for the room. You can use materials in your work various colors and structures including tulle and lace.


Butterflies from tin cans
If you still have empty drink cans, do not rush to send them to trash can– they can be an excellent material for making shiny winged beauties. Using scissors, you need to cut off the top and bottom of the can, cut it in half, getting a base sheet. Next, we will use the template and apply the image of the moth to the surface, cut it out, giving the edges a wavy appearance. To prevent the wings from curling, you can give them a corrugated finish by making longitudinal indentations with the blunt side of a knife or scissors. The resulting blank is decorated using multi-colored markers.

DIY glowing butterflies
Glowing moths look amazing and excellent in the interior, capable of charming with their mystery in the dark. In this case, their images will be applied to the wall using phosphor paints. To get the glow effect, you need to make sure that there is some kind of light source next to the decor.
So, for work you will need paints of different colors, a sponge, a brush, spray glue and stencils. First, we prepare stencils of future moths from cardboard and glue them to the wall. We wrap a piece of sponge to a brush and use this simple tool to decorate the butterflies. To better understand which paints will look best, it is better to carry out work in twilight. After application, you need to wait a quarter of an hour and remove the stencils. The paints will dry completely in two hours, after which you need to trace the contours with a pencil. To “revive” the composition, you can apply additional strokes of paint near the wings. The decor is ready. Let's turn off the lights and admire the beauty of our glowing, fluttering moths.


Butterflies on the wall - decor photo
In conclusion, we suggest visiting our photo gallery. Here we have tried to collect best examples decorating the apartment with compositions of butterflies. We hope these creative works will bring you a lot of fun and inspire you to create your own wall decorations. Enjoy watching!
27.03.2016 22:59
Butterflies are like flowers, only fluttering - just as delicate, beautiful and always different, a bright symbol of summer, sun and warmth. And like flowers, butterflies are very popular as decoration - for clothing, accessories and, of course, for the interior. Butterflies are great for interior decoration; they will certainly enliven the atmosphere, bring smiles and joy.
Butterflies are often used to decorate walls - and this is not necessarily a children’s room, because the decor of butterflies can be very different and often quite seriously play up even the most serious and stylish interior. You can decorate the headboard of the bed with fluttering butterflies, support the color accents set in the interior of the living room, you can decorate the wall in the kitchen or around the mirror in the hallway with butterflies. Butterflies can help you fill empty space in any interior.
Of course, you can buy stickers. But, as you yourself understand, volumetric decor It always looks more impressive and advantageous than a flat picture, so I recommend using 3-D effects in the interior and decorating the walls of the house with voluminous butterflies made by yourself. Without gluing them tightly to the wall, leaving the wings raised. Such a picture will look like it’s alive and the first charming harbingers of summer will lift the spirits of all the inhabitants and guests of your home.
Butterflies for the interior can be made from any available materials - fabric, colored paper, foil, cardboard. They can be cut out from old postcards, magazines, or even newspapers. You can make butterflies from polymer clay or from dough, securing them in the oven, and then gluing them to the wall, for example.
Decorate a wreath on a door, mobile or wind chime with butterflies; butterflies can be placed on a chandelier or mirror, in the form of a garland above the fireplace or in a frame on a bookshelf. You can decorate cut tree branches with butterflies and wait for the first foliage to appear (if we're talking about about spring, like now) - this is also very pleasant and joyful. The main thing is that the butterflies should be artificial, and not the dried, unfortunate corpses of once-living beauties... And best of all, made with your own hands! This is the most valuable. Plus, the pleasure of the creative process always enhances the effect of the result! For you, the best spring-summer ideas for decorating your home with your own hands are on the InteriorClub website - get inspired!
Butterflies for home decoration, DIY butterflies in the interior - 31 decor ideas with DIY interior butterflies:


DIY interior design ideas, interior design ideas, DIY decor ideas - ideas for decorating the interior of apartments and houses, do-it-yourself furniture and interior items, creative DIY home design - GET INSPIRED!
There is no doubt that many would like to transform or slightly refresh their home. Often, the transformation consists of carrying out repairs, at least cosmetic ones. Creativity and a little creativity will help modify the room (apartment) without special labor and solid financial investments. It is enough to take advantage of such a magnificent decor option as ceiling and/or wall panels. Not the last in this series of decorative solutions will be a relatively simple and financially attractive way of decorating - DIY butterflies on the wall.
What is it - “do-it-yourself butterfly decoration on the wall”?
This type of decor is one of the varieties of appliqués, or, more accurately, a panel of figured butterflies, to create which a wide assortment is used sheet materials. Elegant and light applications can be placed on all walls of the room or just one wall can be used for the composition. There are many ways to make and attach butterflies to the wall with your own hands. It is the manufacturing technique you choose that will determine the final result and impression made by this hand-made decoration.
Imagine - from the center of the wall a whirlwind of moths of different sizes and unprecedented colors just takes off! Whirling in a circle and fluttering their graceful wings, they delight the eye and undoubtedly attract the attention of one and all. Naturally, we are not talking about living butterflies or their mummies.
Video: DIY interior decoration with butterflies
To decorate the walls, butterflies of various designs, sizes and colors are used, cut from the selected material. A lot depends on the approach to the implementation of this truly enchanting spectacle. Butterflies made from rigid cardboard can be given all sorts of positions and shapes. They are more durable and do not lose appearance. Moth figures made of light fibrous paper or film, fixed only in the middle, tremblingly flap their lace wings from any, even the slightest movement of air. The impression from such a spectacle is much stronger.
Where to start making butterflies on the wall?
First, decide on the outline of the application. In the event that your own solutions seem less effective than you would like, you can always find a myriad of ready-made models of applied decor online. Next, you should decide on the shapes of the butterflies and their colors. Taking into account the individuality of the design of each home, it is important to choose the most suitable color range of the intended decoration, which should organically fit into the overall concept of the interior. At the same time, do not forget that each element (butterfly) should be bright and stand out on the wall. The shape of butterflies requires special consideration.
Of course, you can be content with the butterfly stickers you need purchased in special stock stores or on order. color range. We are talking exclusively about self-production decorative elements for future application. It is this principle that underlies the recommendations for beginning craftsmen. A sketch of future butterflies can be created using simple and affordable computer programs for drawing or adjusting images. According to the sketch, templates are then made various sizes for cutting from the selected material. Are you good at drawing yourself? Great - make the templates by hand on tracing paper or plain paper. Do not try to add grace by increasing the number of bends and ruffles on the wings of the moths, if only because you will have to painstakingly cut it all out with scissors or a scalpel with a template.
Take the advice of practitioners - do not resort to strict symmetry of each individual element. There is no need for “mirror correct” wings here. It is better if they are slightly different in size from each other. This will add some volume and dynamism to the finished decoration with any mounting option on the surface.
You shouldn’t be too zealous with asymmetry either. Still, measure comes first.
The sketch has been created. We slowly move on step by step. We decide on the format of the decoration, the number and method of securing the butterflies. Now the selected butterfly template can be printed in different sizes for subsequent production of stencils. It's not that difficult here - place the printout on a cardboard sheet and carefully cut out the internal fragments along the contour.
An excellent option for decorating walls with butterflies is origami. You don’t have to be sophisticated in artistic cutting. You just need to master the “assembly” of origami. It's easy and very entertaining. Numerous videos about master classes on creating all kinds of origami, which can easily be found on the Internet, will help here. Which means the problem is solved! Next, let's get acquainted with the features of distribution and fastening of our butterflies to the wall.
 butterflies on the wall - origami technique
 Compose a single drawing
As stated above, the shape of the future decor is selected by viewing options on the Internet or created by your own imagination. You can depict a scattering or a whirlwind of butterflies in places where they harmoniously emphasize the wallpaper pattern, decorative plaster or any other room wall material. From a small flock of butterflies you can create the illusion of them moving from one corner of the room to another. Distributed in small groups, accumulated in the shape of a flower or a heart, they will wonderfully decorate and refresh the atmosphere.
A “ripe” idea is initially fixed on paper, then transferred to the wall. Here you can use a pencil or chalk. Using thin strokes, draw the main directions in which the butterflies will be attached. Do not draw lines with pressure. They are almost impossible to remove, which will certainly spoil general form compositions and your mood.

Selecting the material
To cut out butterflies, you can use a wide range of materials: cardboard, paper, film, vinyl self-adhesive film, fabric. The listed materials have multiple advantages.
Paper butterflies on the wall
Butterflies are the easiest to cut out of paper and can be colored using any available means. The amount of consumables is unlikely to matter given its cheapness. You can use colored paper purchased at any store or office supply department. If you don’t want to arrange monochromatic butterflies, colorful glossy magazines (already read) are great. Moths cut out from printed pages can be arranged by color and use this technique when composing wall decoration. Paper decorative elements can be easily attached to walls by any in an accessible way. Butterflies glued completely will not create a visual relief, while butterflies fixed at a distance will be able to “move” their wings from air vibrations.
Cardboard butterflies on the wall
Cardboard butterflies are many times more reliable and stronger. The complexity of cutting is compensated by the ability of cardboard to be molded. This material is easy to accept the required form and retains it for a long time. Parts of cardboard wings, and the entire wings, can not only be bent, but also formed into round shapes. It is worth moistening the cardboard blank a little and bending it with the help of a weight to the desired configuration. It should be remembered that cardboard is heavier than other materials, and therefore requires more reliable fastening.

Butterflies on the wall made of film
Thick polymer multi-colored film and special vinyl “self-adhesive” are ideal materials for wall decor. Butterflies made from glossy film delight not only with their shapes and colors, but also with their sparkle, brilliance and shimmer depending on the lighting in the room. Technically, the figures are made similarly to cardboard elements. Regular polyethylene film attaches to the wall surface exactly like paper. Self-adhesive film It won’t cause any trouble at all - remove the protective layer and glue the figurine to the chosen place on the wall. If you want the wings to move, remove the strip protective film in the center of the butterfly figurine.
Butterflies on a fabric wall
Fabric decorative elements go well with plain liquid wallpaper, draperies, visually and tactilely soft bases. Fabric butterflies have the same " warm image", fits perfectly into the existing design with a bright, colorful element.
It is better to completely “plant” fabric blanks on glue. With the help of little tricks you can create a relief picture. It is enough to use an aqueous solution of PVA glue or any soap. It is preferable to use a soap solution to treat especially thin fabrics. The technology is similar to that used to process cardboard blanks: fabric cut out from a template is soaked in a solution and allowed to dry in the desired shape.
We fix the decoration
You have prepared the required number of butterflies. You are looking forward to the finale. Let's decide on the option of attaching all the elements of the composition in their places.
Glue
Butterflies partially or completely “planted” with glue will adhere to the surface very firmly. PVA glue and trellis glue are equally applicable. It is important not to go overboard with the amount of glue - it should not protrude beyond the edges of the elements. This is a classic and extremely simple way to attach a butterfly wall decoration.
Pins
You can use a wide variety of pins. Decorative pins with heads made of pearl balls or small figured decorations are especially good. They will help add a little more charm to the overall idea. Pins as fasteners “work perfectly” on surfaces made of wooden or plastic lining, cork or bamboo trellises, and drywall. For walls covered with paper or non-woven wallpaper, you can also use pins, having first bent their tip at a right angle. The folded part goes under the wallpaper and secures the butterfly. The easiest way to glue pins to the figures themselves is with “Moment”, “Second” or similar glue.
Styrofoam pieces
A butterfly is glued to a small piece of this material. The dried “structure” is attached to the wall with its free side. This option has a drawback - loose foam breaks quickly, and it is quite difficult to remove its remains from the wall.
Pendant on threads
This fastening option is perfect for decorative elements made using the origami technique. With thin, colorless fishing line or threads, butterflies are suspended from a window cornice or directly from the ceiling. With the help of such fastening, you can create full-fledged spatial installations.
Without a doubt, such decoration of planes will require a lot of time and painstaking work. But a dream brought to reality is worthy of admiration. Any interior concept will benefit from a decorative man-made panel of butterflies. Find suitable model and start creating with passion...
Video: DIY butterflies on the wall, decor master class


