In every apartment, many small items accumulate, which often get lost and do not have a permanent place. This situation occurs in a woman’s purse, in a needlewoman’s corner, in the hallway and in other rooms. To eliminate clutter, it's smart to make your own small items organizer. With its help you will quickly find what you are looking for. Thanks to the available compartments, you will always find keys, cosmetics, umbrellas, combs, gloves, toys and many other small things on time.
Bag organizer
A woman's handbag contains many small items that are often difficult to find. Moreover, transferring such items from one bag to another is tedious. An organizer for small items will help get rid of this problem. We will discuss in detail how to make such a product with your own hands in this article.
First, you need to draw a pattern that matches the size of the items that will be placed in the future product. We cut out a rectangle with dimensions of 24 by 65 cm and an allowance of 1 cm on each side, calculating that 2 compartments will be 14 cm wide, 3 compartments will be 10 cm wide, and one will be 7 cm wide.
Secondly, we select 2 cuts of fabric that interests you with harmoniously combined colors for the front and back sides. Using your pattern, draw a rectangle on each piece of fabric, then cut them out.
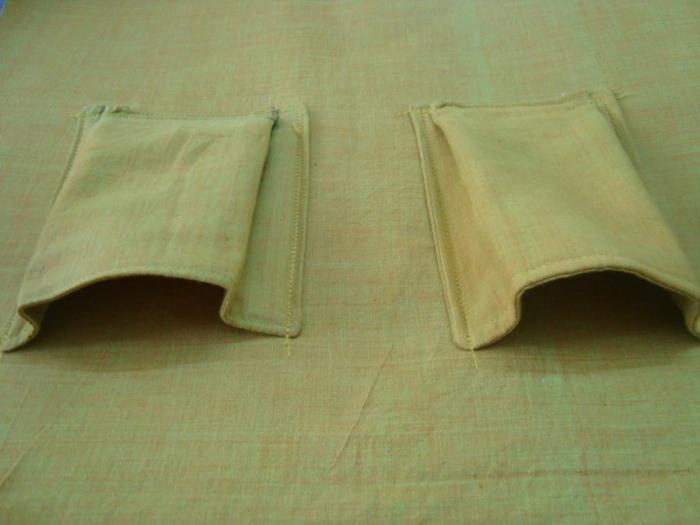
Thirdly, with a 1 cm allowance, sew two pieces on three sides, placing them right sides together. Turn the rectangle inside out through the unstitched area, straighten its corners using a ruler, sushi stick or needle, picking up small bends. Then sew the open side closed with a blind stitch.
Fourth, iron the piece and fold it widthwise so that the front of the pockets is 10 cm and the back is 14 cm. Sew the product on the sides, lay the lines to create pockets.
The resulting organizer can be rolled up and fastened with Velcro or a button. If the fabric is plain, then you can decorate the product with embroidery or appliqué. You learned how to make an organizer for small items. The master class reveals in detail the sequence of actions.
Organizer for the hallway
Things like keys, umbrellas, gloves, combs, creams and shoe brushes tend to get lost in the hallway at the most crucial moment. To avoid this and not be late for work or a meeting, you can sew an organizer for small items with your own hands. It is placed on the wall or the end of the cabinet and has several pockets of different shapes. Small compartments can contain small items, large compartments can contain larger items. In addition, the original panel will serve as a decorative element of the interior.

How to sew pockets for small items with your own hands: master class
The basis of future pockets is made of dense, possibly furniture fabric. If necessary, the base can be duplicated with non-woven fabric. Pockets can be sewn from any fabric of a suitable color, which must be reinforced with a border. Pockets can be voluminous or flat. Volume is obtained by creating a fold along the bottom edge of the pocket.
The side sections of the compartments are processed with edging on the top. On the lower raw side, two opposing folds are laid. Next, you need to attach the pocket to the base at its future location, lower the top edge down, holding the cut with the folds. You will end up with an inverted pocket with the outside facing out. The part is attached to the base with the bottom cut, after which the pocket should be raised up. On the front side, the side cuts are stitched along the line of the bias tape.
Shallow pockets can be fastened with buttons or snaps. It’s not difficult to make such a convenient organizer for small items with your own hands, and it would be appropriate not only in the hallway, but also in the bathroom.
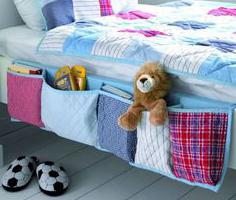
Pockets for children's
To teach your child to keep the children's room clean, you need to have a lot of cabinets, chests of drawers, shelves, and drawers. A convenient option for placing small accessories, pacifiers, bottles, napkins, powders, and diapers can be an organizer in the form of hanging pockets.
Every young mother is interested in learning how to sew pockets for small items with her own hands. A master class on creating a convenient device is described below.
We will need two types of fabric - the main one and for finishing, an elastic band that supports the pockets, and cardboard that strengthens the shape. The organizer can be either vertical or horizontal. Depending on the direction, the product can be hung on the wall, on the end of furniture, or on a child’s bed.
Cutting out products and sewing pockets
We cut out one part for the base for pockets 80 cm long and 35 cm wide. Next, we will need 3 parts for future compartments with dimensions of 20 x 30 cm. To make the pockets convex, we will make a wide sidewall for them, 60 cm long and 8 cm wide. Also necessary prepare bias tape 4.5 cm wide to trim the pockets and the perimeter of the product.
Then you need to round the edges of the compartments using a saucer. Finish the edges with an overlocker or use a zigzag stitch on a machine. Attach the side piece to the front side of the pocket and stitch from the wrong side. Turn inside out, iron, and edge the top of the pocket, including the side, with bias tape.
If desired, you can insert an elastic band into the binding and secure the ends at the edges. In this way we prepare 2 more pockets. Then we sew the pockets to the base, keeping the distance between them. You can strengthen the made organizer for small items with your own hands by cutting out one more piece of fabric and cardboard. Sew two parts on three sides, fold them over, process the top edge, leaving it open to insert cardboard. Edge the outer edges of the product with trim.
Ribbon Keeper
Any needlewoman accumulates a large number of small things, including meters of bias tape, braid and a wad of all kinds of ribbons. In order for all these items to always be quickly found, it makes sense to build How to store ribbons separately from needles, buttons, pins and other small items, we will consider in this part of the article.
To create a box for ribbons, you need a small box, fabric or self-adhesive paper, glue, eyelets, tools for installing them, whatman paper, colored cardboard. A suitable box with a non-removable lid can be purchased at the post office. You need to cut off the excess cardboard from the lid, leaving only the top. If the box is dark, it should be covered with either adhesive paper or white Whatman paper, and a cloth on top. The inside of the organizer is also covered with pieces of fabric. All allowances located on the inside of the lid and box are decorated with colored cardboard. Next, you need to install the eyelets on the lid and sides of the drawer using special tools. Now you can put the spools of tape in the box, and bring the ends out through the holes.

Convenient jewelry storage
Designers offer a glamorous solution for organizing space for decorations. Most often this is a panel placed on the wall near the dressing table. When making an organizer, you should take into account the interior of the room and the design of the dressing table. The panel must be correctly combined with the surrounding environment. Most often, to create an organizer, a baguette is used, on which, instead of a picture, burlap or canvas for embroidery is placed. Sometimes the fabric is replaced with wire, fishing line or colored ribbons, on which earrings and hairpins are placed. To hang beads, you can screw screws decorated with buttons or small decorations into the frame.

To summarize, we can say that organizers for small things can be made from anything. The main thing is to fantasize and not be afraid to experiment.
Today we will tell you how to sew a functional organizer with your own hands. This thing is indispensable in the bathroom: a hanging, spacious “cosmetic bag” with a large number of pockets will help you maintain order and at the same time maintain access to everything you need.
We have collected several examples for inspiration and prepared the necessary patterns. All you have to do is follow the instructions and select all the necessary materials for sewing.
Making an organizer is quite simple. To do this, you can use a sewing machine - it will be faster. However, there is no problem in sewing it by hand. In this case, you just need to take a dense base fabric so that you do not need to further compact it and connect large pieces of fabric together.

What do we need?
- thick fabric for the base (no more than a meter)
- fabric for pockets (you can use different colors and textures)
- thick wire, wooden stick or plastic base (the holder from which we hang the organizer)
- canvas for finishing pockets
Progress
You need to start with a pattern. We suggest you use ready-made options, but this is not at all necessary. Figure out what number of pockets would be optimal for you. Change the pattern to reflect this point.
Standard organizer patterns look like this.


Transfer them first to paper and then to fabric. Try on the finished canvas on a wall or bathroom door to see if its intended length is comfortable.
If you sew an organizer on a machine, you can make an additional layer between the two bases. First sew on the pockets, and then sew the top and bottom parts together.
If you sew by hand, sew on the pockets so that it looks beautiful on the back side. A good solution in this case is to use a terry towel as a base. In the bathroom, such an organizer will look relevant and appropriate. In addition, it will be convenient to wash.
Cut the pockets with a margin of 1-2 cm per bend. First, smooth the edges so that when sewing they do not uncurl and interfere with the process. Mark the location for the pockets using a marker or a bar of soap. Secure the pockets to the organizer.
Process the top of the craft so that it can accommodate a rigid, straight base from which it can be hung. If you don't have anything suitable, sew rings from a shower curtain or curtains onto it.
The next room where organizers are also needed is the bathroom. Combs, cosmetics, personal hygiene products, shaving accessories - all this needs to be laid out, often in a small room where every centimeter counts. In order to keep these things in order and not create a mess, organizers are needed. And as always, you can make them with your own hands and from available materials, spending a minimum of financial costs and receiving a creative charge of energy.
Let's start with organizer for combs. Every girl has a lot of combs: for styling, for hairstyles, and just a comb for every day. And as luck would have it, very often they get lost. This is where an organizer comes to the rescue - a jar for all our wealth.
We have to:
- plastic or tin jar;
- Double-sided tape;
- twine;
- beads;
- hot glue.
A jar of hair balm will work fine, you just need to cut off the threaded neck. We do this using scissors or a stationery knife.
Cover the jar with double-sided tape. We glue the edge of the twine to the bottom of the jar and begin to wrap it around.
You need to wrap it tightly so that there are no gaps between the turns.
To decorate the top and bottom, we will knit chains of air loops from twine. The length of the chain should be equal to the circumference of our jar. We need three such chains.
Glue the finished chains using hot glue to the bottom and top of the jar.
Now we draw patterns and curls with twine. We place them from the lower right corner up and to the sides. We leave their number to your imagination.
Use the third chain to close the cut on the jar.
Another decoration is beads. Here you can choose a lot, you can have a little, as you like.
That’s it, feel free to put your combs in a DIY organizer.
Organizers made from tin cans. Empty tins, such as baby food or tea, make great paper holders.
Necessary materials:
- tin cans;
- acrylic paints;
- colored napkins or a piece of fabric;
- satin ribbon;
- scissors, glue gun.
Paint the bottom of the jar and the top with acrylic paint. The advantage of this paint is its minimal drying time and stability.
We cover the outside of the jar with a decorative napkin or cloth. We glue a satin ribbon along the top and bottom edges; you can also use grosgrain or braid - they are stronger.
We bind the jars with the same ribbon. We fix the bindings with a glue gun.
The towel organizer is the next creation made from tin cans. The materials are the same plus a sheet of plywood and screws.
Cut it out and glue it to the jar. Apply additional patterns with a brush.
We cover the upper sections of the jars with satin ribbon. We screw the bottom of the cans to the plywood sheet using screws. We will also cover the perimeter of the plywood sheet with satin ribbon.
You can replace the towel organizer made from tin cans with hanging towel pockets.
For this we need:
- fabric (it’s better to use linen);
- napkins and glue for decoupage.
We cut out a piece of fabric 1.2 m long and 34 cm wide. This will be the base on which the pockets will be sewn. To determine the size of the pocket, twist a towel and place it in the fabric, it will be approximately 50 cm. Let's make a place on top for several pieces of soap. To do this, fold some of the fabric over the pockets to the size of the soap.
We smooth the edges of the linen strip for towels and hem them. Fold the stuffed pocket inward and hem it.
Cut a rectangle of fabric 67 cm by 12 cm. Fold it 2 cm along the length, press and sew the edges. We will divide the strip into pockets and sew the partitions. We get pockets in the form of folds. Fold the top edge of the larger pocket and sew it onto the bottom of the soap pockets. We will sew everything on the machine.
Our pockets will hang on a stick. Let's prepare it: insert wooden beads into the ends of the stick, which we secure with wooden sticks. Fix with glue.
Above the pockets, about 4 cm from the top edge, we will sew and insert our prepared stick. Sew a second pocket of the same size onto the fabric under the first pocket.
Under the second pocket we will sew several more pockets for washcloths or small towels. To do this, cut pieces measuring 17 cm by 37 cm, fold them and hem them under the second pocket.
We decorate the pockets using decoupage napkins: cut out the picture and divide it into two layers. We will glue the layer with the picture with glue, but at the same time we will limit it to a frame made of thick cardboard, and put parchment underneath.
When the glue has dried, iron the picture through the paper. This will strengthen the design and make it easy to wash by hand. Only after washing will it be necessary to iron it through paper.
A wall organizer made of terry cloth or oilcloth will be a trendy bathroom organizer. We use these materials due to the high moisture in this room.
If it is not possible to purchase terry cloth, you can replace it with several terry cloths.
towels.
So, the necessary materials:
- terry cloth;
- fabric for the back side;
- interlining;
- braid;
- wooden slats.
Let's cut the fabric according to the pattern, taking into account the allowances.
To strengthen the parts, we reinforce them with non-woven fabric. We will sew a braid edging to each pocket and stitch it to the base. Let's sew terry cloth and fabric for the back side. We will also trim the edges with braid. To thread the slats, we will make bends and edge the top edge of the organizer.
Of course, all of these organizers can be purchased ready-made for any room. But it's much nicer to make them yourself. After all, you will not only enjoy making organizers, but also take into account the individual needs of each family member. And this is much nicer and more original. Thanks to all these pockets and jars, your bathroom will be tidy and cozy. All things will be at hand, but at the same time they will not be an eyesore. Good luck and creative success.
Pockets in a kindergarten locker
So we have grown to kindergarten. I decided to sew the pockets myself. Of course, similar things are sold on the market, but I wanted to make my own. I sewed it quickly and without problems. I'll share my experience .
I measured the dimensions of the cabinet door in advance.
I bought a simple oilcloth for household purposes. store (it’s kind of thick) with a bright, childish drawing.
I cut out the base. In my case, it is a rectangle 22*79cm (here the drawing does not play a special role, since it will be covered with pockets).
I found some bias tape at home in a contrasting color, so I used it to cover the top edge of each pocket.
Next, on each of the 3 large pockets I made markings for folds (it turned out 4 marks at 6,12,18,24 cm). I placed small folds: 2 to the right, 2 to the left of the center, secured with pins. Folds are needed so that the pockets are voluminous and not flat. Some people also use an elastic band around the edge of the pocket for this.
I'm starting to collect. I work on the bottom pocket first. The distance from the bottom of the fabric (main) to the place where the pocket is sewn is about 4 cm.
I place the pocket tightly on top of the main one, face to face down, with the pattern so that the bias tape is at the bottom and the folds are at the top. I sew with a simple stitch on a sewing machine at a distance of 0.6 cm from the edge. I remove the needles and lift up the pocket. The front side is clean, the seam is inside the pocket. I connect short sections to the main fabric with pins. I sew the other 2 pockets in the same way. The distance between the top of one pocket and the bottom of another is 1-1.5 cm.

When the large pockets were sewn, I sewed a small pocket into the free space. It turned out flat, just for a handkerchief.
After the pockets, I took on the entire canvas.

I had 7 cm left at the top, I folded them and stitched them once. Into the resulting space I inserted a piece of cardboard 22 cm long (along the width of the main canvas) and 3 cm wide (along the width of the fold).
I sewed bias tape around the entire perimeter, catching the edges of the pockets. I left 5 cm tails at the top of both edges for loops. I turned the loops and sewed them separately. The result is a canvas with 4 pockets, which can be easily wiped and folded with everything you need.
1 pocket - for a handkerchief; 2 pockets for changing to physical equipment; 3 pockets for a T-shirt, panties, T-shirt, shorts; 4 pockets for tights and socks.

Bright, convenient, fast, functional. The main thing is that I did it myself!