Making and repairing a chair with your own hands is much easier than it might seem at first glance.
A homemade chair will become original furniture in the house, because if you show your imagination, you can come up with unique design. Also, such furniture will definitely be of high quality and inexpensive.
You can make any chair: a kitchen chair, a folding chair for fishing or a summer cottage, a step-ladder chair. You just need to find out how to make a chair with your own hands.
First, measurements are taken, after which it is necessary to draw up a project and develop drawings of the chair (examples are presented below).
A do-it-yourself wooden chair can be made from beech, pine, oak. The wood is selected without knots and cracks. Beech and oak can be sanded, which will provide a great look to the chair.
You can easily prepare the wood yourself; to do this, you need to remove the shavings from the timber and process it first with coarse-grained sandpaper, and then with fine-grained sandpaper.
This is necessary to ensure that the wood becomes smooth.
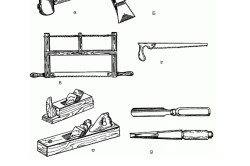
To make or repair kitchen chair, you will need tools such as:
- construction stapler;
- saw;
- mallet;
- jigsaw;
- plane.
Below we will look at how to make a chair and repair it.
Assembling a new product and repairing an old one have the same procedure. Only if repairs are being made, the chair is first disassembled. The worn part is replaced with a new one. Then the repair continues with the assembly of elements.
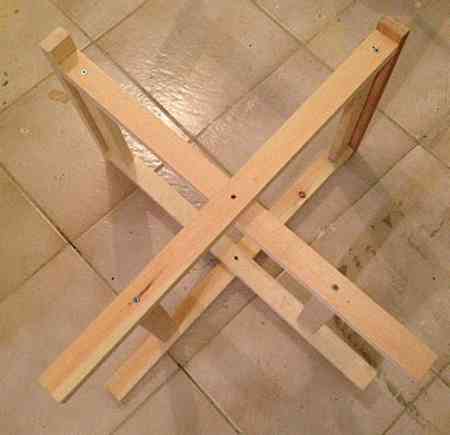
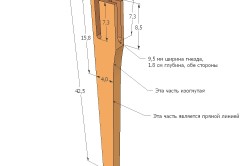
For manufacturing, you first need to prepare four bars: two 40x60 mm, 80 cm long - for the rear legs and two 40x40 mm, 44 cm long - for the front.
Holes are made in these bars for longitudinal and transverse bases and legs. The elements need to be laid on top of each other, the ends must match, as in the photo.
Now, with a pencil, 2 notches measuring 20x40 mm are marked on adjacent legs with a chisel. The rear legs need to be cleaned, the edges planed with a gradual transition from 6 to 4 cm.
Now transverse bases with spikes similar to the spikes of the longitudinal base are made from two 40x40 mm bars with a length of 420 mm.
The next step is to make a backrest 420 mm long and 8-10 cm wide. For this, it is recommended to take an edged board.
WITH inside back wall you need to make grooves equal to the thickness and height of the backrest. The backrest must be inserted into the grooves. Next, the seat needs to be secured with screws.
Small braces can be attached to increase the rigidity of the chair. The legs and back should be rounded on the outside.
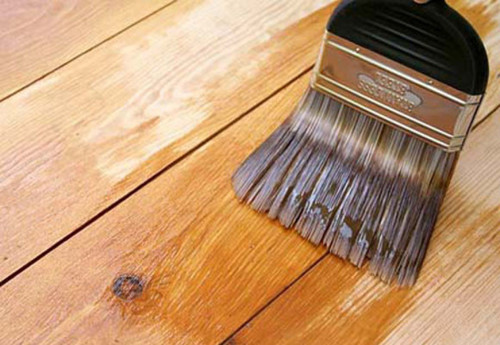
The finished base must be varnished, polished and left until completely dry.
If repairs are being made, all connections are sealed with glue.
Varnishing should be done in a ventilated area. Or purchase an odorless coating, which is safer for health.
If the wood is uneven and uneven in color, then you need to coat the chair with a dark-colored varnish.
Now you need to make a seat for which foam rubber is cut required size so that the seat is soft, and wrap the foam in durable fabric. The fabric must be secured with a stapler.
If an old chair is being repaired, the product can be upholstered with fabric, like a cover.
After the base has completely dried, all elements need to be assembled. The spikes are treated with glue and driven into the recesses with a mallet. Finally, the seat and backrest are screwed on.
The screw heads can be hidden. To do this, you need to prepare a thick mixture from sawdust and PVA glue and apply it to the cap and leave until completely dry.
Then the camouflaged caps need to be varnished, after which they will become almost invisible. Chair repairs must be completed with varnish.
These chairs are perfect for a garden
Garden chairs and a table can be made from logs; examples can be seen in the photo.
A table and chairs made of logs will become original decoration dachas The sawn logs are left to make a table and chair, and the stumps will serve as support.
The table is made as follows: several boards are knocked together and installed on a stump - this will be the lid. A log table needs to be carefully sanded.
Then the logs need to be cut into identical logs, 60 cm high. The logs are dug into the ground, surrounding the table. All that remains to be done is the chair frame and seat.
The kitchen is ready garden table and chairs made of logs.
Assembling a folding chair
A folding chair is an excellent option for the garden and fishing; let’s look at how to make a folding chair with your own hands.
Folding chair without backrest
For work you will need a hacksaw and a drill.
The difficulty of making a chair lies in the preparation of parts, such as:
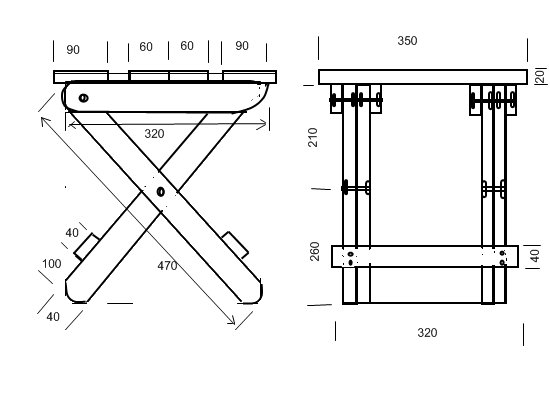
- 4 legs made of timber 470x40x20 mm;
- 4 seat strips 320x40x20 mm;
- 2 legs 320x40x20 mm;
- seat beam: 2 pcs. 350x90x20 mm, 2 pcs. – 350x60x20 mm.
First, axial bolts are installed on the legs. The axis must be moved upward so that it is located 2 cm below the wide bars of the seat, otherwise the product will be unstable.
Then the seat crossbars need to be bolted together: first to the inner legs, and then to the outer ones. It turns out 2 hinged parts that need to be connected.
First, the seat slats are connected, fixed on the free ends of the crossbars. From the bottom of the legs, at a distance of 10 cm, the legs are attached with self-tapping screws.
The middle bars do not need to connect to each other for the chair to fold. One block is installed on the outer crossbar, the second - on the inner one.
If you insert a 20x20 mm beam between the middle bars of the seat, this will allow you to adjust the height of the seat. A folding chair for a summer house is clearly shown in the photo above.
Folding version with backrest
The next option for a summer cottage or fishing is folding chair with backrest.
Details being prepared:
- 2 legs each 90 cm and 55 cm long;
- 2 cross bars 400x50 mm, 340x50 mm, 280x50 mm;
- back 400x70 mm;
- 2 seat supports 290 mm long;
- 6 boards for seat 340x40 mm.
First you need to lay out 6 boards at a distance of 10 mm, and place supports on top with a pitch of 34 cm on the last board and 28 cm on the first.
With a pencil, you need to mark the boundaries of the location of the planks, then the structure is turned over and the support and seat are attached with screws.

On the outside, at the bottom of the long legs, a recess is made for the bolt, and on the inside there are recesses for the ends of the rod. Recesses for dowels are made on top.
You need to thread the dowels perpendicularly between the posts, clamping the rod. Fixed on dowels cross bar length 34 cm. Cross beam 40 cm long, secured with screws.
A hole is made in the middle of the short posts for connection with the long posts, and on top there is a hole for fixing the seat.
Transverse strips 28 cm long are fixed on dowels in two places: below and just above the center.
Now you just need to assemble the elements: the short legs are connected to the seat and long legs with bolts. A DIY folding chair for the garden is ready.

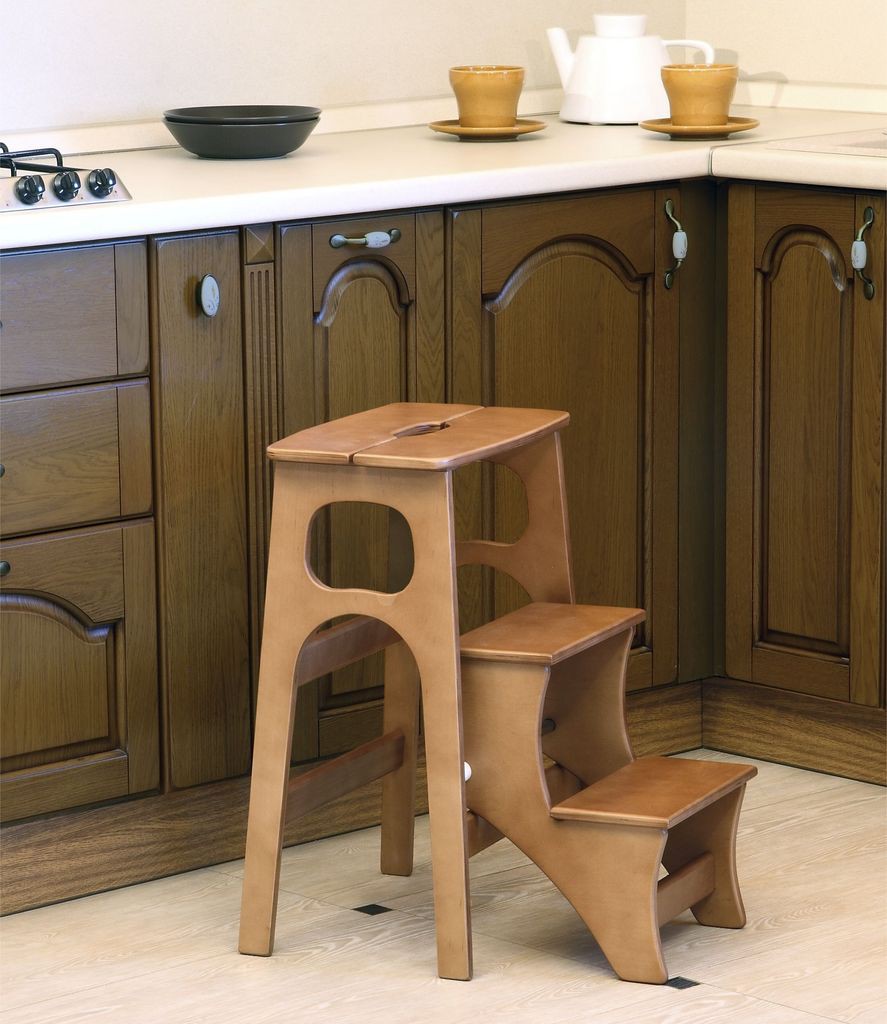
How to assemble a step stool?
A stepladder is an indispensable item in the household, but it takes up a lot of storage space. Therefore, a compact stepladder chair can be made from plywood.
The seat, back and steps are made of plywood, the legs are made of pine boards. Below are drawings with the dimensions of the elements according to which the stepladder is made.
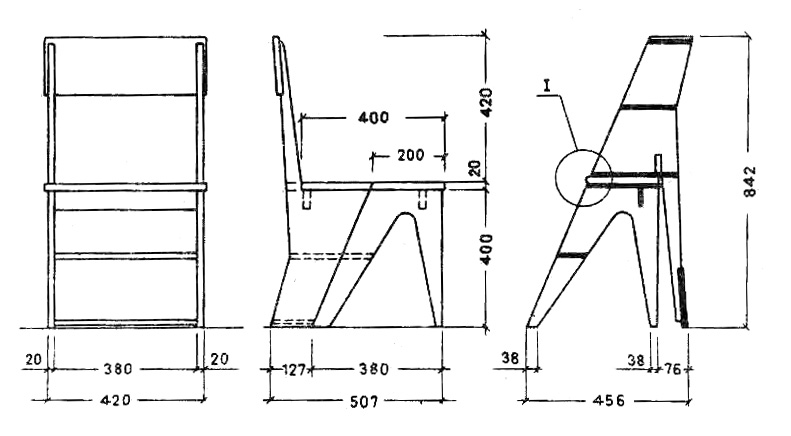
A convenient stepladder has the following dimensions: the distance between the strings is 48 cm, the distance between the string and the support is a maximum of 60 cm, the seat height is 60 cm, the dimensions of the plywood seat are 30x50 cm.
For a plywood seat, you will need 5 transverse slats and 2 base slats, which are processed and fastened together. Stepping back 5 cm from the edge, mark the lines for the grooves on both sides.
Then the transverse bars are fixed on the base slats. The joints of the plywood chair elements are coated with glue.
The supporting part is made of 5 slats. The slats are connected with dowels. Holes are made at the ends of the slats; the same holes are needed in the rack-racks.
The joints are glued. This design represents the back of the chair.
Now the string and steps are made from plywood 44 cm wide.
The photo shows a drawing of a stepladder chair.
The string and support posts are then attached to the seat. The slats connecting the ladder and the racks are fixed on strings between the seat and the top step, and the other end is fastened in the middle of the racks.
The finished stepladder is varnished. A stepladder chair made of plywood is shown in the photo below.
Wooden chairs are perfect for home and garden, performing practical and aesthetic functions.
Making or repairing a chair on your own is not very difficult, as many people think at first. Homemade furniture will become an original decoration of your interior, because in creating special design solutions human imagination knows no bounds. At the same time, keep in mind that the furniture you create will be distinguished by reliability, quality and low cost, because you can use the remains of wood building materials.
Assembling a chair for the kitchen
It should be noted that it is always possible to make chairs not only for the kitchen, but also for fishing or for a picnic. You just need to know how to make folding chairs from wood with your own hands, the drawings of which are presented below.
To begin with, measurements are taken, based on which a drawing of the product is drawn up.
Can be selected for work various breeds wood:
- beech;
- pine;
- oak.
The main thing is that the material does not have knots or cracked areas.
The preparatory process is simple - the timber should be planed and sanded with coarse and then fine-grained sandpaper. This will give the wood a smooth finish.
To work you will need the following tools:
- stapler;
- hacksaw;
- mallet;
- plane;
- electric jigsaw.
Work on assembling a new chair or repairing an old one takes place in the same order. But in the second case, the furniture is first completely disassembled and worn parts are replaced with new ones. After this, the chair is assembled.
Before making the chair, we prepare two eighty-centimeter bars with a cross-section of 4 by 6 cm for the rear legs, and a pair for the front legs, the cross-section of which is 4 by 4 cm and the length is 44. We arrange holes in them for the longitudinal and transverse bases and legs. We apply all the elements to each other so that the end points coincide.
Recesses are made with a chisel, the rear legs are cleaned, the edges are removed with a plane to create a smooth transition from 60 to 40 mm.
From edged boards the backrest is being prepared for the future chair.
The assembled base is coated with a varnish composition and left to dry. At this time, the seat and back can be covered with material and a soft foam pad inserted.
Having prepared everything, you can perform a complete assembly, secure the elements with screws, masking their caps. Chairs of such designs can also be used in the country.
Garden chair
This chair is easily made from scraps of logs.
It will be an excellent decoration for your summer cottage. The easiest option is to cut the log into blocks of equal size, each 0.6 meters high, and dig them into the ground. On top you can arrange a seat from soft material.
Folding bar stool
Such pieces of furniture can be made in two versions - with and without a backrest.
For a chair without a back, you should prepare four legs (47 x 4 x 2 cm), the same number of planks for the seat and a pair of legs (32 x 4 x 2 cm), two planks each for the seat measuring 35 x 9 x 2 and 35 x 6 x 2 cm.
We connect the strips that are fixed at the ends of the crossbar and attach the legs. We do not connect the middle bars so that the chair can be folded.
Another country option- a chair with a backrest. For it you need to prepare two legs (0.9 and 0.55 m each), two cross-type slats of three sizes (40 x 5; 34 x 5; 28 x 5 cm), a back (40 x 7 cm), a pair support strips under the seat, each length is 29 cm; boards - 6 pieces (34 by 4 cm).
Having prepared everything, you can start assembling. In its final form, the chair will look like this:
Folding step stool
Such a thing is considered an indispensable element for every owner. But the stepladder takes up free space when stored. Therefore, it is advisable to replace it with a chair made of plywood.
For the legs it is necessary to use pine wood, the remaining elements are made of multi-layer plywood. To make the product comfortable, it is recommended to adhere to certain sizes:

Having assembled the step stool, it is varnished.
Folding type furniture is considered a good decision for organizing picnics, relaxing on summer cottage or in the courtyard of a private house. Convenience also lies in the fact that when assembled, the furniture is stored compactly and does not take up much free space.
A folding chair with a fabric seat is perhaps the easiest of all the projects I have published on this site. Anyone, even a novice carpenter, can make a folding chair with their own hands, the drawings of which I offer. For its manufacture, only one standard size of wood was used, which simplifies the process of making a folding chair with your own hands to the limit.
How to make a folding chair with your own hands. Drawings, details and subtleties of the manufacturing process
It is useful to have a set of folding chairs in your country house or even in your apartment if you need to seat a large number of guests. And for a picnic in nature or on a fishing trip, such a hand-made folding chair is absolutely necessary. You can cram at least a dozen of these chairs into the trunk of a car, and they won’t take up too much space.
The folding chair, the drawings of which I offer you, is equipped with a fabric seat that can be easily removed for washing, storage or transportation. Fastening the fabric, with minor differences, is similar to how it is done on the folding chaise longue for the garden, which I told you about earlier.
Any seat is a source of increased danger, and a simple folding chair is no exception. If you fall off it, you can not only make others laugh, but also get serious injuries. Through knots and splits in the material used are excluded. Fastening elements: screws + glue. You can use round wooden dowels + glue, but in most cases I trust screws more.
The fabric for the seat should be strong and dense, not subject to stretching. Since such furniture is often used in quite extreme conditions, then it is better to use synthetic fabric when making a folding chair with your own hands, which suffers less from rain and dew, and which can be dried easier and faster. Awning fabric is the best option.
Dimensions of the folding chair
DIY folding chair. Detailing, fasteners
Cuts
Legs 19x38x610mm – 4 pcs.;
Top strips 19x38x375mm – 2 pcs.;
Cross members of the outer frame 19x38x311mm – 2 pcs.;
Cross members of the internal frame 19x38x267mm – 2 pcs.;
Round dowel for fixing the seat fabric on the side of the outer frame 8x343mm – 1 pc.;
Round dowel for fixing the seat fabric on the side of the inner frame 8x286mm – 1 pc.
Fasteners
Bolts 6x50mm – 2 pcs.;
Nuts 6mm – 2 pcs.;
Flat washers 6mm – 6 pcs.;
Screws 4x50mm;
Wood glue.
Fabric cutouts for folding chair seat
Seat 686x483mm – 1 piece;
Side flaps 584x108mm – 2 pcs.
Assembling a folding chair with your own hands
1.
We assemble the outer frame of the folding chair as indicated in the drawing.
In both this and the following cases, we pre-drill guide holes for the screws. Before connecting the elements, apply glue to the contact points.
Note: Immediately remove excess glue squeezed out after screeding the elements so that there are no problems when finishing products.
2. The inner frame of the folding chair is completely identical to the outer frame, with the exception of the width. The assembly procedure is the same.
3. We connect the frames of the folding chair together with bolts. We place washers between the bolt head and the nut, and one between the frames.
Sewing a fabric seat for a folding chair
1. We cut out blanks from the fabric according to the dimensions indicated below.
2. We fold the blank for the seat fabric along the long side in half with the wrong side facing out, and sew the long open side with a seam spaced approximately 1.3 cm from the edge.
3. We fold the blanks for the side flaps in the same way. We sew one of the long sides with an indentation of approximately 1 cm from the edge, and the short side with an indentation of 1.3 cm.
4. Turn the pieces right side out. We fold one of the raw edges of the seat blank, insert the valve blank in the center, and attach it to one of the sides of the seat blank.
5. We fold the valve blank in half, inserting the edge of the blank into the seat “bag”, adjust the valve to the required length, and sew the whole thing together.
6. Similarly, we sew the flap on the other side of the folding chair seat.
7. We push the side flaps into the gaps between the top slats and the crossbars of each frame, and secure the fabric seat of the folding chair with dowels.
We're sitting well!

Well, now you know how to make a folding chair with your own hands. I hope you found the drawings useful.
I have not touched upon the topic of finishing and protecting wood at all. I'm just tired of repeating myself: that's it wooden elements folding chair are processed similarly to the elements of any other wooden furniture, used outdoors, and there is a lot of information on this topic on the site - for example, in the article about making
Those who are familiar with arranging their home “from scratch” know that this is a very expensive pleasure, starting from interior decoration, ending with the purchase of furniture. And even such a seemingly insignificant trifle as a chair can cost a pretty penny. One well-made, but completely ordinary chair costs a lot of money, but you need at least three of them. What to do when guests come to celebrate a housewarming? The experience of building chairs with your own hands will help you not only save money family budget, but will allow you to create your own original designs that will match the character of the interior and your preferences. In this article we will tell you in detail how to make a chair from wood.
Almost any wood is suitable for making a chair, but it is best to start with the cheapest, for example, pine. Later, when you have mastered the basic skills of handling turning tools, you can “swing” at oak, teak, cherry or other elite species. When choosing lumber for a future chair, you should take into account the pliability of the wood, its color, durability and other characteristics. Thus, oak is very hard, and over time its color becomes darker, and the darker the oak product, the more noble and beautiful it is considered. Stain is a special substance for treating wood that has coloring properties. It does not cover the texture, but makes the surface a tone darker, allowing you to create the effect of an expensive rock. Thus, you can make the same cherry or merbau from pine in a couple of hours. To make a chair you will need ordinary turning tools:
A little about the finishing of the chair. If you want to preserve the beautiful texture of the wood, coat it with clear (or tinted) varnish. If you plan to use the chair outside, for example, in the garden or on an open veranda, it is better to coat it with PF-170 alkyd varnish or Yacht varnish - these products will protect the wood from fading under the sun and humidity. For “home” chairs, use a special furniture varnish. Nitro varnishes dry quickly, but they emit a pungent odor, so it is better to work with them on a balcony or in a well-ventilated area.
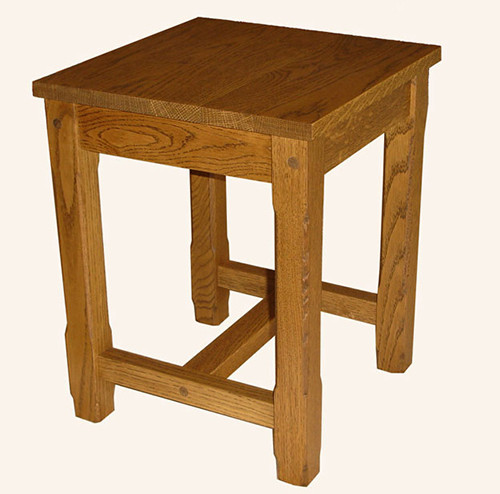
Wooden stoolFor those new to the world of DIY furniture, it's best to start with something simpler, like a stool. This is an elementary design, the manufacture of which will give an idea of the basic subtleties of working with wood. If you decide to make a chair from pine, be prepared for the fact that you will have to tinker with sanding, especially if you don’t have a sander. As an alternative, you can use beech - it is quite inexpensive, has a beautiful texture and is easy to work with.
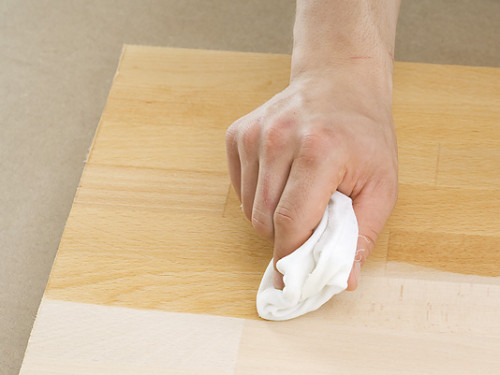
Materials for the stoolFor a stool you will need to make 4 bars with square section 40 mm, 8 bars 40x20 mm for crossbars and a square seat with a side of 350 mm. Can be used for seat furniture board or thick plywood. Of course, you can knock it down from boards, but a solid surface looks more aesthetically pleasing. We propose to make a classic stool designed for an adult of average height. The height of the legs will be 42 cm, and they will be held together by crossbars 21 cm long. Before sawing off the excess part, carefully check the evenness of the intended line and compliance with the dimensions. Contrary to the well-known proverb, this should not be done seven times, but at least a couple. Sanding the stoolWhen the blanks are sawn, the silhouette of the future stool begins to emerge, but it is still very early to assemble it. First, you need to carefully sand all parts of the structure so as not to plant a splinter in the future. If the surface is very rough, use sandpaper No. 4. When you have more or less smoothed out the knots and the surface becomes rough, wipe it with a damp cloth - the water will lift the small short fibers, after which they can be removed with No. 2 sandpaper.
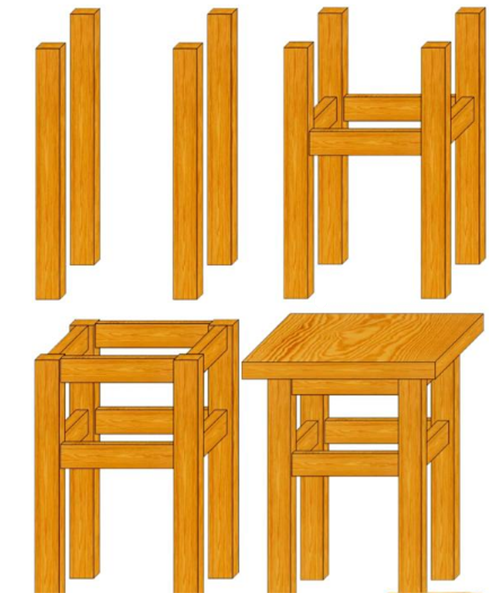
You need to “raise” the wood fibers until the surface becomes perfectly smooth, each time reducing the number of sandpaper. In this regard, an electric grinder is very helpful. Assembling the stoolFinally, you can start assembling the stool. How to do this is intuitively clear, but there are still some subtleties here.
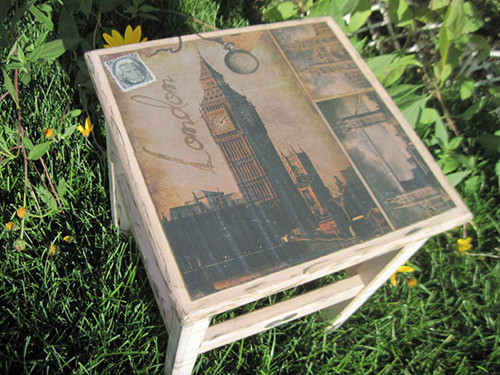
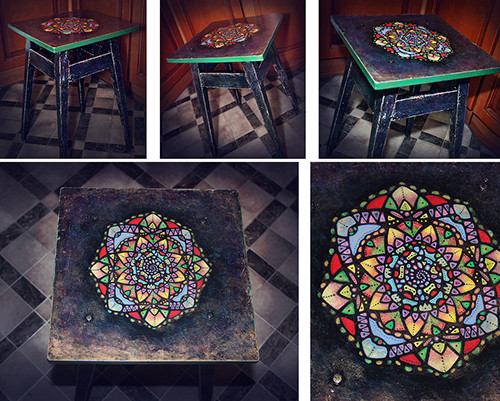
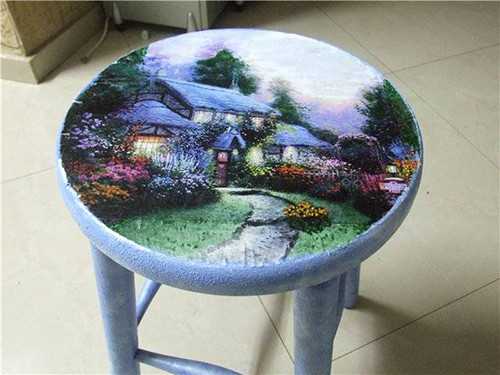
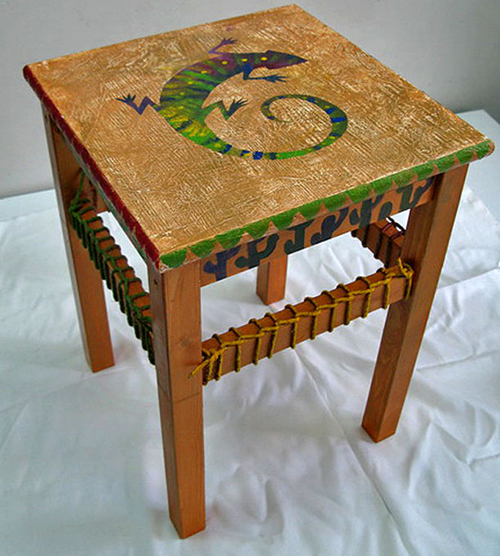
How to assemble a stool with your own hands: 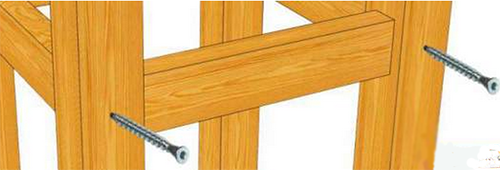 Helpful advice: Before painting, make holes for future fasteners and do not screw the screws into them completely. Once you have painted the piece, you can tie a thread to this screw and hang the leg or crossbar in the air. Otherwise, you will have to wait until the top part dries, then turn the element over and paint it from below, and this is fraught with the above-mentioned spots and stains. If you feel the urge to create or want to involve children in creating original interior for a family “nest”, the chair can be painted before varnishing. Use for this acrylic paints or regular gouache. The decoupage technique is also very popular, which will allow you to create a beautiful drawing even without artistic abilities.
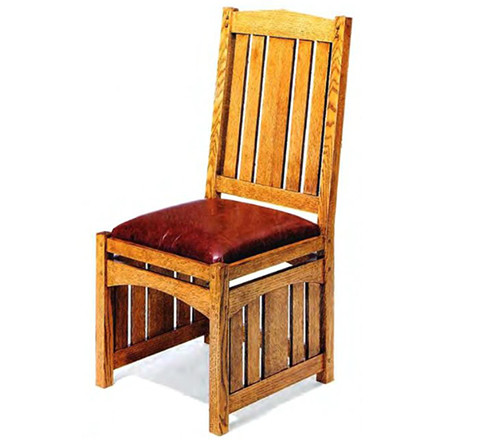
Chair with backIf you have successfully completed the manufacture of a stool, we suggest making a “full-fledged” wooden chair with your own hands. For such a product, you can already choose more solid wood - oak or walnut, for example. In addition to lumber, you will need screws, wood glue, the tools described above and a cutter. If it is not possible to work on a machine, use a set of chisels and a hammer. For tinting you can use the same stain.
Below is a table describing the number and sizes of parts needed to make a chair with a backrest. At first glance, it seems that there are too many of them (especially when compared with a stool), but such a chair will turn out to be very comfortable and will serve for many decades.
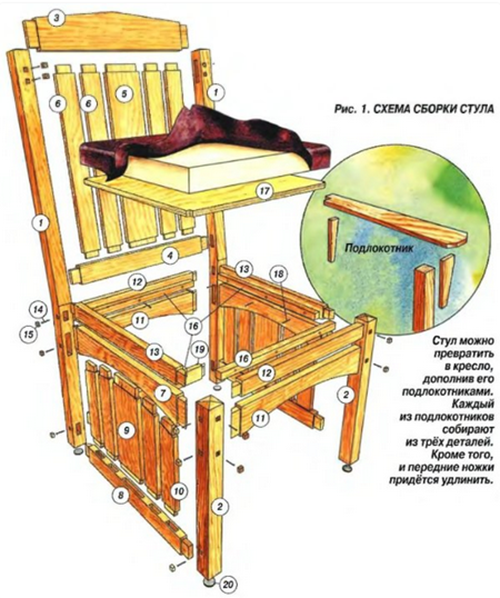
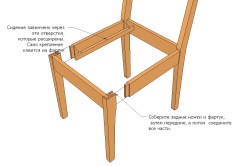
To make the task easier for you, we have prepared a visual plan for subsequent assembly with numbered parts. In the future, to create your own exclusive furniture, you will have to make a drawing of a wooden chair yourself.
Progress: 
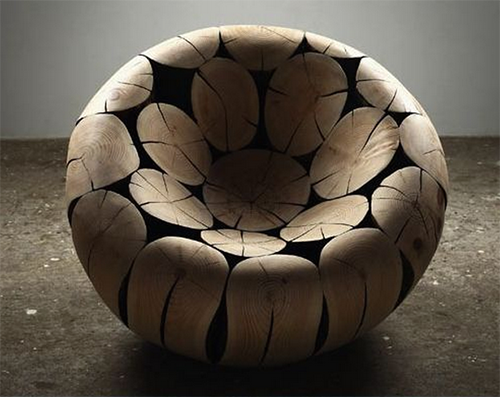
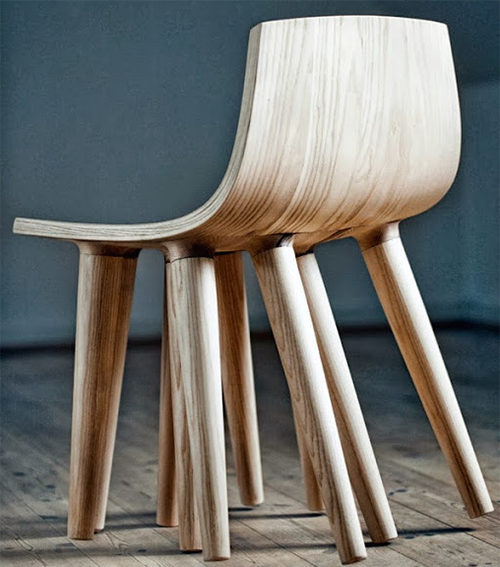
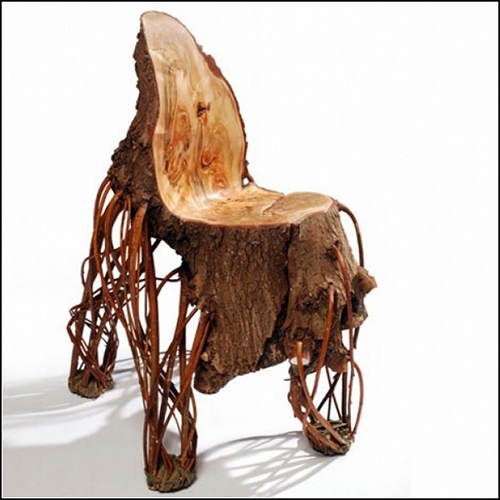
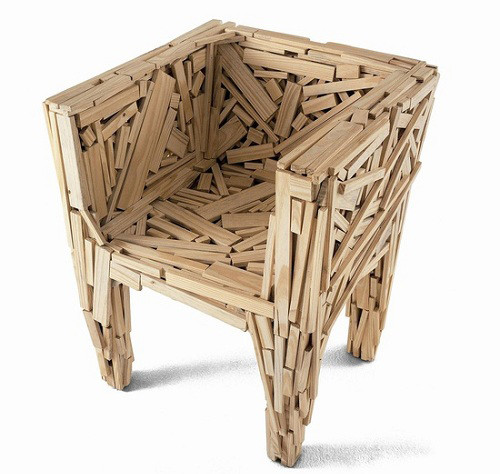
Making chairs from wood is a very interesting and creative process, which over time can develop into a useful hobby. Having learned how to make basic designs, you can diversify the process by adding your own details, using wood carving tools and combining various materials. Anyone can make wooden furniture, but you can start with an ordinary kitchen stool! Wooden chairs: photoWhat do you imagine when you hear the phrase “wooden chair”? An ordinary stool or a bulky, roughly processed structure? We have prepared a photo selection of original wooden chairs, which will significantly expand your understanding of this piece of furniture.
|


- Required materials and tools
- Technology and features of work
- Folding chairs: manufacturing nuances
- Wicker chair: recommendations
If you go to furniture store, then a wide assortment will catch your eye different models wooden furniture. There are many beautiful chairs: from stools to luxury models. However, such beauty requires a lot of money. Therefore, to decorate the interior of the room, you can create a wooden chair with your own hands. To make it, you must have certain materials and tools.
Exist different methods allowing you to do . When choosing a method, you need to be guided by the style, as well as its purpose. The work should begin with a drawing of the future structure, which should indicate all the dimensions of the parts, their quantity, and the materials necessary for the work. The success of the work depends on the quality of the drawing.
Required materials and tools
When you need to make a chair using wood with your own hands, you need to use only hardwood. The main material is considered to be wood that is well dried and free of any knots. For the manufacture of furniture they usually choose:
- pine;
It is very difficult to process oak or beech, but furniture made from such wood with your own hands is durable and reliable. To do this, you need to have:
- two bars;
- thick upholstery fabric;
- foam rubber from which the seat is made;
- boards of different sizes;
- sandpaper;
- furniture glue;
- self-tapping screws
Bars can be purchased at construction market. Then they need to be processed so that they are completely smooth. To do this, they are ground until rough. First, the timber is sanded with fine sandpaper (no. 100 is suitable). Sandpaper No. 220 will give the timber the final shine.
Any work in order to make a chair from wood with your own hands requires the following tools:
- sandpaper;
- stapler;
- hacksaw;
- conductors,
- wooden mallet;
- chisel;
- plane.
Return to contents
Technology and features of work
How to make a chair? First you need to prepare two bars. The bars of the rear legs should have dimensions of 800x40x60. For the front legs, the size of the beams should be 440x40x40 mm.
Grooves are cut into the beams for the legs and base (both longitudinal and transverse). All grooves must be made at the same level. To achieve this, you need to lay them together, the ends of the legs must match. Then the place where the grooves will be made is marked. Their dimensions are 20x40x15 mm. Interior The groove must have an indentation from the inside of the leg. Usually 10 mm is taken.
To attach the bases, the legs must have grooves. There should be two of them in each leg. The grooves are made at the corresponding ends of the legs. After assembly is completed, the base will look like a rectangle. Each top will have a leg installed. A chisel is used to make grooves. Then the grooves are freed from chips that got into them during manufacturing.
The rear legs need to be adjusted slightly. For this purpose, an edge is planed along the entire length of the leg, starting from the groove made at the top and ending with the bottom groove. The result will be a smooth transition; the size should decrease and be equal to 40 mm.
After making the legs, two legs are made, and two longitudinal bases are prepared. For this purpose, four bars with dimensions of 350x40x40 mm are made. Each end should have a mark for the tenons. The tenons are made with a chisel from blanks cut with a hacksaw.
The dimensions of the tenons must be made in accordance with the dimensions of the grooves. They should fit tightly into the groove. The presence of backlash is prohibited.
Then two bars with dimensions 420x40x40 mm are prepared. They are needed to make the transverse base. For such bars, tenons are also cut.
The next operation will be making the backrest. It is better to make it from edged boards. Backrest dimensions – 420x80x100 mm. Grooves of the required width are hollowed out in the rear legs. The backrest is inserted into them.
The seat is fastened with self-tapping screws, and they must be screwed in from below. To make it more convenient to tighten the screws and give the chair additional rigidity, special braces are inserted between the bases.
To give a beautiful appearance The chair legs must be rounded and then carefully sanded. The same operation must be carried out with the base. Fully finished parts must be coated with furniture varnish and then polished.
One of last stages is manufacturing soft seat. A seat is cut out of a sheet of thick plywood, and foam rubber of the appropriate shape is made in the same way. When a chair cover is made, approximately 15 cm is removed from the edge. Then the plywood, together with foam rubber, is wrapped in furniture fabric.
The material is secured with a stapler on the back side of the base.
Experience shows that when making a wooden chair with your own hands, you must always remember the surroundings. The fact is that varnishing causes a very strong bad smell. The neighbors obviously won't be happy. Therefore, it is best to do all painting work outside the apartment. For example, in a garage or shed.
Recently, special varnishes have appeared, the basis of which is water. They have no smell.
The chair is assembled from the prepared varnished parts. The spikes are covered with glue and inserted into the grooves. All parts are knocked down with a wooden mallet.
If you use a metal hammer, then its striking part must be closed soft cloth. Otherwise it may be damaged varnish coating. The seat and backrest are secured with screws.


