In 1968 italian designers Francisco Teodoro, Cesare Paolini and Piero Gatti inhaled new life in a mattress - a bag filled with hay or leaves. Sacco (bag translated from Italian) was the same mattress stuffed with foam balls. Since then, frameless furniture has gained popularity in many countries.
A frameless bean bag chair is a fabric cover, 2/3 of the volume of which is filled with foam balls. When a person sits in it, grains under pressure flow into the free parts of the form. Thus, the frameless chair takes every time new uniform perfectly matching the curves of the body. Besides classic version- “pears” - there are many other models, each of which dictates certain poses.
The technology for making frameless furniture is quite simple and available at home. Before starting work, you should decide on the following points:
- How many covers will a frameless chair consist of? Ideally, the inner cover, which is a container for the filler, is duplicated by an external removable cover. It is sewn from beautiful decorative fabric, it can be removed and sent to the wash without adding filler.
- What fabric will the frameless chair be made from? The inner cover will take on most of the load. It is recommended to use dense natural blended fabric or Oxford 400 polyester material. It is durable (will not rip apart at the seams), lightweight (will not weigh down the chair) and is impregnated with water-repellent substances. Thick, non-stretchy fabrics are suitable for the outer cover. It should be remembered that lint materials will collect dust particles and pet hair and will have to be cleaned more often. It is better to give preference to special furniture fabrics that have dirt- and water-repellent impregnations. Such materials can be cleaned with a brush or machine washed.
- Children will be comfortable in a chair of any size. But if you make it small, then no one except the child will be able to use it. For a large man, on the contrary, it is necessary to increase the patterns.
In this article we will tell you how to make a bean bag chair with your own hands with a low seat and a back of medium height - up to the middle of the shoulder blades. It will consist of one cover made of dense Oxford fabric 600. It has a dense, durable weave that allows it to be used for sports equipment. The reverse side is rubberized, which will protect the filler from water penetration and allow you to clean the chair without resorting to washing.

Necessary materials
- Oxford fabric 600 - 2.5 m.p.
- Durable reinforced threads No. 70ll
- Tractor or spiral zipper No. 5, 30 cm long
- Sewing machine and needles for heavy fabrics No. 100
- Tailor's scissors
- Wax chalk
- Expanded polystyrene granules 3 kg (or 250 - 300 liters)
- Plastic bottle
- Scotch.
DIY bean bag chair. Stages of work
Cut the material according to the following pattern, adding 1.5 centimeters on each side to the indicated dimensions for seam allowances. It is better to cut out the side parts according to a pattern previously drawn on paper, then the parts will be symmetrical.

Pin the back and bottom part facing inward and stitch to the place where the zipper will be located, i.e. leave 30 cm of seam unstitched. Baste with a temporary hand stitch, straighten the seam allowances, baste and sew on the zipper. Open the temporary seams.


Pin facing inward and stitch the front piece and back piece. Pin and baste them with the bottom and back pieces.

All seams can be processed with an overlocker or a seam - an imitation of an overlocker, which is found on modern machines. Or, to reinforce the seams, you can fold the seam allowance in half and stitch over it.

Baste and stitch the front part. This seam should not be reinforced additionally. Turn the product inside out. Place a stitch along the perimeter of the front part, securing it with a fold 0.7 cm high. The resulting edging will strengthen the seam and give visual rigidity to the product.

Fill the case with foam balls. To do this you need to take plastic bottle 1.5 l, cut off the neck and bottom so that you get a pipe. If the bottle has a "waist" - even better. Open the bag with the filler, insert the bottle into it and secure the bag with tape. Make sure that the neck of the bag is completely secured with tape and the balls will only spill out through the bottle. Unzip the chair and put the cover on the bottle. Close the zipper, fixing it at the “waist” of the bottle. Hold this area with your hand and turn the bag of filler over. Fill the chair to about 2/3 of its volume. If there is too much filling, the chair will not “hugg” and will be uncomfortable. If it's too small, it will sit too low.

All materials for the chair can be purchased at regular sewing stores. The only difficulty may arise with the purchase of filler. It is sold by companies engaged in the production of frameless furniture or manufacturers thermal insulation materials. An important point is the quality of the filler. Ideally, polystyrene foam granules should be same size- 4 - 5 mm. If the balls are too small, the chair will be heavy. If they are too large or of different sizes, then the fluidity of the filler will be lost, and you will have to distribute it inside the chair with your hands. Also, sometimes the so-called “crushed material” is used to stuff frameless bean bags. This is recyclable material, made from defective foam boards. This kind of filler does not flow at all, but only squats under the weight of the person sitting and makes an unpleasant squeaking sound. If the filler has a strong chemical odor, it should be ventilated for several days. outdoors, for example, leave a bag of balls open on the balcony, or even pour them into a fabric bag.

- If you choose a chair with a double cover, then the zipper on the outer one should be long enough so that you can get through it the inner cover with filling.
- It is better to buy filler with a small reserve, because during active use it will shrink up to 25%.
- The finished chair should not be placed near heat sources or bathed in a pool.
- If you have children, then it is better to sew an additional flap in the place where the closed zipper will be located.
- Several small grommets can be installed on the outer faux leather cover to allow air to escape between the outer and inner cover.
- So that the chair is lush and does not lose its appearance even when no one is sitting on it, the outer cover can be duplicated with a layer of padding polyester.
Frameless chairs are used to save space, so the question of how to sew a bag chair with your own hands often arises among residents modern apartments, because ready-made copies are not cheap. Such interior items are bright, soft and can be a bean bag or ottoman, a giant pear or ball. Sewing a bag chair with your own hands is not too difficult; there are several ways to do this. If you have at least some sewing skills, things usually go faster, but even a beginner, with some effort, can cope with this task, perhaps spending a little more time. Even if the work does not look perfect, this fact can be disguised as the author’s idea and you will get a unique bean bag chair made by yourself.
The bean bag chair is popular because it takes the shape of the body of everyone who sits on it.
DIY bag chair: choice of material
Frameless furniture is subject to the same loads during operation as standard furniture, and perhaps to a greater extent. Therefore, before sewing a chair bag, you need to choose the right fabric for it. The material should be durable and pleasant to the touch, and everyone can choose a color from those available to suit their taste. In order to sew a chair bag yourself, silk, satin, calico or satin are definitely not suitable, since they are too thin and fragile and are not intended for this kind of use.
You can use velor for the outer cover, this fabric resembles artificial fur, it is soft and fleecy to the touch, velvety and quite durable. Flock is similar to it in its properties, which also has water-repellent properties. This fabric is recommended for use by small children, as it is very easy to wash or clean and for a long time does not fade in the sun.

To sew a bean bag chair, you can use chenille fabric.
If, in order to sew a chair bag, you can use fabrics of non-natural origin, then good option is chenille. This fabric has synthetic fibers in its composition, due to this the surface does not form pills, is easy to care for and, like any furniture fabric, is quite durable. Jacquard is very similar to chenille, which also has a small percentage of synthetic fibers. Despite the presence of loop pile on the front surface, this coating does not unravel if one thread is accidentally caught and broken. It is recommended to sew a chair from such fabric, as it is durable and all dirt can be easily washed off its surface.
You can sew a bag with your own hands using artificial suede or leather. These materials are not budget ones, but a bag chair made from them will last a long time. Faux suede has a pile and is very wear-resistant; leather can be embossed and is also very durable. Without any restrictions on funds, you can also use tapestry; it is a very durable and dense fabric of natural composition, on which a variety of patterns are woven. This type of material has antistatic properties, so it is especially good for sewing a chair filled with polystyrene foam balls.

You can fill the chair bag with foam balls.
The fabric that will be used to sew the inner bag can be any. Mandatory characteristics are breathable properties, since air must pass freely through the structure without preventing it from taking the desired shape. You should not use slippery or too loose fabrics for the inner bag; lining materials used in sewing clothes will not be suitable. You can take satin, calico or flannel, chintz and cotton are used in 2 folds.
Most often, fabric sold in rolls has a factory width of 140-150 cm, this is enough to sew a frameless chair without unnecessary seams. Material of a smaller width is not suitable for every model, and choosing a larger width is impractical, since the remains are unsuitable for further use and go to waste.
How to sew a pear chair with applique
To work you will need:
- calico, satin;
- fabric for outer cover;
- 2 zippers;
- fabric for applique;
- filler;
- threads in color;
- scissors;
- tape measure;
- pencil;
- pins.

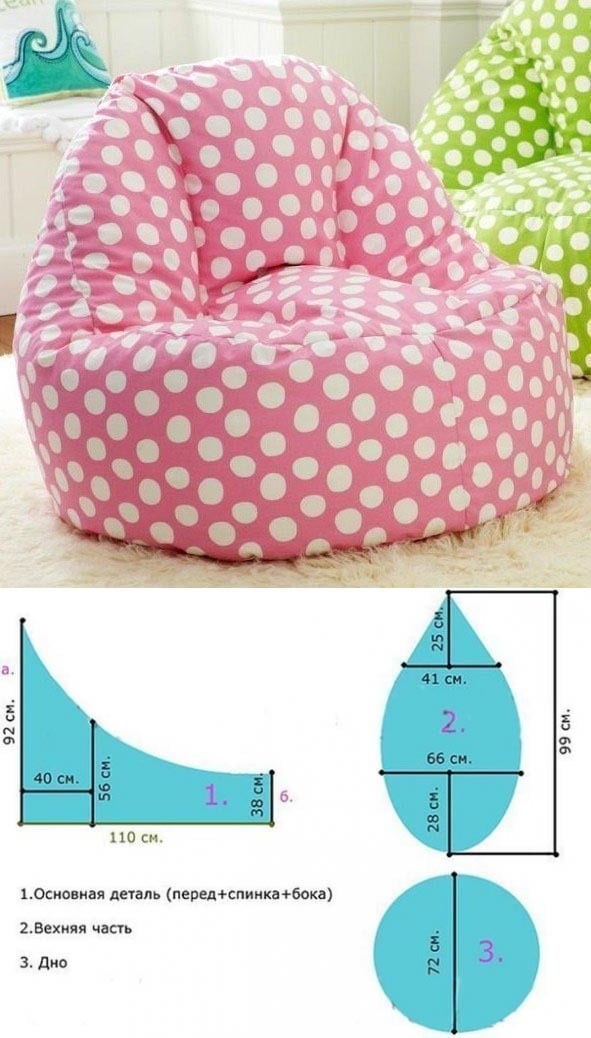
Bean bag chair pattern.
The pattern needs to be transferred to the fabric, enlarged to the right size. Most often, the pattern consists of a small lower part, which will serve as the bottom, and 6 wedges for the chair itself. The parts are cut out, leaving the necessary seam allowances. Before or after stitching, be sure to process the inner edges of the seams. If the fabric is dense and voluminous, it is more convenient to process it in one layer before the cover is sewn. Faux leather, suede and flock do not need this operation, since their edges do not fray.
In order to sew frameless bag with your own hands, you first need to fold and sew all the wedges one by one, leaving a small area unsewn and inserting a zipper into it. Two wedges for stitching are folded with the right sides of the fabric inward and pinned together so that the fabric does not move and the seams are even. All 6 wedges are sewn together in this way, not forgetting the zipper. For a beginner in sewing, we can advise you to start with the inner cover, on which errors are not so critical and practically invisible, and then take on the outer cover, which must be sewn flawlessly.

Dimensions for patterns of adult and child chairs.
Lastly, the bottom is sewn on. The lower, inner cover that any chair bag has is sewn in the same way, but working with it is usually easier, since its fabric is thin and easier to process. To put filling into the inner case and remove the outer case for washing or cleaning, a zipper is sewn into one of the wedges.
The zipper in both cases must be sewn with special care, making sure that the slider is firmly fixed. An unfastened zipper will create many difficulties with collecting the filler and placing it back into the case. A zipper on the inner cover is necessary, since the filler cakes after a while, it is necessary to add it so that the chair does not lose its shape. The inner cover is filled 2/3 of the volume with a special filler, then the zipper is fastened and the outer cover is put on it.
How to sew a rectangular frameless bag with your own hands
To make such an interior item, you will need the following materials:
- fabric for the inner cover;
- fabric for outer cover;
- matching threads;
- 2 zippers;
- filler;
- needles;
- tailor's pins;
- scissors;
- pencil;
- tape measure;
- square
Patterns can be drawn on paper and then transferred to fabric or drawn directly onto fabric. They are cut out, leaving the required seam allowances.
First of all, in order to sew a chair, you need to connect the bottom and back, not forgetting to insert a zipper into the seam. After this, the sides and back are sewn together. The front side is sewn to the sides last, the seams are processed using an overlocker or a zigzag seam on a machine. After this, the bag chair is turned inside out.
To sew a chair rectangular shape and ensure that this shape is maintained during operation, you need to trim the seams with piping or make an additional stitch along their contour, attaching the seams to inner contour at a distance of 0.7 cm. Then fill the inner case with filler, fasten the zipper and put on the outer case.
How to sew a beanbag chair in the shape of a ball
To work you will need:
- fabric for the inner cover;
- fabric for the outer cover of 2 types;
- pencil;
- square;
- tape measure;
- scissors;
- threads to match the fabric;
- pins for pinning;
- filler;
- 2 zippers.

A beanbag chair can become the highlight of any interior.
Before sewing a chair of such an unusual shape, you need to correctly draw up a pattern that will consist of several regular polygons. Classic shape The ball is made up of several pentagons and hexagons, of which 12 and 20 parts are needed, respectively, to sew a chair. The assembly process will be the same as in the previous versions, but before sewing the chair, a lot of patience and perseverance will be required, since all the shapes must be accurate.
All shapes are transferred to the fabric in the required quantity and cut out, leaving appropriate seam allowances. Since these parts are relatively small and have sharp corners, it is recommended that the seams be treated to prevent fraying before the parts are assembled. This does not apply to non-shedding materials, and the rest are processed using an overlock or zigzag stitch. Even better—but also time-consuming—is to trim the edges with piping before sewing the chair together.
First, the parts are pinned together and only after that they begin to stitch, so that no displacement occurs during the process and the whole work does not have to be redone. Sewing a chair in the shape of a ball is also more difficult because of the zipper, since it usually does not fit into only one side, you have to place it along a curve.
The inner cover should follow the shape of the outer one, but it can be sewn from fabric of the same color. Filling is poured into it, the zipper is fastened, then the outer cover is pulled on top. The question of how to sew a ball-shaped bag chair can be considered resolved.
How to add filler correctly
The filler of frameless furniture is its most important attribute, since the product will only hold its shape when placed inside polystyrene foam balls.
Putting such small balls inside the case is not an easy task, especially when there are so many of them. To complete this work you need to prepare:
- filler;
- paper;
- vacuum cleaner.
This may take quite a long time. Make a funnel out of paper by rolling it up like a bag. The narrow end must be placed in the open hole in the inner bag. Required amount The filler is poured inside; it is most convenient to do this with an assistant, when one person holds the cover and funnel, and the second one pours in the polystyrene foam balls.
When required quantity The filler is placed inside the case, the funnel is removed and the zipper is fastened. More or less of the granules will end up on the floor and must be removed with a vacuum cleaner. Particular care must be taken if there are pets or children in the room, as swallowed pellets can cause many problems. It is better to take children out of the room while filling, as small balls can easily end up in the ears or nose.
You can sew a frameless chair bag filled with polystyrene foam balls with your own hands. Fortunately, patterns of different shapes for these chairs are a dime a dozen on the Internet. I decided to sew it for my daughter’s nursery.
DIY bag chair: materials used
- Fabric for the inner cover (I used a regular duvet cover from the linen set, which I don’t like at all), it is important that the fabric is breathable and smooth. The inner cover is needed so that the outer one can be easily removed and washed.
- Fabric for the outer cover, I used furniture fabric, thermal jacquard (1.5 m*3.5 m), if anyone is interested in where it was purchased in Chelyabinsk, this is the store Bel-Tex on the street. Kosareva. It cost me about 1000 rubles and kopecks. But it’s high-quality, dense and funny colors. Just right for a bean bag chair in a child's room!
- 2 zippers: preferably 100 cm for the outer cover and 30-50 cm for the inner one.
- Threads, scissors.
- A sewing machine and paper for a pattern, but you can immediately create a pattern on the fabric (as I did).
- Pear chair filler (foam balls). I am sharing information where they can be purchased in Chelyabinsk, near the Shershni dam, in the ring area there is a miracle company, Thermoplastic, there you can buy these granules, 0.1 cubic meters in a bag.
Now, from my own “bitter” 🙂 experience, I’ll tell you how many of these bags you need. Initially, this chair was intended to be a child-sized pear, so I decided that two 0.1 cubic meter bags would be enough, I sewed the inner cover according to the pattern given below and... OH MY GOD!! it turned out to be simply huge, I could curl up in this chair, naturally, these two bags were not enough for me and I went for two additional ones.
As a result, 4 bags of balls were purchased, 200 rubles per bag.
By the way, 4 bags of these balls can easily fit into a car, into an ordinary sedan, 2 go into the trunk with a whistle.
Pattern details and placement on fabric
So, here is a pattern for a pear chair with the dimensions of the parts.

Also, like a decent lady, I made allowances for the seams, and it turned out very large. Here is a photo with the inner case and filled with 4 (!) bags of balls. Of course, the photo against the background of the wall (with my daughter’s art 🙂) does not convey all the scale, but still! Until I sewed the outer cover, my daughter came up with the following idea: she moved it to the sofa and with a battle cry jumped from it into this chair :) When I sat in it, it gently enveloped me from all sides :)

Here is an example of the arrangement of pattern details on the fabric:

While cutting out the parts, I ran into a problem. How to draw regular hexagon. I'll make your task easier. To draw a regular rectangle with a predetermined side, for example, for us it is 10 cm (the side of the top of the chair). You just need to draw a circle with the same radius (10 cm).

Then make notches along the entire length of the circle - these will be the vertices of our hexagon. Then we connect adjacent vertices and get the desired hexagon.

The sequence of sewing a pear chair with your own hands

- We cut out the parts for the inner and outer cover from the fabric; I repeat once again, if you use this pattern with these dimensions, it is better not to allow seam allowances.
- Details for outer case:
- - 6 side wedges;
- - 1 hexagon with a side of 40 cm for the base of the chair (depending on the location of the parts on the fabric, it will be solid or consist of 2 parts);
- - 1 hexagon with a side of 10 cm for the top;
- - 1 handle for carrying the chair - a regular rectangle with dimensions 5*12 cm;
- - for the inner cover all the same pattern details are used, with the exception of the handle for carrying the chair.
- If the fabric is loose, then it is better to process the sections of the parts using an overlocker (if available) or with a regular zigzag on a sewing machine.
- We take two side wedges, fold them face to face and grind 15 cm from the top and 15 cm from the bottom along the long side of the parts.

- At the end and beginning of the seams we make bartacks. We form a cavity for sewing in a zipper.
Attention: The length of these seams depends on the length of your zipper and the length of the side of the piece.
- Next we sew in the zipper.


- Take the next wedge and sew down the side seams. All side seams are ironed and pressed to one side. On the front side we make a delay along each seam, capturing the ironed allowances.


This is how it should turn out neatly.
- Now let's sew a handle for our bean bag chair. To do this, take the part, fold it in half along the long side, and sew the seam on a machine.

- Turn it inside out and iron it so that the machine seam is in the middle of the part. We stitch along it.
- We sew on the top part of the bag, not forgetting to put a handle between the parts for carrying the chair, smooth out the allowances, and do some stitching.

- Now let's start sewing the base of the chair. For convenience, let's open the zipper.
We sew the inner cover in the same way. Now the final part of our master class. And the most entertaining part of it: filling the inner case with foam balls.
Filling a frameless chair with polystyrene foam balls
It is important that the bag is filled to 2/3 of its volume.
Why entertaining?
Yes, because without skill you can’t just put these balls into the case, they tend to scatter around the room and stick to your fingers. In general, they behave disgracefully! To avoid having to run around the apartment with a vacuum cleaner, I recommend taking a regular plastic bottle, for example, 1.5 liters. Cut off the bottom and top from it, so that you get a pipe. Open the zipper of the case so that you can insert a bottle through the hole and tape it to the case with tape! We tape the other end of the pipe to a bag of polystyrene foam balls, in which you previously made a small hole, for example, in one of the corners. Make sure that there are no cracks where these sticky balls could penetrate :) Now we begin to pour them into the bag into the case! The first bag, the second, the third... We monitor the filling of the cover so that it is not too full and does not press too much. After manipulating the foam granules, all that remains is to tightly zip the inner cover, put on a beautiful outer cover and relax in a beanbag chair sewn with your own hands. Let your household also love spending time in it.

P.S.: I deliberately made my outer thermo-Jacquard cover smaller in size so that it would fit more for a child than an adult, so I had to pour the granules back into the bags. My husband, who did not see my machinations with the bottle, tape and balloons, took it upon himself to do this. Therefore, to my daughter’s delight, the balls rolled all over the apartment! 🙂 There were some adventures! Although the pear chair turned out to be smaller in size than the previously sewn inner cover, I still feel comfortable sitting and relaxing in it.
I hope my MK will be useful to you. I would be glad to hear your feedback in the comments below!
What could be more pleasant in the evening than to fall into soft bean bag chair and watch your favorite series? Children love them no less than adults: the kids seem to play on the floor, but they also seem to play on the chair! It’s good that sewing such a practical piece of furniture is not at all difficult, especially if you have a sewing machine.
To create a bean bag chair with your own hands you will need:
- graph paper;
- two types of fabric - thick and beautiful (for the outer cover), another one (any) - for interior decoration, 3 m each;
- two zippers;
- strong thread;
- filler (sintepon, stuffing from old pillows, toys, polystyrene granules, foam balls, etc.).

Let's start sewing a bean bag chair with our own hands step by step instructions and the diagram:
1. Using graph paper, transfer the design from the pattern onto the fabric.


2. Cut out the parts for the exterior and interior decoration of the bean bag chair.
3. Sew the wedges together, sew a zipper on the side to one.
4. Sew the bottom, top and the first and last wedges for the outer and inner fabric.0
5. Fill the bean bag chair with filling and fasten the zipper. In the future, it will be very convenient to wash the outer cover.
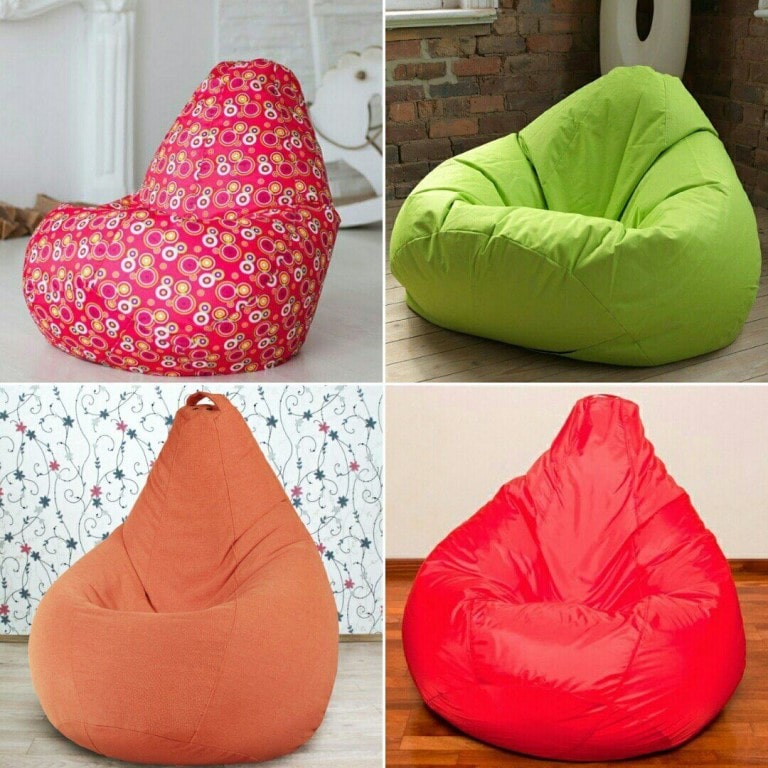
And here is another option for a bean bag chair:
You can easily sew these bean bag chairs with your own hands:


The multifunctional bag is at the peak of its popularity. It has many advantages over other models.
The absence of a frame allows the product to completely follow the curves of the body.
In addition, the chair is characterized by mobility, light weight and ease of use.
 A design feature is the absence of a rigid frame. The bean bag chair is made in two sizes – 50 and 100 cm in diameter. This depends on the height and weight of the users, as well as the purpose of the room.
This frameless furniture consists of two covers: internal and external. The removable cover is made from different materials (cotton, linen, velvet, fur, leatherette).
And the main requirement for the inner case is strength and high density fabrics. The main thing is that the selected materials are practical, wear-resistant, pleasant to the touch and fit harmoniously into the environment.
Attention: After some time of use, the chair may shrink. The situation is corrected by adding filler to the inner case.
The peculiarity of a frameless chair is that under the weight of a person it completely takes on the shape of a vacationer. On such products, people can completely relax and unwind with a book or laptop in their hands.
The advantages of frameless furniture include:

Shapes: pear, ball and drop
A bean bag can have different shapes. But the most popular and in demand are:

Materials
For sewing the outer cover they are used different materials. The main thing is that they have:
- abrasion resistance and high strength;
- ease of care;
- attractiveness.
What is the cover made of?
As a removable cover, different materials are used to make a bean bag chair:

Advice: the inner cover is sewn from denser fabrics. Good choice will be spunbond with perforation for ventilation. This fabric is sold in rolls and is characterized by its low cost and high technical qualities.
Filler
As for fillers, you can use:

Pattern with detailed dimensions for children and adults
To make a pear chair you will need to make a pattern. You can draw it yourself or find it ready-made option in the Internet.
The pattern is drawn on graph paper. And then it is transferred to the fabric. The parts are cut along the contour.

Attention: When transferring the pattern onto the fabric, do not forget to leave an allowance of a few centimeters on each side.
The pattern of a chair for an adult will consist of the following parts:
- 6 pieces of wedge-shaped parts, 15 cm wide and 40 at the ends, with a diameter of 50 cm and a length of 130 cm;
- diamond-shaped top 15 cm on each side;
- The bottom is diamond-shaped, 40 cm on each side.
The pattern of a chair for a child will consist of the following 6 wedge-shaped parts:
- height – 90 cm;
- diameter – 45 cm;
- width – 40-22 cm.
The bean bag chair consists of:
- Internal zippered cover filled with polystyrene foam. Here you should choose thick cotton or raincoat fabric.
- Outer cover. Suitable for manufacturing: corduroy, leather, velor. You will need to sew a 1 meter long zipper onto the removable cover.
Master class on how to sew it yourself at home step by step
After making a pattern on the material, it’s time to sew a bean bag chair with your own hands:

Now all that remains is to fill the chair with polystyrene foam and you can install the piece of furniture in the interior.
Attention: Expanded polystyrene clings to all surfaces. If you scatter it around the room, the cleaning process will take a long time.
Step-by-step operating instructions
To ensure that a piece of furniture serves its owners for as long as possible, it is recommended:

As can be seen from all of the above, no bean bag required special labor . And when correct operation, it will serve its owners for many years.
Photo
Your efforts will be rewarded - you will receive a stylish and comfortable furniture, which will decorate any interior:


Useful video
A detailed description of the manufacturing process with a description of little tricks can be seen in the following video:
Conclusion
In conclusion, it is worth noting that a bean bag chair has many advantages. It will give its owners maximum comfort during vacation, and the original design solutions, will allow you to harmoniously fit it into any environment.
In contact with