You can very easily make a New Year's snow globe with your own hands from scrap materials. This is one of the most popular Christmas souvenirs all over the world. To decorate a souvenir, you can make some kind of figurine, for example, like here, a snowman. You can sculpt from any modeling mass, except salted dough, which dissolves in water

For work we will need:
glass jar with a tight-fitting lid, boiled or distilled water, glycerin solution; waterproof glue (two-component transparent waterproof epoxy glue, florist clay, aquarium sealant, glue gun in the form of silicone sticks), snow substitute (artificial snow, body glitter, crushed foam, broken eggshell, coconut shavings, white beads); various figurines made from chocolate eggs, homemade toys from polymer clay, various little things - you can use anything to decorate a souvenir, except salt dough, which dissolves in water.

The inner surface of the jar must be washed and dried. On inner part We glue the prepared figures onto the lids. If we need to use some metal parts, then they must first be coated with colorless nail polish - otherwise they risk corroding and ruining the craft.
Now we pour boiled water mixed with glycerin in a 1:1 ratio into the jar, but you can add more antifreeze - then the snow inside the dome will be very slow and “lazy”. Pour “snowflakes” from the selected material into this liquid, and if they fall too quickly, add more glycerin. After testing the snow is completed, we are left with the last step: screw the lid tightly and treat the joint with glue. When the craft is dry, you can turn it upside down and admire the result!


A wonderful New Year's ball with a snowman!
Required materials and tools:
Glass jar (spices/mustard/baby food…)
Boiled water (cooled)
Sequins (glitters)
Polymer clay
Glue gun
Nail pusher
Waterproof glue
Baking paper
Glycerol
Brush
Wire cutters
Pin
Spoon
Vodka
Process description:
You don’t have to make a snowman yourself, but take a ready-made holiday figurine.
Let's get started! First, let's take white polymer clay and divide it into three parts (here I had plastic, which was already packaged in the form of balls). Let's make two balls for a snowman - one twice the size of the other.


During the sculpting process, do not forget to check the size of the figure - whether the snowman fits into our jar.


We connect the two resulting balls using a pin. Remove the pin head using wire cutters.


Using the tip of the brush (not shaggy) we outline the future eyes. Making eyes - coals from small balls dark color(plastic). Some materials, such as a brush, can be replaced in this MK (for example, with a toothpick).


Now you need to make a smile. I did this using a nail pusher. You can also use a special tool for polymer clay. The mouth is done carefully, in small steps. Do not hurry.


What's a snowman without a carrot nose? Let's take 2 plastic balls - yellow and red (or you don't have to bother and just one orange). Press the balls together until you get almost the same color, with small streaks.


Let's make a carrot. We mark the place for the nose and stick our vegetable there.


We will make “legs” from two balls of white clay (you can skip this moment and leave the snowman as is). Flatten the balls a little.


Now - “hands”. We roll the sausage, make one end sharp - it turns out to be shaped like a droplet. We bend the resulting stumps slightly and attach them to the sides.


Let's give our friend a festive caramel. To do this, take two colored balls of the same size. Roll out two sausages.


We trim the ends of our new sausage and form a hook. We insert the resulting candy between the hand and the snowman’s belly (he is holding it).


Now we “knit” the scarf. Forming two sausages different colors. Roll them out quite thin.


Roll two sausages together right hand let's spin it FROM OURSELVES. We roll out two more thin ones, which we twist towards ourselves (in the other direction).


We connect our bagels so that we get “loops”. We cut off the ends. We put the resulting scarf on the snowman.


We attach tiny sausages to the scarf - this is fringe.


Let's create another scarf. Starting from the back, we wrap the snowman's head in a spiral, forming a hat.


At this stage, my snowman was tired and began to fall back. He had to prop his butt up with a jar lid.


Our hat is missing a pompom. We do something similar using small sausages.


It turned out to be a fun winter hat.


The final touch is to make buttons (two indentations). The snowman is ready! We bake it in the oven and glue it to the lid of the jar. The next part of the master class is devoted to making a snow globe.


Apply glue to the lid around the snowman. Sprinkle glitter on top of the glue.


When the glitter has stuck, pour out the rest.


Now we make snow from different types glitters (can be from one). If you take sparkles that are too small, they will float up instead of sinking down.


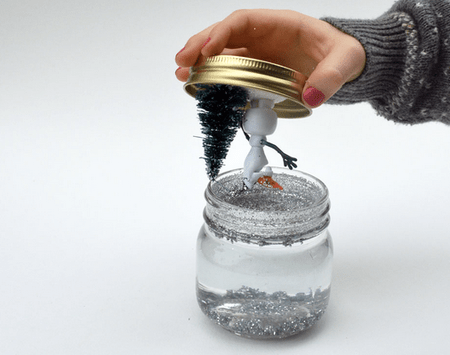
It's time to fill our snow globe with a special liquid.


My (secret recipe). A tablespoon of glycerin (sold at the pharmacy) per tablespoon of vodka.


Plus - cooled boiled water(possibly distilled). We pour so much water that together with the snowman we get a full jar (don’t forget about Archimedes’ law).


By using glue gun fix the cover. This is very important point. It is necessary that water cannot seep through. After you have glued it and twisted it, check it (shake it in all directions).


The hardened glue can be decorated with glitter on top. The result will be a kind of snowdrift.


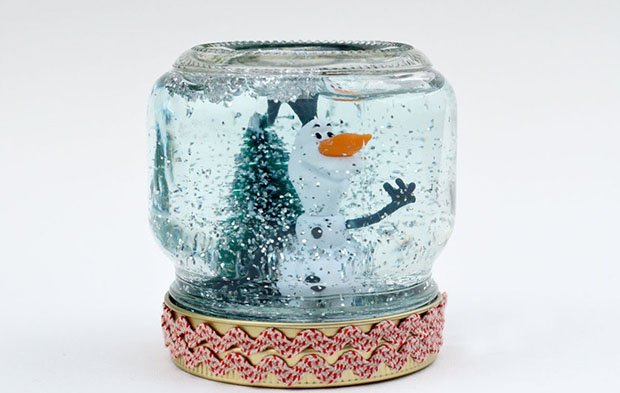
So our magical snow globe is ready. Happy holidays everyone!


What should dads and children do while moms carefully cut salads into pieces? New Year? Have fun making a magical glass ball with them! After all, Santa Claus is already on his way with gifts, and you still have time to prepare a wonderful surprise for him. Moreover, making a snow globe at home is not at all difficult.
To create a snow ball you will need:
The basis - it may be small glass jar with a tight-fitting lid;
A small piece of foam;
Decorations, figurines, figurines of a New Year theme or a symbol of the coming year ( Yellow Dog). It is advisable to treat metal jewelry with a corrosion protection agent, and if you want to place a photograph inside, it must first be laminated;
Glycerin solution;
Distilled water;
Artificial snow, sparkles, stars. You can make “snow” with your own hands. To do this, you need to peel the eggshell from the film and grind it. You can also use finely chopped rain;
White enamel oil paint (optional);
Epoxy glue (waterproof, transparent), silicone sealant.
When you find all the necessary components, you can start creating a glass ball with snow inside.
Snow globe making process:
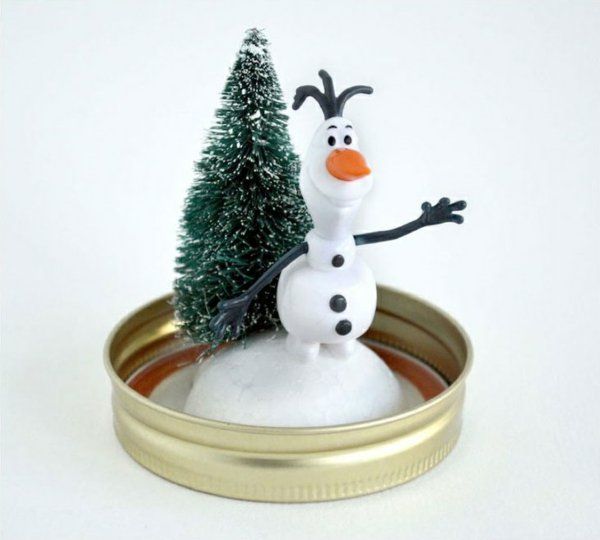
1. We make a platform for the figure from polystyrene foam and glue it to the lid. We paint in White color. Leave until completely dry.
2. Lubricate the platform thin layer glue and generously sprinkle with glitter. Carefully shake off those that do not stick.
3. We make a composition of figures so that it fits on the platform. Then glue them and let them dry.
4. After the epoxy glue has completely dried, pour distilled water and glycerin into the jar (glycerin should be slightly less than half of the total liquid in the jar). If you add a little more glycerin, the snowflakes will fall more slowly.
5. Add sparkles, stars and artificial snow.
6. Coat the threads of the lid with glue and close the jar tightly. Let the glue dry.
7. Apply sealant to the joint area to prevent water from leaking out.
Your snow globe is ready, shake it and enjoy the magical spectacle.
Such a toy can become a decoration for your interior or an unusual gift for guests and loved ones.


To complete the composition, decorate the resulting snow globe along the edge of the lid with decorative braid or ribbon. A little New Year's souvenir is ready!
Based on Internet materials.


 DIY New Year's snow globe from a jar
You can very easily make a New Year's snow globe with your own hands from scrap materials. This is one of the most popular Christmas souvenirs all over the world. To decorate a souvenir, you can make some kind of figurine, for example, like here, a snowman. You can sculpt from any modeling mass, except salted dough, which dissolves in water
For work we will need:
glass jar with a tight-fitting lid,
boiled or distilled water,
glycerin solution;
waterproof glue (two-component transparent waterproof epoxy glue, florist clay, aquarium sealant, glue gun in the form of silicone sticks)
snow substitute (artificial snow, body glitter, crushed foam, broken eggshells, coconut shavings, white beads);
various chocolate egg figurines
polymer clay toys,
various little things - to decorate a souvenir you can use anything except salt dough, which dissolves in water.
The inner surface of the jar must be washed and dried. Glue the prepared figures onto the inside of the lid.
If we need to use any metal parts, we must first coat them with colorless nail polish - otherwise they risk corroding and ruining the craft.
Now we pour boiled water mixed with glycerin in a 1:1 ratio into the jar, but you can add more antifreeze - then the snow inside the dome will be very slow and “lazy”.
Pour “snowflakes” from the selected material into this liquid, and if they fall too quickly, add more glycerin.
After testing the snow is completed, we are left with the last step: screw the lid tightly and treat the joint with glue. When the craft is dry, you can turn it upside down and admire the result!
With a figurine and falling snow inside - a Christmas souvenir known all over the world. It is believed that the French were the first to make such crafts back in the 19th century. Today on the eve New Year's holidays You can buy a similar product in any store, but it is much more interesting to make a snow globe with your own hands.
Preparing the necessary materials
To make this Christmas craft, you will need: a jar with a lid, any waterproof glue, decorative figures, glitter or foam, glycerin, water. You can make a snow globe with your own hands from almost any container. Jars from baby food and other food products. Remember, the more interesting the shape of the container, the more original the finished craft will look. You can put any figures inside the jar: factory-made souvenirs, small children's toys, you can make the decor yourself from polymer clay. Before starting to make the craft, rinse and dry the container thoroughly.
Making interior decor
New Year's snow globe home production can stand on the lid or bottom of the jar. Decide in advance what you like best and start decorating the part that will become the bottom.

Option one: glue the selected figures directly onto the lid or bottom. Fill the remaining space around with glue and sprinkle with foam shavings or glitter. Leave the decor to dry for a while. It is believed that a snow globe made by yourself will look most impressive if you install the interior decor on a slight elevation. The easiest way to achieve this effect is to use a piece of plasticine. Make a cake of suitable shape and size and glue it to the lid or bottom with glue. Next, install the decorative figures by drowning their bases in plasticine, and then mask the base with foam or glitter.
The magic begins
As soon as the blank with the interior decor is dry, you can begin filling our container and assembling it. at home? To fill the container you will need glycerin - you can buy it at the pharmacy. Pour distilled water into the jar - 2/3 full. Fill the remaining space with glycerin. Don't forget to add sparkles, sequins, beads or other small elements that imitate falling snow. If you don’t have anything suitable at hand, you can make “snowflakes” from finely chopped rain, foil or waterproof confetti.
Sealing and finishing touches
Even if the lid of your jar closes tightly, it is a good idea to coat it with glue before screwing it on. Handle the finished souvenir very carefully. Remember, if the glass snow globe leaks or breaks, you will ruin the textiles or very dirty the furniture.

Your magical New Year's craft is ready, but if you wish, you can add a few finishing touches. Decorate the outside of the lid using foil, wrapping paper, or pretty fabric. If the top of the souvenir is flat, you can glue a small decorative figurine onto it.
Is it possible to make a ball with falling snow without glycerin?
A popular question among those who decided to make a snow globe with their own hands for the first time is whether it is possible to use ordinary water without additives to make this craft? Actually it's not best idea, since glycerin slows down settling to the bottom and extends the “shelf life” of the souvenir. Ordinary water will deteriorate faster, the interior decor may become covered with an unpleasant coating, or the liquid itself may become cloudy.

If you don’t have glycerin on hand, but you want to start the creative process right now, you can replace it with refined vegetable oil or very sweet clear syrup. But remember, no matter what product you choose, in any case it will go bad in a few months. This also applies to glycerin.
It is believed that the smaller the snow globe and the more interesting its shape, the prettier it looks. Whether to follow this rule or not is your personal choice, but do not use jars larger than 1 liter for this craft.
A souvenir with falling snow can also be made from plastic container. The main condition is a tightly closing lid, transparency of the vessel and the absence of unnecessary edges and unsightly seams on its surface. A glass jar is selected using a similar principle. A container with smooth walls or a small amount faces. But a complex cut will interfere with viewing the fascinating inner world of the composition.

Now you know how to make a snow globe, but still wondering what to put inside? Small houses, Christmas trees, snowmen, Santa Claus, animal figures or fairy tale characters- if you create together with your child.
A craft with “falling” snow can be not only for New Year’s. Try making such a souvenir for March 8 or Valentine's Day. Accordingly, the interior decor should support the theme of the holiday, and only sparkles, multi-colored beads and confetti can fall in such a ball, foam chips need not.
Another one interesting idea- make a ball with a postcard or photo inside. You will need paper photo or Nice picture suitable size. Cover the workpiece with transparent tape so that it does not get wet. Next, as always, place the decor inside and mask its base, add glitter and finish the craft by pouring the solution and sealing the lid tightly.


