Any repair work is not a simple matter, which requires serious financial investments, as well as time. While you can still find time in your busy schedule, money is not so easy for everyone. And the prices for such work are steep.
That is why, in order to save money, you can put some work on your shoulders, especially such as puttingtying window slopes with your own hands. Today, many people are interested in the question of how to properly putty the slopes on the windows so that they come out smooth and beautiful? But, it’s not so important how you putty them, but how the old window block was dismantled.
That is, a positive result largely depends on the condition of the opening. Of course, the whole problem here is who will dismantle the windows. But, as a rule, dismantling is carried out immediately before installation by the same craftsmen, so they must approach the issue with full responsibility. Next, we will talk about the most common problems and also tell you how to get rid of them.
Preparation of materials and tools
To understand how to putty the slopes on windows with your own hands correctly, you must first fulfill some conditions:
- Do right choice putties.
- Prepare the surface.
- Equip workplace everything you need.
Putty tool window slopes
So what kind of putty should I use to putty the slopes on the windows?
- Putty for external window slopes should be selected according to the application and scope of work.
- putty external slope You only need frost- and water-resistant compounds. Any façade putty is perfect for outdoor work.
- To seal the slopes on the inside of the house, you need to take into account the microclimate of the room. If indoors all the time high level humidity, then puttying is best done with a polymer or cement composition. If the finishing will be done in an ordinary living room with normal conditions, it is permissible to use putties on a lime-gypsum basis.
- If the slopes are not level enough, they will need to be leveled first. To do this, it is better to choose a finishing and starting putty, or purchase a universal composition.
Please note that if the installation of slopes is carried out in a new building, they are given shape by plaster, after which puttying helps to even out the errors. In addition to the fact that the surface will have to be puttied, a primer is also necessary deep penetration to increase the adhesion of the mixture for leveling with the base. To do this, it is better to choose a solution with an antifungal effect to avoid the appearance of fungus and mold in the future. Also get silicone-based sealant and perforated corners.
The following tools will help you do the job yourself:
- Spatula with narrow and wide working blade.
- Building level.
- Stationery knife.
- Brushes and rollers for priming and painting.
Puttying slopes for painting (video)
How to prepare the surface before work?
Before plastering and puttingtying the slopes, you need to prepare the surface and the necessary materials. Better not buy ready-made mixtures! Each master is accustomed to working with his own solution consistency, so a purchased product may turn out to be too liquid or vice versa, which will negatively affect the result of the work performed.
Both external and internal slope requires preparation. To do this you need to delete old Decoration Materials, as well as surface fragments that do not adhere well. Only after this can the walls be primed. Both plastic and wooden window blocks require such preparation. Then it won't hurt to use tape and protective film cover the glass and window frame to avoid contamination.
Slope leveling
 Surface preparation before puttying
Now the time has come to tell you how to putty the upper slope of a window, as well as the opening at the door or window block. The most popular material for leveling slopes is plasterboard. To level the slope, it is enough to screw an L-shaped profile onto the window frame and adjust the inner side, which can be hidden under the finishing putty.
The outer part of the drywall sheet is set vertically using a level. But, it’s even easier to glue a perforated corner in advance and use it as a guide along which to adjust the gypsum board. Between the window and the drywall you need to lay mineral wool, which will act as insulation, and outside you can use Knauf Perlfix drywall.
Starting putty
 Applying the mixture to the slope
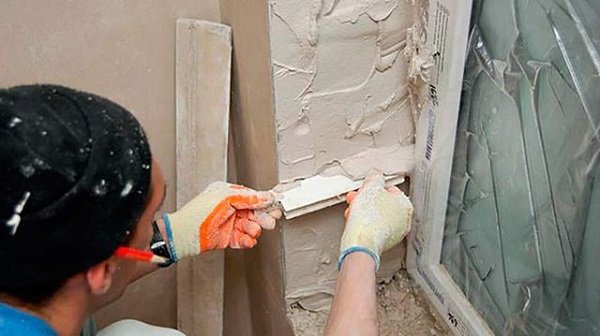
And so, it came directly to the puttying process. To do this, you need to take a tool of a suitable size and apply the solution to the surface. If it was not possible to plaster the surface efficiently, you will have to putty the slopes in 2 approaches: the first layer is the starting mixture, the top layer is the finishing one. As a rule, slopes need to be sealed with putty to a depth of 5-7mm so that all defects are hidden. It is best to work with a spatula with a wide working blade.
After the mixture is applied, the spatula is pressed tightly to the surface and moved in the direction “you”. If the wall is severely damaged and needs to be leveled with a large amount of mortar, reinforcement will be required to better fix the building mixture.
To work in slope corners, you can choose a special corner spatula, which will simplify the work and improve the final result. If you need to re-treat the slope with starting putty, this can be done no earlier than 24 hours after the first layer has completely dried.
Features of finishing
 Puttying slopes for painting
If home owners plan to cover the slopes with ceramics or hide them under wallpaper, finishing not required. But, if in the future you decide to paint the walls, you will have to carefully plaster and putty them. We talked about how to putty a brick or block slope with starting putty, now we’ll tell you in more detail about the finishing design. The finishing putty can be used even when the starting putty has not dried, but only if gypsum was used as the starting mixture.
To complete the finishing, you will need 2 spatulas with different widths of the working blade. Using a small spatula, apply the mass onto a large one, which is used to directly pull the putty along the slope. Please note that it is recommended to take a wide spatula wider than the slope itself. This will allow you to avoid scarring, resulting in a much faster resurfacing process.
Decor
 Painting window slopes after puttying
No matter how carefully you work with putty, you will still have to sand the surface after drying. To treat the surface with paint, it is better to get a wool or mohair roller. Basically, for painting slopes, water-dispersed or water-based paints are selected, which are used to cover the wall in 2-3 layers. This is what allows you to achieve the most suitable shade.
If the interior of your house or apartment allows it, the slopes can not only be painted in one color, but also decorated with stucco and other decorative elements. Today, thanks to the Internet, you can watch many video lessons from experienced finishers, as well as get acquainted with design solutions. This is very appropriate if you do the work yourself and are trying to save on the services of professional designers.
OK it's all over Now! I would like to believe that our article has given you confidence in your own abilities and that you will cope with the task not only without difficulty, but also with high quality.
Photo gallery of finished works
Slope finishing
In many ways, the puttying of slopes depends on how the old window or door was dismantled. That is, on the state of the opening, which may be destroyed or untouched. This, for the most part, depends on those who will install the new structure, since in 99% of cases dismantling occurs immediately before installation of the product. I want to draw your attention to the main vicissitudes that await you during finishing, and the video in this article will help you.
Plastering work for window and door slopes
Exterior works
The general principle of finishing the slopes of windows and doors may differ:
- Puttying of door and/or window slopes can be done according to all the rules plastering works. That is, beacons are installed in the opening and a leveling layer of the mixture is applied - first the starting layer, then the finishing layer. A cement-sand mortar can be used as a starting point;
- In cases where the opening is severely broken or simply to save time, the door and/or window openings are finished with plasterboard, which is subsequently covered with a finishing mixture and painted. In some cases, this method is the only option besides the slope leveling alternative brickwork due to its severe destruction.
Tools and materials
Set of spatulas
You will need a few tools for finishing:
- of course it is spatulas, of which you will need at least two - one to apply and the other to stretch the finishing mixture;
- in this case, a spatula with a wide blade should be slightly larger than the slope, that is, completely cover its width;
- to mix the solution you will need mixer(drill with attachment) and rubberized bucket;
- required for leveling long level or plumb line;
- if you work with drywall, then you can’t do without screwdriver with a special attachment.
Different perforated corner
From the materials we will need:
- paste or powder finishing putty;
- for alignment, the instructions allow you to use starting putty, or cement-sand mortar. You can also level the slopes if you wish. drywall;
- In addition, drywall can be glued to the surface, rather than mounted on profiles, and for this it is best to use Knauf Perlfix;
- definitely needed perforated corner for clarity of edges;
- primer will be needed for any alignment method.
Preparing the putty mixture
Beating the mixture
Before you putty the surface, you need to learn how to properly prepare the solution, since not only the final result, but also the work process itself depends on this. This applies to powder starting and finishing plasters, the mixing method for which is the same.
And it all starts with water, which is taken in the same amount (by volume) with the putty. For full-scale work, mix 1/3 of a bucket of water and the same amount of powder. The remaining 1/3 of the void is needed to prevent the solution from scattering during processing.
But, be that as it may, you need to prepare as much of the mixture as you can produce in the next 20-25 minutes, until it begins to set, since after this you cannot mix the solution - it loses its properties. So, having poured in the powder, mix it with water with your hands with a mixer for 3-4 minutes, and then let it settle for 2-3 minutes so that there are no dry spots left.
After this, stir the mixture again and immediately get to work - you need to have time to quickly develop the resulting substance.
Leveling the slopes
In order not to return to this issue again, I will say right away that before each “wet” finishing (putty or painting), the surface must be coated with a primer. Further work begins only after the soil has dried.
Installation of beacons
Now let's move directly to the question of how to putty the slopes on windows or doors and let's start, of course, with the beacons that define the contours. You can see the location of these profiles in the photo above.
Beacons are installed at the window (usually 6 mm thick), and perforated corners along the contour. All these profiles are installed on gypsum putty. Just be careful not to overlap the window frame too much - 3-5 mm of layering will be enough.
If you use a template, you can do without a beacon at the frame
But you can do without beacons on the frame, only in this case you will need to make a template from ordinary wooden slats. It is not entirely clear from the picture how to use this template at the window, and I will try to explain - the cutout is made for the glazing bead. That is, the whole side of the device will slide along the corner, and the cut side will slide along the bead.
In my opinion, using a template is even better than using a beacon near the frame, since the thickness of the layer placed on the profile will be absolutely the same here.
Installation of the L-profile on the frame
You can also level the slopes with plasterboard. To do this, screw an L-guide (Elka) onto the frame at the very edge of the profile, which is usually used for installation plastic panels. It turns out that the inner side of the slope will be regulated by the elka, which will subsequently be covered with finishing putty.
Using drywall to level a slope
The outer part of the gypsum board strip is aligned vertically using a level, although you can also glue a metal perforated corner there in advance as a guide and align the strip along it. On the side of the window you should place mineral wool as insulation, and with outside glue Knauf Perlfix drywall.
Although other compositions can be used. This one just worked well. Even if you aligned the outer perimeter with a pre-glued perforated corner there, you will still need to glue another one on top of the drywall to provide a clear edge for finishing.
Finishing putty
Final putty of the slope
In cases where the slopes are finished with wallpaper or laid ceramic tiles, you won't need finishing, but if you want to prepare the surface for painting, then let's look at the topic further. Second, finishing layer, can be applied even when the starting finish is not yet completely dry, but this is only if gypsum was used for the start, but not cement.
If you apply isogypsum on undried cement-sand mortar, then your entire finish will crack in the coming months.
For finishing you will need two spatulas
As I said, you will need two spatulas to work - one to pull the solution along the slope, and the other to apply the mixture, as shown in the photo above. It is important here that the blade big tool it turned out wider than the slope - this way you will get a layer with practically no scars and it will be much easier to sand.
Since you need to putty the slopes on the windows close to the frame, it is best if you first paste over the frame masking tape- then you can simply cut it flush with the trim (this measure is needed if the protective film has already been removed from the window).
Sanding and painting
Sanding corners
Despite the fact that your plane will most likely turn out almost mirror-like (since the spatula is wider than the slope), there will still be small imperfections in the corners that can be corrected with sandpaper. But before you start sanding, you need to wait until the surface is completely dry.
This can be determined by the presence or absence of dark spots; when they finally disappear, this indicates that there is no more moisture left. By the way, if necessary, you can also go over the entire plane and for this use paper No. 20-H, 16-H, 12-H and 10-H according to GOST 3647-80, or No. P60, P80, P100 and P120 according GOST 52381-2005.
It is best to use a paint roller for painting.
To paint the slopes, when they are completely dry, it is best to use a wool or mohair (but not foam) paint roller of any width. For such finishing, as a rule, water-dispersed or water-based paints are used - they are applied in two or three layers, at least until the desired shade is created.
Conclusion
If you want to express gratitude, add a clarification or objection, or ask the author something - add a comment or say thank you!
Slope putty is one of the most common types of window finishing. The appearance of each room depends on the renovations made in it. Pasting wallpaper, laying laminate on the floors, whitewashing the ceilings is sometimes not enough to maintain comfort in the house.
Sometimes unfinished window slopes do not harmonize with a seemingly completed repair, so we suggest considering how to properly putty the slopes. This will help finish redecorating and give the missing comfort to your home.
Besides, step-by-step instruction will allow even novice finishers to do the job efficiently, while saving money on the services of a professional.
Tools and materials
When puttingtying slopes, you cannot do without the following tools:
- several steel spatulas;
- scissors for metal carving;
- electric drill or hammer drill;
- drill attachment – mixer for stirring the solution;
- bucket for stirring putty;
- brushes, roller
- level.
The materials you will need are:
- Deep penetration soil.
- Finishing putty.
- Perforated aluminum corner.
- Grinding machine or grater for sanding.
- Fine sandpaper.
- Masking tape.
- Water-based paint is better.
Armed with the materials and tools from this list, you can get down to business.
Surface preparation
Puttying slopes is quite labor-intensive and slow work. Before you begin the putty process itself, you need to prepare the work surface.
Frame pasting
Cover the frames with masking tape
First, take some masking tape and start covering the window frames with it. This will help keep frames clean, especially wooden frames, because... Plastic frames can be washed if you try hard enough. This will also protect the windows from damage and dirt.
Slope priming
We definitely take deep penetration soil, thanks to which we can achieve the best adhesion of the putty and the slope.
The choice of material should be approached responsibly, because the final result of the work will depend on the quality of the solution.
The primer itself has the properties we need, such as adhesion, moisture repellency, strengthening the surface itself, in question environmental safety has no complaints.
It is best to choose a primer that has antifungal properties. It will prevent the formation of fungi and mold on the surface in the future.
Before applying the primer, it is necessary to thoroughly clean the surface to be treated from dust and dirt.
If there are elements old decoration(paint, wallpaper, plaster that doesn’t hold up well), then we get rid of them.
Then, using a brush, carefully apply the solution itself. It is not recommended to use a spray bottle here, because... working surface small and there is a chance of splashing everything around.
Preparation of putty
While the primer is drying, it is worth preparing the putty solution itself. Putty for slopes can be different: ready-to-use and dry mixture that requires preliminary dilution. The finished putty already has the consistency needed for work.
It is released in sealed packaging. It does not require any preparation before application. This material perfectly shades all the irregularities and cracks on the surface and creates a thin finishing layer.
The dry mixture, unlike the ready-made mixture, is produced in paper bags or plastic bags. Their advantage is a longer shelf life compared to the ready-made mixture. Buy ready-made or dry mixture - you should decide on this yourself.
Types of putties
The finishing putty can be applied immediately decorative coating
The following types of putty are distinguished:
- Starting putty is intended for preliminary leveling of the plane. It is responsible for temperature properties, repels and does not allow moisture to pass through. The durability and strength of the finished slopes depends on this type. The starting putty must have good qualities adhesion to the surface being treated, perfectly fills all cracks and holes, and makes the surface smooth. It can be applied in a layer thickness of up to 25 mm, which is important when correcting defects in slopes.
- Finishing putty is intended for leveling and finishing the surface, onto which the final decorative coating can immediately be applied. When choosing this type of putty, it is necessary to take into account its compatibility with both the coating of the lower layer (for example, plaster) and the coating of the top layer (for example, paint). The quality of the finish after time depends on this: absence of peeling, smudges, etc. In addition, you should definitely pay attention to the size of the filler grains. The finer it is, the more even and smooth the surface will be.
- A specialized putty is designed for sealing joints created during the puttying process.
- Universal putty designed for budget renovation. It combines the properties that are inherent in both starting, finishing and specialized putty. It can be used to perform preliminary leveling of the plane, and to carry out finishing or decorative finishing.
The finished mixture is stirred before application.
If the mixture is ready for use, it must be thoroughly stirred. If the mixture is dry, then you need to pour it into a bucket and add water as follows: first pour in ¾ of the amount stated in the instructions, mix thoroughly using a drill and a mixer attachment, then gradually add the remaining ¼ of water, choosing the consistency that will suit you. convenient for your work.
Installation of a perforated corner
Use a level to level the corner
The installed corner will subsequently help protect the slopes from various types of damage and help distribute the material itself over the surface more evenly.
To do this, measure a piece from the corner along the length of the slope and cut it off using scissors for cutting metal. It is important to make a neat cut without serifs so that nothing sticks out later.
Then you need to lubricate the corner itself with putty. thin layer and press it to the corner of the slope. Here it becomes necessary to use a level to align the perforated corner evenly relative to the plane.
This should not be neglected, because... the crooked angle of repose will be noticeable.
Applying layers
How to putty slopes? To do this, use large and small steel spatulas. For large areas, use large tools to hard to reach places– small.
To begin with, it is recommended to apply a layer of starting putty. This will get rid of defects on the original surface. The composition of the starting mixture has larger fractions compared to the finishing mixture. Usually this solution is applied in two layers: the first along the slopes, wait until it dries (usually this takes about 24 hours) and apply the second layer across the first in the direction from the window to the corner.
If the original surface has very complex nature with many defects, it is justified to reinforce the plane with plastic mesh, which will allow the solution not to slide down.
Before applying the finishing layer of putty, you need to wait until the starting layer has completely dried. Next, be sure to clean the surface of excess material using sandpaper and special grater for grinding or sanding machine.
Now you can apply the finishing coat. Its thickness should not exceed 2 mm, because the task of finishing putty is not to level the surface, but to perform protective functions. After applying the first layer, you can repeat the layer if necessary. However, it must be applied perpendicular to the first layer. After complete drying, sand the surface again and remove all imperfections. For more information on how to putty slopes, watch this video:
We move on to the final stage of window finishing - painting. Again, it is recommended to prime the slope with a special solution. This will improve the adhesion of putty and paint.
It is better to choose water-based paint. It must be applied using a small roller, because... The slope surface is small.
So, you have learned how to putty slopes. As you can see, on the one hand, this is not an easy task, requiring maximum attention and concentration, but on the other hand, there is nothing complicated here, and even a non-professional, subject to the presented rules for puttying slopes, will achieve excellent results.
After the installation team installs the new frames, there will be potholes in the walls. Even the most careful workers will not be able to dismantle old shutters without having to repair the slopes.
After installing the new frames, you must definitely start finishing the window slopes.
You can figure out the technology of how to putty the slopes on the windows yourself. It is not difficult to make smooth sides of external openings. Special mixtures are available for sale to form a smooth surface.
Preparing walls for further work
Even an inexperienced craftsman will need an average of 2-3 days to tidy up the narrow spaces of the walls around the glass. When getting started, you need to remember a few rules:
- Do not dilute the putty too much so that it does not dry out before it is used up.
- After each stage, let the layer dry.
- Observe the proportions when diluting the mixture indicated on the packaging.
When installing double-glazed windows, the openings are filled with foam. Excess foam remains in the gaps under the window sill and around the frame, which must be carefully trimmed away sharp knife. The surface must be clean and dry. Paint brush sweep away the remains of plaster and wipe the slopes damp cloth. Places for putty are treated with primer for better adhesion of the composition to the wall. Potholes need to be filled with gypsum mixture - starting composition. The walls inside the room are covered with a mixture for internal surfaces, from the street side - for external ones.
For work you will need the following materials:

- gypsum mixtures for external and interior work: start and finish;
- PVA glue for construction work;
- primer;
- reinforcing mesh;
- perforated corner;
- water-based paint.
Before you start plastering, you need to prepare your tools. They should always be at hand. The mixture for leveling slopes should be consumed within 30-40 minutes after its preparation. You will need:

- bucket for mixing the solution;
- mixer to mix putty with water;
- 2-3 spatulas of different widths - one of them should be the size of the slope;
- paint brush;
- sandpaper;
- level to determine possible irregularities.
The work begins with preparing the solution. To do this, combine starting putty and PVA glue in water at a ratio of 1:2:1. IN right hand take a wide spatula, and a narrow one on the left.
Using a narrow tool, it is convenient to scoop the solution from the container and apply it to a working spatula in small portions along the entire length. The plaster is applied to the potholes of the slope and a mesh for plastering work is glued onto the damp surface, slightly pressing it into the wall. The mesh will hold the deep layers of the solution and prevent them from crumbling in the future. All cracks and chips are gradually repaired.
Return to contents
Several ways to align window openings
After the slopes on the windows have turned into a relatively flat surface, you can proceed to the main work. It will be necessary to make the walls framing the opening smooth and even. Leveling technologies different walls similar. Curved surfaces can be difficult to level using only putty. An already prepared smooth plasterboard or foam board will come to the rescue.

It is better to apply the “starting” and “finishing” mixtures to the slopes from the bottom up.
- We plaster the walls. You will need starting and finishing gypsum putties. The technology for applying them to the prepared wall is the same as described in previous section. The starting mixture is diluted in a small amount of water to the thickness of rich sour cream. Working with 2 spatulas, apply the solution to the opening, leveling it. After the “start” has completely dried, the “finish” is applied in the same way, but in a thinner layer. The finishing solution can be made more liquid.
- Leveling the slope with plasterboard. On windows, there is no need for extra wall thickness; you need to take the thinnest drywall - 0.8 cm. Using a tape measure, measure the dimensions of the slope and draw it on the paper surface of the drywall. The blanks need to be cut with a sharp knife and glued around the opening. The surface is primed and plastered as described in point 1. Polystyrene foam is used in the same way.
The spatula should be held at an angle to the surface, pressing it lightly.
The solution is laid in layers, running the tool from the ceiling to the window sill, then from the window to the corner.
If you can’t immediately make a smooth canvas, you can straighten it slowly until it’s smooth. You need to apply the mixture in parts to separate areas, then it will be possible to level it before it dries.
Slope putty is one of the most common types of window finishing. The appearance of each room depends on the renovations made in it. Pasting wallpaper, laying laminate on the floors, whitewashing the ceilings is sometimes not enough to maintain comfort in the house.
Sometimes unfinished window slopes do not harmonize with a seemingly completed repair, so we suggest considering how to properly putty the slopes. This will help complete the cosmetic renovation and add the missing comfort to your home.
In addition, step-by-step instructions will allow even novice finishers to do the job efficiently, while saving money on the services of a professional.
Tools and materials
When puttingtying slopes, you cannot do without the following tools:
- several steel spatulas;
- scissors for metal carving;
- electric drill or hammer drill;
- drill attachment – mixer for stirring the solution;
- bucket for stirring putty;
- brushes, roller
- level.
The materials you will need are:
- Deep penetration soil.
- Finishing putty.
- Perforated aluminum corner.
- Grinding machine or grater for sanding.
- Fine sandpaper.
- Masking tape.
- Water-based paint is better.
Armed with the materials and tools from this list, you can get down to business.
Surface preparation
Puttying slopes is quite labor-intensive and slow work. Before you begin the putty process itself, you need to prepare the work surface.
Frame pasting
Cover the frames with masking tape
First, take some masking tape and start covering the window frames with it. This will help keep frames clean, especially wooden frames, because... Plastic frames can be washed if you try hard enough. This will also protect the windows from damage and dirt.
Slope priming
We definitely take deep penetration soil, thanks to which we can achieve the best adhesion of the putty and the slope.
The choice of material should be approached responsibly, because the final result of the work will depend on the quality of the solution.
The primer itself has the properties we need, such as adhesion, moisture repellency, strengthening the surface itself, and has no complaints regarding environmental safety.
It is best to choose a primer that has antifungal properties. It will prevent the formation of fungi and mold on the surface in the future.
Before applying the primer, it is necessary to thoroughly clean the surface to be treated from dust and dirt.
If there are elements of old finishing (paint, wallpaper, plaster that does not hold well), then we get rid of them.
Then, using a brush, carefully apply the solution itself. It is not recommended to use a spray bottle here, because... The working surface is small and there is a chance of splashing everything around.
Preparation of putty
While the primer is drying, it is worth preparing the putty solution itself. Putty for slopes can be different: ready-to-use and dry mixture that requires preliminary dilution. The finished putty already has the consistency needed for work.
It is released in sealed packaging. It does not require any preparation before application. This material perfectly shades all the irregularities and cracks on the surface and creates a thin finishing layer.
Dry mixture, unlike ready-made mixture, is produced in paper bags or plastic bags. Their advantage is a longer shelf life compared to the ready-made mixture. Buy ready-made or dry mixture - you should decide on this yourself.
Types of putties
You can immediately apply a decorative coating to the finishing putty.
The following types of putty are distinguished:
- Starting putty is intended for preliminary leveling of the plane. It is responsible for temperature properties, repels and does not allow moisture to pass through. The durability and strength of the finished slopes depends on this type. The starting putty must have good adhesion to the surface being treated, perfectly fills all cracks and holes, and makes the surface smooth. It can be applied in a layer thickness of up to 25 mm, which is important when correcting defects in slopes.
- Finishing putty is intended for leveling and finishing the surface, onto which the final decorative coating can immediately be applied. When choosing this type of putty, it is necessary to take into account its compatibility with both the coating of the lower layer (for example, plaster) and the coating of the top layer (for example, paint). The quality of the finish after time depends on this: absence of peeling, smudges, etc. In addition, you should definitely pay attention to the size of the filler grains. The finer it is, the more even and smooth the surface will be.
- A specialized putty is designed for sealing joints created during the puttying process.
- Universal putty is intended for budget repairs. It combines the properties that are inherent in both starting, finishing and specialized putty. It can be used to perform preliminary leveling of the plane, and to carry out finishing or decorative finishing.
The finished mixture is stirred before application.
If the mixture is ready for use, it must be thoroughly stirred.
If the mixture is dry, then you need to pour it into a bucket and add water as follows: first pour in ¾ of the amount stated in the instructions, mix thoroughly using a drill and a mixer attachment, then gradually add the remaining ¼ of water, choosing the consistency that will suit you. convenient for your work.
Installation of a perforated corner
Use a level to level the corner
The installed corner will subsequently help protect the slopes from various types of damage and help distribute the material itself over the surface more evenly.
To do this, measure a piece from the corner along the length of the slope and cut it off using scissors for cutting metal. It is important to make a neat cut without serifs so that nothing sticks out later.
Then you need to coat the corner itself with a thin layer of putty and press it to the corner of the slope. Here it becomes necessary to use a level to align the perforated corner evenly relative to the plane.
This should not be neglected, because... the crooked angle of repose will be noticeable.
Applying layers
How to putty slopes? To do this, use large and small steel spatulas. Large tools are used for large areas, and small ones for hard-to-reach areas.
Usually this solution is applied in two layers: the first along the slopes, wait until it dries (usually this takes about 24 hours) and apply the second layer across the first in the direction from the window to the corner.
If the original surface is very complex with many defects, it is justified to reinforce the plane with a plastic mesh, which will prevent the solution from sliding down.
Before applying the finishing layer of putty, you need to wait until the starting layer has completely dried. Next, be sure to clean the surface of excess material using sandpaper and a special grater for sanding or a sanding machine.
Now you can apply the finishing coat. Its thickness should not exceed 2 mm, because the task of finishing putty is not to level the surface, but to perform protective functions.
After applying the first layer, you can repeat the layer if necessary. However, it must be applied perpendicular to the first layer. After complete drying, sand the surface again and remove all imperfections.
For more information on how to putty slopes, watch this video:
We move on to the final stage of window finishing - painting. Again, it is recommended to prime the slope with a special solution. This will improve the adhesion of putty and paint.
It is better to choose water-based paint. It must be applied using a small roller, because... The slope surface is small.
So, you have learned how to putty slopes. As you can see, on the one hand, this is not an easy task, requiring maximum attention and concentration, but on the other hand, there is nothing complicated here, and even a non-professional, subject to the presented rules for puttying slopes, will achieve excellent results.
Source: http://MoyaStena.ru/shpatlevka/otkosov-2
How to putty slopes on windows?
Slopes window openings play an important role in shaping the interior decoration of the room. If they are crooked or tattered, they may well hopelessly ruin the entire impression of the installed double-glazed windows.
Not always installation companies plastic windows, provide such a service as plastering of slopes.
And if you have to install modern structures with double-glazed windows yourself, then you will also have to putty the slopes and paint them yourself. What will a home handyman need for this?
What materials and tools will you need to stock up on?
The choice of putty is made depending on the microclimate in which the window slope will be located:
- Facade putties are perfect for external slopes. They have good resistance to moisture and low temperatures.
- For interior decoration For window slopes in rooms with high humidity, cement or polymer putty mixtures are used.
- For normal conditions, gypsum-based putties are suitable.
It is necessary to assess the scale of work that will have to be done:
- For smooth slopes without strong defects, finishing putty will be sufficient.
- If a significant leveling layer is required to eliminate unevenness, you will also have to purchase a starting putty mixture.
- If the slopes are being removed for the first time, their initial leveling is done using a plaster solution, and then putty is applied.
The construction market offers ready-made raw solutions for putty, but professionals advise preparing the putty yourself from dry mixtures. This will create a solution consistency that the best way will suit you.
You need to stock up in advance:
- perforated corners;
- masking tape;
- silicone-based sealant;
- deep penetration primer.
Tools you will need:
- a pair of spatulas - narrow and wide;
- sharp knife;
- building level and roller for priming the surface.
If you plan to cover the slopes in the future acrylic paint, then you need to prepare the painting tools required for painting.
Preliminary work
The surface adjacent to the window must be prepared before applying the leveling layer.
It is advisable to install the window sill before leveling the slopes. This will allow you to carry out all the work more efficiently in one go.
- The polyurethane foam protruding beyond the surface of the window structure is carefully cut off with a clerical or construction knife. In this case, it is recommended to go a little deeper behind the window block: in this case, the cut can be filled with sealant. It will close open pores in the foam and prevent unwanted moisture from entering there.
- Use masking tape to protect the elements of the window opening from contamination. If there are surfaces that can be damaged by masking tape, then cover them with plain paper.
- The entire surface is cleaned of old wallpaper, paint and dirt.
- Remove poorly adhering pieces of plaster or brick and prime the surface.
It is advisable that primer mixture had pronounced antifungal properties.
How to apply putty correctly?
Before starting work, it is important to know that to use gypsum solutions, the room temperature should not be lower than +10˚C. Cement mortars can be used at temperatures up to +5˚С.
Work progress:
- The window opening is measured with a tape measure, after which sections are cut from the perforated corner the right size. To do this, you can use metal scissors or a small grinder.
- Mix using a construction mixer putty mixture. It is better to prepare it in small portions so that you have time to use up the putty before it hardens. It would be a good idea to read the manufacturer's recommendations. Ready solution should have the consistency of thick sour cream without any lumps.
- Having assessed the curvature of the surface using a level, apply a starting solution no more than 7 mm thick. Using a narrow spatula, apply the putty onto a wide one and apply it to the surface from bottom to top using wide, sweeping movements. Excess solution is removed with transverse movements of the spatula away from the window.
- On external corners Before the putty solution has hardened, pre-prepared pieces of perforated corner are attached. The corner is set according to the level. Excess solution protruding through the perforation holes is removed with a spatula.
- If leveling the slope of a window requires a significant layer of putty, then each subsequent layer is applied only after the previous one has hardened. To increase strength, you can use a thin fiberglass reinforcing mesh.
Important! To prevent cracking of the putty caused by thermal expansion of the window elements, a thin groove is made in the fresh putty between the slope and the window block. Subsequently, it is filled with sealant, which will serve as a kind of damping layer.
- After leveling and drying, the surface is treated with sandpaper. For convenience, it can be stuffed onto a wooden block. As soon as all irregularities and marks from the spatula are removed, the finishing putty is applied. Its layer should not be thicker than 1 mm.
- After allowing the surface to dry, it is sanded again, after which you can paint over it.
At the final stage, remove all protective elements from the window block and window sill: masking tape and paper.
Thus, it is not at all difficult to putty the slopes yourself. If everything is done correctly and carefully, it will not only give a finished look to the window opening, but will also save significant money.
Adblock detector
Source: https://mr-build.ru/podgotovka-osnovaniy/shpaklevka-otkosov.html
Putty for windows
Slope finishing
In many ways, the puttying of slopes depends on how the old window or door was dismantled. That is, on the state of the opening, which may be destroyed or untouched.
This, for the most part, depends on those who will install the new structure, since in 99% of cases dismantling occurs immediately before installation of the product.
I want to draw your attention to the main vicissitudes that await you during finishing, and the video in this article will help you.
Plastering work for window and door slopes
Exterior works
The general principle of finishing the slopes of windows and doors may differ:
- Puttying of door and/or window slopes can be done according to all the rules for plastering work. That is, beacons are installed in the opening and a leveling layer of the mixture is applied - first the starting layer, then the finishing layer. A cement-sand mortar can be used as a starting point;
- In cases where the opening is severely broken or simply to save time, the door and/or window openings are finished with plasterboard, which is subsequently covered with a finishing mixture and painted. In some cases, this method is the only option other than the alternative of leveling the slope with brickwork due to its severe destruction.
Preparing the putty mixture
Beating the mixture
Before you putty the surface, you need to learn how to properly prepare the solution, since not only the final result, but also the work process itself depends on this. This applies to powder starting and finishing plasters, the mixing method for which is the same.
And it all starts with water, which is taken in the same amount (by volume) with the putty. For full-scale work, mix 1/3 of a bucket of water and the same amount of powder. The remaining 1/3 of the void is needed to prevent the solution from scattering during processing.
But, be that as it may, you need to prepare as much of the mixture as you can produce in the next 20-25 minutes, until it begins to set, since after this you cannot mix the solution - it loses its properties. So, having poured in the powder, mix it with water with your hands with a mixer for 3-4 minutes, and then let it settle for 2-3 minutes so that there are no dry spots left.
After this, stir the mixture again and immediately get to work - you need to have time to quickly develop the resulting substance.
Leveling the slopes
In order not to return to this issue again, I will say right away that before each “wet” finishing (putty or painting), the surface must be coated with a primer. Further work begins only after the soil has dried.
Installation of beacons
Now let's move directly to the question of how to putty the slopes on windows or doors and let's start, of course, with the beacons that define the contours. You can see the location of these profiles in the photo above.
Beacons are installed at the window (usually 6 mm thick), and perforated corners along the contour. All these profiles are installed on gypsum putty. Just be careful not to overlap the window frame too much - 3-5 mm of layering will be enough.
If you use a template, you can do without a beacon at the frame
But you can do without beacons on the frame, only in this case you will need to make a template from an ordinary wooden slat. It is not entirely clear from the picture how to use this template at the window, and I will try to explain - the cutout is made for the glazing bead. That is, the whole side of the device will slide along the corner, and the cut side will slide along the bead.
In my opinion, using a template is even better than using a beacon near the frame, since the thickness of the layer placed on the profile will be absolutely the same here.
Installation of the L-profile on the frame
You can also level the slopes with plasterboard. To do this, screw an L-guide (EL), which is usually used for mounting plastic panels, onto the frame at the very edge of the profile. It turns out that the inner side of the slope will be regulated by the elka, which will subsequently be covered with finishing putty.
Using drywall to level a slope
The outer part of the gypsum board strip is aligned vertically using a level, although you can also glue a metal perforated corner there in advance as a guide and align the strip along it. On the side of the window you should put mineral wool as insulation, and on the outside, glue Knauf Perlfix plasterboard.
Although other compositions can be used. This one just worked well. Even if you aligned the outer perimeter with a pre-glued perforated corner there, you will still need to glue another one on top of the drywall to provide a clear edge for finishing.
Finishing putty
Final putty of the slope
In cases where the slopes are finished with wallpaper or laid with ceramic tiles, you will not need finishing, but if you want to prepare the surface for painting, then let's consider the topic further. The second, finishing layer, can be applied even when the starting finish is not yet completely dry, but this is only if gypsum was used for the start, but not cement.
If you apply isogypsum on undried cement-sand mortar, then your entire finish will crack in the coming months.
For finishing you will need two spatulas
As I said, you will need two spatulas to work - one to pull the solution along the slope, and the other to apply the mixture, as shown in the photo above. It is important here that the blade of a large tool is wider than the slope - this way you will get a layer with virtually no scars and it will be much easier to sand.
Since you need to putty the slopes on the windows close to the frame, it is best if you first cover the frame with masking tape - then you can simply cut it off flush with the trim (this measure is needed if the protective film has already been removed from the window).
Sanding and painting
Sanding corners
Despite the fact that your plane will most likely turn out almost mirror-like (since the spatula is wider than the slope), there will still be small imperfections in the corners that can be corrected with sandpaper. But before you start sanding, you need to wait until the surface is completely dry.
This can be determined by the presence or absence of dark spots; when they finally disappear, this indicates that there is no more moisture left. By the way, if necessary, you can also go over the entire plane and for this use paper No. 20-H, 16-H, 12-H and 10-H according to GOST 3647-80, or No. P60, P80, P100 and P120 according GOST 52381-2005.
It is best to use a paint roller for painting.
To paint the slopes, when they are completely dry, it is best to use a wool or mohair (but not foam) paint roller of any width. For such finishing, as a rule, water-dispersed or water-based paints are used - they are applied in two or three layers, at least until the desired shade is created.
Conclusion
Source: https://prookna.info/okna/shpaklevka-dlya-okon.html
Putty for slopes
How to putty slopes on windows: the whole process from start to finish
Finishing the slopes after installing the windows can be done with your own hands
New window blocks by themselves will not add aesthetics to the room if they are framed by crooked or ragged slopes. The overall impression will be dull. But the situation can be easily corrected if you know how to putty the slopes on the windows and how to finish them after leveling. Let's talk about this topic.
Preparing for work
To do everything correctly, efficiently and reliably, you need to fulfill several conditions: select the right putty, prepare the surface, create conditions in the room suitable for carrying out this type of work.
Selection of putty and other materials
The leveling mixture is selected in accordance with the area of application and scale of work:
- External slopes can be puttied only with water- and frost-resistant cement compounds. All types of façade putty are suitable.
Carefully select materials for outdoor work
- The mixture for interior work is selected depending on the microclimate in the room. If there is constant high humidity (bath, sauna, etc.), then the putty should be cement or polymer. For dry rooms, gypsum and lime-gypsum compositions can be used.
- If a thick layer of mortar is required for leveling, buy both finishing and starting putty. Or a universal mixture.
Advice. In the case of the initial removal of slopes in a new building, they are given shape plaster solutions, and only then use leveling putty.
- Relatively smooth slopes without significant defects can be repaired using only finishing putty.
In addition to putty, you will need a deep penetration primer to improve the adhesion of the leveling composition to the base, silicone sealant, perforated corners to strengthen external corners.
Advice. Buy a primer with antifungal additives. It will prevent mold from appearing on slopes.
Before priming, existing traces of mold should also be removed.
Standard set of tools: wide and narrow spatulas made of of stainless steel, level, painting knife, as well as a brush or roller for priming and subsequent painting.
Slope leveling technology
Now about how to properly putty slopes on windows.
The technology depends on the degree of curvature, the presence or absence of serious defects on the surface. If they are already plastered, then you just have to smooth the surface with finishing putty to get rid of small potholes, scratches, cracks and roughness.
Let's take for example more difficult option when slopes require leveling.
Rules for plastering slopes of door and window openings
In this case, the main work is done with starting putty, which can be applied in a fairly thick layer, or several layers can be applied.
It is important. Before you start finishing, make sure that the ambient temperature is not lower than +10 degrees if you are using a gypsum mixture, and not lower than +5 degrees if you are using a cement mixture.
The instructions for performing the work are as follows:
- Measure the width and height of the window opening with a tape measure, cut pieces of the required size from the perforated corners.
- Using a drill with a mixer attachment, prepare a putty solution. Its quantity should be such that you can use it before it loses its viability. This parameter is always indicated by the manufacturer on the packaging.
- Using a building level, check the verticality and horizontality of the corresponding angles formed by the slopes with the wall. Apply putty on them, making the layer thicker where the level requires it.
- Glue the perforated corner onto the fresh putty, pressing it into the solution. Also correct the vertical and horizontal position of the corner using a level, pressing it deeper into the solution where necessary.
Remove excess mixture squeezed out through the perforations with a spatula
- Allow the solution to set and harden so that the corners do not move during the puttying process.
- Using a wide spatula, apply a layer of starting putty, pressing it to the surface at an angle of about 30 degrees and moving from bottom to top. Then remove the excess in a transverse direction from the window to the wall. At the same time, create an even angle with the wall.
Photo of the main process
- One layer of putty should be no more than 5-6 mm. If leveling and eliminating surface defects requires large quantity layers, they are applied as many as required, but each one must be thoroughly dried before the next.
Advice. To prevent a thick layer of putty from peeling off over time, it can be reinforced with plastic or fiberglass mesh.
- Having finished leveling, wait for the putty to dry and use sandpaper attached to a grater to rub the surface, removing marks from the spatula and sagging.
- Finish the work by smoothing the surface with a thin, no more than 1 mm, layer of finishing putty. After it has dried and been sanded with fine sandpaper, the slopes can be painted.
The final stage of finishing
Finishing specialists recommend that owners of plastic windows add one more intermediate stage to this set of works. After leveling the slope, it is necessary to use a spatula to make a thin groove in the corner, between it and window frame, and when the solution dries, fill it with sealant.
It has good elasticity and will act as a shock absorber as the plastic expands on hot days. If this is not done, cracks may appear on the slopes.
Puttying window and door slopes will not cause difficulties for those who are familiar with such work - they leveled walls or ceilings themselves. If you decide to pick up a spatula for the first time, then be sure to study the tutorial in this article. In it you will find answers to questions that we may have missed.
Installation of plastic windows completed professional builders in compliance with all the rules, it gives comfort and coziness to the home.
How to properly putty slopes on windows
But during the operation of windows, it is not always possible to avoid scratches and all kinds of damage. And while replacing fittings is quite simple, getting rid of marks on the surface of slopes and window sills is problematic. The solution is to purchase plastic putty and repair the defects.
Window sill with large cracks should be replaced, since repairs with putty on plastic will not strengthen the crack and a trace of the damage will still remain. But for small scratches use special compounds would be a good option.
Any type of plastic putty has certain properties and is intended to solve specific leveling problems. There are special elastic compounds for repairing moving cracks and for sealing seams between sheets without the use of reinforcing mesh.
Expanding types of putties are also produced for plastics, fastening and repairing certain structural elements. Are being manufactured universal species putties, which have almost all the functions of the listed types. Putty for plastic is usually required in small quantities for minor repairs.
Therefore, it is convenient to buy an expensive universal paste, given that one composition can solve a number of other problems.
The restoration composition for puttying plastic windows is used for minor damage, cracks and incorrectly drilled holes.
Such compositions include “COSMOFEN RM”, which consists of two components: powder and liquid resin.
This composition can be used to putty on plastic on vertical surfaces, due to its high viscosity and adhesion. This material also has good adhesive properties and is resistant to ultraviolet radiation.
Before using putty for plastic windows, it makes sense to try to sand out the damage with abrasives and polishes for shallow scratches. You can also use a sanding solvent, because even the most flexible putty will differ from the surface being repaired.
If you have sufficient experience working with putty for plastic, you can use a special paste for plastic windows. It is applied to scratches, “eaten” into the plastic, after which they grind and polish the area of application.
Foam plastic is often used to insulate buildings, since its use reduces heating costs, it does not rot, is lightweight compared to other insulating materials, and is quite easy to install. The sheets are glued to the wall surfaces and the foam is puttyed. Adhesive for polystyrene foam is produced by many companies: Master, Ceresit and others.
To protect the foam during external insulation, you can putty on the foam with CM11 glue from Ceresit. For work you will need additional painting corners and reinforcing mesh. The work should be done in parts approximately about a meter wide and the height of the wall. Further work on puttying polystyrene foam does not differ from ordinary puttying of the facade.
Foam putty protects the slabs from external influences sun rays, mechanical damage.
For stronger protection, you can additionally use acrylic-based decorative plaster with marble chips. The installation of such plaster does not require the use of reinforcing mesh.
A wide choice of colors combined with durability will give the surface the required qualities: beauty and functionality.
Reading time: 7 minutes.
As a rule, replacing any windows leads to the destruction of the adjacent section of the wall. The question arises: what should be done to make the window structure look beautiful and reliably protect from noise, wind and other troubles of the street? The answer is simple: in this case, without repair work not enough. Exist various options sealing slopes, but to choose the right option, it is necessary to consider them in more detail.
About slopes
The sections of the wall adjacent to the window block are called slopes. They are internal and external. Strict requirements apply to internal areas.
The following functions are assigned to the slopes:
- giving the window structure an aesthetic and attractive appearance. Can you imagine quality window, which is docked with a broken wall;
- improvement of sound and thermal insulation. Window designs those that do not have high-quality slopes do not have sufficient tightness;
- protection mounting elements and seams from exposure environment. A high-quality slope not only protects fasteners from corrosion, but also reduces the likelihood of windows fogging and freezing.
Thus, slope repair is a list of works aimed not only at restoring damaged sections of the wall, but also at creating additional insulation.
Basically, one of the following repair options is selected:
For any repair of slopes, first of all, high-quality surface preparation is necessary.
Preparing the window opening
Restoration of slopes begins after their surface has been prepared. Preparation is performed in the following sequence:

In order not to destroy the restored slopes, the window sill is installed before the repair begins.
To protect against dirt and broken elements, the window and window sill are protected with paper or polyethylene. It also wouldn’t hurt to protect the window handle and battery under the windowsill.

The protective film on the window is removed only after all work is completed.
- The surfaces of the slopes are thoroughly cleaned. Large dangling fragments are attached to the mortar.

Plastering slopes
This option for repairing slopes is low cost. For sealing it is enough to have: finishing mixture, a set simple tools and water-based paint.
High-quality putty directly depends on how exactly the old window was dismantled. Experts must take into account the actual state of the opening, which may turn out to be dilapidated or not touched at all. In 90% of all cases, dismantling is carried out before installing a new product. Classic window blocks are not able to significantly improve the aesthetic characteristics of a room if they are framed by uneven slopes with multiple defects. The situation can be radically changed if a layer of solution is applied correctly.
Giving the structure aesthetic appeal
Preparation of materials and tools
To figure out how to properly putty existing slopes, you must first fulfill several basic conditions:
- Prepare your work surface.
- Choose the right putty.
- Equip the workplace with all necessary equipment.
Numerous experiments have shown that the solution must meet the following requirements:
- For treating external slopes, only those compounds are suitable that are not afraid of the negative effects of moisture and frost. Any façade putty is ideal for street work.
- The product must correspond to the specific structure and scope of the upcoming manipulations.
- If the slopes have obvious deformations, they must be leveled. The starting and finishing mixture is ideal for these purposes. The master can buy a universal composition.
- When working indoors, the microclimate should be taken into account. If the level of humidity in the room is high, then puttying is best done with cement or polymer composition. A lime-gypsum base is suitable for finishing a standard living space.
Important! If manipulations with slopes are carried out in a new building, then create the required form You can use plaster, but putty will help for final leveling. The master will need a deep penetration primer, which can significantly increase the adhesion of the mixture. Additionally, it is necessary to purchase a composition with antifungal properties.
To work you will need:
- Two wide spatulas.
- Rubberized bucket and drill with a special attachment for mixing.
- Plumb or long level.
- Screwdriver with different attachments.
- Powder or paste finishing products.
- Adhesive for fixing drywall sheets.
- Cement-sand mortar or putty. You can level the slopes with durable plasterboard.
- Primer.
- Perforated corner.
 Basic tools for applying the mixture
 The main stages of do-it-yourself putty
In order for the result to impress not only with its aesthetic appeal, but also with its durability, you need to adhere to the basic recommendations of experts. It's better to refuse ready-made mixtures. Each builder is accustomed to working with a certain consistency of mortar, which is why a purchased product may turn out to be too liquid or too thick. This situation will have a negative impact on the final result.
Internal as well as external slope needs quality training. To do this, the master must carefully remove all old finishing materials, as well as those surface fragments that have already peeled off from the base. Only after this is the primer applied. It is worth noting that both wooden and plastic window blocks require professional training. Using regular film and tape, carefully cover the glass unit itself and the frame from the inside to avoid accidental contamination.
 Street work
 Preparatory manipulations
Before you begin to putty the surfaces, you need to thoroughly clean work area. The master will have to remove old paint, chipped plaster, remove all dust, and also cut off all unnecessary fragments protruding beyond the window polyurethane foam.
Important! It is necessary to cut the foam not close to the frame, but a little deeper. After this, you need to use a sealant to protect the material from condensation, which negatively affects the thermal insulation parameters.
If the window sill has not yet been installed in its place, then this must be done before finishing all the slopes. In another situation, the technician will have to spend additional time repairing damaged areas. If you immediately perform all the manipulations correctly, then in the end there will be no need to resort to additional repair work.
The craftsman should think about how to properly protect the window frame and window sill from contamination and damage during the puttying process. You can use regular masking tape to cover wooden and plastic structures.
We must not forget about applying a primer, with which you can significantly increase adhesive properties and prevent the appearance of dangerous mold because of high humidity. It is better not to save on this product. Since only a small amount of primer is needed, the final price will not significantly affect the total cost. But the resulting quality and reliability will be excellent. Plastering can only be done when the primer is completely dry. But you shouldn’t hesitate with this procedure either, since dust quickly settles on the surface.
 Seal all cracks
 Subtleties of applying putty on slopes
The final solution distribution technology depends on the condition of the wall. The technician must evaluate the presence or absence of serious defects on the surface. If the problem areas are already plastered, then you just need to level the surface with a special finishing putty. This will help get rid of scratches, potholes, roughness and even cracks.
But most often, craftsmen have to deal with situations where slopes need leveling. All initial work must be done with durable putty, which can be safely applied in a fairly thick layer.
Important! Before you start finishing, you need to make sure that the ambient temperature is above +11 C. Otherwise, it will be difficult to achieve the necessary adhesion of the surfaces.
Experts have created instructions for applying putty:
- Using a tape measure, measure the width and height of the opening. It is necessary to cut fragments of the required sizes from the perforated corners.
- To prepare the putty solution, use a drill with a mixer attachment. The amount of the mixture must be selected so that the master has time to use it before it hardens. This parameter is always indicated by manufacturers on the packaging.
- The verticality and horizontality of the corners are carefully checked with a building level. When applying a putty layer, be sure to ensure that it corresponds to the indicators of the device.
- Carefully glue the prepared corner onto the fresh solution, pressing it into the mixture. The final position of this element is also controlled by the level.
- It is necessary to allow the solution to set as much as possible. Otherwise, when applying putty, you may accidentally disturb the position of the corner.
- Use a wide spatula to distribute the prepared solution, pressing it to the surface at an angle of 30. All movements should be directed from bottom to top. Excess is removed with a quick movement from the window to the wall.
- One layer of solution should not be more than 6 mm. If a large number of layers are necessary for high-quality leveling and elimination of surface unevenness, then each of them must be thoroughly dried.
- After the putty has completely dried, it is necessary to use a special sandpaper, which is first fixed on a grater. The surfaces are carefully treated, removing all traces of the spatula and sagging.
- At the final stage, a maximum of 1 mm of the finishing mixture is applied.
 Solution distribution
 Final finishing
Before you begin to putty with the selected finishing solution, you need to carefully treat the surface again. For these purposes, abrasive paper is useful, which can quickly and efficiently remove all irregularities. Some professionals actively use a lamp on a wire, which greatly simplifies the work process. The product is brought to the surface of the slope at an angle, due to which all defects become immediately visible.
 Painting
 Finishing putty is not intended for leveling substrates, as it performs integral protective functions. To give the surface an aesthetically attractive appearance, 2-3 words are enough, each of which should be applied as carefully as possible, changing the direction of the spatula. All that remains is to use water-based paint. The liquid product is taken into a paint ditch and applied to the surface of the slope with a regular roller in different directions.
 Result of the work done
 Conclusion
Planned puttying does not cause any difficulties for those who have already encountered such work. If the property owner decides to cope with this task on his own, then it is necessary to study all the intricacies of the work process. Thanks to this, the result will certainly please you with its reliability, quality and accuracy.
More interesting information presented in the video:
In contact with
Comments
Irina 04/17/2019 02:12
I am very far from the subject of construction, but I am already an expert on the issue of slopes. Three different craftsmen remade it for me until I was happy with it. But I look at this article and I could do it myself.
Grade
New articles
New comments
ArtemGrade
ElenaGrade
nezabudka-1Grade
CatherineGrade
Vladimir


