The popularity of CDs is declining. Today they are being replaced from our lives by miniature flash media. But you shouldn't get rid of old disks. Laser media is a beneficial material for decorating walls, furniture, creating garden miniatures for the dacha, as well as for children's creativity.
When starting work, you should be careful and attentive so as not to get hurt. Cutting tools should be large and sharply sharpened.
If there is a need to heat the vinyl during the process, this should be done at outdoors or in a well-ventilated area, and also keep a container of water on hand to extinguish the fire if materials ignite.
What can be made from CDs
A napkin holder, stands for stationery and hot dishes, a sparkling ball, a candlestick, New Year's toys - this is just a part of what you can make from disks with your own hands. All these things don't require large investments, and the process of making them will not take much time.
Shiny ball
A disco ball is perhaps the most good example Togo,
Tools and materials:
- foam ball;
- unnecessary disks;
- glue;
- scissors.
Manufacturing process:
- Using scissors, cut the media into pieces of arbitrary shape.
- Lubricate the workpiece with glue and cover the surface with sparkling fragments.
- When the glue dries, you can hang the disco ball from the ceiling.
An unforgettable atmosphere at the party is guaranteed!

Napkin holder
A napkin holder is not just a serving item, but also stylish decoration a table that you can make yourself.
You will need:
- carriers - 3 pcs;
- large beads;
- glue gun;
- stationery knife;
- mock-up rug or piece of laminate.
Since the base will be a whole disk, work should begin by preparing the holders. Using a knife, cut off ¼ of the disks as shown in the photo.

Attach the sides to the base using a gun.

Start decorating. Glue a thread of beads along the joint - this will cover all the flaws in the glue seam. Decorate the napkin holder with beads in random order.

Other decoration options are also possible. For example, using the decoupage technique.

You can use floristry techniques.

Or you can decorate the napkin holder with stickers and miniature figures.

Hot coasters
Continuing the kitchen theme - hot pads.
For work prepare:
- floppy disks;
- cardboard;
- scissors;
- PVA and Titan glue;
- alcohol;
- fine-grained sandpaper;
- napkins with drawings;
- putty;
- acrylic primer and varnish.
How to do
Cut a circle of the appropriate diameter from cardboard.

Coat all components with glue.

Assemble them into a “sandwich”, as shown below.

Pack into files. If several stands are made at once, then they need to be placed separately.

Submit to press. As soon as everything is dry, fill the hole and ends of the “sandwiches”.


Sand the surface thoroughly with sandpaper, degrease with alcohol, and prime.

Dilute PVA with water in a 1:1 ratio. Glue the napkin with this solution. Leave to dry.

After drying, walk along the edge of the stand with sandpaper, removing excess tissue.

Varnish. Since hot dishes are placed on the stand, it is advisable to choose a heat-resistant varnish.


Interesting models are made from felt, inside of which a DVD is sewn - for rigidity.


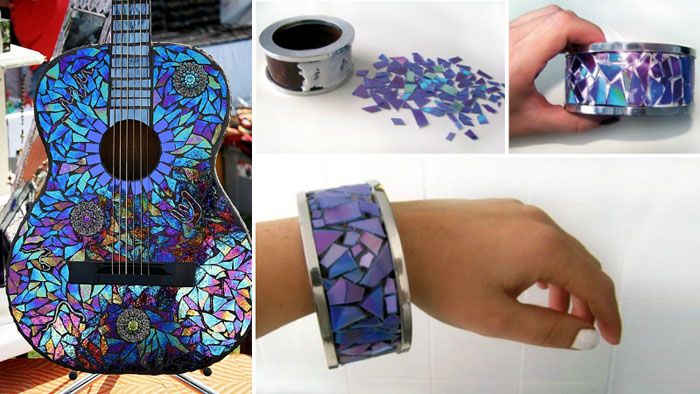
Laying mosaics on a flower pot
Look luxurious flower pots, decorated with a mosaic of used CDs.
In addition to disks, you will need:
- scissors;
- glue gun;
- stained glass paint.
Cut laser plates into pieces.

Glue the mosaic fragments onto the degreased surface of the flowerpot so that the distance between them is minimal. Let the glue dry.

At the end of the work, carefully paint over the seams.

You can cover the entire area of the flowerpot with mosaics.

Watch
A great idea is to make a clock from a used CD and keyboard.
For work you will also need:
- Super glue;
- clock mechanism with hands.
Take out the function keys, that is, those marked F1, F2 and so on. There are 12 of them in total, which is exactly what you need. Apply a time index scale to the disk. Fix the keys with glue according to the resulting markings.

Install the clock mechanism and hands. Insert battery. And the clock is ticking!

Photo frame
Original decoration the room will be a photograph framed in a sparkling frame.
To implement the idea you need:
- cardboard - 2 sheets;
- PVA glue;
- disks;
- scissors;
- contour on glass;
- ruler;
- pencil.
Draw the outlines of the frame on one sheet of cardboard. Cut it out.

Use scissors to turn the discs into rainbow shards.

Generously coat the frame with glue.

Use tweezers to lay out the mosaic pieces.


Leave to dry for 3-4 hours.

Draw a contour along all the joints, not forgetting the edges of the frame.


Let the paint dry. Connect the frame and the backdrop, leaving one side uncovered - this is where the image will be inserted.

All that remains is to place the photo and hang it on the wall.

New Year's toys
Create new Year decoration better with the kids. This is an opportunity not only to acquire a number of unique toys, but also to have fun joint creativity.
It is best to invite your child to make his favorite character from the animated series “Smeshariki”.
All you need for this:
- colored paper and cardboard;
- glue;
- pattern;
- paints (if necessary);
- scissors;
- unnecessary blanks.
How to make
Find your favorite character image on the Internet. From paper, cut out parts of the face, hairstyle, flowers, glasses - everything that a cartoon character needs. Then cut out arms, legs, and ears from cardboard.

Glue all the elements onto the disk. To make facial features more expressive, outline the details with a black felt-tip pen or marker. Glue a loop at the back and you can hang the craft on the Christmas tree.

The principle of making the next toy is similar.
Prepare:
- kit paper decor New Year's theme - snowflakes, stars;
- postcard;
- scissors;
- a little glue.
Cut out a circle from your favorite card. Glue the fragment onto the disk and add a frame of snowflakes in a circle.
One row is positioned so as to hide the contours of the cut out element. The second one is closer to the center. A puncture is carefully made with a hot awl, a ribbon is threaded, and tied with a bow. The Christmas tree toy is ready.

Christmas tree decorations made from old disks will look harmonious on a large tree. If the Christmas tree is miniature, then crafts are used to create a festive atmosphere in the interior.
The installation on the wall in the shape of a Christmas tree looks spectacular and unusual.

And if you hang a sparkling owl on the door, it will definitely not go unnoticed!

Ideas for inspiration
When making New Year's crafts, you can use beading or isothread techniques.


Or you can decorate them in an original way using decoupage techniques or photographs from an album.


Curtain tiebacks
One more useful little thing for the home, you can make it from vinyl circles - a tieback for curtains.
For one lift you will need:
- disk - one piece;
- bamboo stick for rolls - one piece;
- a piece of whatman paper;
- tape 2.5 cm wide - about three meters;
- rhinestones, half beads - three pieces;
- hot glue gun;
- candle or lighter;
- tweezers;
- needle and thread;
- scissors.
Decoration technique
Cut out the record inner part so that it turns out to be a bagel.


Glue one end of the ribbon to the ring and braid it. The turns are overlapped so that the base does not show through.

When the entire surface is braided, cut off the excess tape, securing it on the wrong side.

Go to floral elements. Cut the ribbon into pieces about 8 cm in length. Singe the ends of each so as not to crumble.

Fold the petal as shown in the pictures.


This is what the front side looks like. There should be 15 such petals in total.

Using a thread and a needle, collect three flowers, each with five petals.


Decorate the middle with rhinestones or half beads.


Collect everything into a single composition.


Using the kanzashi technique, you can create a wide variety of curtain holders - just master the basic techniques.


If you replace the ribbon with jute twine or fabric with sequins, you will get completely different models.


Candlestick
There is something mystical and bewitching in the flame of a candle; you just can’t take your eyes off the flickering light! And the corresponding candlestick will only emphasize the romantic and mysterious atmosphere.
Add to the already known toolkit:
- candle tablet;
- drinks can;
- decorations (cones, shells, pebbles, large beads, artificial flowers and others).
Cut off the bottom of the jar, place a candlestick in the center of it on the plate. Arrange the decor in a circle: pine cones, beads. Lubricate the cones with glue and sprinkle with artificial snow. You can paint the ends with gold or silver paint, and lay a “rain” around the perimeter of the circle.

By changing the decorations, you can make a candlestick on any theme: marine, for the holiday of March 8, oriental style and just for a romantic dinner.


Country ideas
The cottage should be beautiful. This is a place where soul and body relax from the bustle of the city. As a rule, all the trash that has accumulated in the apartment moves here, and vinyl roundels are no exception. Crafts made from them can be used in dacha farming.
You can make a kitchen apron using mosaic techniques.

In the same way, it is possible to transform a coffee table.

Rainbow circles make an interesting scarecrow for the garden or curtain holders in the bathroom.


You can make a window curtain.

And if you have talent and patience, then these are real landscape miniatures.


If you happen to have 3.5-inch floppy disks lying around in the closet, you can use them too. Just to get started, you need to prepare it in a certain way: lower the protective cap and pierce holes in the corners of the floppy with a hot awl.


You will get a blank with holes through which the floppy disks will be connected to each other. As connecting elements take wire, clamps, metal rings; for greater strength of the seams it is advisable to walk super glue.
You can, for example, make a stand for stationery.

From more three inches will make a box or chest for small items.

By changing the assembly configuration, you can get a stylish lampshade.

All this is just a part of the DIY CD crafts. The main thing is not to limit your imagination.
Mini sharpener made from an old hard drive
Don't throw away any spilled hard disk ( HDD). It can be given a second life as a sharpener for knives and scissors.
For this, in addition to the hard drive, you will need:
- PC power supply ( personal computer);
- connector where the power will be connected;
- sandpaper;
- screwdriver for disassembly hard drive;
- wires;
- soldering iron
Remove all stickers from the hard drive, unscrew all the bolts, remove the pancakes. Remove all unnecessary components, leaving only the motor, spindle and logic board.

Place one pancake on the sandpaper, trace it with a pencil, and cut along the contour. Coat the circle with glue and glue it on. Place the pancake on the spindle and secure it. Supply power from the computer PSU (power supply).

The mini sharpener is ready for use.

Products from old car wheels
Every car owner eventually develops outdated rims. As a rule, they gather dust in the garage. But from them you can make a good-quality barbecue with removable supports for country house.
Required Tools and materials:
- car disk;
- metal rods with threads at the ends;
- nuts;
- a piece of square mesh - 400 x 400 mm;
- metal sheet 5 mm thick - 250 x 250 mm;
- welding machine.
Weld a sheet onto the bottom of the disk. This is necessary so that hot coals do not spill through its large holes.


Place the nuts on the legs (do not tighten them all the way, so as not to accidentally weld the posts, and they could be removable). Weld to their locations on the structure.


Turn the grill over. Place the grid on the disc and trace it with a marker. Trim off all excess with a grinder.


Place the mesh in its intended place.


Video
In the video you can see how to make a barbecue oven from old rims.
The following video shows 35 examples of DIY crafts made from old DVDs - from simple miniatures to garden sculptures.
Another video review of crafts made from old laser plates: 40 simple, but original ideas.
Some regretfully part with their once beloved CDs. Men are reluctant to give away discs from car wheels. In order not to have to part with your favorite things, the editors of HomeMyHome.ru found many ideas on how to make simple and beautiful crafts from disks.
Many people no longer use CDs or DVDs. But why throw away something that might be useful?
What you can make from disks with your own hands - a general overview
Beauty is nearby and created with your own hands. All you need to do is take a disk, scissors and... imagination. From such material you can build an excellent designer lamp, panel, Wall Clock. Rims serve as a kind of decoration for garden plots or harsh men's garages.
DIY crafts from computer disks
For many it was a revelation interesting technique working with CD blanks. They are easy to divide into two halves, each of which can be easily cut into small pieces with scissors. But with these shiny mosaics you can already do interesting crafts: decorate any piece of furniture, decorate a photo frame, veneer a flower pot.

The shiny iridescent iridescent surface just begs to be remade

Most discs are easy to halve and cut into any shape you like.

Your imagination or our article will tell you what to do with such pieces.
In addition, shiny mugs are used entirely in crafts, covered with fabric or paper, and even made into chic lamps.
What can be made from car rims
People are not always far-sighted when it comes to using old items. Some of them may start new life, giving the owner good emotions. The same applies to car wheel rims. They lend themselves well to polishing and painting and can turn into very useful products!

Unnecessary wheel disks can be a great table

Creative lamp? Easily!

A table with lighting will surprise many guests

Charming stand for a cauldron – perfect solution for a country house
DIY crafts from CDs and DVDs with manufacturing instructions and photo examples
Thanks to the pliability of the material and its beautiful iridescent surface, seemingly waste products can be used. Blanks can become a highlight in the decor of a room, and it will be especially pleasant that this miracle is made with your own hands.
DIY Crafts for Wall Decoration from CDs
To decorate the walls, you can take the photo below as an example. What can you make from unnecessary CDs for your room? This could be a panel, a screen, or a three-dimensional decoration.

The screen has a decorative and aesthetic function: it is transparent and effectively reflects light
To make a screen you will need a base assembled from wooden slats or polypropylene pipes. You need to attach longitudinal strips to it with self-tapping screws on the lower rod: they can be made from thick rope, crocheted or taken wide satin ribbons. Blanks are glued to each tape at equal distances. Once the glue has set, the tapes are screwed to the top rod.

For such a fish you need a large number of blanks and a base made of thick cardboard. Disks are assembled onto the base, starting from the tail to imitate scales

A wall panel can be made by decorating the discs with bright fabric, tying them or covering them with colored film.
Lamps and lampshades made of disks
Let's try to create a lamp with our own hands.
| Illustration | Description of action |
|---|---|
 |
Let's prepare three pieces of plywood, a threaded rod, a light bulb with a socket, a cord with a switch and plug, washers and nuts. |
 |
We trace the discs on a piece of plywood and cut them out with a jigsaw. |
 |
In one circle we drill a hole for the cartridge and insert it inside. |
 |
Let's make a recess for the wire. |
 |
We connect three circles, the one with the wire in the middle. We drill three holes at equal distances from each other. |
 |
All that remains is to make identical holes in the stack of disks. We string them onto three pins inserted into the base. |
Frames for photos and mirrors from disks
What else can you make from old CDs for your home? We propose to build beautiful frame for mirrors or photographs. The work process is simple: glue is applied to the base (ready-made flat mirror frame or cardboard) and pieces from the blank are laid. You can cut them into squares or choose any shape.

The work is quick and easy

It is important to coat all the cracks between the pieces. This can be done with decorative putty, acrylic contour, acrylic paint

They also design a frame for the mirror. A light-colored grout will look better in this case.

Another option for a photo frame
DIY watch made from disks
A clock in the house can also be created with your own hands. To do this, you will need an unnecessary DVD blank, a decoupage napkin or rice paper, a wide synthetic brush, hands and a clock mechanism, and craquelure varnish.
| Illustration | Description of action |
|---|---|
 |
Lubricate the surface with craquelure varnish, after wetting the brush in water and squeezing it out. |
 |
Once the varnish has dried a little, apply acrylic paint. Both layers will be ready for further work in 2 hours. |
 |
The drawing is torn out by hand. |
 |
Apply PVA to the surface with a brush, lay out the design and coat it with glue on top. |
 |
After we glued the sequins as numbers, we assembled the clock mechanism. |

Another example of decorating a watch
What can you make for your kitchen from old CDs?
The kitchen is a special place. The housewives spend a lot of time there. To make your time more fun, you can make several DIY crafts for the kitchen. This could be flowers made from disks, panels, a lamp, mosaic on an apron, furniture decoration.

An interesting decorative fabric: the discs are tied together with a thick thread or fishing line and hung

For the kitchen, you can interestingly decorate boxes for household small items. Such things are easy to wash, so they will serve perfectly in the kitchen.

Decor kitchen furniture: original and easy

Interesting screen: a rainbow in the house. You can use glass as a base, and use stained glass paints instead of grout.

Mini organizer: we cover the disc with fabric and equip it with a convenient pocket

The table will attract attention from anywhere in the kitchen. The pieces are applied directly to the table surface, then grout is applied and excess is removed

You can decorate a flower pot in a piecewise rainbow style
Related article:
Weaving from newspaper tubes: new ideas with photo instructions. Let's look at the features of making crafts and step by step instructions several new products.
What crafts for children can be made from disks with your own hands?
Plunging into the world of childhood is useful for many: to see how a child’s eyes sparkle with pleasure and the knowledge that he did everything BY HIMSELF! These are the kind of positive emotions that are easy to get when working with DVD discs: a child can handle the decor with minimal help from adults.

Christmas tree toy: the baby’s fine motor skills will develop faster if he himself cuts everything into pieces and glues them onto the ball provided by his mother

These crafts are done with the help of elders: the lamp needs to be fastened, like the carriage. Young children may not be able to handle this on their own. But they will support the idea

The disc is glued onto colored cardboard. Using scissors, colored paper and PVA glue, a shiny circle turns into a fish

The turtle is based on plastic from a bottle, which can be replaced with cardboard. The disc itself is painted with stained glass paints. To prevent the paint from mixing, you need to purchase an outline

Favorite “Smeshariki” are made simply: adults draw elements of animals on paper, and children’s hands cut them out and paste them onto the disk.
Crafts from disks for May 9
Crafts for the holiday of May 9 come down to decorating the disk space with thematic elements and symbols.

Decorating the base is easy. There will be such a small panel a great gift for Victory Day
Take a clean blank as a base. Using PVA glue, an applique made of colored paper, cardboard or satin ribbons will be glued onto it. In order for the panel to hang, a hole is pierced from the edge of the blank using an awl heated over a gas burner. A rope or ribbon is inserted before creating the applique.

Elements for the applique are created separately and then applied without glue - you need to know what kind of composition the end result will be
If you use satin ribbons instead of paper, then it is also worth studying the tutorial on creating flowers from satin ribbons. Touch finished work It is not advisable to do this until the glue has completely dried.
How to use old disks to make three-dimensional figures
You can build amazing three-dimensional figures from blanks. This work is more difficult than the previous ones, since it requires many pieces cut into elongated triangles and strips. All of them are attached to the base using glue for ceiling tiles Titanium. Anything can be taken as a basis, up to plastic bottles or unnecessary plastic toys.

Crafts made from disks are perfect for decorating a garden

The ball that many dreamed of in childhood will become a reality

This craft requires a lot of time and effort; it is better for beginners to master simpler products first
DIY crafts from old car wheels with manufacturing instructions and photo examples
Here you may need the help of a man - we involve fathers, husbands, and grandfathers. It's not only decorative items, but also practical. Let's try to make an original fireplace and table.
Crafts from wheels for the garden
Instructions for creating a fire pit are shown in the photo below. The construction of such a structure will take less than a day.

You will need to stock up on bricks or stones for finishing, a car wheel (stamped!) and a shovel
For creating a fire, the stamping is ideal: there are holes for the air duct, and there is enough space for both firewood and coals. If desired, you can weld two such disks together by welding 4 legs to them - the design will serve excellent barbecue for the cauldron.
DIY crafts from CDs for the home
We make a coffee table from a car wheel with a glass top.
| Illustration | Description of action |
|---|---|
 |
The disc needs to be sawed in half with a grinder. |
 |
We select the parts: a brake disc, two different hubs, a pipe, several bolts with washers. |
 |
We connect the hub to the brake disc. |
 |
We insert the pipe into the brake disc and screw it on. We turn the product over and mount the second hub on top. |
 |
We screw half of the car disk to the hub. You will need to pre-drill holes in it to connect to the glass. Holders are glued to the glass and attached to the rest of the structure. |
Create your own miracles and don't forget to share your ideas with us! The editors of HomeMyHome.ru are sure to answer all your questions on the designated topic.
Video: how to make a mini vase with your own hands
Another folk craftsman who decided to try his hand at producing alloy wheels deserves our attention. In order to make such disks, he used old junk, which was lying around in his garage, and some other materials.
For the disks, raw materials were needed, they became the ZMZ-402 engine block made of AK4 cast alloy, as well as other engine parts, a cooking furnace, a crucible (might work seamless pipe with boiled bottom), regular charcoal, flasks ( wooden frames to give shape), sifted sand and silicate glue.
First let's mix liquid glass with sand and glue. It is best to use a construction mixer. Then we take a cast from the workpiece, leaving a reserve for turning. We leave the cast to dry for several days. We make a fire, put the crucible on high heat, add more coal and turn on the blower. Liquid aluminum is poured into the mold. When the metal hardens, we beat off the crust, sprues and vents. We send the wheels for turning. Next, we assemble the disk; for this you can use 10 M8 screws with an internal hexagon and 10 M8 nuts with a nylon ring.


We will send the material to you by e-mail
Some regretfully part with their once beloved CDs. Men are reluctant to give up rims from car wheels. In order not to have to part with your favorite things, the editors of the site found many ideas on how to make simple and beautiful crafts from disks.
Many people no longer use CDs or DVDs. But why throw away something that might be useful?
Beauty is nearby and created with your own hands. All you need to do is take a disk, scissors and... imagination. From this material you can build an excellent designer lamp, panel, wall clock. Car rims serve as a distinctive or harsh men's garage.
DIY crafts from computer disks
For many, an interesting technique for working with CD discs was a discovery. They are easy to divide into two halves, each of which can be easily cut into small pieces with scissors. But with these shiny mosaics you can already make interesting crafts: decorate any, decorate, veneer.

| Illustration | Description of action |
|---|---|
 | Let's prepare three pieces of plywood, a threaded rod, a light bulb with a socket, a cord with a switch and plug, washers and nuts. |
 | We trace the discs on a piece of plywood and cut them out with a jigsaw. |
 | In one circle we drill a hole for the cartridge and insert it inside. |
 | Let's make a recess for the wire. |
 | We connect three circles, the one with the wire in the middle. We drill three holes at equal distances from each other. |
 | All that remains is to make identical holes in the stack of disks. We string them onto three pins inserted into the base. |
Frames for photos and mirrors from disks
What else can you make from old CDs for your home? We offer to build a beautiful frame for or photos. The work process is simple: glue is applied to the base (ready-made flat mirror frame or cardboard) and pieces from the blank are laid. You can cut them into squares or choose any shape.


DIY watch made from disks
A clock in the house can also be created with your own hands. To do this, you will need an unnecessary DVD blank, a decoupage napkin or rice paper, a wide synthetic brush, hands and a clock mechanism, and craquelure varnish.
| Illustration | Description of action |
|---|---|
 | Lubricate the surface with craquelure varnish, after wetting the brush in water and squeezing it out. |
 | Once the varnish has dried a little, apply acrylic paint. Both layers will be ready for further work in 2 hours. |
 | The drawing is torn out by hand. |
 | Apply PVA to the surface with a brush, lay out the design and coat it with glue on top. |
 | After we glued the sequins as numbers, we assembled the clock mechanism. |

What can you make for your kitchen from old CDs?
The kitchen is a special place. The housewives spend a lot of time there. To make your time more fun, you can make several DIY crafts for the kitchen. These can be flowers from disks, panels, lamps, mosaics on furniture, furniture decoration.


Kitchen furniture decor: original and easy


Related article:
What crafts for children can be made from disks with your own hands?
Plunging into the world of childhood is useful for many: to see how a child’s eyes sparkle with pleasure and the knowledge that he did everything BY HIMSELF! These are the kind of positive emotions that are easy to get when working with DVD discs: a child can handle the decor with minimal help from adults.


Related article:
This decor is especially popular when creating objects in vintage style. In the article we will consider detailed photo instructions decoupage: furniture, on glass from napkins, on a box.
Crafts from disks for May 9
Crafts for the holiday of May 9 come down to decorating the disk space with thematic elements and symbols.

Take a clean blank as a base. Using PVA glue, an applique made of colored paper, cardboard or satin ribbons will be glued onto it. In order for the panel to hang, a hole is pierced from the edge of the blank using an awl heated over a gas burner. A rope or ribbon is inserted before creating the applique.

If you use satin ribbons instead of paper, then it is also worth studying the tutorial on creating flowers from satin ribbons. It is not advisable to touch the finished work until the glue has completely dried.
How to use old disks to make three-dimensional figures
You can build amazing three-dimensional figures from blanks. This work is more difficult than the previous ones, since it requires many pieces cut into elongated triangles and strips. All of them are attached to the base using Titan ceiling tile adhesive. They can use anything as a base, even plastic bottles or unnecessary plastic toys.


DIY crafts from old car wheels with manufacturing instructions and photo examples
Here you may need the help of a man - we involve fathers, husbands, and grandfathers. These are not only decorative products, but also practical ones. Let's try to make an original fireplace and table.
Crafts from wheels for the garden
Instructions for creating a fire pit are shown in the photo below. The construction of such a structure will take less than a day.

For creating a fire, the stamping is ideal: there are holes for the air duct, and there is enough space for both firewood and coals. If desired, you can weld two such disks together by welding 4 legs to them - the design will serve as an excellent barbecue for a cauldron.
Article
The time of CDs has almost passed, many people still have a large number of them - music, films, cartoons, outdated computer programs- with images of characters from fairy tales and films, flowers, graphic pictures.
They sparkle and shimmer with all the colors of the rainbow on one side, and on the other beautiful drawings. You don’t feel like throwing them away - and there’s no need to, you can use them to make a lot of original, beautiful and useful things for your home.

In addition, it is very simple to work with them - they already have the correct circle shape, which in some crafts will only need to be changed slightly to give it to a future product or decoration the right type. At the same time, they are easily cut with ordinary office scissors and glued to a surface made of almost any material.
It happens that some home interior items have lost their appearance, it is not possible to replace them with new ones, or it is simply a pity to throw away an old favorite thing that has served faithfully for many years. Discs will help give things a new life.

For example, you can decorate an old mirror with them, making them out of pieces different shapes and the size sparkling and iridescent in the rays sunlight from a window or in the light of an electric lamp in all the colors of the rainbow - an original frame.

You can make a beautiful frame for a photo, decorate the edges of the cabinet drawers with a mosaic of pieces of disks.

Frame for mirror or photo
You will need a lot of disks, scissors, paints, glue, thick cardboard, colorless transparent varnish.

First you need to cut out a frame from cardboard in the shape and size of a mirror or photo. Then cut the disks into pieces of different shapes - squares, irregular quadrangles, rhombuses, triangles.

Take glue and stick the figures onto the frame so that there is a distance of one or two millimeters between them. As a result, the frame will have a mosaic of iridescent geometric shapes.

When the glue has dried and the figures cut out from the disk have stuck well, use black ink or paint to carefully and carefully go over the joints of the figures. After this, the frame is coated with transparent varnish, allowed to dry and mounted on a wall with a mirror or photograph.

Mirror frames made from discs look mysterious and original.

If in an apartment interior doors with glass, the glass can also be laid out with a mosaic of discs. In this case, there is no need to paint the joints between the pieces, but simply cover everything with transparent varnish, then there will be a feeling of light and space.

Clock made from disks
An option is to purchase a clock mechanism with hands or remove it from an old clock, lay clocks of any configuration on the wall with disks, gluing them to the wall, and strengthen the clock mechanism in the middle.
Decorating walls with discs
On the wall in the room or in the kitchen from disks with beautiful pictures, selected by topic, can be posted interesting composition. Or you can use them to create your own painting.
To do this, you need to take the disks and paint their shiny side with black ink, when the ink is dry, mark the lines of the future image along it, and then go over them with something sharp - a thick needle, a special scraper or a sharp knife with thin blade and a sharp tip.

Iridescent lines on a black background will look very beautiful - you can draw anything you like: unusual birds, flowers, an abstract design. And hang the discs on the wall in any order.

Decorating the kitchen with discs
In the kitchen, discs can make an unusual “apron” in the work desk area. It will look extremely original, and the discs will not be inferior in performance properties tiles– they are also easy to clean from splashes of fat and juice from vegetables and fruits.

The principle of working with them is the same as with frames for mirrors and photographs - just stick them on the wall.

Whether for a room or a kitchen, you can make a mosaic panel from disks by gluing pieces the desired shape and colors onto cardboard, and then covering the composition with clear varnish.
Household items made from discs
The discs will make an excellent hot plate. IN in this case– the disk will play the role of a base; you need to put a nice cover made of fabric on it, and the stand is ready.

It will be original to update the tabletop with cut pieces of disks coffee table. To do this, cut them, fix them on the tabletop using a plasticizer in any order or by making a pattern out of the pieces, and then fill the tabletop thin layer clear varnish, making it even.

The coating will be durable. The tabletop will sparkle and shimmer beautifully.

You can make a holder for women's earrings from two disks and a thick tree branch.
The core of the stand is made from a smoothly processed branch, ground to the diameter of the hole in the center of the disks, one disk will be the base, the second shelf, make holes in it and insert the earrings into them.

How to decorate a suburban area with discs
There is room for creativity and imagination. For example, from old car tires and rims, you can make a flower bed by decorating the outer surface of the tires with a mosaic of shiny pieces.

Is it possible from rubber tire cut out a peacock, and make the tail from whole round disks - to do this, you need to glue them in pairs with their shiny sides facing out, and then make them into a large triangle-tail, gluing the glued blanks in pairs overlapping.

On country fence The discs can be used to create a huge iridescent caterpillar. You can color the discs ladybug– use red paint, black paint to make spots and draw a head, and place them on fruit bushes and trees.

New Year's decorations from disks
Due to the fact that the discs shimmer in the rays of light with all the colors of the rainbow, beautiful snowflakes will come out of them. New Year's holiday– they are easy to cut with scissors, you can cut out the most intricate patterns. You can hang snowflakes on the Christmas tree and on the walls.

You can cut the disks into small pieces, thickly cover an ordinary ball with them and hang it from the ceiling on a thread - it will rotate and sparkle, reflecting the lights of New Year's garlands.

The application can be very different. From disks you can make interior curtain in the likeness of bamboo - collect disks on long threads. They can make an ultra-modern necklace, a refrigerator magnet, a vase, a candlestick, a stand for ballpoint pens and pencils, a box, you can even decorate a summer bag with them.

Unneeded CDs are an excellent material for creativity, a way to spend leisure time - making certain things from them, and an opportunity to decorate a house or cottage in an original and unusual way without spending a lot of money.

Photos of ideas for fake CDs