A fire pit in a country house is an element that performs both a practical and aesthetic function. Street fire for a fire will decorate the area, become a place for relaxation and even allow you to cook food on the fire! You need to build a fire pit around the hearth, pave it with durable tiles or stone. Such a site will become not only a favorite place to relax, but also a place to safely light a fire.
Safety rules for setting up a fireplace in the country
Because we're talking about about open fire, it is necessary to take into account all safety requirements and rules.
- The fireplace must be at least 3 meters away from all types of buildings. Ideally at 3.5-4 and beyond.
- The place where the fire is made must also be at least 4 meters away from trees and shrubs.
- According to the requirements of supervisory government agencies, a fire cannot be located next to fences, as well as on the border with neighboring areas and the street.
Thus, the most optimal location for a fire pit on a standard plot of 6 acres would be a clearing in the middle of the plot.

What kind of fire pit to make at the dacha
First, let’s determine what type of fireplace or hearth will look best on the site.
Conventionally, lesions can be divided into two groups:
- Stationary (made of brick, concrete, stone and other materials).
- Mobile and collapsible (like barbecues).
- Recessed hearth. The easiest way is to dig a hole in the ground (50-70 cm deep) and line it with brick or stone.

- Brick fireplace. It is necessary to choose fire-resistant materials. The shape can be arbitrary, but a round hearth is considered a classic. A metal grate can be placed in the center.

- Concrete hearth. You need to dig a hole, mark the boundaries and install the formwork. Then fill the future hearth concrete mixture. To make the element look more aesthetically pleasing, it can be faced with stone or tiles.

- Fire pit with table. The focus is created with depth. A stone tabletop with a hole in the center is laid on top of it. It turns out to be a very roomy table.


- Concrete products Reinforced concrete products can also be used to make a hearth. These can be rings for wells, borders, garden flowerpots.

- Metal. Here everything depends on the skills of the master: you can simply cook a barbecue from sheet metal, or you can make an intricate forged bowl.

Important! The walls of the metal hearth easily heat up and are traumatic. It is best to surround such a fireplace with stone, concrete blocks or brick.
Mobile fire pits, in our opinion, are best purchased from finished form. The offered variety of shapes will satisfy any designer's whim. In addition, everything is included in the package necessary equipment: poker, ash shovel, and so on.


If you want to use something from your dacha trash for this, then there is room to turn around here too. To make a fireplace, you can safely use old items: barrels, basins, a tank from washing machine, tractor wheel rims, boilers, large buckets.


This article is about ideas. We do not specifically focus on how to do this yourself, although it is quite simple. A video from our colleagues will help us verify this.
How to decorate a fire pit at the dacha
The fire bed is ready. It is necessary to decorate the place around it to make it comfortable and beautiful. We have collected the main ideas for decorating a fire pit in the country.
In order for an outdoor fireplace to fit into the style of the site, its design must match the house and its surroundings as a whole.


Setting up the outdoor fireplace area
Around the fire itself it is customary to lay out a small area of stones, pebbles, granite chips or you can simply fill it with concrete. When using colored stones, the site will be the “bright” spot of the area.


This improves security. And the fact that your guests don’t walk on the lawn is a big plus.
To create privacy, you can plant trees around the site at a distance of 4-5 meters from the fire pit. hedge or arrange tall plants in pots. This way you will be hidden from the eyes of unwanted witnesses.

We arrange chairs and benches
Depending on the number of family members or regular companies, we place chairs and benches around the fireplace, on which pillows or mattresses can be placed for beauty and convenience.


If next to each seat there is a small table where you can put a mug of hot tea or a plate of steaming kebab, then that’s great!

The following can be used as seats:
- Hemp;

- Ordinary chairs, which in case of rain will have to be brought into the house;

- Deep armchairs;

- Garden furniture, for example, rattan;

- Sun loungers;

- Swings and hanging chairs;


- Benches and benches, sofas.


Installing lighting
If desired, you can install around the fire pit area additional lighting or post Street lights on solar energy. When dusk sets in, this will create an atmosphere of celebration and comfort.

Woodshed, awnings and other elements
Next to the fire pit, you can equip a firewood shed (a place for orderly stacking of firewood). It’s practical - you don’t have to go far, and it’s beautiful - stacked firewood itself looks very attractive. In addition, this is an element of creating secrecy. We don't know why, but it seems important! :)

A rain cover is possible. But, in our opinion, this is not practical, since sitting in the rain, even under a canopy, around a fire is not at all comme il faut, and if you cover the fire itself with a canopy, then it is not very pleasant to sit in the smoke. And the canopy itself will become smoked and this, in general, does not meet fire safety requirements.

Another item we can't confidently recommend is a hammock. If a company gathers, does one lie down and the others sit? Not good. If you are alone and want to relax, then periodically get up, add firewood... what if the smoke hits you?? No, it is better to hang the hammock in the shade of trees away from the gathering place of noisy groups.

Decoration with figures
To make your area unique, placing chairs around the fireplace is not enough. A trick is required. Original idea- decorate the hearth area with figures.
It can be as a single character...

so does the whole ensemble...


Craftsmen make such beauty
It turns out very unusual and really unique.
Photo of a successful fire pit design in a summer cottage
Of course, the best fire pit is the one that you, family and friends enjoy. As you have seen, the choice of options is huge. The main thing is that a fireplace or outdoor hearth will definitely become a place of attraction and will allow you to spend time at the dacha in comfort, so that both soul and body can rest.
Here are some more photo ideas to inspire you.


In the courtyard of the house, at the country house or garden plot, it’s so nice to sit by the fire and barbecue. There are some for frying meat, but they are utilitarian and it never occurs to anyone to enjoy the sight of burning wood. On the contrary, ready-made coals are often thrown in, adding only a little thin firewood to keep preparation time to a minimum. In the case of a fire pit - a special place for lighting a fire - everything is different. This place is more often called a fire pit. It is designed not only for grilling kebabs, but also for admiring the fire. In a dacha or garden plot, a fire pit will come in handy even after pruning: you can burn the branches and use the ash as fertilizer.
Place for a fire in the country house
It is better to place a fire pit on a personal plot or in a country house at a sufficient distance from the house so that the smoke does not reach the house.
The site must be blown by winds - good draft is needed for normal combustion. The place must be level or some area will have to be leveled - under the hearth itself and under the seating area or armchairs.
Device and dimensions
The fire pit can be round or rectangular shape. It can be so deep that it is flush with the ground, or it can be partially buried, with slightly raised walls. There are options that are generally located above ground level - they are placed on a previously prepared site. So the choice is yours.

There is no point in arguing about forms. Round ones are more convenient - we stack the firewood in a hut. But rectangular ones are easier to build, especially brick ones. Here all the techniques are known - the masonry is carried out as regular wall. The wall thickness is just a quarter of a brick.
Those who are deciding how to set up a fire pit in the backyard of a house, in a country house or in a garden plot usually have several questions:
- What size should a fire pit be?
- Do you need a blower, if so, how many, what sizes, how to make them and where to place them?
- Should I install a grate or not?
- How to make cleaning the fireplace easier?
In fact, the first two questions are interrelated. If the dimensions of the fire bowl are quite large - a meter or more in diameter, you can make the walls solid, without a blower. If less than a meter, you will have to make holes for air intake.

It is better to make a blower not from below, but in the walls. Their number - two or four - is diagonally opposite each other. Small holes are left in the wall by breaking off a piece of brick (about a quarter). If necessary, they can be laid with the same, slightly trimmed, quarters. It is not worth making a vent from below: with such a design, ash flakes often fly around the area during the “operation” of the hearth - they are carried away by the air flow, which with such a design is difficult to regulate.
About the grate bars. It’s possible to do whatever is more convenient for you, but they don’t really affect functionality or convenience.
Site preparation
If the area is dense sandy soils, Can earthworks exclude. The second option for a simplified fire pit arrangement is an existing platform, laid out paving slabs, stone, paved or concreted. On this base you can lay a couple of rows of brick or stone. Now the hearth is ready. This option is ideal for soils that do not drain water well. After rain, in such an area the sunken bowl under the fire will turn into a mini-pond and will dry for a very long time.

You can prepare the site like this... By the way, an interesting idea is to use concrete blocks by loading the voids with pebbles or crushed stone
In other cases, without preparatory work not enough. No, you can build a fire pit right on the ground, but after a few years it will become unusable - the walls will “creep” after rains or spring heaving of the soil. Preparing the site for a fire pit is standard:
- We remove the fertile layer of soil, remove roots and stones.
- We level and compact the soil.
- Pour a layer of crushed stone (not limestone, but granite) of medium and large fractions measuring 10-20 cm, level it, and tamp it.
You can already install a fireplace on this base, provided that you are satisfied with a crushed stone cushion as a base or you are going to pour concrete. True, for concrete you will need to assemble formwork around the perimeter. If you plan to pave the area around the fireplace with tiles or stones, pour sand or fine screenings onto the crushed stone. The sand/screenings are compacted, leveled, then tiles or stone are laid.

Crushed stone site is not so bad
On clayey or fertile soils To prevent crushed stone from “sinking” into the ground, a density of 200-250 g/m is placed underneath it. This non-woven material, which allows water to pass through, prevents roots from germinating and prevents crushed stone from mixing with the soil. In fact, this is a very important layer that is best laid down.
How to make a fire pit out of concrete
A concrete fire pit can be round or square. The only difference is in the shape of the formwork. You only need two rings or two rectangles/squares.
A round shape can be made, for example, from two metal barrels different diameters. You just need to cut off two rings required height. Once the concrete has hardened, the mold will need to be removed, so it will have to be cut. If you may need it in the future, make a detachable mold from two half rings. Weld the hinges on one side and make fasteners on the other.

The easiest way to make a square shape is from boards, scraps of fiberboard, or thick plywood. They don't have to be new, but they should be even. We use self-tapping screws to assemble the form - it will also need to be disassembled.
The distance between the outer and inner formwork should be equal to the wall thickness. For a concrete hearth, a sufficient thickness is 15-20 cm. Place the form on the prepared base, check the distance, verticality and horizontality. We secure the form by driving in pegs so that the formwork does not move when filled with concrete.
A ring has formed between the two formworks into which we will pour concrete. We stick into this ring into the ground and hammer in pieces of reinforcement with a diameter of 10-14 mm. They are needed for greater wall rigidity. The length of the reinforcement is about 60 cm, the installation step is 15-20 cm. We also drive 15-20 cm into the ground. We place the reinforcement in the middle of the ring and so that its upper edge “sinks” into the concrete by 5 cm or a little more.

Now you can pour the concrete. The composition is normal; for 1 part M150 cement, 3 parts sand and 4 parts crushed stone. The amount of water is usually 0.7-0.8 parts (depending on the moisture content of the sand and crushed stone). We pour the concrete into the mold, leave it for 5-7 days, after which the formwork is disassembled. The concrete fire pit is ready, but you can start a fire in it no earlier than after 2-3 weeks, or better yet, after a month and a half. Only then will it gain enough strength and not crack from fire.
Making a fire pit out of brick or stone
You can set up a fire pit using bricks different ways. There are simple and cheap ones, but which can quickly fall apart. There are more difficult ones to make, but they will definitely last for several years. To build a fire pit, you can use ordinary solid red brick, but it will not “live” for long. This material can be used for country or garden hearths for one or two seasons.

If you need to do it quickly, you can do it this way
According to the rules
For permanently designed recreation areas, you will need to look for fireclay bricks. You can choose the sizes yourself, but it’s easier to install smaller ones, although it will take longer. But even for the largest fire pit you will need only four to five dozen bricks, so the laying will not take that much time.
Fireclay bricks are not a cheap pleasure, so when laying a hearth, they usually lay them out of fireclay inner part hearth, which is in direct contact with the flame. External part can be covered with ordinary brick or stone.

If you have already splurged on fireclay bricks, then you should lay it on fireclay mortar - it is sold in powder form in bags. Add water to the mixture and stir. After some time, the solution is ready for use. After you put the hearth together, you will need to wait 5-7 days for the solution to dry. Then load the fireplace fully with wood and warm it up thoroughly for a couple of hours. This is necessary so that the mortar and brick sinter into a single whole, and for this the temperature must be high. So don’t skimp on wood here. But fireclay mortar is used only for laying the inside of the hearth - where the temperatures are highest. The outer row is placed on cement-sand mortar. Fireclay is unacceptable here - it won’t have enough temperature and it will simply crumble.
Ordinary brick can be laid on clay or cement mortar. In some cases, you can do without mortar at all - filling the voids between the bricks with compacted crushed stone, sand or soil.
Simple and fast
You can set up a fire pit in just a few hours. You only need a few flat granite stones or pebbles, crushed stone. They line the bottom of the fire pit. You can also lay brick at the bottom and fill the gaps with crushed stone. To build the walls of the fire pit you will need two to three dozen bricks. That's all.

The procedure for arranging a fire pit is as follows:
- We mark a circle on the ground.
- We remove the turf and remove the soil to a depth that is equal to the length of the brick and the thickness of the base. The brick installed on the poke must rise at least a little above the ground level - then the fireplace will not flood or blow out.
- Level and compact the bottom.
- We lay out bricks or stones, tap them thoroughly with a mallet (or just with our feet).
- We fill the gaps with crushed stone, which we also press well into the ground.
- We place bricks “sticking out” around the circumference. On one side they become close to each other, and on the other side small gaps form. They are filled with previously excavated soil (if it is not clay or loam), sand or small crushed stone.

That's all. A simple brick fire pit is ready. It is not a fact that after a good rain it will remain in its normal form, but it requires little time and money.
Reliable design of a round fire pit made of bricks
In order for a brick fire pit to serve for a long time, its walls must stand on a solid foundation. On a bed of crushed stone it is usually poured reinforced belt made of concrete. It is made around the circumference, the thickness is not less than the thickness of the walls, the height is 10-15 cm. For greater strength, a reinforcing ring made of a rod with a diameter of 12-14 mm is placed approximately in the middle of the height.

The inner part of the hearth is lined with fireclay bricks, the outer part is lined with ordinary, hollow bricks, laid with bandaged seams (offset by half the brick). Fireclay bricks are placed on clay or fireclay mortar, ordinary bricks are placed on a cement-sand mixture.
Such a fire pit made of brick requires more materials and time to arrange, but it will last for many years. And to prevent it from being flooded with precipitation and covered with leaves, you can cover the fire pit with a shield. In this form, by the way, it can be used as a table.

A square or rectangular brick hearth is built using exactly the same principle. The technology remains the same, the only difference is the form.
Simple options
It is possible to make a fire pit much faster. Firstly, there are a lot of country or backyard fireplaces made of metal. All you need is a platform on which you will place a metal fire pit.

Metal bowl - quick way arrange a fire pit
The advantage of this solution is not too high price and the ease of setting up a place to make a fire. The advantages include low weight, which allows the installation to be carried under the roof for the winter or in bad weather.
A very similar option is a concrete fire pit. They are cast different sizes, they come in round or square. You can do exactly the same thing yourself, but you will have to wait at least a month. The finished bowl was placed and you can use it.

Photo ideas for decorating a fire pit
Making a fire pit is only half the battle. It is also necessary to equip a platform so that you can sit, look at the fire, enjoy the evening and conversation with friends. Some interesting ideas we have collected in this section.

You can simply stack the stones one by one...

Metal fire pit - safe, inexpensive


Make seats from logs - in the style of forest fires


Very easy to put together... but very difficult to find these bricks


How we want every corner of the dacha to please our eyes. And if stationary flower beds require preliminary preparation and careful planning, we can make small flower beds with our own hands from scrap materials, which can quickly add additional bright element to any corner of our garden.
With minimal effort you can turn any unnecessary container into a flower container.

Bright red salvia is a favorite choice for a bonfire bed.

Old ones have accumulated in the house flower pots? Let's make cheerful flower beds with our own hands that will make everyone smile.

Have you always wanted to try making a flower garden from a single log?

If you don’t have a suitable log, you can make such a flower garden yourself from the remains of a slab.

Tired of it plastic bottles in the country? There is a chance to make a vertical flower bed out of them for a gazebo or terrace.

You can easily make a flower garden from building blocks. Depending on how the blocks are painted, you can create a completely different mood: from strictly black to a fun colored mosaic.

No old containers, boards, bottles and other unnecessary things? Believe it or not, an ordinary thick rag and a cement solution can become the basis for an unusual flower garden.

An option for those who still have old unnecessary containers at their dacha. Your dacha - your rules, perhaps such a flower garden will not become a permanent guest in your garden, but it will lift your spirits for the season.

A flower garden option for fans of crafts made from tires.

Indeed, you can make flower beds with your own hands from any available materials. For example, this flower garden is made from an old motorcycle tank.

Any old box V in capable hands has a chance to turn into unusual flower garden.

If you are a fan of landscaping using flower containers, then you know about their high cost. You can make such flower containers yourself from cement, decorating them to your liking.

It's always a pity to part with unnecessary things that we have become accustomed to. We can say goodbye to them beautifully, making an unusual flower garden out of them with our own hands, and then calmly throw them away.

Even if these things are of small capacity, they can still serve us as a cute flower garden.

Near the house itself we usually have a blind area near the foundation and shade - this is not the best better place for a large flower bed. But a small stump from an old tree and one bush of ampelous petunia can create a small miracle.

Any unpretentious annuals can be planted both in a flower bed and in containers. These containers can beautify your garden lawn, porch or gazebo. In order to give such flower beds country style, wrap them in burlap.

Any old tub or even just an unnecessary barrel, plus a small bush of creeping flowers - and you already have a beautiful flower stream right under the windows of the house.

Plastic containers with flowers look better if they are a little closer to natural look, for example, place in a wicker basket.

Unusual DIY flower beds made from wood cuts require more frequent watering - unlike a regular flower bed, the flowers in them dry out faster.

Not only flowers, but also ornamental grasses look beautiful in the garden. Look how interestingly this sheep flower garden is organized.

Taking an original flower container is one of the simplest and most effective ideas. Cheerful flower caterpillars will illuminate your entire garden with their bright smile.

The unusual swan flower garden skillfully uses the bright contrast between white and blue bushes of small flowers.

If old car no one needs it anymore, and there is no hope of getting rid of it, you can make an unusual flower garden out of it with your own hands. The solution, of course, is not for everyone.

DIY flower garden using garden figurines. Such a nice company will always be waiting for you near the porch if you make a small front garden with your own hands.

A beautiful idea for a flower garden: a trellis with perennial vine in the shape of a heart. Your garden will immediately take on a romantic look.

The owner of an old clothing mannequin has the chance to create a small garden masterpiece with his own hands, like this goldilocks flower garden.

If you decide to decorate your garden with flowers, then an old dried tree is not a hindrance to you, but new challenge design thought. An unusual flower bowl with petunias will be the subject of admiration for your family and friends.

There are both simple and complex ideas for flower beds, but any of them will decorate your garden. Even if you are not a wonderful and skilled gardener, it is enough to buy a couple of bushes flower seedlings in the spring and experiment with them.

Even if in the first year, your flower beds, made with your own hands from scrap materials, do not turn out as beautiful as in these photos, you will be able to draw conclusions and increase your skills every year, and sooner or later your garden will become your pride.
Setting up your own cottage is an extremely exciting process. Even with a limited budget, making it a paradise vacation spot is quite possible. Let's share fresh ideas that will help make the dacha more comfortable and beautiful with minimal costs. There is no doubt that the effect of implementing these ideas will exceed all expectations.
1. Colored fire

Making a fire in the country is a troublesome task, and spending time on this activity is not always justified. Arranging a flowerbed in the form of a fire will help solve this issue. This decor is absolutely safe and requires investing energy into its construction only once. In addition, tamed fire, even if it is not real, always evokes positive emotions.
2. A secluded place to relax

A bench placed in the middle of the lawn or just under a tree may not be cozy enough. Place it with its back to the fence, and plant two low trees or bushes on the sides. This will make the resting area separate from the rest of the space. summer cottage.
3. From the kitchen to the dacha

A table on which flowers grow instead of tea and sweets looks cute and unexpected. In addition, this solution is also practical. It will help place more plants on a personal plot that cannot boast large area.

4. Functional and beautiful fence

Often a fence, the arrangement of which is not given enough attention, spoils appearance dachas You can easily combine business with pleasure by decorating it and at the same time turning it into a spacious storage system. Place boxes on the fence or place tall shelving close to it. Place pots with plants in them or place necessary little things.
5. Children's joy

In order for children to enjoy their stay at the dacha no less than adults, you need to take care of organizing their leisure time. For example, arrange an original children's Corner from scrap materials. Several large enamel containers built into a paved area - and the child will get a lot positive emotions. To make the corner a decoration of your dacha, not only arrange a sandbox on it, but also plant plants.
6. Entering a fairy tale

The gate is the item that creates the first impression. Which, as we know, is the strongest. To arrange a fairy-tale gate you will need wooden door and a lot of stones. This win-win combination of natural materials always looks fresh and attractive.
7. Tamed element

What cottage would be complete without barbecue? Building a fire pit can take a lot of time, as can putting it out later. A special place for the fire in the form of a recess lined with stones will help you prepare food over fire. It’s easy to make, but the benefits and aesthetics are obvious.
8. Garden in miniature

Japanese art the creation of miniature landscapes appeared many centuries ago. And today, the ability of such mini-gardens to have a harmonizing effect on a person’s emotional state is valued. Making such a work of art is quite simple. A base container, soil, small plants, stones and remnants of tiles - and a wonderful garden is ready. It can be placed on the veranda or used as a flower bed, placed on the lawn.
9. If there is no pond, but you really want it

Decorative crushed stone blue color replaces water. The swan's head is cut out of wood, and the body is made of wooden planks dug into the ground. Then all that remains is to plant the plants suitable color. This flower pond looks more than impressive, and its care is minimal, unlike the real thing.
10. Multi-level flower arrangement

Pots and containers for growing flowers of different heights, collected together, become a real decoration of the site. Don't be afraid to combine different pots - so decorative composition It will even look more interesting. But in this case, it is better to plant the same plants. This way the composite flower garden will look complete.
11. Turn on birdsong

The sounds of birdsong are known for their relaxing effect on the psycho-emotional sphere. It’s just a matter of small things - to attract birds to personal plot. In order not to spend a lot of time making a feeder, make it from painted tin cans tied to branches with bright ribbons.
12. The beds are in order

Most often, the beds look chaotic, which does not add aesthetics to the garden plot. From thin wooden slats you need to create something like a grid with square cells. Paint or coat the wood with a suitable protective impregnation. All that remains is to put the structure on the ground and plant the plants in the cells.
13. Stones and flowers

It will not be possible to find identical stones special labor. You need to put them on the ground, so that there is free space between adjacent ones. All that remains is to pour the seeds into the soil and wait for the plants to emerge.
14. Original lawn

If completely planted lawn grass If you don’t want to have the entire garden plot, then plant it in the shape of circles. To make such lawns look neat, make a low, almost invisible fence for them.
15. Fun swing

Swings are a source of positive emotions not only for adults, but also for children. They are easy to make from a construction pallet tied to strong tree branches.
Another proven way to make your dacha more comfortable is to install a gazebo. Continuing the topic -
A garden flowerbed is usually one of bright accents on the site, beautiful in itself. But if you decorate it in an original way and use various garden accessories, then it can be significantly revived and made even more attractive. Let's share a few ideas.
Before you design a flowerbed, it is important to choose for it appropriate place. It may depend on the rules for growing flowers that will live in the flowerbed, on the general concept of landscape design, on the characteristics of the climate zone, etc. Each gardener has his own preferences in organizing a flowerbed. A few ideas below may be helpful.
Garden scrap metal
The easiest way is to use available tools. Sometimes those items that you have long wanted to throw away can help create very original and successful garden compositions. For example, an old iron bed that has long been asking for a landfill. It can make an interesting base for a flower bed.

While not everyone has an old iron bed, a spacious iron basin or bathtub is more common. You can simply fill them with drainage and soil to plant the desired flowers. If plants have a long taproot root system, then it is better to remove the bottom of tin containers to leave room for the flowers to develop roots.

Old bicycles from the garage can also become an original basis for a flower bed. In this case, flowers are planted either in containers attached to the frame or trunk, or around the bicycle itself.

Some gardeners manage to use an entire car destined for scrap instead of a flowerbed. Looks like this flower bed very impressive and original.

An old, rusty garden wheelbarrow is also a good option for a flower bed. You can paint it the color you want, fill it with soil and plant flowers in it.

A flowerbed made from an umbrella looks no less elegant. If it’s been lying around on the farm for a long time old umbrella, then it can be used as a container for flowers in garden decor, or you can install such a mini-flower bed in the center of the flower garden.

Mini slide with serpentine
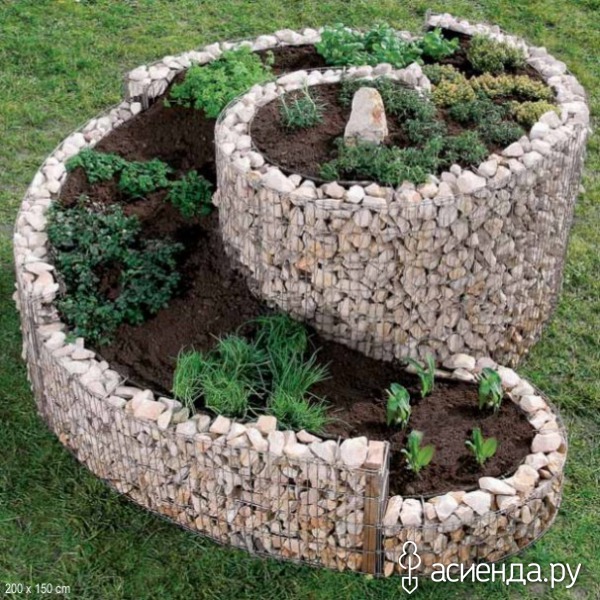
If ordinary alpine coaster a little tired, then you can replace them beautiful flower beds several floors, reminiscent of a serpentine road in the mountains. They use as a basis different materials: stones, bricks, boards, tiles, logs, etc. It all depends on the size and design of the slide. It is better to plant flowers in ascending order: short ones at the top, and taller ones at the bottom.

For large similar flower beds, gabions are suitable. They will hold the soil well and look very aesthetically pleasing.
Flowering logs
The massive logs left over from the construction of the bathhouse can be useful for creating a mobile flower bed. They look very natural and fit well into any garden design. A hole is hollowed out in the log (at least 20-30 cm, depending on the width of the log), soil is filled in and flowers with a small root system are planted. If necessary, such a flower bed can be moved to a new location.
stream of flowers
This version of the flower bed is very popular and beautiful. It’s not difficult to make: just choose a large container (preferably a large jug, barrel, bucket, etc.), dig a little (5-7 cm) into horizontal view into the soil. Then the container is filled with earth so that it seems to spill out. It is best to choose ground cover plants with a small root system for such a flower bed: alyssum, sedum, young, saxifrage, grass carnation...
"Revived" stump
If an old stump remains in the garden after a tree was cut down and has been standing idle for a long time, then it can be decorated with flowers. You need to make one or more depressions in it, pour soil there and plant flowering plants.

Boat with flowers
Gardeners whose plot is located next to a body of water may find an old, unnecessary boat on their farm. It is just perfect for creating an elegant and neat flower bed.


