Pencil holders are a necessary and useful item for a written interior. Manufacturers offer us a huge good range of pencil holders and that's good. However, manual work has its advantages. You can create an even better pencil box to your taste in an exclusive version with your own hands. In this article we will look at: how to make original pencil boxes with your own hands.
You will need: toilet paper sleeves, colored corrugated paper, scissors, glue, a simple pencil ruler.
Master Class
Salt dough pencil

You will need: water, flour, extra salt, a cardboard jar for the frame, PVA glue, scissors, a piece of decorative cord or corrugated paper, gouache, a brush, a button, stacks, acrylic varnish for crafts, a toothbrush.
Master Class

Salt dough pencil is ready!
original pencil case

You will need: tin can, white and green fleece fabric, green felt, scissors, synthetic winterizer, glue gun, thread, needle, centimeter, pencil, plastic eyes for toys.
Master Class

Apple pencil

You will need: oval-shaped plastic bottle, red liquid acrylic paint, golden cord, artificial leaf, glue gun, plate, nail file.
Master Class
- Pour the paint into the bottle and shake well so that the entire inside of the bottle is painted.
- Drain off any remaining paint.
- Put the bottle on a plate and wait until it dries completely.
- File the edges of the neck, if necessary, removing excess paint.
- Wrap the neck with a golden cord and glue the leaf.
The apple pencil is ready!
creative pencil box

You will need: glass jar, yellow liquid acrylic paint, black permanent marker, nail file.
Master Class
- Pour the paint into the jar, close the lid and shake well to evenly color the inside of the jar.
- Drain off any remaining paint.
- Wait for complete drying.
- File the edges of the neck of the jar, removing excess paint if necessary.
- Draw a funny face with a permanent marker.
minion pencil holder

You will need: superglue, hole punch, scissors, EVA polymer material (bathroom rugs are made from it) in blue, white, black, gray, brown, wooden skewer, black and blue felt-tip pen, simple pencil, template printout.

Master Class

Plastic bottle pencils

You will need: 3 plastic bottles (for example, from shampoo), photo frame, glue gun, scissors, acrylic paints.
Master Class
- Cut off the neck and cut out the front top as shown in the photo for each bottle.
- Color the bottles to your liking.
- Glue the bottles to the frame.
Plastic bottle pencils are ready!
Cheerful pencil box

You will need: plastic shampoo bottle, scissors, stationery knife, glue, colored paper, pencil, double-sided tape.
Master Class
- Cut off the top of the bottle.
- Draw the desired shape with a pencil, such as a crown or horns, then cut it out.
- Cut the paws out of plastic and glue them on.
- Cut out eyes, teeth, tummy from paper and glue on a pencil holder.
- Attach the pencil holder to the wall using double sided tape.
book pencil

You will need: thick paperback book, pencil, cardboard, scissors, white acrylic paint, glue, clips.
Master Class
- Divide the pages of the book into 5 equal parts and secure with clips.
- Glue the pencil to the side of the book.
- Wrap the pencil around the book so that it is in the center.
- Form the petals and secure with glue.
- Paint the top of the petals with white acrylic paint, thus priming the pages so that they do not separate.
- Trace the bottom of the pencil case onto heavy card stock, then cut out.
- Glue the cardboard bottom and wait for it to dry.
pencil case

You will need: 32 pencils, glue gun, cardboard, scissors.
Master Class
- Glue 8 pencils together to form a wall.
- Make 4 walls in this way.
- Glue the walls together to make a square.
- Cut out a square of cardboard the size of a pencil case and glue it as the bottom.
The pencil box is ready!
Exquisite pencil holder

You will need: tin can, double-thread braid, rose braid, satin ribbons, stationery pins, glue gun, scissors.
Master Class
- Wrap the surface of the jar with double-thread tape and secure with glue.
- Glue the ribbon with the roses to the top of the jar.
- Tie a satin ribbon bow.
- Twist a rose from a satin ribbon and attach it to the bow with stationery pins.
- Glue the bow with the rose to the pencil holder.
A pencil is one of the useful attributes on the desktop, which helps us keep our workplace in order and quickly find writing utensils. Quartblog has prepared for you some simple ideas on how to make pencil boxes with your own hands from what is usually available in the house. In addition, these crafts can be made with the child. Let the original pencil holders become an additional decorative element in your interior!
From jars
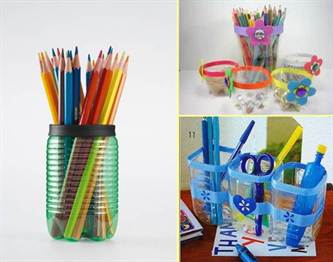
This is the most popular way to make pencil cases. Jars can be any: glass, plastic, tin. They can be pasted over with multi-colored paper, fabric, braid, ribbon, lace, painted with acrylics - it all depends on your imagination!


From cardboard and paper
Another easy way to make a pencil holder is cardboard or colored paper. You can use cardboard toilet paper rolls, shoe wrappers, old magazines or newspapers.


From plastic bottles
Use plastic bottles for shampoo, cream and other cosmetics. For example, funny monsters can be cut out of multi-colored bottles.


From natural materials
More precisely, from logs and twigs. Here you will need a man's help to cut out a suitable stump and drill holes in it for pencils. You can also take several branches of the same height and tie them with twine around the base.


Clay
Clay is a fertile material for creating pencil holders. You can either take self-hardeningpolymer clay and wrap it around some kind of base, or come up with an original design and mold it from sculptural clay or plasticine, and then paint it with paints.


From pencils
From papier-mâché
The papier-mache technique allows you to create three-dimensional figures from shredded paper mixed with glue: use newsprint, and then color the pencil box with paints.

Crochet or knit
If you know how to knit, and even try to introduce a child to knitting, then you can easily tie a warm multi-colored cover onto a base jar.


Sew from fleece or fabric
Soft and cozy pencil cases can also be made from fleece and fabric. Attach eyes, nose and ears to such coasters - you will get funny pencil animals for the children's room.


Decorate with twine, thread


Decorate with beads, buttons
If you like small and painstaking work, you can glue the pencil holder with small beads, pebbles, buttons.
To please a schoolchild and bring bright colors into the interior of a nursery, you don’t need so much: improvised materials, a little imagination and 15-20 minutes of free time.
The elements necessary for making a bright pencil holder from a plastic bottle are always at hand for any housewife.
All you need is:
- empty plastic bottle,
- absorbent wipe,
- bright threads
- and a beautiful button for decorating the product.
Do-it-yourself pencil from a plastic bottle for children:
First you need to make a "shell" for our turtle. To do this, we cut the bottom of the bottle along the line found on most of these plastic products. If there is no such line, carefully draw it with a marker and make sure that the cut edges are as even as possible.

The resulting blank will be the basis for our turtle stand. The next step is holes for pens, pencils and other student joys. We make them on the "hills" of the shell, using small ones, including nail scissors.


Then we cut out the “body” of the turtle along the contour, eliminating all the flaws in the drawing. If it did not work out the first time to draw ideal contours, do not be discouraged: the side on which there are flaws will not be visible when using the product. Don't let inaccuracies in proportions bother you either. This will not spoil the stand at all, but, on the contrary, will give it uniqueness and “liveness”.

It's time to put the whole design of the stationery stand together. For this we use bright threads. Having attached the shell to the outside of the body, start stitching the napkin with a regular seam. When you reach the nearest "hollow" in the bottom of the bottle, throw the thread to the opposite side and sew in the other direction, repeating the process of throwing over and over again. When all the hollows are circled with a thread, fasten it with a knot in the central part of the bottom and decorate with an interesting button.


The turtle is assembled. From above, it looks perfect thanks to an interesting decorative solution, from below everything is also very neat - only a modest circular seam.

It remains to make only the final touches in the decor of our stand. Using a black gel pen, draw "fingers", placing three stripes on each foot of our turtle. Let's not forget to draw her a dazzling smile and glue her eyes.

That's all - a do-it-yourself plastic bottle pencil holder is ready to use.


The stationery stand became an integral part of the office interior around the middle of the 20th century. The pencil box helps to maintain order in writing materials, so it will be useful not only for office workers, but also for preschoolers, schoolchildren and students. In this article, you will learn about DIY crafts for schoolchildren. A variety of coasters for pencils and pens will be a good gift and at the same time a useful item.
Materials for making a pencil case:
- cardboard;
- scissors;
- PVA glue.

1. A cardboard pencil will consist of several modules, each of which is made separately. Cut out a square from one sheet of cardboard.
2. Fold the square in half and then in half again.

3. Bend the extreme sides of the square to the center. Turn the rectangle over and fold the other sides to the center. Thanks to such folds, the square that was at the very beginning was divided into 16 identical squares.
4. Bend the corners of the main square. Then fold the parallel sides towards the center.
5. Turn the workpiece over and fold the parallel parts again towards the center. Insert the pieces one into the other to make a square in the center. If the square came out sloppy, cut out a square from the remnants of cardboard and insert it into the blank. You can insert a photo or picture instead of regular cardboard.

6. Make five more of these blanks. Glue the parts to be joined if necessary.
7. Six blanks must be connected and glued so that a hexagon forms at the bottom.
8. Trace the base on a blank piece of cardboard and cut it out. Glue the pencil holder obtained in step 7 to the bottom.
Cardboard pencil ready. This craft can be done not only by schoolchildren, but also by younger children in kindergartens. The original stand for writing instruments will decorate the desktop and help to maintain order in the study area.
Stands for writing instruments can also be made from used shampoo bottles. Such pencil holders will bring notes of cheerful mood and will be able to decorate the children's room.

- scissors;
- plastic shampoo bottles;
- self-adhesive;
- stationery knife;
- double sided tape;
- glue.

1. Cut off the top of the bottle in a semicircle. You can make an incision with a clerical knife, and then cut through to the end with scissors.
2. You can cut handles or legs from the top to make the pencil holder more interesting. Glue them on.

3. Cut out eyes, mouth and teeth from black and white self-adhesive. Glue on the bottom of the bottle.
4. Apply double-sided tape to the back of the pencil holder so that it can be mounted on the wall.

How the finished pencil box from the bottle will look depends on your imagination.
Even small children will like the minion-style pencil, and it is not difficult to make it with all the necessary materials. This master class will be useful for teachers in labor lessons.
Materials:
- can;
- EVA (foamed rubber);
- hole puncher;
- markers;
- pencil.
1. Download the minion clothes template and print it out on paper.
2. Clean the tin from the label, wash well and dry.
Scattered writing materials on the table distract attention and interfere with important matters. To eliminate the mess on the table, make a pencil holder from a plastic bottle with your own hands. Such an item will not only help maintain order in the work area, but also make the interior more comfortable.
Necessary tools and materials
Even a child can make a pencil holder with his own hands, because you don’t need special skills for this skill.To create a pencil case that can perform the function of a pencil case, you will need:
- 2 plastic bottles with a volume of 0.5 l;
- glue;
- scissors or stationery knife;
- bright plastic zipper;
- centimeter tailor;
- items for decorating crafts - depending on the decor option invented, these can be threads, colored cardboard, buttons, paints, felt-tip pens or something else.
While working on creating a stand for pencils and pens, you should follow safety precautions, handle plastic and cutting objects carefully to avoid injury.
Step by step instructions for making
 To clean up the table will help pencil holders, thanks to which you can separately lay out pencils, pens and felt-tip pens
 Hand-made creation of a stand-pencil case will take no more than half an hour. And the algorithm for making a pencil holder is as follows:
- Plastic bottles with a volume of half a liter (containers from lemonade or mineral water are suitable) are rinsed and dried.
- The neck and a couple of centimeters of plastic adjacent to it are cut off from the first bottle, and the bottom from the second.
- With the help of a centimeter, the circumference of the resulting holes is measured, and the resulting result is transferred to the zipper, measuring its part from the fastener.
- The cut off part of the zipper is unfastened and on each half of it the fabric base is smeared with glue.
- Glue the zipper to the prepared parts of the bottle so that it can be fastened.
- They wait for the glue to dry and start using a practical and convenient pencil holder.
Such a simple version of making a stationery stand is good because it allows you to keep pens, felt-tip pens, pencils, brushes in order and will not let them crumble, even if the craft falls off the table.
decor ideas
In order for the pencil box to play not only its main functional role, but also look beautiful, fit into the interior, cheer up, it can be decorated. There are many decor options - you can stick pasta of a suitable shape on plastic, cover them with paint and, after waiting for it to dry, apply a layer of transparent varnish.
 Creating amazing crafts allows you to keep your child useful and interesting
 A very simple and original decor for a plastic stand can be made from ordinary colored paper or cardboard.
 Cheerful coasters for pencils will cheer up any child
 You can also create a unique finish for your creation from ice cream sticks.
 Ice cream sticks will help in creating an interesting and new little thing
 And if you have the remnants of yarn at hand, you can coat the pencil holder with PVA glue and wrap it tightly with threads. To make an original pencil holder with your own hands, you need a little time, a minimum set of materials and a desire to create the necessary and practical little thing.
You can make a stand for pens with your own hands from anything. These are glass, tin, plastic cans, and a piece of wood, and cardboard, and it would seem that material is completely unsuitable for this: disks, floppy disks, ice cream sticks, an old grater and much more. Consider how to make several of these coasters from different materials.
wooden coasters
They can be made from a saw cut, a block, a log, plywood, ice cream sticks, twigs, etc. The material for decorating is also varied. For example, paint or decoupage stickers and more unusual options like woolen socks. Stands made of wood are beautiful, stable, durable. They look beautiful not only on a child's desk, but even decorate an adult's desk.
For a stand from a saw cut, you need to drill several holes in it. The saw cut should be about 10 cm in height. It will look unusual if you use it at an angle. Be sure to carefully clean the bumps and burrs. If desired, paint, cover with a layer of varnish. By the same principle, you can make a stand from cork wood discs. They need to be pre-glued and drilled holes for the handles.


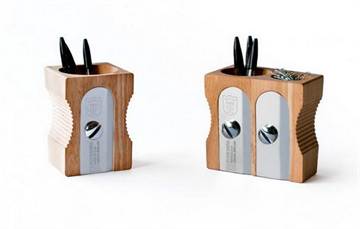
A bar stand can be made using the same technology as the previous one, or you can cut it into several pieces and fold the box. There are also many design options. From paint or burning to decoupage technique. This material can make a very unusual stand. For example, cut a sharpener or a horse out of it.

For a log stand, you need to remove the core with a chisel. Choose the height as desired and ease of use. Clean up the burrs well. Decoration is not required here, but you can use ribbons, natural material, decorative elements.

From plywood, you can come up with a very unusual stand. You will need a drawing to assemble the structure. The parts are glued together. Decorate with the technique of cutting and burning wood. From this material it is easy to make both a funny elephant and real openwork masterpieces.


For a stand made of ice cream sticks and twigs, it is advisable to use some kind of jar or cardboard blank as a base. But you can do without it by folding a well out of sticks, for example. These materials can also include wooden pencils and clothespins.


paper models
Origami technique is used for paper coasters. According to the scheme, a stand of any desired shape is formed from a sheet of paper. The technique of modular origami is also used. In this case, many blanks (modules) of one or several colors are assembled in advance, and a stand is assembled from them, like from a designer. Such stands are assembled according to the scheme.


Another popular material is cardboard. You can even use waste material from it - bushings from rolls of paper towels or toilet paper. Suitable and various boxes of cardboard. Such coasters can be decorated with corrugated paper, felt, fabric, cord, ribbons, etc.
If a sheet of cardboard is used, then a box of the desired shape and size is pre-glued from it.


Like real braids, coasters are made from newspaper tubes. For them, cut the newspaper page into 4 strips. From each twist the tube with a knitting needle. You can use several strips for one tube, lubricating with glue, or glue a long tube from short ones. The product is woven according to the scheme, and then stained with paint and varnished. Decor elements - optional.


An interesting idea - a stand from old magazines. For the stand, they need to be divided into several parts. Glue to each other in the form of a flower. Decorate with paint, decorative elements.

We use plastic
Here, the material can be milk bottles, sour cream, detergents, ordinary plastic bottles and cups. Options for such stands in the photo:


Master class of a plastic bottle stand on video:
For milk and detergent bottles, cut off the cap or cut out any other convenient shape. The material is light, so the stand from it can not only be placed on the table, but also hung on the wall or table with a hook or Velcro. As a decoration, you can stick a funny muzzle on the stand.

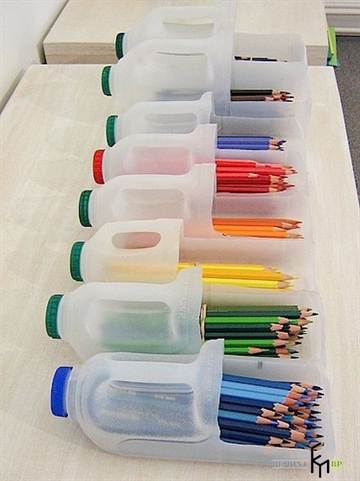
From bottles you can create whole compositions. Where in each compartment will be stored separately pens, separately pencils, separately other accessories. Options for such stands in the photo:

Unusual decision
To make a pen stand from disks, take 7 disks, a tool that can be used to cut them (hacksaw, jigsaw, grinder or hot nail), sandpaper. Make cuts on the disks according to the scheme.
Scattered writing materials on the table distract attention and interfere with important matters. To eliminate the mess on the table, make a pencil holder from a plastic bottle with your own hands. Such an item will not only help maintain order in the work area, but also make the interior more comfortable.
Necessary tools and materials
Even a child can make a pencil holder with his own hands, because you don’t need special skills for this skill.To create a pencil case that can perform the function of a pencil case, you will need:
- 2 plastic bottles with a volume of 0.5 l;
- glue;
- scissors or stationery knife;
- bright plastic zipper;
- centimeter tailor;
- items for decorating crafts - depending on the decor option invented, these can be threads, colored cardboard, buttons, paints, felt-tip pens or something else.
While working on creating a stand for pencils and pens, you should follow safety precautions, handle plastic and cutting objects carefully to avoid injury.
Step by step instructions for making
 To clean up the table will help pencil holders, thanks to which you can separately lay out pencils, pens and felt-tip pens
 Hand-made creation of a stand-pencil case will take no more than half an hour. And the algorithm for making a pencil holder is as follows:
- Plastic bottles with a volume of half a liter (containers from lemonade or mineral water are suitable) are rinsed and dried.
- The neck and a couple of centimeters of plastic adjacent to it are cut off from the first bottle, and the bottom from the second.
- With the help of a centimeter, the circumference of the resulting holes is measured, and the resulting result is transferred to the zipper, measuring its part from the fastener.
- The cut off part of the zipper is unfastened and on each half of it the fabric base is smeared with glue.
- Glue the zipper to the prepared parts of the bottle so that it can be fastened.
- They wait for the glue to dry and start using a practical and convenient pencil holder.
Such a simple version of making a stationery stand is good because it allows you to keep pens, felt-tip pens, pencils, brushes in order and will not let them crumble, even if the craft falls off the table.
decor ideas
In order for the pencil box to play not only its main functional role, but also look beautiful, fit into the interior, cheer up, it can be decorated. There are many decor options - you can stick pasta of a suitable shape on plastic, cover them with paint and, after waiting for it to dry, apply a layer of transparent varnish.
Creating amazing crafts allows you to keep your child useful and interesting A very simple and original decor for a plastic stand can be made from ordinary colored paper or cardboard.
 Cheerful coasters for pencils will cheer up any child
 You can also create a unique finish for your creation from ice cream sticks.
 Ice cream sticks will help in creating an interesting and new little thing
 And if you have the remnants of yarn at hand, you can coat the pencil holder with PVA glue and wrap it tightly with threads. To make an original pencil holder with your own hands, you need a little time, a minimum set of materials and a desire to create the necessary and practical little thing.
You can make a stand for pens with your own hands from anything. These are glass, tin, plastic cans, and a piece of wood, and cardboard, and it would seem that material is completely unsuitable for this: disks, floppy disks, ice cream sticks, an old grater and much more. Consider how to make several of these coasters from different materials.
wooden coasters
They can be made from a saw cut, a block, a log, plywood, ice cream sticks, twigs, etc. The material for decorating is also varied. For example, paint or decoupage stickers and more unusual options like woolen socks. Stands made of wood are beautiful, stable, durable. They look beautiful not only on a child's desk, but even decorate an adult's desk.
For a stand from a saw cut, you need to drill several holes in it. The saw cut should be about 10 cm in height. It will look unusual if you use it at an angle. Be sure to carefully clean the bumps and burrs. If desired, paint, cover with a layer of varnish. By the same principle, you can make a stand from cork wood discs. They need to be pre-glued and drilled holes for the handles.


A bar stand can be made using the same technology as the previous one, or you can cut it into several pieces and fold the box. There are also many design options. From paint or burning to decoupage technique. This material can make a very unusual stand. For example, cut a sharpener or a horse out of it.


For a log stand, you need to remove the core with a chisel. Choose the height as desired and ease of use. Clean up the burrs well. Decoration is not required here, but you can use ribbons, natural material, decorative elements.

From plywood, you can come up with a very unusual stand. You will need a drawing to assemble the structure. The parts are glued together. Decorate with the technique of cutting and burning wood. From this material it is easy to make both a funny elephant and real openwork masterpieces.


For a stand made of ice cream sticks and twigs, it is advisable to use some kind of jar or cardboard blank as a base. But you can do without it by folding a well out of sticks, for example. These materials can also include wooden pencils and clothespins.


paper models
Origami technique is used for paper coasters. According to the scheme, a stand of any desired shape is formed from a sheet of paper. The technique of modular origami is also used. In this case, many blanks (modules) of one or several colors are assembled in advance, and a stand is assembled from them, like from a designer. Such stands are assembled according to the scheme.


Another popular material is cardboard. You can even use waste material from it - bushings from rolls of paper towels or toilet paper. Suitable and various boxes of cardboard. Such coasters can be decorated with corrugated paper, felt, fabric, cord, ribbons, etc.
If a sheet of cardboard is used, then a box of the desired shape and size is pre-glued from it.


Like real braids, coasters are made from newspaper tubes. For them, cut the newspaper page into 4 strips. From each twist the tube with a knitting needle. You can use several strips for one tube, lubricating with glue, or glue a long tube from short ones. The product is woven according to the scheme, and then stained with paint and varnished. Decor elements - optional.


An interesting idea - a stand from old magazines. For the stand, they need to be divided into several parts. Glue to each other in the form of a flower. Decorate with paint, decorative elements.

We use plastic
Here, the material can be milk bottles, sour cream, detergents, ordinary plastic bottles and cups. Options for such stands in the photo:


Master class of a plastic bottle stand on video:
For milk and detergent bottles, cut off the cap or cut out any other convenient shape. The material is light, so the stand from it can not only be placed on the table, but also hung on the wall or table with a hook or Velcro. As a decoration, you can stick a funny muzzle on the stand.

From bottles you can create whole compositions. Where in each compartment will be stored separately pens, separately pencils, separately other accessories. Options for such stands in the photo:


Unusual decision
To make a pen stand from disks, take 7 disks, a tool that can be used to cut them (hacksaw, jigsaw, grinder or hot nail), sandpaper. Make cuts on the disks according to the scheme:

Carefully clean the edges of the cuts from all kinds of irregularities. If you plan to paint them, you can do it at this stage. Assemble the structure.

The stand made of floppy disks looks interesting. The easiest option is to make a box of 5 floppy disks, fastened with plastic fasteners. But there are more complex options:


A very unusual solution is a stand made from an old grater. Here the handles are inserted into large holes. And actually there is nothing to do - insert the handles into the grater and that's it.

Video on the topic of the article
There are many interesting solutions, there is a suitable idea for everyone. See the video for a few tutorials:
All parents are familiar with the situation when, after drawing, pencils are scattered around the children's table. Pencil boxes are made of cardboard and usually don't last long. Therefore, in order for the child to have order on the table, you can make an original pencil holder from a plastic bottle.
- Plastic bottle;
- saucer;
- felt-tip pen;
- awl;
- narrow green ribbon;
- needle;
- sticker;
- scissors.
1. Cut off the top of the bottle with scissors or a sharp knife. The length of the pencil is approximately 16 cm, so the height of the remaining part of the bottle must be at least 25 cm.

2. Place a saucer on top of the cut off part of the bottle so that its edge coincides with the edge of the bottle.

3. With a felt-tip pen, we circle the edge of half of the saucer.


4. Cut the edges of the bottle along the drawn line with scissors.

5. We put the saucer again, but now we circle its lower edge with a felt-tip pen.

6. Cut off only one side of the bottle along the line.

7. Bend the valve from above so that the cut edges match. It turned out a box for pencils with a lid.

8. Now let's start decorating the pencil box. First, we glue the cut edges with tape to protect ourselves from cuts on sharp edges. With a heated awl, we make punctures along the edge of the lid.

9. In the same way, we make holes at the bottom of the bottle.

10. We thread a green ribbon into a large needle and “stitch” over the edge along the holes on the lid. You can use any color ribbon if you like.

11. In the same way, we “stitch” the bottom of the pencil holder.