What could it be better than a gift or a souvenir made with your own hands from natural materials. The most common, affordable and easy to process material is wood. Therefore, today the topic of our article is standmade of woodfor pens and pencils. The stand is a universal thing - it can be safely placed either at home near the computer or on a desk, or in the office. So, let's start manufacturing and move from simple to complex...
Tools that we will need for all types of crafts:
- drill with drill bit from 8 to 10 mm. ,
- wood hacksaw (preferably with fine teeth) or a hacksaw for metal for smoother cuts in branched places,
- knife and wood cutters
- skin, Sander or emery.
- screwdriver and screws
- glue, varnish, paints
1 pencil stand square.
To begin with, the simplest stand, for it we take a piece of wooden block, better coniferous species, or other wood with a beautiful vein texture. The size of the bar is 7*7*10 cm (depending on the number of pencils you plan to insert). We saw off, mark, and drill holes (it is better not to make them not through, so as not to stain the table with stylus). Then we sand the surface and varnish it so that the wood does not darken and looks beautiful. The simplest stand for writing instruments is ready.
2 Pencil stand round cut
Next option simplest stand– a stand made of cut wood. We take a tree that is suitable for us in size - the diameter is about 20 cm. We cut off the piece of log we need - the height of the cut is about 10 cm. Next, according to the plan, we mark and drill holes, sand it down so as not to plant a splinter later. The top of the stand can be coated with varnish or paint. In the latter case, you can safely place it on a formal office desk.
3 Pencil stand mushroom tinder fungus
And this is a variation on the theme of sawing. Which uses the tinder fungus.
The mushroom usually grows on rotten birch trees. We cut it off, dry it, and sand the place where it grew on the tree. We saw off a piece of the log and glue a mushroom onto it. In the mushroom we drill the required number of holes for pencils. We decorate the cut to taste. I used acorn caps. If desired, you can also drill holes in the cut or make a recess for an eraser and paper clips.
4 Pencil holder wood

Let's move on to more complex options stands. For the “pencil tree” stand we will need a processed lathe a blank, one and a half pencils high (about 20 cm) and a diameter of 10 cm at the butt to 5 at the top of the tree. You can do without a machine if you work on the block properly with a knife and sandpaper.
In the finished tree trunk, at different angles (the bottom is more blunt, the higher, the dumber) we drill holes into which we will insert pencils. If you have a lathe, you can make wooden tubes. Then drill holes of larger diameter in place of some knots and place the tubes there with glue, as shown in the figure. This way it will look more beautiful and there will be no monotony.
5 Pencil stand stump with mushrooms
In order - we find a log (you can use oak, linden or another deciduous tree with beautiful bark), cut off a stump 10 cm high. Next, from a board with beautiful veins we make a stand, a cover for the stump and several mushrooms (a lathe or the ability to cut out figures will be very useful here made of wood)
We drill in the stump required amount holes for pencils, we drill the same number in the lid of the board for the stump. The lid can be carved in a circle. Parts from the board are carefully sanded and, if necessary, varnished.
We assemble the entire structure using self-tapping screws (stump and stand), wooden cotter pins (lid and mushrooms) and glue.

The photo above shows a variation on the hemp theme, where carved wooden flowers are used for decoration instead of mushrooms.
6 Pencil stand - composition “Forester’s Farm”
And finally, the most complex, but at the same time the most beautiful of the stands, codenamed “Forester’s Farm.”
You can’t do this without the ability to work on a lathe and cut out figures from wood.
In the composition we have:
A forester's house, consisting of a stump 10 cm high, with a cut piece of bark in the form of a window and a roof-bar, sawn diagonally along to form a triangular figure. The house is the most beautiful detail of the composition. The roof is decorated with carvings in the form of a maple leaf (made separately and glued). Longitudinal grooves, burnt flowers along the roof slopes and applique on it in the form of flowers. The roof and stump are attached to wooden cotter pins, screws and glue.
The next details of the composition are a stylized barrel-stand for pencils, a sheaf and bast shoes are carved from pine. I admit that they were made by a master using special wood cutters based on my sketches. The parts are simply glued to the base.
Cellar with drilled holes for pencils, made of half hemp, secured to the base with cotter pins and a self-tapping screw on the reverse side.
These are such different, but each wonderful, stands we got.
We have been using pencils since kindergarten. But few of us know how pencils are made, what kind of wood is used for these purposes. It is noteworthy that the creation of these stationery products is carried out differently in each factory. But there are also general points that are fundamental to the production process.
What tree?
A classic wooden pencil has an important component - wood, the quality of which determines the use of this accessory. It is clear that not every tree is suitable for these purposes. In the past, wood from Virginia or red cedar, which belongs to the juniper genus, was used in industry. Long fibers, absence of knots, ease of processing - this is what attracted attention in this material. But due to the high cost, European and American brands producing pencils began to use California cedar wood. Moreover, high-quality products are created on its basis, which are used for graphic and artistic purposes.
In most cases, pencils are made from alder, basswood, pine, California and Siberian cedar, as well as such a rare tree as jelutong. What wood are pencils made from in our country? In most cases, from alder and linden, of which there are a huge number in Russia.
Alder is not the most durable material, but it has a uniform structure, which makes easier process processing and retains its natural color. As for linden, it meets all operational requirements, and therefore is used in the production of both cheap and expensive pencils. Due to its good viscosity, the material holds the lead firmly.
A unique material for creating pencils is cedar, which is widely used in factories in Russia. It is noteworthy that it is not healthy wood that is used, but specimens that no longer produce nuts.
Core: what is the basis?
Pencils are produced using a special core. consists of three components - graphite, soot and silt, to which organic binders are often added. Moreover, graphite is a permanent component, including a colored one, since it is the lead that leaves a mark on the paper.
The rods are created from a carefully prepared mass, which has a certain temperature and humidity. It is important that the mixture does not dry out, as this will affect the wear of the equipment. The kneaded dough is formed using a special press, then passed through equipment with holes, which makes the mass look like noodles. These noodles are formed into cylinders from which rods are extruded. All that remains is to heat them in special crucibles. Then the rods are fired, and then fattening is performed: the formed pores are filled with fat, stearin or wax under pressure and at a specific temperature.

How are colored pencils made? Here, the fundamental difference is, again, the rod, which is made from pigments, fillers, fatliquoring components and a binder. Here the rod production process is as follows:
- the manufactured rods are placed in special grooves on the board and covered with a second board;
- both boards are glued together with PVA glue, but the rod should not stick;
- the ends of the glued planks are aligned;
- preparation is performed, that is, adding fat to the existing mixture.
It is noteworthy that the production of pencils is carried out taking into account consumer properties products. So, cheap ones are made from wood that is not the best High Quality, the shell is exactly the same - not the highest quality. But pencils that are used for artistic purposes are made from quality wood, which has double sizing.
Wood preparation stage
The production of pencils is carried out from well-selected wood, which is processed to obtain bars. Be sure to trim the bars along the length of the pencil, and allowances must be taken into account, since the material will shrink. A special multi-rip machine is used to cut the bars into planks, which are impregnated with paraffin in special autoclaves. This procedure improves mechanical properties future product.
Depending on what the pencil is made of, it will be sharpened. It is believed that neat shavings are obtained if the products are made from pine, linden or cedar wood. In addition, it is important that the lead is properly glued - such a pencil will not break even if dropped.
What shell?

The simplicity and beauty of the pencil depends on the shell. Since pencils are made from wood, it must meet the following requirements:
- Softness, strength and lightness: during operation, the shell should not break or crumble, like the entire body.
- Do not delaminate under the influence of natural factors.
- Have a beautiful cut - smooth and shiny, while the chips themselves should not break.
- The wood must be resistant to moisture.
What equipment?
Pencil production is carried out using a variety of equipment. For example, cleaning clay from which a graphite rod will subsequently be created requires special mills and crushers. Processing of the mixed dough is carried out on screw press, where the core itself is formed from the dough using rollers with three different gaps. For the same purposes, a die with holes is used. Drying of wooden blanks is carried out in a place where the products are subjected to rotation for 16 hours. When properly dried, the wood acquires a moisture level of a maximum of 0.5%. As for colored pencils, they are not subject to heat treatment due to the presence of fillers, dyes and fattening components. Pencils are trimmed lengthwise on a special machine.
Drying
How are pencils made? IN production process Drying plays an important role. It is carried out in special wells using machines, and the boards are laid so that drying is as efficient as possible. In these wells, drying is carried out for approximately 72 hours, then the boards are sorted: all cracked or unsightly products are rejected. Selected blanks are refined with paraffin and calibrated, that is, special grooves are cut out on them where the rods will be located.

How are pencils made in production? Now a milling-through line is used, on which the blocks are divided into pencils. Depending on what shape the knives are used at this stage, the pencils are either round, or faceted, or oval. An important role is played by fastening the stylus in wooden case: This should be done firmly and securely, which reduces the risk of lead elements falling out. The elastic glue used for binding makes the lead stronger.
Coating features
Modern pencils and colored pencils come in a huge variety of designs and colors. Since pencils are made in a factory, close attention is paid to each stage of production. Painting is one of the important stages, as it must meet a number of requirements. The extrusion method is used to finish the surface, and the end is finished by dipping. In the first case, the pencil passes through a priming machine, where at the end of the conveyor it is turned over to apply the next layer. This way you get an even coating.
Paint quality: what does it depend on?
The quality of painting depends on how well they meet the established requirements. paints and varnishes, whether the priming machine is set up correctly, whether the deadlines for drying pencils on the tape are met. Any pencil factory uses quick-drying compounds that form a hard, durable and elastic film on the surface that adheres well to the surface of the wood.

Painting is done with special primer paints that have a certain viscosity and contain pigments. If the pigment part is large, this will reduce the shine of the film and require further application of nitro varnish to the surface. Even simple pencils are varnished using nitrocellulose gloss varnish.
If a pencil dark shades, then it is painted with at least 5 layers and 4 layers of varnish. To achieve light shades, a combination of 7 layers of paint with 4 layers of varnish is used. At the same time, for a uniform and accurate coating, it is important that the surface has a maximum of 18 layers. Coloring the end parts of pencils is done in a dipping machine, into which a frame with pencils placed on it is lowered.
Pencil frame
Depending on how pencils are made and from what materials, their frame may vary. IN traditional version the lead has a wooden frame, however modern market offers wide choose products in plastic, varnished and even paper casings. On the one hand, this adds beauty and unusualness to them, on the other hand, if they fall, there will be little left of such pencils.
After painting, pencils are subjected to finishing. Various stamps and foil are used for this. different colors. This processing process is called thermostatting.
What is the hardness?

All colored and simple pencils are distinguished by the hardness of the lead, which is reflected in their markings. You need to choose them like this: the thicker and harder the paper, the harder the graphite rod should be. But graphite that is too hard can damage the paper. In Russia you can buy pencils of the following markings:
- M - soft.
- T - hard.
- TM - hard-soft.
You should be aware of markings when choosing pencils for creating drawings or drawing using the appropriate technique.
Features of colored pencils

We have already figured out what simple pencils are made of. Now we need to understand when and how they appeared. It is known that the first products with colored lead appeared back in 1820, although who invented them remained a mystery. The basis of colored lead is a combination of a connecting substance, colored pigments and filler. Kaolin glue acts as a connecting substance, due to which the lead form is formed. Well-ground, high-quality colored materials are used as color pigments, and the pigment can be of an organic or inorganic base. The color pigments themselves are created on the basis of materials that are resistant to fading under the influence of sun rays And environmental safety. Today pencils are produced in 36 color shades respectively international scale Pantone shades. As for fillers, kaolin and chalk are used, which are thoroughly crushed.
Wooden pencil holder made of different types of wood.
Making a pencil with your own hands is often quite primitive and easy. Therefore we will use different breeds wood: bamboo plywood and American walnut. Our pencil holder craft includes a drawer that slides out in both directions, as well as a separate slot in which it is convenient to store pencils.
For work we will need:
- Miter saw;- ;
- band saw and blade;
- ;
- ;
- spray glue;
- ;
- ;
- ;
- ;
- ;
- ;
Let's get to work.
First let's make the body
Step 1: The wooden pencil will consist of 3 layers. One of which must be processed before gluing. More precisely, we need to pre-cut on band saw future container for pencils. We will do this in a walnut block, the dimensions of the edges of which are: 16 x 13 x 4 cm. 
Step 2: Take the cut out part and cover it with bamboo blanks using and. 
Step 3: Using spray adhesive, attach the template with the marked places for cutting to the front bamboo overlay. You can also transfer the drawing to parts using tracing paper. 
Step 4: File our shape on the ribbon 
Step 5: And carefully cut out the central part, from the nearest edge. It is advisable to make the cut as straight as possible and along the grain. This will make it easier for us to disguise it. 

Now let's take the box.
Step 6: Take our future box and cut off the ends of the wooden cylinder on the ribbon. We pre-clamp it to avoid scrolling and for ease of holding. 

Step 7: Next let's focus on the central part. We outline the part to be removed, and
we form inner part drawer 

Step 8: Glue our parts together and secure with clamps. 
Returning to the body of the pencil holder
Step 9: In parallel with gluing the box, we glue the gap that appears in the body of the pencil box.
Step 10: Once the glue has dried, we need to sand our parts to remove the marking marks and the glued template, and this will also give them a neat look. And so we grind all the ends and edges to give the surface the proper appearance. 

The same operations can be performed simply by hand or by gluing it to a surface.
Step 11: We overtake our body on c to form a beautiful chamfer. 
Step 12: Final sanding 
Finishing
Step 13: Process the pieces to add depth to the texture. (the inside can be covered with velvet or flocked)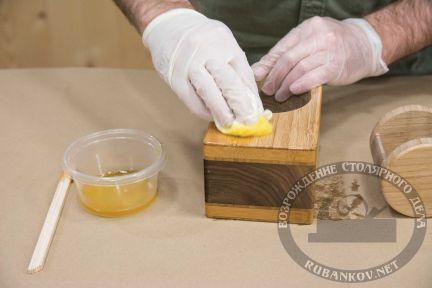
Step 14: Drill out the handle attachment point
Final step: All that remains is to glue the turned handle to the box and voila, our pencil holder is ready! 
A handmade pencil holder made of wood - not only useful item, but also interesting decorative element design. We will tell you how and what to make it from in this article.
When making a stand for writing instruments, it is advisable not to use hazel or birch, since such material is quite hard and fragile, but to give preference to cherry, rowan, cedar and linden.
Separate recesses for each pencil are effective when searching since the pencils do not mix
Required tools and materials
To make a pencil holder yourself, you need:
- chisel;
- drill with 8 mm drill bit;
- sandpaper;
- varnish for coating the product.
 It's easy to make a pencil holder from a wooden cube from a pallet, you just need to cut out a recess and decorate it
 To decorate the product, you can use wood paints, decoupage napkins, canvas threads or other decorations.
Step-by-step instruction
The first thing to do is find suitable material. It could be a cube wooden pallet or a large tree branch. Then:
- Using a chisel, the product is given a cylindrical or other, for example, square shape.
- Sand the surface with sandpaper.
- The top is drilled required quantity holes. In this case, it is advisable not to make holes through, since pencil leads and paste from pens will stain the surface of the table. Or you can use a Forstner drill to make one recess, then the shape of the product will resemble a glass.
 Cut a cylinder from a large branch, process it with a chisel and sandpaper, drill and design to suit every taste - a ready-made pencil holder
 - To make decoupage - apply a primer to the wood, dry it, glue a napkin with the image you like with PVA glue, and then varnish the product.
- Color the pencil holder in bright color- Children especially like this option.
- Lubricate the surface of the pencil holder with glue and wrap it tightly with canvas threads, attach a small bow on top.
 A wooden “glass” wrapped in canvas thread is pleasant to the touch and can serve as an antidepressant.
 A self-made pencil holder will not only decorate the interior, but will also allow you to keep your writing utensils in order. And the special beauty of such a stand is that it is very simple to make, the main thing is to have the desire and time to do the work.
A child's or adult's desk will be decorated with a homemade pencil holder. It can be of any shape, from various materials, can also be used for other office supplies (pens, scissors, rulers). Such a stand will decorate the interior, bring order to the desk, and help you find the right thing in time.
The easiest way
In order to make a pencil holder, you do not need any special skills or abilities. There are a lot of options for creating it and you can choose according to your skills, available materials and desire. The easiest way is to take a ready-made base and decorate it.
The base can be a glass or tin jar, glass, jars of sour cream, milk or cleaning product. Main principle To select it, choose a suitable shape and size so that the pencil holder is comfortable to use.

Decoration can also be anything from ribbons to natural material. The most common decoration method today is decoupage. Even a beginner can handle it, and the product will turn out very beautiful and neat.
Decoupage is a technique for decorating various objects, which is based on attaching a drawing, picture, ornament to the object and then coating it with varnish. It is not at all necessary to open any product with varnish. In many cases this is not required at all.
To work with this technique you may need anything, but Basic materials and tools are presented below:
- base for stand;
- napkins for decoupage;
- paints;
- stencils;
- file;
- PVA glue;
- scissors;
- brushes
The list is far from complete, but not all items are required. We decide on an idea, select a suitable shape and decorate it as we wish. To make it easier and more fruitful to think, here are a few examples in the photo:


Who doesn't look for easy ways
The ideal material for a pencil holder is wood. With products made from it, the house becomes warm and cozy, and the material is natural. The weight of such a pencil stand will be significant, which means that any extra pencil will not weigh it down with its weight. Another plus - a pencil holder made of wood is perfect not only for desk child, but will also fit into the interior of dad’s office. The material is universal, suitable for everyone. To decorate the work, you can cut out or burn a design on it yourself and open it with varnish.


Master class on making wooden stand for DIY pencils, look at the video:
Well, now about the cons. More precisely, about the most important of them - the complexity of manufacturing. Not every beginner will be able to cut a pencil holder from wooden cut or treat the snag properly. For these purposes, you will need certain skills and special equipment.
But let's not get upset ahead of time. You can choose a simpler idea. In fact, not everyone should be able to carve wood... Therefore, it is not at all necessary to look for a whole log, it is enough to use materials such as wooden sticks, twigs, ready-made wooden blanks. Then we will get a wooden product, and a beginner can make it.


Interesting pencil holders are made from plywood. You can even make a whole organizer. We decorate it using burning, painting, decoupage. This material is ideal for beginners.


What's at our fingertips
From scrap materials you can make work of any complexity, in any style and for any purpose. First, let's look at an example of a bottle pencil holder. We take a bottle of anything - milk, juice, shampoo. It is important that it is easy to cut with scissors to give it the desired shape.


Of course, ordinary plastic water bottles were not left out. The disadvantages of this material are a light weight bases and sharp cut edges. The first problem can be solved through decorations. And the second - either trim the edges with some material, or use an iron. To do this, take a hot iron and a workpiece, place a sheet of paper between them and press them together. Due to high temperature the cut will melt a little and become smooth and not sharp at all. Example of a pencil holder from plastic bottle below:

Have you accumulated a lot of old newspapers? So you can make a pencil holder from newspaper tubes. Detailed master class on how to weave stands from them in the video:
Without a ready-made form at hand, it’s easy to make it from cardboard. Even a child can handle this job. And you can make any shape - round, square, triangular, etc. This also includes crafts made from a roll toilet paper. Thus waste material will turn into a useful thing.


