Sooner or later, we all usually face the need to reupholster furniture. It's about O upholstered furniture, which just needs to change the upholstery. Furniture repair in the form of changing the upholstery is usually called furniture reupholstery. Today we will tell you how you can reupholster furniture with your own hands by replacing its upholstery with new one. As an example, we will describe the process of reupholstering a bed and show photographs of the main points of the process. Believe me, this is not such a difficult task (for those whose arms grow from their shoulders and not from somewhere else). In order to reupholster a sofa, bed or anything else, you will need three basic things:
- upholstery;
- staples for the stapler;
There are different reasons why upholstery fails, for example:
- Fabric upholstery may fade in areas regularly exposed to strong sunlight;
- leatherette upholstery may crack and begin to peel;
- any upholstery can be damaged by the claws of pets;
- any upholstery can simply be accidentally torn or stained;
Preparing to reupholster furniture
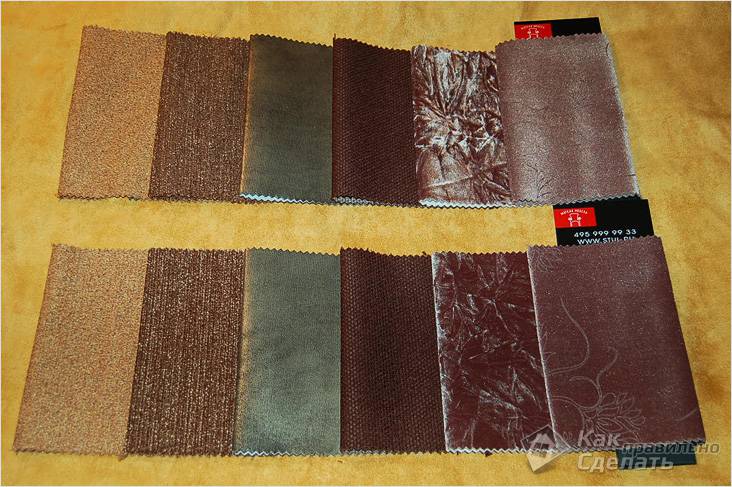
Preparation for reupholstering furniture should begin with the selection of upholstery material. Depending on your financial capabilities and tastes, I recommend choosing between genuine leather and fabric. Faux leather is not durable.
Leather upholstery
If you decide to buy genuine leather as upholstery, then choose it of such a thickness that it still remains quite elastic. Do not try to buy thick leather with a thickness of more than 3 mm (unless you are pursuing some goals known only to you). Thick skin will be difficult to work with. This is especially true in cases where the length of the purchased piece is not enough to cover any part and you will need to sew several pieces together. It is quite easy to work with thin leather (thickness up to 1.5 mm), just like with thick material. You need to work with dry skin. If the skin is wet, it stretches significantly in size, followed by shrinkage when dried. They work with wet leather only in cases where it is necessary to stretch it like a drum; in this case, it is wetted, stretched and secured. When the skin dries, it tightens even more. To buy genuine leather inexpensively and in the form of large pieces, you need to look in your city for shops selling materials and accessories for shoemakers. In St. Petersburg, one of these stores is located in the courtyard of a house at 93 Obukhovskaya Oborona Avenue (the intersection of Obukhovskaya Oborona Avenue and Elizarov Avenue). It’s easier to find by entering the courtyard through the arch from Elizarov Avenue (in the picture below) and immediately turning right. The shop is located immediately to the right behind the arch in the basement.
Fabric upholstery
If you decide to buy material for upholstery, then you don’t have to look for special upholstery materials, but take a regular tapestry. You may be surprised, but tapestry is often cheaper than many upholstery fabrics. A positive characteristic of the tapestry is that its structure practically eliminates the possibility of the formation of puffs. Even if your pet catches the thread with its claw and a snag is formed, it will not disrupt the pattern of the fabric and will not form a snag, so you can safely simply cut off the resulting loop and the tapestry will not begin to “crumble” in this place. There is enough in St. Petersburg wide choose tapestries by low prices presented in the Uzor store, located at Pyatiletok Avenue, building 9, building 1 (the intersection of Pyatiletok Avenue and John Reed Street).
In our case, we chose a tapestry purchased in this store. It is this material that is present as upholstery material in all the photos presented below. Unlike genuine leather, material has the advantage that you can buy it in a size that will save you from the need to splice several pieces together to get one, but with dimensions sufficient for upholstering any large piece of furniture being reupholstered.
Tool selection
Reupholstering furniture will require the use of tools that can solve the following problems:
- Carry out partial disassembly of furniture individual elements and dismantle hanging elements, for example, legs (for this you may need screwdrivers or a screwdriver, wrenches or adjustable wrenches);
- Remove the old brackets holding old upholstery. The task is not at all easy, given that there can be hundreds of such brackets and in order to remove them, you first need to pick them up with something (to pick up old brackets, a chisel, chisel, sharpened unnecessary screwdriver or some other strong knife). Once you've picked up the old staples and lifted them up a bit, you'll need to use something to grab them and pull them out. (Pliers or round nose pliers are perfect for this purpose);
- Pull and secure new upholstery(To do this, you need a stapler and the corresponding staples with the required length). If you are going to reupholster a bed or sofa, I recommend using an electric stapler (but not a manual mechanical one). A manual mechanical stapler is best suited for reupholstering a chair or similar small-scale work. It is also worth noting that staplers vary in power and not everyone may be suitable for you. Read more about the types of staplers and their comparison in our articleStapler... Which stapler should I buy?
Furniture reupholstery - where to start?
As we already wrote at the very beginning of the article, as an example we will talk about reupholstering a double bed and show photographs of the process.
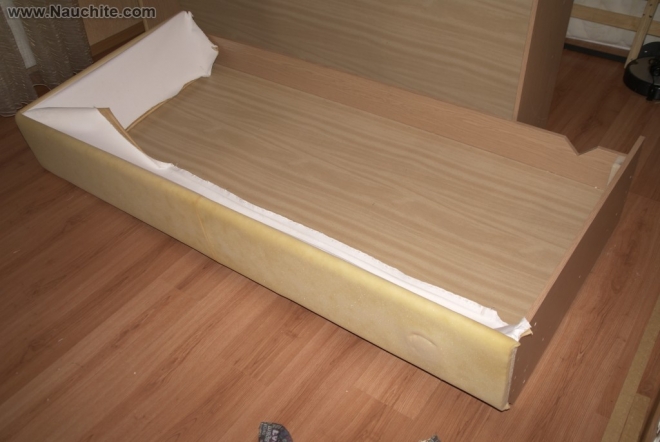
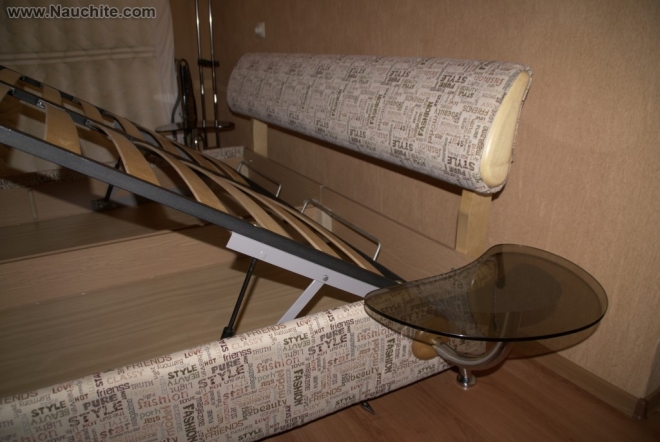
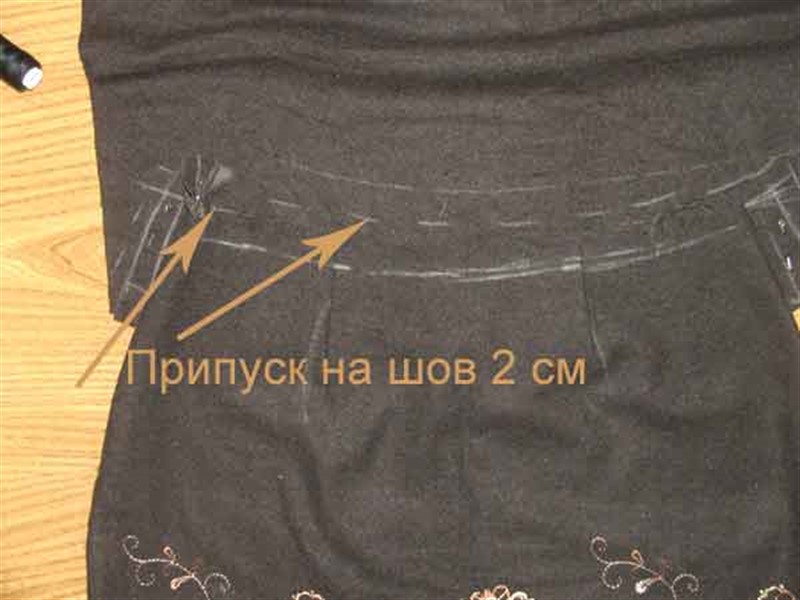
First, you need to carefully examine the furniture whose upholstery you are going to change. The purpose of the inspection is to understand how it is disassembled and to identify attachment points. In our case, the first element to be dismantled was the headboard.

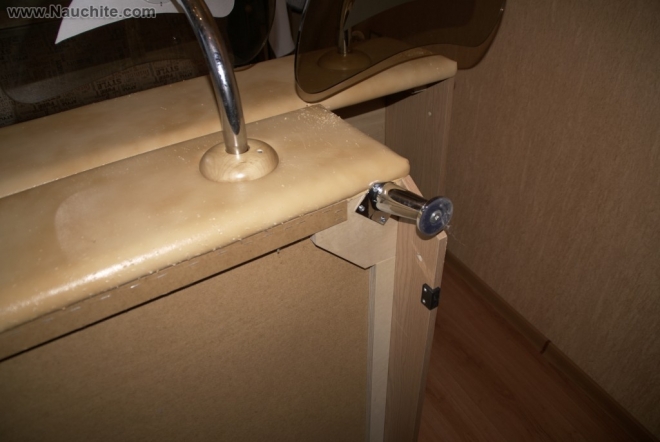
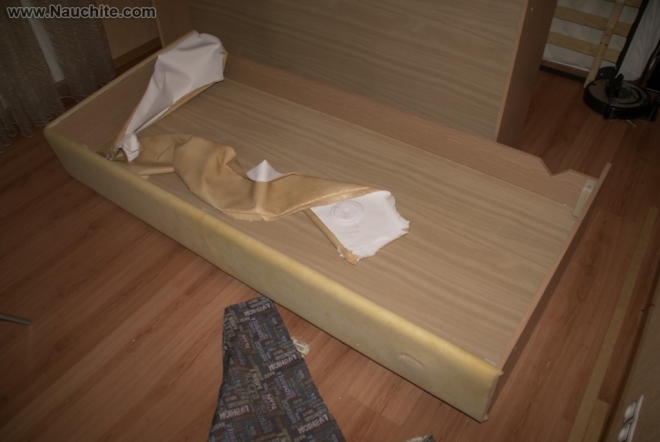
What happened to this back to make it look like this? It's simple - the old leatherette cracked and began to peel and roll off from the friction of the pillows on the back. So, having removed the backrest, you need to carefully examine it in order to understand where to start dismantling the old upholstery. Usually the upholstery is attached to in a certain order and dismantled in reverse order. When disassembling the backrest, we were faced with a dilemma when it was not clear how the upholstery was secured on the sides and how the side pads could be removed. The lack of visible fasteners and the inability to reach invisible fasteners led me to believe that the pads are attached with glue and/or pins. Therefore, using a chisel, we try to carefully pry the side pads around the perimeter and tear them off (without fanaticism, so as not to break them), they finally give in and separate.
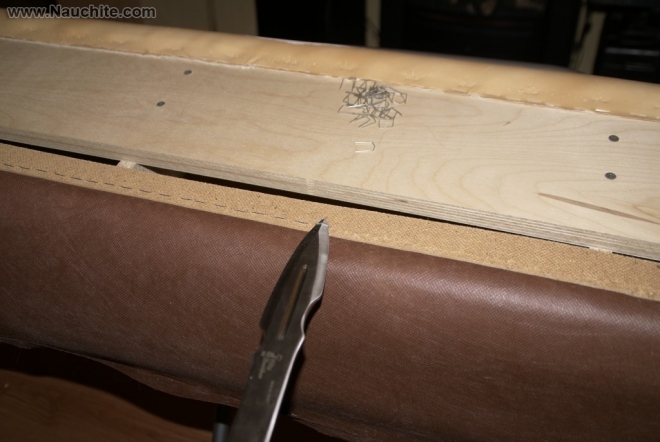
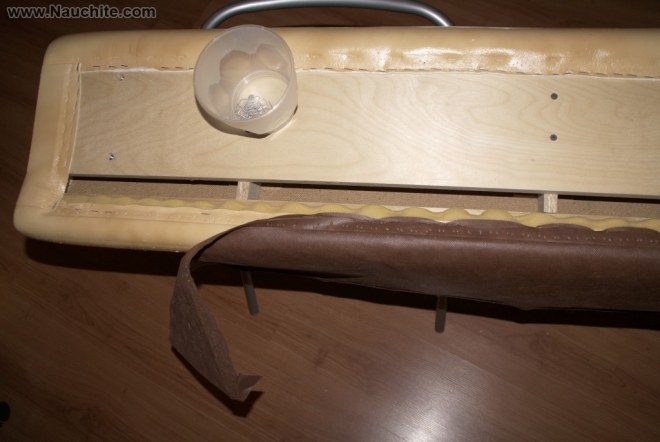
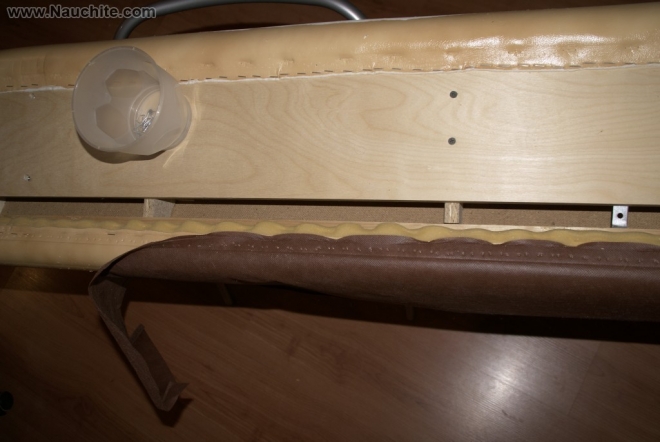
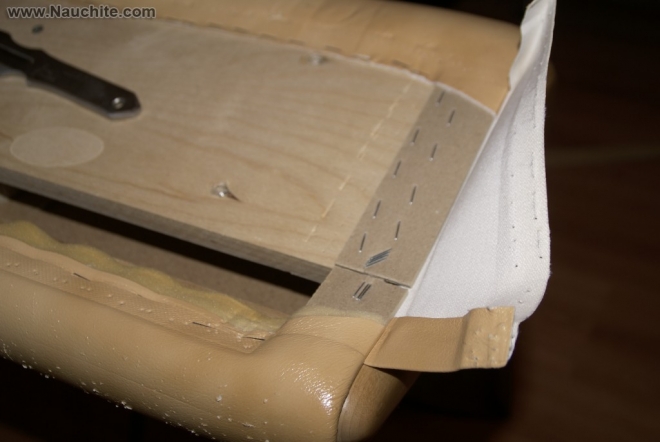
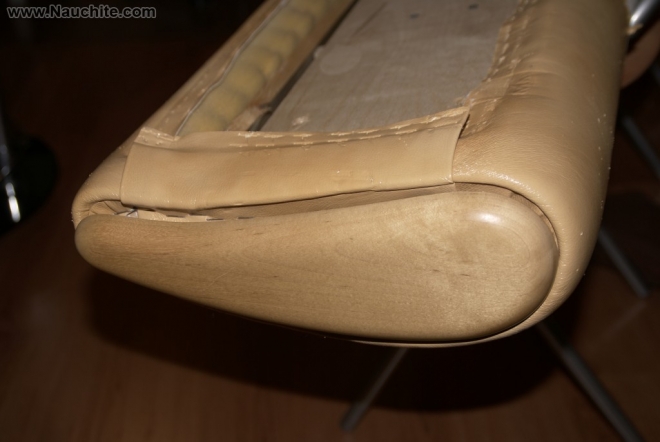

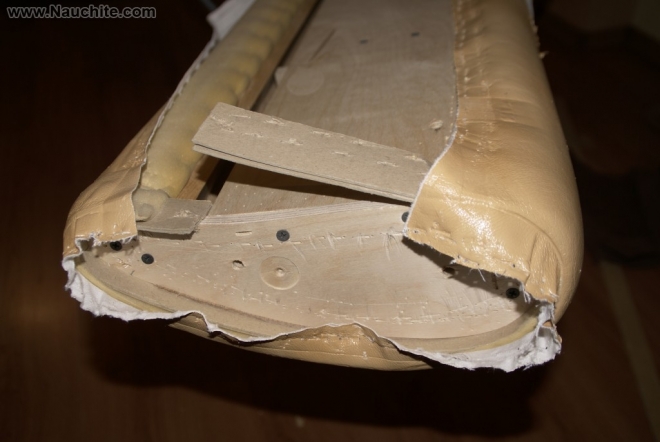
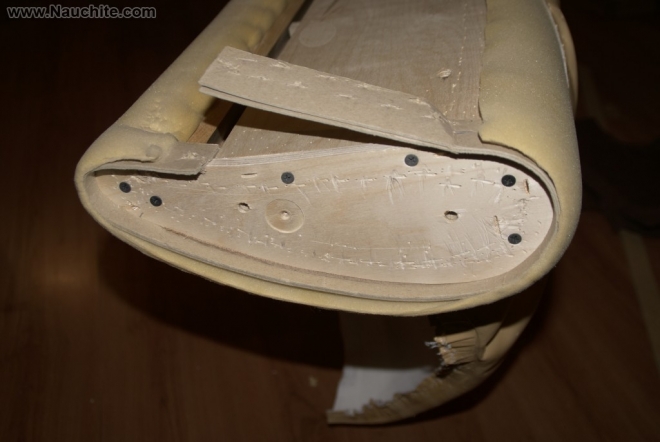


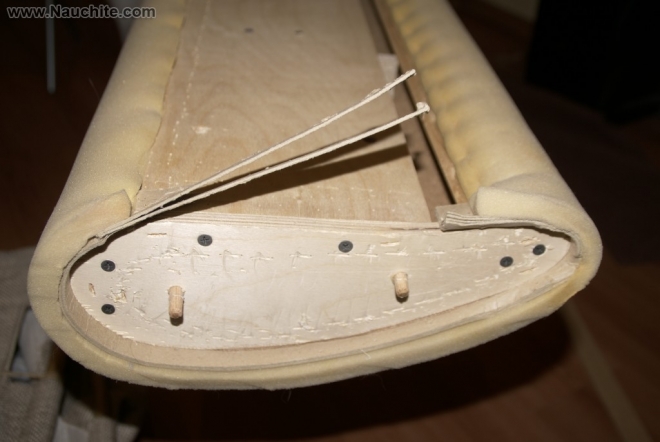
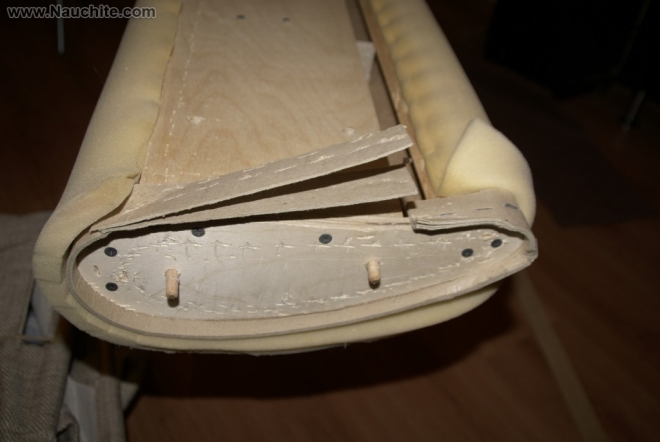
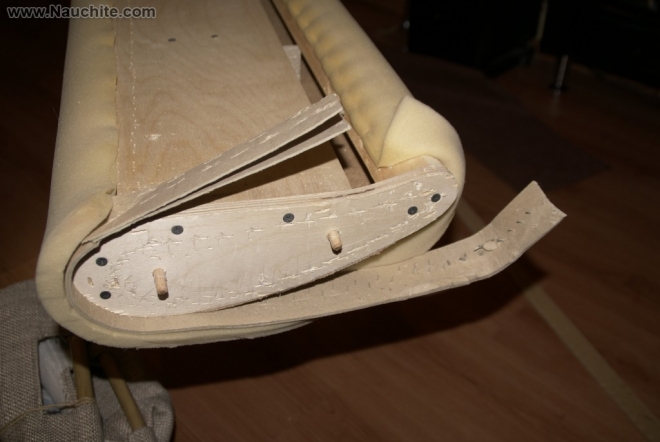
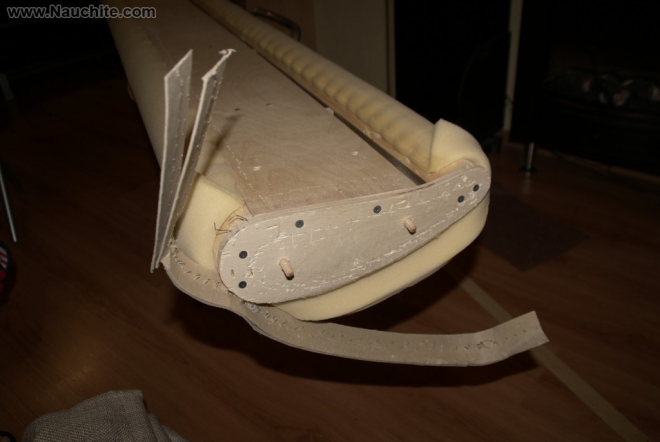
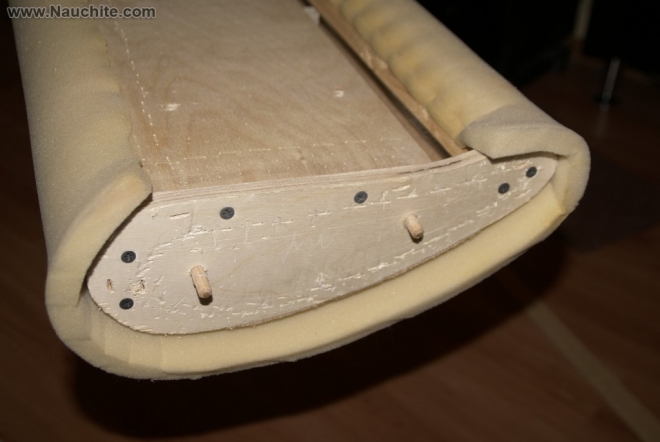
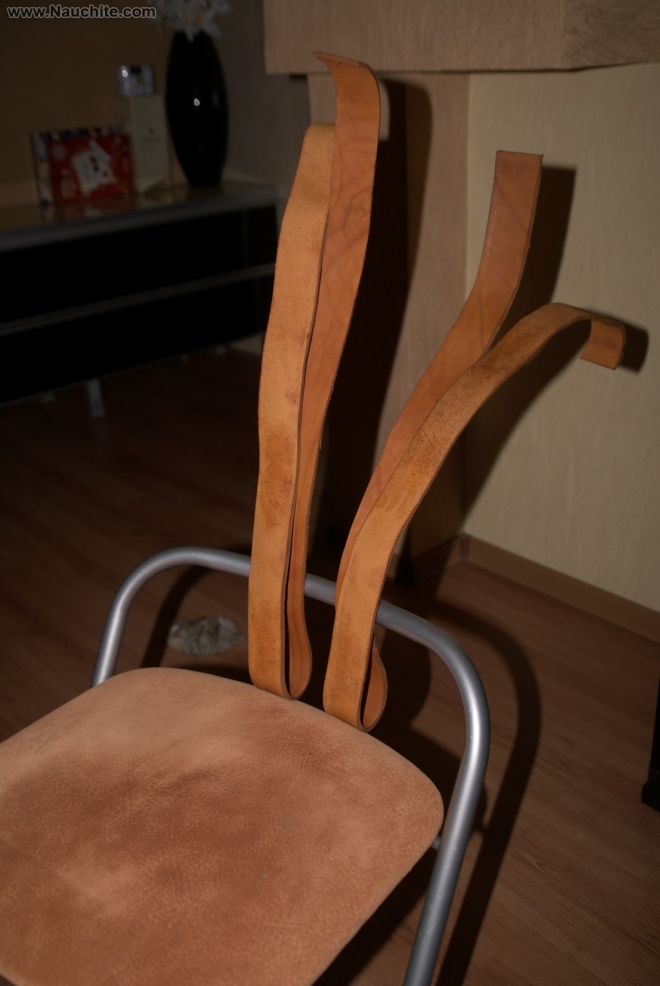
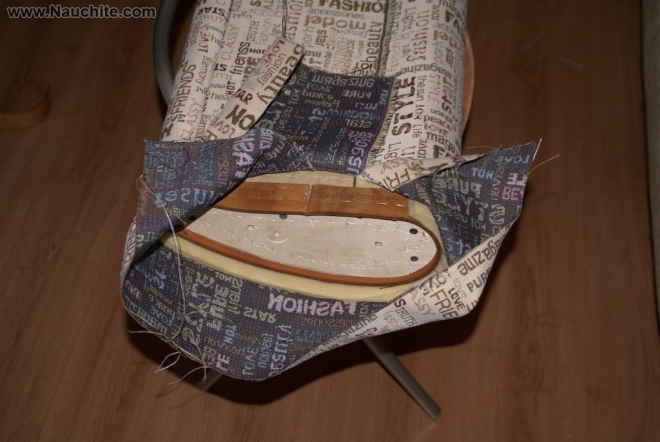
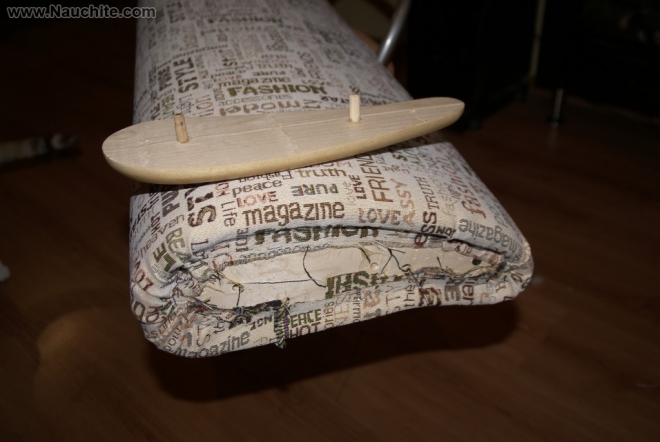
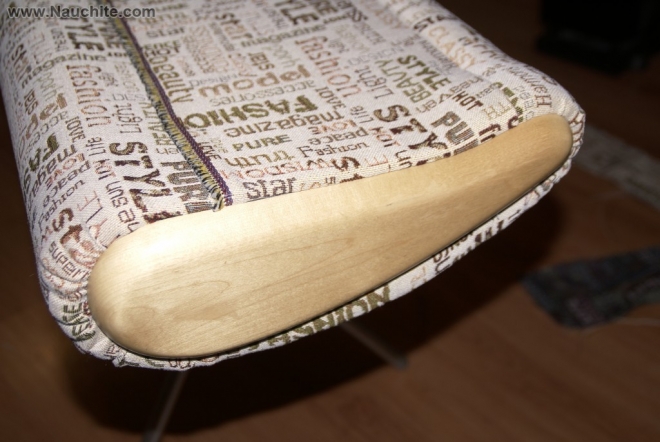
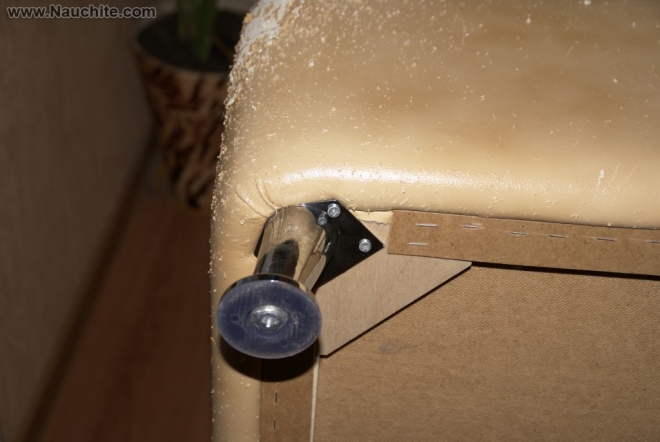
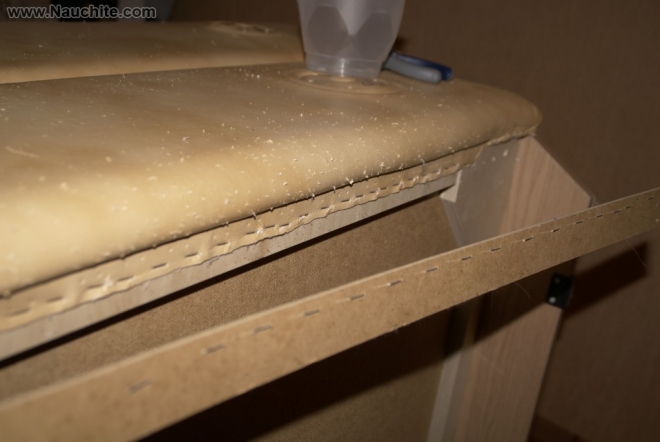
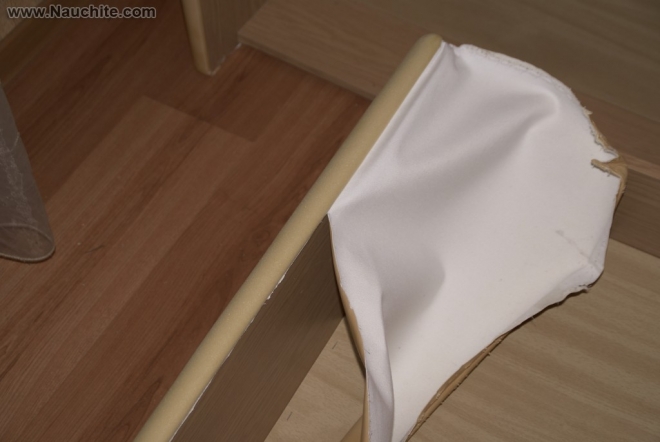
Note the cardboard tape that was found nailed to both ends of the back. We damaged this cardboard strip when we used a chisel to pry up the wooden end caps. The purpose of this tape is to create a protrusion around the perimeter of both ends of the back. These protrusions are covered with upholstery material, after which the end plates are, as it were, “recessed”. This is done not only for beauty and to add volume to the upholstery material. No matter how tightly you fasten the end pads, there will be a certain gap between them and the back. And only the creation of protrusions, into which the linings are inserted, hides any gaps from the observer.

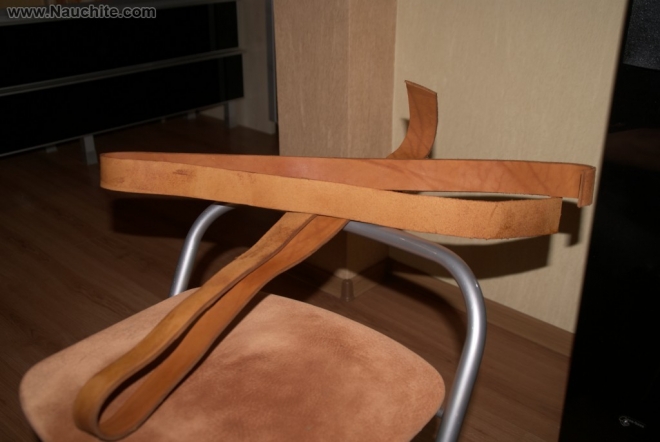
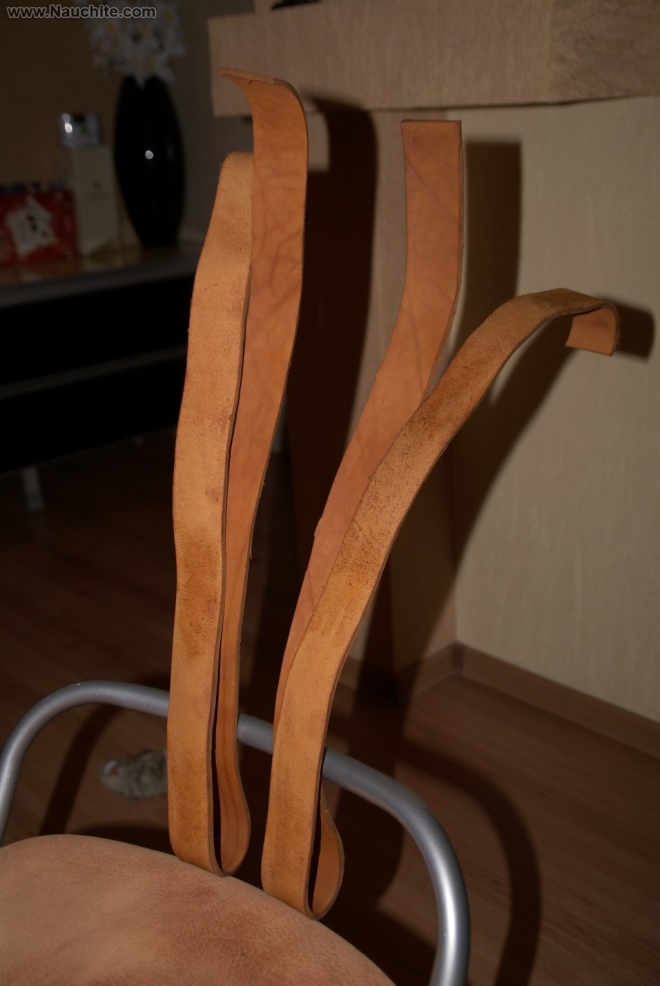
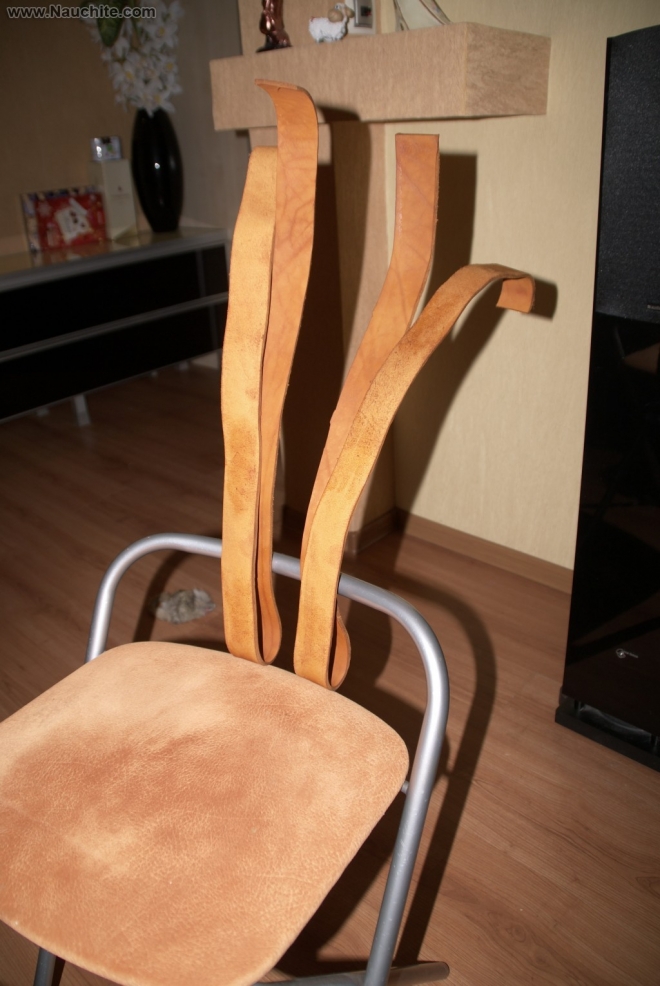
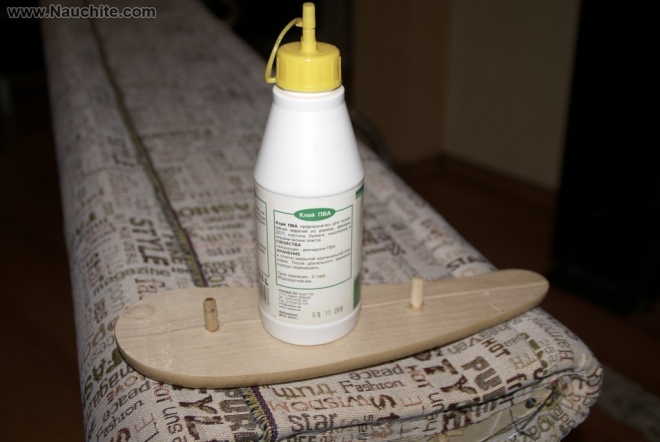
We decided to replace the damaged cardboard with leather, after making it more rigid. In order to give the skin stiffness, hardness and reduce its elasticity, you need to soak it in water containing small quantity ordinary PVA glue, then dry. In the photos below you can see the result this gives - the strips of leather stand at an upward angle without bending.


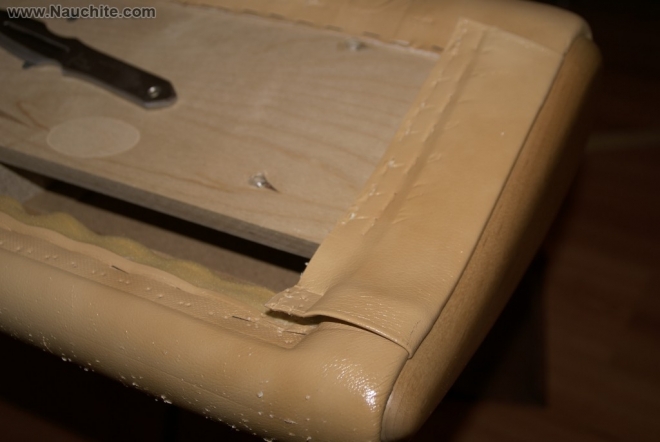
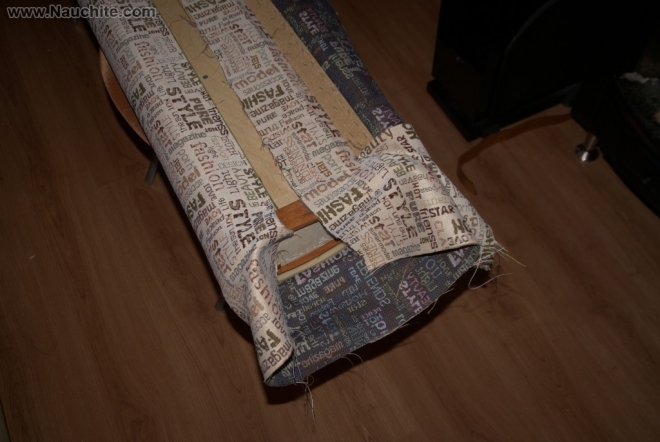
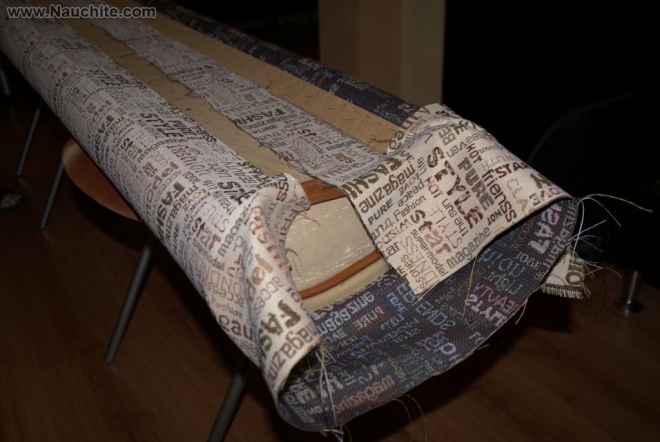
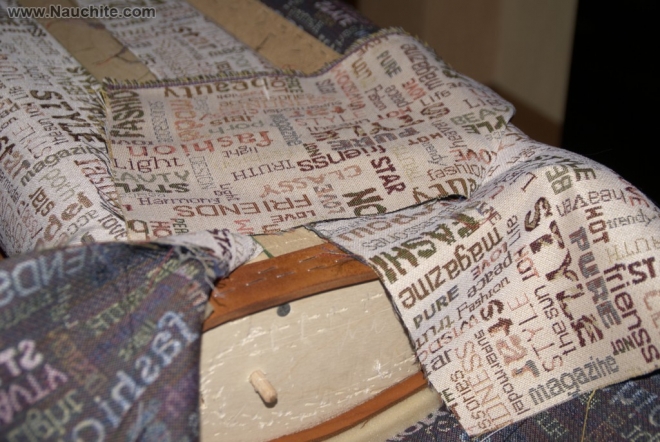
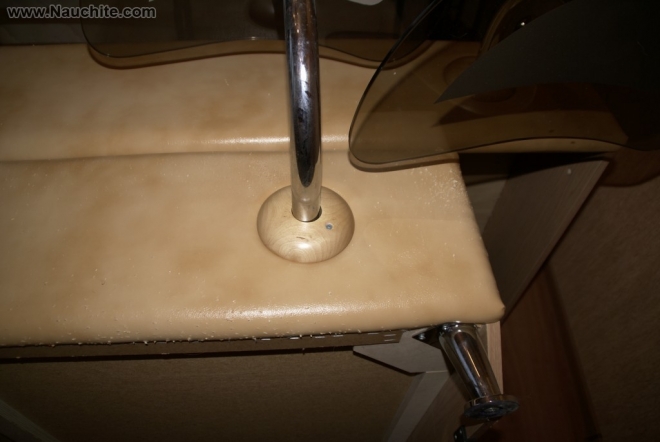
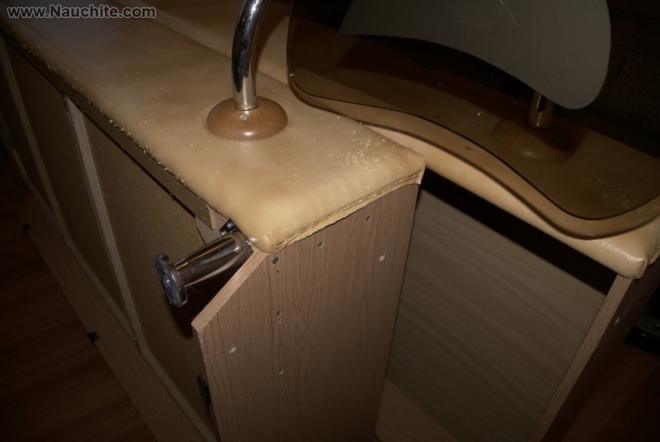
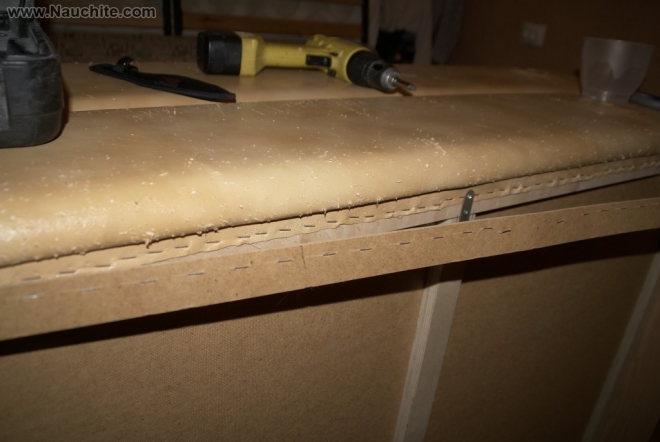
After this, you can begin reupholstering the backrest with new upholstery. Before you start shooting the upholstery fabric, its edge should be folded (just as this is done when working on a sewing machine - by bending the edge, you protect it from starting to crumble into fibers. In general, reupholstering furniture is practically no different in its approaches from the approaches used when sewing on a sewing machine. For example, to hide the staples with which you fasten the first edge of the upholstery fabric - place the fabric inside out and attach with a stapler, then turn the fabric over, covering the hammered staples. We forgot to photograph this moment separately, but if If you take a close look at the photos of the back reupholstery below, you will understand what we are talking about.


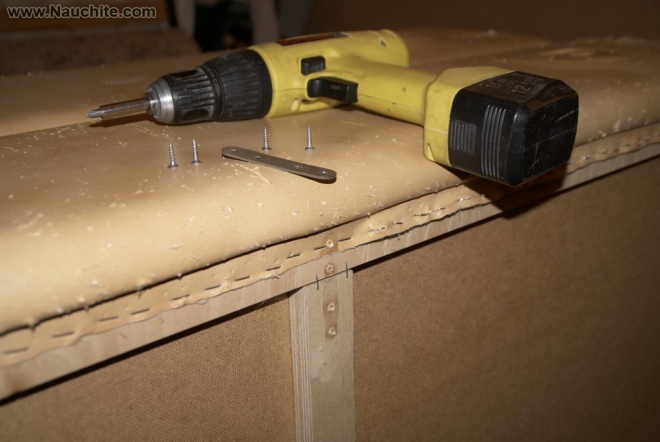
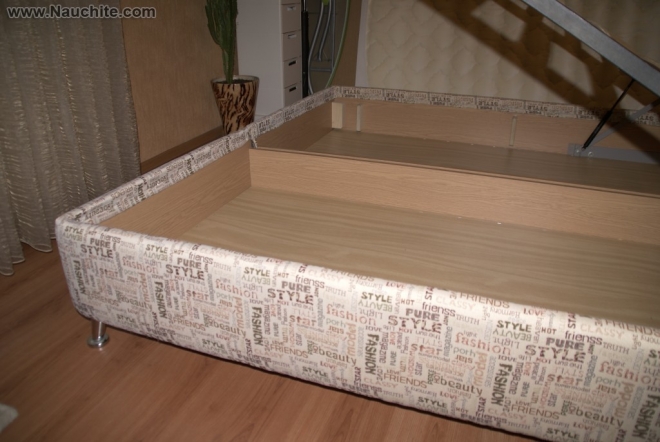
So, having replaced the upholstery of the headboard with your own hands, you can move on to reupholstering the base of the bed. First we need to dismantle all the elements that prevent us from removing the old casing. In our case, these are legs and side shelves.


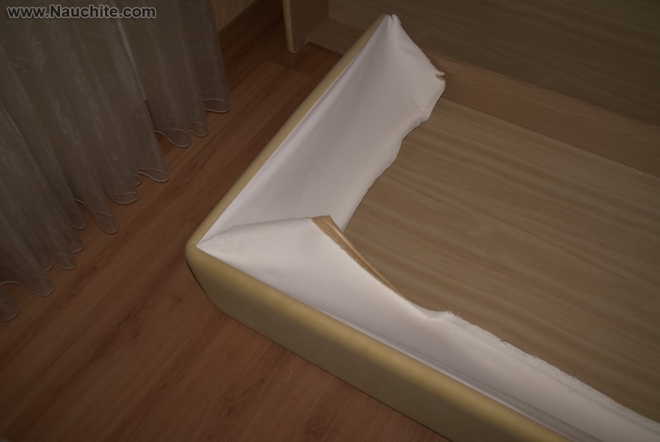
Next, we study how the old upholstery is fixed, from which side we need to start dismantling it. In our case, there was a hidden fastening on top, from which installation began at the factory, and an open (visible from the outside) fastening was found below (under the bed). Therefore, dismantling was carried out in the same order - first from below, then from above. To be honest, in our case, to simplify installation, we decided not to use a hidden fastener on top, since it still won’t be visible when the bed is closed. Therefore, we began installing the upholstery fabric not from above, but from below, then, evenly stretching, we began to fasten it from above. It is very important before attaching upholstery fabric to maintain the same tension of this fabric over the entire surface of the furniture. Otherwise, the upholstery will not lie flat, but in waves or folds (where it is stretched more tightly there will be indentations, where it is weaker there will be bulges). To evenly tension the upholstery, you can use a narrow strip cut from fiberboard. In this case, the edge of the upholstery fabric is attached to the strip, then the strip is rolled, twisting the fabric onto it one turn. After this, it is easier to stretch the entire upholstery fabric evenly along the entire length with a strip. Having stretched the fabric, the strip is fastened with a stapler, nailing it to the product along with the fabric.


As you can see, reupholstering furniture with your own hands is not that difficult process. Re-upholstering the bed shown in the photo took 2 days.
- Tools for work
- Main stages
- Tips for choosing material
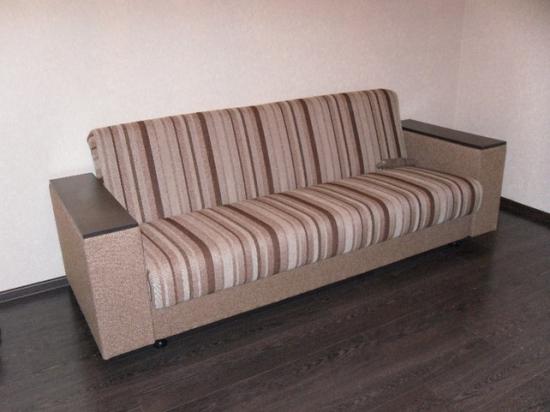
A new piece of furniture in the house always brings a certain joy to the owners. It's hard to imagine an apartment without a sofa, armchairs and other upholstered furniture. But after a few years, the upholstery loses its former attractiveness, becomes unusable and no longer fits into the interior of the room. Often in such cases it is thrown into a landfill or taken to the country. Sometimes specialists are invited to reupholster and give the furniture a new look.
But not everyone knows that reupholstering a sofa with your own hands is not a very difficult task.
How to repair furniture at home, what difficulties can you encounter and how to overcome them? Difficulties may arise if:
The cutting of fabric furniture parts is done according to patterns.
- The furniture has a very complex design and it is difficult to make out.
- Individual parts are made in complex geometric shapes, making it difficult to correctly cut new upholstery.
- The service life of furniture is 7-10 years; not only reupholstery is required, but also frame repairs and replacement of the filling. Professionals can do this job better.
- The furniture is expensive, antique, you don’t want to accidentally ruin it.
- It is planned to use natural leather as a new material for the upcoming reupholstery, which is not easy to work with.
In all other cases, you can reupholster any sofa yourself. It is worth considering this issue step by step.
Tools for work

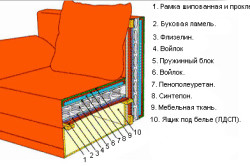
Sofa upholstery: a – soft and upholstery materials; b – cutting; c – order of upholstery and reupholstery.
When performing work on reupholstering home upholstered furniture, the following tools may be required:
- A flathead screwdriver or staple remover to remove old staples.
- Wrenches from 8 to 19 mm.
- Nippers, side cutters and scissors.
- Stapler.
- Sewing machine.
- Titan threads with high strength.
- Decorative buttons may be needed to decorate pillows.
Return to contents
Main stages
Do-it-yourself reupholstery of a sofa and other upholstered furniture includes several main steps:
- Disassembly with removal of individual components in the form of pillows, sides, poufs. A diagram of a spring sofa is presented. Disassembling the sofa is done using some tools. First, carefully disconnect the sides, remove all the overhead elements, the seat and the back. This is usually done quite simply, since manufacturers assemble furniture with high maintainability. Place all fasteners in a container so as not to lose them.
- Removing old upholstery that has become unusable. Worn upholstery can be removed using an anti-staple gun, which can be replaced with a regular flat-head screwdriver. The work requires a certain amount of care so as not to tear the old casing and use it as a pattern for cutting out parts from new fabric. All internal cavities are cleared of debris and dust. Old foam rubber should be mercilessly thrown away, since usually only dust remains from it. All metal mesh, various kinds of stretch marks, as well as springs need to be carefully inspected and some detected defects must be eliminated. Nylon or fabric stretchers should be replaced with new ones. All screws must be carefully tightened, the joints of the parts must be strengthened, and the wooden joints must be glued.
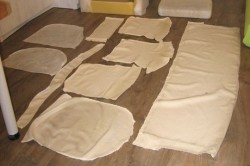
- Uncover new upholstery parts. The result of the entire reupholstery of the product largely depends on the quality of the new patterns. Old upholstery can serve as a pattern for the pattern, if you leave an allowance of a few centimeters at the edges of the new fabric. Worn parts of the old upholstery are placed on new fabric and traced with chalk, then cut out with tailor's scissors.
- Attaching new upholstery to furniture parts. The fabric on the sofa parts is stretched evenly so that the pattern on the fabric does not warp. The material is secured using a stapler. The distance between the staples should not exceed 4 cm. In order not to make a mistake with the amount of new fabric, it is recommended to buy it with a small margin. The remaining material can be covered with kitchen stools or sewn from it decorative pillows. Foam rubber is cut out and attached in the same way as fabric. You can cut it sharp knife. Leftovers can also be used to upholster stools and sew decorative pillows.
- Assembly of an updated design.
The same procedure is used to reupholster any sofa, including a corner sofa.
During the renovation process, all objects and elements of the room are subject to changes. But not everyone has sufficient funds to update their furniture. If the frame is still strong and reliable, then there is no need to go shopping at all - you can modify and restore upholstered furniture yourself. The central place in the living room is occupied by a sofa or sofa. If you don’t know how to make a reupholstery for little money, we recommend that you read this article.
Tools

As with any other process, it all starts with planning and preliminary work. If you are planning to upholster a sofa at home without involving specialists, then you should perform all the steps in order. To begin with, a tool is selected. Here's what you need to stock up on:
- Screwdriver Set;
- hammers;
- scissors;
- construction or furniture stapler with staples ( optimal size 8-10 mm);
- pliers;
- set of wrenches;
- screwdriver;
- PVA glue).
In addition, you should select new materials: filler and upholstery material. Let's look at the most popular options.
Filler
Among modern fillers, the leading place is occupied by polyurethane foam, which can be purchased in hardware store By affordable price. When purchasing foam rubber, you need to pay attention to the following characteristics:
- Density. Depends on what element the filler is selected for. For example, for sitting you need a larger indicator, and for the back and armrests - a smaller one. Thus, experts recommend choosing a density of 30 kg/m3 (brand EL3040 and EL4050) for seating, and 25 kg/m3 for armrests.
- Softness.
- Elasticity.

Among domestic producers foam, the company “Muromporolon” stands out, which has been offering its consumers high-quality products with a large list of advantages for many years:
- quality;
- safety;
- environmental friendliness;
- hypoallergenic material;
- affordable price.
Covering materials
Once you have decided on the filler, you can move on to choosing the material for the upholstery. The choice is quite large, most often consumers choose the following options:
- Tapestry is a dense and noble fabric that has dust-repellent properties. An excellent option for rooms designed in retro style.
- Jacquard - artificial silk with a double-sided pattern. The material is very aesthetic, so it looks solid. Cleans without problems.
- Flock is made from a natural (cotton) or artificial (polyester) base. The material has a velvety feel in a small volume, making it pleasant to touch. Can be cleaned dry or wet method. This sofa is not afraid of cat claws, since there are no marks left on it.
- Velor has a high strength index and low pile. Doesn't wrinkle.
- Shinil - by external signs quite similar to velor, but unlike it the material is of higher quality. In addition, it breathes and has a slight fluffiness.
- Artificial suede - can be either non-woven or woven. The material can be cleaned well and can be wet cleaning warm soapy water.
- Leather can be either natural or artificial, depending on the restoration budget and your own preferences. The material is durable and practical, but is resistant to animal claws.
Regardless of what is chosen, the following requirements are taken into account:
- strength;
- ease of cleansing;
- resistance to ultraviolet radiation;
- environmental friendliness;
- attractive appearance.
You should also include furniture tape, braid and edging in the list of required materials. This Consumables which will be needed for upholstery.
Let's get started

When all necessary materials and the tools have been collected and purchased, you can get to work. To begin with, the sofa should be disassembled into its main elements. Typically, each model consists of the following parts:
- back;
- seats;
- armrests;
- lower part (tsar);
- locks for fixing the backrest.
To do everything correctly and not break the components, follow a simple algorithm of actions:
- Unscrew the bolts that secure the armrests to the base.
- Remove the seats.
- Disconnect the drawer.
- Unfold the sofa and turn it over so its front part is facing the floor.
- Remove the backrest.
- Remove the locks.
- Remove the seats.
- Remove old fasteners: nails and staples.
- Remove old upholstery and filling.
- If there are faulty or broken springs, remove the unit completely.
The upholstery and filling must be carefully removed, since they will subsequently be used to cut out new elements.
Main part
The main part of the process involves several steps. To know exactly how to properly upholster a sofa, you should do everything step by step and carefully.
Repair of internal parts
You should start by repairing the frame, namely the spring block:
- faulty elements are carefully unscrewed with pliers;
- install new springs;
- insert the block back and secure it with nails.
It is possible to make old springs more elastic using pieces of foam rubber or an old blanket. We stuff the springs with pieces of cut foam rubber. If an old blanket was chosen, then they cover the entire block from above and stitch it with a needle and twine. To ensure that the foam sheets lie tightly, they are first coated with glue. To make the foam look more voluminous, you can lay a padding polyester on top of the foam.
You don’t have to remove sagging springs, just stretch them - this way they will last longer.
Sewing covers
Regardless of whether the sofa will be upholstered with leather or fabric, the procedure is very simple:
- on the floor, with the wrong side up, we lay out the fabric, on which we lay out the elements of the old upholstery on top;
- we fix it with needles so that the elements do not move;
- We outline all the components with chalk, not forgetting the seam allowances;
- cut out the material;
- We sew everything together on a sewing machine.
We cover the sofa elements

When everything is ready, the sofa is directly upholstered, or rather its individual components:
- we put sewn covers on the back, seats and armrests;
- the places where the new covers will be fixed must be exactly where the old covers were placed;
- We fix the new covers using a stapler, and the material must be tensioned each time we drive in subsequent fasteners.
All that remains is to assemble all the components in the reverse order of disassembly, while paying attention to:
- for matching marks;
- the lock is secured first to the back, then to the seat and drawer;
- install the sidewalls and then the armrests;
- at the end we fix it wooden panels, pre-varnishing them if necessary.

All processes are quite simple and only require attention. Now you know how to upholster a sofa yourself and save a decent amount of money.
Constantly tensioning the upholstery is required to ensure that the material lies evenly and smoothly. Work should be done on the long side and move towards the short side.
Features of skin tightness

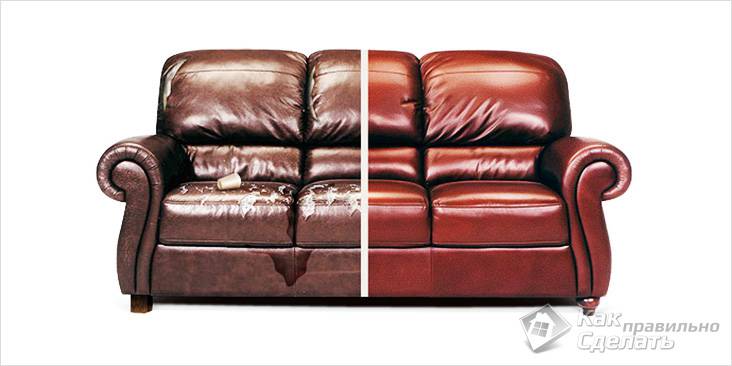
If leather was chosen as the new material, then the tightening process here is somewhat different; more precisely, it will be necessary to take into account several important points. It should be noted that a sofa covered with leather will look somewhat more respectable, and the care process will be easy, because, unlike textiles, it is easy to remove dirt, dust, greasy spots and other types of pollution.
The sequence of work when disassembling and repairing the sofa frame is no different from the previous description, so we will not dwell on it again. We pay great attention to removing the old upholstery, which will be used as a pattern for cutting out the new material. In addition, you will also need a lining, which will be any adhesive material.
When sewing new covers, we take into account the following features:
- we exclude the basting process, since the needle can leave holes in the material;
- We fix all the upholstery elements on the wrong side with adhesive tape;
- to avoid damaging the leather when sewing (foot sewing machine may leave marks), you should first lubricate the material with Vaseline.
You will also have to work with the allowances that were left for the seams during the cutting process. If you put them together, they can stick out like a lump on the front side. To get an even and smooth surface, the allowances should be separated well and smoothed with an iron through gauze.
The seams will be securely fastened if you use tape.
To summarize, we can say that the restoration process can be completely completed independently without the involvement outside help. It is enough to purchase the necessary materials, assemble a simple tool for the job and begin the painstaking task of upholstering the sofa.
Video
An old sofa can be brought back to life:
Surely everyone in the house has upholstered furniture, which for several years in a row has received sidelong glances, because the hand rises to throw it away, maybe an antique, or a gift from a beloved mother-in-law for her birthday, and it is impossible to use, because the luster is no longer the same, but creaking remained. You can remove this issue once and for all - resolutely and solemnly take responsibility and rid the family of the creaking tyrant. Or you can try to reupholster the sofa and give it a second life. At least you can try, but throw it away anyway.
Reupholstering a spring sofa, video tutorial
Before reupholstering a sofa with your own hands, you should think a hundred times whether it is necessary to do this and how high of a value it represents in terms of upholstered furniture, in terms of the space occupied and ease of use. There are times when the whole family is just waiting for that moment for that very board to fall off the sofa, which will overflow the cup of everyone’s patience and the hated creaky and unaesthetic tormentor will be taken to the trash heap to applause. Happens. But it’s always easier to throw it away, so if the sofa somehow justifies its existence (the same mother-in-law, for example, will be able to spend the night on it once when she accidentally comes to visit), perhaps it makes sense to think about reupholstering the sofa with your own hands step by step video of which we have posted below, extended it happy Days in the apartment.
If this video was inspiring, then you can try to do something similar with your own hands. Taking into account useful tips, which are given by experienced furniture makers.
What upholstery material to choose
In general, choosing fabric for upholstered furniture is a thankless task. It is very difficult to assess the effect that it will produce in combination with our old ruin. There are a lot of nuances to consider here:

Also, a lot depends on where the sofa ends up after reupholstering. We mean a room in the house. If this is a sofa for the kitchen, then there can be no question of any woven materials. They will quickly absorb odors and then the fate of the sofa will be decided even faster. In addition, there is constant humidity, the risk of kitchen sofa stains from liquids and grease, rather, suggest that the upholstery material should be inexpensive leatherette or something similar.
Materials for a sofa in the living room
If the leather-like fabric meets the requirements for the living room interior, then it makes sense to choose more expensive leatherette. At the very least, it should not creep away from tension; the substrate should be moderately strong and moderately soft. Smell. This is the scourge of cheap leatherette. It is almost impossible to eradicate it, and if there is still some way to deal with it in a car, there are enough of their own odors, and it dissipates faster in the car, then the living room can turn into a small branch of a chemical plant for several months. The joy of drinking tea on such a sofa will most likely not be enough.
There are woven water-repellent fabrics with special impregnation, but even experienced furniture makers do not always undertake reupholstery with such material. It can be more capricious than the thickest tapestry. This is also worth considering. The rigidity of the foam rubber is no less important. As a rule, for reupholstering this kind of product, foam rubber with either HL hardness or the hardest EL is chosen. Foam rubber that is too soft will quickly sag and crumble, one that is too cheap will spread out, one that is too thick will be difficult to shape, and one that is too thin will lead to rapid wear of the upholstery, and not everyone will find it comfortable to sit on.
Tools and technological subtleties of reupholstery
Reupholstering upholstered furniture with your own hands, and even more so a complex sofa, is impossible without a minimum set of tools. Of course, you can do without, for example, a stapler, but then retightening will take a hundred cosmic years and will turn from a pleasure into a heavy duty. Here is an approximate set of tools that is needed to reupholster a sofa of any configuration: 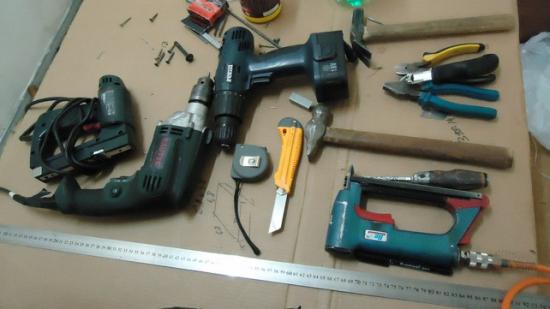

Talking about the technological aspects of upholstery without knowing the design of the sofa is sinful idle talk, so we will limit ourselves to general recommendations, which are given by experienced furniture makers.
Actually, this is all you need to know about how to delay the removal of your old sofa for scrap and save a little on buying a new one. And the money saved can be spent on buying a good professional stapler. You never know what else will have to be tightened.
Over the past ten years, it has become popular to restore old upholstered furniture - Soviet book sofas, seats of dining chairs, favorite armchairs. Reasons that make people give new life old things, practically sentimental - a relic sofa brought by a great-grandfather as a trophy from the war, or an armchair in which the grandmother knitted a lot of socks for a family of three generations.
But more often we are surprised to realize that good quality soviet furniture in terms of the quality and integrity of the frame, it is much better than a new one, located in the low and medium price ranges. Such furniture is often made from raw timber, cheap spring blocks, and covered with cheap and low-quality fabric on top.
A great many master restorers have appeared - there are even craftsmen who can so transform the appearance of an old sofa that it will not differ from its modern counterparts in design and content. But, in fact, with minimal business skills, desire and patience, reupholstering upholstered furniture with your own hands is an easy and even creative task.
Do-it-yourself methods for restoring and upholstering furniture

Furniture restoration allows you to completely transform old interior items
There are two ways to update the appearance of upholstered furniture: washing and replacement. Both options are quite labor-intensive and technically cumbersome, but doable! All your efforts will pay off when you see and feel the fruits of your labor with a feeling of complete satisfaction.
This option is best suited for small pieces of furniture: chair seats, stools and small armchairs. If upholstery fabric on your favorite old sofa you like and it is well preserved, has a unique woven pattern, and you understand that a modern analogue is unaffordable, then the sofa cover can be thrown in the wash.

To wash large furniture covers, it is better to use the services of a professional laundry.
- Saving money - you only spend time with small expenses, including the cost of detergents and furniture fittings (staples, lining fabric).
- Reviving the authentic look of a piece of furniture.
There is one minus, but a significant one - there is a high probability that the cover will “shrink” during washing or even fall apart. Since upholstery fabric is not designed for washing, it is not treated for shrinkage, like clothing fabrics, for example.
Complete replacement of furniture cover
This path is the longest and most difficult, but true. Old and shabby upholstery is mercilessly thrown away, and the sofa can please you with brand new fabric in fresh colors. Complete replacement It is quite possible to make a furniture cover yourself at home. But be prepared for problems hidden under a leaky cover: cracked frame beams, broken springs, broken fiberboard or a faulty locking mechanism.
If, upon opening the cover, you are saddened to discover internal damage, do not despair - simply the operation of replacing the cover develops into a more complex, major phase of reupholstering upholstered furniture.
Padding
This relatively new concept includes not only replacing upholstery, but also: complete renovation frame, replacement of foam rubber, locks, spring blocks, everything that is needed. Essentially, constriction is major renovation upholstered furniture, as a result of which you will receive a new interior element made to your taste.
![]()
Major repairs allow you to save even the most “dead” furniture
Required tools and materials
In order for the work of reupholstering upholstered furniture to proceed comfortably, smoothly and without unnecessary nerves, you need to prepare the necessary tools in advance.
Tools d For disassembly and assembly work
- A large flat-head screwdriver and pliers are used to pick up and pull out old staples.
- A Phillips or flat-head screwdriver that matches the size of the slot in the heads of the screws securing the lock to the frame.
- Set of wrenches for nuts and bolts.
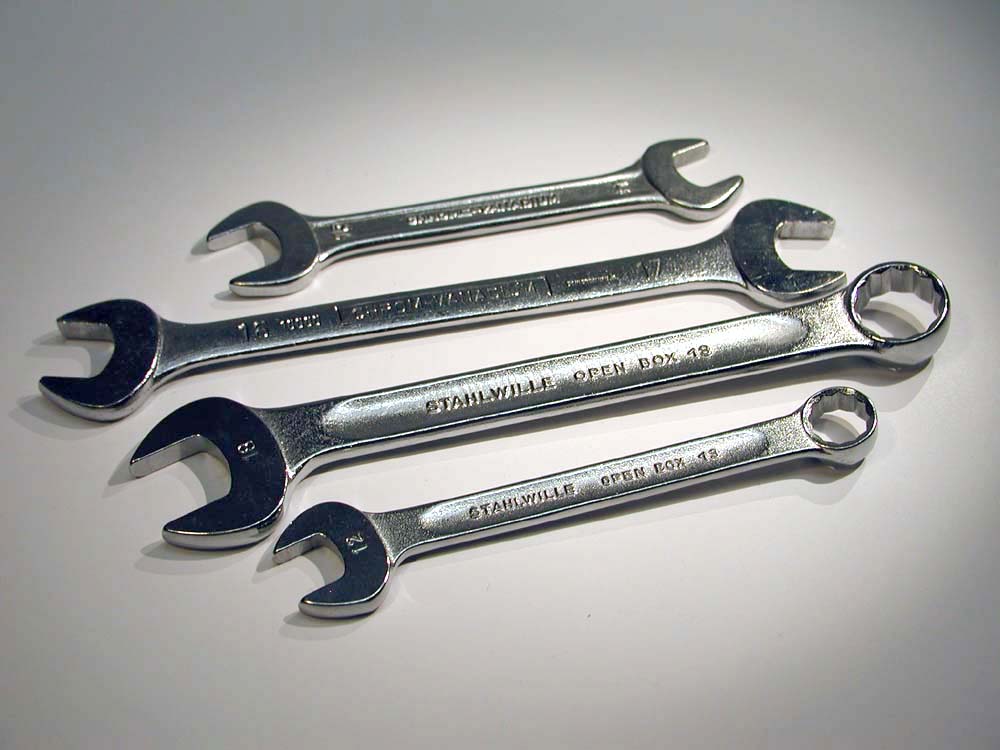
Almost all upholstered furniture frames are bolted, so you can’t do without a set of keys
- Tape measure - take the necessary measurements when replacing body parts.
- Stapler - construction or pneumatic. The second is preferable because, without effort on your part, it drives long, strong staples deep into the wood of the frame, even through several layers of fabric.
- Staples - from 6 mm to 10 mm depending on the thickness and density of the selected upholstery fabric.
- Garbage bags (larger and denser).
To sew new covers you will need:
- New upholstery fabric - the choice in stores is mind-boggling, choose according to taste and cost. In order not to make a mistake with the footage, sketch out approximate details before purchasing. Consider standard width roll - up to 145 cm (together with the edging of the edges of the canvas) and the location of the patterns relative to the pile and shine of the material.
- Lining fabric for padding the back surfaces of the back and seat. This is not necessary, but a layer of lining will protect the furniture from dust getting inside, and the cost of lining material is low. Therefore, it is better not to neglect this simple operation.
- Sharp scissors, preferably special tailor's scissors for cutting.

When cutting new covers, tailor's scissors will be simply irreplaceable.
- Crayons or thin pieces of soap.
- Threads - no less than No. 10, and better - special reinforced ones for rigid fabrics.
- Meter ruler.
- Paper for patterns if you are going to modify the appearance of the product: change the shape of the legs, back and seats.
- Sewing machine.
Constriction technology
Dismantling old furniture
This is the first and dirtiest stage - you have to unscrew and remove the bolts, locks and disassemble the frame. Then remove all the old staples that fasten the upholstery to the frame.
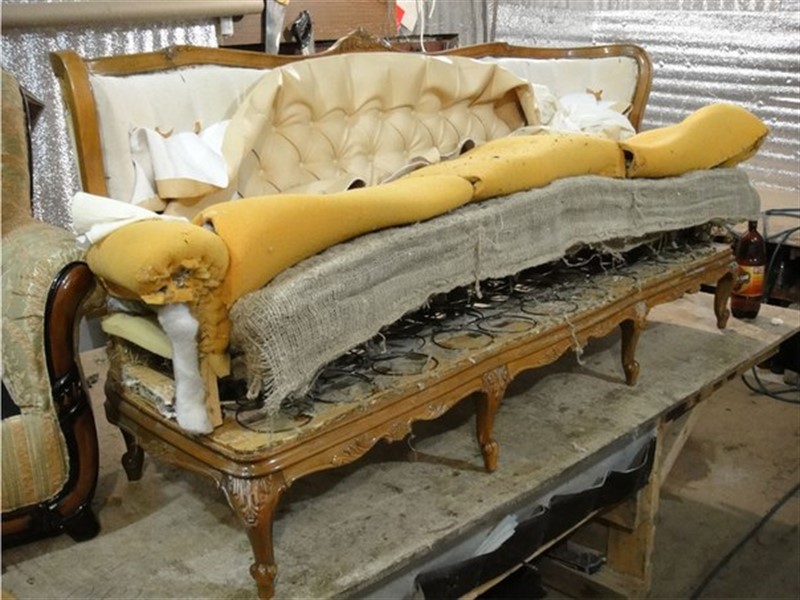
After removing the upholstery, a rather unsightly picture may be revealed to the eye.
Take care of the disassembly site - you will have to stir up the “dust of centuries” that has soaked the sofa or armchair. And staples have a sneaky habit of scattering across the floor and digging into the soles of sneakers (or feet). If it is not possible to disassemble the sofa outside, cover the equipment (TVs, computers, etc.) with film, and take everything that is possible into another room.
Keep garbage bags on hand - you will have to throw away a lot of rubbish that the inside of the sofa (chairs, chairs, etc.) has become. Once you've finished disassembling, immediately remove all resulting debris from your home. Various nasties can lurk in the interior dust of upholstered furniture - from allergens to dust mites.
Repair work and replacement of parts
Having removed the old cover, you may find a number of serious damages under the harmless abrasions of the upholstery; do not rush to give up and throw away the sofa, calculating in your head how much it will cost to buy a new one.
All repair problems can be solved, and parts are replaceable - the list of breakdowns and ways to fix them is not as extensive and scary as you might think at first glance.
Cracked frame beams
All old sofas and armchairs are based on frames held together with locking saws and glue. This is a strong and durable system, much better than modern installation with self-tapping screws. But when the service life ends, the corners of the frames become weak and crack. The beams need to be replaced. Choose a dry tree, without knots, cracks and bark - bast or middle with a smooth, straight structure. Otherwise, the beam, which carries a large load and lacks strength and integrity, will quickly burst. Damp wood in warm and dry apartment conditions will belatedly begin to dry out and warp. It is better to repeat the lock cut - order it from a master carpenter or do it yourself. It is better to soak the joints of the frame beams with PVA glue before joining.
Broken fiberboard parts (lintels of the seat frame and backrest)
Everything is simpler here - you measure the size and cut out new parts yourself with a jigsaw or make them to order in a furniture workshop. It is better to prepare separate parts of the jumpers (in old sofas there are usually three of them - the middle and two sides), which are easier to replace in case of a break. They can be attached to the frame with nails or a pneumatic stapler.

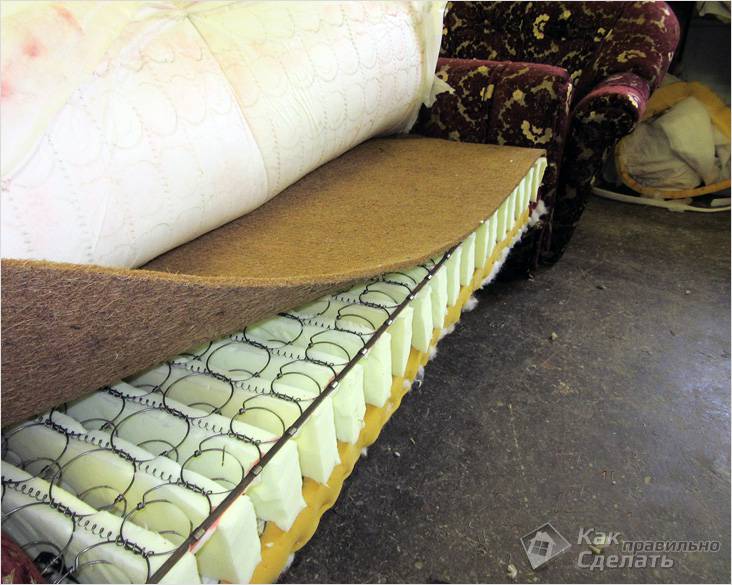
Broken springs not only impair the cushioning properties of furniture, but can also cause injuries and cuts.
The sore spot is the middle of the seat, where children love to jump and guests love to sit. Some craftsmen manage to “twist” spring blocks, replacing broken springs with new ones. However, there is no guarantee that after some time another one will not burst. old spring and for her sake you won’t have to start all the work all over again. Therefore, it is more rational to replace the spring blocks completely.
Replacing seat belts
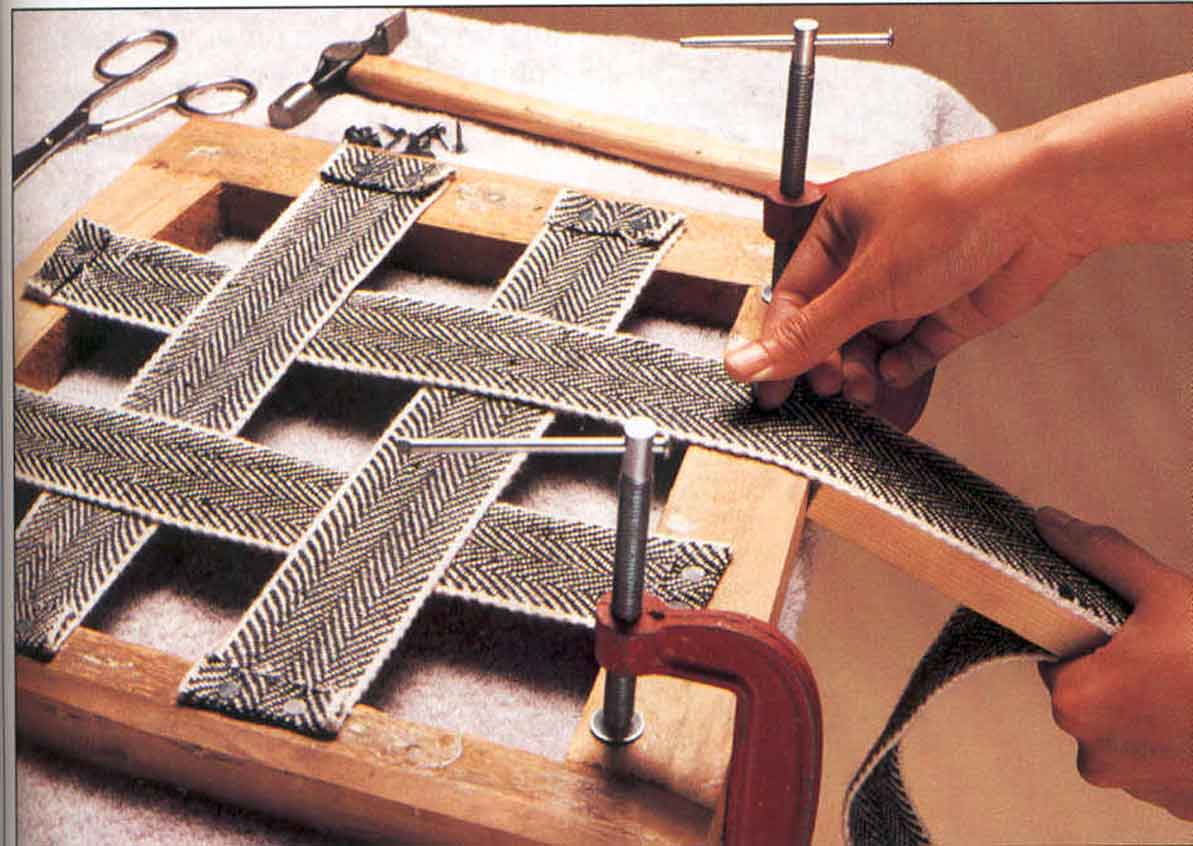
Any dense tape of suitable width can act as belts.
Typically, the frames of the seats and backs of old chairs are tightened with intertwined wide belts, on which foam rubber is laid. And the belts very rarely break; most often the place where the belt and the frame meet is worn out. Any belts that you consider durable will be suitable for replacement. The main thing is that they are tightly woven, preferably from synthetic materials and a width of at least 5–7 cm.
Caked foam rubber
Any type of foam rubber has this technical characteristics, as the number of compressions. This is an indicator of how many times the material will withstand compression and be able to restore its original shape and elasticity. Almost always in old furniture, foam rubber has long outlived its usefulness in this respect and has turned into dust or into a viscous substance reminiscent of sticky plasticine. Throw it away without regret and lay down new foam rubber.

It’s better not to skimp on foam rubber - it’s not only a soft layer, but also protects the internal structure from damage
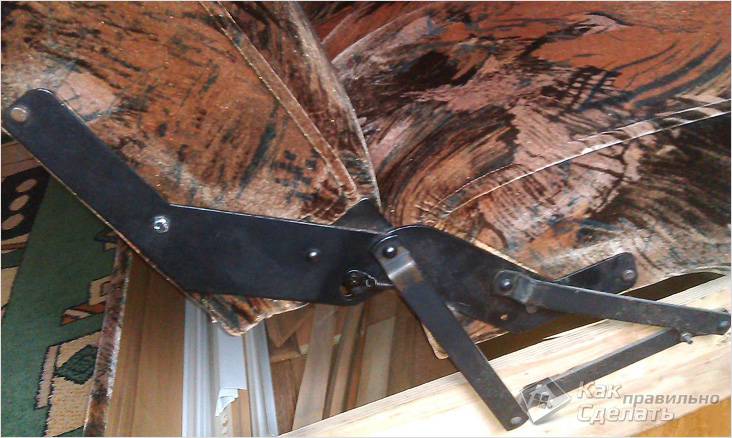
Replacing locks
Another common problem is that over time, the steel lock mechanism becomes loose, there is play in it, or the springs that lock the lock into the “sitting” or “lying” position fall off. Inspect the lock carefully; you may need to change the screw or install a new latch spring. If not, then the lock will have to be changed - fortunately, this is not a problem, furniture fittings stores will offer you big choice modern castles.
Master class on sewing new covers
The most creative stage of work. You can leave the look of the furniture the same; in this case, you can use old covers as patterns. Before work, they should be thoroughly shaken and vacuumed.
When cutting new parts, carefully monitor the location of the weft and warp threads, as well as the direction of the pile. This is especially true for the patterns of the backrest and seat-back, if the width of the fabric does not allow making a one-piece cover (meaning the upholstery of a sofa-book).
With creativity and sewing skills, you can transform the look of old furniture to make it more modern, comfortable and suit your taste. The main part of the modifications is achieved with foam rubber overlays - soft bolsters are added on the side panels, and backrest headrest pads are added. You can take into account the position of the body in a sitting position and add foam pads on the seat (under the knees) and inserts under the lower back.
When using darts, folds, and curly details, the covers will be completely new uniform and become more modern.
In order to do a high-quality and beautiful job of modifying the appearance of upholstered furniture, you need basic cutting and sewing skills. If you are not confident in your abilities, it is better not to risk doing it yourself, but hire a specialist to do the work.
Nuances of cutting and sewing
- Leave seam allowances of 1 – 1.5 cm depending on the density of the fabric.
When cutting fabric, be sure to leave 1-1.5 centimeters for seams
- It is advisable to process the edges of the sewn parts with an overlock or zigzag stitch.
- Upholstery fabric with a large pile must be basted by hand before machine stitching to avoid moving parts.
- If leatherette, artificial or natural leather is chosen for the upholstery, then when making facial finishing seams, use it as a presser foot sewing machine use a special roller. As a last resort, you can coat the surface of the fabric under the presser foot. thin layer machine oil.
- In case of sewing into a cover decorative overlays, baste the folds by hand.
As often as possible during the sewing process, do fittings - foam rubber, a softening hard spring frame, a pliable material, the shape of which is determined by the cover.
Attaching new covers to upholstered furniture parts
The repair work has been completed, the covers have been sewn, it’s time to begin the important stage of stretching the new upholstery. You need to clearly understand that the final result and appearance of your chair or sofa depend on the quality of this stage. You will need patience and accuracy in your work.
At the stage of the last fitting, it will still be possible to correct mistakes - sew in or loosen the corners a little, alter the darts. Do not be alarmed if the cover fits very tightly onto the frame - in the process of attaching it, you will still “shoot” it even tighter. It's worse if the cover is put on loosely, because... By attaching it with staples, there is a high probability of getting unsightly folds and creases.
The sequence of work on attaching new upholstery covers:
- First of all, put the covers on the parts and, while they are in a free position, straighten them as much as possible. The seams should be positioned evenly and parallel to the edges of the parts; match the corners of the covers with the corners of the frames.
- Then start attaching the cover with staples - holding the stapler in right hand, with your left hand, constantly, using ironing movements, pull the fabric from the middle of the part to the edge. Make sure that the bevel is even and evenly rounded - this especially applies to the edges of the backs and seats of chairs and sofas. It is better to start “shooting” staples from the middle, so any excess tissue will move to the edges, where they can be sutured manually.
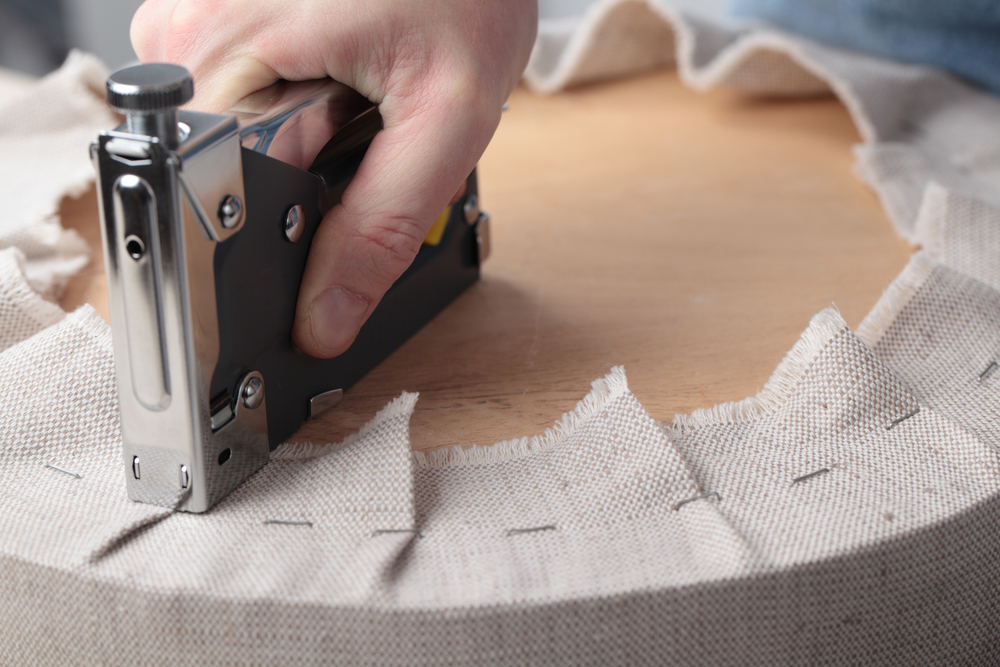
Stapler - best tool for fastening furniture covers
- When upholstering the former, carefully cut out the holes for the bolts with scissors and fill the edges of the cutouts with staples. If necessary, use a hammer to drive the staples into the wood more tightly.
- After stretching the upholstery, you need to cover the wrong sides with sheets of lining fabric. There is no need to waste time carefully cutting out the lining with scissors. Having outlined the approximate length, taking into account the folding of the edges 3-4 cm on each side, make a notch with scissors and tear the fabric; the synthetic lining breaks exactly along the thread, which you will not get when cutting with scissors. The inside of the lining should be shot from the corners, pulling the fabric tightly.
Byltse - (from Ukrainian) the back of a bed, chair, armrest of a sofa, armchair, etc.
The last stage of work is assembly. When assembling a sofa, first of all we attach the lock to the back and seat, then attach the resulting structure to the pallet of the sofa book and attach the bolts. When assembling a chair, you gradually install the seat and backrest to one frame, then attach the second to the structure. The legs are installed last.

Restoration helps transform old furniture into a new, stylish piece of furniture
Video: reupholstering an old chair
Since the process of reupholstering furniture is quite complex, we bring to your attention a short video that will clearly demonstrate all the stages of reupholstery, using the example of restoring an old chair.
Reupholstering upholstered furniture with your own hands is a responsible, labor-intensive task, but with excellent practical benefits and moral impact. You get satisfaction from the work done and the updated look of a piece of furniture you personally repaired. And most importantly - experience, which, who knows, can mark the beginning of a new hobby, and perhaps profitable business. Good luck with your renovation!


