During the hot season, a large ceiling fan performs better than other fan models in normalizing the microclimate in the room. The air flow from it covers a significant area. And even at low speeds, the effect is very pleasant for residents. The fact that the fan occupies a central place on the ceiling, which is usually used for a chandelier, does not cause problems, since in some models the functions of the fan and chandelier are combined.
But attaching a regular chandelier to the ceiling and a combined model are somewhat different. For an ordinary chandelier, a hook is sufficient, which is provided in any room. It is motionless and other than gravity, no other forces act on it. And when the impeller rotates, a torque arises. It is directed in the direction opposite to rotation. And this feature should be taken into account when hanging a ceiling fan of any design, especially when combined with a chandelier. In the absence of rigid fastening, axial movements will appear when the impeller rotates.
For high ceilings
Simple ceiling fan during these movements it is not noticeable. But the movement of light bulbs in a chandelier with a fan will create an unpleasant lighting effect in the room. Light and especially shadows will begin to move. If the ceilings in the room are high, suspended ceilings are usually installed. The base of an ordinary chandelier is made at the level of the suspended ceiling and suspended on a chain or cable. These extension cords cannot be used for a chandelier with a fan. In this case, the best extension cord would be metal pipe. Its diameter should be such that it fits onto the ceiling hook with two holes made near its end. These hook holes should be diametrically opposed.
The pipe is also convenient for placing wires inside it. Although the wires are connected as if to one device, they actually create two separately operating circuits. After all, during the day when the impeller rotates, lamp light is not needed. Therefore, to control lamps in the simplest circuit, you will need the same thing as for a chandelier. And the fan has its own separate circuit. It allows you to adjust the speed of the impeller. The connection diagram of the simplest model is shown in the image below. It has one lamp and one impeller rotation speed. Therefore, to control such a chandelier-fan, a switch with two keys is enough.
Variety of models
The number of lamps can be three, five, and sometimes more. The impeller speed can be divided into two or three stages and can even be adjusted smoothly. You can also smoothly regulate the light of lamps using dimmers. There are many models of such combined structures produced and it is unlikely that they can be standardized with just a few schemes. In order not to experience problems with installing the connection diagram for such a chandelier, when purchasing, you need to make sure that the accompanying documentation is available and everything is clearly stated in it regarding connecting the product to the electrical network.
If the connection diagram for a chandelier with a fan turns out to be too complicated to assemble it with your own hands, there will probably be specialists who will do everything necessary. When the selected model contains lighting control sensors or impeller rotation speed, there is a separate control unit, the programming option is better to immediately resolve the issue upon purchase by calling a specialist to connect such a chandelier with a fan. With your own hands complex circuit You can not only fail to assemble, but also damage something.
The connection plan for a fan with a chandelier is convenient. This device combines two devices in one, providing general lighting premises and create air movement in hot, windless weather, while saving on air conditioning. Most often, such fans are located in office buildings or small removable workshops, but can also be located in everyday life. When purchasing such a fan, make sure that instructions are included with the kit. Previously, manufacturers added a section to it about the operation scheme, but due to frequent cases of copying, they stopped doing this.

But if you don’t go into details, the plan for connecting the ventilation inside the chandelier is quite simple. The illuminator has a built-in motor, which can be turned on either by a separate switch or switching combinations (restart), or together with the illuminator. The latter fan connection scheme is not recommended for use and is quite rare. It is not recommended due to the limitations of this scheme - when the lighting is turned on, the fan always works, which is unnecessary in cold weather. The recommended connection diagram is separate, when the operation of each function is regulated by its own switch.
A simple diagram for connecting a fan and chandelier
If you are choosing a fan with a chandelier for your home or home workshop, pay attention to the method of grounding the chandelier; in apartments it is TN-C. In office buildings or change houses, grounding methods may vary, so mistakes can be made. Depends on grounding required amount wires connected to the fan and shield. Attention, the grounding of the CT type must under no circumstances come into contact with other electrical appliances. If speak about TN-C system, then two cables, phase and neutral, will be pulled through the shield to the illuminator.

It will be necessary to connect zero and PE to the distributor via terminals. Attention: Observe safety precautions. When working with electrical appliances, it is necessary to turn off the power and check with a multimeter that there is no voltage on the wires. Only after this start working. Use terminals to connect the wires on the distributor; do not twist them under any circumstances.
In new houses it is already possible to use the TN-S grounding system. Its use is recommended and is a priority to ensure safety.
The use of TN-S implies the presence in the electrical wiring of a three-wire copper cable, one of the cores of which serves to ground the circuit and is connected to the ground electrode in the distribution board. Accordingly, the device must have a grounding cable that connects to this core. The fan connection diagrams are different, but it is not possible to describe all of them. When purchasing, read the instructions and use the recommendations provided.
Ceiling fan in last years became much more attractive appearance. Its function is very simple, and it does an excellent job of cooling the air in a particular room. Moreover, it plays a key role in creating complex ventilation system. But its main purpose should not be confused: it cools not the room, but the people. And ceiling models cope well with the task. In this article we will look at how to connect a ceiling fan, its advantages and structure, and also present connection diagrams.
Advantages
There are many space cooling systems. Let's look at some positive traits namely ceiling fans:
- Unlike air conditioning systems, ceiling fans consume 40% less electricity.
- You can have several fans at once in the house and even in one room.
- Easy to install.
- Unlike an air conditioner, it has significantly more low price, and the quality of cooling does not deteriorate from this.
- There are models combined with a chandelier. They are especially often installed in the kitchen.

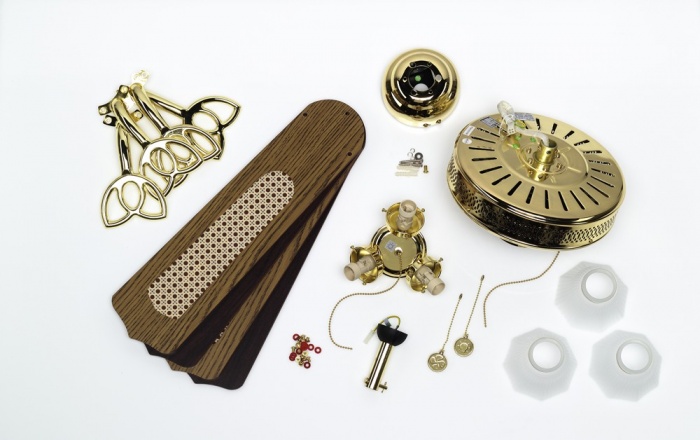
To make it easier to understand the installation of a ceiling fan, let's look at some of the components of the fan.
Device

Already long years The ceiling fan circuit remains unchanged. Therefore, in each individual case it will not be difficult for you to understand their different models and types. Components of a ceiling fan:
- Electric motor. Due to high-quality bearings, the fan can spin around the clock, while consuming a small amount of electricity.
- Frame. The housing for the electric motor can be made of plastic or metal. More expensive models have a sealed housing, which prevents dust from entering the engine. Accordingly, the service life increases.
- Blades. Their number ranges from 3 to 6. Some designer ceiling fans have up to 15 blades. But in this case, the ceiling fan becomes more of a decorative item. Blades can be made of wood, metal, plastic and other materials.
- Lanka (or iron). It connects the blades to the engine. In all cases, it is made of metal.
- Ceiling mount. The fastening will depend on the ceiling material (concrete, wood, etc.)
- Barbell. The rods can be of different lengths up to 1.5 meters. Used for hanging an item.
- Caps. The caps cover the mount on the rod from the bottom and top. The cap hides various electrical fittings.
- Decorative overlays. Close the mounting screws on the fan.
- Regulators, remote controls and switches. Depending on the configuration and model of the ceiling fan, the presence of the remote control and other controls may vary.
Note! Optimal height fan installation from the floor 2.3 meters!

The entire ceiling fan installation job does not have complex processes. Before starting work, turn off the electricity. This will prevent the possibility of an accident. Afterwards, a support strut is mounted on the ceiling. The weight of the fan can vary, so the spacer must be attached to the base of the ceiling, for example, if the ceiling is made of plasterboard. The hole in the drywall is made according to the size distribution box, which will be installed later.
The next step is time to secure the bracket with a few screws. The wiring that comes out of the box must be identified. Typically, the fan has thin copper wires. They should be connected according to the zero and phase diagram. Each connection can be secured with a decorative cap. All wires should be carefully placed in the junction box and covered with a lid. Now the fan blades and the lamp, if present in the structure, are mounted. A bracket is also used for this. Using decorative caps, close all electrical connections on the rod from the bottom and top.

Note! The fan can be turned on using a key along with turning on the light in the room. Its operation can also be adjusted using remote control. It all depends on the model you choose.
So, as you can see, connecting a ceiling fan with your own hands is not particularly difficult. In most cases, the device comes with detailed instructions from the manufacturer. Therefore, you should not have any particular difficulties with this work. Leave your comments if you already have enough experience in ceiling fan installation work.
Artificial lighting is an indispensable condition, without which no enterprise or domestic premises, especially in the dark.
In our article we will try to tell you in detail how to independently assemble, install and connect almost any chandelier, be it a simple one with one lamp, or a complex design design with several lamps with a fan or LED lighting.
And thanks to colorful illustrations and videos, even a person without electrical engineering education can repeat the installation of the chandelier. The main thing is not to forget about safety precautions when working with electricity.
Step-by-step instructions for installing a chandelier with one lamp
Step 1: Applying markings.
Skip this point if the chandelier will be installed instead of an existing one with a similar mount. If the chandelier will be installed in a new place, or old chandelier fastening of a different type, it is necessary to re-apply the markings for the new chandelier fastening.
You need to find the center of the ceiling. To do this, measure the length of the walls, divide the result in half and mark the resulting size on the ceiling using a cord and a pencil. IN suspended ceiling a small hole is drilled for the wires. IN suspended ceilings from PVC film, first special limiting plastic rings are glued on, and then a hole for the wires is cut out with a blade.
Step 2: Install the ceiling beam.
In the case when the ceiling is made in the form of a complex design structure, in the form of a multi-level plasterboard construction, tension PVC canvases or decorative hanging slabs, which complicates the direct fastening of the chandelier to the surface, it is necessary to take care of the fastening system in advance. Otherwise, wires may break or even part of the ceiling may fall off.
If the chandelier is quite massive and its weight is more than 15 kilograms, then to support the chandelier on the ceiling it is necessary to lay an additional beam behind the decorative ceiling in advance. It could be like wooden beam, so metal structure, the main thing is that it is placed exactly in the place where the chandelier is installed. You can also use a special metal chain if the distance from the main one to decorative ceiling exceeds 1 meter.
Step 3: Installation of the junction box.
From the installation site of the future chandelier, the wires are led out and lowered onto the wall; a distribution box will be installed here. Also, power supply wires from the light switch are supplied to this box.
Important note! According to safety regulations, the distribution box is installed no closer than 15 centimeters from the ceiling. The wires should come out of the box with a margin of 10 centimeters.
To connect the lighting line, you must use a separate group of wires coming from switchboard, it must be equipped with a circuit breaker.
The wires in the box are connected according to the chandelier connection diagram. The connected wires are insulated with PVC tape and placed in a box so that they do not intersect with each other. The distribution box is closed with a lid and tightened with screws. On top of it you can plaster and wallpaper.
Step 4: Install the mounting bracket.
Most simple modern chandeliers for one lamp are equipped with a bracket mount. She serves load-bearing mount and allows you to install a chandelier in a short time. Also, thanks to two fastening bolts, maintenance of the chandelier becomes much easier than in old designs with unreliable hooks.
Photo: mounting bracket and terminal connection of the chandelierAfter marking the middle of the ceiling, the fastening bracket is applied close to the wire outlet. Using a pencil, mark the location of drilling the hole for future fastening of the bracket to the ceiling. If the chandelier is already equipped with fasteners, then the drill is selected according to the diameter of the dowel. The hole for the dowels should not be located where the wires pass.
Step 5: Connecting the wires and attaching the chandelier.
The wires coming out of the ceiling must be long enough so that when removing the chandelier there is access to the place where they connect to the chandelier wires.
The wires are stripped of insulation and connected using a terminal block according to the diagram. If there is no terminal block included with the chandelier, then the wires are stripped to a distance of 2 centimeters and twisted in pairs, then the connection point is soldered using a soldering iron. After which everything is insulated with insulating tape.
If the chandelier is made of metal and has a screw on the body for connecting the protective ground, do not forget about it. The corresponding wire coming from the junction box is stripped, rolled into a ring shape and tightly screwed with a screw.
After all the wires are connected and insulated, you can attach the chandelier. Make sure that the wires do not fall under the mounting bolts, attach the chandelier to the bracket on the ceiling, aligning the mounting holes and bracket screws - tighten the bolts.
How to connect a chandelier with two or three lamps
The procedure for installing a chandelier with two or three lamps is not much different from installing a chandelier with one lamp, as shown above. The exception is the number of supply wires. For a simple chandelier with one lamp, you need two power wires and a ground wire; if you are going to connect a chandelier with not one, but two or three lamps, then you will need three power wires and one ground wire.
Video: How to properly connect a chandelier yourself
To connect such a chandelier, the wires from the lamp sockets must be connected in accordance with the diagram. One wire is taken from each cartridge and connected together - this will be the middle point, it is connected to the neutral supply wire.
If there are two lamps, then each of the remaining wires from the sockets is connected to the corresponding phase power wire. If the chandelier is designed for three lamps, then the remaining wire from the third socket is connected in parallel with the phase wire from the first or second socket. The wires are also connected by terminal blocks or by soldering and insulated with electrical tape.
It should also be noted that to turn on such a chandelier you will need two-gang switch and, accordingly, three-wire wiring laid to it. In this case, when you turn on one key, one lamp will light up, when you turn on the second, two other lamps will light up, and when you turn on both switch keys, all three lamps will light up.
How to connect a chandelier with 5 lamps
If there is a need to connect a chandelier that has four or five lamps, this will also not amount to special labor. The technology is the same as when connecting a chandelier with two or three lamps, the only exception is the number of lamps in the groups of phase conductors. The number of groups and lamps in them depends on your imagination and is limited by the number of supply phase wires and groups of keys on the switch.

How to connect a switch for a chandelier
To turn on simple chandeliers with one lamp, a single-key switch is used; its installation is as simple as possible. When connecting a chandelier that has two or more lamps, two- and three-key switches are used.
If the wiring has already been laid, and the number of lamp groups in the chandelier corresponds to the number of keys on the switch, replace it with a new one, following the connection diagram.
 Connection diagram for two-button switch
 If the switch is installed on new wiring, you need to pay attention to the structure of the switch. In two and three-key switches there is one common terminal; the phase supply wire coming from the distribution box must be connected to it. And each of the remaining terminals, in accordance with the location of the key and the desire to turn on a certain group of lamps, is connected to the wires running through the box to the chandelier lamps.
It should be noted that the switch must open the phase power wire! This will protect you when you change a burnt-out lamp with the switch off.
 How to connect a chandelier
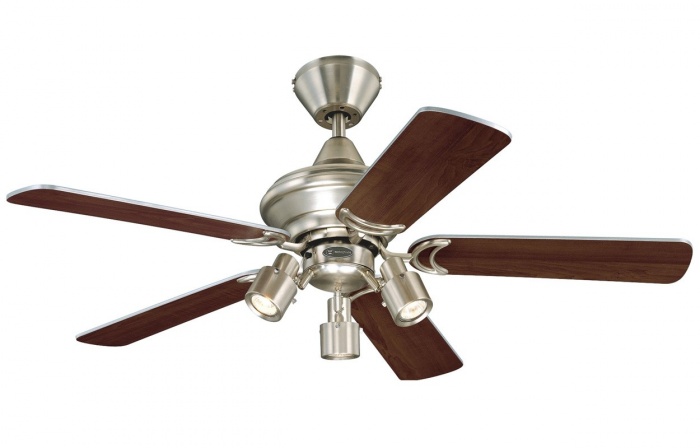
 Chandelier with fan
There are chandelier models that combine two devices: a lighting chandelier and a fan. This constructive solution will good help on hot summer days. Connecting such a chandelier is not as difficult as it might seem at first glance.
Before connecting, read the passport for the chandelier; it will indicate the connection diagram and the color designation of the wires, the main thing is not to confuse anything.
 Ceiling Fan Diagram
 For easier connection, the fan leads can be figuratively imagined as another lamp. You can switch the fan on according to your wishes, either together with turning on the lighting, or with a separate switch key.
For the option where the fan is turned on separately from the lighting, you will need a three-wire power line and a two-key switch. The connection in this case will be identical to the connection of a chandelier with two lamps, only instead of the second lamp there will be a fan.
If you plan to turn on the fan simultaneously with turning on the lighting, then you need to connect the wires from the fan in parallel with the terminals of the lamp socket.
In some modern models The chandeliers feature decorative lighting using multi-colored LEDs. Such chandeliers create a more interesting light, thereby emphasizing the interior of the room.

The connection of such a lamp is made strictly according to the diagram, which is given in the passport for this product. LEDs are designed for low voltage supply, therefore, the chandelier kit uses a step-down LED driver. The power supply of such an LED driver is designed for a lighting network voltage of 220 volts.
When connecting such a chandelier, you can use the above instructions for connecting a chandelier with a fan, only here instead of the fan wires there are power wires for the LED driver.
Not every family can afford to buy an air conditioner. Therefore, many people prefer to escape the sultry heat with the help of a more budget-friendly, but still effective device, which involves the presence of a fan in the design. It has many varieties and modifications, one of which is a chandelier with a fan, when using which you can not only cool down, but also get good lighting in any room.
Advantages
Previously, such devices were common in public canteens and large industrial premises. They were not produced for domestic use. But modern chandeliers are often equipped with a fan, making the ceiling lighting fixture multifunctional.
Among the advantages of chandelier fans are the following:

Design features and varieties
Design options using a lamp with a fan of various models and in various interiors shown in the video:
Such devices are made from the most different materials. These are plastic, glass, metal, wood, fabric inserts, etc. It will organically complement any interior, thanks to the variety of models offered.
You can use a ceiling fan for the most different rooms, where its functions will become simply irreplaceable:

Many models of these ceiling fans are equipped with additional functions, for example, the ability to change the fan speed, as well as direction, reverse, remote control, and others. They are divided into universal ones, which can be used in almost any room, and household ones for home use.
In addition, such a ceiling fan, due to the presence of lighting lamps, can have different kinds backlight - color or with halogen lamps.
Rules for selection and connection
When choosing a chandelier with a fan, you should definitely pay attention to such device parameters as:
- Fan blade diameter. They are selected depending on the height of the ceilings in the room, and the size of the blades themselves will affect the intensity of the airflow. If the ceiling height is less than 3 meters, then you should choose a ceiling fan with a blade diameter 2-2.5 times smaller than the area to be blown. In addition, the number of blades can vary from 1 to 10. The most common are luminaires with fans of 3-6 blades.
- Lighting parameters. IN in this case the choice depends on the required level of lighting, which varies and changes with different numbers of lamps used and their power, as well as the size of the chandelier itself.
Interesting! The device can be controlled either by remote control control, and with the help of mechanical switches, which are located both on the device itself and can be connected to a general switch.

Connecting such a lamp with a fan is quite simple and will not cause any difficulties for a person familiar with the installation features of conventional chandeliers. This procedure is also facilitated by the connection diagram for a chandelier with a fan, which is usually included in the delivery package of the device.
The work may require the following accessories and tools: construction knife, screwdriver, hammer drill (if installation is carried out on concrete ceiling), dowels, insulating tape.
Important! When installing such a device, care should be taken to soundproof the ceiling structure if it is made of plasterboard or tension systems, since the vibrations created by the fan can make the use of such a lamp too noisy.
At the very first stage, a special ceiling hook is secured on which the entire structure will be supported. To do this, a dowel is driven into the ceiling, and a hook is attached to it. Three wires are used for connection - for the lamp, for ventilation and the zero phase.


